Label inspection with computer vision refers to the automated examination, verification, and analysis of product labels using computer vision. It is a specialized application of computer vision that enables machines to accurately confirm that labels adhere to the required specifications visually, textually, and structurally.
Label inspection is used on assembly lines, packaging plants, or other industrial environments (such as food and beverage, pharmaceuticals, and manufacturing, where accurate labeling is crucial for compliance, traceability, and customer satisfaction.).
Label Inspection AI Goals
The primary objectives of label inspection include:
- Ensuring that a label is present on the product.
- Confirming the label is placed in the correct position on the product.
- Detecting misaligned labels or verifying the orientation of the label (e.g., not upside-down or rotated).
- Checking for defects like smudges, blurs, or missing text/images.
- Validating that the text, barcodes, QR codes, or logos are correct and legible.
- Ensuring barcodes or QR codes are readable and match the expected data.
Components of a Label Inspection System
Building an effective label inspection system using computer vision involves several key components and considerations:
High-Resolution Imaging
The system requires high-resolution cameras to capture detailed images of labels. This ensures that even minor defects or misprints are detectable.
Lighting
Proper illumination is crucial. Consistent and appropriate lighting conditions help in accurately capturing label details and identifying discrepancies.
Image Processing Software
Label inspection system uses advanced software capable of analyzing images to detect defects such as presence or absence of label, orientation, smudges, incorrect or missing information etc.
Integration with Production Line
The label inspection system is integrate with existing production lines to allow for real-time inspection and immediate feedback or rejection of defective products.

Key Inspection Capabilities of a Label Inspection System
A robust label inspection system performs several key tasks to ensure that labels on products meet quality, accuracy, and compliance standards. Label quality inspection is an essential process which involves several critical tasks, such as verifying label presence, detecting label orientation, label placement verification, printing defects, label content verification, and label barcode verification. We will discuss these tasks and how to build computer vision system for each:
Verifying Label Presence with Computer Vision
Verifying Label Presence refers to the process of ensuring that a product has the required label applied to it. This step checks if the label is physically present on the product or not. The following are the steps to build this system:
Step #1: Dataset Preparation
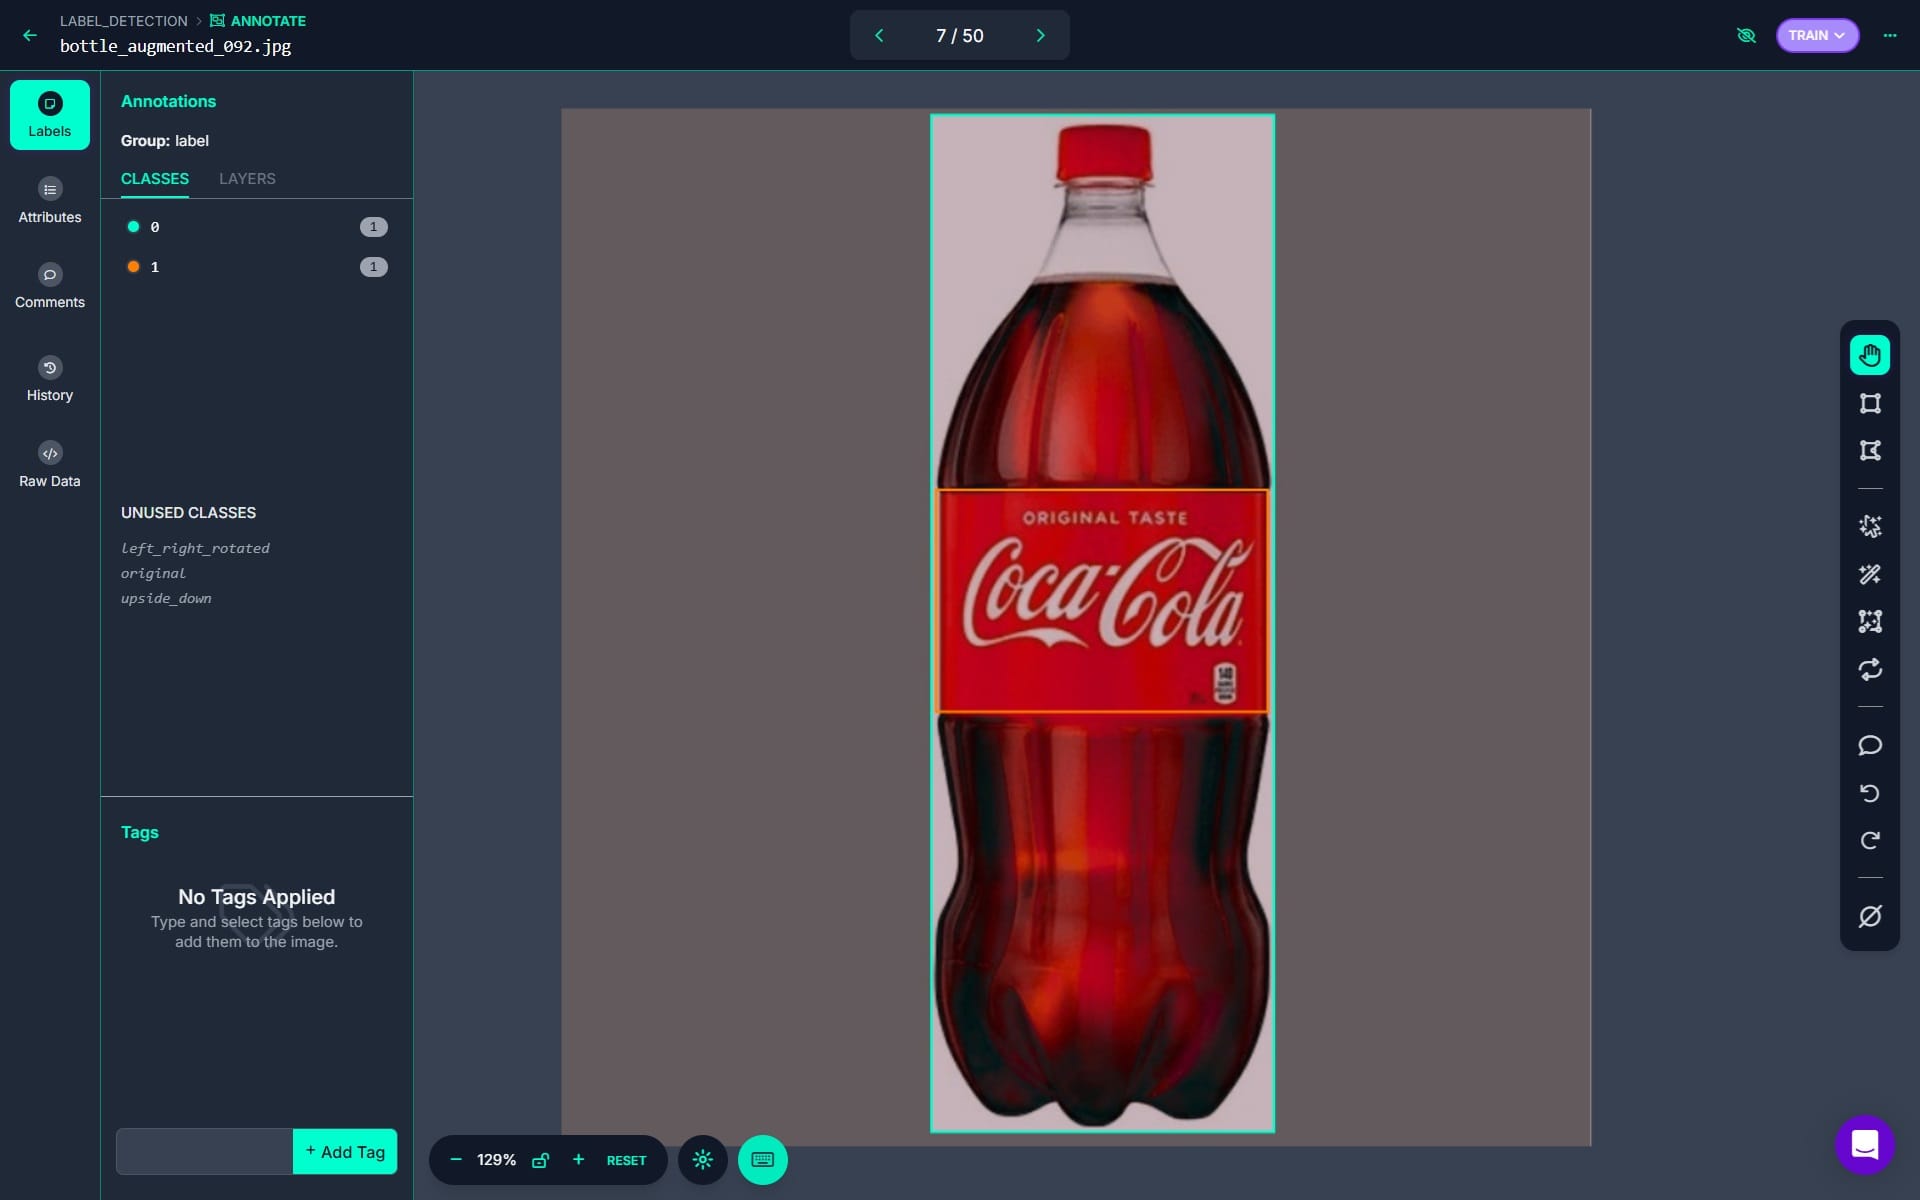
Collect images of products with and without labels. Annotate the presence of labels using bounding boxes or segmentation masks. For this project I have labeled images of coca- cola bottle with two classes (i.e. 0 for bottle and 1 for label) using the Roboflow bounding box annotation tool.
Step #2: Model Training
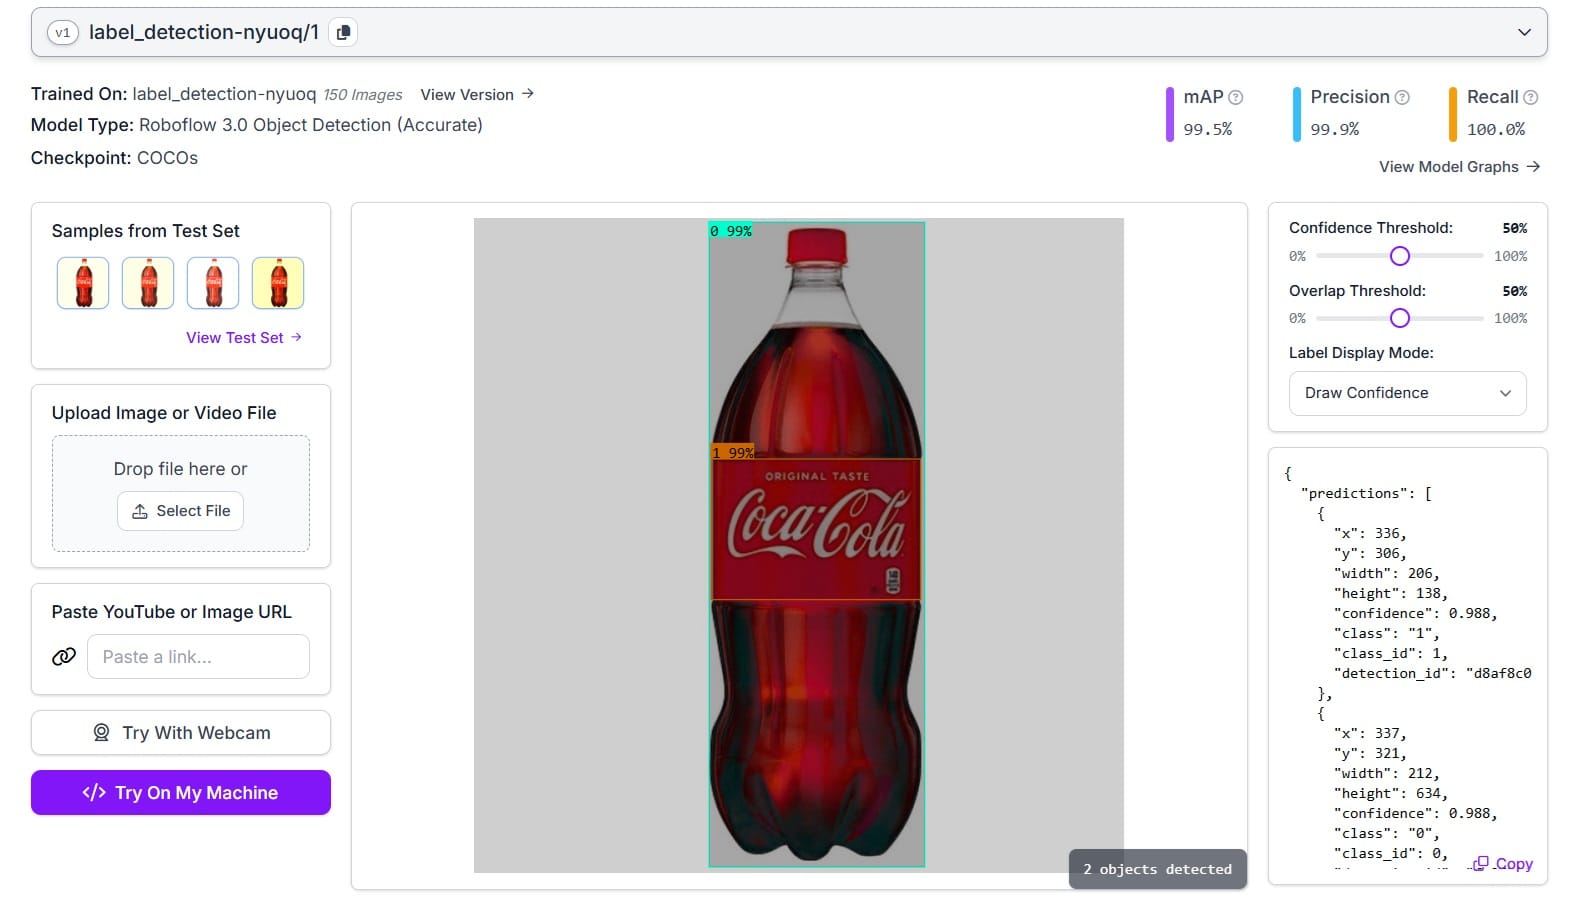
Train a label-detection object detection model using Roboflow auto training feature.
Step #3: Write inference script
Write the inference script to detect the bottle and the label on the bottle in the image, and visualize the results.
import cv2
import matplotlib.pyplot as plt
from inference_sdk import InferenceHTTPClient

# Initialize the inference client
CLIENT = InferenceHTTPClient(
    api_url="https://detect.roboflow.com",
    api_key="ROBOFLOW_API_KEY"  # Replace with your API key
)

# Specify the input image path
input_image_path = "bottle.jpg"  # Replace with your image filename

# Infer on the image
result = CLIENT.infer(input_image_path, model_id="label_detection-nyuoq/1")

# Parse the inference result
predictions = result.get("predictions", [])

# Load the original image
image = cv2.imread(input_image_path)

# Define class mapping
class_mapping = {
    "0": "Bottle",
    "1": "Label"
}

# Visualize predictions with bounding boxes, class names, and confidence scores
for prediction in predictions:
    x_center = prediction["x"]
    y_center = prediction["y"]
    width = prediction["width"]
    height = prediction["height"]
    confidence = prediction["confidence"]
    class_id = str(prediction["class_id"])
    class_name = class_mapping.get(class_id, "Unknown")

    # Calculate bounding box coordinates
    x1 = int(x_center - width / 2)
    y1 = int(y_center - height / 2)
    x2 = int(x_center + width / 2)
    y2 = int(y_center + height / 2)

    # Draw bounding box
    color = (0, 255, 0) if class_id == "0" else (255, 0, 0)  # Green for Bottle, Red for Label
    cv2.rectangle(image, (x1, y1), (x2, y2), color, 2)

    # Put class name and confidence score
    text = f"{class_name} ({confidence:.2f})"
    cv2.putText(image, text, (x1, y1 - 10), cv2.FONT_HERSHEY_SIMPLEX, 0.5, color, 2)

# Convert the image to RGB for displaying
image_rgb = cv2.cvtColor(image, cv2.COLOR_BGR2RGB)

# Display the annotated image
plt.figure(figsize=(10, 8))
plt.imshow(image_rgb)
plt.title("Detection Results")
plt.axis("off")
plt.show()
The code will give the following output.
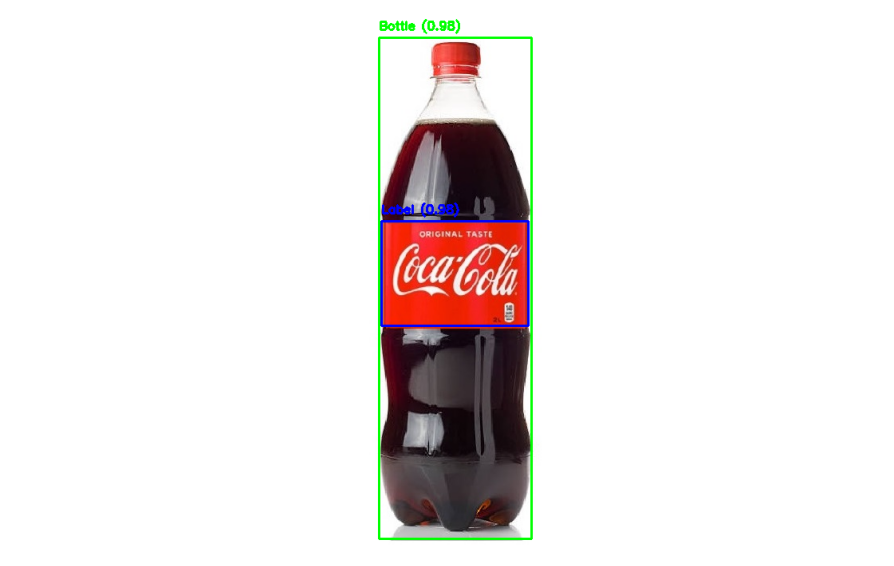
We will use this label detection model for other label inspection techniques in the sections below.
Detecting Label Orientation
Detecting label orientation refers to the process of verifying whether a label is correctly aligned or oriented on a product. It ensures that the label is not upside-down, rotated, or skewed or tilted, which could affect its readability, aesthetic appearance, and compliance with quality standards. The following are the steps to build this system:
Step #1: Dataset Preparation
Collect images of correctly aligned labels and misaligned or rotated labels. For illustration this I have collected labels for the following three classes:

You may collect images representing various misaligned or skewed labes. I have annotate these labels for training image classification model.
Step #2: Model Training
Train a multi-label image classification model in Roboflow.

Step #3: Write Inference Script
The following script uses label-detection model (built in above section) to detect label on the product, crop the label from image and uses label-orientation classification model to verify the label orientation. I use the following image of bottle which has label placed upside down.
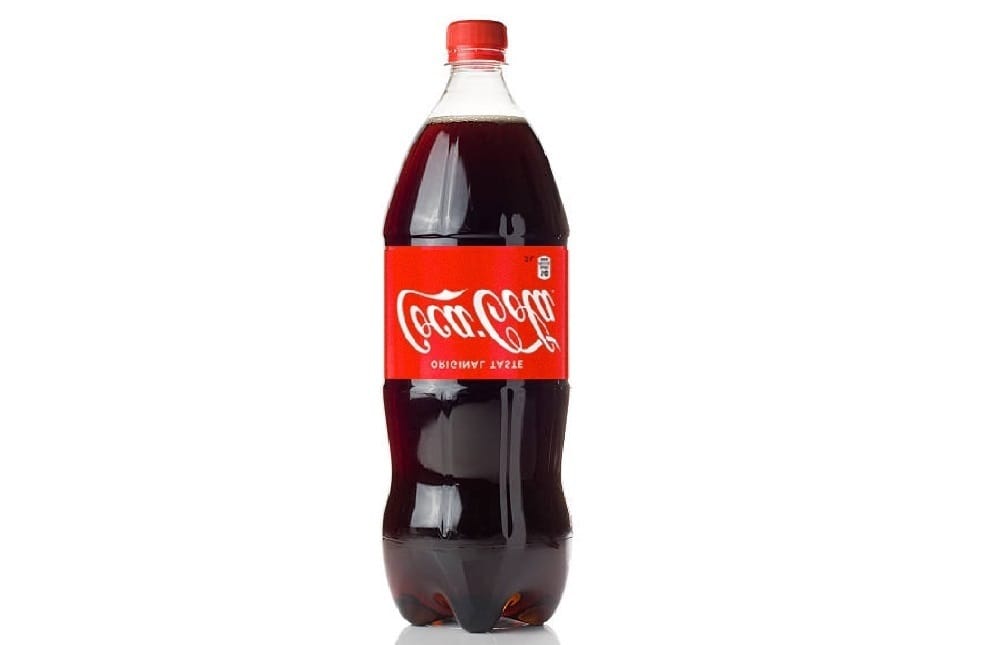
Following is the code:
import matplotlib.pyplot as plt
from inference_sdk import InferenceHTTPClient

# Initialize the inference client
CLIENT = InferenceHTTPClient(
    api_url="https://detect.roboflow.com",
    api_key="ROBOFLOW_API_KEY"  # Replace with your API key
)

# Specify the input image path
input_image_path = "bottle_label_orientation.jpg"  # Replace with your image filename

# Step 1: Detect bottle and label
detection_result = CLIENT.infer(input_image_path, model_id="label_detection-nyuoq/1")

# Parse the detection result
predictions = detection_result['predictions']

# Extract the label bounding box
label_box = next((p for p in predictions if p['class'] == '1'), None)  # Class '1' represents the label

if not label_box:
    raise ValueError("Label not detected in the image.")

# Load the original image
image = cv2.imread(input_image_path)
image_height, image_width = image.shape[:2]

# Label bounding box
x_center = label_box['x']
y_center = label_box['y']
width = label_box['width']
height = label_box['height']

# Calculate the top-left and bottom-right coordinates of the label box
x1 = max(int(x_center - width / 2), 0)
y1 = max(int(y_center - height / 2), 0)
x2 = min(int(x_center + width / 2), image_width)
y2 = min(int(y_center + height / 2), image_height)

# Crop the label from the image
label_crop = image[y1:y2, x1:x2]

# Save the cropped label to a temporary file for orientation detection
cropped_label_path = "cropped_label.jpg"
cv2.imwrite(cropped_label_path, label_crop)

# Step 2: Detect orientation of the cropped label
orientation_result = CLIENT.infer(cropped_label_path, model_id="label_orientation/1")

# Parse the orientation result
predictions = orientation_result.get('predictions', {})
predicted_classes = orientation_result.get('predicted_classes', [])

if not predicted_classes:
    raise ValueError("No orientation prediction found. Check the API response: " + str(orientation_result))

# Extract the predicted orientation and its confidence
predicted_orientation = predicted_classes[0]  # Assuming a single class prediction
orientation_confidences = predictions.get(predicted_orientation, {})
confidence = orientation_confidences.get('confidence', 0)

# Define expected orientation (e.g., "original" for proper orientation)
expected_orientation = "original"

# Determine orientation status
is_properly_oriented = (predicted_orientation == expected_orientation)
orientation_status = "Label Properly Oriented" if is_properly_oriented else "Label Improperly Oriented"
status_color = (0, 255, 0) if is_properly_oriented else (255, 0, 0)  # Green for proper, blue for improper

# Step 3: Annotate the original image
# Add the orientation status to the original image
font = cv2.FONT_HERSHEY_COMPLEX_SMALL
cv2.putText(
    image,
    f"{orientation_status} (Confidence: {confidence:.2f})",
    (50, 50),
    font,
    1,
    status_color,
    2,
    cv2.LINE_4
)

# Draw the label bounding box on the original image
cv2.rectangle(image, (x1, y1), (x2, y2), status_color, 2)

# Convert the images to RGB for display
image_rgb = cv2.cvtColor(image, cv2.COLOR_BGR2RGB)
label_crop_rgb = cv2.cvtColor(label_crop, cv2.COLOR_BGR2RGB)

# Step 4: Display the results
# Display the cropped label
plt.figure(figsize=(6, 6))
plt.imshow(label_crop_rgb)
plt.title("Cropped Label")
plt.axis("off")
plt.show()

# Display the annotated original image
plt.figure(figsize=(10, 6))
plt.imshow(image_rgb)
plt.title("Label Orientation Detection on Original Image")
plt.axis("off")
plt.show()
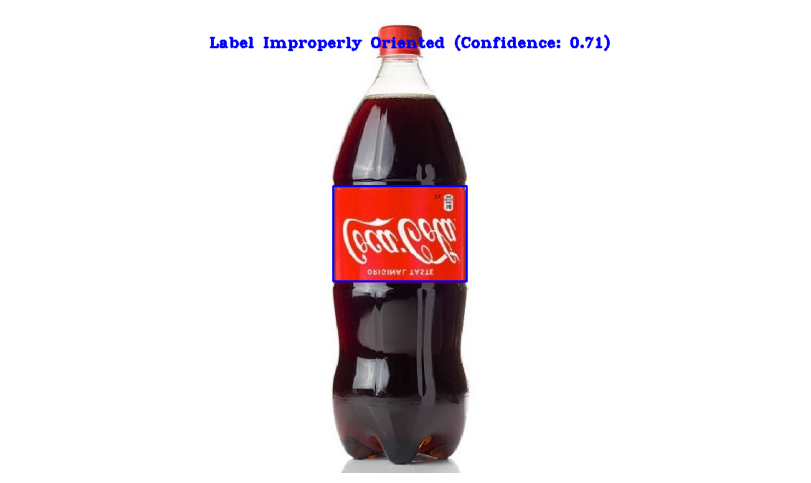
Label Placement Verification
Label placement verification ensures that a label is correctly placed in its designated region on a product. This process involves detecting the label's position and validating whether it is present in the correct region on the product. If the label is entirely within the designated region, it is classified as correctly placed. Otherwise, it is flagged as misplaced.
To illustrate this, we will use the object detection model from the above section which detects the bottle and the label on the bottle. Then use the following script to detect the label placement. I used the following steps to verify the label placement.
Step #1: Calibrate Phase
The coordinates and dimensions (bounding box) of both the bottle and the label are detected in a sample image where the label is correctly placed. The position and size of the label are calculated relative to the bottle's bounding box. For example:
- How far the label is from the top-left corner of the bottle.
- The width and height of the label compared to the bottle.
These relative values (e.g., 50% from the left, 12% from the top) are saved as calibrated values. It act as a benchmark for correct placement. Following is the code:
from inference_sdk import InferenceHTTPClient

# Initialize the inference client
CLIENT = InferenceHTTPClient(
    api_url="https://detect.roboflow.com",
    api_key="ROBOFLOW_API_KEY"
)

# Infer on the image
result = CLIENT.infer("bottle.jpg", model_id="label_detection-nyuoq/1")

# Parse the inference result
predictions = result['predictions']

# Extract bottle and label bounding boxes
bottle_box = next((p for p in predictions if p['class'] == '0'), None)  # Class '0' is the bottle
label_box = next((p for p in predictions if p['class'] == '1'), None)  # Class '1' is the label

if not bottle_box or not label_box:
    raise ValueError("Bottle or label not detected in the image.")

# Bottle bounding box
x_product = bottle_box['x'] - bottle_box['width'] / 2
y_product = bottle_box['y'] - bottle_box['height'] / 2
width_product = bottle_box['width']
height_product = bottle_box['height']

# Label bounding box
x_label = label_box['x'] - label_box['width'] / 2
y_label = label_box['y'] - label_box['height'] / 2
width_label = label_box['width']
height_label = label_box['height']

# Calculate relative position and size of the label
rel_x_expected = (x_label - x_product) / width_product + (width_label / (2 * width_product))
rel_y_expected = (y_label - y_product) / height_product + (height_label / (2 * height_product))
rel_width_expected = width_label / width_product
rel_height_expected = height_label / height_product

# Print the calibrated relative values
print("Calibrated Relative Values:")
print(f"rel_x_expected: {rel_x_expected:.2f}")
print(f"rel_y_expected: {rel_y_expected:.2f}")
print(f"rel_width_expected: {rel_width_expected:.2f}")
print(f"rel_height_expected: {rel_height_expected:.2f}")
The code will set the following variables, which are used in step #2 below.
Calibrated Relative Values:
rel_x_expected: 0.50
rel_y_expected: 0.48
rel_width_expected: 0.97
rel_height_expected: 0.22
The following is the reference image used to get these calibration values.
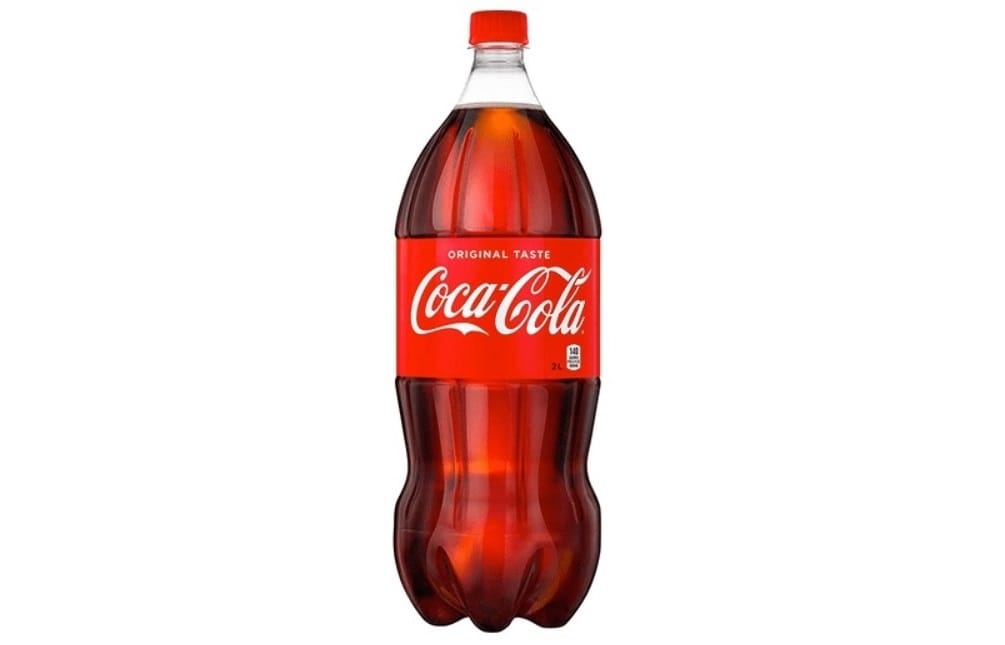
Step #2: Detection Phase
To verify whether the label in a new image is placed correctly compared to the calibrated reference, the coordinates and dimensions of the bottle and label are again detected in the new image. Using the bottle's bounding box, the expected position and size of the label are calculated based on the previously saved calibrated values. The detected label's position and size are compared to the expected values.
import cv2
import matplotlib.pyplot as plt
from inference_sdk import InferenceHTTPClient

# Initialize the client
CLIENT = InferenceHTTPClient(
    api_url="https://detect.roboflow.com",
    api_key="ROBOFLOW_API_KEY"
)

# Specify the input image
input_image_path = "bottle_wrong.jpg"

# Infer on the image
result = CLIENT.infer(input_image_path, model_id="label_detection-nyuoq/1")

# Parse the inference result
predictions = result['predictions']

# Extract the bottle and label bounding boxes
bottle_box = next((p for p in predictions if p['class'] == '0'), None)  # Class '0' represents the bottle
label_box = next((p for p in predictions if p['class'] == '1'), None)  # Class '1' represents the label

if not bottle_box or not label_box:
    raise ValueError("Bottle or label not detected in the image.")

# Bottle bounding box
x_product = int(bottle_box['x'] - bottle_box['width'] / 2)
y_product = int(bottle_box['y'] - bottle_box['height'] / 2)
width_product = int(bottle_box['width'])
height_product = int(bottle_box['height'])

# Label bounding box
x_label = int(label_box['x'] - label_box['width'] / 2)
y_label = int(label_box['y'] - label_box['height'] / 2)
width_label = int(label_box['width'])
height_label = int(label_box['height'])

# Calculate expected label position relative to the product using predefined calibrated values
x_expected = int(x_product + rel_x_expected * width_product - rel_width_expected * width_product / 2)
y_expected = int(y_product + rel_y_expected * height_product - rel_height_expected * height_product / 2)
width_expected = int(rel_width_expected * width_product)
height_expected = int(rel_height_expected * height_product)

# Tolerance values for placement check
tolerance_pos = 10  # Positional tolerance in pixels
tolerance_size = 0.05  # Size tolerance (5%)

# Check position and size match
x_within_tolerance = abs(x_label - x_expected) <= tolerance_pos
y_within_tolerance = abs(y_label - y_expected) <= tolerance_pos
position_match = x_within_tolerance and y_within_tolerance

width_within_tolerance = abs(width_label - width_expected) <= tolerance_size * width_expected
height_within_tolerance = abs(height_label - height_expected) <= tolerance_size * height_expected
size_match = width_within_tolerance and height_within_tolerance

# Determine the result
if position_match and size_match:
    result_text = "Correctly Placed"
    text_color = (0, 255, 0)  # Green
else:
    result_text = "Misplaced"
    text_color = (0, 0, 255)  # Red

# Load the image
image = cv2.imread(input_image_path)

# Draw bounding boxes
cv2.rectangle(image, (x_product, y_product),
              (x_product + width_product, y_product + height_product),
              (255, 0, 0), 2)  # Product bounding box in blue

cv2.rectangle(image, (x_expected, y_expected),
              (x_expected + width_expected, y_expected + height_expected),
              (0, 255, 0), 4)  # Expected label position in green

cv2.rectangle(image, (x_label, y_label),
              (x_label + width_label, y_label + height_label),
              (0,255, 255), 2)  # Detected label position in red

# Add the result text to the image
font = cv2.FONT_HERSHEY_SIMPLEX
cv2.putText(image, result_text, (50, 50), font, 1, text_color, 2, cv2.LINE_AA)

# Convert BGR to RGB for matplotlib
image_rgb = cv2.cvtColor(image, cv2.COLOR_BGR2RGB)

# Display the image
plt.figure(figsize=(10, 6))
plt.imshow(image_rgb)
plt.title('Label Position Check')
plt.axis('off')
plt.show()
I have tried following two different images to detect the label placement. First image has label placed at correct place and second image has label placed at incorrect place.

The following is the output you should see when you run the code on these images. Here the grren bounding box show expected place for label placement, and yellow bounding box annotates the detected label.

The code can detect the label placement even when the bottle is aligned at different location (other than center) in the image.

Why Both Bottle and Label Coordinates are Used?
- Bottle Coordinates: Serve as a fixed reference to measure where the label should be. Since the label's position is calculated relative to the bottle, the bottle's coordinates define the "frame of reference."
- Label Coordinates: Provide the actual detected position and size of the label in the new image. These are compared to the expected values derived from the bottle's coordinates and the calibrated reference.
By comparing the label's actual and expected placement relative to the bottle, the system determines if the label is correctly placed.
Identifying Printing Defects
In this process of label inspection, printing defects like smudges, fading, or incorrect colors or any other defects are detected. The following are the steps to build this system. This system works with the label-detection system we built earlier which gives us the cropped image of the label to be tested.
Step #1: Dataset Preparation
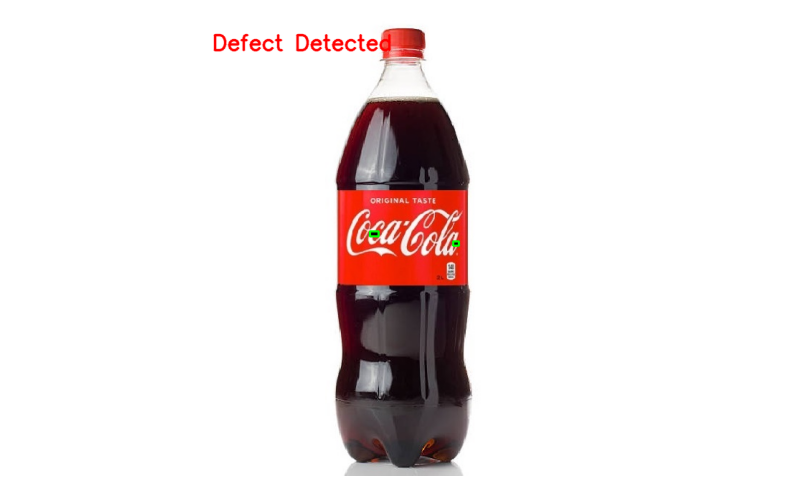
Collect high-resolution images of labels with printing defects (e.g., smudges, faded areas, or color variations). Annotate defective regions using bounding boxes. For the illustration, I have added a random black square in each labels images as defect. You can train this defect detection model for any type of defect using the same technique.
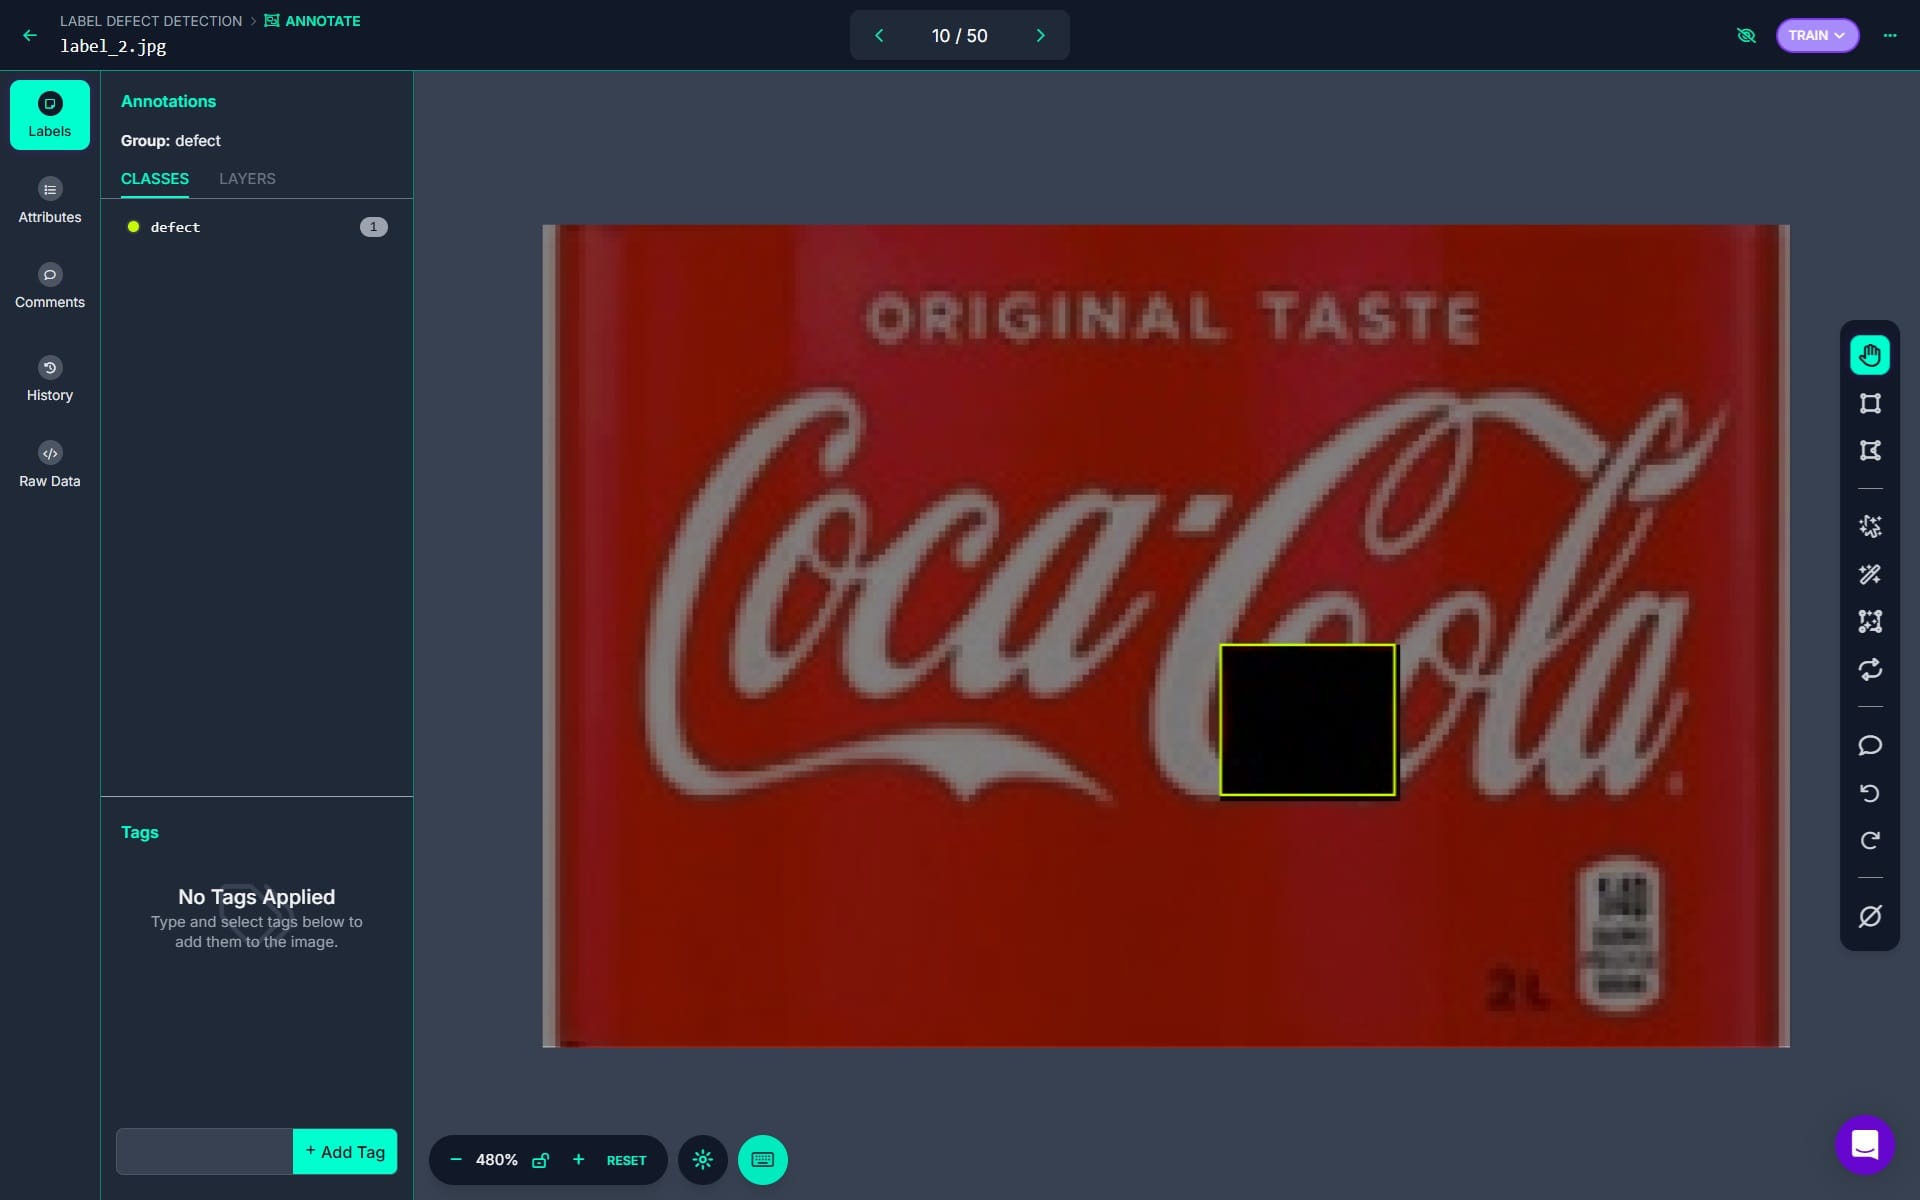
Step #2: Model Training
I have trained the object detection model to detect the defects in the labels.

Step #3: Build the inference script
The following first code crops the label by detecting it using the label detection model and then detect defects in the label (using the label-defect-detection model), along with displaying an alert if a defect is found.
import cv2
import matplotlib.pyplot as plt
from inference_sdk import InferenceHTTPClient
from PIL import Image

# Initialize the client
CLIENT = InferenceHTTPClient(
    api_url="https://detect.roboflow.com",
    api_key="ROBOFLOW_API_KEY"  # Replace with your API key
)

# Specify the input image path
input_image_path = "bottle_label_defect.jpg"  # Replace with your image filename

# Step 1: Detect bottle and label
result = CLIENT.infer(input_image_path, model_id="label_detection-nyuoq/1")

# Parse the inference result
predictions = result['predictions']

# Extract the label bounding box
label_box = next((p for p in predictions if p['class'] == '1'), None)  # Class '1' represents the label

if not label_box:
    raise ValueError("Label not detected in the image.")

# Load the original image
image = cv2.imread(input_image_path)
image_height, image_width = image.shape[:2]

# Label bounding box
x_center = label_box['x']
y_center = label_box['y']
width = label_box['width']
height = label_box['height']

# Calculate the top-left and bottom-right coordinates of the label box
x1 = max(int(x_center - width / 2), 0)
y1 = max(int(y_center - height / 2), 0)
x2 = min(int(x_center + width / 2), image_width)
y2 = min(int(y_center + height / 2), image_height)

# Crop the label from the image
label_crop = image[y1:y2, x1:x2]

# Convert the cropped label to RGB for displaying
label_crop_rgb = cv2.cvtColor(label_crop, cv2.COLOR_BGR2RGB)

# Step 2: Detect defects in the label
# Save the cropped label to a temporary file for defect detection
cropped_label_path = "cropped_label.jpg"
cv2.imwrite(cropped_label_path, label_crop)

# Infer on the cropped label using the defect detection model
defect_result = CLIENT.infer(cropped_label_path, model_id="label-defect-detection/1")

# Check for defects
defect_predictions = defect_result['predictions']
defects_found = any(defect_predictions)  # If predictions exist, defects are found

# Add alert text to the original image
alert_text = "Defect Detected" if defects_found else "No Defect Detected"
alert_color = (0, 0, 255) if defects_found else (0, 255, 0)  # Red for defect, green for no defect

# Draw green bounding boxes for detected defects on the original image
for defect in defect_predictions:
    x_defect = int(defect['x'] - defect['width'] / 2 + x1)
    y_defect = int(defect['y'] - defect['height'] / 2 + y1)
    x_defect_end = int(defect['x'] + defect['width'] / 2 + x1)
    y_defect_end = int(defect['y'] + defect['height'] / 2 + y1)

    cv2.rectangle(image, (x_defect, y_defect), (x_defect_end, y_defect_end), (0, 255, 0), 2)  # Green box for defects

# Add the alert text to the image
font = cv2.FONT_HERSHEY_SIMPLEX
cv2.putText(image, alert_text, (50, 50), font, 1, alert_color, 2, cv2.LINE_AA)

# Step 3: Display results
# Display the cropped label
plt.figure(figsize=(6, 6))
plt.imshow(label_crop_rgb)
plt.title("Cropped Label")
plt.axis("off")
plt.show()

# Convert the original image to RGB for displaying
image_rgb = cv2.cvtColor(image, cv2.COLOR_BGR2RGB)

# Display the original image with alert and defect boxes
plt.figure(figsize=(10, 6))
plt.imshow(image_rgb)
plt.title("Label Defect Detection Result")
plt.axis("off")
plt.show()
The code will generate following output, detecting the defect.
Label Content Verification
Label Content Verification is the process of ensuring that all information on a product label is accurate, complete, and compliant with relevant standards and regulations. It ensures that all printed information is clear and easily readable. Label content verification system can be used to check and verify many important information such as expiry date, lot code and other important information.
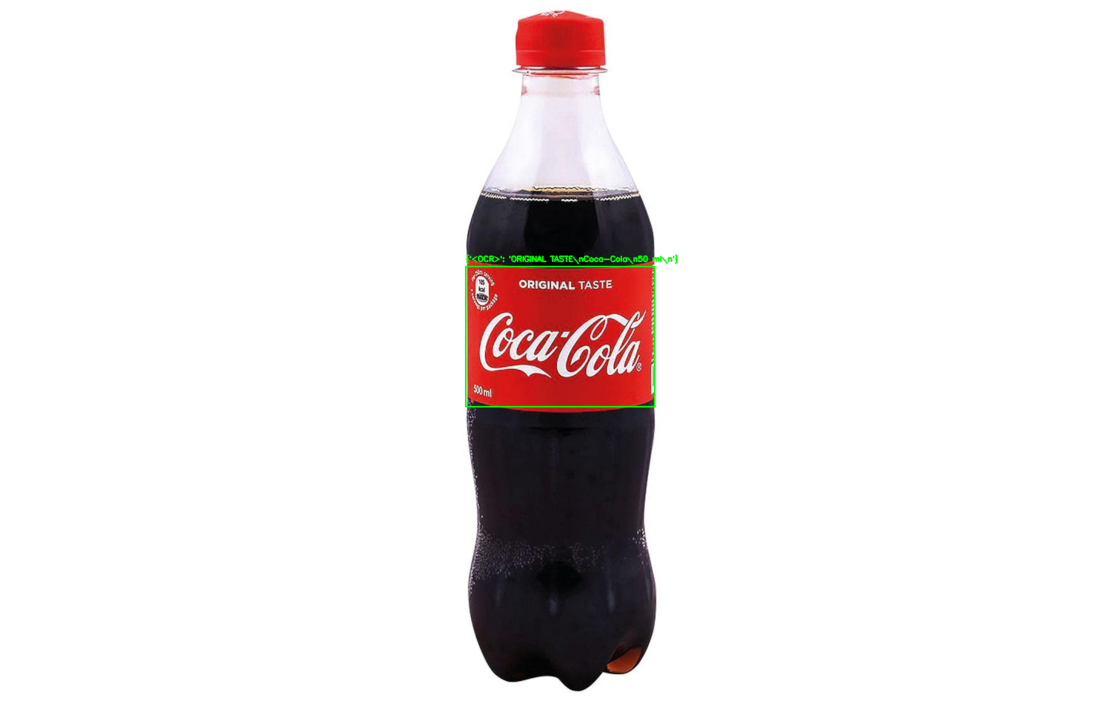
To illustrate this, we will use the object detection model from the above section which detects the bottle and the label on the bottle. Then use the following script to crop the label read content on the label. We will utilize Florence-2 model to read the content on the image.
from inference_sdk import InferenceHTTPClient
import cv2
from transformers import AutoProcessor, AutoModelForCausalLM
from PIL import Image
import matplotlib.pyplot as plt

# Initialize the client
CLIENT = InferenceHTTPClient(
    api_url="https://detect.roboflow.com",
    api_key="ROBOFLOW_API_KEY"  # Replace with your Roboflow API key
)

# Specify the input image path
input_image_path = "bottle.jpg"  # Replace with your image filename

# Infer on the image
detection_result = CLIENT.infer(input_image_path, model_id="label_detection-nyuoq/1")

# Parse the inference result
predictions = detection_result.get("predictions", [])

# Load the original image
image = cv2.imread(input_image_path)
image_height, image_width = image.shape[:2]

# Iterate over predictions to crop label regions
cropped_labels = []
coordinates = []  # Store bounding box coordinates for OCR annotations
for prediction in predictions:
    if prediction["class"] == "1":  # Class '1' represents the label
        x_center = prediction["x"]
        y_center = prediction["y"]
        width = prediction["width"]
        height = prediction["height"]

        # Calculate the top-left and bottom-right coordinates of the label box
        x1 = max(int(x_center - width / 2), 0)
        y1 = max(int(y_center - height / 2), 0)
        x2 = min(int(x_center + width / 2), image_width)
        y2 = min(int(y_center + height / 2), image_height)

        # Crop the label from the image
        label_crop = image[y1:y2, x1:x2]
        cropped_labels.append(label_crop)
        coordinates.append((x1, y1, x2, y2))

# Load Florence-2 processor and model
processor = AutoProcessor.from_pretrained("microsoft/Florence-2-large", trust_remote_code=True)
model = AutoModelForCausalLM.from_pretrained("microsoft/Florence-2-large", trust_remote_code=True)

# Function to perform OCR on an image
def perform_ocr(image):
    prompt = "<OCR>"
    inputs = processor(text=prompt, images=image, return_tensors="pt")

    generated_ids = model.generate(
        input_ids=inputs["input_ids"],
        pixel_values=inputs["pixel_values"],
        max_new_tokens=1024,
        num_beams=3,
        do_sample=False
    )
    generated_text = processor.batch_decode(generated_ids, skip_special_tokens=False)[0]
    parsed_answer = processor.post_process_generation(generated_text, task="<OCR>", image_size=(image.width, image.height))

    return parsed_answer

# Apply OCR to each cropped label
ocr_results = []
for idx, label_crop in enumerate(cropped_labels):
    # Convert OpenCV image to PIL format
    label_image = Image.fromarray(cv2.cvtColor(label_crop, cv2.COLOR_BGR2RGB))
    ocr_text = perform_ocr(label_image)
    ocr_results.append(ocr_text)
    print(f"OCR Result for Label {idx + 1}: {ocr_text}")

# Draw bounding boxes and OCR results on the original image
for idx, (x1, y1, x2, y2) in enumerate(coordinates):
    # Draw bounding box
    cv2.rectangle(image, (x1, y1), (x2, y2), (0, 255, 0), 2)

    # Ensure there's a corresponding OCR result
    if idx < len(ocr_results):
        ocr_text = str(ocr_results[idx])  # Convert OCR result to string
        # Put OCR result text above the bounding box
        cv2.putText(image, ocr_text, (x1, max(y1 - 10, 20)), cv2.FONT_HERSHEY_SIMPLEX, 0.5, (0, 255, 0), 2)
    else:
        print(f"No OCR result for label {idx + 1}")

# Convert BGR image to RGB for displaying
image_rgb = cv2.cvtColor(image, cv2.COLOR_BGR2RGB)

# Display the annotated image
plt.figure(figsize=(10, 10))
plt.imshow(image_rgb)
plt.title("Label Detection and OCR Results")
plt.axis("off")
plt.show()
Running the code will generate an output displaying the extracted text from label alongside the bounding box. This code can be further enhanced to verify this extracted text from the label and validate extracted content.
Label Barcode Verification
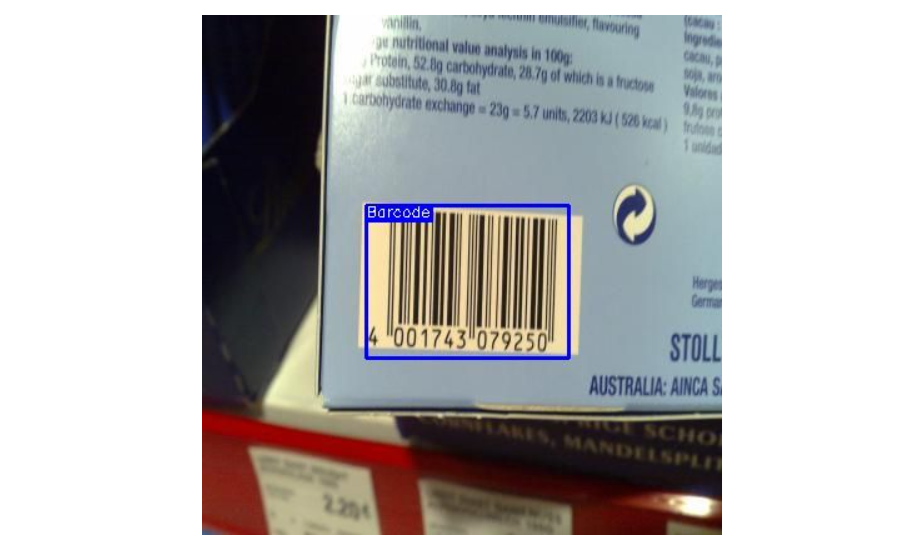
The Roboflow blog post titled How to Use a Free Computer Vision Barcode Detection API provides a comprehensive guide on detecting and reading barcodes using computer vision. The method involves using Roboflow Barcode Detection API to identify barcode locations in images, followed by using the pyzbar library to decode the data within the detected barcodes. This approach enables automated extraction of barcode information for applications such as inventory monitoring.
AI Label Inspection
In this blog, we have learned about different methods for automated label inspection using computer vision. These include verifying if a label is present, checking the label's orientation, and confirming that the label is placed correctly on the product.
We also learned how to detect printing defects and verify the content on the label to ensure the text and images are accurate. Lastly, we learned about barcode verification to make sure the barcode is present, readable, and correct. These methods help improve quality control and make labeling processes more efficient. Roboflow helps streamline label inspection by providing powerful tools to create computer vision models for detecting, analyzing, and verifying labels efficiently and accurately.
Cite this Post
Use the following entry to cite this post in your research:
Timothy M. (Dec 13, 2024). Label Inspection with Computer Vision. Roboflow Blog: https://blog.roboflow.com/label-inspection-computer-vision/
