
The Roboflow Zapier integration lets you connect any Roboflow model to thousands of other apps without writing code. This tutorial builds a complete no-code email routing workflow: a Zap listens for inbound emails with image attachments, saves each attachment to Google Drive, passes the public link to a vehicle classification model from Roboflow Universe, and forwards the email to the correct department based on the predicted class. The same pattern extends to object detection, instance segmentation, and CLIP comparison blocks within Zapier.
Zapier makes it possible to automate tasks without having to write any code. And now, it has the gift of sight. With the Roboflow Zapier integration you pass an image to any Roboflow model and get the predictions back to use downstream in your Zap.
In this blog post, we will show how to connect your Roboflow account to your Zapier account. We will also walk through how to use a Roboflow classification model to automate an inbound email flow. Let’s begin!
Project Overview
For this tutorial, we’ll put ourselves in the shoes of a large auto mechanic shop that receives many questions via email about various vehicles. All of the inquiries come to the same email and the first step that needs to happen is to route each inquiry to the appropriate department.
For this example we’ll have three departments:
- Commercial Vehicles
- Large Consumer Vehicles
- Small Consumer Vehicles
For this task, we’ll use a classification model from Roboflow Universe to route emails. The model we will use takes an image as input and returns a score for each class it knows about. Each score represents how likely it is that the image contains the target class; the higher the score, the more likely an image contains an object.
The classes on which the model is trained are:
- Ambulance
- Bus
- Car
- Limousine
- Motorcycle
- Segway
- Taxi
- Truck
- Van
Note: There are other classes in the dataset, but we’ll ignore them for this tutorial.
Using Roboflow and Zapier we’ll set up an automated flow that listens for new emails to a particular inbox, passes the attachment from the email to our Roboflow classification model, then routes the email to a new address based on the classification results.
The Roboflow + Zapier Workflow
Our workflow will take the following steps:
- Listen for an email with an attachment;
- Filter based on sender email address (ignore for now);
- Save the attachment to Google Drive;
- Get a public link for the Google Drive;
- Pass the public link to the Roboflow classification model;
- Continue if the classification model is confident it knows what’s in the image and;
- Forward the email to the appropriate department based on the classification result.
Here are the forwarding rules we want to implement:
- Predicted class is one of Ambulance, Bus, Limousine, Taxi, Truck → Send to the commercial vehicle department.
- Predicted class is one of Car, Van → Send to large consumer vehicle department.
- Predicted class is one of Motorcycle, Segway → Send to small consumer vehicle department.
Let’s implement this workflow with Zapier!
Prerequisites
Locate Your Roboflow API Key
To use the Roboflow Zapier integration, you’ll need a Roboflow API key. First create a Roboflow account, then follow our instructions on how to retrieve you API key.
Classification Model
To create our Zap – the term used for a workflow in Zapier – we first need to pick a Roboflow model to use. For this, you can bring your own data and train a custom model on Roboflow, or you can browse Roboflow Universe for a public model.
For this tutorial, we are using the public Vehicle Classification model from Roboflow Universe.
Google Drive Folder
When you receive an email attachment, that attachment is saved in a secure location. We need to take the attachment and save it in a location that our Roboflow model has access to so that it can process the image. For this, we’ll create a new folder on Google drive. Once created, we’ll need to set the permissions to “Anyone with the link…” → “Viewer”.

This change will ensure that anyone with a link to the files in that folder will be able to access it without credentials, namely our Roboflow model.
Email Addresses
If this example were for a production application, we would need an inbox for receiving inquiries, and several other inboxes that we would forward those inquiries to based on the department.
For this example we take advantage of a feature of Gmail email addresses. With Gmail email addresses, you can create an arbitrary number of email addresses by appending any string using the “+” symbol. So, if your email is “paul@roboflow.com”, you can also use “paul+test@roboflow.com”. Any emails sent to “paul+test@roboflow.com” will show up in the same inbox as “paul@roboflow.com”. For this tutorial, we’ll use the following setup:
- Inquiries will be sent to paul@roboflow.com
- Commercial vehicle inquiries will be forwarded to paul+commercial@roboflow.com
- Large consumer vehicle inquiries will be forwarded to paul+consumerlarge@roboflow.com
- Small consumer vehicle inquiries will be forwarded to paul+consumersmall@roboflow.com
Create the Roboflow Zap
Now we are ready to create our Zap that uses the Roboflow Zapier integration to implement the aforementioned logic. In your Zapier account, select Create > New Zap.
Step #1: Set Up the Gmail Integration
You’ll be asked to add the trigger (the first block in any Zap):
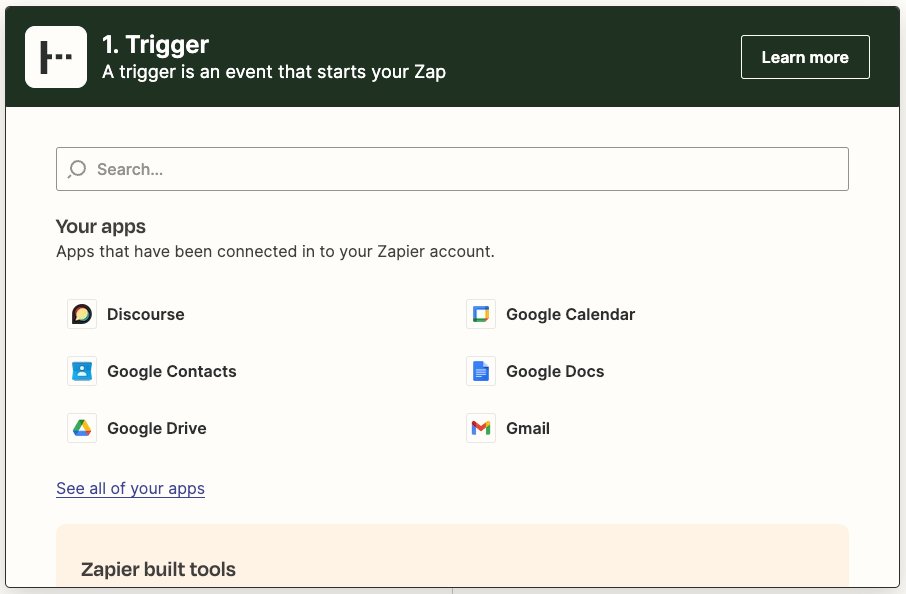
Select the “Gmail” integration. If it’s not shown by default, use the search bar to find it.
Then choose the event “New Attachment”. Next, select your Gmail account (or connect one if you haven’t done so already). Leave all fields on the “Trigger” section blank. Then move on to the “Test” section.
It will be helpful to have a good example email to work with for setting up the rest of this Zap, so before you test this trigger, send an email to your chosen Gmail address with an attachment of an image of a motorcycle. Any image will work, but here’s one from our Roboflow dataset you can use:

After having received the email with the motorcycle image attachment, click the “Test Trigger” button. You may have several attachments to choose from (labeled “Attachment A, Attachment B, etc.). Continue selecting different attachments until you find the one with the motorcycle image. Note that you won’t be able to see the image so you’ll have to select it based on the text in the email or the timestamp of when it was received.
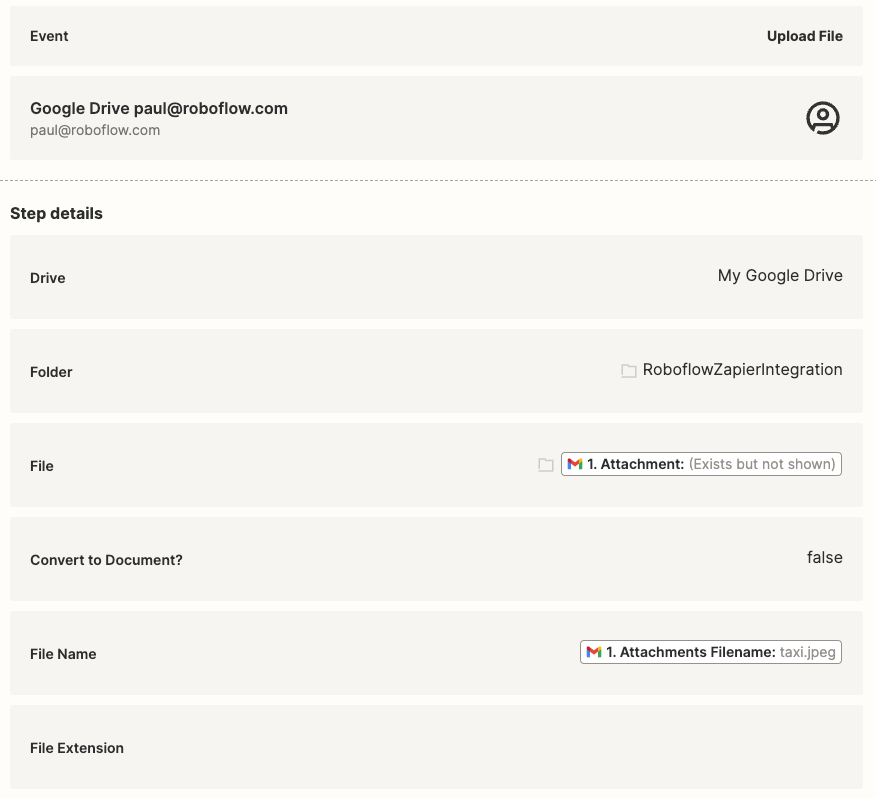
Next, add a Google Drive block to your Zap and choose the event “Upload File”. In the step details choose the drive and folder you created as part of the prerequisites. Set the “File” field to the “1. Attachment: (Exists but not shown)” field from the Gmail block. Set “Convert to Document?” to false. Set “File Name” to “1. Attachments Filename: motorcycle.jpeg”. Leave the “File Extension” and all other optional fields blank.
If we stopped here, our Zap would only upload attachments we receive to our Google Drive folder. But we want to run inference with our image using Roboflow! Let’s build that part now.
Now we need to get a link to our file on Google Drive.
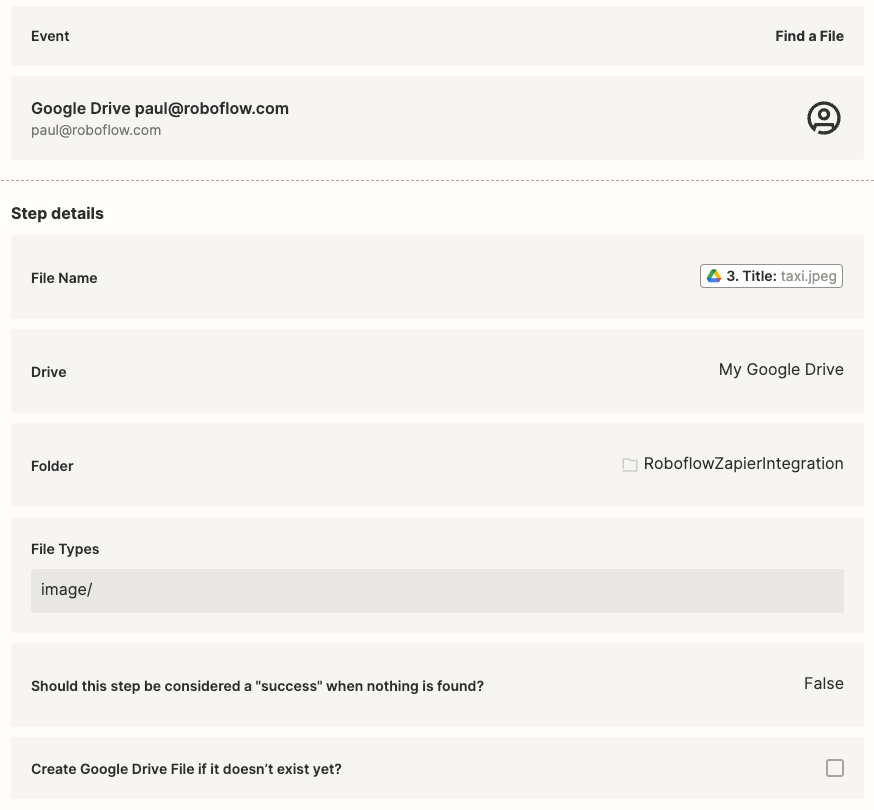
Step #2: Retrieve the URL for an Image
For this, we’ll use another Google Drive block with the action “Find a File”. Set the “File Name” field to the same we used in our previous block, “1. Attachments Filename: motorcycle.jpeg”. Similarly set the drive and folder fields. For “File Types” choose “images/”. Set the field “Should this step be considered a ‘success’ when nothing is found?” to False. And leave “Create a Google Drive File if it doesn’t exist yet?” unchecked.
Step #3: Pass the Image to Roboflow
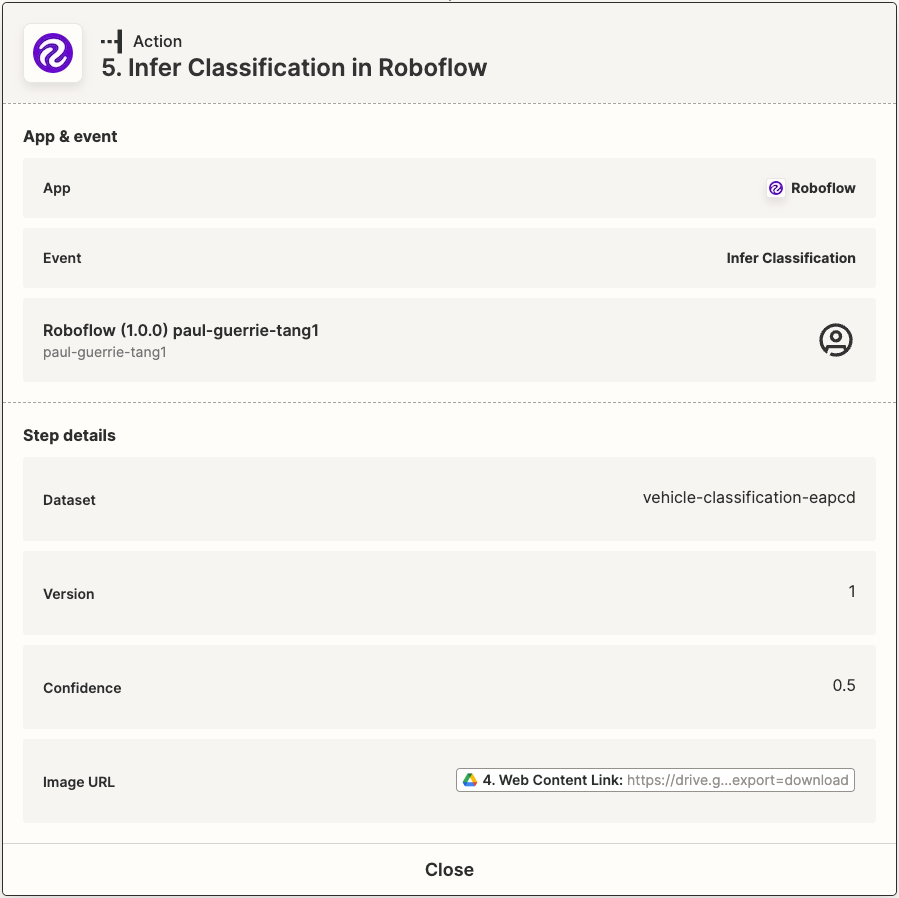
Add a new block and search for Roboflow. Select the action “Infer Classification”. Connect your Roboflow account using the API key you found during the prerequisite steps of this tutorial. For the “Dataset” field, use “vehicle-classification-eapcd”. That’s the dataset slug of the vehicle classification model we want to use. If you want to use your own custom model, you’ll need to locate your dataset’s slug. For the “Version” field, use “1”. Leave confidence as “0.5”.
For the “Image URL” field, use “4. Web Content Link: https://drive.g…export=download”. This is the publicly accessible link to the file we saved in Google Drive.
When we test this block, we’ll see real classification results from our Roboflow vehicle classification model. You can read more about the JSON output in our hosted API documentation. For our purposes, we’ll use the “Top” field and the “Confidence” field from the output. The “Top” field is the class name that is most likely to describe the image.
The “Confidence” is a number between 0 and 1 that describes how confident the model was when predicting that class name. For example, if the “Top” field was “Motorcycle” and the “Confidence” was 0.85, that means the classification model was 85% confident that the image is of a motorcycle. Read more about model confidence and model metrics here.
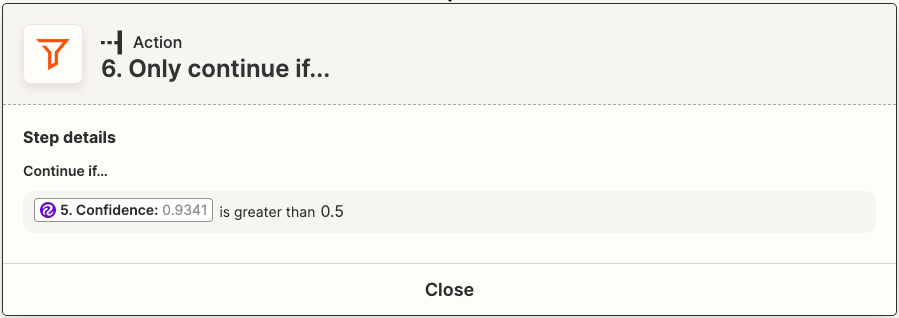
Next, we only want to continue if the classification model was confident about what it saw. Typically, we use the value 0.5 as a threshold. This means the model must return a confidence rate equal to or greater than 0.5 to return a prediction.
Create a new block and choose the Zapier “Only continue if…” block. Set the first field to “5. Confidence: 0.9341”. Set the second field to “is greater than”. And set the third field to “0.5”.
Finally, we need to route our email to the correct department. There are a couple options for how to do this. In this tutorial we will use the Zapier “Paths” action. This lets us set up several paths, each of which apply a filter, then take an action if the filter conditions are met. This block, however, is only available on higher paid tiers.
To avoid using this block, you can simply use another “Only continue if…” block, filter based on the classification result, then send an email to the department that matches the parameters of the filter block. If you do this, you’ll need to set up a separate Zap for each department since each filter block will be set up differently.
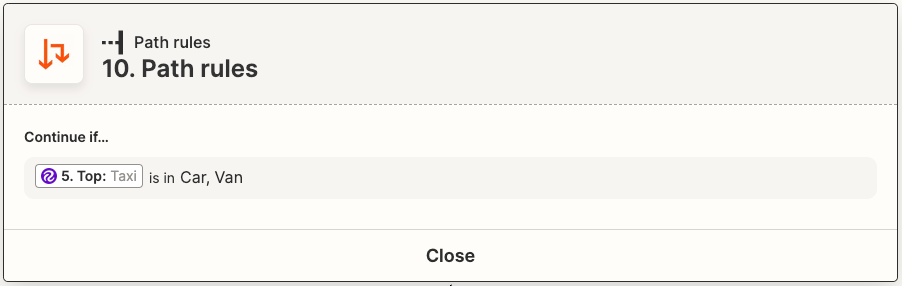
Within our “Paths” action, we’ll set up three paths. Each path will contain two blocks, a “Path rules” block (which functions as a “Only continue if…” block), and a Gmail block.
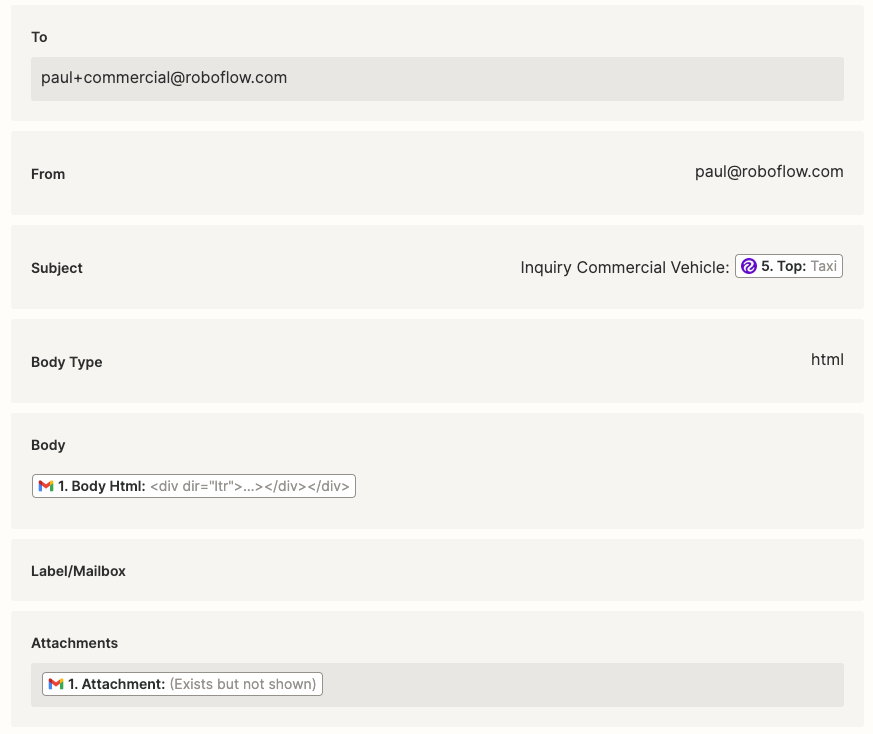
The first path we’ll setup is the “Commercial Vehicle” path. For the “Path rules” block set the first field to “5. Top: Motorcycle”. For the second field, select “is in”. For the third field, type “Bus, Truck, Ambulance, Limousine, Taxi”. This tells the filter to only continue if the predicted class from the classification model output is one of the ones we just typed.
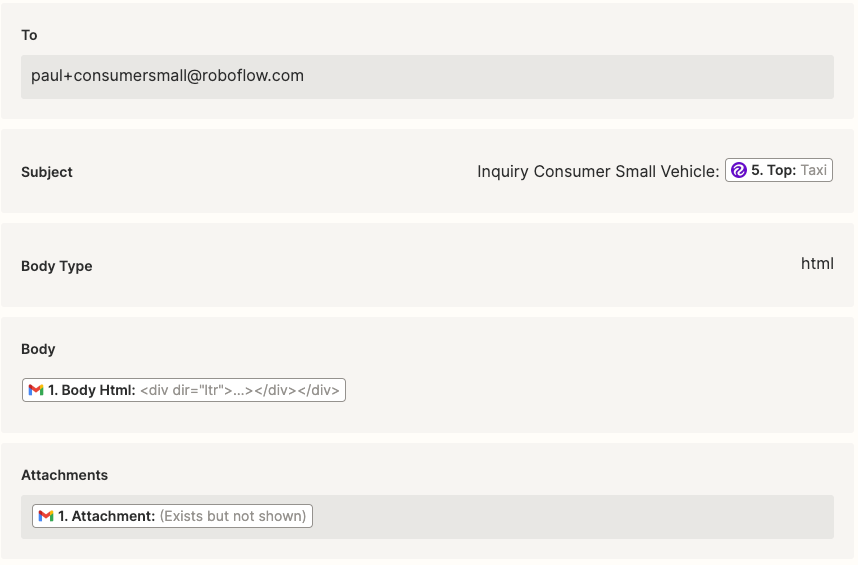
Next, select a Gmail block with the action “Send Email”. For the “To” field type your email and add “+commercial” before the “@” symbol. For the subject field, type “Inquiry Commercial Vehicle: 5. Top: Motorcycle”. This will insert the name of the predicted class into the subject of our forwarded email. For the “Body Type”, select HTML and for the “Body” select “1. Body Html: … “. For “Attachments” select “1. Attachment: (Exists but not shown)”.
We’ll repeat this process to create two more paths with some different parameters:
- Large Consumer Vehicles
- “5. Top: Motorcycle” is in “Car, Van”
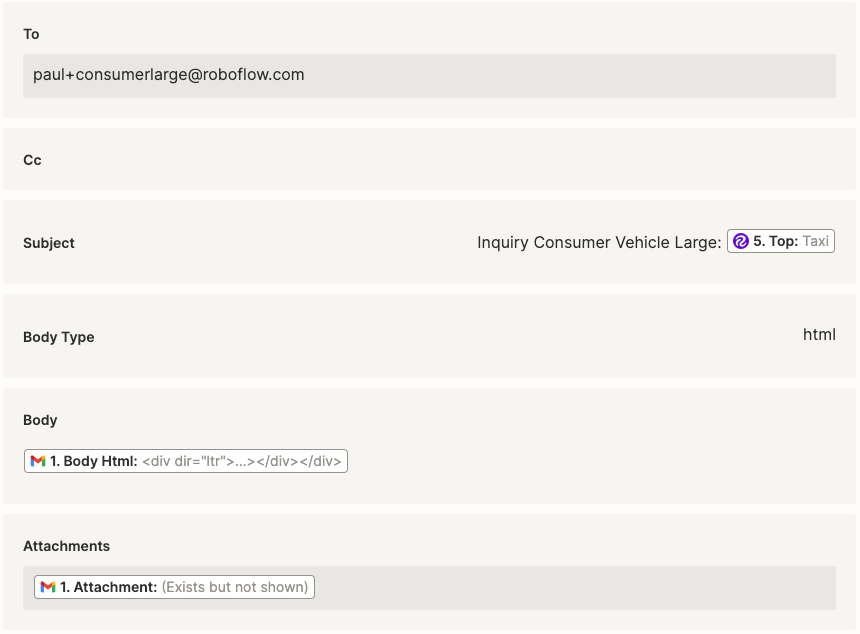
- To: “+consumerlarge”
- Subject: “Inquiry Consumer Vehicle Large: 5. Top: Motorcycle”
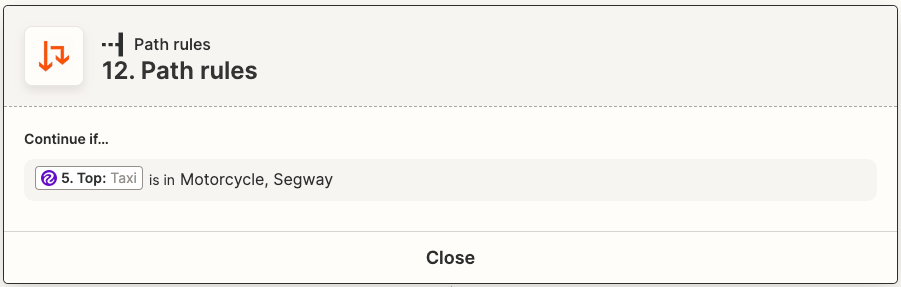
- Small Consumer Vehicles
- “5. Top: Motorcycle” is in “Motorcycle, Segway”
- To: “+consumersmall”
- Subject: “Inquiry Consumer Vehicle Small: 5. Top: Motorcycle”
Finally, we have one final (optional) step. Recall from the overview, step two said “ignore for now”. Since we are not actually using different inboxes for our example, we have just set up for ourselves an infinite loop. Our Zap will receive an email, classify it, then send it back to our inbox. Then it will see the email it just received, classify it again, and send it back to our email again. And it will continue doing so until the computers finally get smart enough to stop taking orders from us.
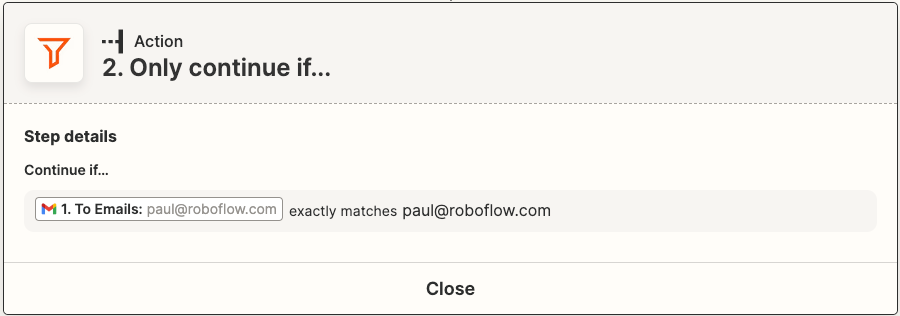
To avoid this (the infinite loop, that is), we can add an “Only continue if…” block after our trigger (first Gmail block). We’ll set the fields to “1. To Emails: …” exactly matches “youremail@youremail.com”. This way, when the Zap sees an email that was sent to “youremail+commercial@youremail.com” it will stop and won’t continue with our automated flow.
Test the Zap
Now we are ready to publish and test our Zap! To do that, simply click the publish button, then send an email with a picture attachment to the email address you used. For my test, I sent an image of a Taxi. After my Zap ran, I got this email:
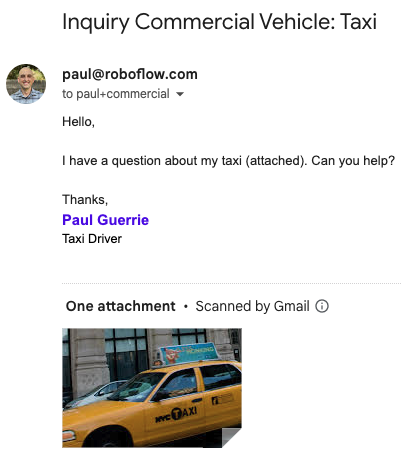
We can see everything worked just as planned! From the subject line, we can see Roboflow recognized that the picture was of a taxi. Then, using the result from the Roboflow model we were able to route the email to my “+commercial” address with the original body and attachment included.
Endless Possibilities
This example showcased just one of seemingly endless possibilities. We can’t wait to see what you do with the Roboflow Zapier integration which includes blocks for Classification inference, Object Detection inference, Instance Segmentation inference, and CLIP comparison. We’ll be creating Zapier templates for each of these blocks in the near future. Don’t forget to post on discuss.roboflow.com with any questions. Happy Zapping!
Cite this Post
Use the following entry to cite this post in your research:
Paul Guerrie. (Mar 31, 2023). No Code Computer Vision with Roboflow + Zapier. Roboflow Blog: https://blog.roboflow.com/no-code-computer-vision-zapier/