
When you are training object detection models, the end goal is to achieve high performance while not overfitting to your data. A model with these properties is said to “generalize well”.
One way to improve a model’s ability to generalize – and, thereby, improve its accuracy – is to add augmented images.
Augmented images are generated by applying transformations to some images in a training dataset. For example, you can apply a grayscale augmentation that will copy some images in your dataset and turn them gray. Such an augmentation may be ideal if you are training a model where the color of objects is not important.
In this guide, we will walk through how to generate augmented images with Roboflow. Your dataset with augmented images can then be used to train a model on Roboflow. You can also export your data for use in a custom model training pipeline.
Without further ado, let’s get started!
Step #1: Create a Project
To get started, we need to create a Project in Roboflow. A Project is where you store data for a specific computer vision model.
Create a free Roboflow account. Then, navigate to your Roboflow dashboard and click the “Create Project” button. You will be taken to a page where you can configure your new project:
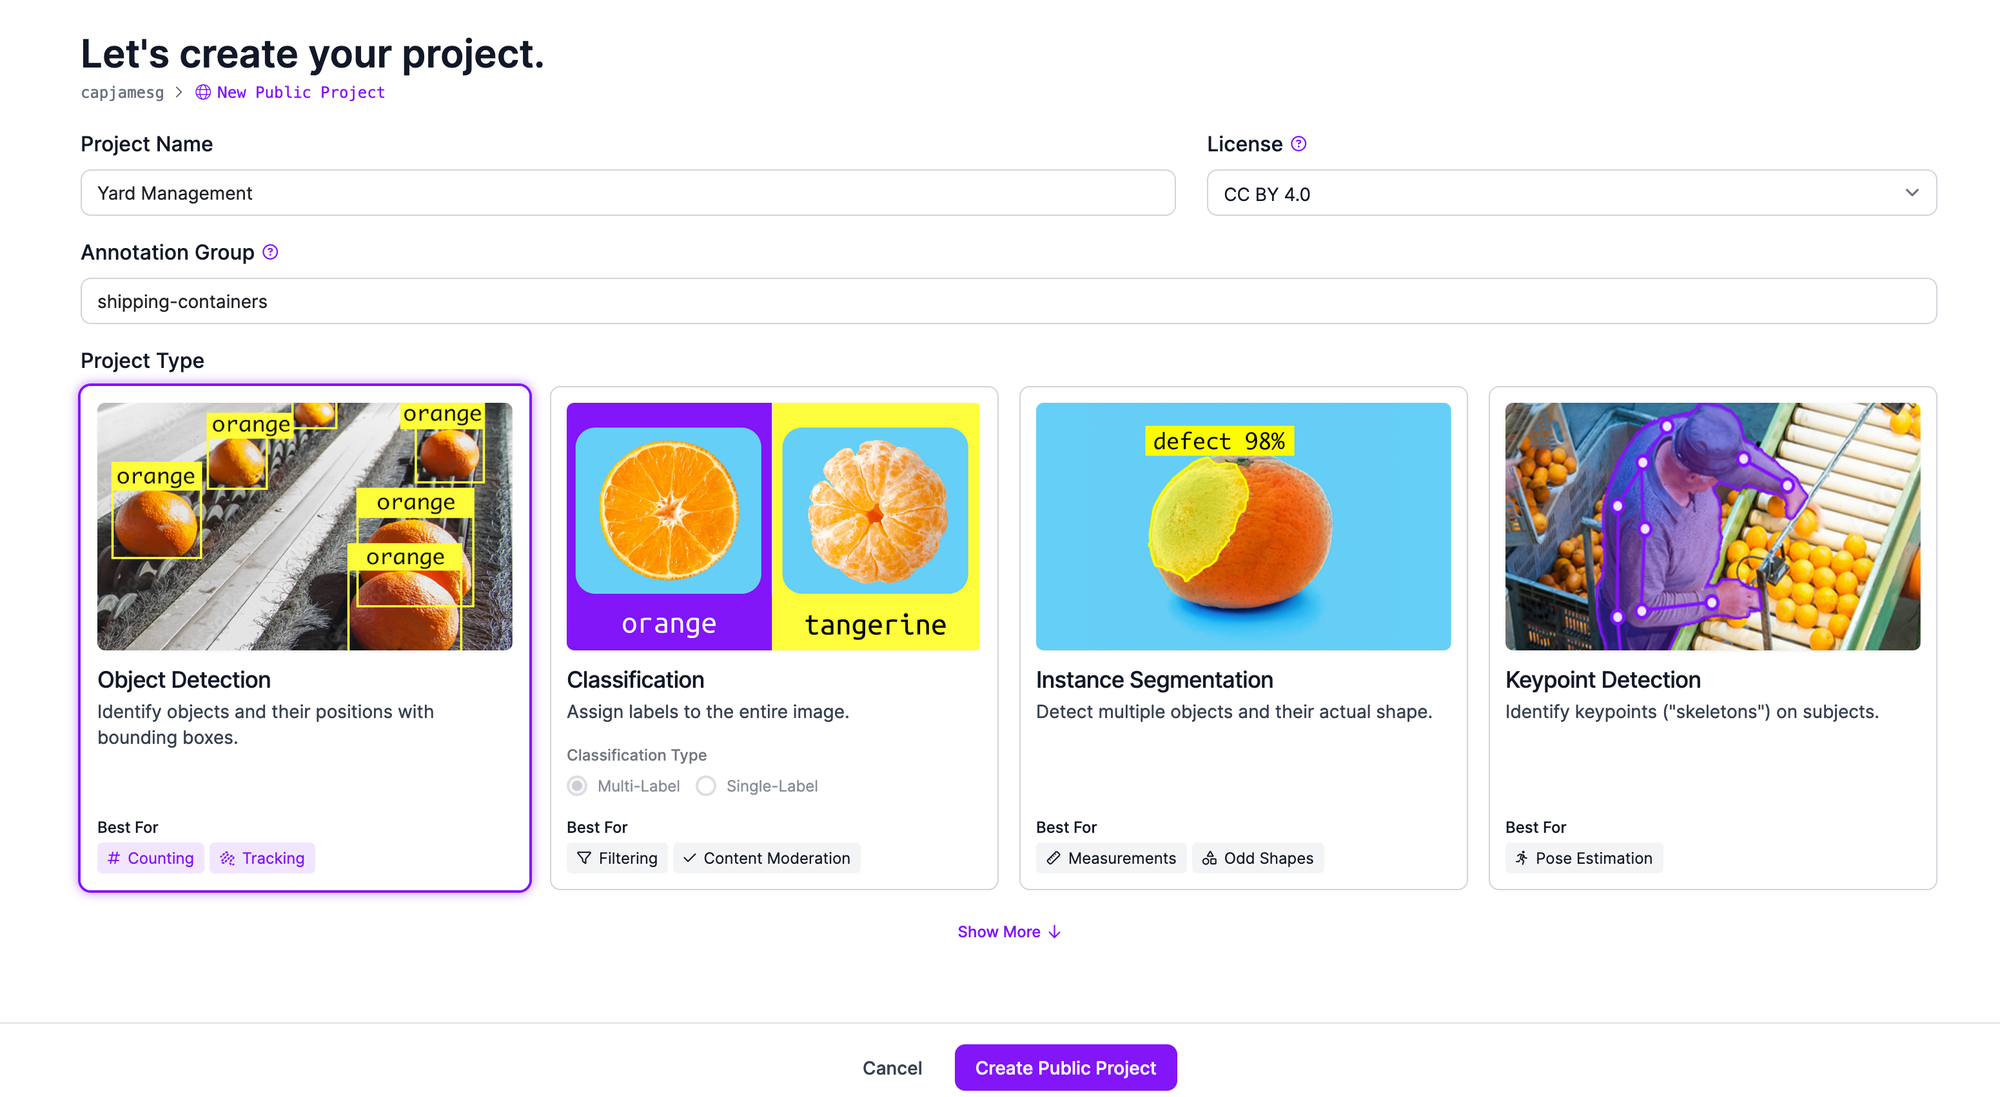
On this page, set a name for your project, then select the “Object Detection’ data type. Click “Create Project” at the bottom of the page to create your Roboflow project.
Step #2: Upload Data
With a project created, you can upload data to Roboflow to which you can later apply augmentations.
You can either upload images without annotations, or images with annotations in any of the supported formats like YOLOv8 PyTorchTXT and PaliGemma JSONL. See a full list of supported annotation formats.
To upload images, drag and drop your data into the Roboflow dashboard.
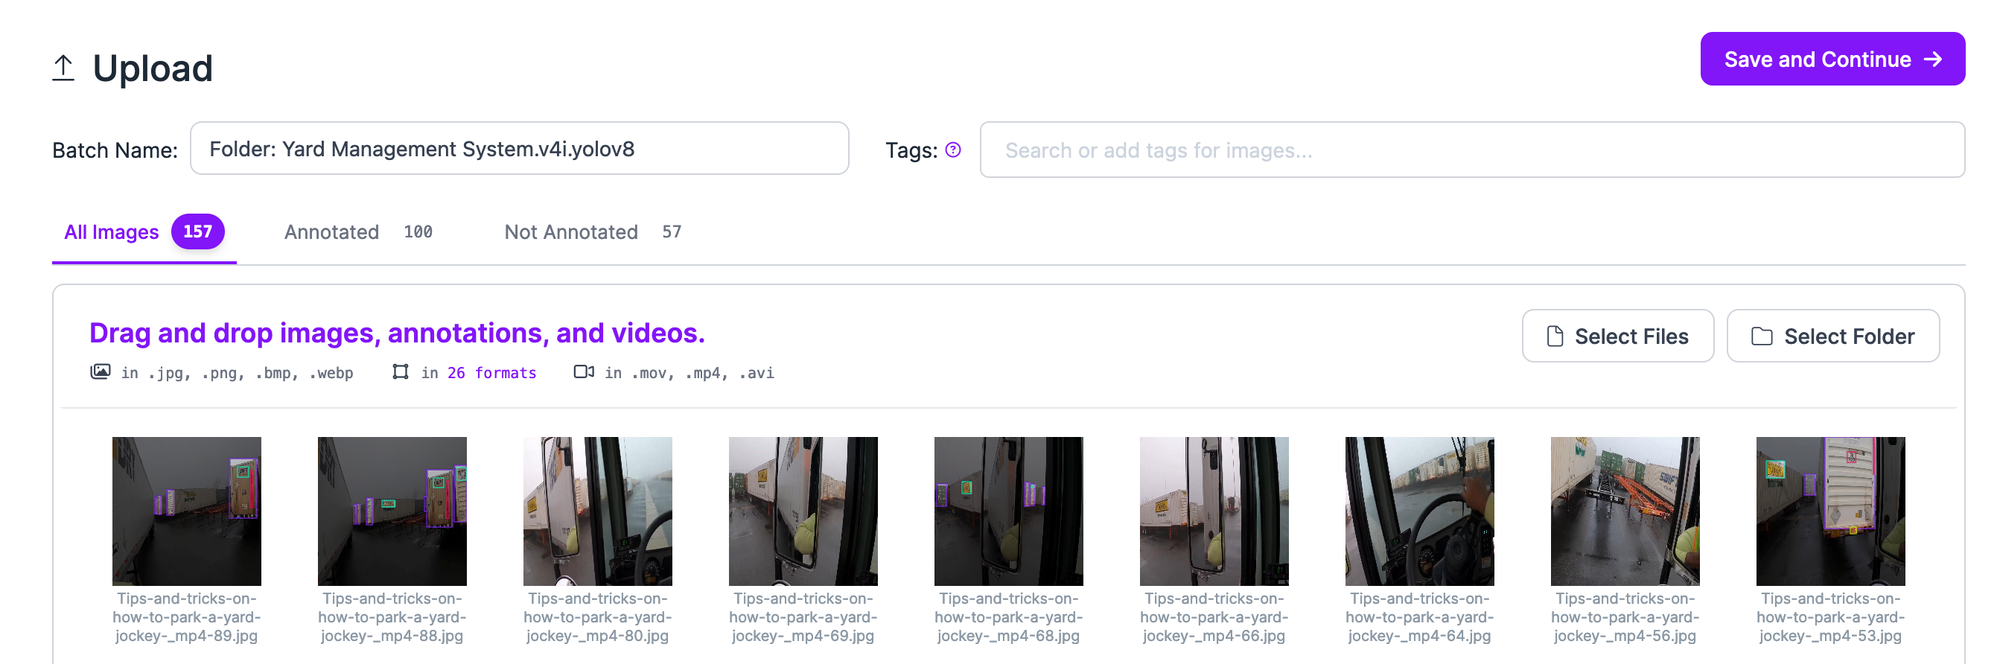
Your images will be processed, then a “Save and Continue” button will appear. When you click this button, your images will be uploaded to your Roboflow project. The amount of time this process takes will depend on the number of images you are trying to upload, and the speed of your internet connection.
If you have unannotated images in your dataset, you can label them with Roboflow. To learn more about labeling data with Roboflow, refer to the Roboflow Getting Started guide.
Roboflow has a web interface for labeling images, with tools for drawing bounding boxes and polygons. You can also use our SAM-powered Label Assist feature to label polygons that will later be transformed into bounding boxes in one click. This feature eliminates the need to manually draw bounding boxes by hand.
Step #3: Augment Object Detection Data
Once you have labeled your data, you are ready to generate augmented images.
To generate augmented images, click “Generate” in the left sidebar of your Roboflow project. On this page, you can configure a dataset version. A dataset version is a snapshot of your dataset that is frozen in time.
You can apply augmentations and preprocessing steps to your dataset version without changing the underlying dataset. This allows you to generate several datasets using different augmentations, ideal for use in experimenting while you evaluate how various augmentations help improve your dataset.
Augmentations will be applied by copying some images in your dataset and augmenting the copies. This means that all of your original training images, as well as your augmented images, will be in your dataset version.
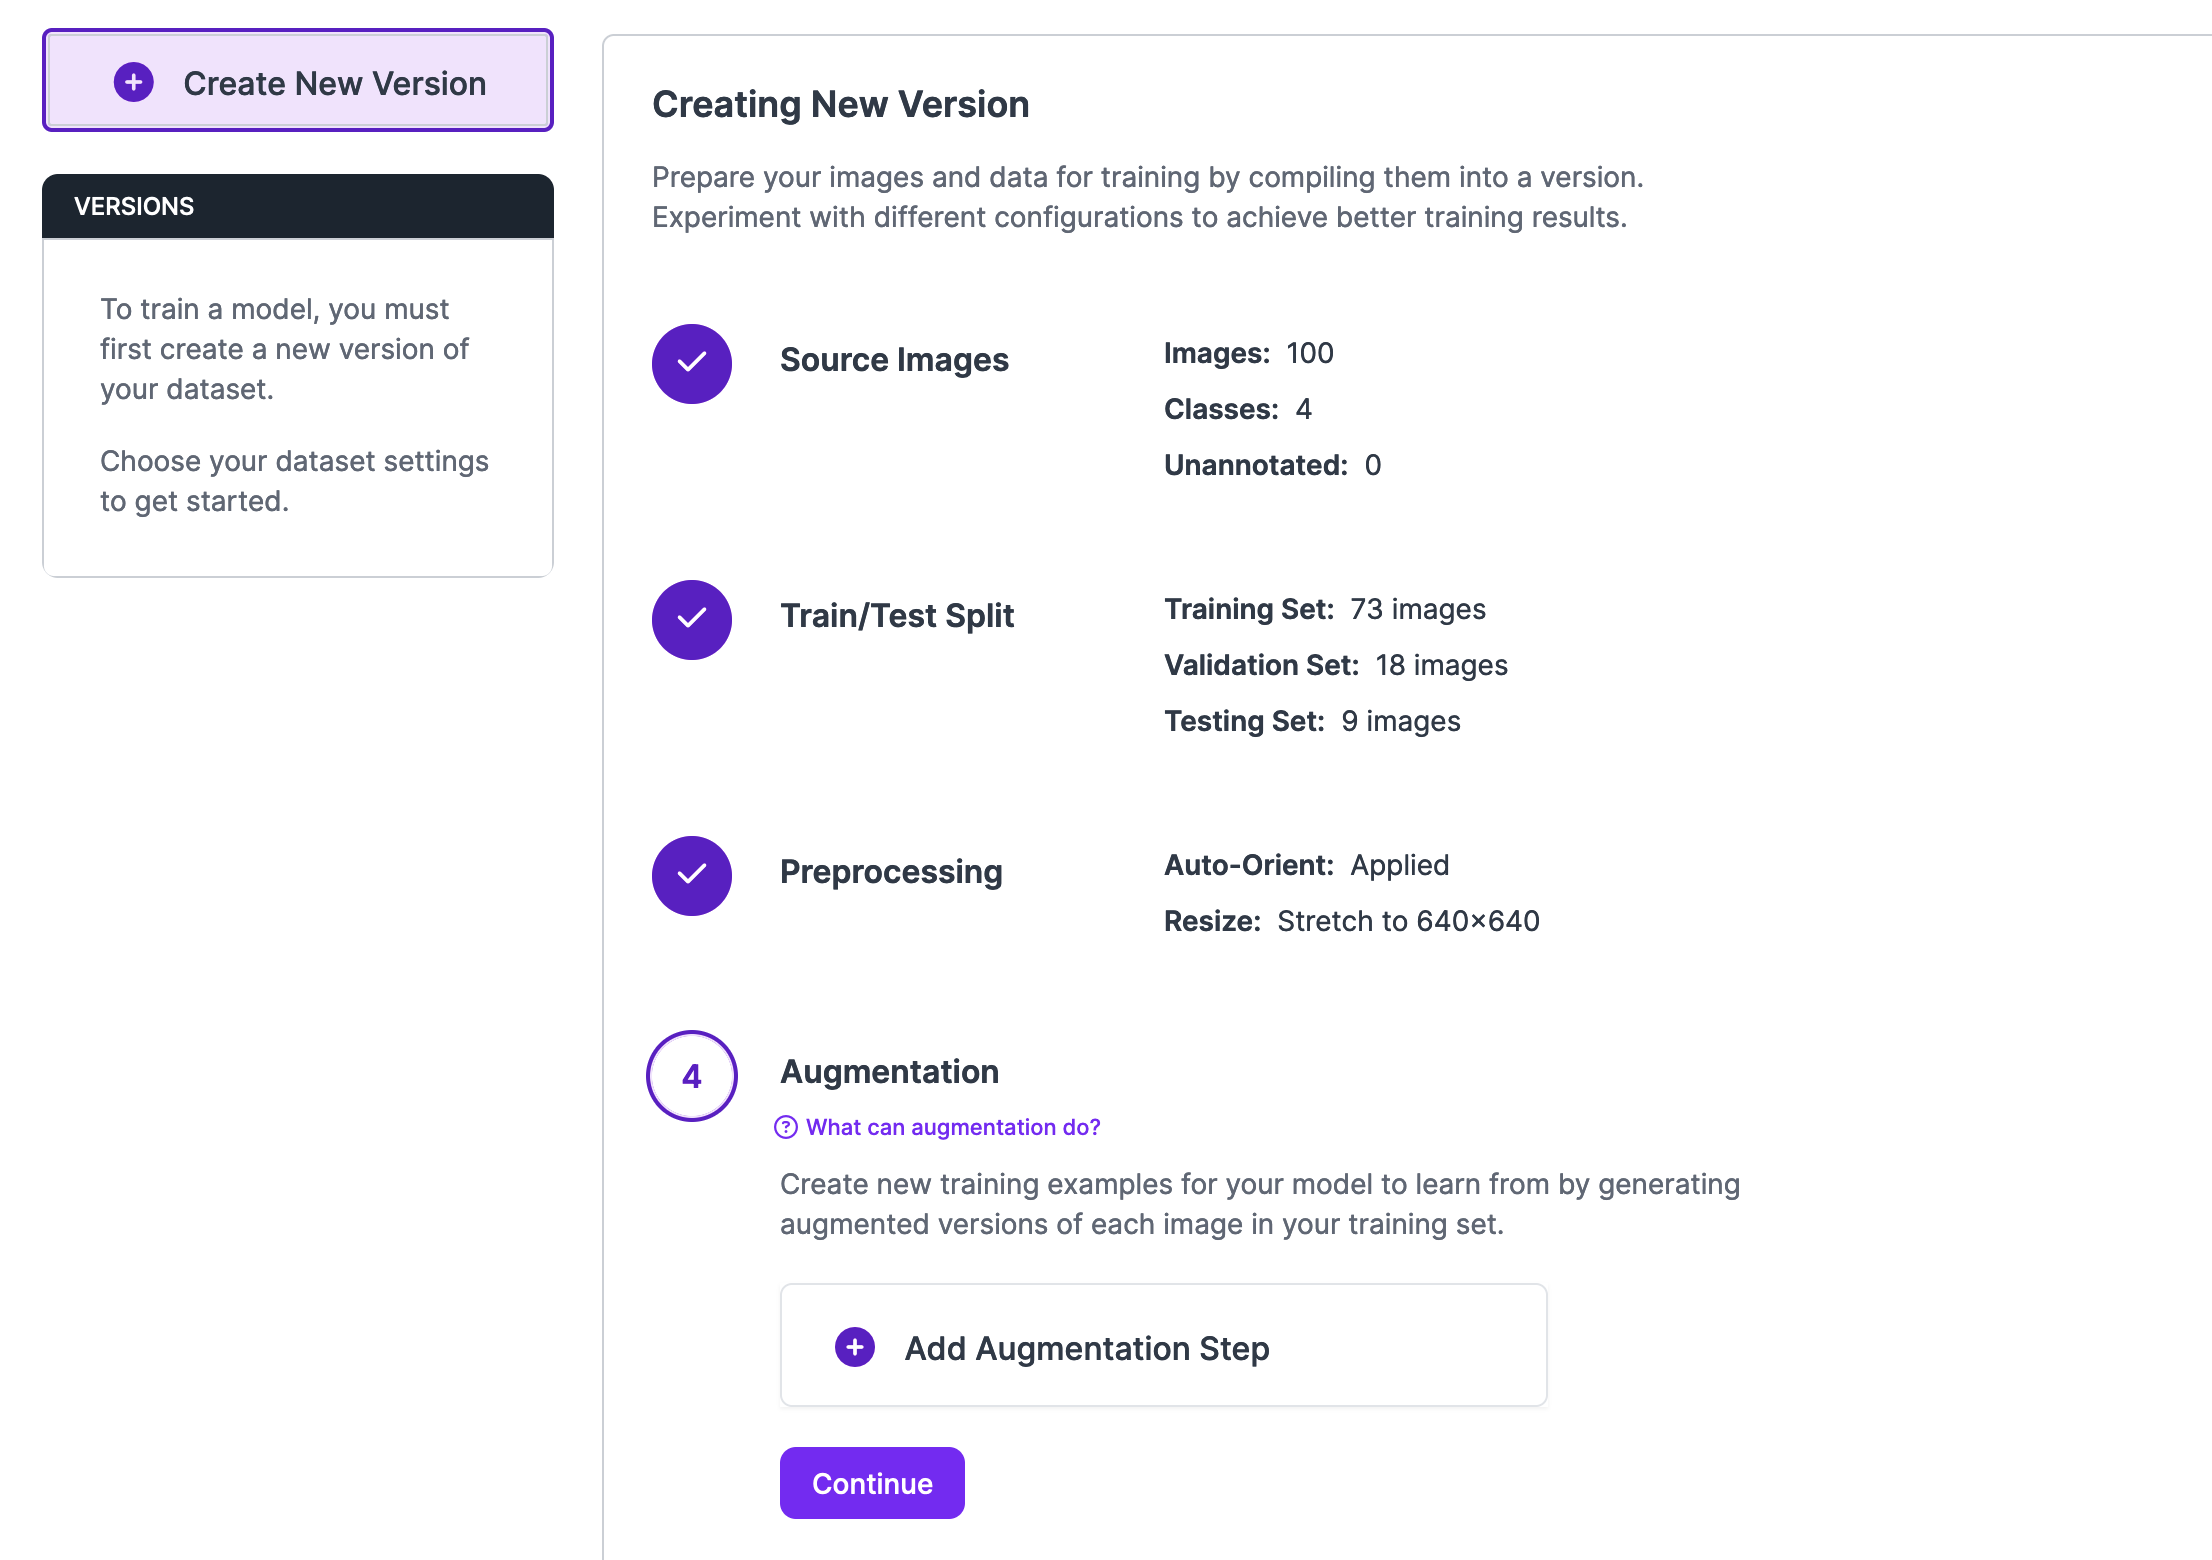
To add an augmentation, click “Augmentation” on the dataset generation page. Then, click “Add Augmentation Step”. A window will appear with several augmentation options.
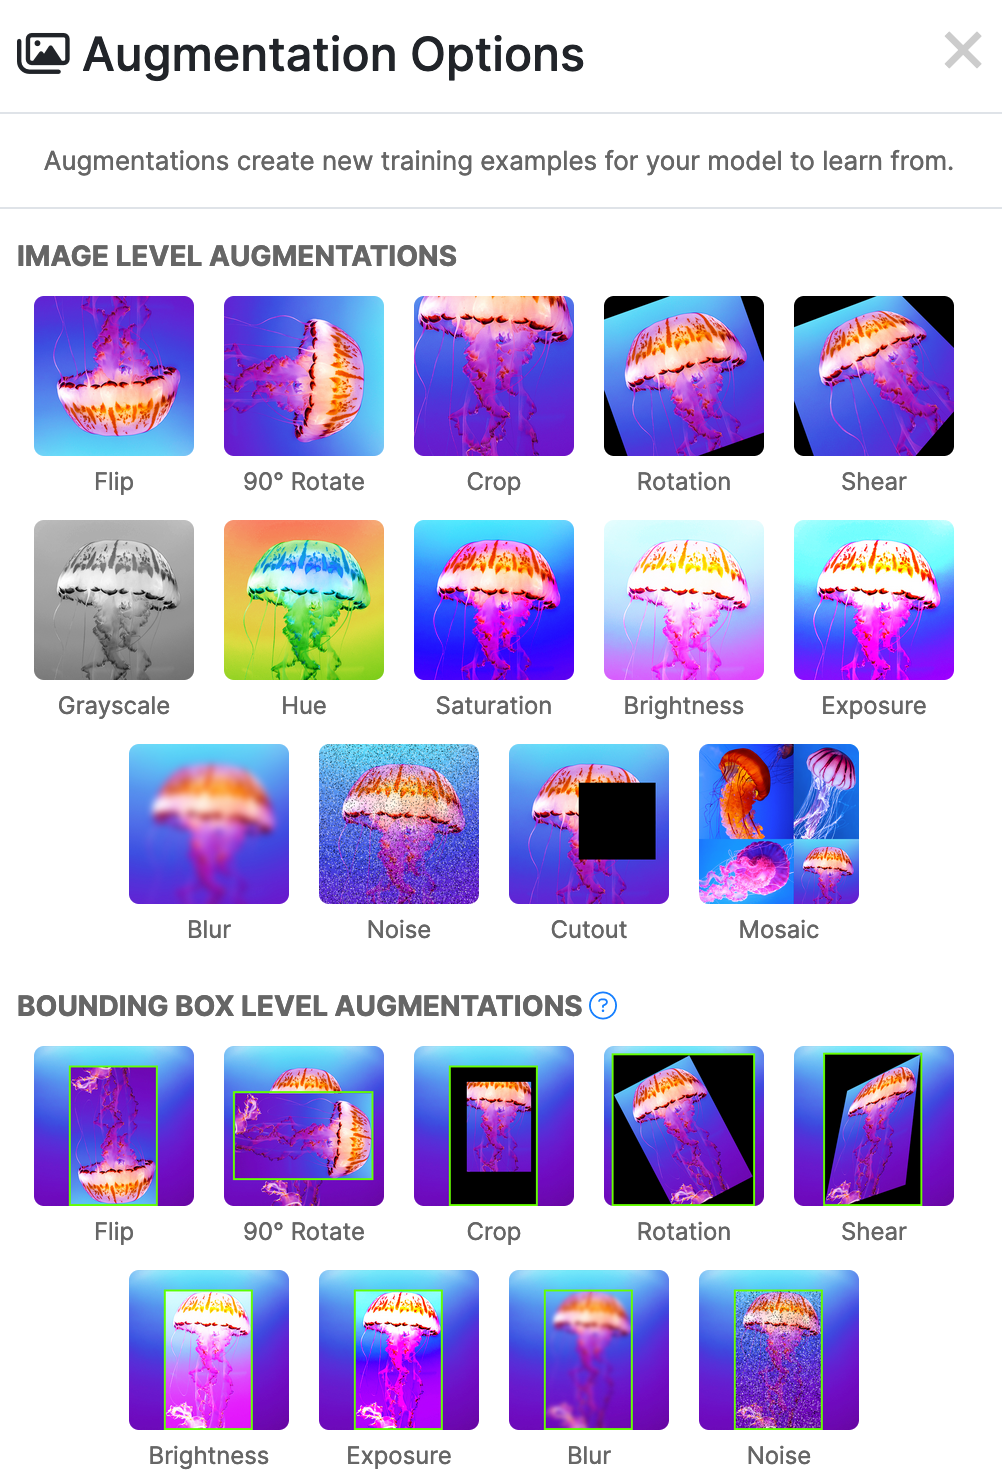
There are two types of augmentations you can apply to object detection datasets: image-level or bounding box-level. Image-level augmentations are applied to a full image. Bounding box-level augmentations are applied within the region of bounding boxes.
There are many augmentations available, including:
- Flip
- 90 degree rotate
- Crop
- Rotation
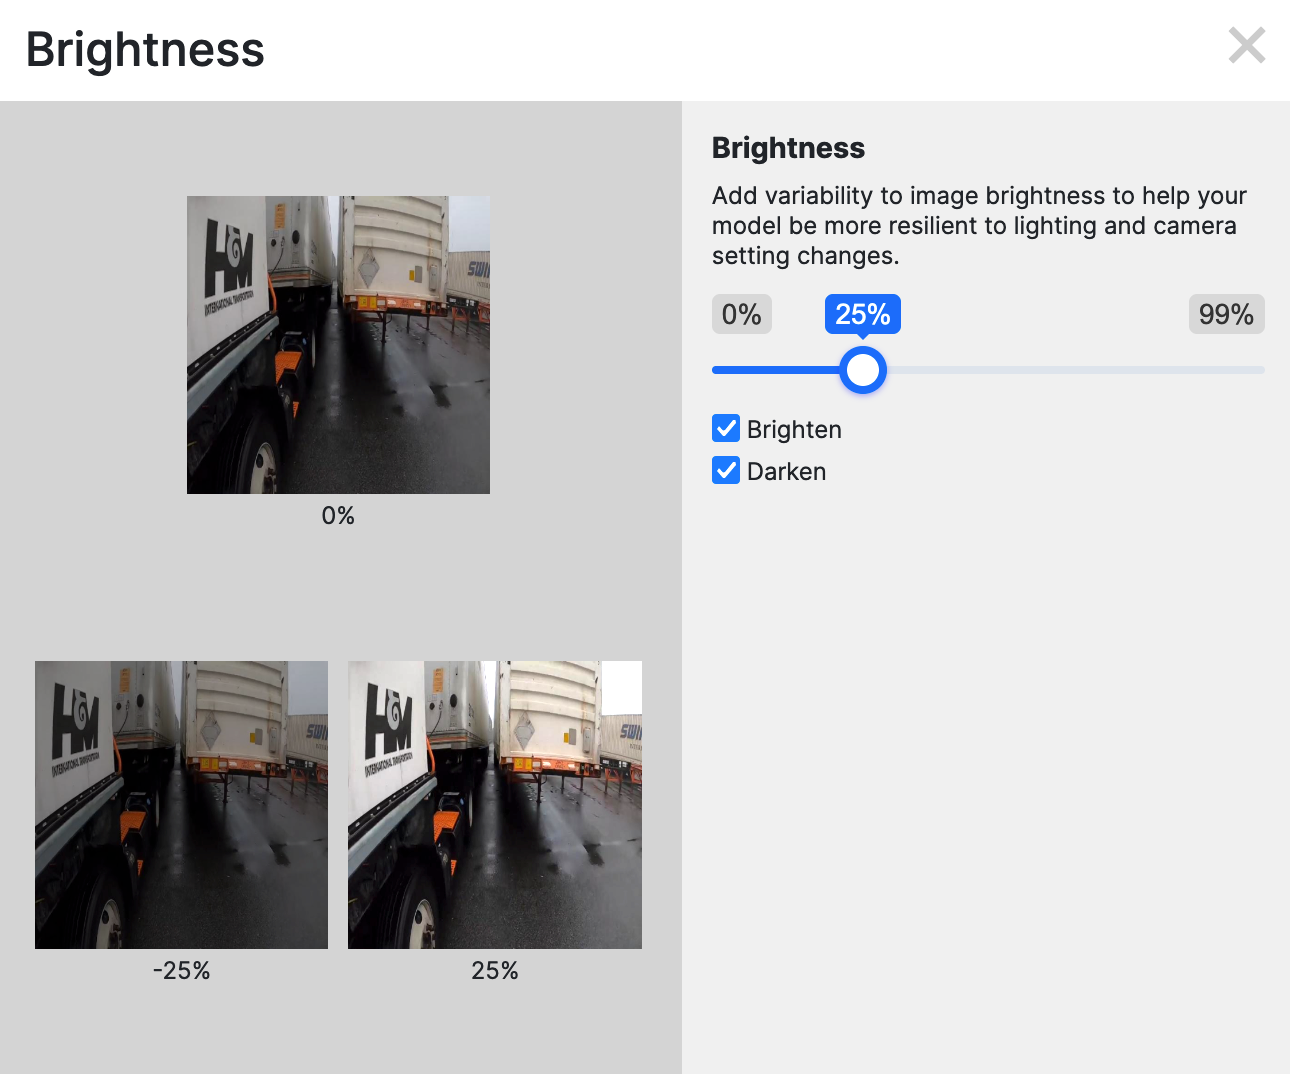
- Brightness
- Grayscale
- Noise
To learn more about what augmentations may be best for your specific project, refer to our image augmentation and preprocessing guide.
When you are ready to apply an augmentation, click an option in the window.
You will then be able to configure the augmentation. For example, if you choose a flip image-level augmentation, you will be able to choose the direction in which images can be flipped (horizontally, vertically, or both).
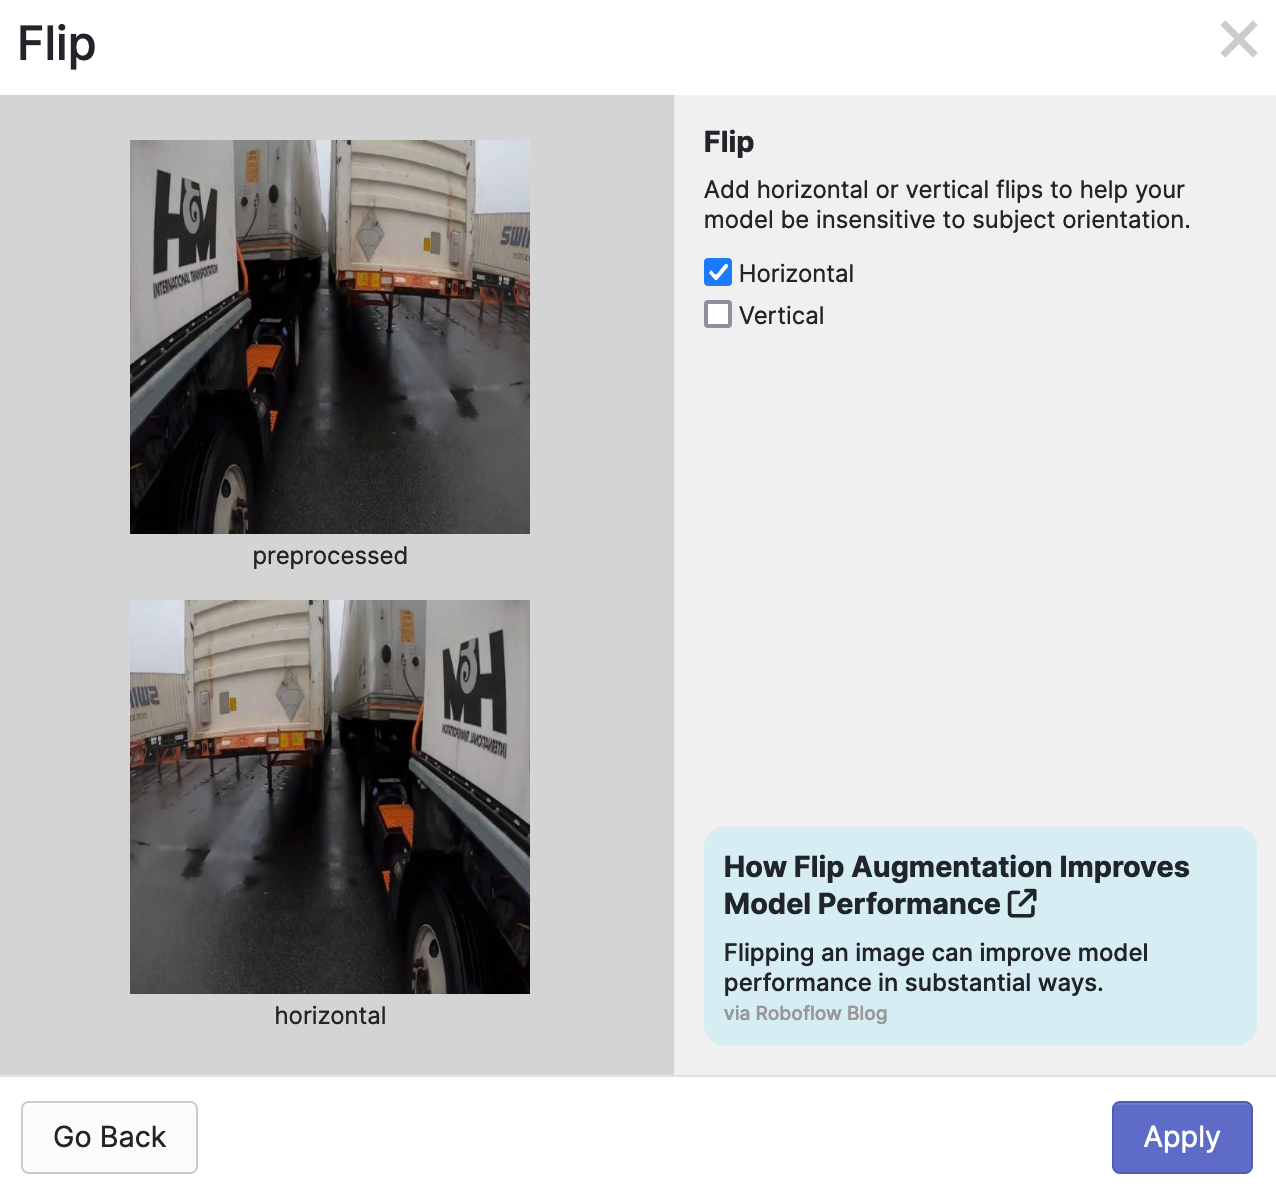
Once you have configured an augmentation, you can apply it by clicking “Apply” in the augmentation window.
You can apply as many augmentations as you want to your dataset version. With that said, applying more augmentations does not necessarily mean your model will perform better. We recommend applying augmentations sparingly, and in line with our guidance on when different augmentations may be best.
When you are ready to generate your dataset, click on the “Create” tab then click the “Create” button. Your dataset will then start generating. The time this process takes will depend on how many images are in your dataset and how many augmented images need to be generated.
Step #4: Train an Object Detection Model with Augmented Images
Once your dataset has been generated, it will be available for use in training a model within the Roboflow platform, or export from the Roboflow platform.
You can see options to train a model and export your dataset on your dataset version page:
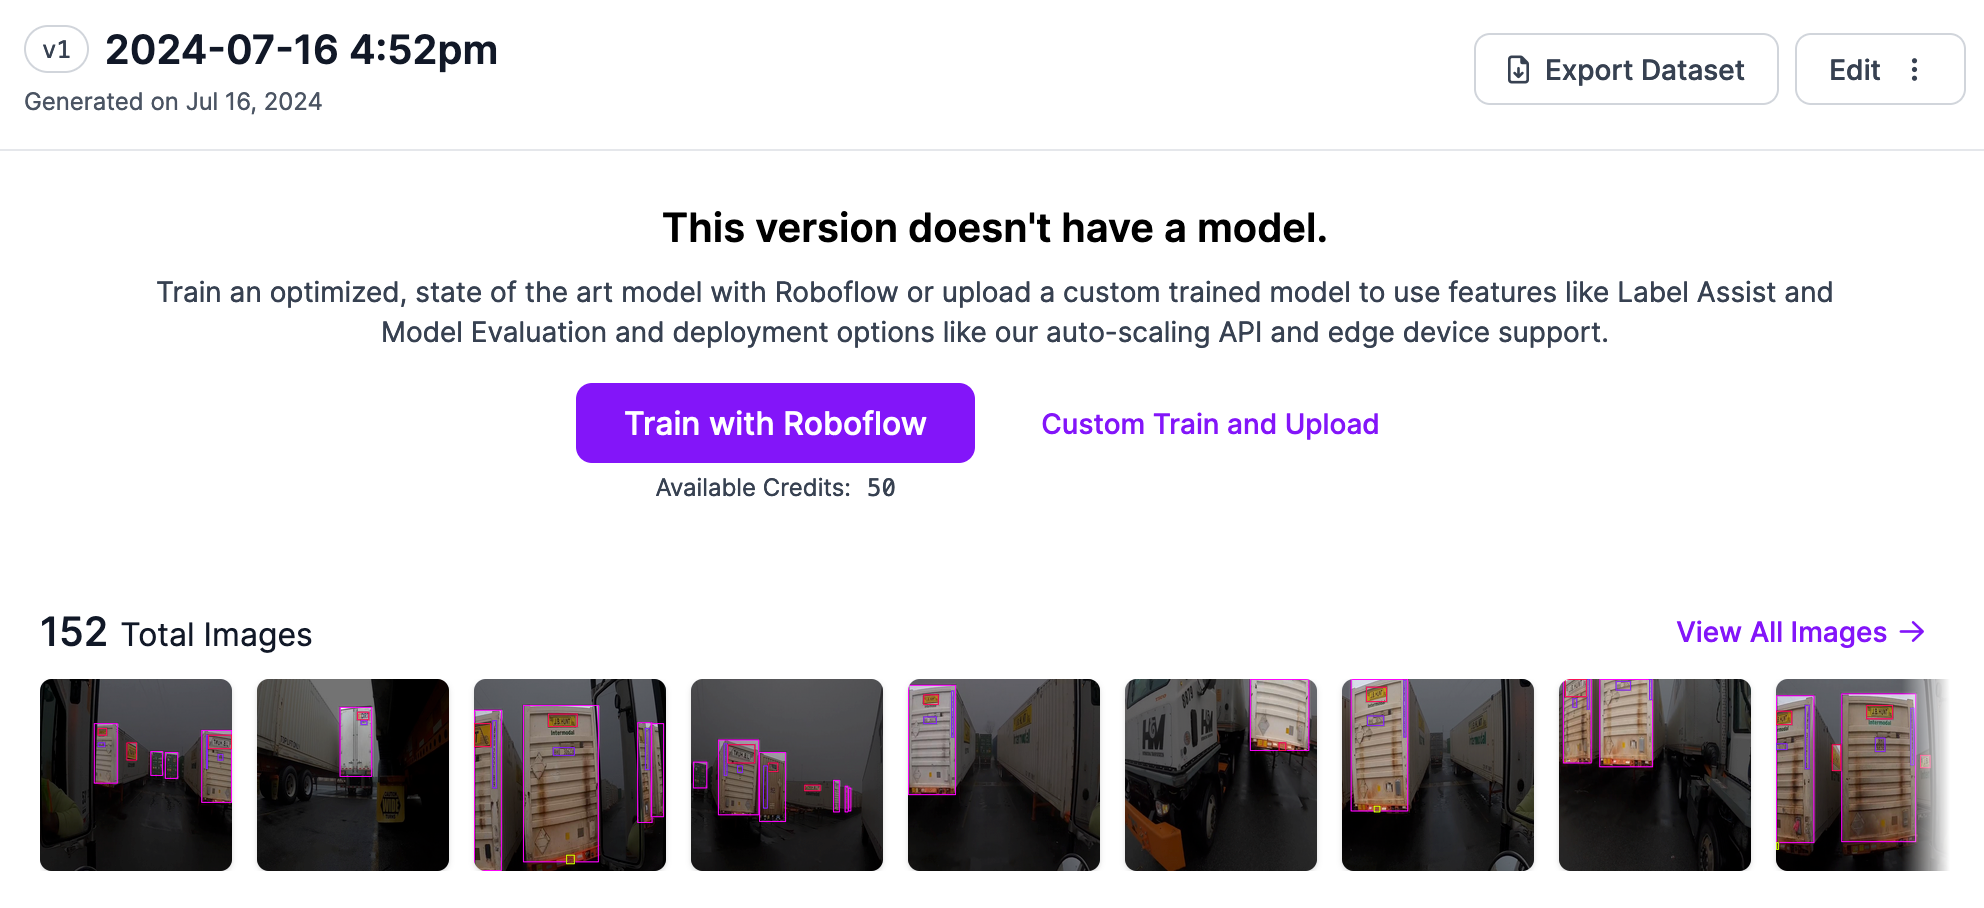
By training your model on Roboflow, you can create your model without writing any code. To train your model on Roboflow, click “Train with Roboflow”, then follow the model training configuration flow in the web application to configure your model. Your model will then start training.
If you train your model on Roboflow, you can deploy it in the cloud, or on your own device with the open source Roboflow Inference server. Refer to the Inference documentation to learn more about on-device deployment.
In addition, if you train a supported model (i.e. YOLOv8) on your own infrastructure, you can upload it to Roboflow and deploy it in the cloud or with Inference.
To export your dataset, click “Export Dataset”. You can export your dataset in many different formats, including YOLOv8 PyTorch TXT, Pascal VOC XML, and COCO JSON. See a full list of supported formats to which you can export your dataset.
Conclusion
You can use the Roboflow platform to generate augmented images for use in object detection datasets. You can apply augmentations at the image level, or at the bounding box level. The augmentations available in the Roboflow platform range from grayscale to rotate to blur.
In this guide, we walked through how to augment images for object detection. We created a Roboflow project, uploaded data, then configured a dataset version to which augmented images were added. We then discussed using your dataset in training a model on Roboflow, and how to export your dataset for use in training on your own infrastructure.
To learn more about deploying your model with Roboflow, refer to the Roboflow Inference documentation.
Cite this Post
Use the following entry to cite this post in your research:
James Gallagher. (Jul 16, 2024). How to Augment Images for Object Detection. Roboflow Blog: https://blog.roboflow.com/object-detection-augmentation/