

You can automate powder coat defect detection by training RF-DETR on a labeled coating dataset to find craters, orange peel, bubbles, and scratches (74.0% mAP@50 here), then having Gemini 2.5 Pro write a one-line inspection summary in a Roboflow Workflow. Every inspection is logged with Vision Events, and uncertain findings are flagged for human review rather than treated as a final quality decision.
Powder coat defect detection uses a trained vision model to find craters, orange peel, bubbles, and scratches on coated parts automatically, before they reach rework, recoating, or rejection. In this tutorial we build that system in Roboflow Workflows: RF-DETR locates and classifies the visible defects, and Gemini 2.5 Pro reviews the annotated image and writes a brief inspection summary.
Corrosion costs the global economy more than $2.5 trillion annually, according to the Association for Materials Protection and Performance, and powder coating is one of the main defenses: it cures into a uniform layer that keeps moisture and chemicals off the metal underneath. A crater, bubble, or scratch is a break in that layer, and an orange-peel region signals uneven application. Defects can appear during application, curing, handling, or storage, and each one is a spot where the protection can fail early.
Catching powder coating defects at inspection, rather than after parts ship, means less unnecessary processing, more consistent surface quality, and a clear record of which components need human review.
Powder-Coat Defect Detection with Roboflow
The system we will build can detect and report:
- Craters: small circular depressions or pits
- Orange peel: uneven, textured surface regions
- Bubbles: raised or blister-like areas
- Scratches: narrow marks where the coating appears damaged
- AI-generated summaries of defect type, location, and apparent severity
Uncertain findings are flagged for human review. The final output is an annotated image with bounding boxes, class labels, and a Gemini-generated summary.
Step 1: Prepare the Dataset
We use this dataset from Roboflow Universe. The project contains 2,775 images and 10 original object-detection classes. For this workflow, we keep four visually clear classes relevant to coating quality inspection:
- Crater
- Orange Peel
- Paint Bubble
- Scratch
Exclude the null class and the remaining defect categories so the training dataset stays focused on the four defects covered in this article.
These classes are suitable for the project because they represent visually distinct surface conditions that can be localized using bounding boxes and explained clearly in an inspection workflow.
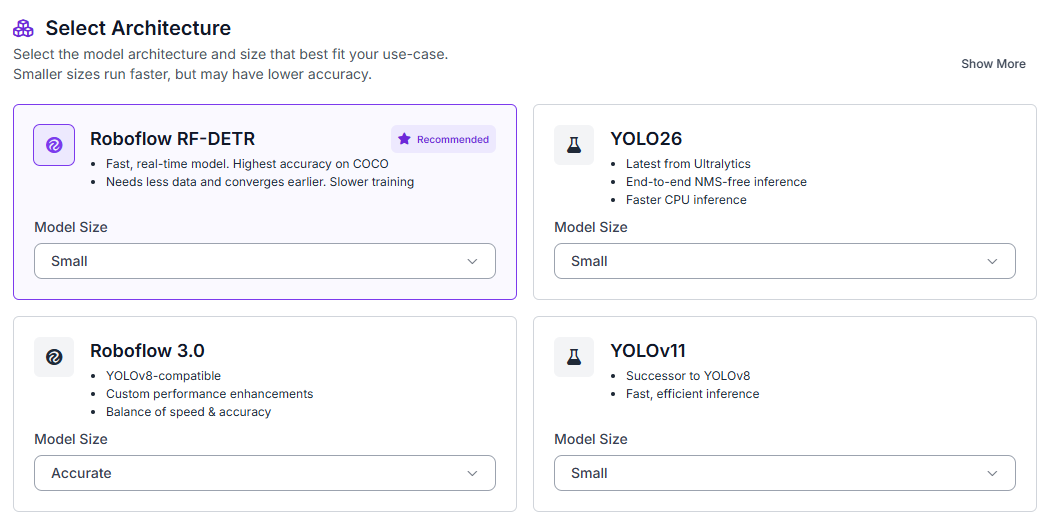
Fork the dataset into your Roboflow workspace. Review the annotations for the four selected classes, then open the Train tab. Select Custom Training, choose RF-DETR, and set the model size to Small.
Generate a new dataset version and configure a 70/15/15 split for training, validation, and testing.
Enable:
- Auto-orientation
- Resize to 384 × 384
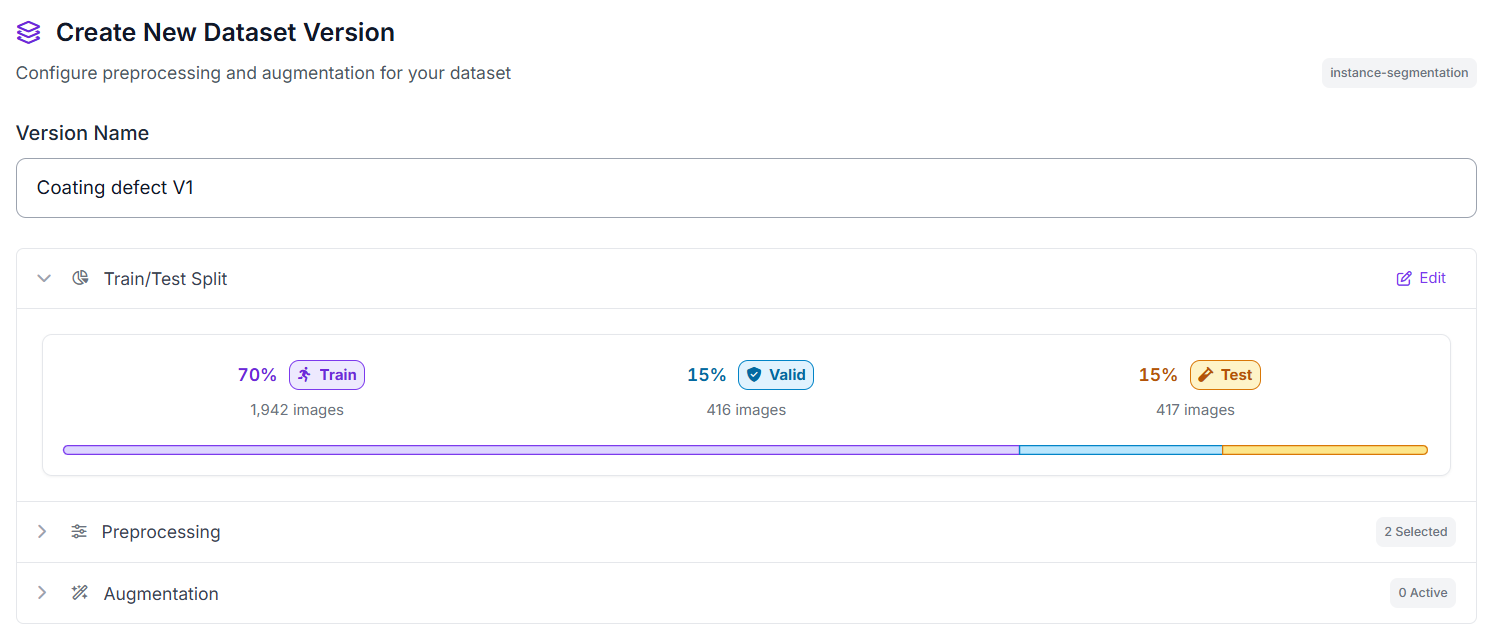
These preprocessing steps correct inconsistent image orientation and standardize the input resolution. Consistent inputs make training more stable while preserving enough surface detail for the model to learn the appearance of craters, orange peel, bubbles, and scratches.
Step 2: Train the RF-DETR Model
During training, RF-DETR learns to locate and classify each visible coating defect using the bounding-box annotations. For every detection, the model returns a class label, confidence score, and bounding box identifying the affected region.
These instance-level detections provide the visual evidence used during the inspection-summary stage. The detector identifies where a crater, orange-peel texture, bubble, or scratch appears, but it does not independently explain the broader quality implications.
The workflow draws bounding boxes and class labels on the complete image, then sends the annotated result to Gemini for contextual interpretation.
This separation keeps the system clear: RF-DETR identifies and localizes the visible defect, while Gemini summarizes what appears in the image, estimates its apparent severity, and highlights cases that may require human review.
Step 3: Evaluate Model Performance
The trained RF-DETR Small model achieved 74.0% mAP@50, 72.2% precision, 77.1% recall, and a 74.6% F1 score on the validation set.
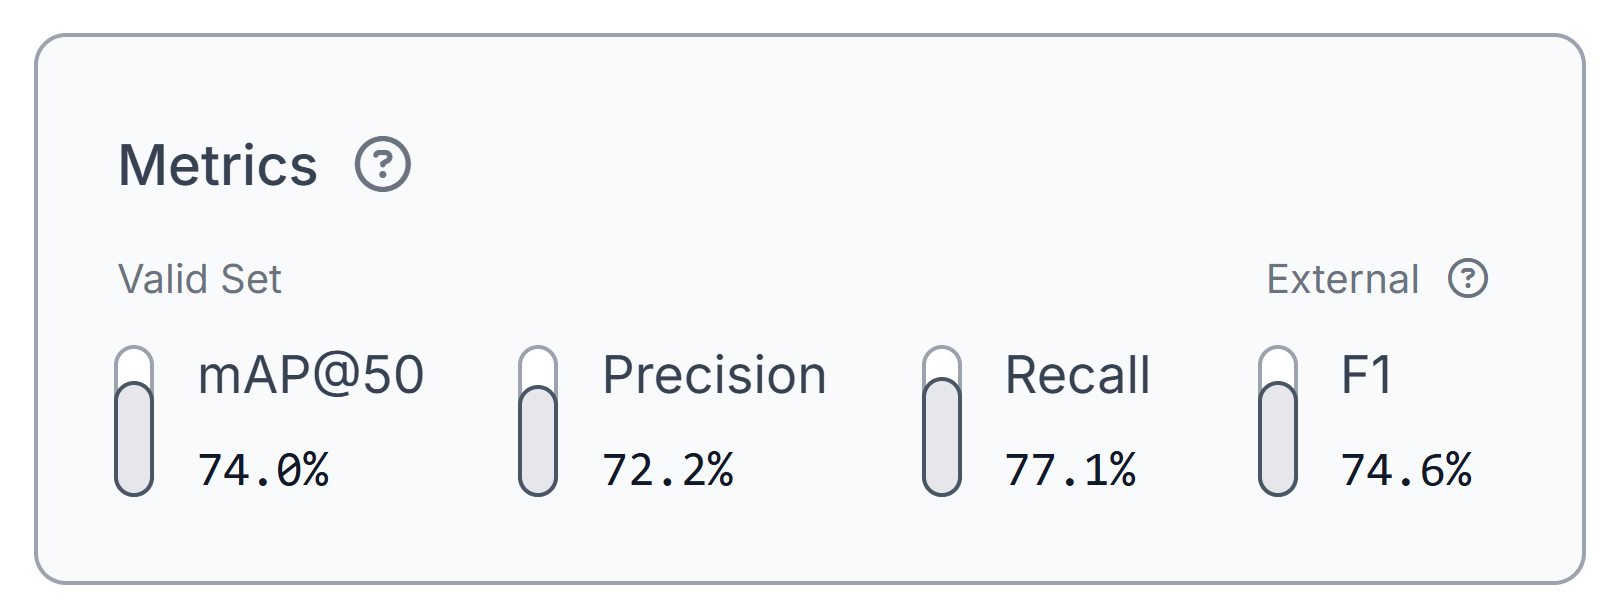
These results indicate that the model provides a useful foundation for detecting craters, orange peel, bubbles, and scratches. Recall is slightly higher than precision, so the model may detect most annotated defects while still producing some false positives.
Before deployment, test the model on images from the intended inspection environment. Lighting, reflections, camera angle, surface color, gloss, and defect size may differ from the training data.
These metrics evaluate only the RF-DETR detection stage. They do not measure the accuracy of Gemini’s summary or severity estimate.
Step 4: Deploy to Roboflow Workflows
After evaluating the model, deploy it in Roboflow Workflows to create the complete coating inspection pipeline. Here's the workflow we'll build.
The workflow accepts one inspection image, runs RF-DETR, draws bounding boxes and class labels, sends the annotated image to Gemini 2.5 Pro, overlays Gemini’s summary on the image, and records the result using Roboflow Vision Events.
Open the trained model and click Deploy Model. Select Customize With Logic to open the Workflow editor with the model already connected.

The completed workflow follows this structure:
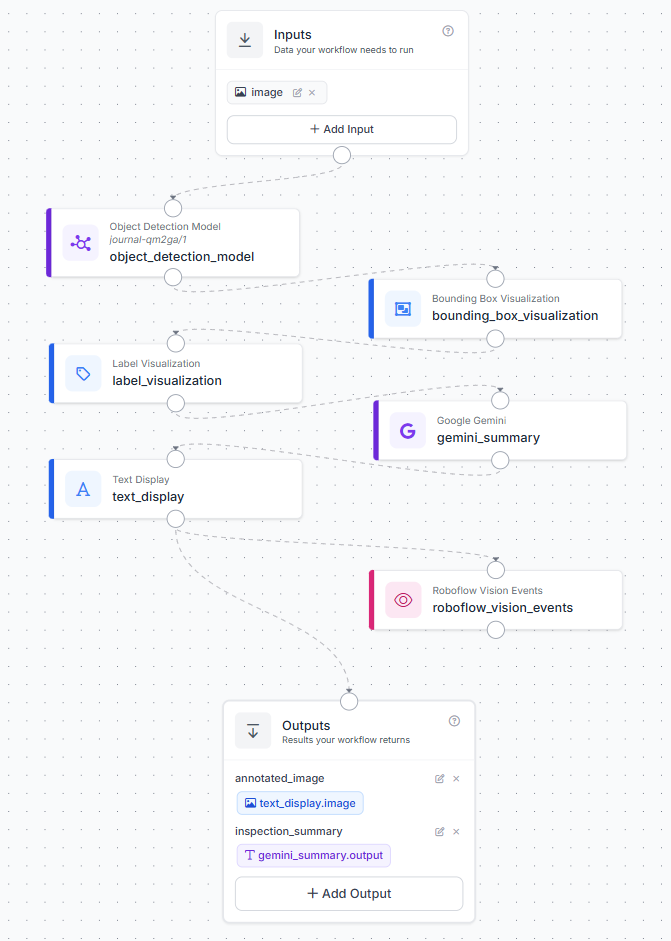
The image input is passed to RF-DETR, which returns predictions for Crater, Orange Peel, Paint Bubble, and Scratch. The visualization blocks draw the detections on the original image, and Gemini reviews the annotated result.
The Text Display block places Gemini’s summary on the image. The workflow returns the final visual result as annotated_image and the generated text separately as inspection_summary.
The Vision Events block stores the original image, annotated output, model predictions, and Gemini summary for later review. It does not alter the returned outputs.
Step 5: Configure the Detection Visualizations
Add a Bounding Box Visualization block after the RF-DETR model.
Connect:
- Image: inputs.image
- Predictions: object_detection_model.predictions
The block draws a box around each detected defect region.
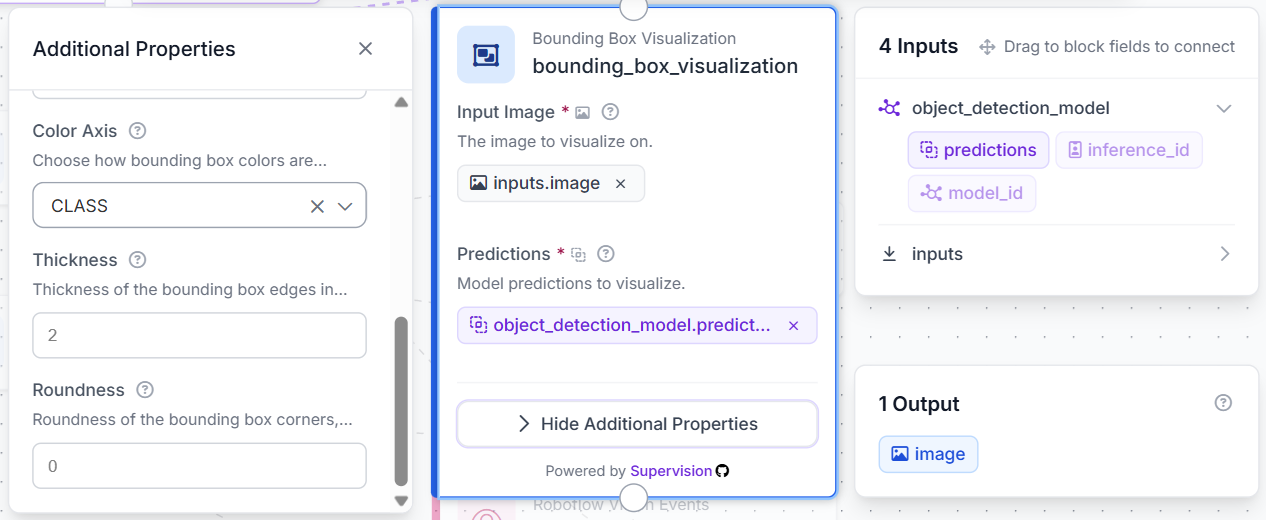
Next, add a Label Visualization block. Use the bounding-box image as its image input and connect the same model predictions.
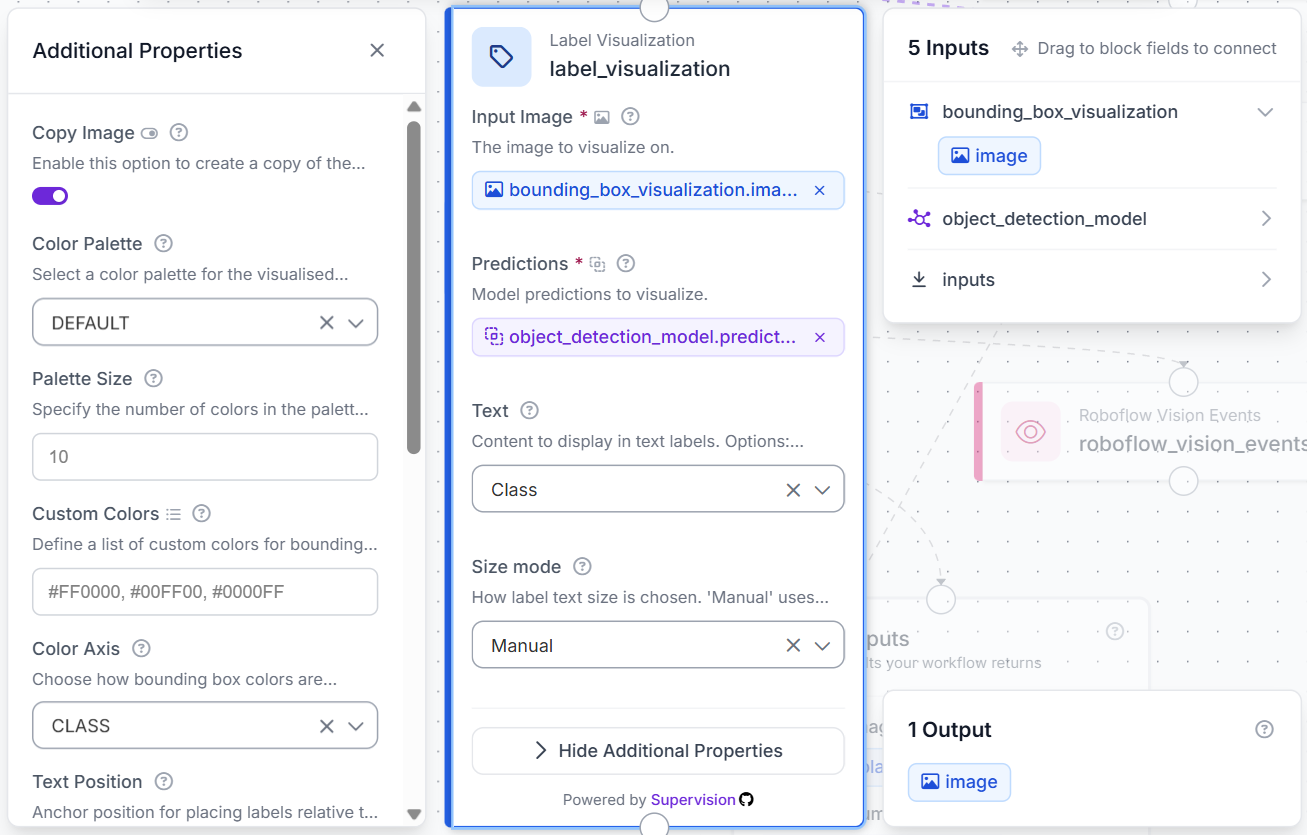
The label block displays the predicted defect class. The trained model uses the class name Paint Bubble, although the article refers to it more generally as Bubble.
These visualization blocks do not determine severity or explain the defect’s cause. Their purpose is to make the model predictions visible before Gemini analyzes the image.
For example, RF-DETR may identify a textured area as Orange Peel or place a box around a small crater. Gemini then uses those visible annotations to describe the defect’s location and apparent severity.
Keep the boxes and labels readable without covering important surface details. This is especially important for small craters and narrow scratches.
Step 6: Configure Gemini 2.5 Pro
Add a Google Gemini block after Label Visualization.
Use:
- Image: label_visualization.image
- Model: Gemini 2.5 Pro
- Task type: Open prompt
Use this prompt:
Review the RF-DETR annotations and write one plain-text sentence under 14 words.

State that a defect was detected, then mention its type, location, severity, and whether human review is recommended. Refer to Paint Bubble as Bubble.

Do not infer causes or invent defects.

If no defects are detected, write: No target defects detected; human review may still be required.
The prompt keeps the output short enough to display directly on the image. It also tells Gemini to rely on the visible RF-DETR annotations rather than inventing additional defects.
Gemini should describe only the detected defect type, approximate location, apparent severity, and whether human review is recommended. It should not identify the cause, infer the production process, or make a final pass-or-fail decision.
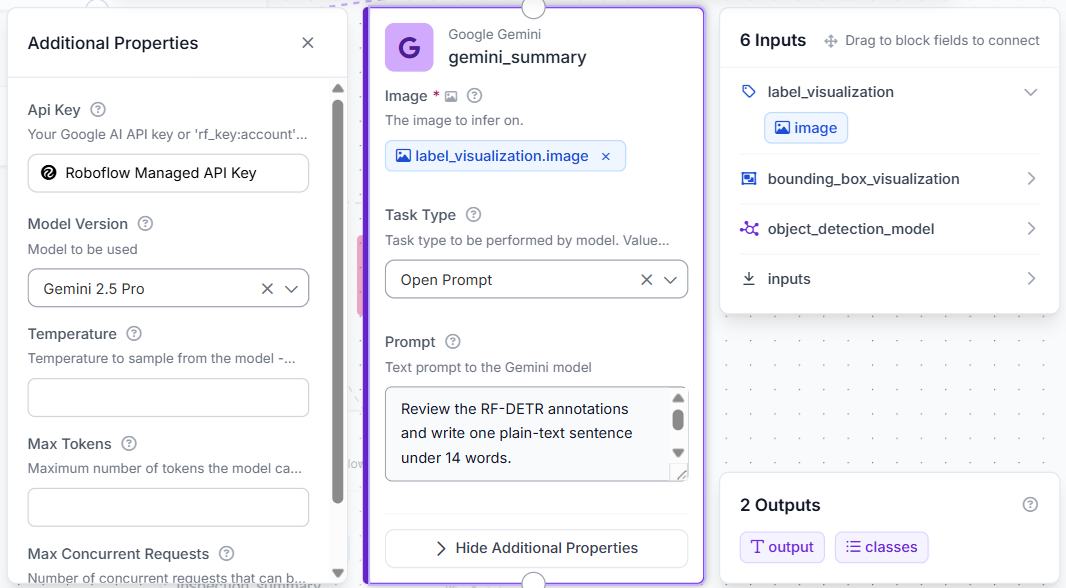
Add a Text Display block after Gemini. Use label_visualization.image as the base image and connect the Gemini output as the displayed text.
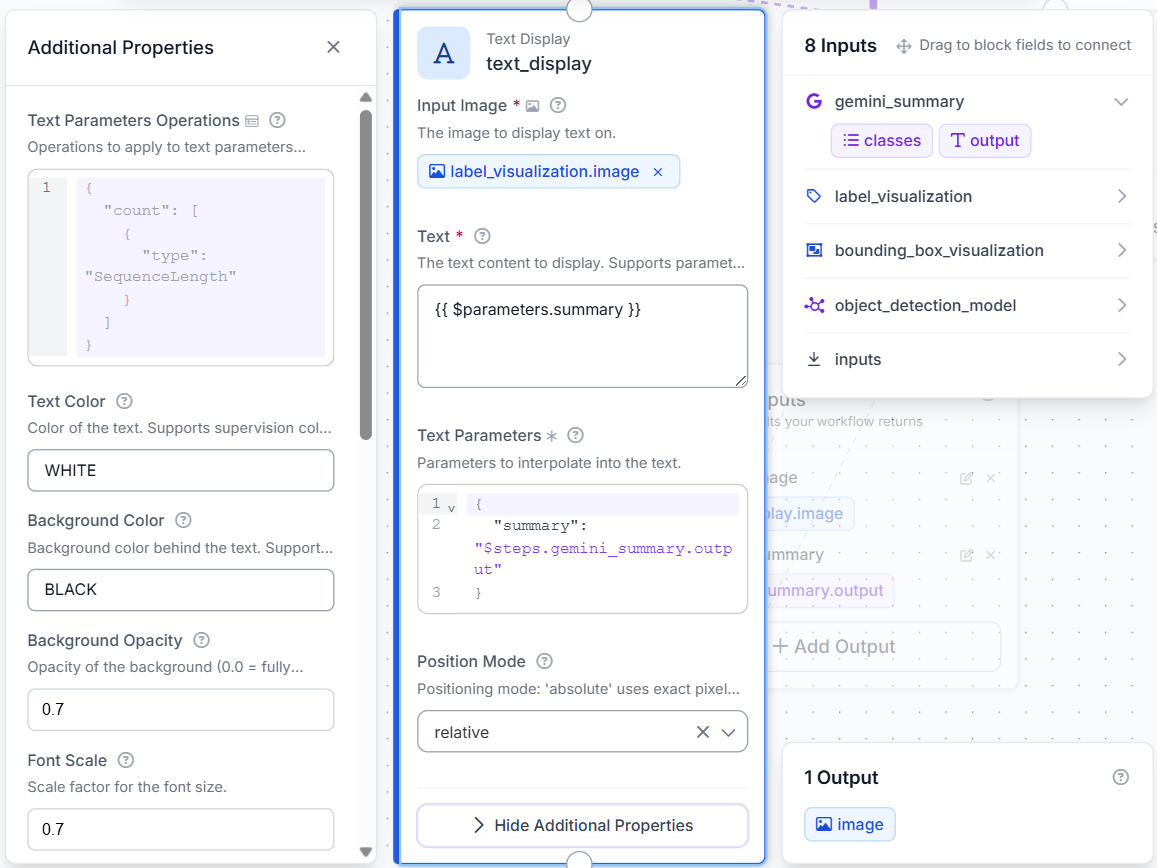
The final image should include:
- RF-DETR bounding boxes
- Defect class labels
- Gemini’s brief inspection summary
Return the Text Display output as annotated_image and the Gemini response as inspection_summary.
Step 7: Configure Roboflow Vision Events
Add a Roboflow Vision Events block after the Text Display block.
Connect the original input image, final annotated image, RF-DETR predictions, and Gemini summary. This creates an event record for each workflow run.
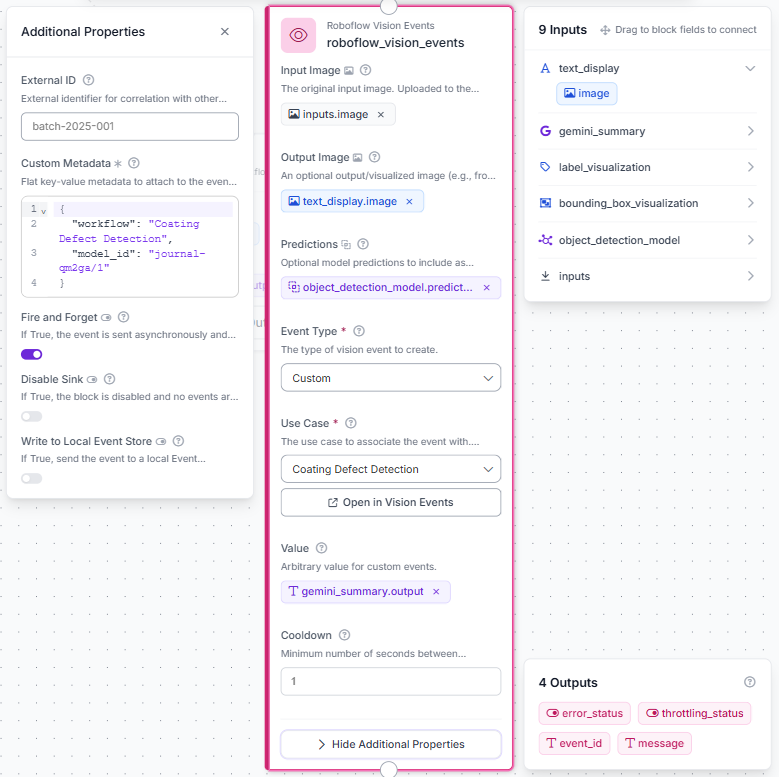
Vision Events can help teams review inspection results after processing. Each event can contain the original image, the final annotated result, the detected classes, and the generated summary.
This block is useful when inspections need to be reviewed later, compared across production periods, or stored for quality analysis. It does not feed into the workflow outputs. The workflow still returns the annotated image and summary directly.
Step 8: Test the Workflow
Click Run and upload an image containing one or more visible coating defects.
The output:
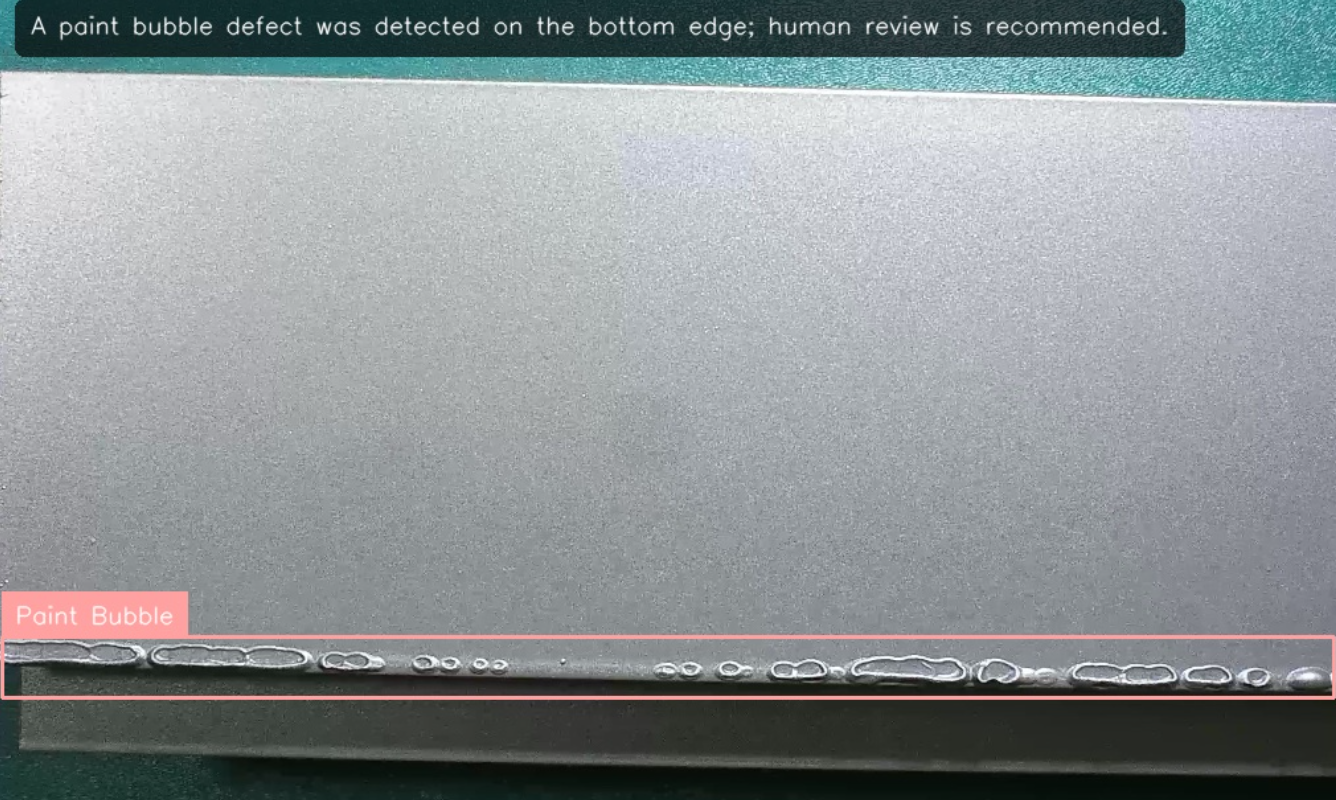
Test several types of examples:
- A small crater
- A broad orange-peel region
- A narrow scratch
- Multiple defects in one image
- A coated surface with no target defects
- Reflections or textures that may resemble defects
- A raised or blister-like bubble
No-defect examples are especially important. They help verify that Gemini does not report a defect when RF-DETR returns no detections. Also test difficult conditions such as uneven lighting, glossy reflections, curved surfaces, low contrast, distant defects, and unusual camera angles.
When the final summary is incorrect, first review the RF-DETR predictions. If the model misses a defect, Gemini does not receive that annotation as evidence. If the model produces a false detection, Gemini may describe it as a real defect.
This means the detection stage should be checked before adjusting the Gemini prompt.
Extending the Workflow
The workflow can be connected to fixed inspection cameras or other image sources to process coating images continuously.
Roboflow Vision Events can store each result for later review. Events may include the original image, annotated output, detected classes, timestamp, camera identifier, and Gemini summary.
Additional logic could route severe or uncertain findings to a separate review process. Teams could also compare defect frequency across products, inspection stations, cameras, or production periods.
The workflow could later be extended with:
- Defect counting
- Region-based inspection
- Class-specific confidence thresholds
- Notifications for selected defect types
- Automated routing for human review
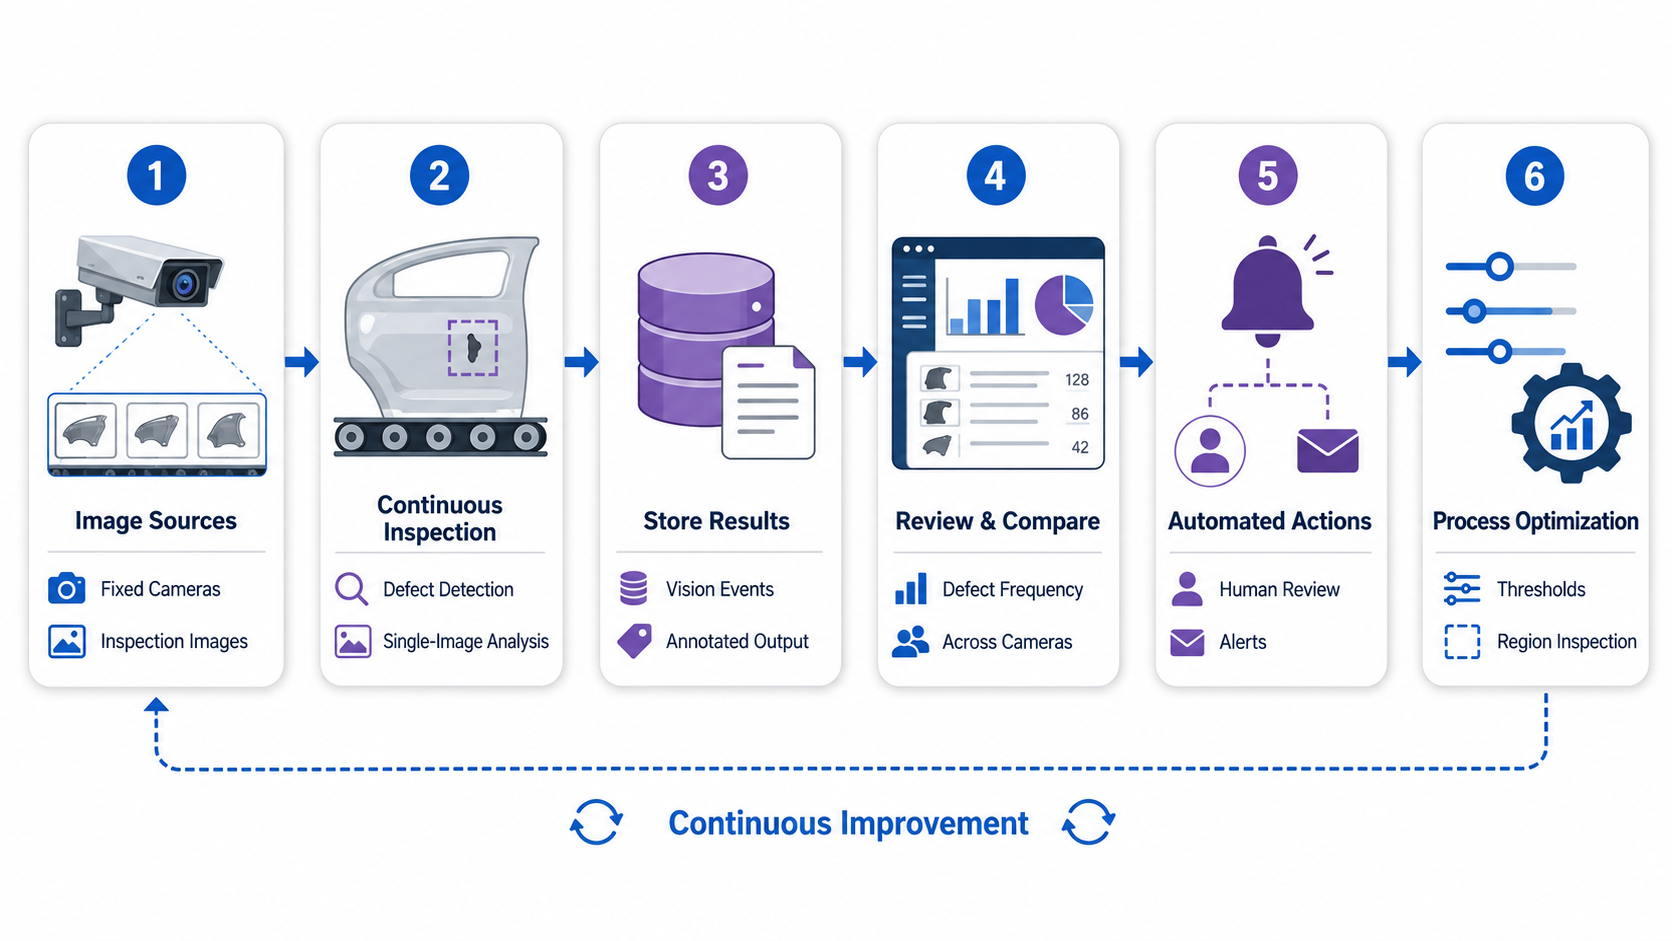
These additions should be introduced only when they support a clear inspection requirement.
Use Roboflow Agent for Powder Coat Defect Detection
You can also build this workflow by describing it instead of wiring it block by block. Roboflow Agent, opened from the Agent tab in your workspace sidebar, builds Workflows from a natural language prompt: ask for a workflow that runs your trained RF-DETR coating model, draws boxes and labels on the defects, sends the annotated image to Gemini 2.5 Pro with the inspection prompt from Step 6, and logs each result to Vision Events.
The agent also debugs. If a visualization block is wired to the wrong input, the Gemini summary comes back empty, or the Vision Events block is missing a connection, it can inspect the workflow and fix the configuration. The video below shows the agent building this coating inspection workflow.
Conclusion
This workflow combines RF-DETR object detection with Gemini-based visual interpretation. RF-DETR identifies and localizes craters, orange peel, bubbles, and scratches, while Gemini generates a brief summary of the detected defect, its approximate location, and its apparent severity.
The final result is an annotated inspection image containing defect detections and a concise summary. Roboflow Vision Events stores the inspection record for later review.
Because the workflow analyzes a single image and estimates severity from visible appearance alone, its output should be treated as an inspection aid rather than a final quality decision.
Further reading:


Cite this Post
Use the following entry to cite this post in your research:
Mostafa Ibrahim. (Jul 31, 2026). Powder-Coat Defect Detection. Roboflow Blog: https://blog.roboflow.com/powder-coat-defect-detection/