

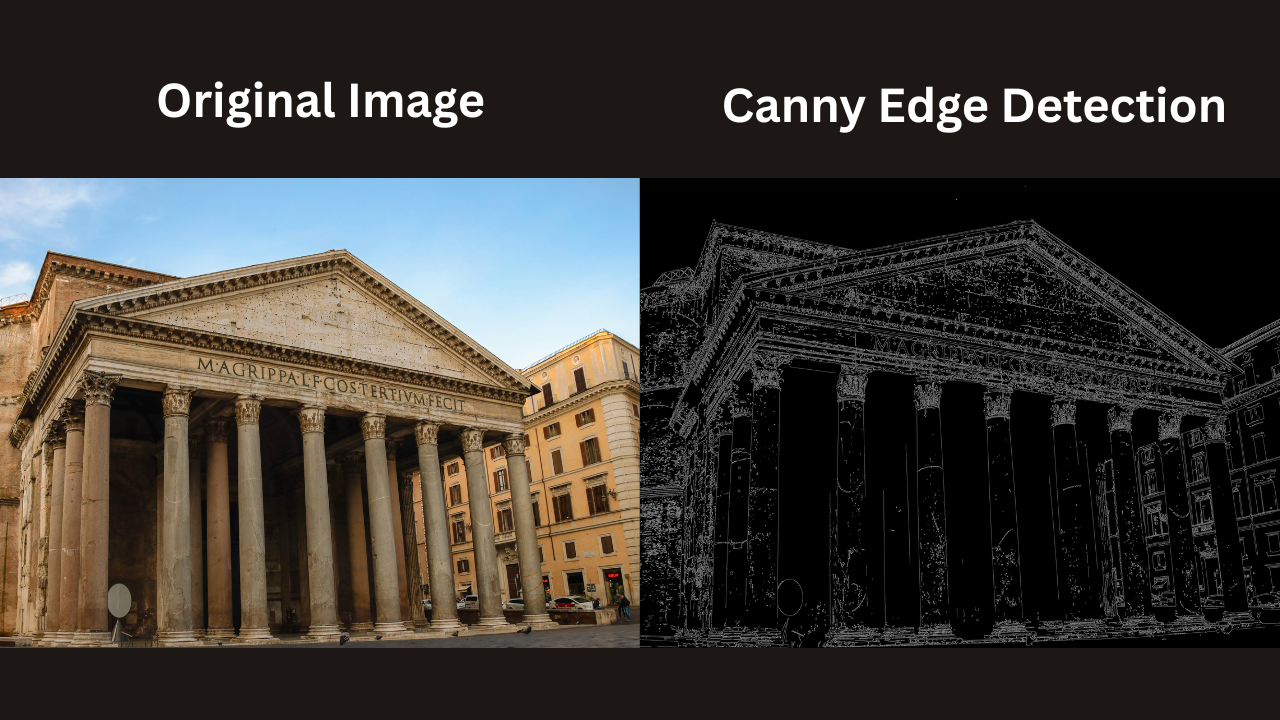
Canny Edge Detection is a computer vision technique used to identify the boundaries of objects and regions in an image or video frame. It detects areas with sudden changes in pixel intensity, which often indicate the presence of an edge.
Edges play an important role in computer vision. They help us identify the boundaries of objects, shapes, and regions within an image. By detecting these boundaries, we can simplify an image and extract useful information before applying more advanced computer vision techniques.
There are several techniques for detecting edges, and one of the most widely used is Canny Edge Detection. Developed by John Canny, it is a multi-stage edge detection algorithm designed to detect meaningful edges while reducing noise and minimizing false detections.
In this guide, you’ll learn what Canny Edge Detection is, how it works, why it is useful, and how to implement it using Roboflow Workflows.
What Is Canny Edge Detection?
Canny Edge Detection is a popular computer vision technique used to detect the boundaries of objects and regions in an image or video frame. It is widely used because it can detect edges while reducing noise and producing relatively thin, well-defined edges.
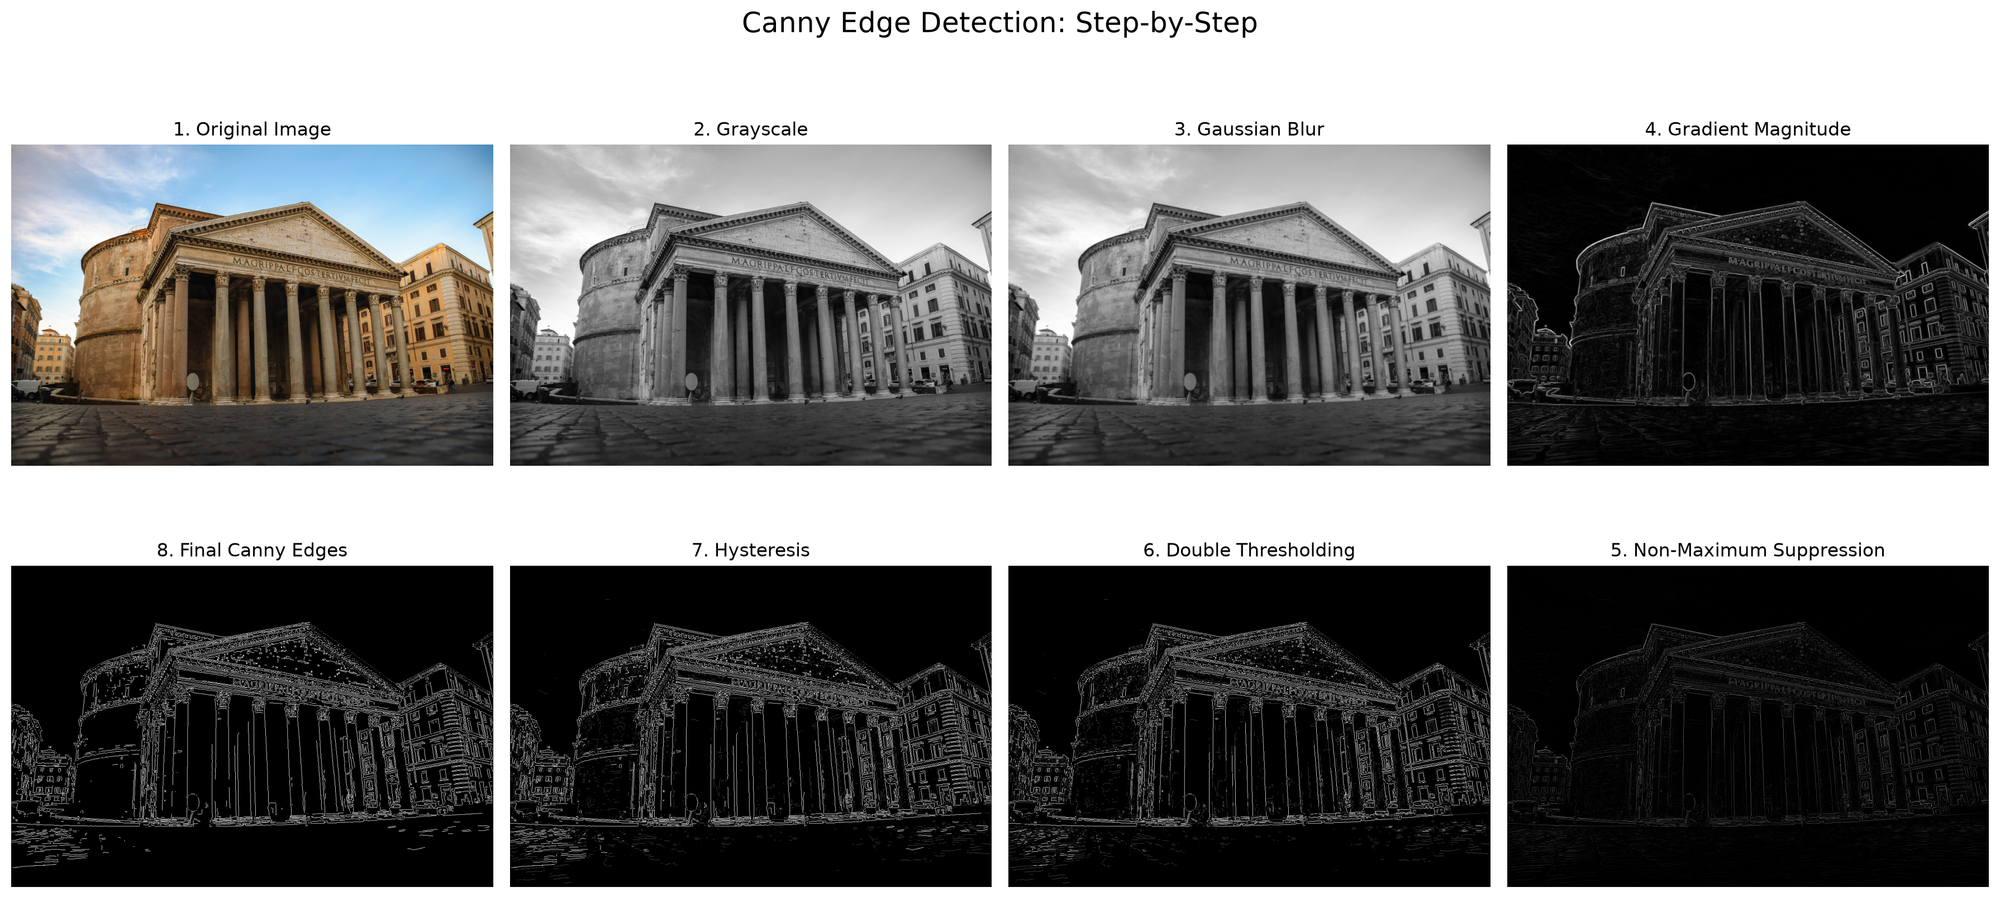
It works by identifying areas where there are sudden changes in brightness or color, which often indicate an edge. The algorithm typically involves several steps:
- Reduce noise using a Gaussian blur.
- Calculate image gradients to find areas of rapid intensity change.
- Thin the detected edges using non-maximum suppression.
- Apply thresholding to distinguish strong edges from weak ones.
- Connect relevant edges using hysteresis.
The visualization below demonstrates how an image passes through each step of the Canny Edge Detection algorithm.
How Does Canny Edge Detection Work?
Canny algorithm uses a sequence of steps. Each step prepares the image for the next stage, allowing the algorithm to produce thin, well-defined edges while reducing the effects of noise and other unwanted variations.
The Canny Edge Detection process consists of five main stages: Noise Reduction, Gradient Calculation, Non-Maximum Suppression, Double Thresholding, and Edge Tracking by Hysteresis.
1. Noise Reduction
Images often contain noise caused by camera sensors, compression, lighting conditions, and other factors. This noise can create small, sudden changes in pixel intensity that may be incorrectly detected as edges.
To reduce the effect of noise, Canny Edge Detection first converts the input image to grayscale and then applies Gaussian Blur. Converting the image to grayscale reduces it to a single intensity channel, making it easier to analyze changes in pixel intensity. Gaussian Blur then smooths the image by reducing small variations and noise that could otherwise be detected as false edges.
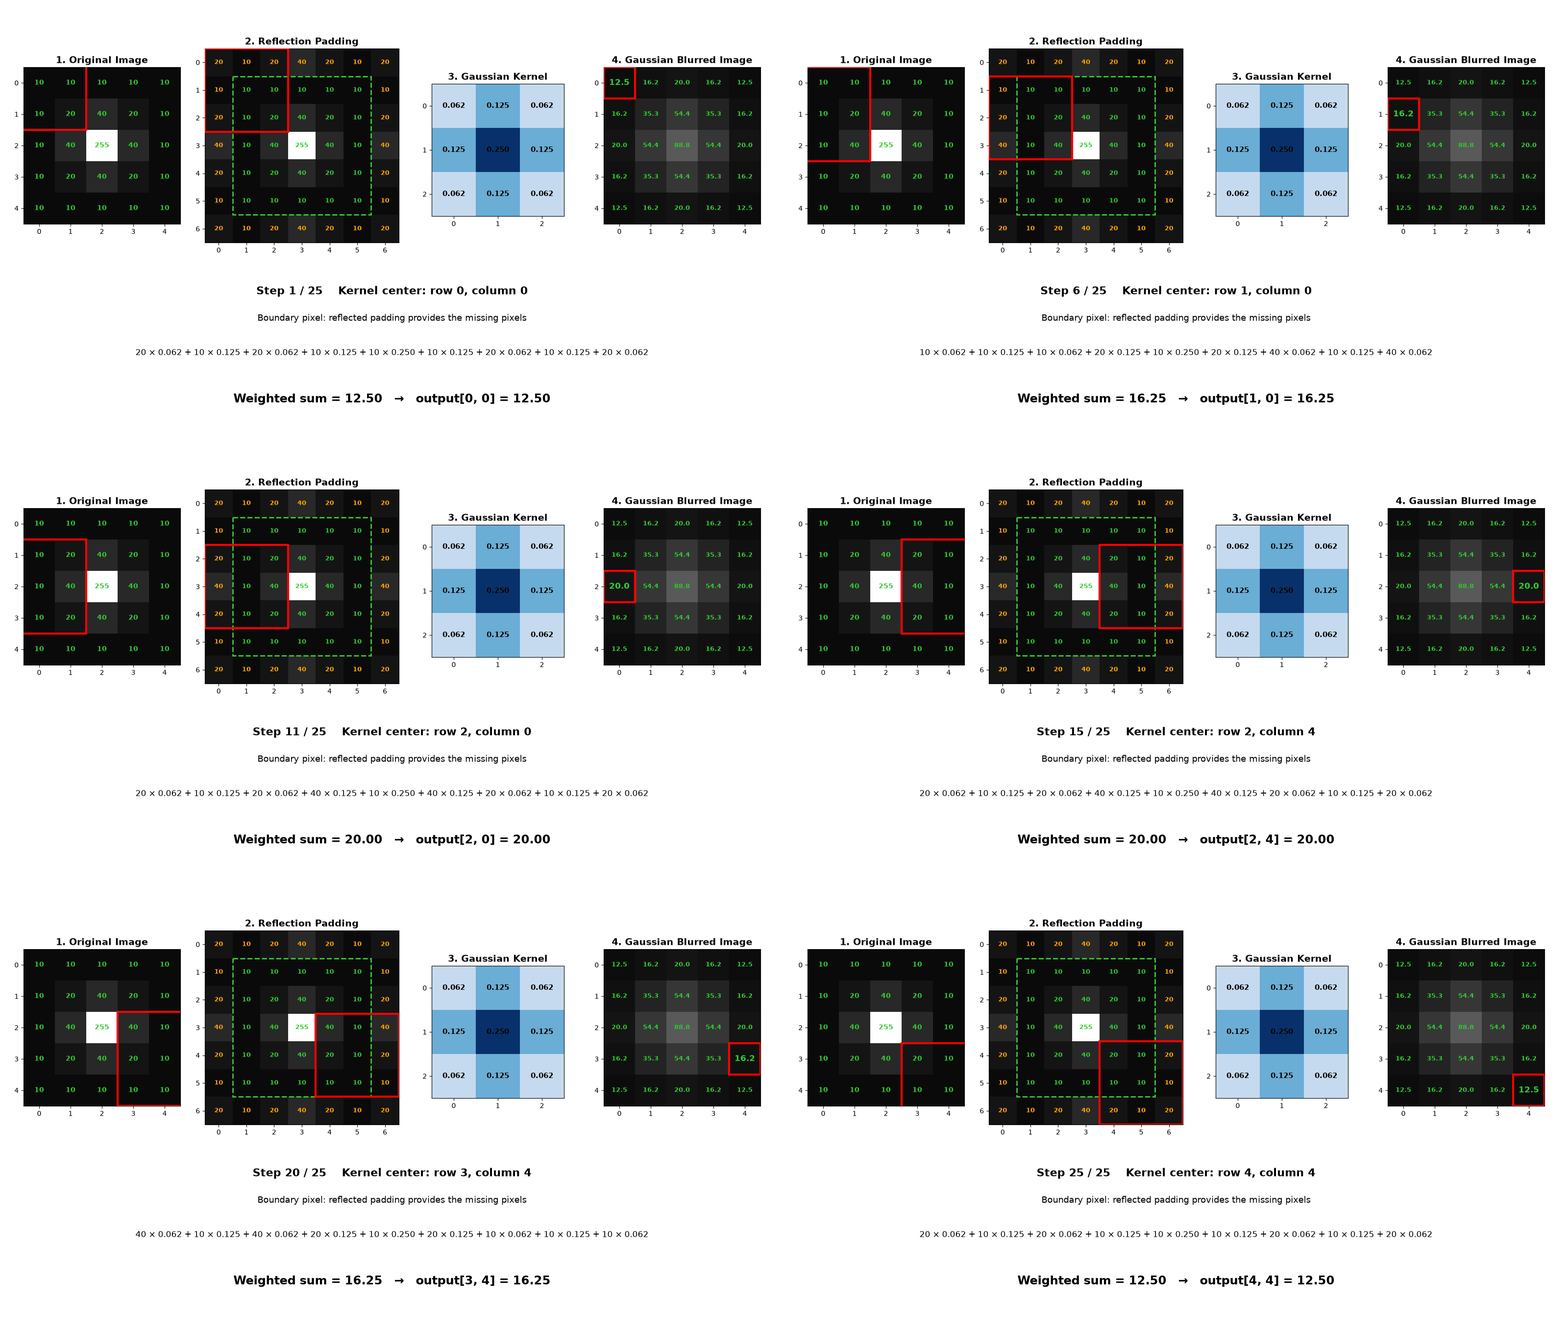
Gaussian Blur works by applying a Gaussian kernel to the image. The kernel is placed over a small region of pixels, and each pixel is multiplied by its corresponding value in the kernel. These weighted values are then added together to calculate the new value of the center pixel. This process is repeated across the image to produce a smoother image.
For example, Canny Edge Detection can use the following Gaussian kernel:

The kernel is then moved across the image, repeating the same calculation for each pixel. This produces a smoother image with less noise. For pixels at the boundary, reflection padding is applied to the image so that the kernel has enough neighboring pixels to perform the calculation.
The visualization below shows how the Gaussian kernel moves across the image and calculates the new pixel values at each position.
The kernel size can also be changed depending on the amount of smoothing required. For example, Gaussian Blur can use larger kernels such as 5×5 or 7×7. Larger kernels generally apply more smoothing, which can help reduce more noise but may also remove some fine image details.
2. Gradient Calculation
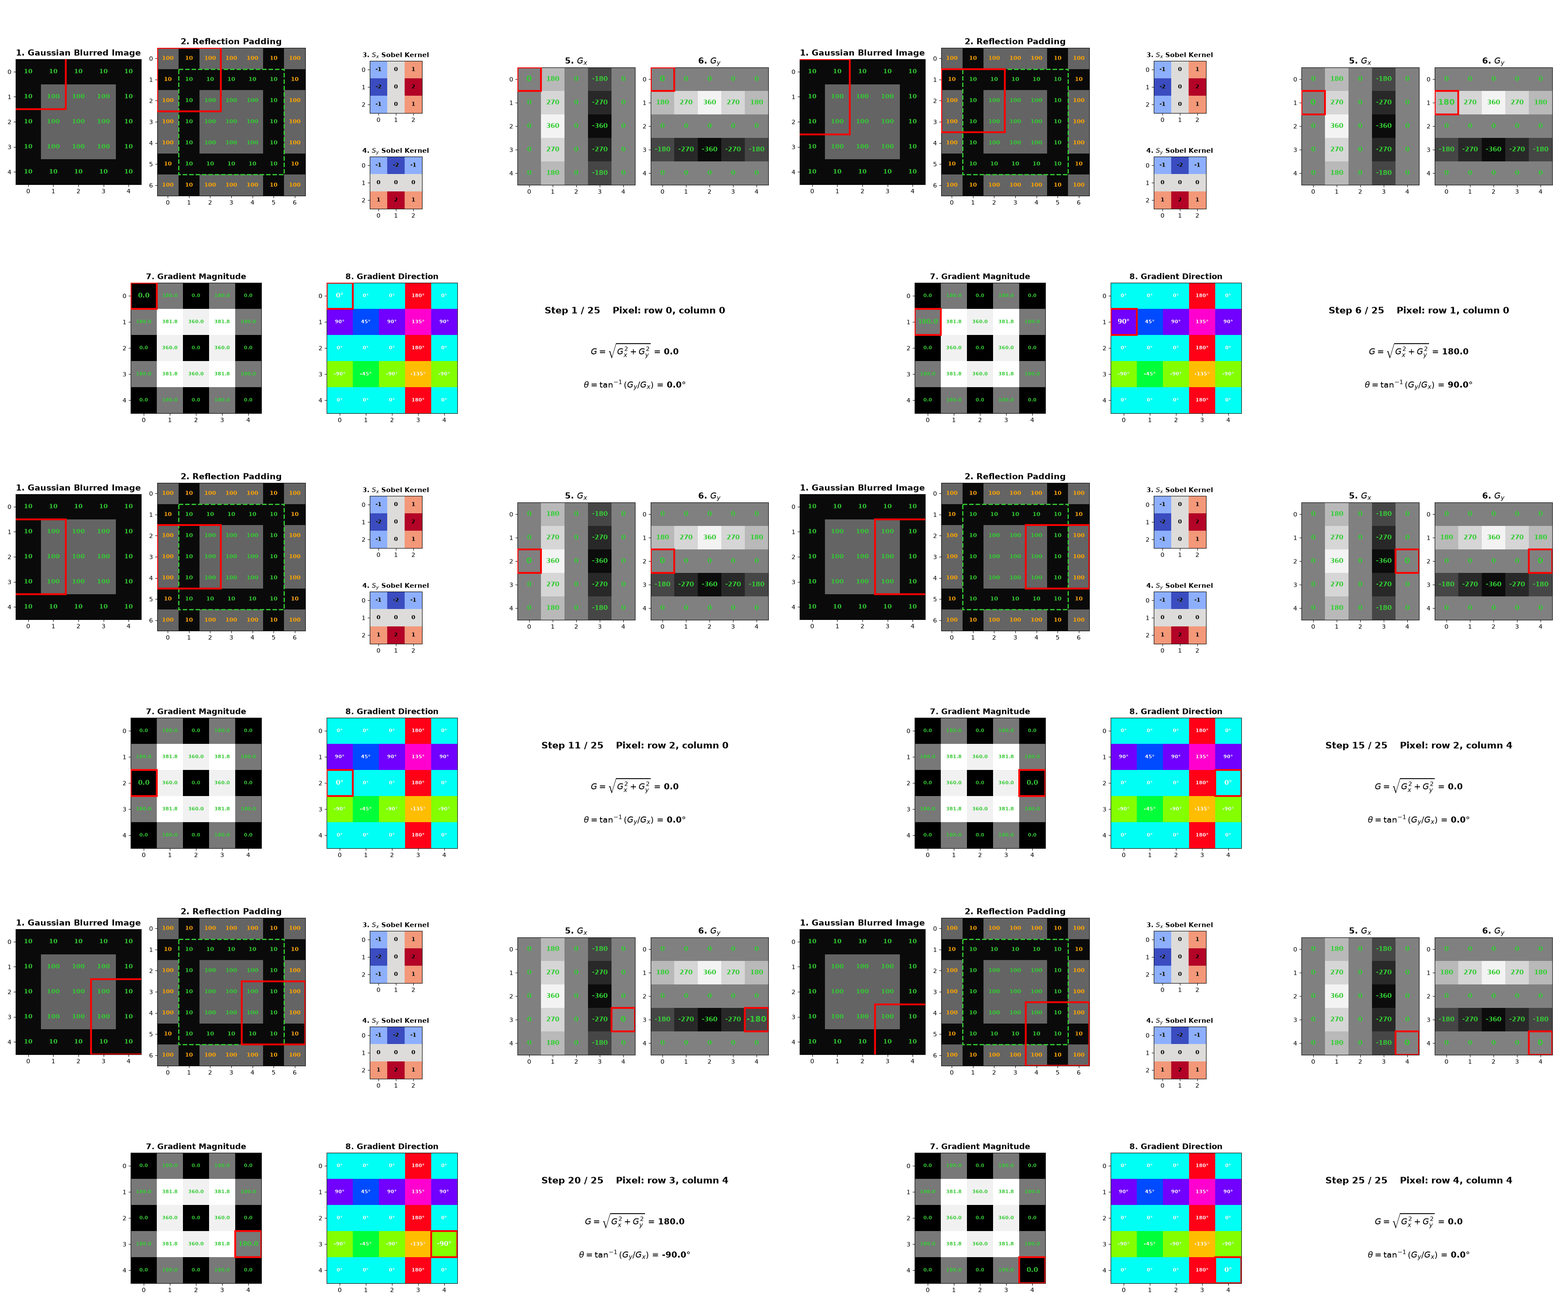
After reducing noise, Canny Edge Detection calculates how quickly the image intensity changes at each pixel. These changes are called gradients. A large change in intensity usually indicates that an edge may be present. The horizontal gradient is represented as: Gx and the vertical gradient as: Gy.
Canny Edge Detection typically uses the standard Sobel operators to calculate intensity changes in the horizontal and vertical directions.
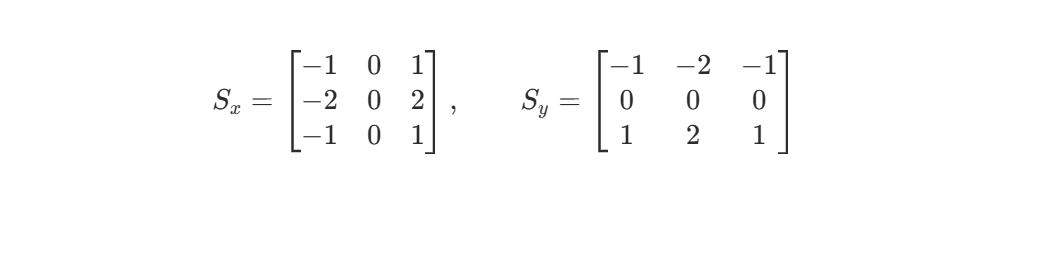
Similar to the Gaussian kernel, these kernels are moved across the image. At each position, the pixel values are multiplied by the corresponding kernel values and added together. This produces a value for Gx and Gy at each pixel.
The gradient magnitude combines these two values to determine how strong the intensity change is:

A larger gradient magnitude means there is a stronger change in intensity, which often indicates a stronger edge. A small gradient magnitude indicates that the neighboring pixels have similar intensities and are less likely to contain an edge.
The algorithm also calculates the gradient direction, which describes the direction in which the intensity changes most rapidly:

The gradient direction is important because it tells Canny the orientation of the intensity change around each pixel. This information is used in the next step, Non-Maximum Suppression, where Canny determines which pixels should remain as part of the edge.
The visualization below shows how the Sobel operators calculate the horizontal and vertical gradients, and how these values are combined to determine the gradient magnitude and direction.
3. Non-Maximum Suppression
After calculating the gradient magnitude and direction, Canny Edge Detection has information about the strength of the intensity change at each pixel and the direction of that change. However, multiple neighboring pixels may have strong gradient magnitudes around the same boundary, causing a single edge to appear as a thick band rather than a thin line. To thin these edges, Canny applies Non-Maximum Suppression.
Non-Maximum Suppression (NMS) is used to thin these edges by keeping only pixels that have the strongest gradient magnitude along the gradient direction. For each pixel, Canny uses its gradient direction to identify two neighboring pixels for comparison.
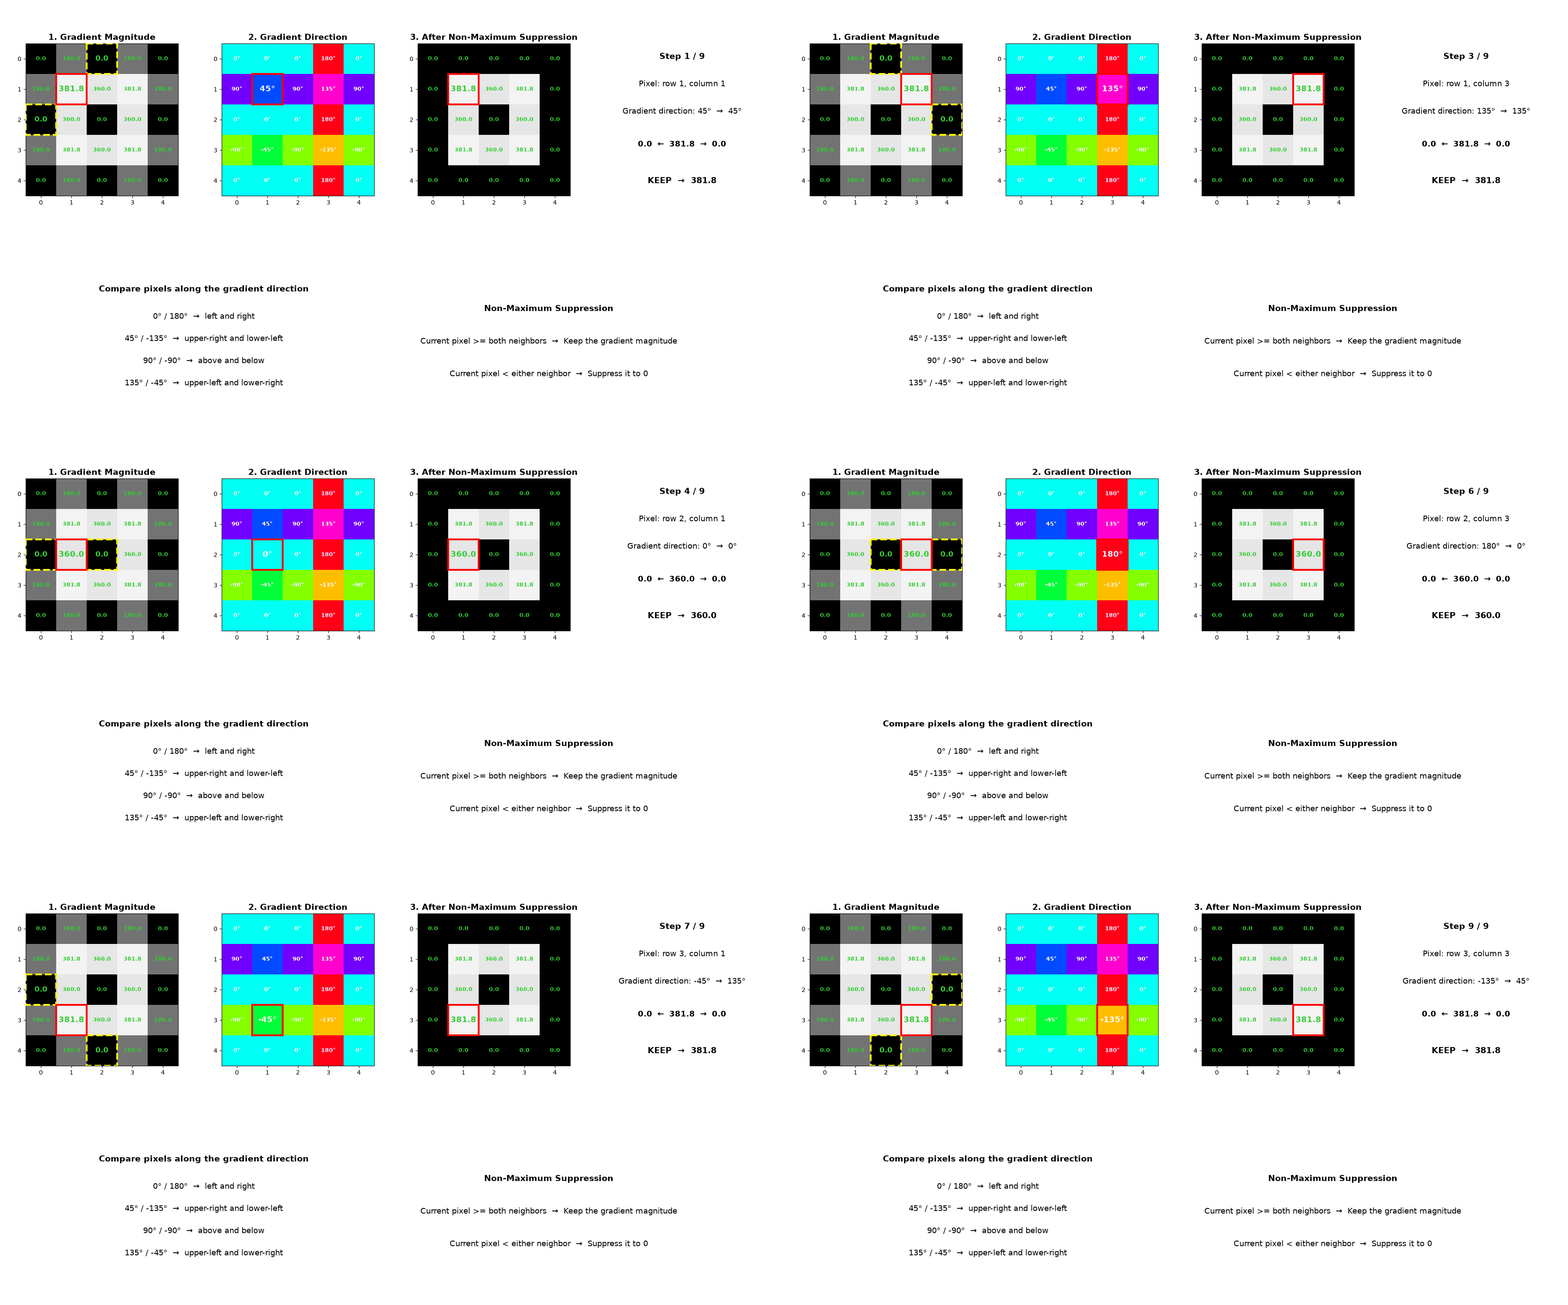
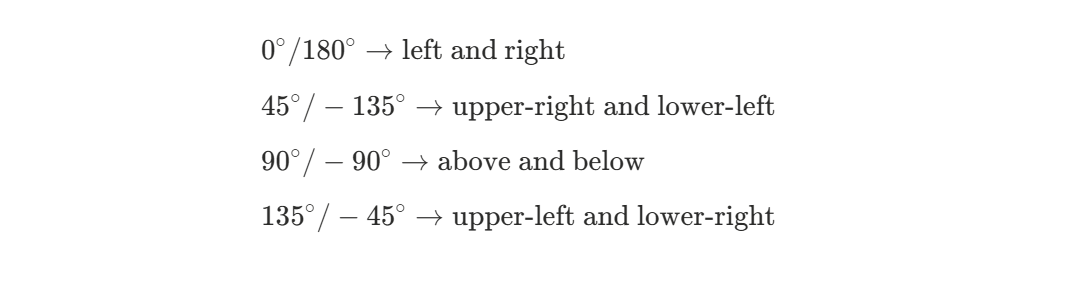
The comparison is made along the gradient direction rather than simply comparing the pixels directly above, below, left, or right. The gradient direction is grouped into four main directions:
For each pixel, NMS compares its gradient magnitude with the gradient magnitudes of the two neighboring pixels along the corresponding gradient direction.
If the current pixel has a gradient magnitude greater than or equal to both neighboring pixels, it is a local maximum and its gradient magnitude is retained:

If the current pixel has a smaller gradient magnitude than either neighboring pixel, it is not a local maximum and its gradient magnitude is suppressed by setting it to zero:

This comparison is performed for each pixel in the image. By removing pixels that are not local maxima along the gradient direction, NMS suppresses weaker parts of the detected edges and reduces them to approximately one pixel in width.
The actual gradient direction can be any angle, such as 45.2° or 136°. For NMS, these angles are grouped into the nearest of the four directions mentioned above, typically using 22.5° ranges around each direction. This determines which two neighboring pixels should be compared.
For pixels near the image boundaries, one or both neighboring pixels required for the comparison may fall outside the image. These boundary pixels are typically suppressed by setting their gradient magnitude to zero, since a complete comparison cannot be performed.
4. Double Thresholding
After Non-Maximum Suppression, the remaining pixels represent thin edges, but not all of them necessarily correspond to meaningful object boundaries. Some may result from noise, texture, or small variations in illumination.
To determine which pixels are most likely to represent real edges, Canny Edge Detection uses Double Thresholding, with a low and high threshold, to classify pixels based on the strength of their gradients.
The threshold values can be manually selected based on the image and the desired result, automatically estimated from the image's gradient magnitude distribution, or adjusted experimentally to achieve a suitable balance between detecting meaningful edges and suppressing unwanted edges.
The gradient magnitude of each pixel is then compared with these two thresholds and classified into one of three categories:
- Above the high threshold: Strong edge
- Between the low and high thresholds: Weak edge
- Below the low threshold: Non-edge
Strong edges have a large intensity change and are more likely to correspond to actual object boundaries. Weak edges may also be part of a real edge, but their gradient strength is not high enough to be considered a definite edge on their own.
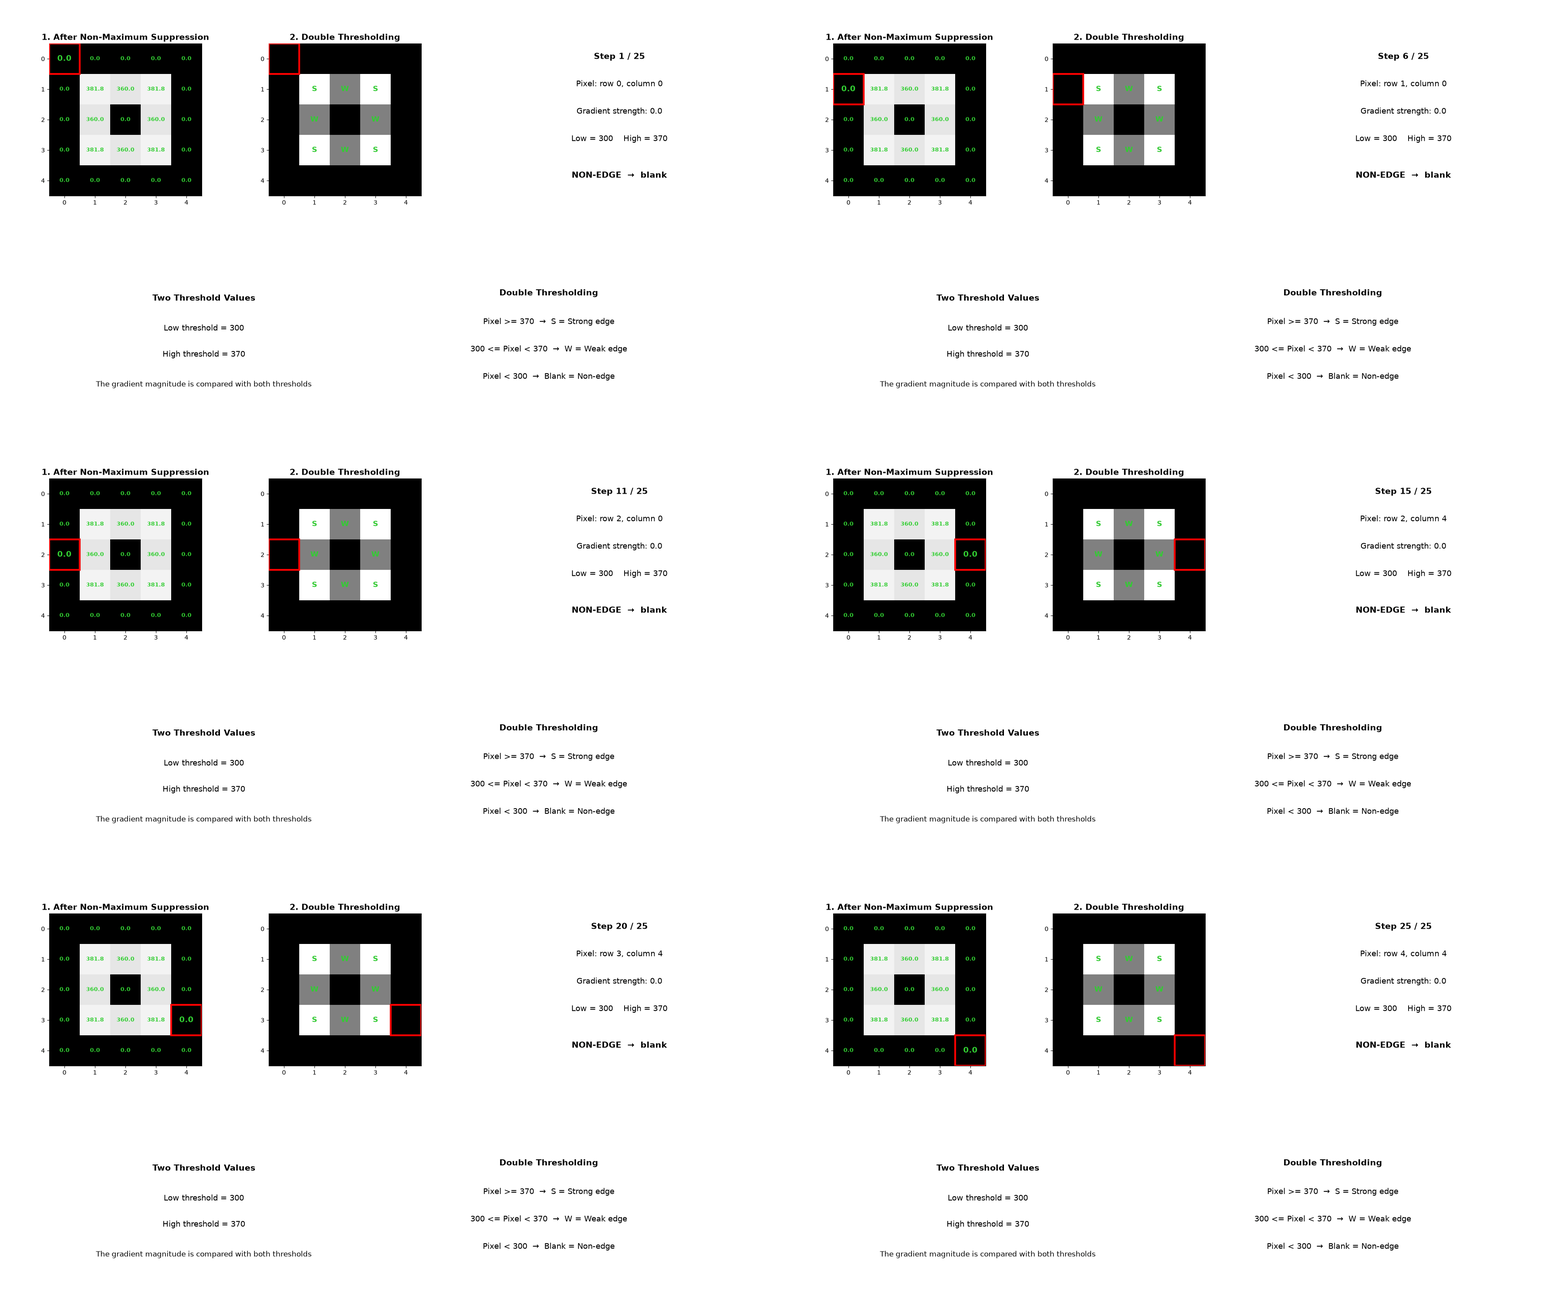
Pixels below the low threshold are classified as non-edges and get discarded. Weak edges are not immediately discarded. They may represent weaker sections of a continuous object boundary, so Canny keeps them temporarily and evaluates their connection to strong edges in the next step, Edge Tracking by Hysteresis.
5. Edge Tracking by Hysteresis
After Double Thresholding, Canny classifies pixels into three categories: strong edges, weak edges, and non-edges. Strong edges are considered reliable and are retained, while non-edges are discarded. Weak edges are temporarily retained because they may be part of a real edge, but they must be evaluated based on their connection to strong edges.
Canny then uses Edge Tracking by Hysteresis to evaluate the weak edges. A weak edge is retained only if it is connected to a strong edge through neighboring edge pixels. Weak edges that are not connected to any strong edge are discarded. This process removes isolated weak edges while preserving weak edge pixels that form part of continuous edges.
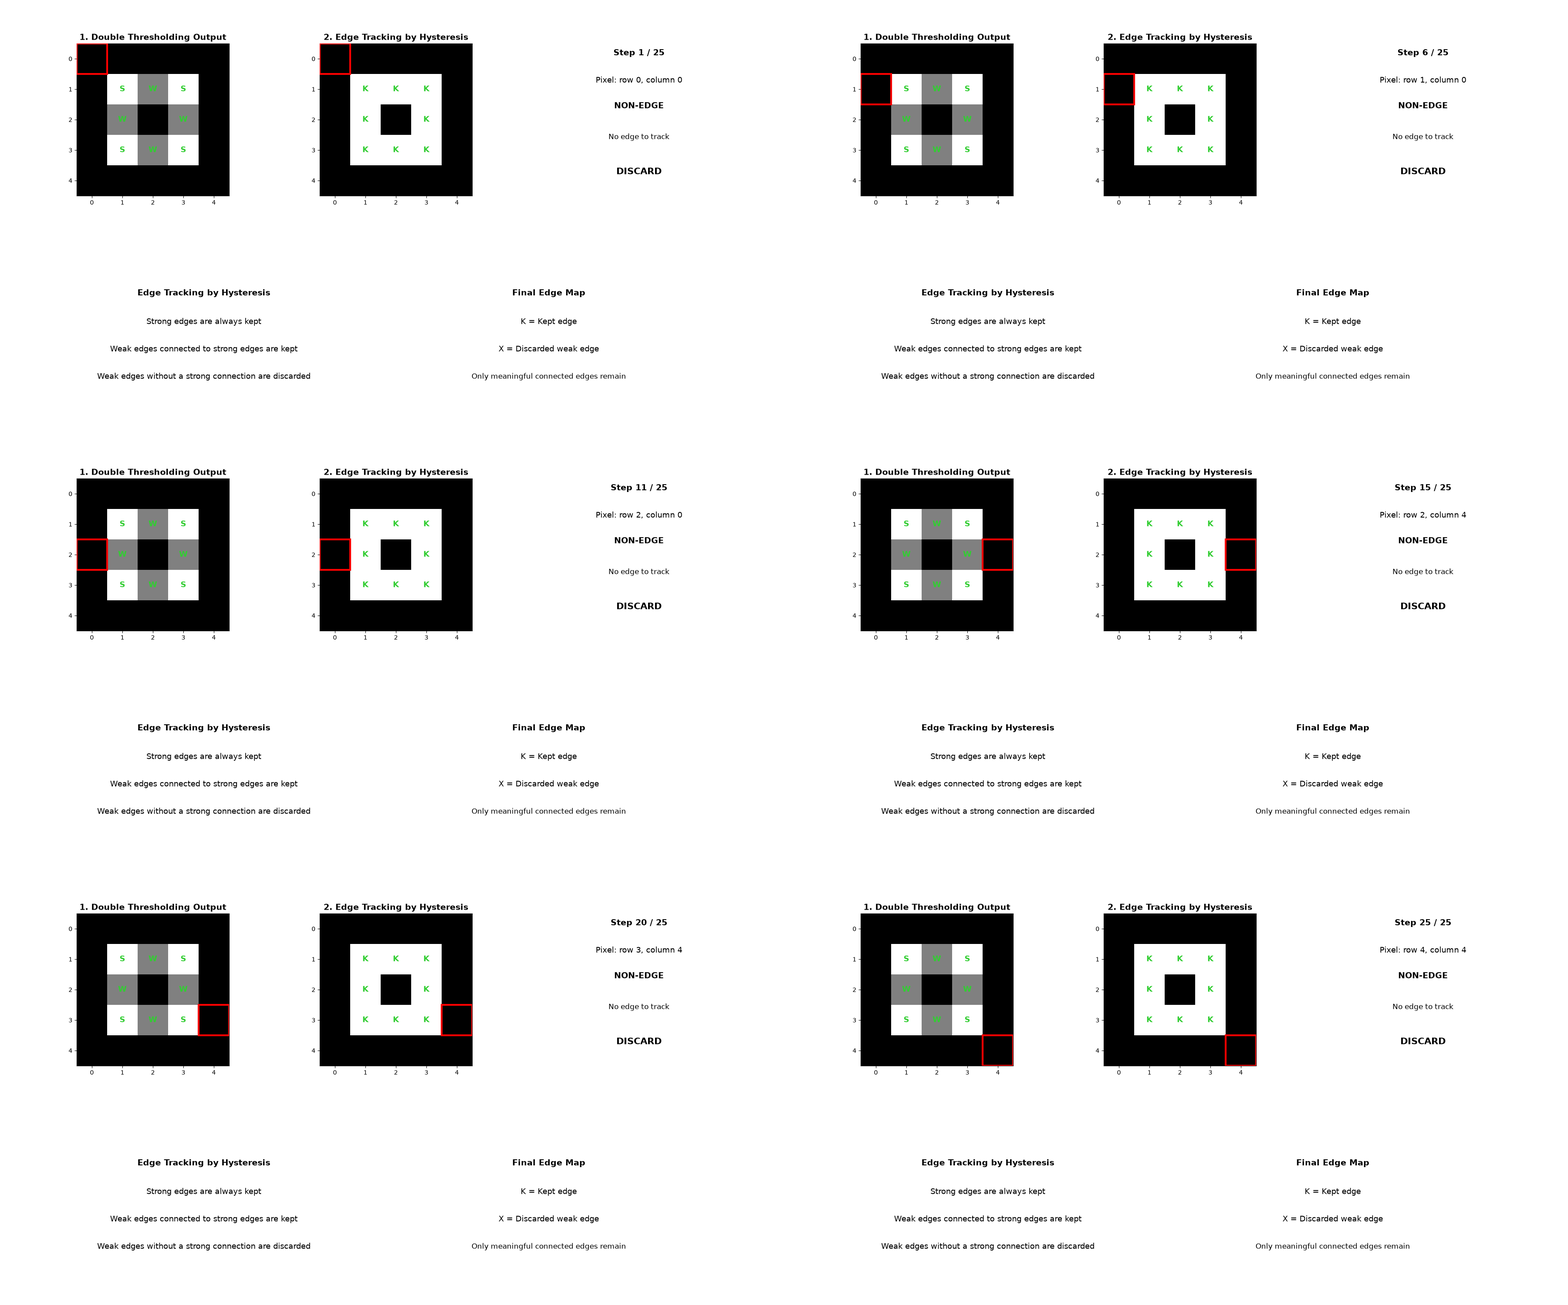
Together, these five stages transform the input image into a final edge map containing thin, well-defined edges while reducing noise and removing weak edges that are unlikely to represent meaningful boundaries.
Where Is Canny Edge Detection Used?
Canny Edge Detection is used in a wide range of computer vision applications, including:
- Industrial quality inspection: Detects cracks, scratches, dents, and other surface defects on manufactured products.
- Medical image analysis: Identifies the boundaries of tumors, blood vessels, bones, organs, and other structures in X-rays, CT scans, and MRI images.
- OCR and document analysis: Detects the boundaries of characters, text regions, tables, and other document elements to support text extraction and layout analysis.
- Face and facial feature analysis: Identifies boundaries around facial features such as the eyes, nose, mouth, and jawline.
- Building and architectural analysis: Detects edges of walls, windows, doors, roofs, and other structural elements in images.
- Satellite and aerial imagery: Extracts boundaries of roads, buildings, agricultural fields, rivers, and other geographic features.
Integrate Canny Edge Detection into Your Computer Vision Pipeline with Roboflow Workflows
You can integrate Canny Edge Detection into your computer vision pipeline using Roboflow Workflows. Workflows provides a range of pre-built blocks, including detection and segmentation models, image preprocessing, and visualization blocks. These blocks make it easy to build computer vision pipelines without implementing every component from scratch.
To build a Canny Edge Detection workflow, you can either create one manually in Roboflow or use Roboflow Agent. To create a workflow manually, log in to Roboflow, navigate to Workflows in the left sidebar, and select Create Workflow. This opens the Workflow Editor, where you can add and connect the blocks needed to build your pipeline.
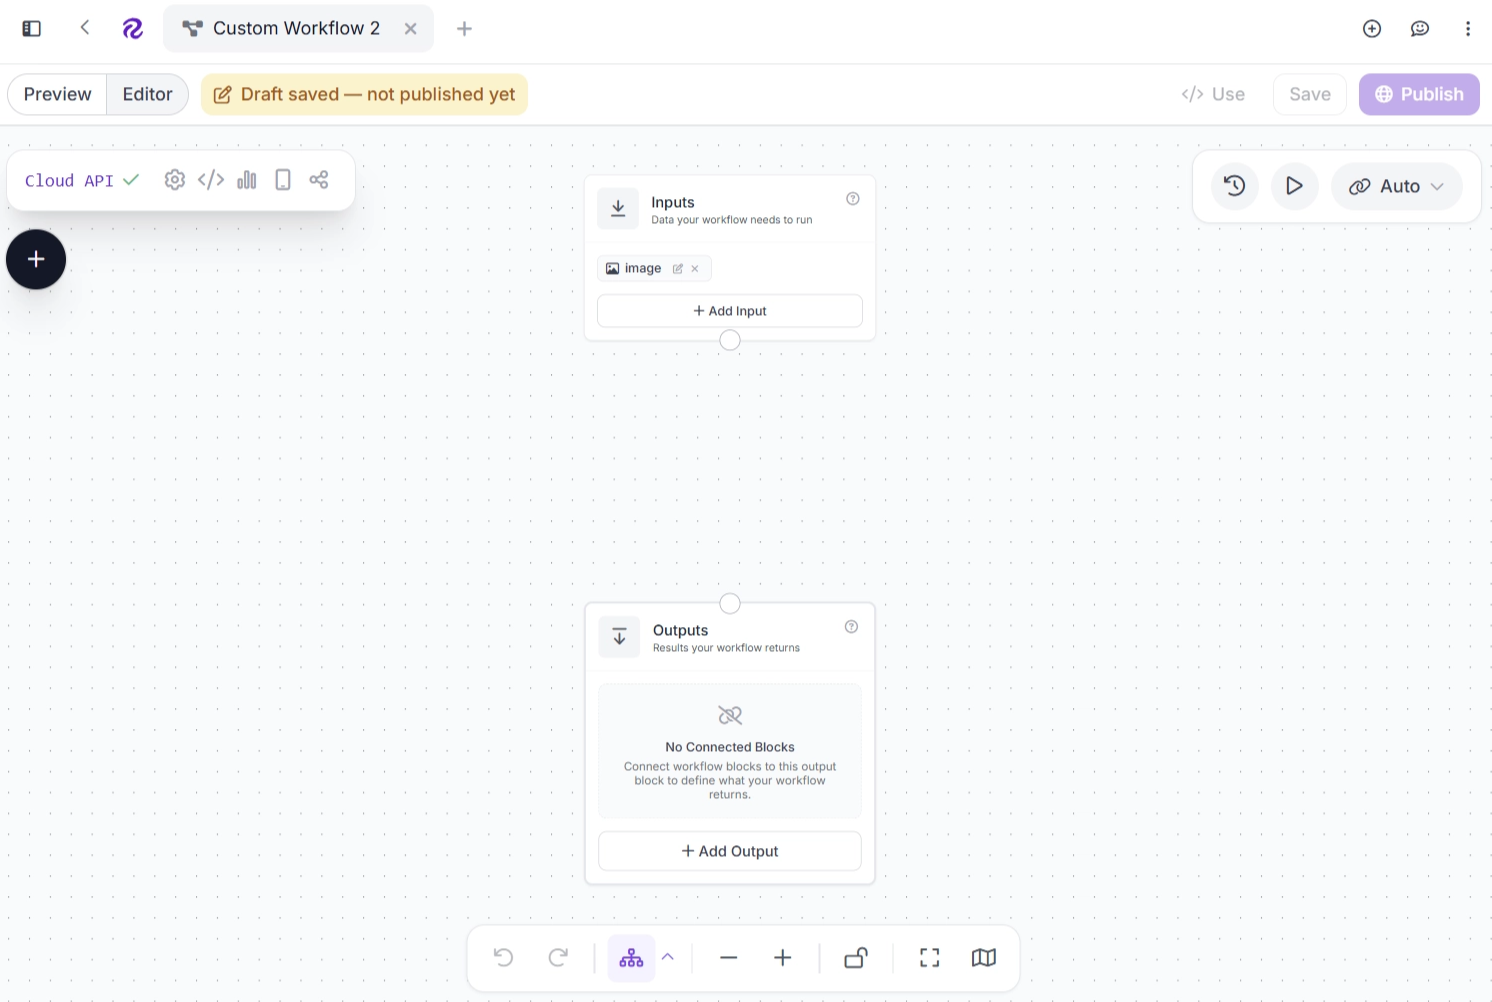
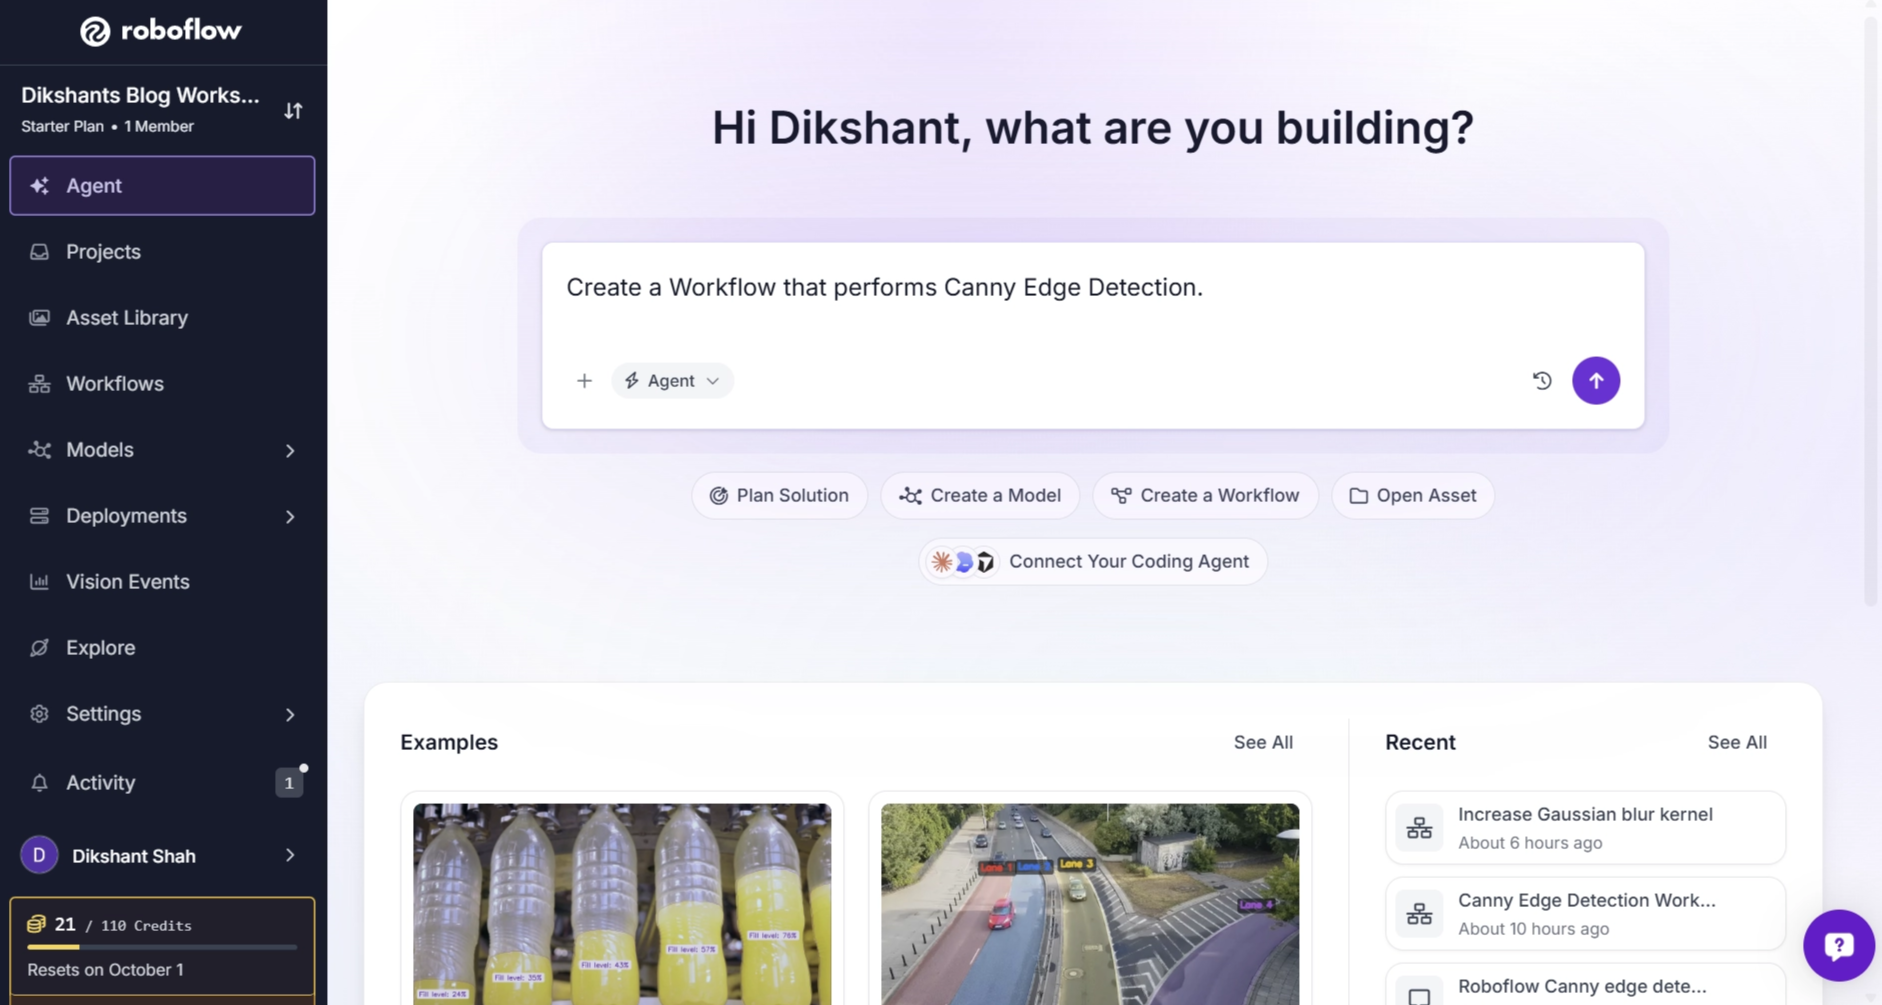
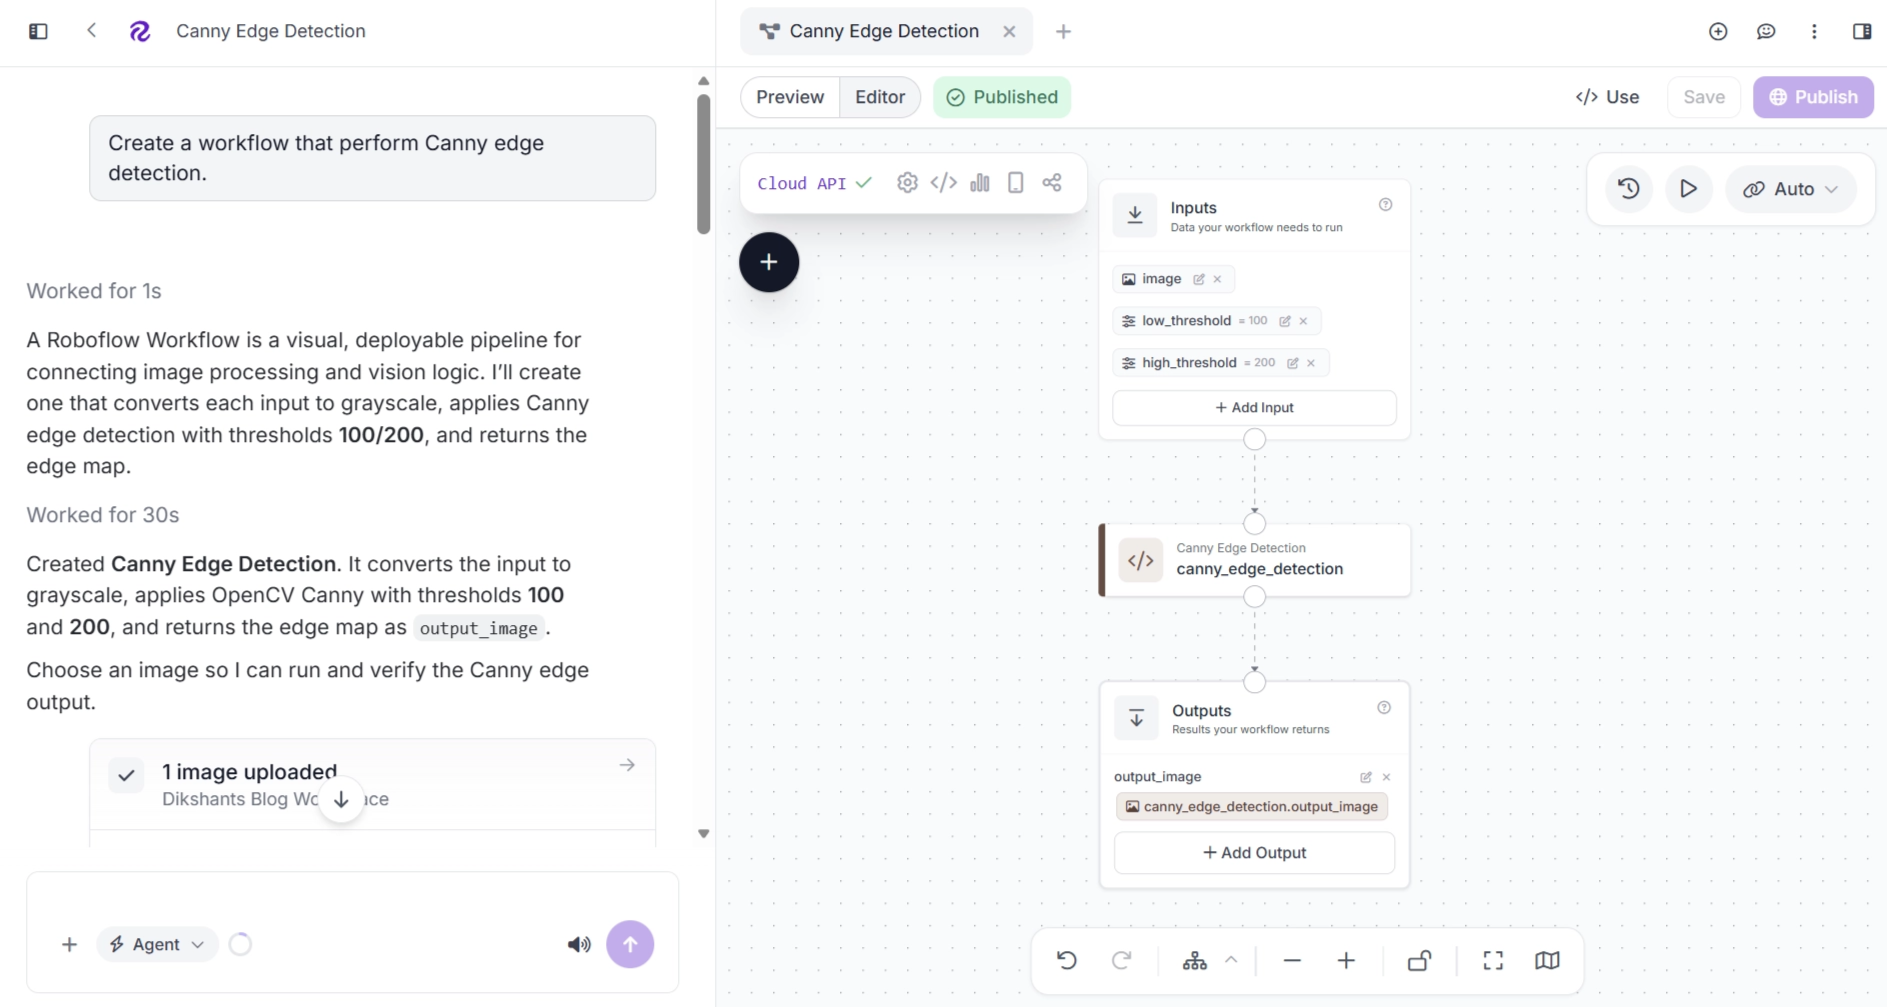
With Roboflow Agent (available after you login), you can simply describe the workflow you want to create, and the agent will build it for you. As shown below, I asked the Agent to build a Canny Edge Detection workflow.
Roboflow Agent then generated a workflow that performs Canny Edge Detection on both images and video streams. It also provided a UI where I could drag and drop images or videos to test the workflow.
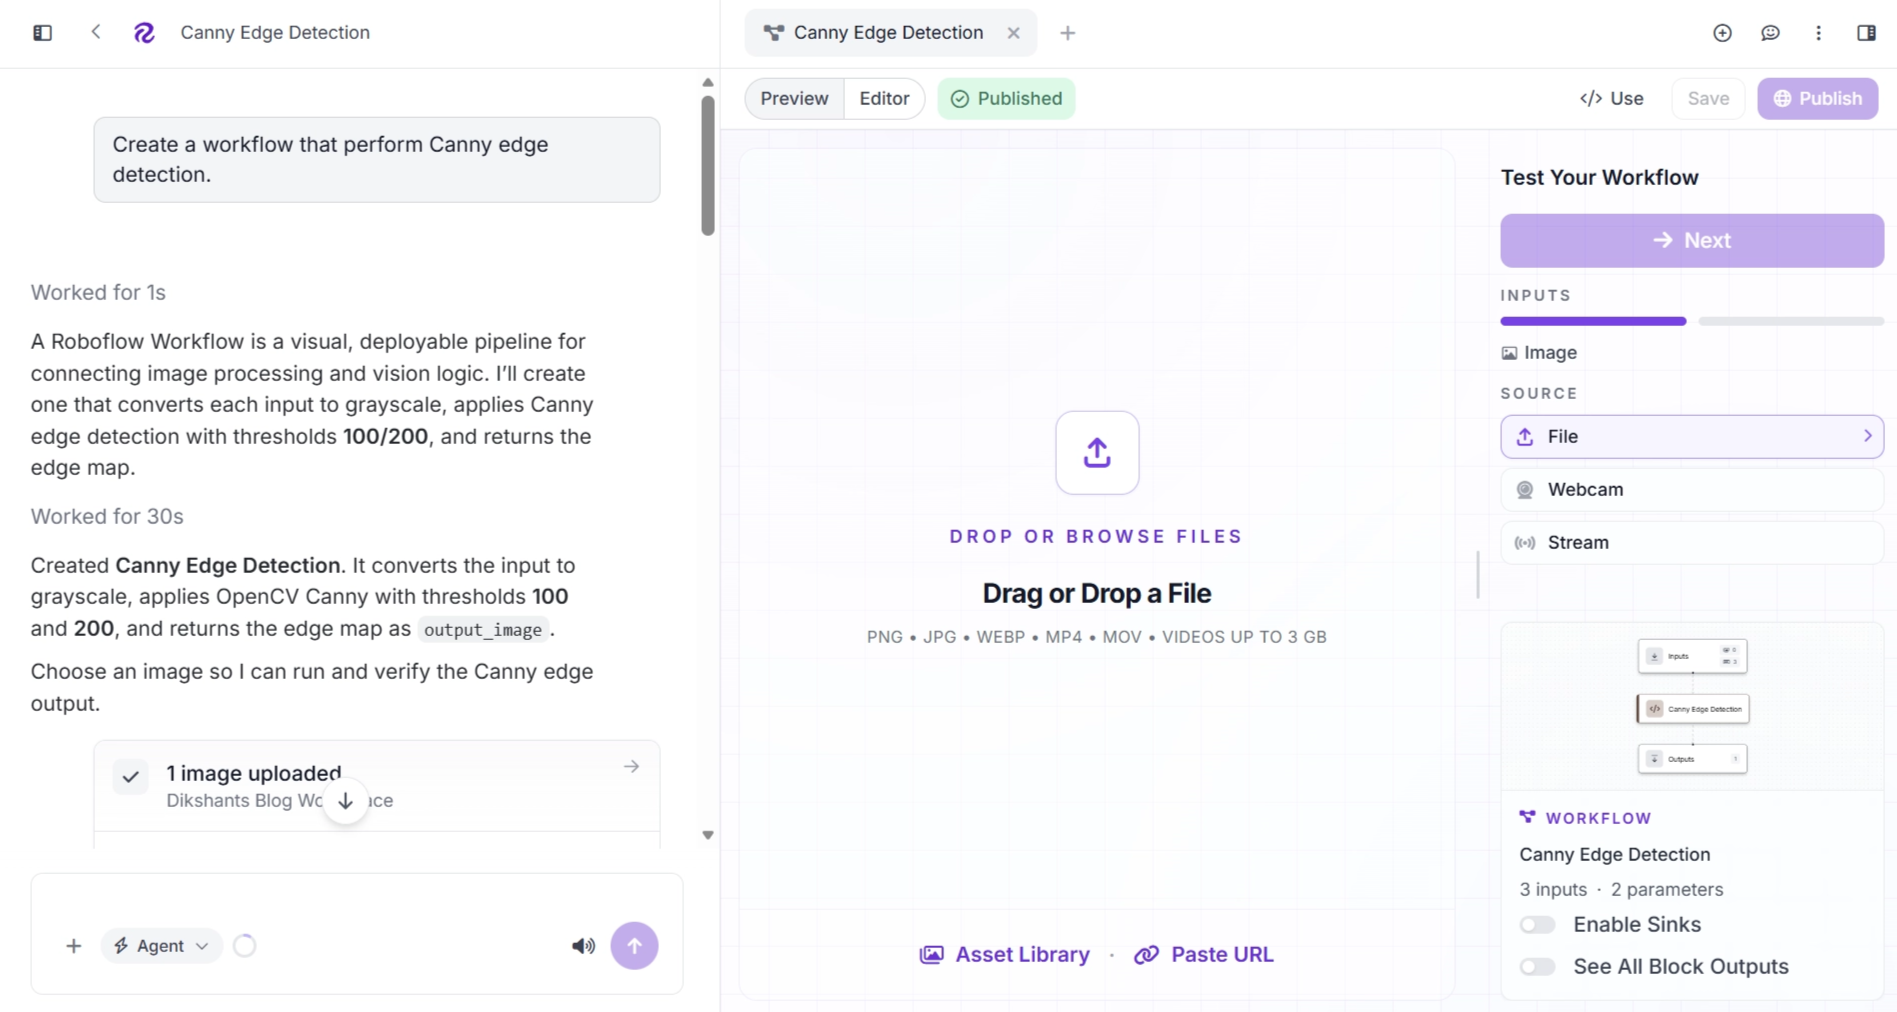
The generated workflow is shown below. It uses a Custom Python Block in Roboflow Workflows to implement Canny Edge Detection. Try the workflow.
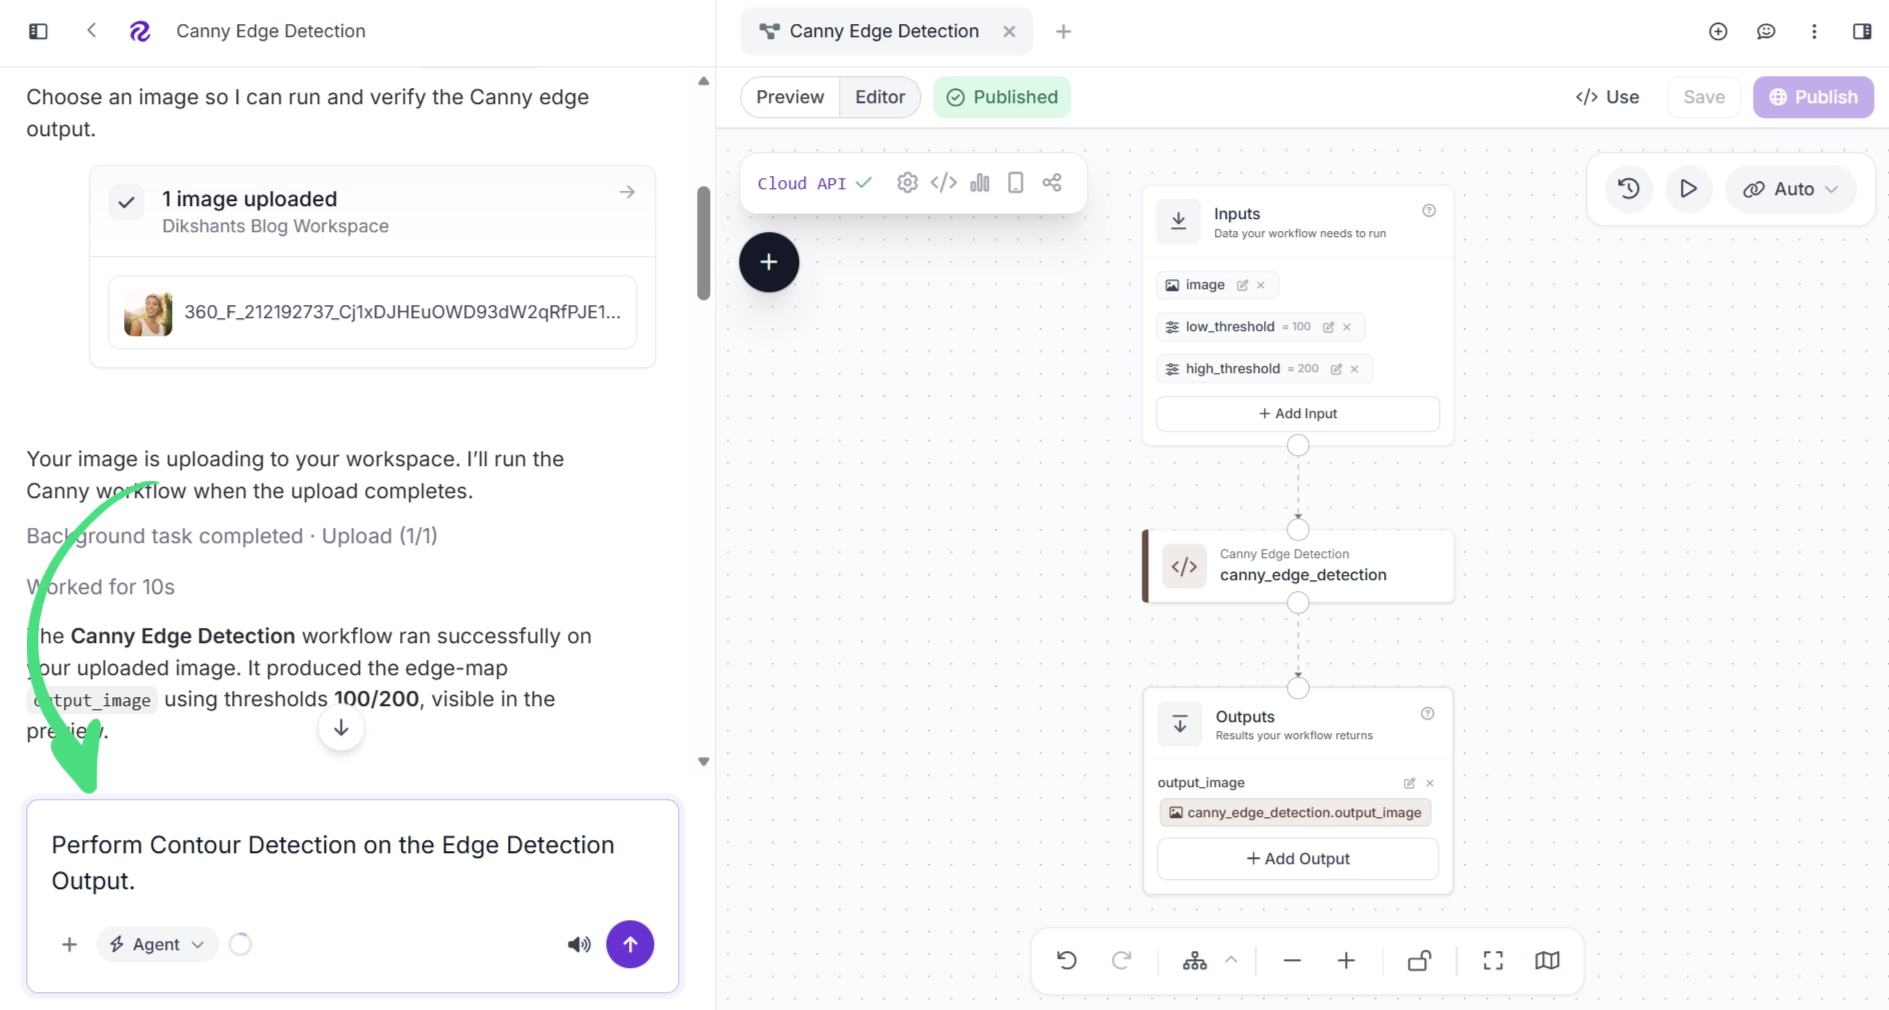
You can also use Roboflow Agent to add additional computer vision operations to the workflow, allowing you to build a complete computer vision pipeline simply by describing what you want in a prompt.
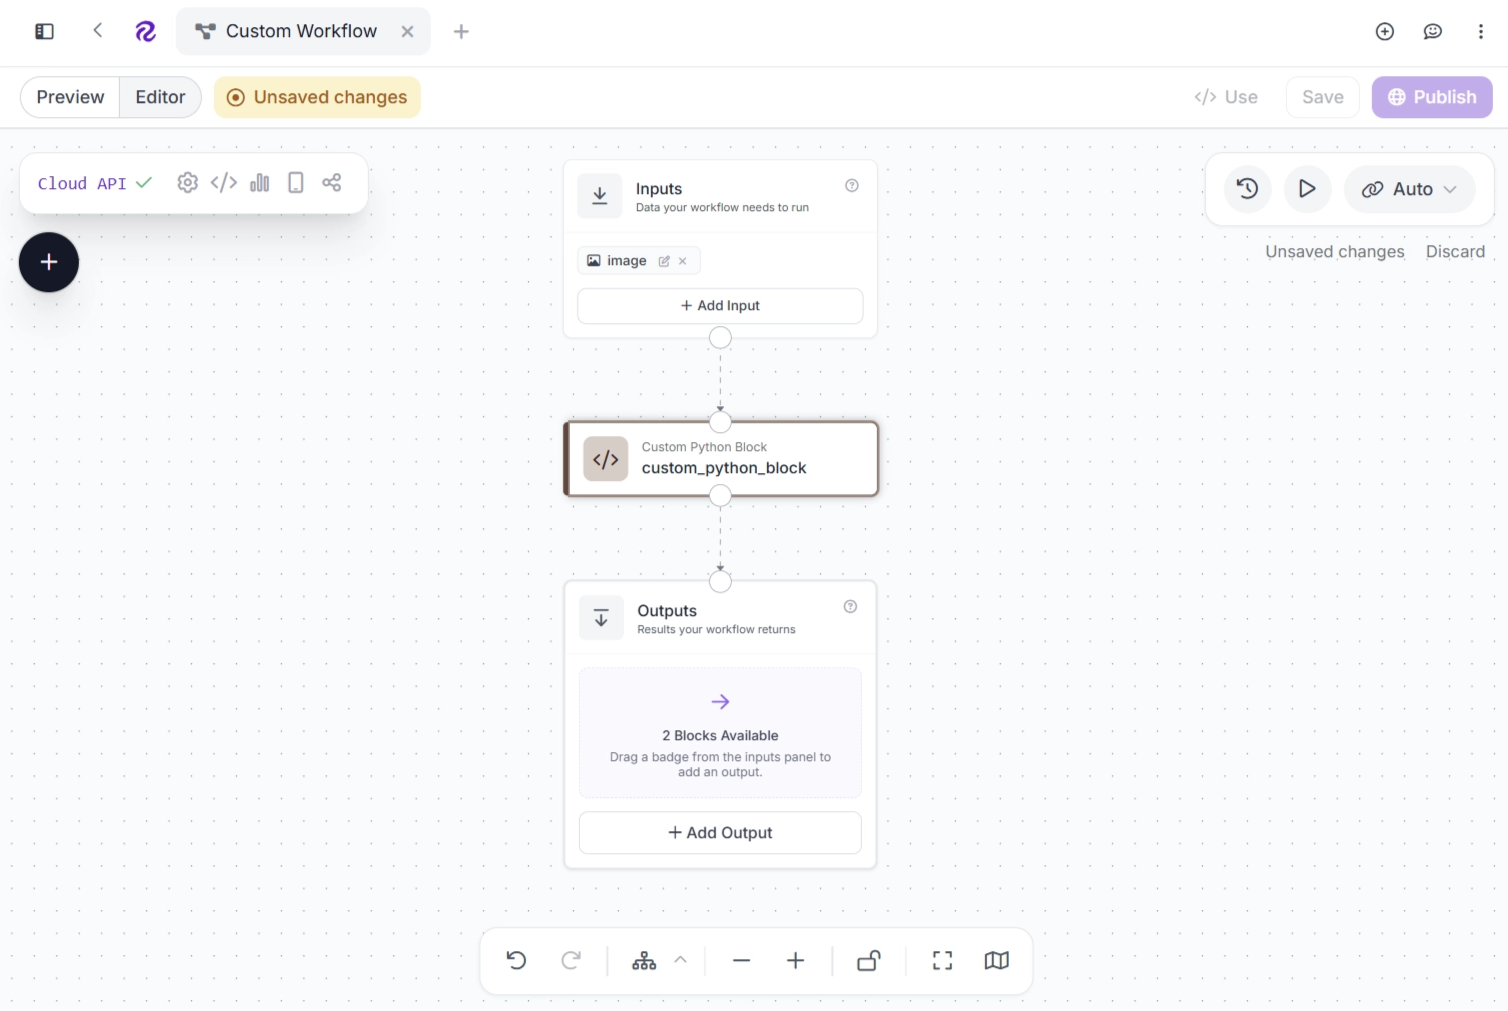
If you prefer to build the workflow manually, click the + button in the upper-left corner of the Workflow Editor, search for the Custom Python block, and select it to add it to the workflow. Custom Python Blocks allow you to add your own Python code to a Workflow and use it alongside other workflow blocks.

Once you add the block, connect it to the workflow as shown below.
Next, select the block and click Edit Code. This opens a form where you can configure the block, as shown below.
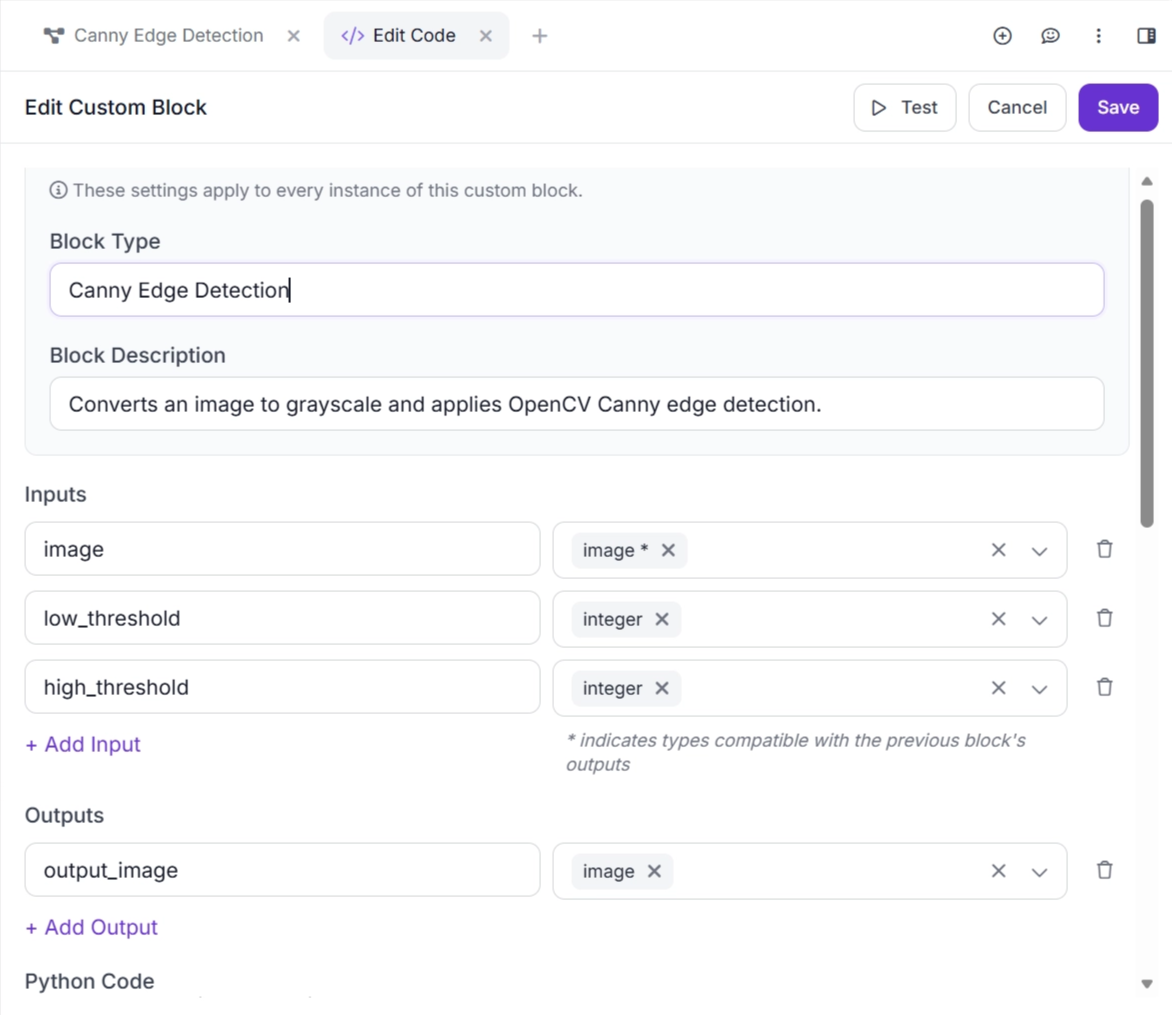
In the Python Code section, add the following code. When you use Roboflow Agent, the code for this block is automatically generated.
def run(self, image, low_threshold, high_threshold):
    # Get the image as a NumPy array
    arr = image.numpy_image

    # If the image is already grayscale, use it directly
    if arr.ndim == 2:
        gray = arr

    # Convert BGRA images to grayscale
    elif arr.shape[2] == 4:
        gray = cv2.cvtColor(arr, cv2.COLOR_BGRA2GRAY)

    # Convert regular BGR images to grayscale
    else:
        gray = cv2.cvtColor(arr, cv2.COLOR_BGR2GRAY)

    # Ensure the low threshold is a non-negative integer
    low = max(0, int(low_threshold))

    # Ensure the high threshold is greater than the low threshold
    high = max(low + 1, int(high_threshold))

    # Apply Canny Edge Detection using the two thresholds
    edges = cv2.Canny(
        np.ascontiguousarray(gray, dtype=np.uint8),
        low,
        high
    )

    # Convert the single-channel edge image back to a 3-channel BGR image
    edges_bgr = cv2.cvtColor(edges, cv2.COLOR_GRAY2BGR)

    # Create a new WorkflowImageData object with the detected edges
    output = WorkflowImageData.copy_and_replace(
        origin_image_data=image,
        numpy_image=edges_bgr
    )

    # Return the edge image as the Workflow output
    return {"output_image": output}
Make sure the Inputs block in the workflow has three parameters: image, low_threshold (default = 100), and high_threshold (default = 200). The image parameter is provided by default in the workflow, while low_threshold and high_threshold control the thresholds used by the Canny Edge Detection algorithm.
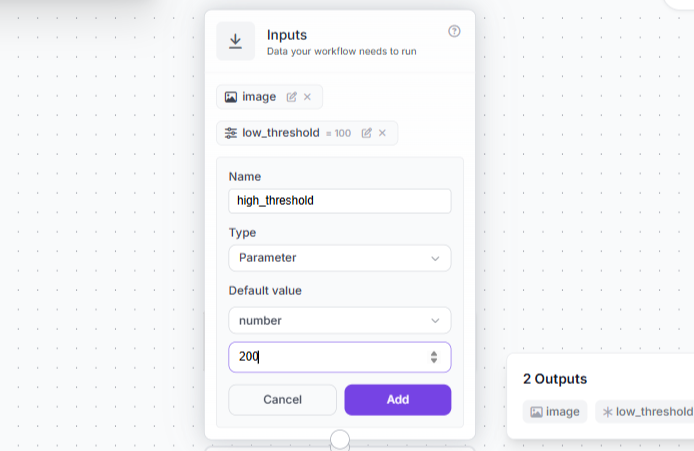
Adding these threshold parameters allows you to adjust the sensitivity of edge detection directly from the workflow inputs. The low threshold determines the minimum gradient strength for a pixel to be considered a weak edge, while the high threshold determines the gradient strength required for a pixel to be considered a strong edge.
Once you have added the input parameters to the Inputs block, configure the Canny Edge Detection block to use these parameters, as shown below.
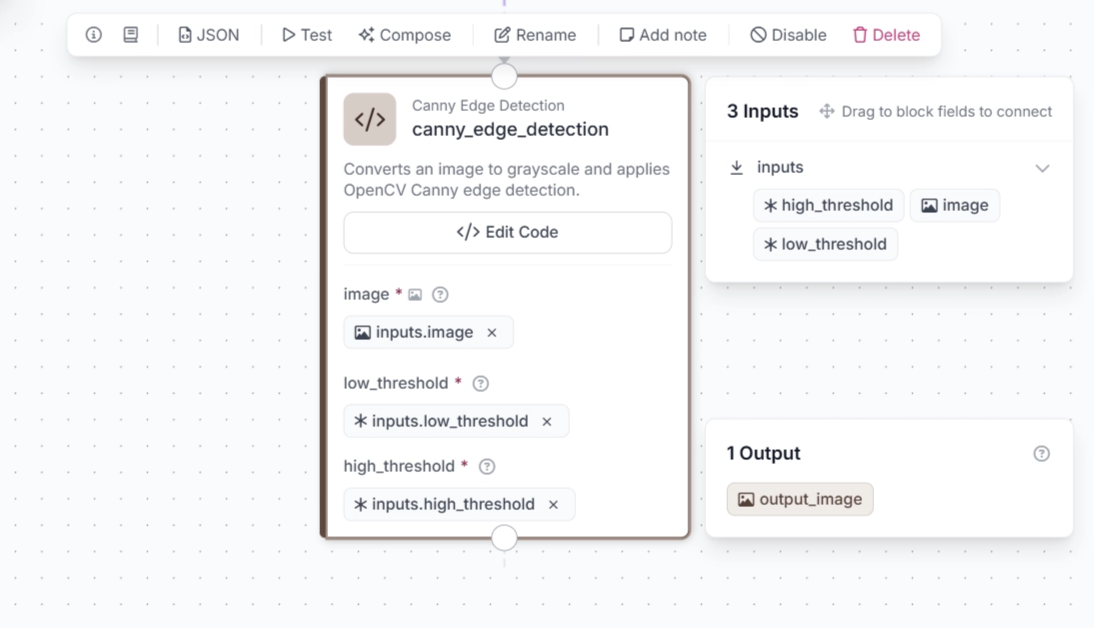
The final workflow should look like the one shown below, with the Canny edge-detected image as its output.
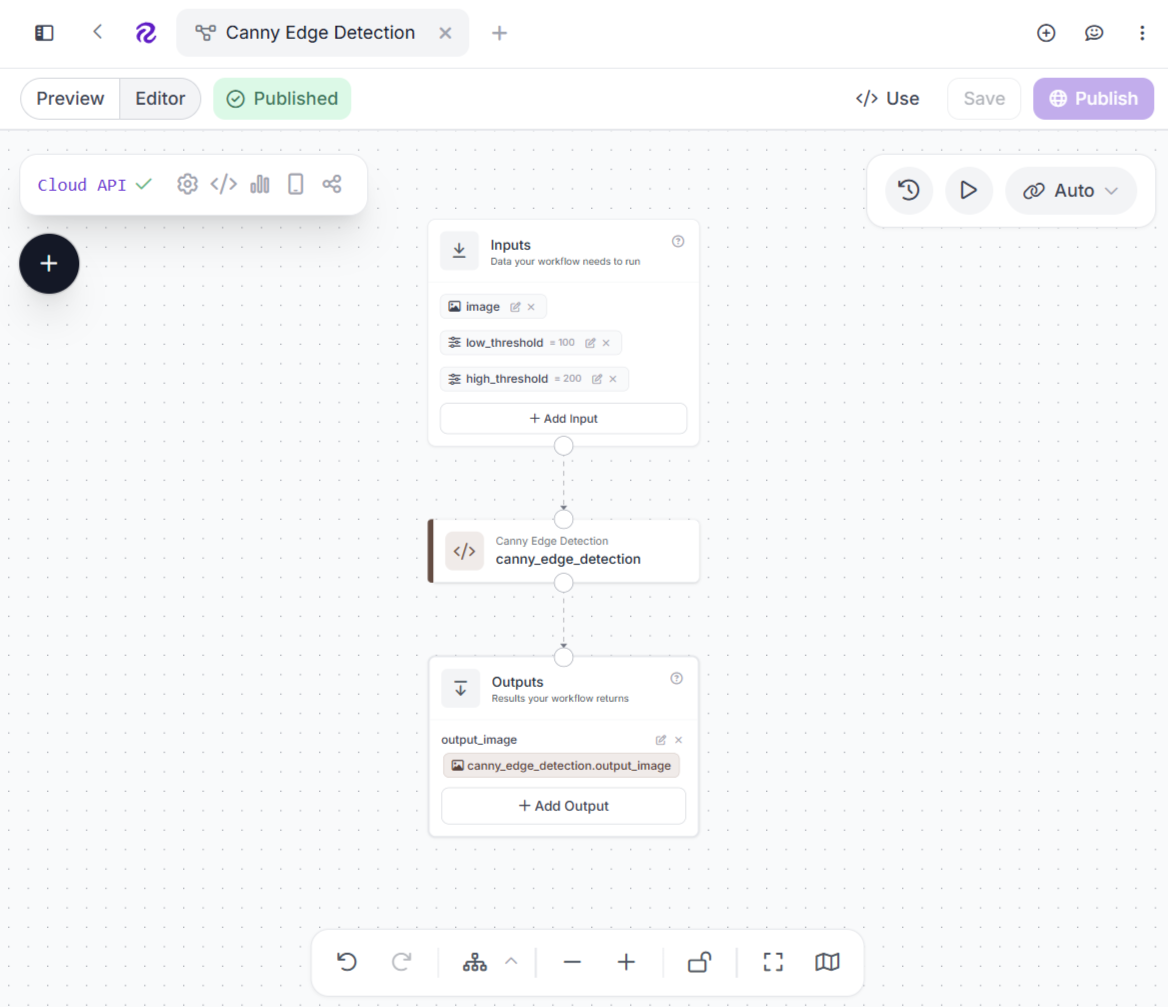
You can then run the workflow directly from the Workflow Editor.
Deploy Canny Edge Detection Workflows with Roboflow Deploy
Once your edge detection workflow is complete, click </> Use in the Workflows editor to open the deployment panel. From here, you can choose a deployment option and access everything you need to run your workflow in production.
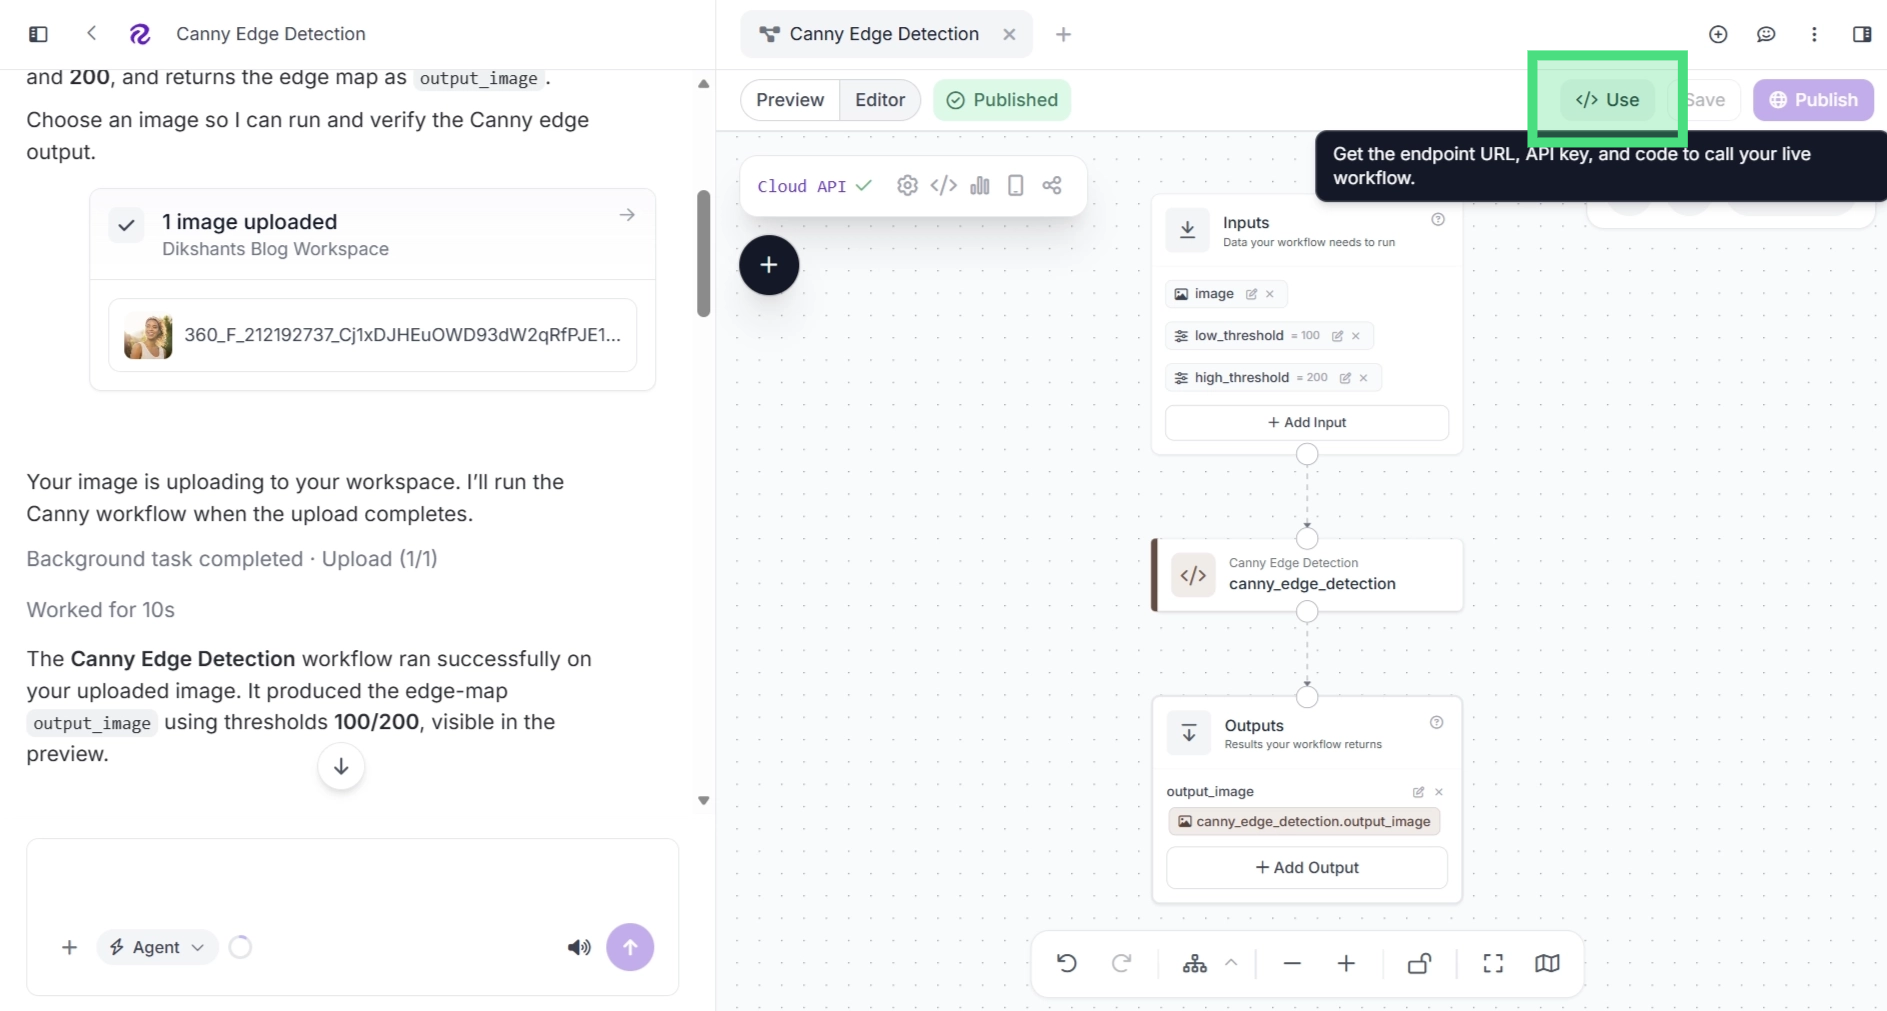
Roboflow Deploy automatically generates production-ready code snippets that you can copy directly into your application. These snippets can also be used with AI coding assistants such as Codex, Claude, Cursor, and ChatGPT to accelerate workflow integration and application development.

Roboflow Deploy also supports cloud-based deployment through the Serverless Cloud API, where your workflow runs in the cloud and you are charged credits for each inference.

You can also deploy your workflow locally and run it on your own hardware, including devices such as NVIDIA Jetson and Raspberry Pi.
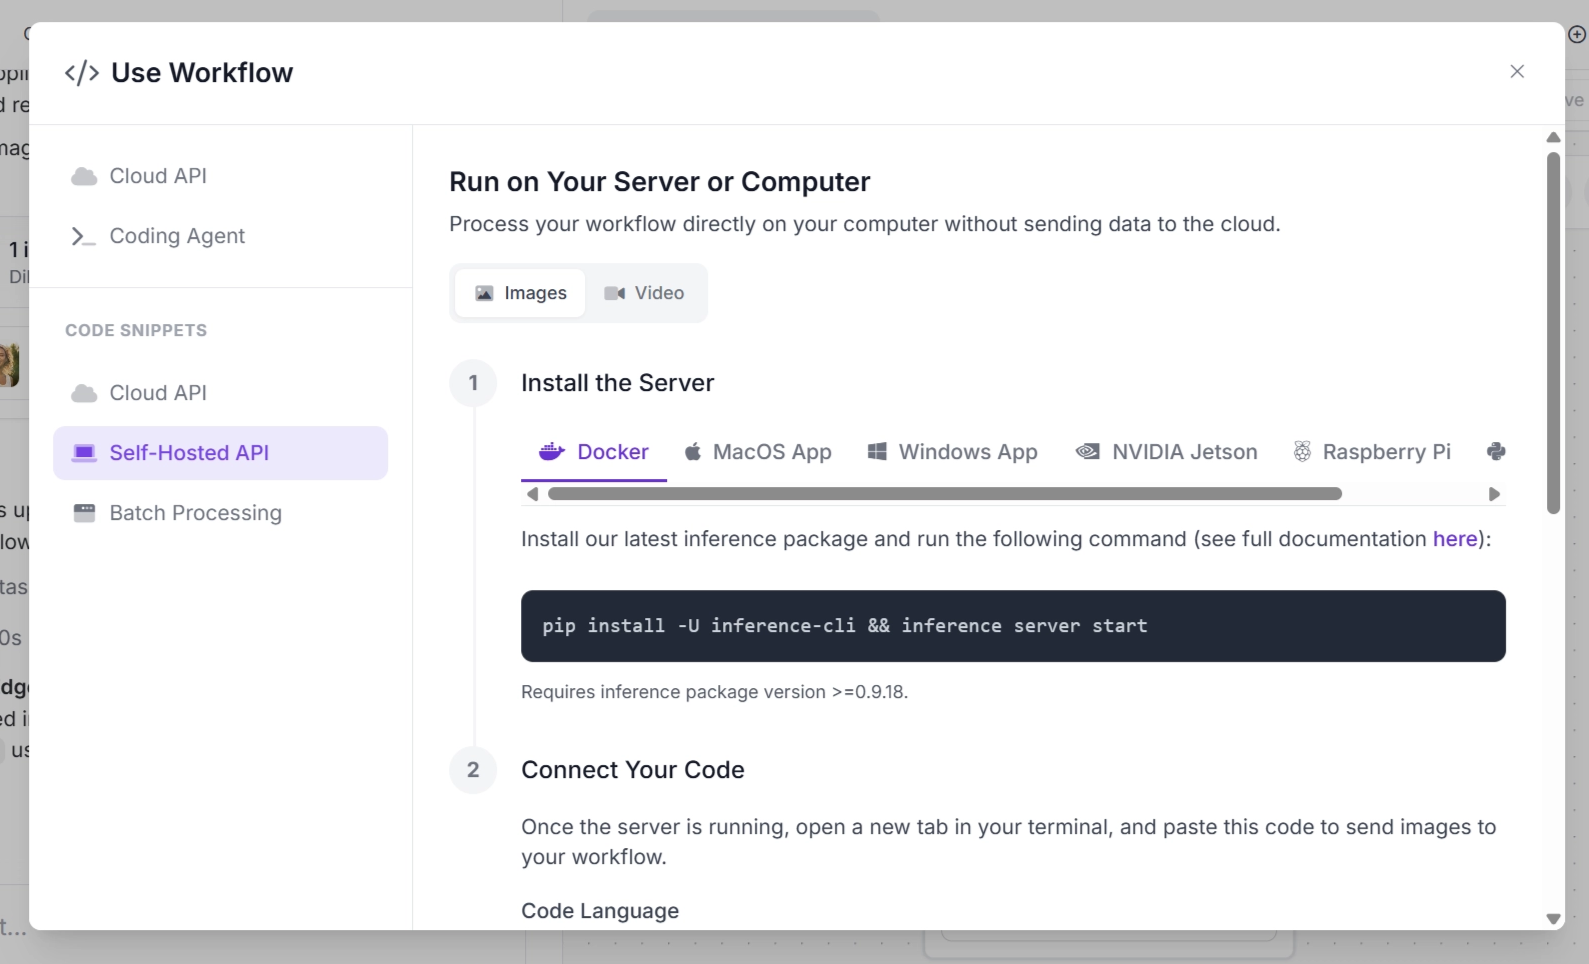
The Deployment panel provides ready-to-use code for running your workflow with different input sources, including images, video files, live webcam streams, and RTSP camera streams.
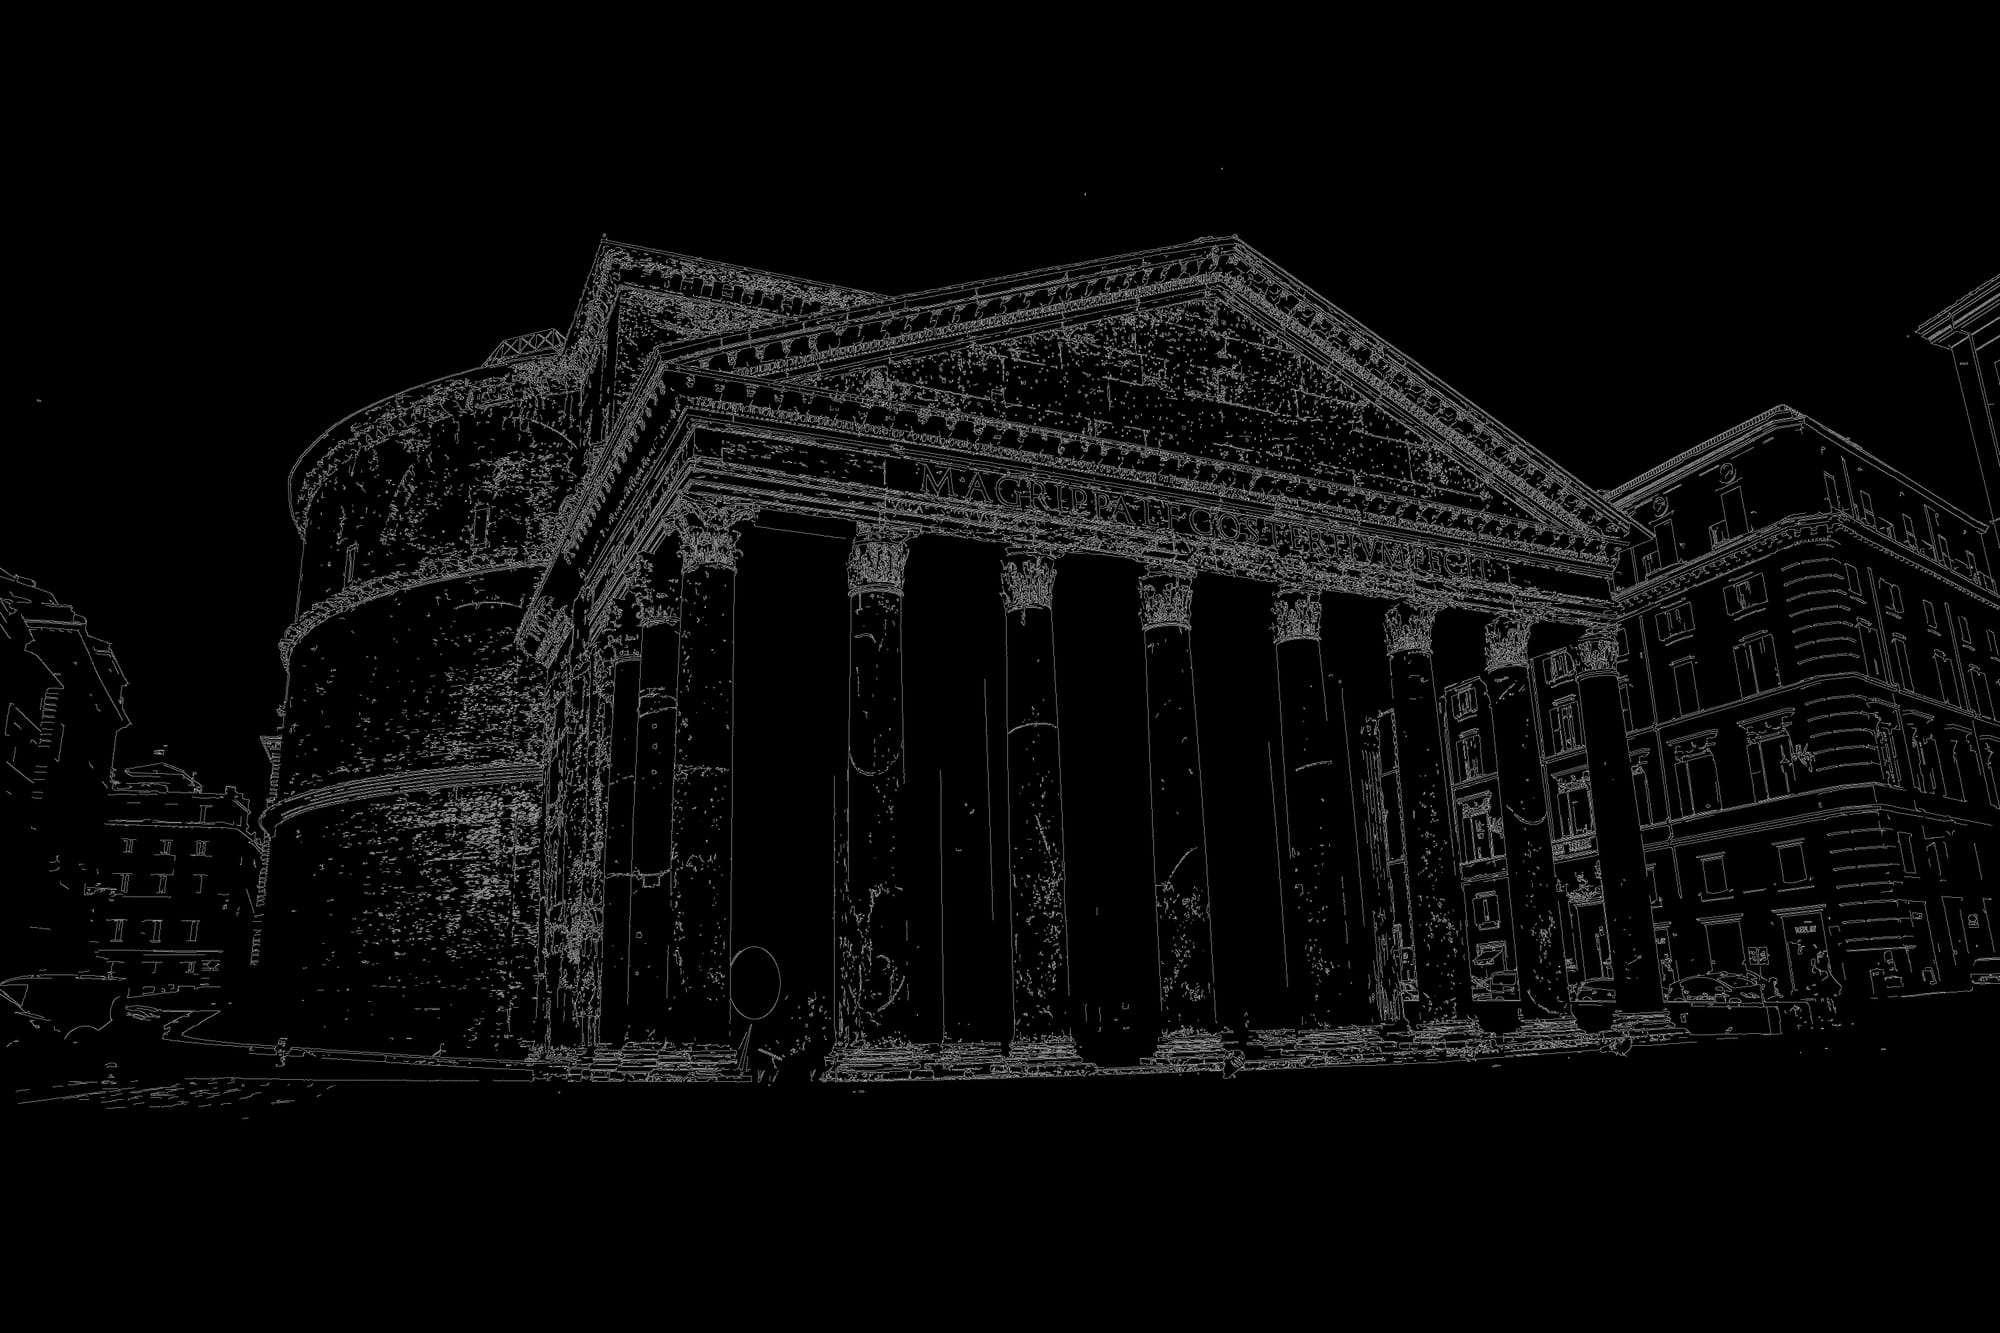
For example, the script below, provided by Roboflow Deploy, calls the Canny edge detection workflow with an input image and threshold parameters, then saves the output image locally:
import base64
from io import BytesIO
from PIL import Image
from inference_sdk import InferenceHTTPClient, InferenceConfiguration

# 1. Connect to your workflow
client = InferenceHTTPClient(
    api_url="<https://serverless.roboflow.com>",
    api_key="YOUR_ROBOFLOW_API_KEY"  # Replace with your actual API key
).configure(InferenceConfiguration(
    api_key_transport="header"
))

# 2. Run your workflow
result = client.run_workflow(
    workspace_name="your-workspace", # Replace with your actual workspace name
    workflow_id="your-canny-edge-detection", # Replace with your actual workflow ID
    images={
        "image": "input.jpg"
    },
    parameters={
        "low_threshold": 100,
        "high_threshold": 200
    },
    use_cache=True
)

# 3. Get the Base64 image from the first result
output_image = result[0]["output_image"]

# 4. Decode the Base64 string
image_bytes = base64.b64decode(output_image)

# 5. Open the decoded image
image = Image.open(BytesIO(image_bytes))

# 6. Convert to RGB and save as JPEG
image.convert("RGB").save("canny_output.jpg", "JPEG")

print("Saved output image as canny_output.jpg")
Make sure you have installed the inference-sdk package before running the script above.
pip install -U inference-sdk
The image below shows the output image saved when you run the script:
Conclusion
Canny Edge Detection provides a simple but powerful way to extract meaningful boundaries from images. With the Roboflow Platform, Canny Edge Detection can become part of a larger computer vision pipeline without requiring you to build the surrounding infrastructure from scratch. Start building your own computer vision pipeline with Roboflow today.


Cite this Post
Use the following entry to cite this post in your research:
Dikshant Shah. (Sep 15, 2026). Canny Edge Detection in Computer Vision. Roboflow Blog: https://blog.roboflow.com/canny-edge-detection/