
Object detection is a fundamental computer vision technique that identifies and locates objects within images, videos, or live streams using labels and bounding box coordinates. It powers a wide range of applications across industries, automating visual tasks such as surveillance, quality inspection, construction safety, and autonomous driving.
In this blog, I’ll walk you through how to seamlessly integrate object detection into your system using Python through the Roboflow Inference package.
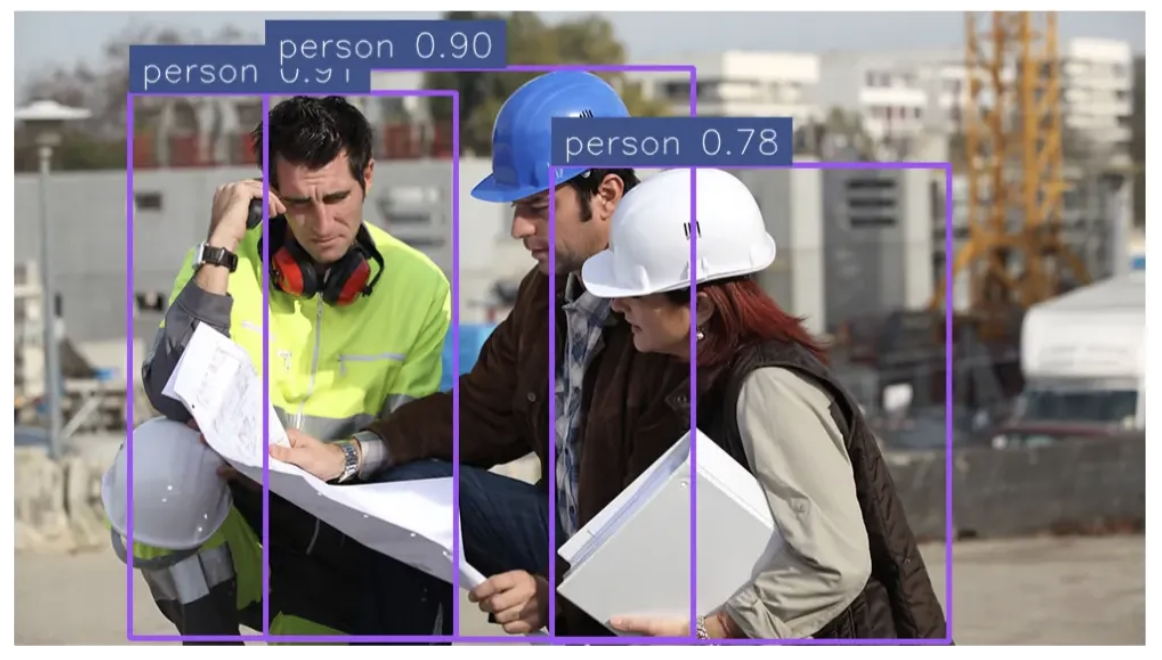
The image below demonstrates the object detection results we’ll achieve in this blog using the RF-DETR model and a fine-tuned RF-DETR model from Roboflow Universe:

Similarly, the video below demonstrates the object detection results on a video using the same models:
Python Object Detection Using Roboflow Inference
Roboflow Inference is a Python library that enables you to run and deploy computer vision models locally, on edge devices, or in the cloud.
It supports a range of tasks such as object detection, segmentation, and classification through modular workflows capable of processing images, videos, or live streams.
Image Object Detection with RF-DETR Model via Roboflow Inference
Follow the steps below to build an object detection Python script for images utilizing the RF-DETR model. You can also find the complete script for the code demonstrated in the steps below here.
Step 1: Install Inference Package
Begin by installing the inference package:
pip install inferenceStep 2: Load a Pre-trained Object Detection Model
Next, create a new Python script, and in it, import and load the RF-DETR model:
from inference import get_model

model = get_model("rfdetr-base")
RF-DETR is a real-time, transformer-based object detection model developed by Roboflow, designed to achieve state-of-the-art performance with high accuracy and low latency.
Step 3: Run Inference on an Image
In the same script, use the loaded model to run inference on your image:
from PIL import Image
image = Image.open("YOUR_TEST_IMAGE.jpg")

# Define which coco classes to detect (empty = all)
class_filter = ["person"]

# Run inference on the image
predictions = model.infer(image, confidence=0.5, class_filter=class_filter)[0]
print(predictions)
The class_filter is a list of COCO classes that the RF-DETR model should detect; if the list is empty, the model will detect all COCO classes present in the image.
Step 4: Convert Predictions into Supervision’s Detections
Supervision is a Python package that enables us to visualize model outputs effectively. To use it, install the package via:
pip install supervisionOnce installed, add the following code to your script to convert your model predictions into Supervision’s Detections. Supervision requires model predictions as Detections for visualization:
import supervision as sv

# Convert predictions into Supervision's Detections
detections = sv.Detections.from_inference(predictions)
print(detections)
Step 5: Create Annotators for Visualization
Supervision provides annotators for drawing bounding boxes and labeling them. Set up these annotators in your script to add boxes and labels to your image:
# Create a BoxAnnotator to draw bounding boxes around detected objects
box_annotator = sv.BoxAnnotator(
    color=sv.ColorPalette.ROBOFLOW,
    thickness=4
)

# Create a LabelAnnotator to draw text labels on the image
label_annotator = sv.LabelAnnotator(
    color=sv.ColorPalette.from_matplotlib('viridis', 5),
    text_scale=1
)
Step 6: Annotate and Display the Image
Now use these annotators to overlay bounding boxes and class labels, visualizing your detections:
# Prepare labels for each detection in the format: "class_name confidence"
labels = [
    f"{prediction.class_name} {prediction.confidence:.2f}"
    for prediction in predictions.predictions
]
print(labels)

# Make a copy of the image to draw annotations
annotated_image = image.copy()
# Annotate the image with bounding boxes
annotated_image = box_annotator.annotate(annotated_image, detections)

# Annotate the image with labels
annotated_image = label_annotator.annotate(annotated_image, detections, labels)

# Display the final annotated image
sv.plot_image(annotated_image)
Your script is now complete. Run the script on a test image.
Annotated Image Output
The output below shows the result on a test image using the script above. Since we specified only 'person' in the class_filter, the model detected only people. You can view the full list of detectable classes here.
Video Object Detection with RF-DETR Model via Roboflow Inference
Follow the steps below to build an object detection Python script for videos utilizing the RF-DETR model. You can also find the complete script for the code demonstrated in the steps below here.
Step 1: Initialize Inference Pipeline
Ensure that the inference package is installed, as demonstrated earlier. Then, create a new script and initialize the RF-DETR inference pipeline, allowing you to process a video and receive predictions for each frame through a callback function:
from inference import InferencePipeline

def callback(predictions, video_frame):
    print("Predictions:", predictions)
    print("Video Frame:", video_frame)

# Source of the video — Video file path, stream URL, or device ID (e.g., 0 for a webcam)
video_path = "test_video.mp4"

# Initialize the pipeline
pipeline = InferencePipeline.init(
    model_id="rfdetr-base",
    video_reference=video_path,
    on_prediction=callback,
    api_key="YOUR_ROBOFLOW_KEY",
    confidence=0.5,
)

# Start pipeline
pipeline.start()
pipeline.join()
The pipeline processes each frame individually, invoking the callback function for every frame and providing the corresponding object detection predictions from the RF-DETR model.
Follow this tutorial to get access to your Roboflow API key for free after logging in.
Step 2: Convert Predictions into Supervision’s Detections
Next, update the callback function to convert the model’s predictions into Supervision’s Detections using the Supervision library:
from inference import InferencePipeline
# Import Supervision
import supervision as sv

def callback(predictions, video_frame):
    # Print Prediction and Video Frame Code

    # Convert Predictions to Detections
    detections = sv.Detections.from_inference(predictions)
    print("Detections:", detections)

video_path = "test_video.mp4"

pipeline = InferencePipeline.init(
    model_id="rfdetr-base",
    video_reference=video_path,
    on_prediction=callback,
    api_key="YOUR_ROBOFLOW_KEY",
    confidence=0.5,
)

pipeline.start()
pipeline.join()
Step 3: Add a Byte Tracker
Keeping the previously added code intact, integrate object tracking across frames using Byte Tracker to maintain consistent object identities throughout the video:
from inference import InferencePipeline
import supervision as sv

# Create BYTETracker instance
byte_tracker = sv.ByteTrack()

def callback(predictions, video_frame):
    # Print Prediction and Video Frame Code
    # Convert Predictions to Detections Code

    # Integrate Byte Tracker
    detections = byte_tracker.update_with_detections(detections)

video_path = "test_video.mp4"

pipeline = InferencePipeline.init(
    model_id="rfdetr-base",
    video_reference=video_path,
    on_prediction=callback,
    api_key="YOUR_ROBOFLOW_KEY",
    confidence=0.5,
)

pipeline.start()
pipeline.join()
ByteTracker is an object tracking algorithm that assigns unique IDs to detected objects, enabling their continuous tracking across video frames and maintaining consistent identities throughout the video.
Step 4: Define and Filter Object Detection Classes
Now, filter detections by specific object classes (e.g., a COCO class like 'person') to focus on relevant objects in the final detected video:
from inference import InferencePipeline
import supervision as sv

# Define which coco classes to detect (empty = all)
class_filter = ["person"]

byte_tracker = sv.ByteTrack()

def callback(predictions, video_frame):
    # Print Prediction and Video Frame Code
    # Convert Predictions to Detections Code
    # Integrate Byte Tracker code

    # Filter Classes
    keep_indices = (
        [i for i, class_name in enumerate(detections.data.get('class_name', [])) if class_name in class_filter]
        if class_filter else list(range(len(detections)))  # keep all if no filter
    )
    filtered_detections = (
        sv.Detections(
            xyxy=detections.xyxy[keep_indices],
            confidence=detections.confidence[keep_indices],
            class_id=detections.class_id[keep_indices],
            data={k: v[keep_indices] for k, v in detections.data.items()}
        ) if keep_indices else sv.Detections.empty()
    )

video_path = "test_video.mp4"

pipeline = InferencePipeline.init(
    model_id="rfdetr-base",
    video_reference=video_path,
    on_prediction=callback,
    api_key="YOUR_ROBOFLOW_KEY",
    confidence=0.5,
)

pipeline.start()
pipeline.join()
Step 5: Annotate and Save Each Frame with Bounding Boxes and Labels
We now use Supervision annotators to draw bounding boxes and class labels on each frame, then save all the annotated frames sequentially in a folder named annotated_frames:
from inference import InferencePipeline
import supervision as sv

# Import OpenCV, Numpy, OS
import cv2
import numpy as np
import os

# Create folder to save annotated frames
output_folder = "annotated_frames"
os.makedirs(output_folder, exist_ok=True)

# Maintain a frame counter
frame_counter = {"count": 0}

# Utilize Video path for extracting total frames
video_path = "test_video.mp4"

# Get total frames to measure progress
video_info = sv.VideoInfo.from_video_path(video_path)
total_frames = video_info.total_frames

# Define annotators
box_annotator = sv.BoxAnnotator(
    color=sv.ColorPalette.ROBOFLOW,
    thickness=4
)
label_annotator = sv.LabelAnnotator(
    color=sv.ColorPalette.from_matplotlib('viridis', 5),
    text_scale=0.6
)

class_filter = ["person"]

byte_tracker = sv.ByteTrack()

def callback(predictions, video_frame):
    # Print Prediction and Video Frame Code
    # Convert Predictions to Detections Code
    # Integrate Byte Tracker Code
    # Filter Classes Code

    # Generate labels
    labels = [
        f"{class_name} {conf:.2f}"
        for class_name, conf in zip(
            filtered_detections.data.get('class_name', []),
            getattr(filtered_detections, 'confidence', [])
        )
    ]

    # Convert VideoFrame to NumPy array and annotate
    frame_array = cv2.cvtColor(np.array(video_frame.image), cv2.COLOR_RGB2BGR)
    annotated_frame = box_annotator.annotate(frame_array, filtered_detections)
    annotated_frame = label_annotator.annotate(annotated_frame, filtered_detections, labels)

    # Save annotated frame
    idx = frame_counter["count"]
    frame_filename = os.path.join(output_folder, f"frame_{idx:05d}.jpg")
    cv2.imwrite(frame_filename, cv2.cvtColor(annotated_frame, cv2.COLOR_RGB2BGR))

    # Count the number of processed frames
    frame_counter["count"] += 1
    print(f"Processing frame {idx + 1} / {total_frames}")

pipeline = InferencePipeline.init(
    model_id="rfdetr-base",
    video_reference=video_path,
    on_prediction=callback,
    api_key="YOUR_ROBOFLOW_KEY",
    confidence=0.5,
)

pipeline.start()
pipeline.join()
Now, run the script; it will process each video frame, detect objects in every frame, and save the annotated frames to a folder named annotated_frames, which can then be merged to create the final object-detected video.
Step 6: Merge all the Annotated Frames into one single video
Finally, create a new script in the same directory as the previous one to combine all the saved annotated frames into a single video using OpenCV, preserving the original resolution and frame rate, as shown below:
import cv2
import os
import supervision as sv

# Paths
frames_folder = "annotated_frames"
output_video_path = "annotated_video.mp4"
video_path = "test_video.mp4"

# Get video info using Supervision
video_info = sv.VideoInfo.from_video_path(video_path)
fps = video_info.fps
width = video_info.width
height = video_info.height

# Prepare video writer
fourcc = cv2.VideoWriter_fourcc(*'mp4v')
out = cv2.VideoWriter(output_video_path, fourcc, fps, (width, height))

# Write frames to video
for frame_file in os.listdir(frames_folder):
    if frame_file.endswith(".jpg"):
        frame_path = os.path.join(frames_folder, frame_file)
        frame = cv2.imread(frame_path)
        out.write(frame)

out.release()
print(f"Video saved to {output_video_path}")
Annotated Video Output
The output below shows the result on a test video using the script above. Since we specified only 'person' in the class_filter, the model detected only people.
Searching Fine-Tuned Models on Roboflow Universe
In the object detection examples above, an RF-DETR model is used in the construction domain. Its limitation is that it recognizes only the COCO-based classes it was trained on, but fine-tuning the model on custom datasets can overcome this limitation.
Roboflow Universe offers an open repository of datasets, models, and projects from developers and researchers worldwide. It hosts fine-tuned RF-DETRs and other models optimized for tasks in domains like construction, sports analytics, and geospatial research, making it easy to find and use models tailored to your needs.
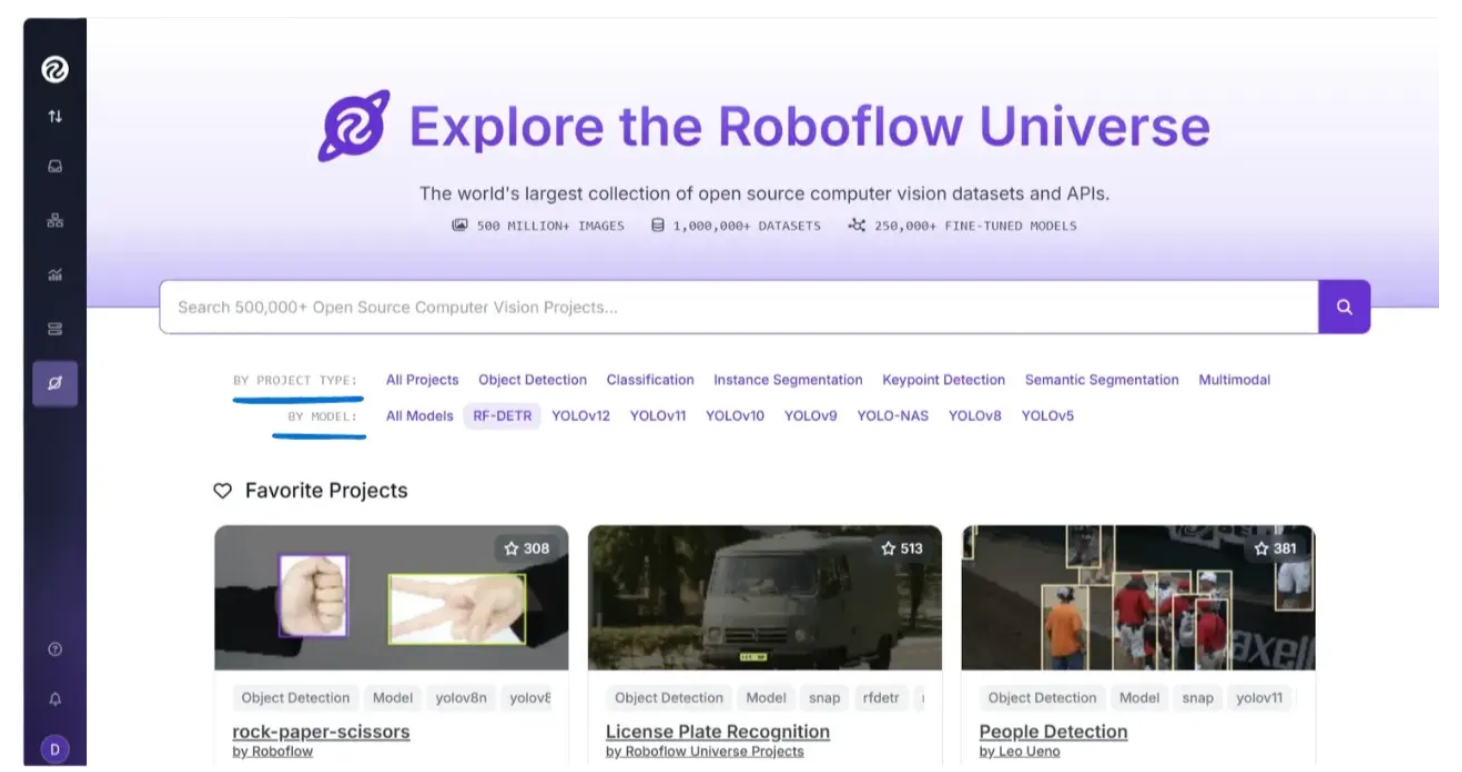
The video below demonstrates the different fine-tuned models, datasets, and projects available on Roboflow Universe:
You can search for models either by the base model they were fine-tuned on, as shown below, or by their project type:
For example, to search for fine-tuned models based on RF-DETR, click on “RF-DETR” in the user interface above, and you will see something like this:
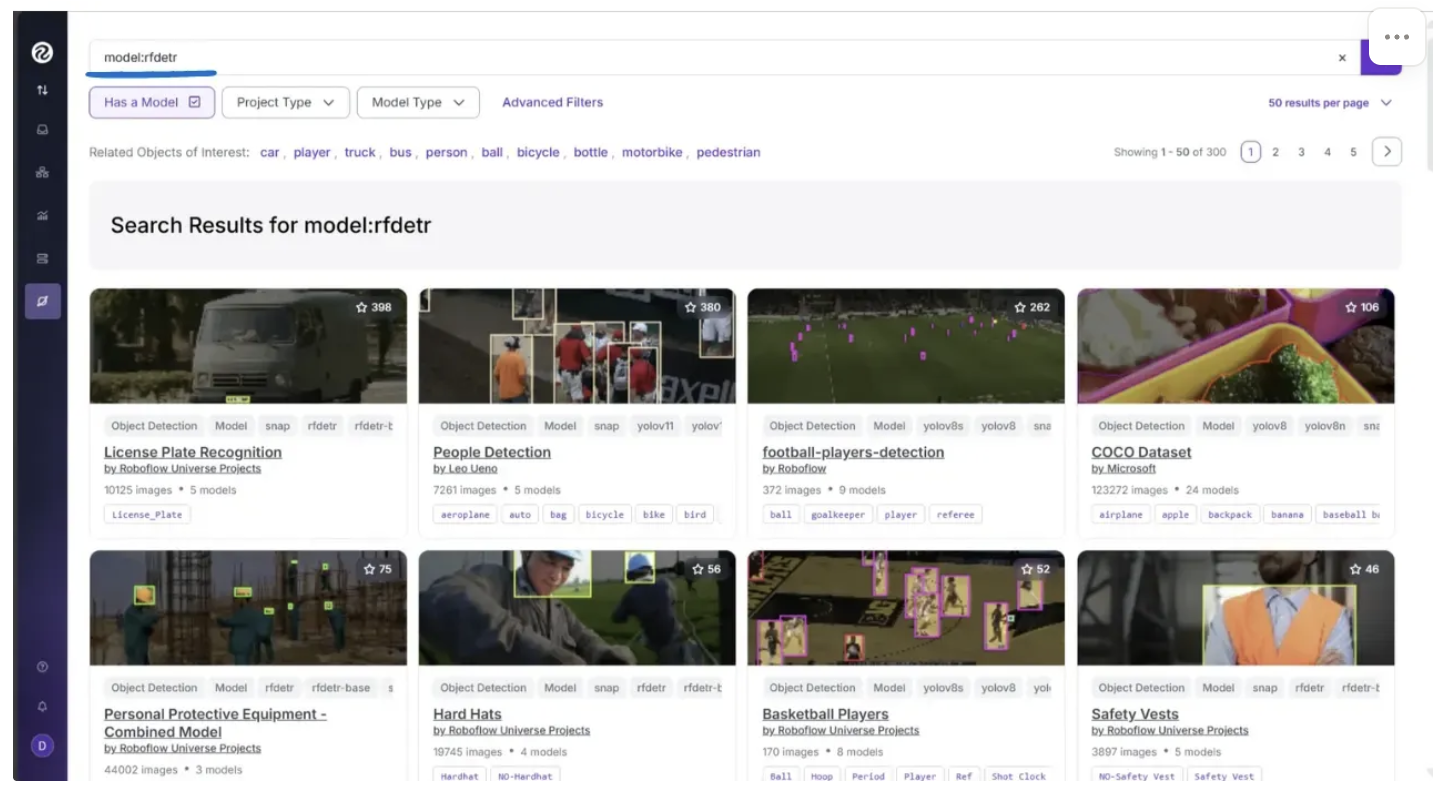
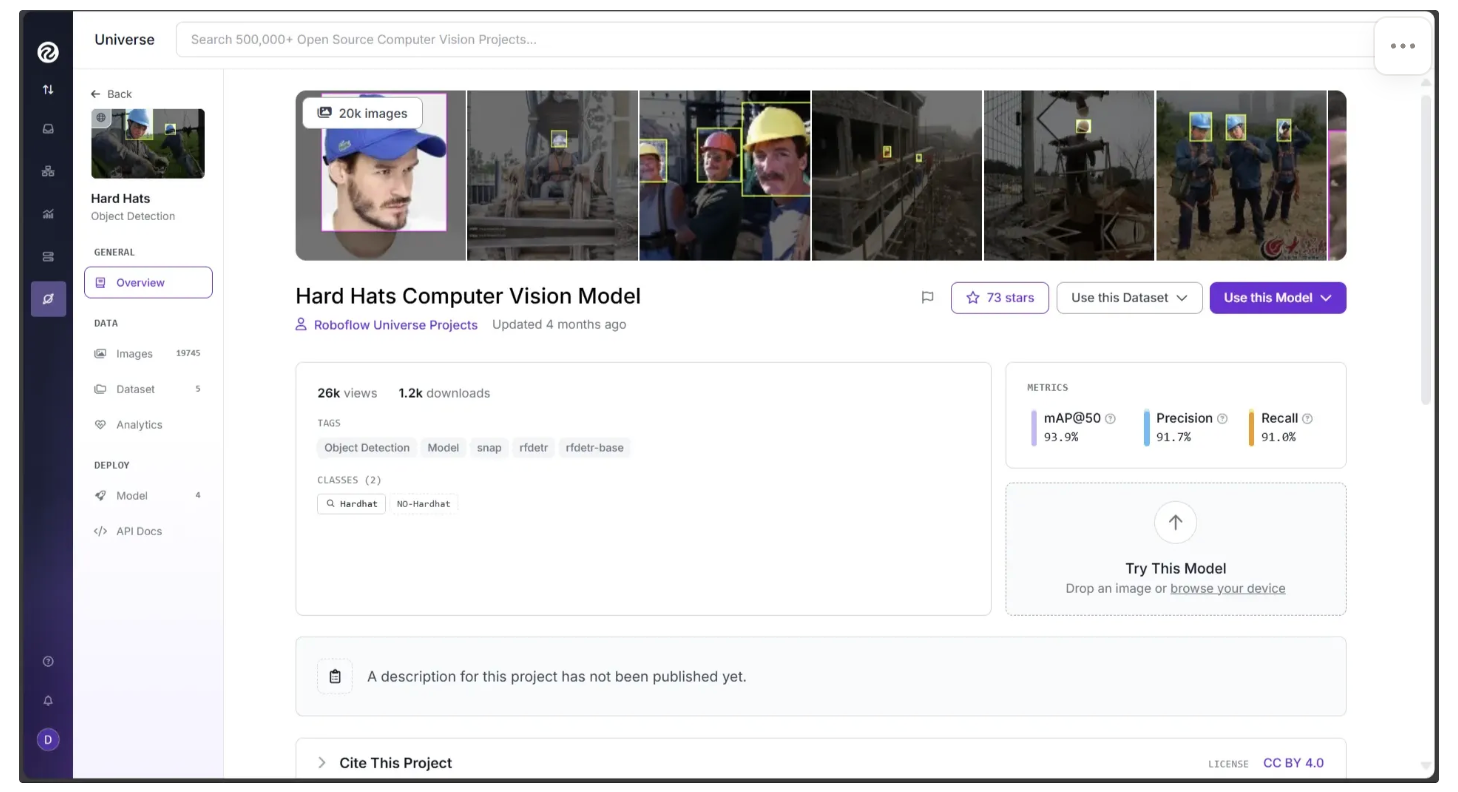
All of the projects shown above are based on RF-DETR. Similarly, you can search for models tailored to your specific object of interest. In my case, I want to detect whether a person on a construction site is wearing a hardhat. Since "hardhat" is not a COCO class, we need a model that has been specifically fine-tuned for this task.
The search below was for Hardhats, which returned several fine-tuned models capable of detecting hardhats:
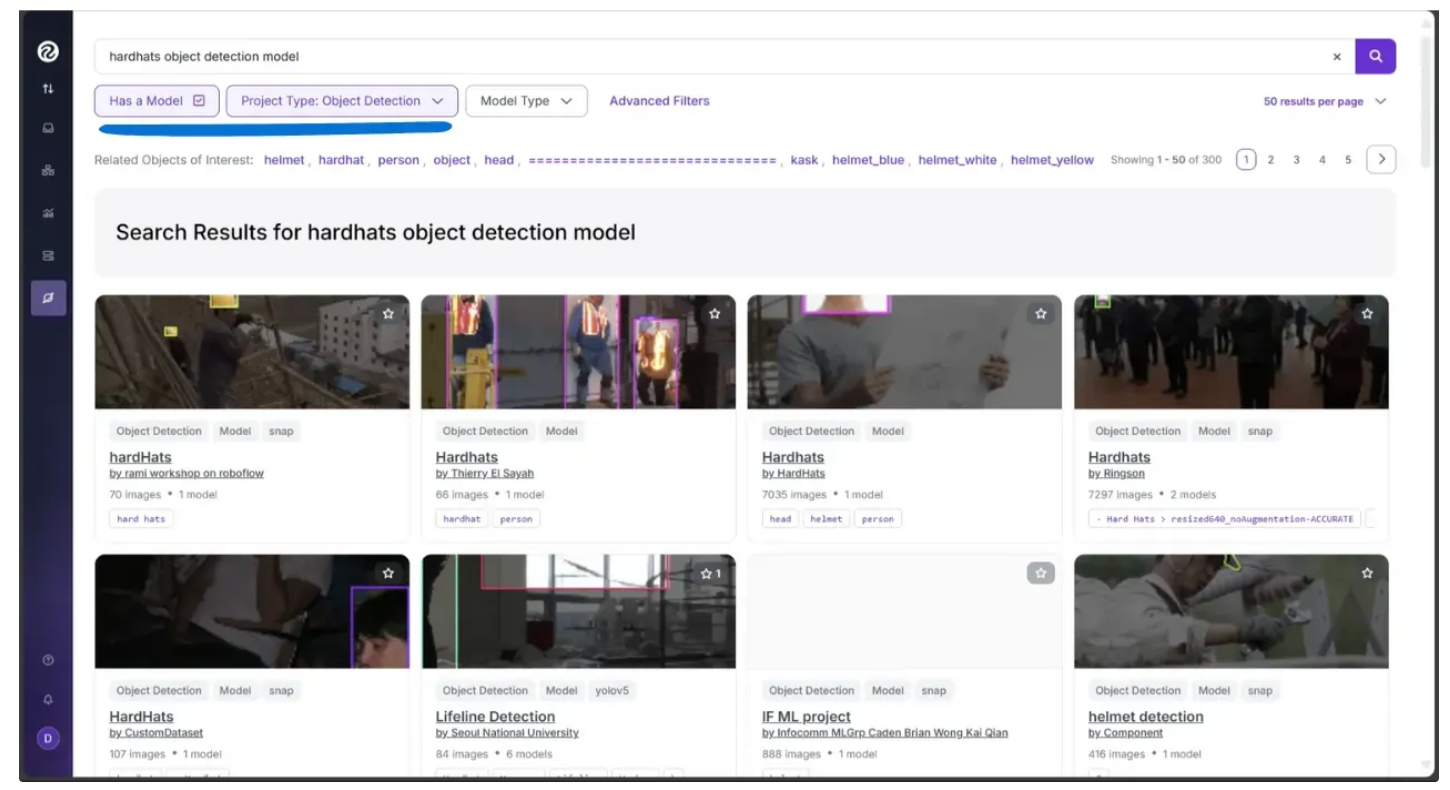
Among these, I chose the model shown below, which has been fine-tuned on a hardhat dataset using the RF-DETR model as its foundation:
I decided to choose this model after testing it directly through the Roboflow Universe user interface. By going to the “Model” section in the left sidebar, you can test the model on images and videos:
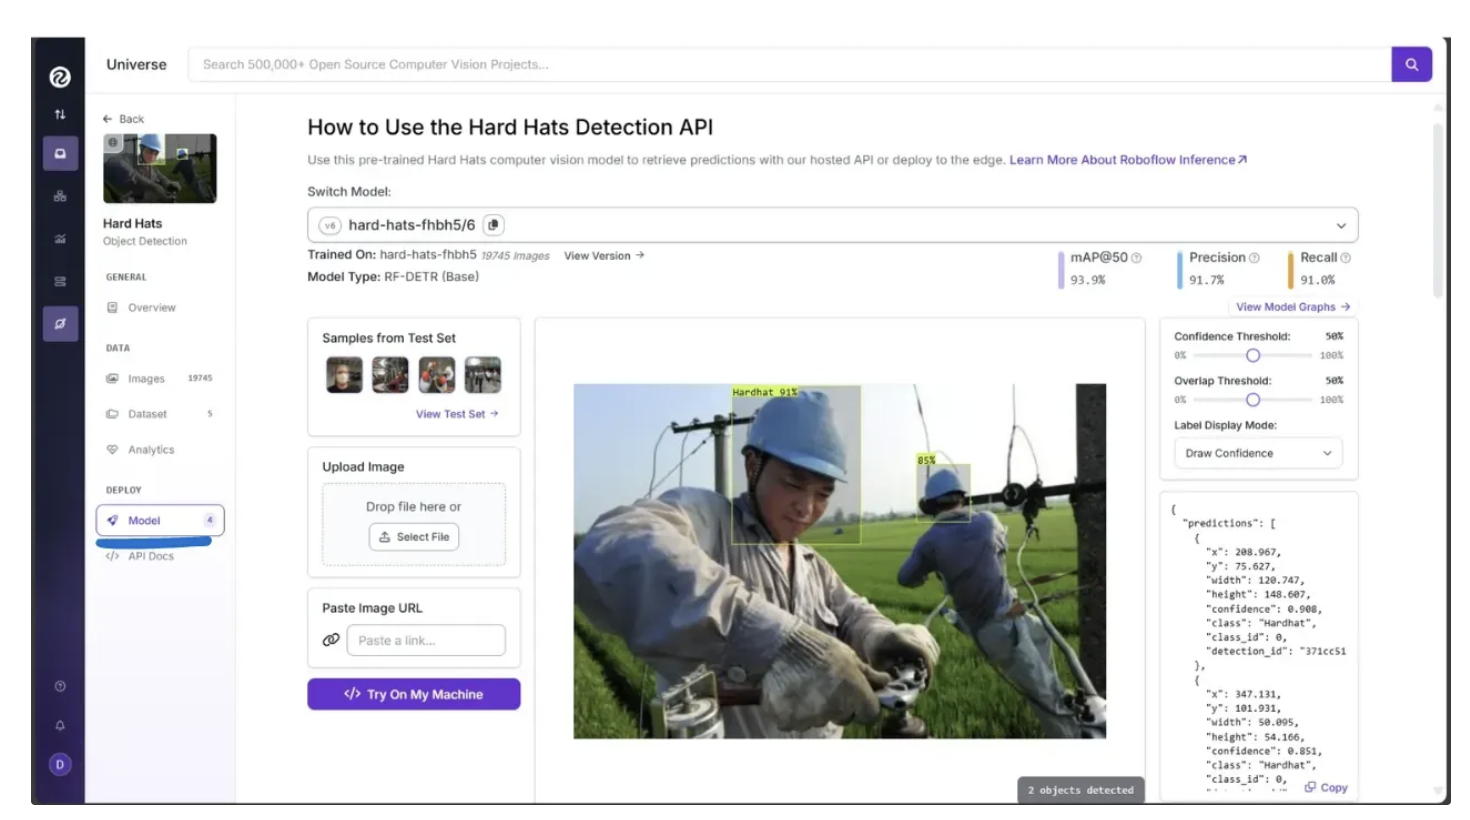
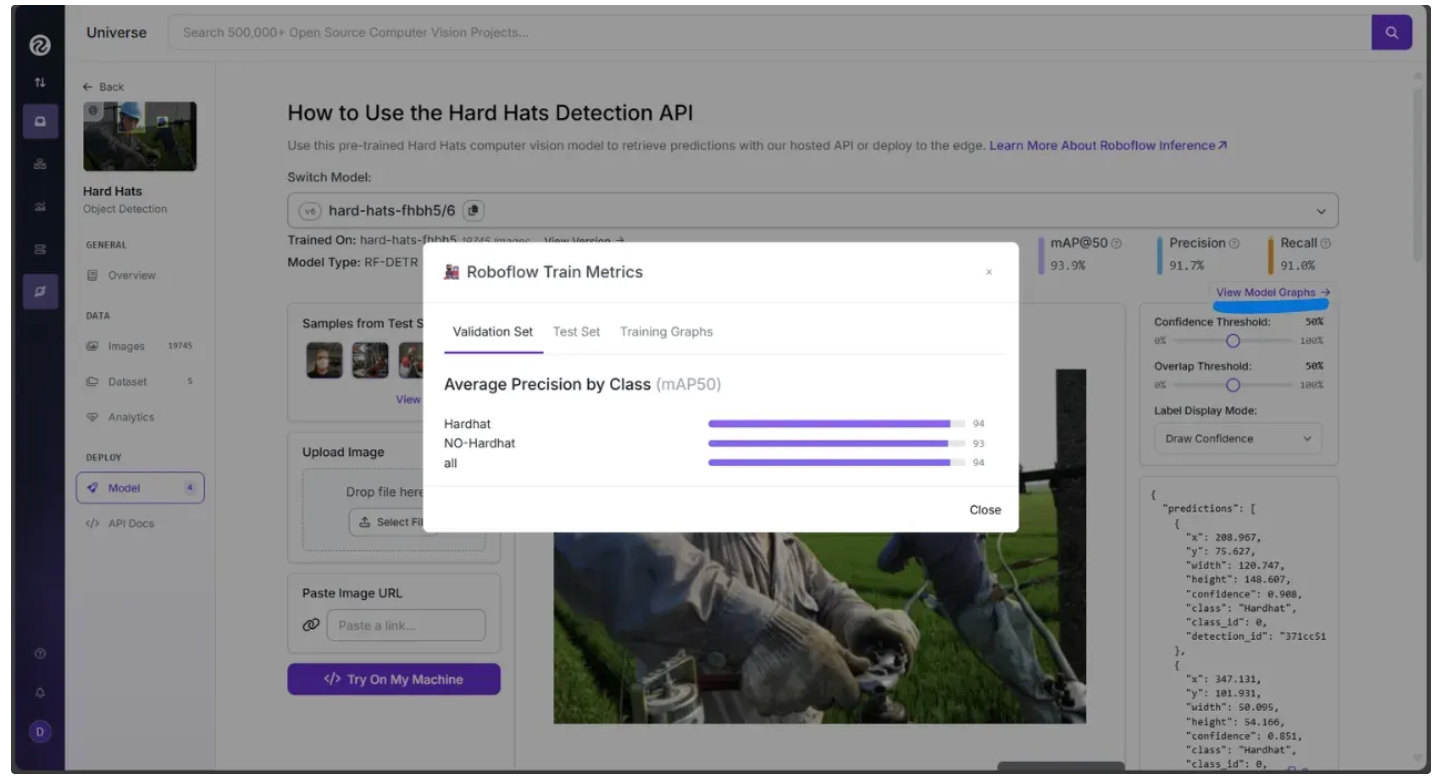
It has been fine-tuned to classify exactly two classes, 'Hardhat' and 'No-Hardhat,' as shown when you click “View Model Graphs” under the “Model” section in the left sidebar:
By leveraging this fine-tuned version of RF-DETR, we can accurately determine whether an individual is wearing a hardhat.
Integrating Models from Roboflow Universe
Similar to the code above, where we integrated the RF-DETR model for object detection, we can use any Roboflow Universe model by referencing its model ID through Roboflow Inference.
You can find a model’s ID in the “Model” section of the left sidebar in Roboflow Universe, as shown below:
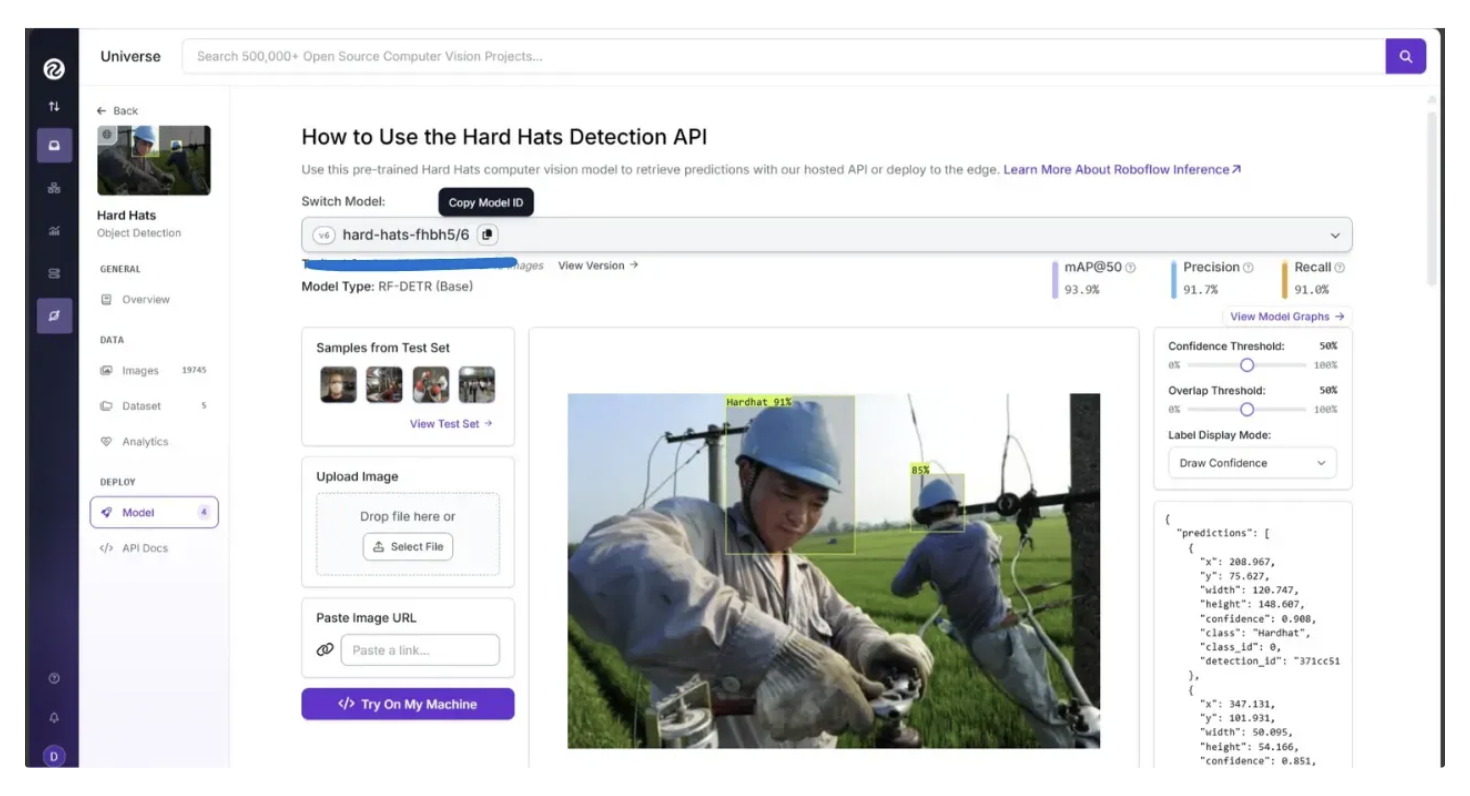
Image Object Detection with Fine-Tuned Roboflow Universe Model via Roboflow Inference
In the case of images, update the class_filter and model ID in the previously completed script used for object detection, as shown below, using the new model ID and the detection classes supported by the model:
# Trained classes
class_filter = ["NO-Hardhat"]

# Get finetuned roboflow universe model
model = get_model("hard-hats-fhbh5/6")
You can leave the rest of the code unchanged. The class_filter now targets "No-Hardhat" objects in the image. If the list is left empty, the model will detect all available classes; in this case, both "Hardhat" and "No-Hardhat" would be detected.
The below image demonstrates the object detection capability of the Fine-tuned model on our test image:
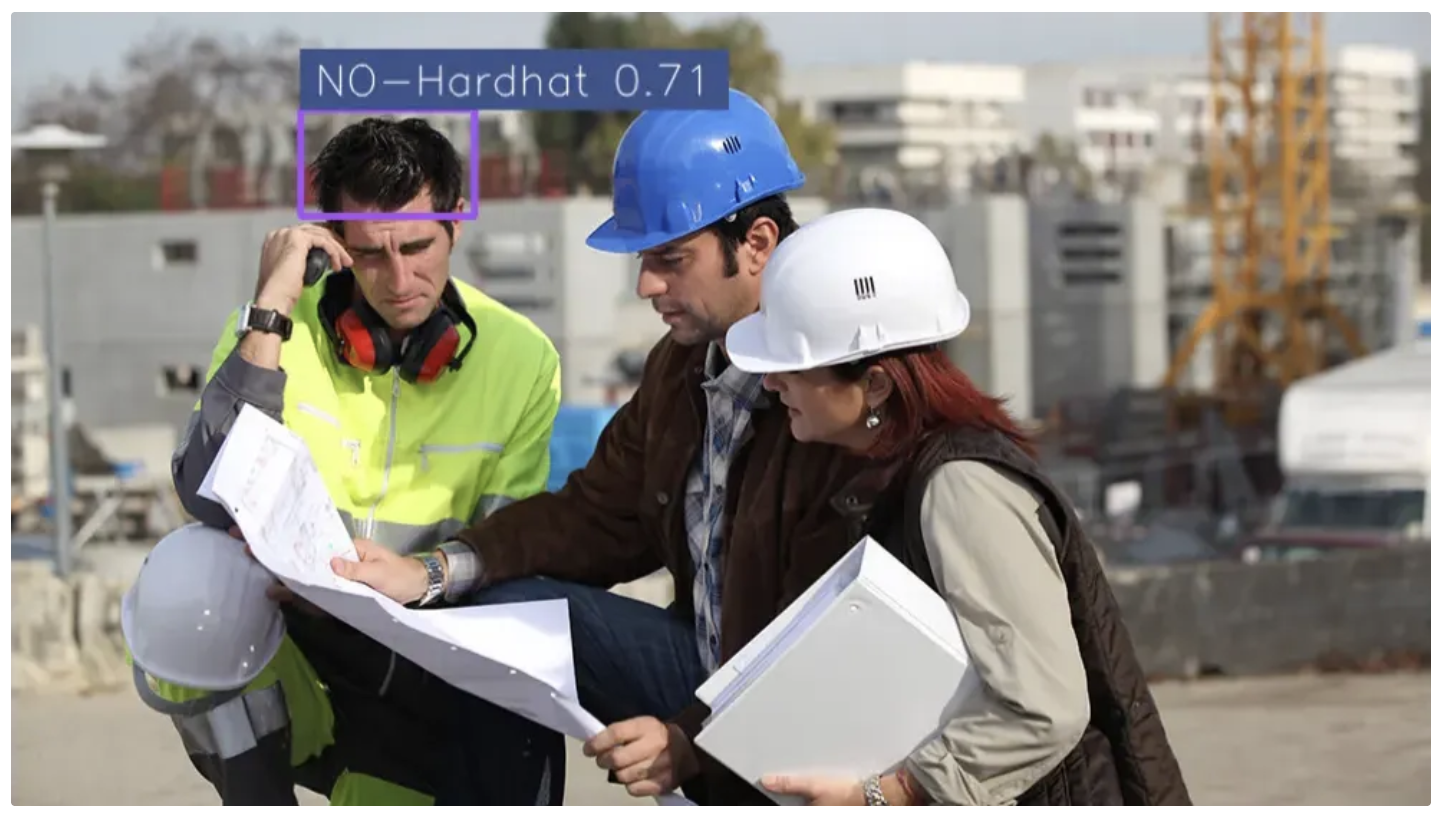
In the image above, the fine-tuned model successfully detected a case where someone was not wearing a hardhat, even though this category is not included among the COCO dataset classes.
Video Object Detection with Fine-Tuned Roboflow Universe Model via Roboflow Inference
Similarly, in the case of videos, update the class_filter and model ID in the previously completed script used for object detection, as shown below, using the new model ID and the detection classes supported by the model:
# Trained classes
class_filter = ["Hardhat"]

# Initialize with finetuned roboflow universe model
pipeline = InferencePipeline.init(
    model_id = "hard-hats-fhbh5/6",
    video_reference=video_path,
    on_prediction=callback,
    api_key="YOUR_ROBOFLOW_KEY",
    confidence=0.5,
)
You can leave the rest of the code unchanged. The class_filter now targets “Hardhat” objects in the video.
The below video demonstrates the object detection capability of the fine-tuned model on our test video:
In the video above, the fine-tuned model successfully detected hardhats, even though they are not included among the COCO dataset classes.
Fine-Tuning Models on Your Custom Datasets with Roboflow
Roboflow offers a comprehensive suite of tools that simplify the fine-tuning of computer vision models, such as RF-DETR, SmolVLM2, and SAM-2.1, for specific use cases such as:
- Roboflow Annotate: An AI-assisted labeling platform featuring Smart Polygon, Label Assist, and Auto Label to speed up dataset creation.
- Roboflow Universe: A community-driven hub for discovering and sharing datasets and pre-trained models.
- Roboflow Inference: Enables running fine-tuned models locally or via Roboflow’s API for fast image and video processing.
- Roboflow Maestro: Streamlines the fine-tuning of multimodal models with ready-to-use recipes for models such as Florence-2, PaliGemma 2, and Qwen2.5-VL.
Roboflow also provides extensive learning resources for fine-tuning various models, including RF-DETR, SmolVLM2, SAM2.1, and more.
Conclusion: Performing Object Detection Using Python
Roboflow, combined with Python, makes object detection both accessible and scalable, enabling developers to efficiently detect and track objects in images, videos, or live streams.
By leveraging pre-trained models like RF-DETR or fine-tuned models from Roboflow Universe, you can identify domain specific objects such as construction hardhats that go beyond the standard COCO classes.
Roboflow’s ecosystem, including Inference, Annotate, Universe, and Maestro, provides all the tools you need to train, fine-tune, and deploy custom models tailored to your specific use case. Learn more about object detection.
Written by Dikshant Shah
Cite this Post
Use the following entry to cite this post in your research:
Contributing Writer. (Oct 13, 2025). Python Object Detection. Roboflow Blog: https://blog.roboflow.com/python-object-detection/