
Custom PyTorch datasets give you precise control over how you load and transform each sample and pass them to your model, ensuring that the training process is both efficient and tailored to your project’s needs. In this article, you’ll walk through creating a custom dataset with PyTorch step by step. Then you'll see how to use it to train a model tailored to your needs. Along the way, you’ll:
- Understand PyTorch’s Dataset/DataLoader API and why it matters.
- See how Roboflow handles labeling and augmentation.
- Walk away with a GitHub repo + Colab that trains on your data in minutes.
PyTorch Custom Datasets
If you’ve ever taken a beginner deep learning course in PyTorch, chances are you’ve worked with datasets like MNIST or CIFAR-10. Using them is simple: just call a torchvision.datasets class, set a few parameters and transformations, and you’re ready to go.
For example, you can load the MNIST dataset with just a few lines of code like so:
from torchvision import datasets, transforms
from torch.utils.data import DataLoader

# Define a simple transform
transform = transforms.ToTensor()

# Download MNIST dataset
train_dataset = datasets.MNIST(root="data", train=True, transform=transform, download=True)

# Wrap in DataLoader
train_loader = DataLoader(train_dataset, batch_size=64, shuffle=True)

# Iterate through a batch
images, labels = next(iter(train_loader))
print(images.shape, labels.shape)  # torch.Size([64, 1, 28, 28]) torch.Size([64])
The Dataset gives you an abstraction over raw data, while the DataLoader makes it easy to manage batching, shuffling, and parallel loading. Together, they handle the heavy lifting of feeding data efficiently to your model.
But here’s the catch: prebuilt datasets only take you so far. They’re great for learning, but in real-world projects, your data almost never looks like MNIST or CIFAR-10. You might need to:
- Work with data stored in custom formats (e.g., images with labels in CSV/JSON or video files).
- Apply domain-specific preprocessing (e.g., medical image normalization, NLP tokenization).
- Handle large datasets that don’t fit in memory by streaming them efficiently.
- Add custom logic, like balancing class distributions or applying different augmentations on the fly.
That’s where custom PyTorch datasets come in. By subclassing torch.utils.data.Dataset, you define exactly how samples are accessed and prepared. This gives you complete control over your pipeline, ensuring your model learns from the data that actually matters to your use case.
Anatomy of a PyTorch Dataset Class
Building a custom dataset in PyTorch is straightforward. All you need to do is create a subclass of torch.utils.data.Dataset and implement these three methods:
- __init__ – set up your dataset (paths, annotations, transforms, and other configurations).
- __len__ – return the total number of samples.
- __getitem__ – fetch a single sample (and its label) by index.
Here’s the basic skeleton of a dataset class:
from torch.utils.data import Dataset

class CustomImageDataset(Dataset):
    def __init__(self, annotations_file, img_dir, transform=None, target_transform=None):
        pass

    def __len__(self):
        pass

    def __getitem__(self, idx):
        pass
This skeleton gives you the building blocks for handling any dataset. For example:
- In an image classification task, __getitem__ would return an image and its class label.
- For object detection, it could return an image along with bounding boxes and class IDs (e.g., from a COCO-style annotation file).
- For natural language processing (NLP), it might return a tokenized sequence and its target label.
The key point is that these three methods are all PyTorch needs to integrate your dataset seamlessly with the rest of its ecosystem: transformations, DataLoaders, and training loops.
Create Your Custom Dataset
Now that we have a basic understanding, let’s begin the process of creating our custom dataset. Before building the dataset with PyTorch, we first need to fetch and annotate our data.
In this article, the data consists of poker cards. The goal is to collect as many images of poker cards as possible.
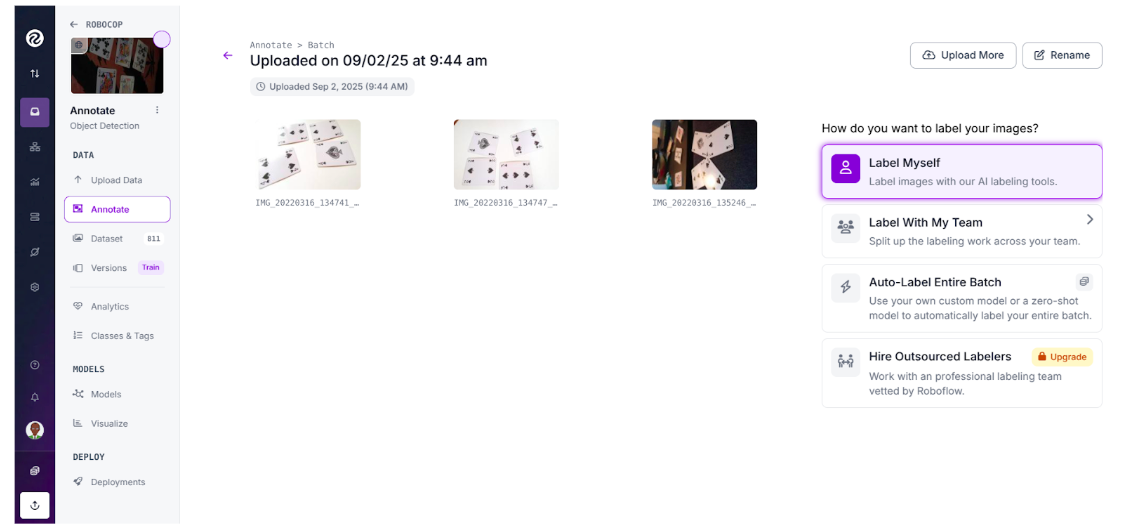
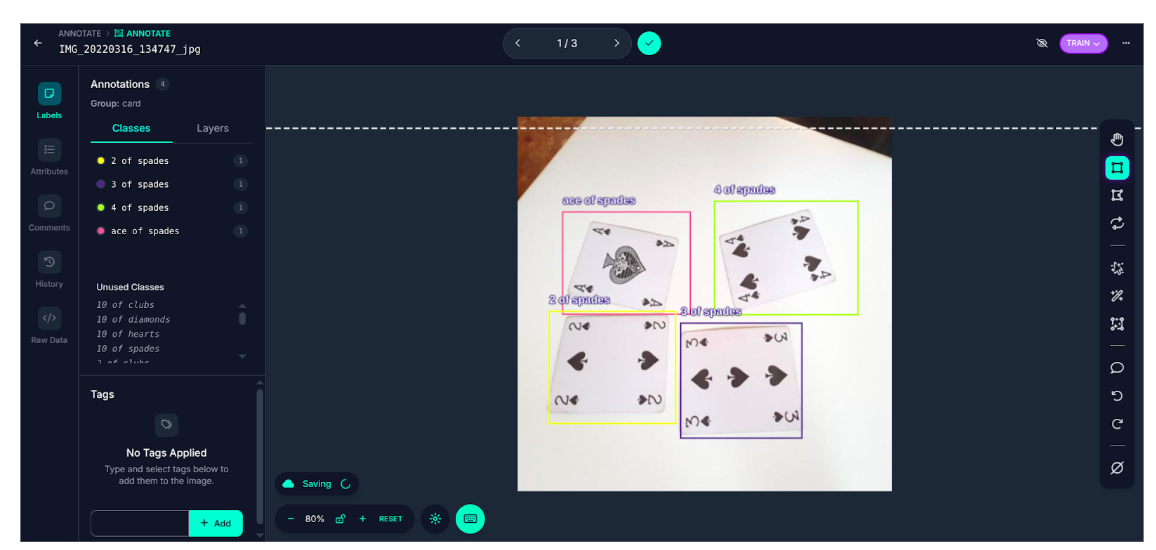
You can manage the entire process of collecting card photos with Roboflow (just create a free account and start your project). After gathering the images, proceed to annotation.
Or rather than collecting and annotating your own images, you can use a ready-made dataset that already exists on Roboflow Universe: the Poker Cards dataset.
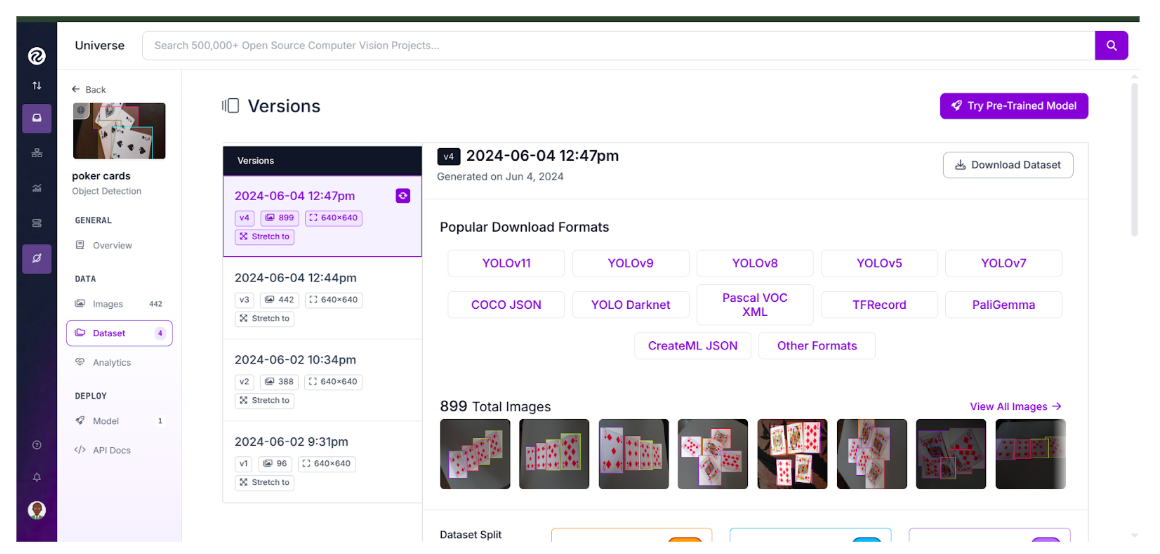
With this dataset, the next step is simply to download it. On Roboflow Universe, you can export in a variety of formats. This article uses the COCO format, so the download will look like this:
poker-cards-4/
├── train/
│   ├── _annotations.coco.json
│   ├── image1.jpg
│   ├── image2.jpg
│   └── ... (other image files)
├── valid/
│   ├── _annotations.coco.json
│   ├── image1.jpg
│   ├── image2.jpg
│   └── ... (other image files)
└── test/
    ├── _annotations.coco.json
    ├── image1.jpg
    ├── image2.jpg
    └── ... (other image files)
Each split (train, valid, test) is in its own folder, with its annotations stored in _annotations.coco.json and the corresponding images alongside it.
Now that you have the dataset, it’s time to turn it into a custom dataset in PyTorch.
Build Your Custom Dataset Class
To build the custom dataset in PyTorch, you’ll implement the key methods outlined in the anatomy section.
import os
import json
import torch
from torch.utils.data import Dataset
from torchvision import transforms
from PIL import Image
import torchvision.transforms.functional as F


# --- Custom dataset ---
class PokerCardDataset(Dataset):
    def __init__(self, root_dir, transform=None, resize=None):
        self.root_dir = root_dir
        self.transform = transform
        self.resize = resize  # (H, W) tuple if resizing

        # Load COCO annotations
        ann_path = os.path.join(root_dir, "_annotations.coco.json")
        with open(ann_path, "r") as f:
            self.coco = json.load(f)

        # Map image_id -> image file
        self.images = {img["id"]: img for img in self.coco["images"]}

        # Collect annotations by image_id
        self.annotations = {}
        for ann in self.coco["annotations"]:
            img_id = ann["image_id"]
            if img_id not in self.annotations:
                self.annotations[img_id] = []
            self.annotations[img_id].append(ann)

        self.image_ids = list(self.images.keys())

        # Build category mapping {id: name}
        self.cat_id_to_name = {cat["id"]: cat["name"] for cat in self.coco["categories"]}

    def __len__(self):
        return len(self.image_ids)

    def __getitem__(self, idx):
        img_id = self.image_ids[idx]
        img_info = self.images[img_id]

        # Load image
        img_path = os.path.join(self.root_dir, img_info["file_name"])
        image = Image.open(img_path).convert("RGB")

        # Original size
        orig_w, orig_h = image.size

        # Load annotations
        anns = self.annotations.get(img_id, [])
        boxes, labels = [], []
        for ann in anns:
            x, y, w, h = ann["bbox"]
            boxes.append([x, y, x + w, y + h])
            labels.append(ann["category_id"])

        boxes = torch.as_tensor(boxes, dtype=torch.float32)
        labels = torch.as_tensor(labels, dtype=torch.int64)
        target = {"boxes": boxes, "labels": labels, "image_id": torch.tensor([img_id])}

        # Resize if specified
        if self.resize:
            new_h, new_w = self.resize
            image = F.resize(image, (new_h, new_w))

            scale_x = new_w / orig_w
            scale_y = new_h / orig_h
            boxes[:, [0, 2]] = boxes[:, [0, 2]] * scale_x
            boxes[:, [1, 3]] = boxes[:, [1, 3]] * scale_y
            target["boxes"] = boxes

        if self.transform:
            image = self.transform(image)

        return image, target
The __init__ method loads the dataset, sets up transformations, handles resizing, and builds the mapping between images and their annotations. The __getitem__ method makes sure each image is returned alongside its annotations, applying resizing and transformations when needed.
The complete code and accompanying notebooks for this article are available here.
Here’s how you can initialize the dataset:
transform = transforms.ToTensor()
dataset = PokerCardDataset("poker-cards-4/train", transform=transform, resize=(256, 256))
To use the custom dataset, you need to create an instance of it by specifying the dataset split (train, valid, or test), the transformations we want to apply, and any resizing parameters.
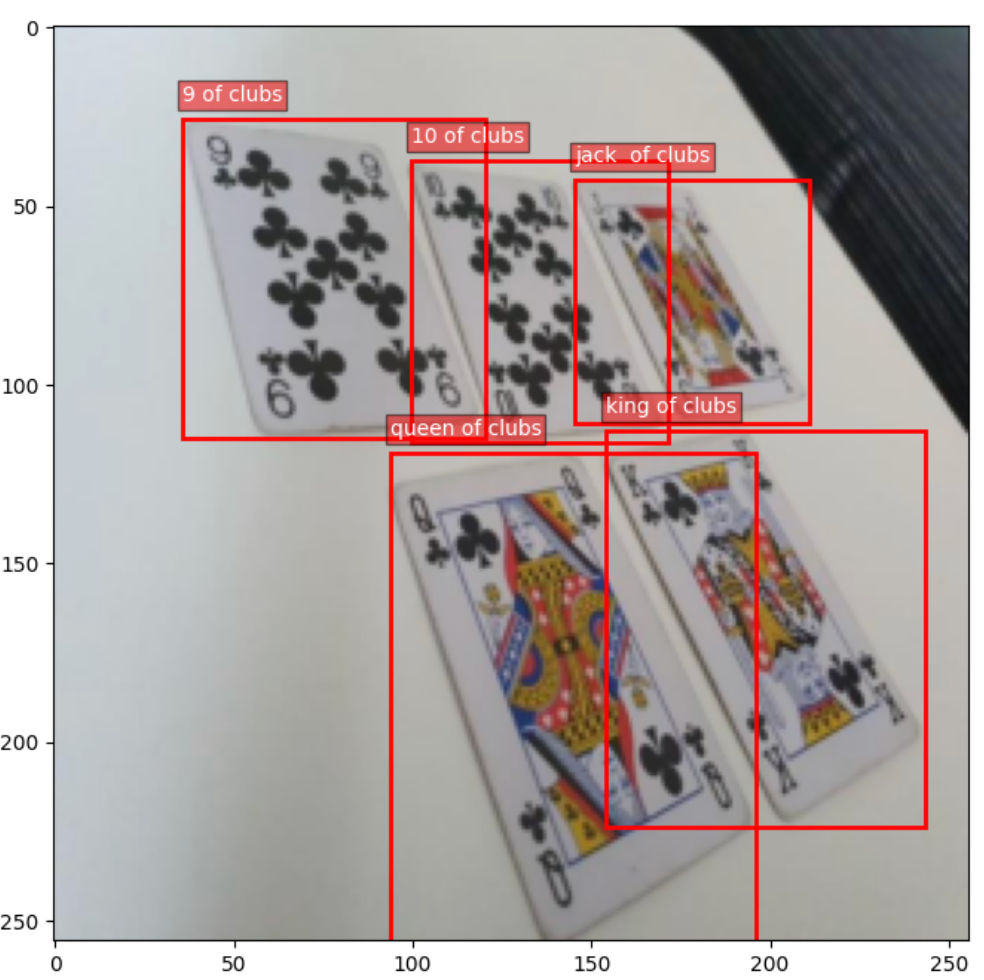
Once you have the dataset instance, you can interact with it just like any PyTorch dataset. For example, you can visualize an image along with its bounding box annotations:
import matplotlib.pyplot as plt
import matplotlib.patches as patches

# Get a sample
image, target = dataset[0]

# Convert back to numpy for plotting
img_np = image.permute(1, 2, 0).numpy()

# Plot
fig, ax = plt.subplots(1, figsize=(8, 8))
ax.imshow(img_np)

for box, label in zip(target["boxes"], target["labels"]):
    x1, y1, x2, y2 = box
    rect = patches.Rectangle(
        (x1, y1), x2 - x1, y2 - y1,
        linewidth=2, edgecolor="red", facecolor="none"
    )
    ax.add_patch(rect)

    # Add label text
    class_name = dataset.cat_id_to_name[label.item()]
    ax.text(
        x1, y1 - 5, class_name,
        fontsize=10, color="white",
        bbox=dict(facecolor="red", alpha=0.5, pad=2)
    )

plt.show()
This allows you to confirm that the dataset and annotations are correctly aligned. With that step complete, you are ready to move on to training a model using your custom dataset.
Train a Minimal Model
In this section, you’ll train a Faster R-CNN object detection model on the custom Poker Cards dataset. Since you already have the dataset prepared, the training process is fairly straightforward. You’ll use PyTorch’s DataLoader to efficiently feed data into the model during training.
We start by importing the necessary libraries:
import torch
import torchvision
from torchvision.models.detection import FasterRCNN_ResNet50_FPN_Weights
from torch.utils.data import DataLoader
import torchvision.transforms as T
import numpy as np
Next, define the transformations that will be applied to the dataset images:
transform = T.Compose([
    T.Resize((512, 512)),
    T.ToTensor()
])
Then create two instances of the dataset, one for training and another for validation:
train_dataset = PokerCardDataset(root_dir="poker-cards-4/train", transform=transform)
valid_dataset = PokerCardDataset(root_dir="poker-cards-4/valid", transform=transform)
And their corresponding data loaders:
train_loader = DataLoader(train_dataset, batch_size=2, shuffle=True, collate_fn=lambda x: tuple(zip(*x)))
valid_loader = DataLoader(valid_dataset, batch_size=2, shuffle=False, collate_fn=lambda x: tuple(zip(*x)))
Now, load the Faster R-CNN model from TorchVision. Since the dataset has custom classes, you need to replace the model’s classification head:
num_classes = len(train_dataset.coco["categories"]) + 1  # +1 for background
model = torchvision.models.detection.fasterrcnn_resnet50_fpn(weights=FasterRCNN_ResNet50_FPN_Weights.DEFAULT)
in_features = model.roi_heads.box_predictor.cls_score.in_features
model.roi_heads.box_predictor = torchvision.models.detection.faster_rcnn.FastRCNNPredictor(in_features, num_classes)
Next, choose the device for training (GPU if available, otherwise CPU):
device = torch.device("cuda" if torch.cuda.is_available() else "cpu")
model.to(device)
Define the optimizer:
params = [p for p in model.parameters() if p.requires_grad]
optimizer = torch.optim.SGD(params, lr=0.005, momentum=0.9, weight_decay=0.0005)
Finally, set up the training loop:
num_epochs = 10
for epoch in range(num_epochs):
    model.train()
    total_loss = 0
    for images, targets in train_loader:
        images = [img.to(device) for img in images]
        targets = [{k: v.to(device) for k, v in t.items()} for t in targets]

        loss_dict = model(images, targets)
        losses = sum(loss for loss in loss_dict.values())

        optimizer.zero_grad()
        losses.backward()
        optimizer.step()
        total_loss += losses.item()

    print(f"Epoch {epoch+1}/{num_epochs}, Loss: {total_loss:.4f}")
When training is complete, save the model for future use:
torch.save(model.state_dict(), "fasterrcnn_pokercards.pth")
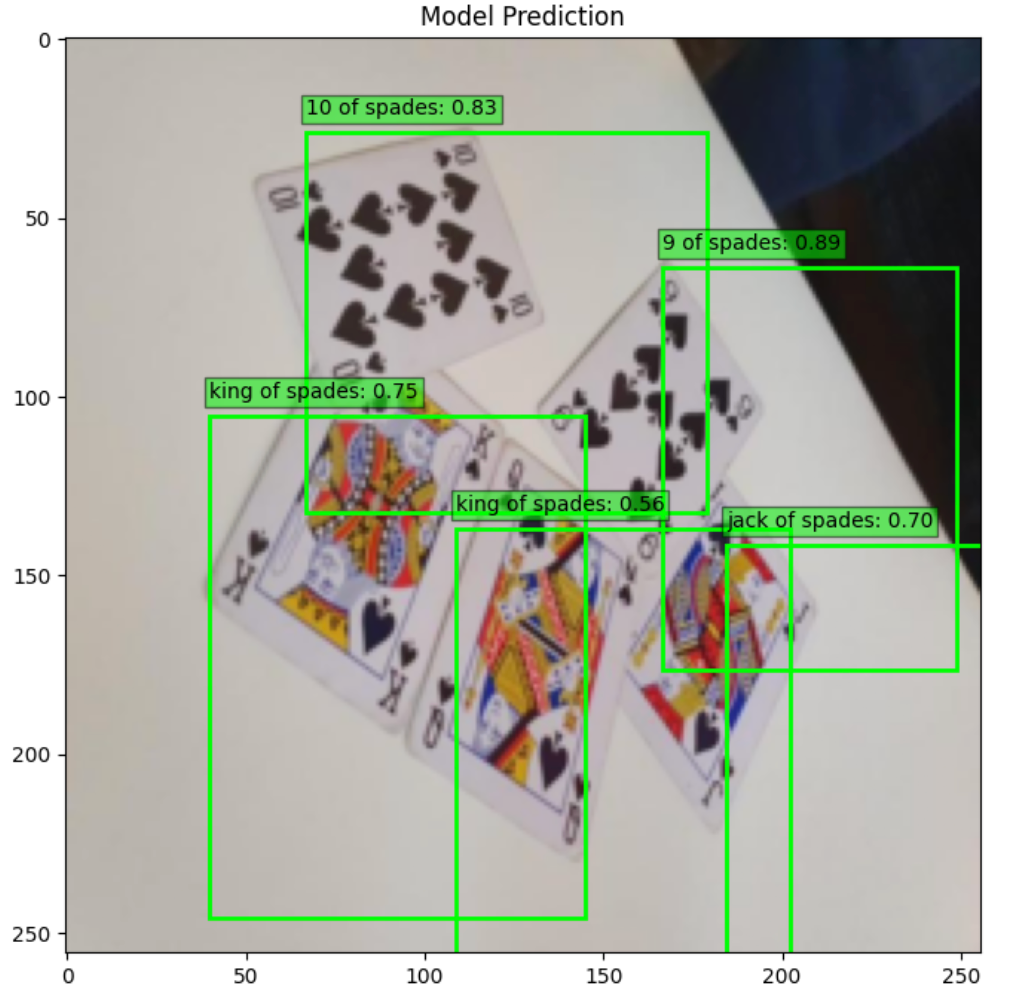
Now that you have a trained model, see how it performs on a sample from the test set. You’ll run inference and visualize the predicted bounding boxes, labels, and confidence scores.
import torchvision
import matplotlib.pyplot as plt
import matplotlib.patches as patches

# --- Load trained model for inference ---
model.eval()

# Pick one sample from the test set
test_dataset = PokerCardDataset("poker-cards-4/test", transform=transforms.ToTensor(), resize=(256, 256))
image, target = test_dataset[0]

# Add batch dimension and send to device
img_tensor = image.unsqueeze(0).to(device)

# Run inference
with torch.no_grad():
    prediction = model(img_tensor)

# Convert back to numpy for plotting
img_np = image.permute(1, 2, 0).numpy()

# Plot results
fig, ax = plt.subplots(1, figsize=(8, 8))
ax.imshow(img_np)
ax.set_title("Model Prediction")

# Get predicted boxes, labels, scores
pred_boxes = prediction[0]['boxes'].cpu()
pred_labels = prediction[0]['labels'].cpu()
pred_scores = prediction[0]['scores'].cpu()

# Draw only boxes above a confidence threshold
threshold = 0.5
for box, label, score in zip(pred_boxes, pred_labels, pred_scores):
    if score < threshold:
        continue
    x1, y1, x2, y2 = box
    rect = patches.Rectangle(
        (x1, y1), x2 - x1, y2 - y1,
        linewidth=2, edgecolor="lime", facecolor="none"
    )
    ax.add_patch(rect)

    # Add label + score
    class_name = test_dataset.cat_id_to_name[label.item()]
    ax.text(
        x1, y1 - 5, f"{class_name}: {score:.2f}",
        fontsize=10, color="black",
        bbox=dict(facecolor="lime", alpha=0.5, pad=2)
    )

plt.show()
This code will display the test image along with the model’s predictions, showing which objects it detected and with what confidence.
At this point, you’ve built a fully functional object detection model trained on a custom PyTorch dataset. Building everything from scratch gives you fine-grained control over preprocessing, model setup, and training. But it also means more manual work.
Next, let’s explore how you can accomplish the same task much faster using Roboflow Train.
Create a Custom Dataset With Roboflow
With Roboflow, creating and managing a custom dataset is incredibly simple. All you need to do is:
- Install the Roboflow library.
- Set your Roboflow API key as an environment variable (ROBOFLOW_API_KEY).
- Fetch your dataset directly from Roboflow Universe, specifying the format you want.
from roboflow import download_dataset

dataset = download_dataset("https://universe.roboflow.com/roboflow-jvuqo/poker-cards-fmjio/dataset/4", "coco")
With just one line of code, you have your dataset downloaded and ready to use. From here, you can begin training or fine-tuning any model of your choice.
Fine-Tune RF-DETR
For this example, you’ll fine-tune the RF-DETR model. First, install the library:
pip install rfdetrThen, initialize the model and start training:
from rfdetr import RFDETRSmall

model = RFDETRSmall()

model.train(dataset_dir=dataset.location, epochs=10, batch_size=8, grad_accum_steps=2)
That’s all it takes; just point the model to your dataset’s location, and training begins.
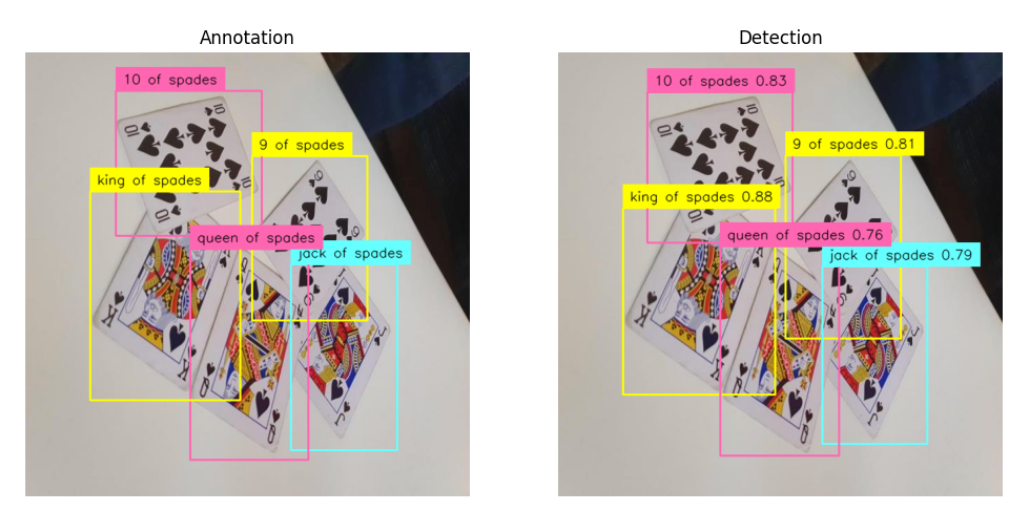
Evaluate Model Predictions
Once trained, we can use Supervision to visualize predictions from the model and compare them with the ground truth annotations. This makes it easy to evaluate how well the fine-tuned model performs on your custom dataset.
The complete code and accompanying notebooks for this article are available here.
Conclusion: How to Make a Custom Dataset for Training a Model with PyTorch and Roboflow
Custom datasets are the backbone of serious deep learning projects. They give you full control over how your data is collected, labeled, transformed, and ultimately fed into your model.
Unlike prebuilt datasets, which are great for learning but rarely reflect your real-world problem, custom datasets ensure your model is trained on data that truly matters to your use case. This flexibility leads to better performance, more reliable results, and models that are actually useful in production.
Of course, building and managing datasets from scratch can be time-consuming. That’s where Roboflow comes in. With Roboflow Annotate, you can handle labeling and augmentation in a streamlined interface.
Once annotated, you can organize and host your datasets in Roboflow Universe, making them easy to version, share, and scale. And when it’s time to train, the Roboflow Python package lets you pull down any dataset from Universe and instantly convert it into a custom PyTorch Dataset, ready for your training.
➡️ Try Roboflow Free: upload 20 sample images, annotate, train, deploy, and improve in minutes.
Cite this Post
Use the following entry to cite this post in your research:
Contributing Writer. (Sep 3, 2025). Build a PyTorch Custom Dataset. Roboflow Blog: https://blog.roboflow.com/pytorch-custom-dataset/