
When you are building computer vision models, you may want to use a model’s predictions to make real world business decisions and notify individuals about the results. This can range from detecting if a defect is present on an object, a shelf is out of stock, or a package has been delivered.
In this guide, we are going to discuss how to configure your vision system to send alerts if a backup is detected on an assembly line using the Slack Notification block with Roboflow Workflows.
Make a Slack Notification Workflow
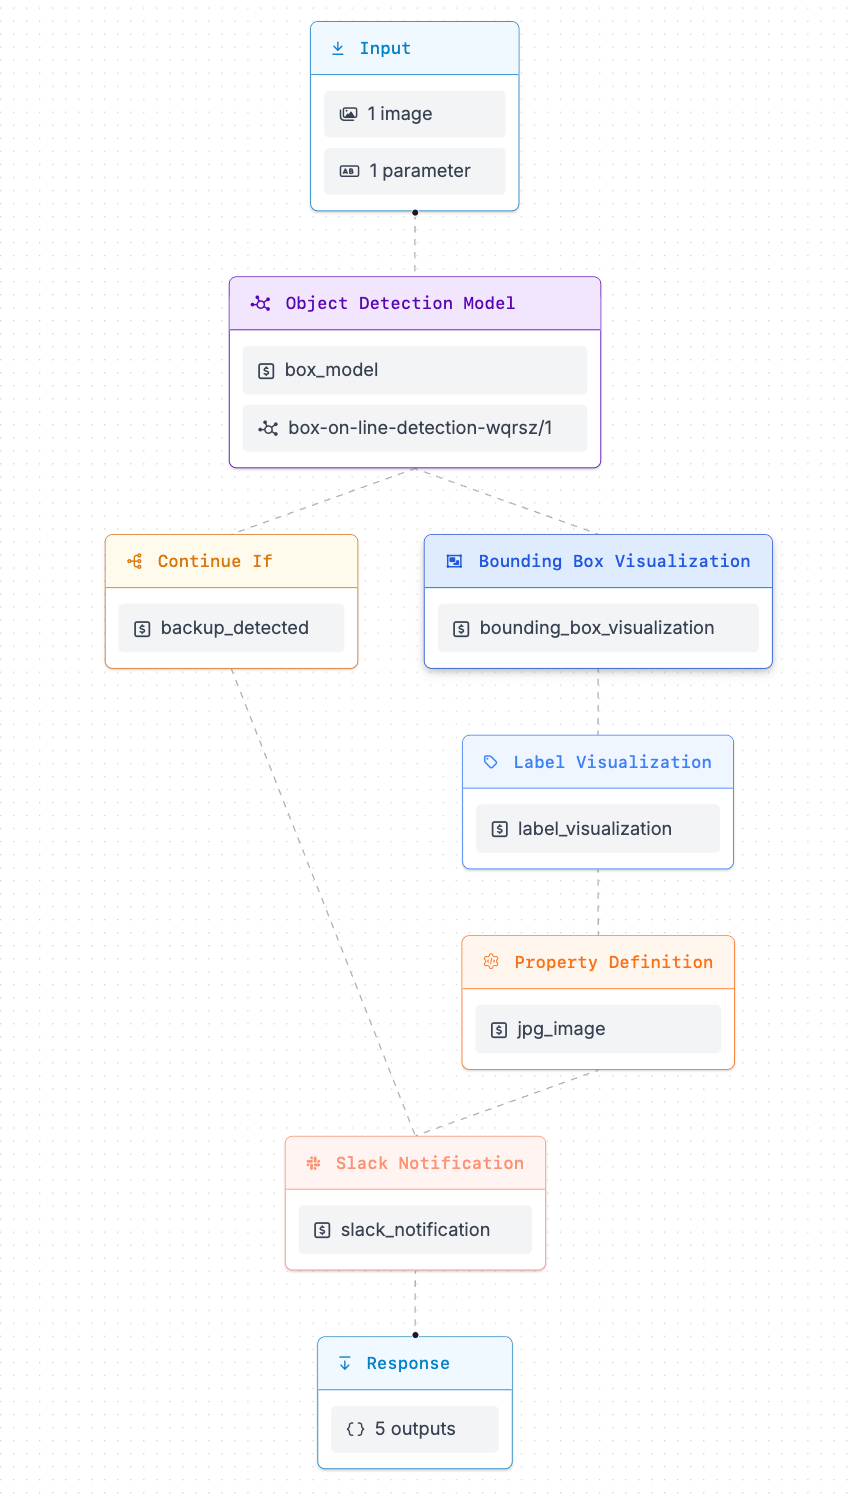
Here is a preview of what our final workflow will look like:
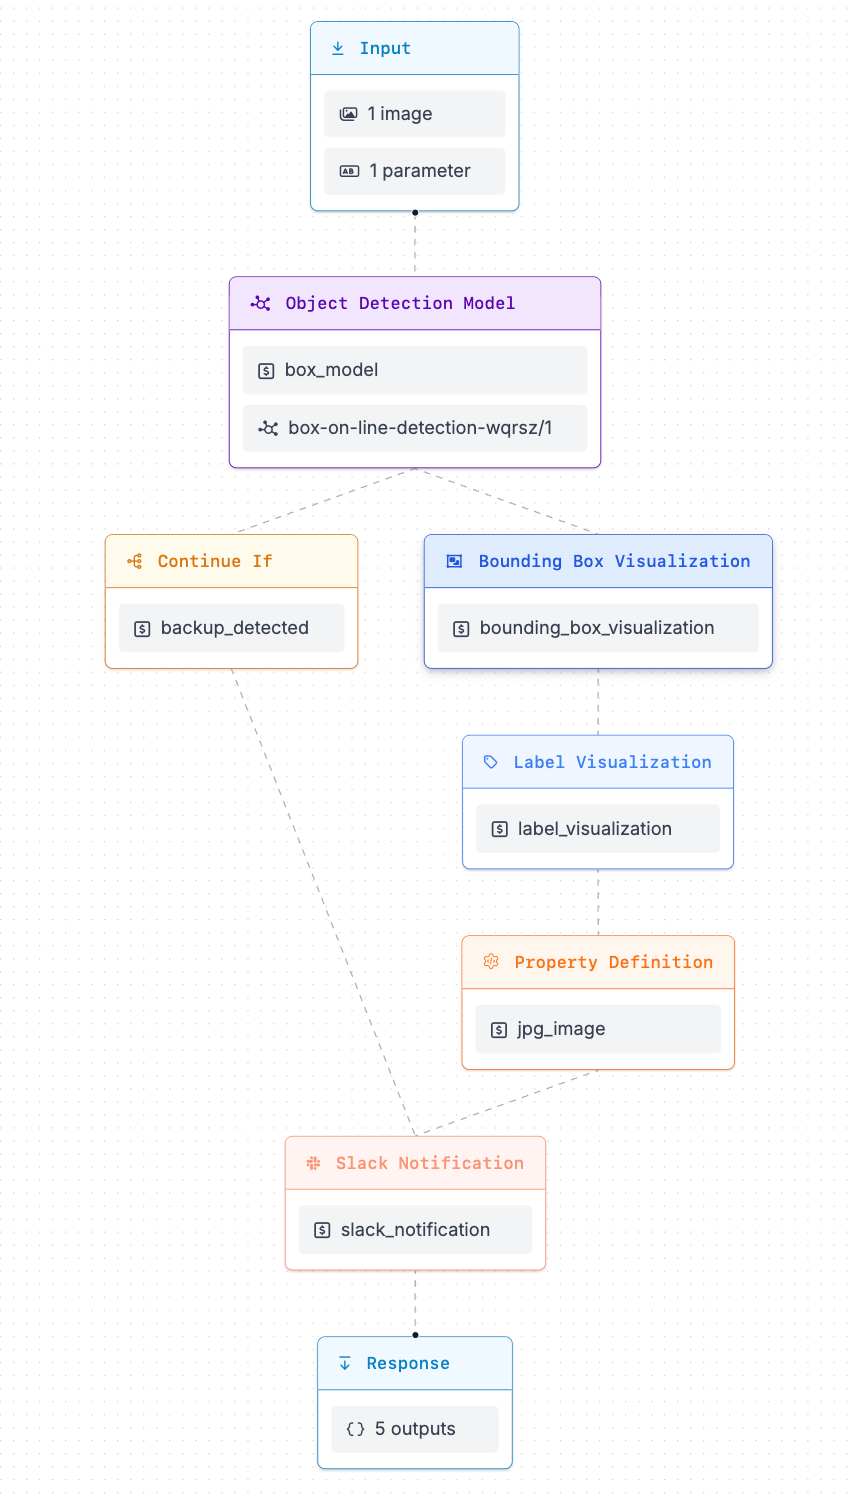
To build this Workflow, we will:
- Create a new Workflow in Roboflow.
- Configure an input image.
- Configure an object detection model.
- Determine if the number of boxes on an assembly line is greater than the accepted threshold.
- Send a slack notification if there is a backup detected.
If you are looking exclusively for information on the slack notification block, skip to Step #5.
What is Roboflow Workflows?
Workflows is a computer vision application builder. With Workflows, you can build complex computer vision applications in a web interface and then deploy Workflows with the Roboflow cloud, on an edge device such as an NVIDIA Jetson, or on any cloud provider like GCP or AWS.
Workflows has a wide range of pre-built functions available for use in your projects and you can test your pipeline in the Workflows web editor, allowing you to iteratively develop logic without writing any code.
Step #1: Create a New Workflow
To get started, first you will need a model in Roboflow. Follow the Roboflow Getting Started guide to learn how to create a project and train a model in Roboflow.
Once you have a model, navigate to Roboflow Workflows by clicking “Workflows” in the sidebar of your Roboflow dashboard.
Click the “Create a Workflow” button to get started.

Step #2: Configure your Inputs
Our workflow will accept a single image as an input (which could also be a frame from a video). Your workflow will accept a single image by default, but you can configure the workflow to accept multiple images or parameters using the Input block.

Step #3: Configure your Model
Next, we’ll want to run an object detection model and return the objects found. We need to configure what model we want to use in our workflow.
To do this, click on the “Object Detection Model” block and select a model. We’ll be using the box-on-line-detection-wqrsz/1 model trained on Assembly Line Boxes. For this example, I’ve added plastic_box

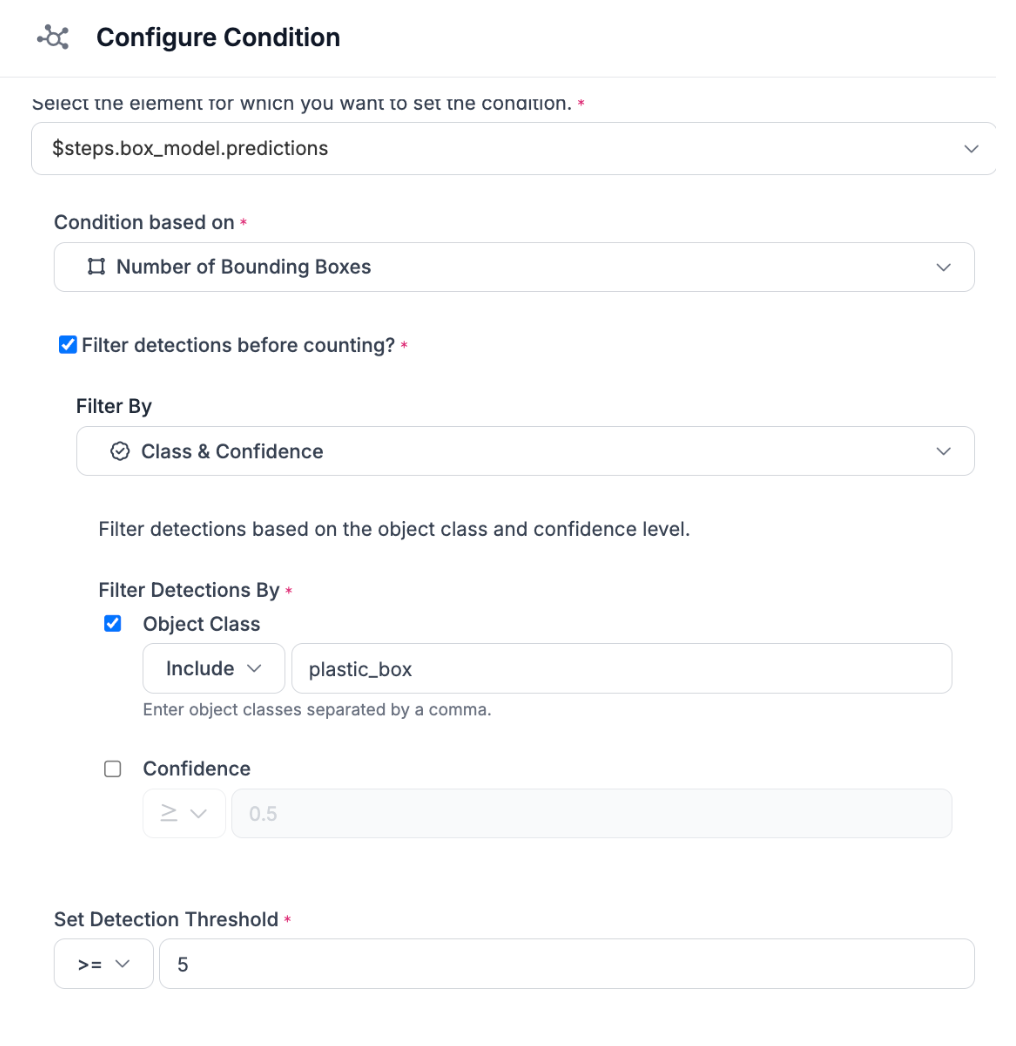
Step #4: Determine if an Assembly Line Backup Exists
For this guide, we are going to determine if an assembly line backup exists. This is defined by if the number of objects with the plastic_box class is greater than four. Add the Continue If block and edit the "Condition Statement" to use criteria below. The conditional will check that the number of bounding boxes, with class plastic_box, is greater than or equal to five.
Step #5: Configuring the Slack Notification Block
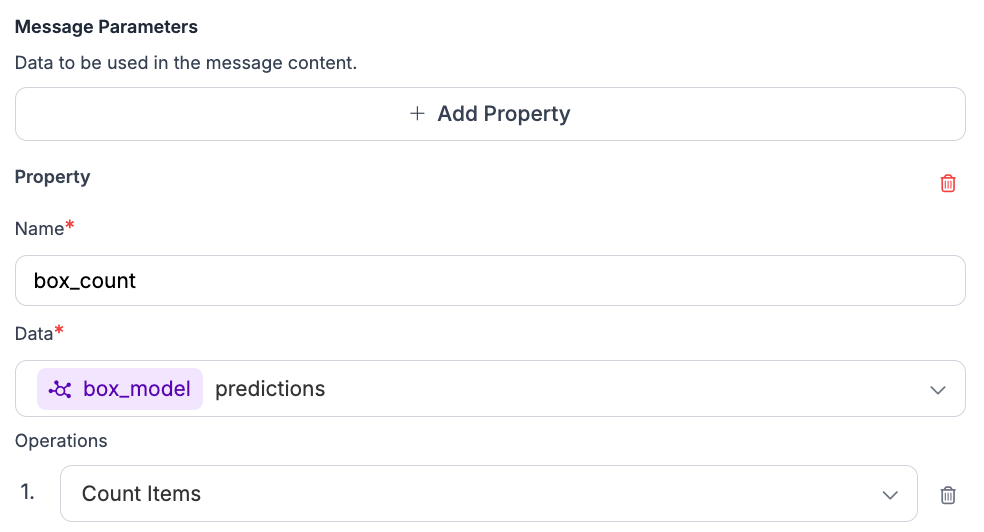
Next, we'll configure the slack notification block to send “A backup has been detected, with {{$parameter.box_count}} boxes found” to a specified slack channel.
First you’ll need to configure a slack token. If you already have one, skip to step 2.
Create a new slack app if you don’t have one already to send notifications on your behalf. You’ll want to choose the from scratch configuration option.

Next, navigate to the OAuth & Permissions section and scroll down to the Scopes section. We’ll be adding a Bot Token Scope with the following permissions.
Note: Follow the principle of least privilege and only grant access to the actions your slack bot needs.
- chat:write: for sending messages in channels the bot is part of
- chat:write.public: for sending messages in channels the bot isn’t part of
- files:write: for sending attachments in channels. Note: the bot must be in the channel to send attachments
Here is an image of the final access scopes for my workflow slack bot.

Install the app to your workspace to gain access to your Slack OAuth Token. Once that completes, you’ll be granted an access token with the following format: xoxb-XXXX

Navigate to the slack channel where you’ll be sending messages, find the channel members section, select integrations, and add the app you just created to your channel.

Copy the channel ID, you can find this by selecting the channel name, and copying the ID at the bottom

Configure the message. To add parameters, you’ll need to use the following syntax: {{$parameters.PARAMETER_NAME}}

Configure the message parameters to be used in the message content. These must match the name of the parameters used above.
Set the number of seconds that need to pass before sending a subsequent message. By default, a notification will only be sent once every five seconds.
Optionally, send an annotated image with the detected objects as an attachment. Note: your slack bot must be in the channel to send attachments
In your Roboflow Workflow, add three blocks:
- Add a bounding box visualization to draw boxes around the detected objects.
- Add a label visualization block to add the class label to each detected object.
- Add a property definition block and convert the label visualization output image to jpg format.
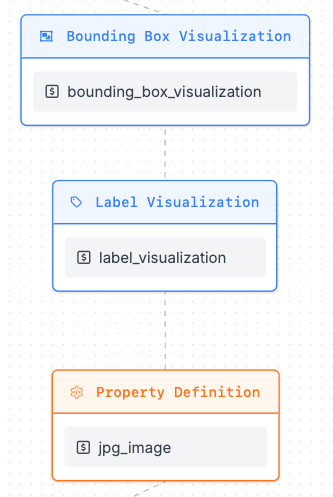

Add the generated jpg image to the attachments section of your Slack notification block. You’ll want to add the filename, such as image.jpg, followed by a reference to the output image, $steps.<block_name>.output

Optionally, set Fire and Forget to False while debugging to wait for the notification to finish sending before returning the workflow response, This is useful to confirm the message sent successfully while setting up the notification block.
We’ve finished setting up the workflow! Here’s a link to copy the completed version shown below.
Testing the Slack Notification Workflow
To test a Workflow, click “Test Preview” at the top of the page.
To run a preview, first drag and drop an image into the image input field. Click “Test Workflow” to run your Workflow.
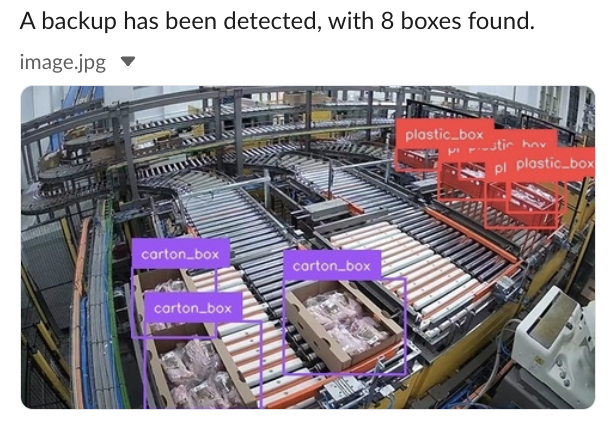
Let’s run the Workflow on this image:

Our Workflow detects a backup and sends a notification to the configured slack channel:
Deploying the Workflow
Workflows can be deployed in the Roboflow cloud, or on an edge device such as an NVIDIA Jetson or a Raspberry Pi.
To deploy a Workflow, click “Deploy Workflow” in the Workflow builder. You can then choose how you want to deploy your Workflow.
Use the Slack Notification Workflow
You can use the Slack Notification block in Roboflow Workflows to alert users based on the output of a computer vision model.
In this guide, we built a system that uses an object detection model to identify boxes on an assembly line, determines if there was a backup of more than four plastic boxes, and sends a slack message if a backup was detected.
This system was built with Roboflow Workflows, a web-based computer vision application builder.
To learn more about building computer vision applications with Workflows, refer to the Roboflow Workflows documentation.
Cite this Post
Use the following entry to cite this post in your research:
Emily Gavrilenko. (Dec 21, 2024). How to Send a Slack Notification with Roboflow Workflows. Roboflow Blog: https://blog.roboflow.com/slack-notification-workflows/
