

If you've ever watched Mark Rober, you've seen the glitter bomb series. It's the engineering/revenge series where porch pirates steal a booby-trapped package and get instant retaliation in the form of fart sprays and other brilliant ideas for karma. It's great television, but it's payback rather than prevention. The package still gets taken, and you lose quite an expensive prop.
I wanted to engineer another solution for this. Instead of punishing the thief after the theft, what if the porch just never left a package out in the first place?
So I built a lockbox that watches my porch with a computer vision model. When it sees a delivery driver holding a package, it unlocks itself, gives them a few seconds to drop the package inside, locks again, verifies the package actually made it in, and pings my phone with a photo. There's a live dashboard so anyone in my family can check the porch from anywhere, and a push notification for every delivery. There's no glitter involved, and nothing is left out to steal.
The electronics cost about $35-40, the camera is an old iPhone that was sitting in a drawer (properly concealed in your porch to prevent it from being stolen), the AI runs on Roboflow's free tier, and the box is whatever protective container you have.
I’ll show you how you can build it too. Follow along with this github repository.
How it works
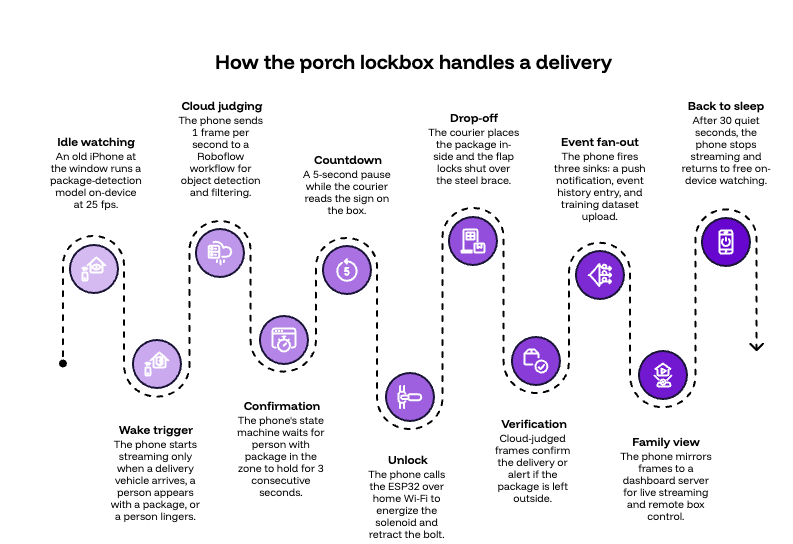
The tripwire is the old iPhone at the window. It runs an object detection model on-device at full speed, costing almost nothing.
The judge is a Roboflow workflow in the cloud. When the phone spots something worth judging, it streams one frame per second up, and the workflow checks detections against a drawn porch zone with tuned thresholds. It then returns facts like person_in_zone and package_in_zone, confidences.
The action is an ESP32 wired to a relay and a solenoid lock. When the confidence and detections are steady for long enough (~3s), the phone tells it to open. Then there’s an adjustable 13-second delivery window and the auto-relock runs on the ESP32's own firmware timer, so the box closes even if everything upstream dies mid-delivery.
The window for humans is a tiny dashboard server the phone mirrors its frames to, serving a live porch stream, the delivery history, and a remote open button. Thus, if someone wants to retrieve a package, they simply have to click the button on their web app and go get it.
The shopping list
| Part | Notes | ~Price |
|---|---|---|
| ESP32 dev board | Any devkit clone works | ~$11 |
| 5V relay module, 1 channel | Get one marked "high/low level trigger" | ~$2 |
| 12V fail-secure solenoid lock | Spring bolt, energize-to-open | ~$7 |
| 12V 2A DC power adapter | Powers the solenoid through the relay | ~$6 |
| Jumper wires | To connect the components. You might already have some of these in your house. | ~$7 |
| Small hinge | Turns your box lid into a flap | ~$5 |
| 1 L bracket | Prevents pushing the flap down and helps solenoid lock function properly | ~$5-8 |
| Scrap wood | For the flap, sized to your box opening | $0 |
| An old iPhone | Anything with a neural engine (iPhone XS or newer is comfortable) | $0 |
| A box | Any sturdy open-top rectangular box you already own | $0 |
Get the code
All of the software for this project lives in a single repository. Clone it before starting the hardware, since each of the following sections configures a different part of it:
git clone https://github.com/aarnavshah12/Package-Track.git
cd Package-Track
The repository contains the following components:
- esp32_lockbox/: the lock firmware (Arduino sketch), used when you flash the firmware.
- workflow_spec.json: the full cloud workflow definition, used when you build the workflow.
- ios/: the camera and control app (Xcode project), used when you build the app onto the phone.
- dashboard/: the live-stream dashboard server and page, used in the dashboard section.
- render.yaml: the cloud deployment blueprint, used when you deploy to Render.
- lockbox_client.py: a Mac webcam version of the phone app, used to test the pipeline before the phone exists.
Every file that requires a key or password has a committed .example template beside it, and the real file is excluded by .gitignore. There are three such files:
- Copy .env.example to .env. This holds your Roboflow API key, the ESP32's IP address, your ntfy topic, and your dashboard token.
- Copy esp32_lockbox/credentials.example.h to credentials.h. This holds your Wi-Fi network name and password.
- Copy ios/.../LockboxSecrets.example.swift.txt to LockboxSecrets.swift. This holds the same secrets for the iOS app.
Each section below indicates when to fill in the relevant values. Because the real files are gitignored, you can fork, commit, and push the project without exposing any credentials.
Finally, lockbox_client.py is worth noting before you begin. It is a Python implementation of the phone app that uses a Mac webcam as the camera, which allows you to test the complete pipeline before the box, phone, or mount exist. Install the dependencies with pip install -r requirements.txt, run python lockbox_client.py, and hold a package in front of the webcam. The full sequence of detection, countdown, unlock, and verification will run against the real ESP32. This is the fastest way to verify the system end to end. For more specific information, refer back to the README in the repository.
Finding (not building) the box
Let’s talk about how you can make your lockbox. You can just find any suitable container from your house. Any rigid, open-top rectangular container big enough for your typical deliveries works, whether that's a wooden crate, a storage trunk, or a sturdy planter box. If you’re good with wood-working, just make it yourself. Mine was a cedar planter I previously bought but never used.
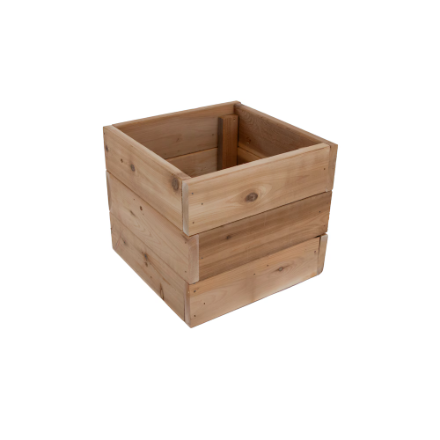
Whatever you find, you're adding three things to it.
First comes the flap. Cut a piece of spare wood to fit the box's opening and hinge it along one edge so it can swing up and down like a flap. It doesn't need to be pretty, but it does need to be stiff.
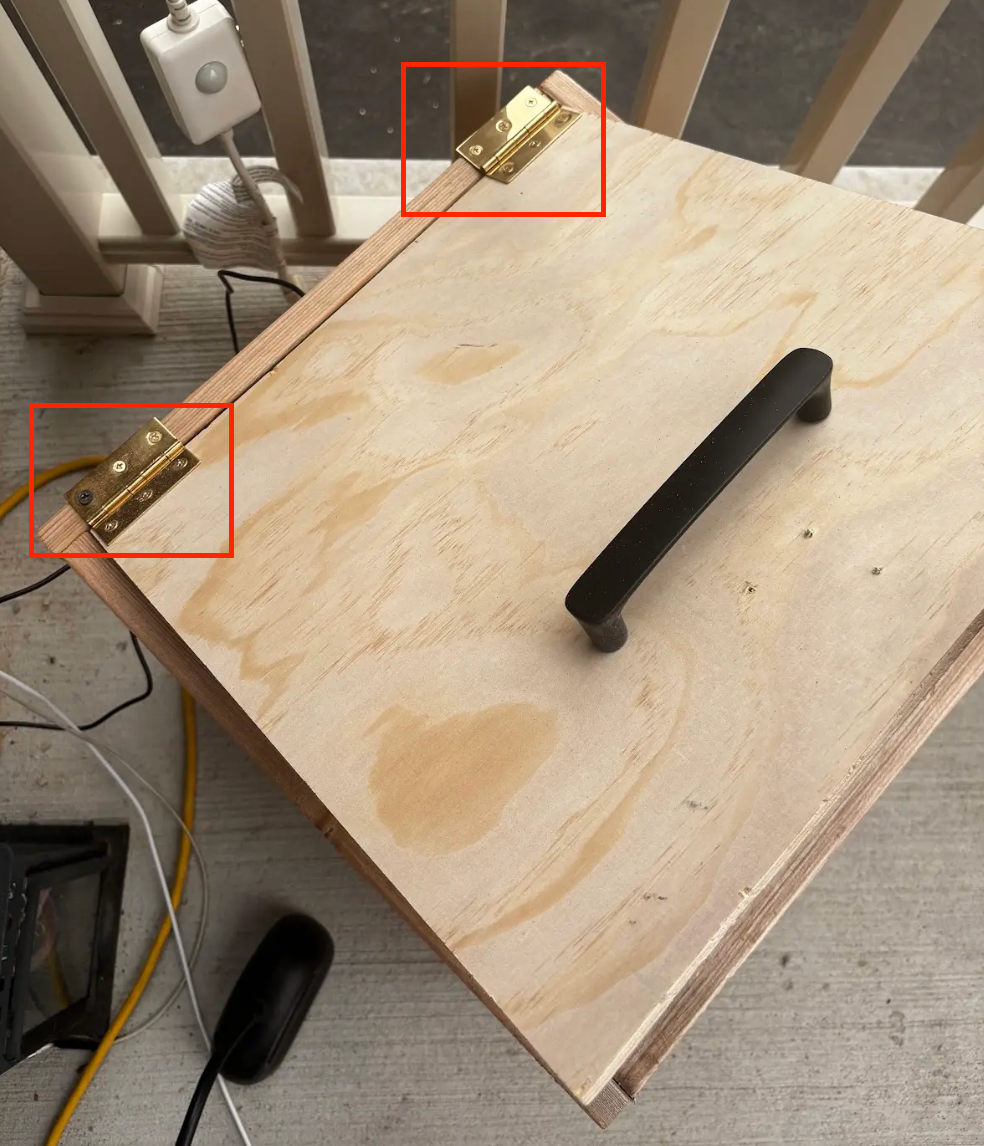
Second comes the brace: an L-shaped brace screwed to the inside walls just under where the flap rests, in the middle away from the hinge. This acts as a physical stop, so a thief can't push the flap down and inward past the lock, and also acts like a strike plate which prevents the thief from pulling upwards. Position it so the solenoid's bolt slides over it when locked. With the bolt extended above the brace, the flap physically cannot lift.
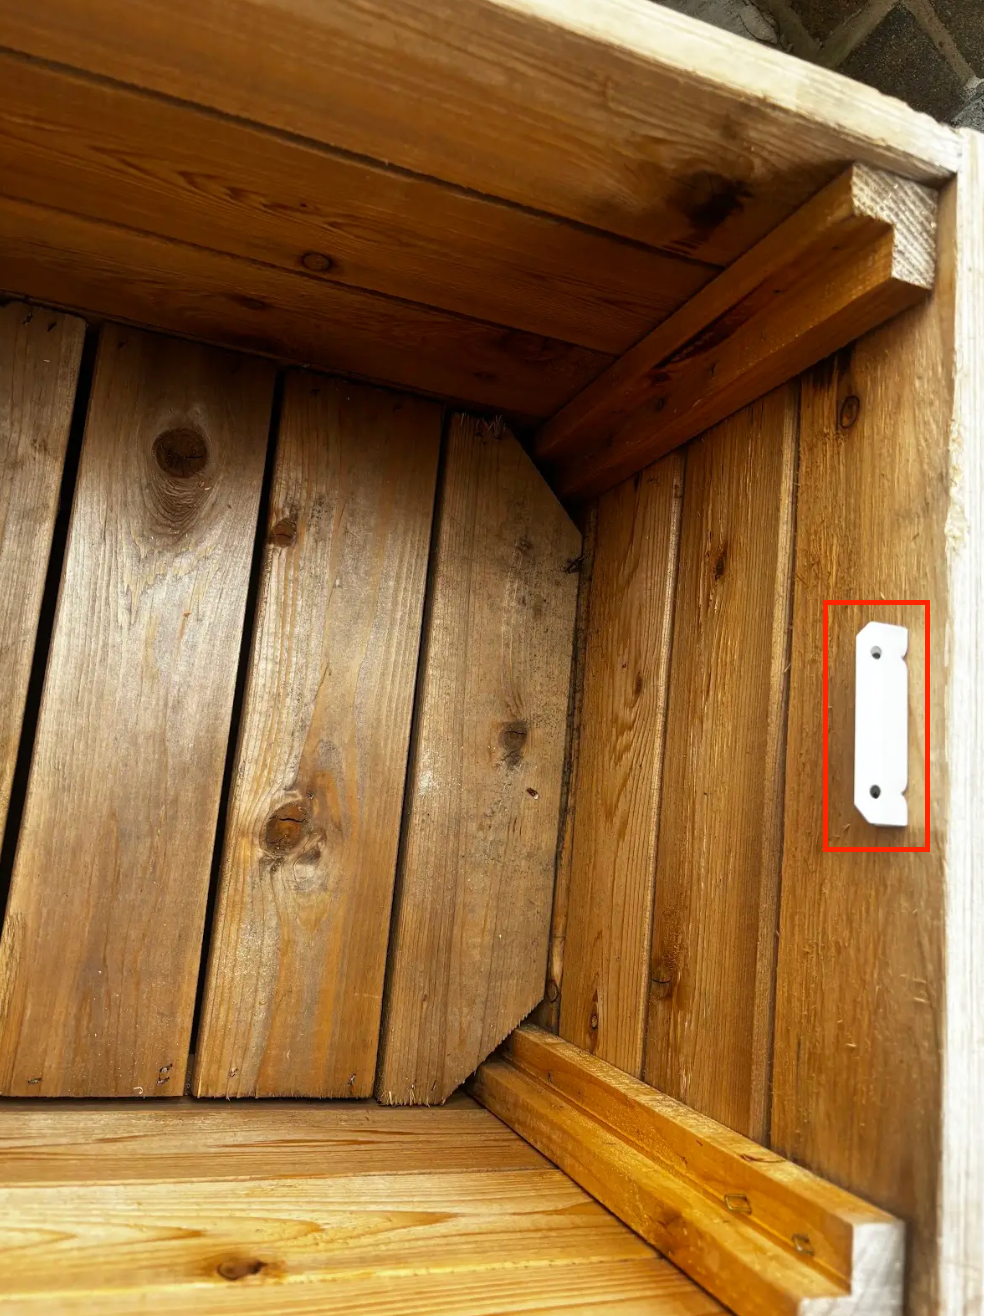
Third comes the lock itself, mounted to the inside wall so its bolt sits over the brace when extended.
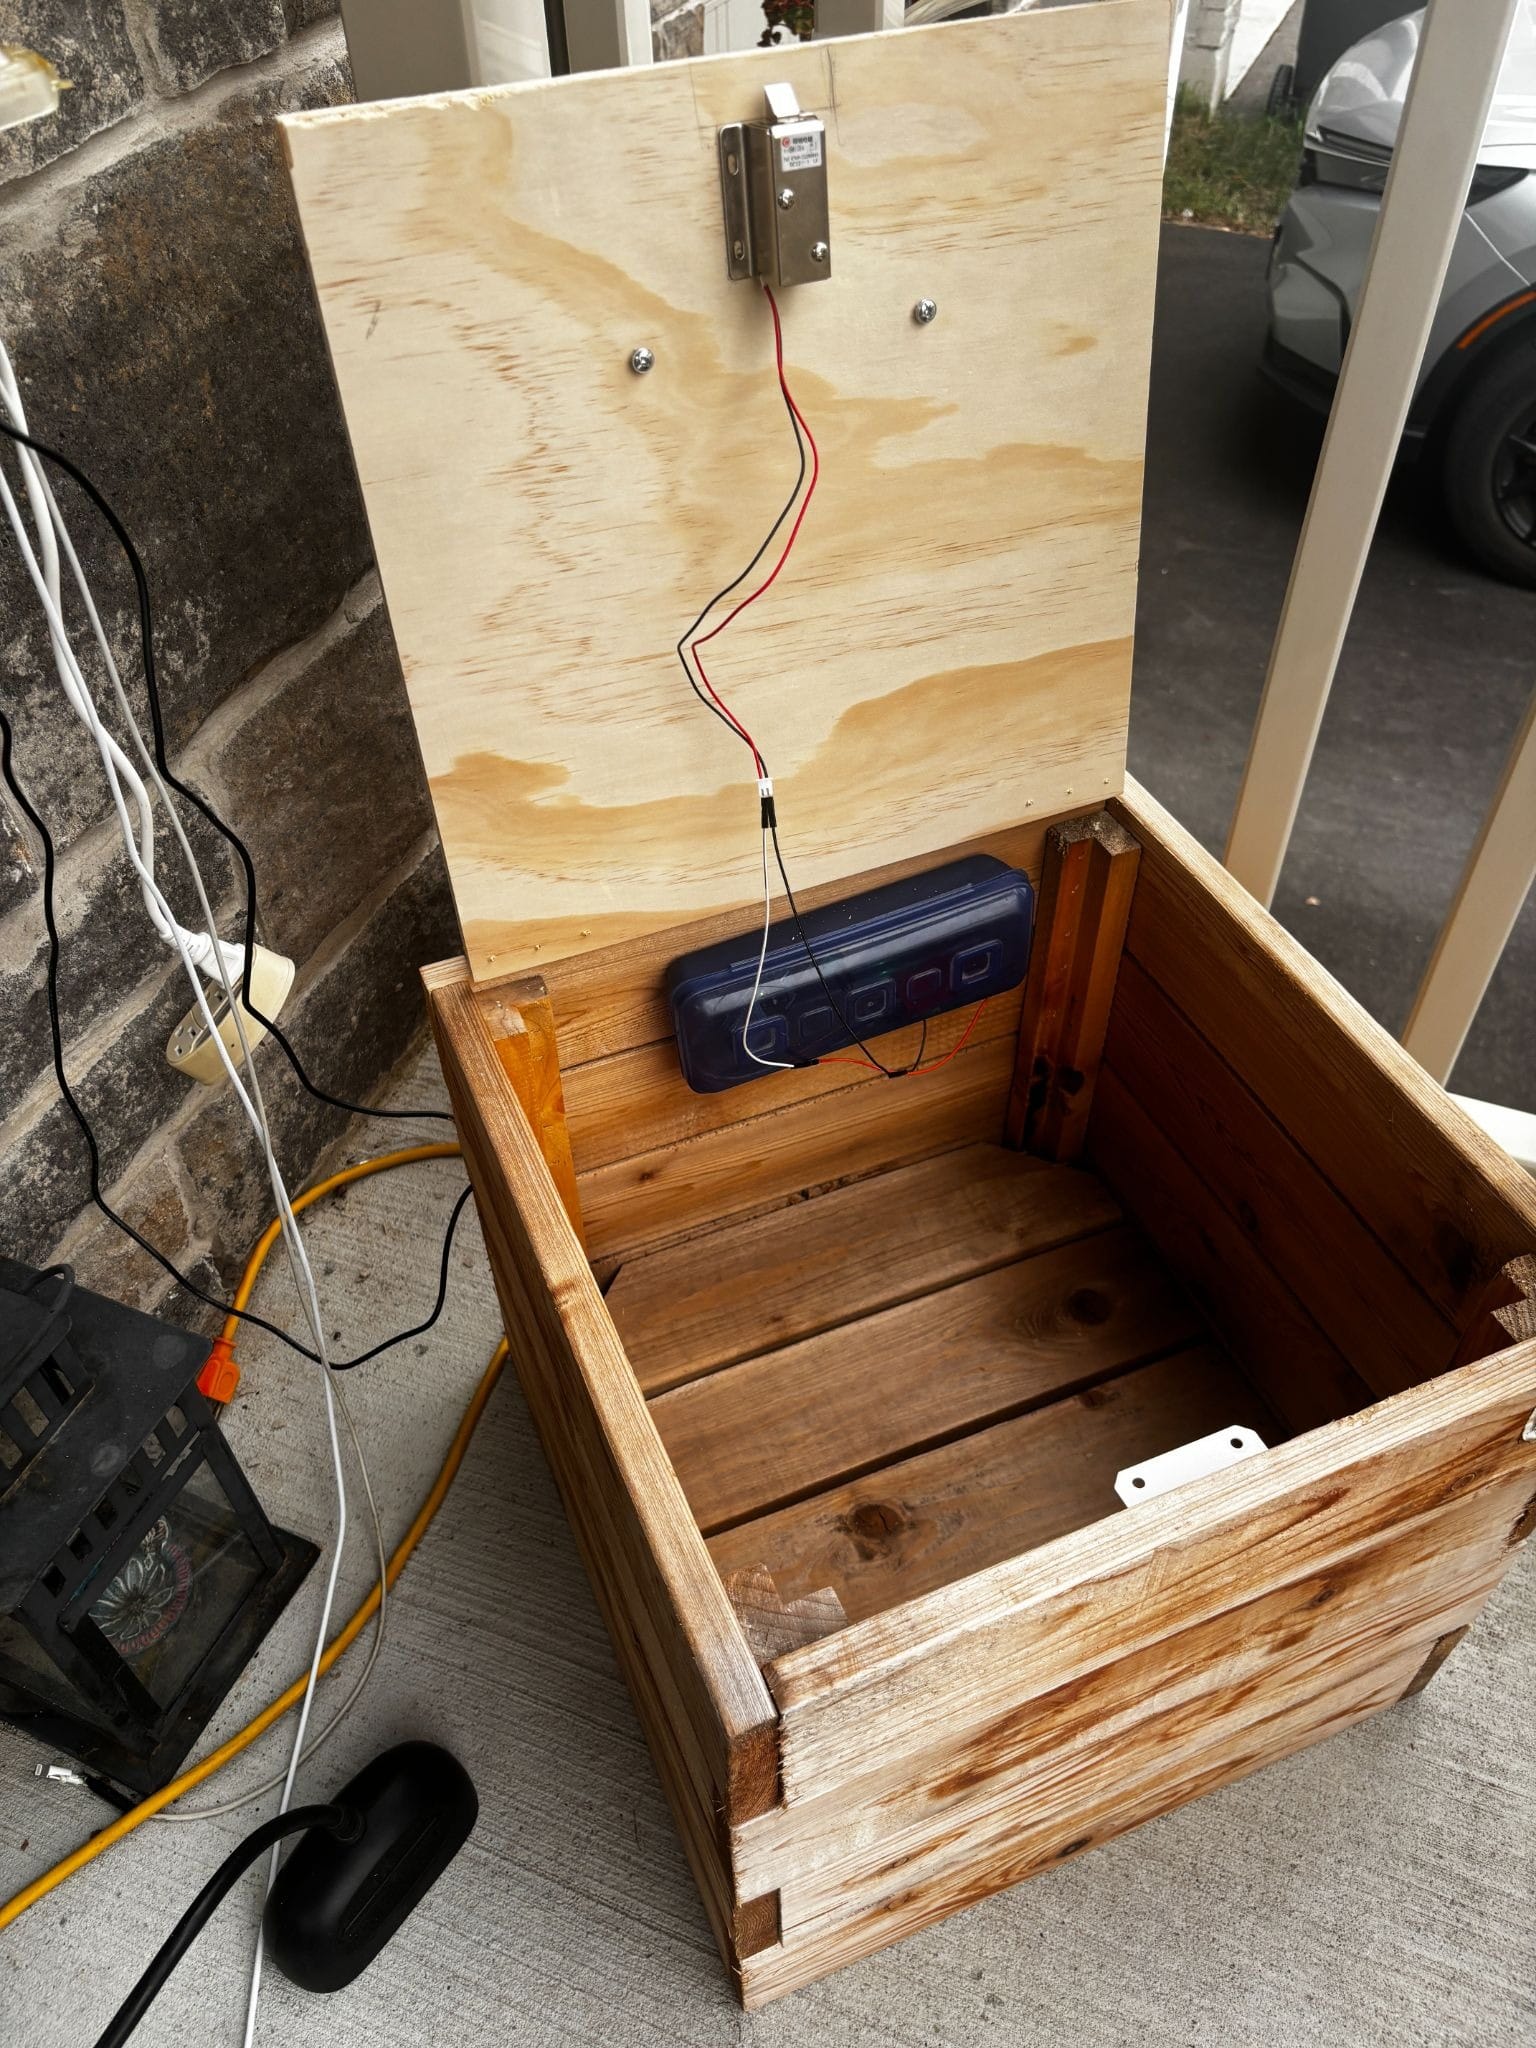
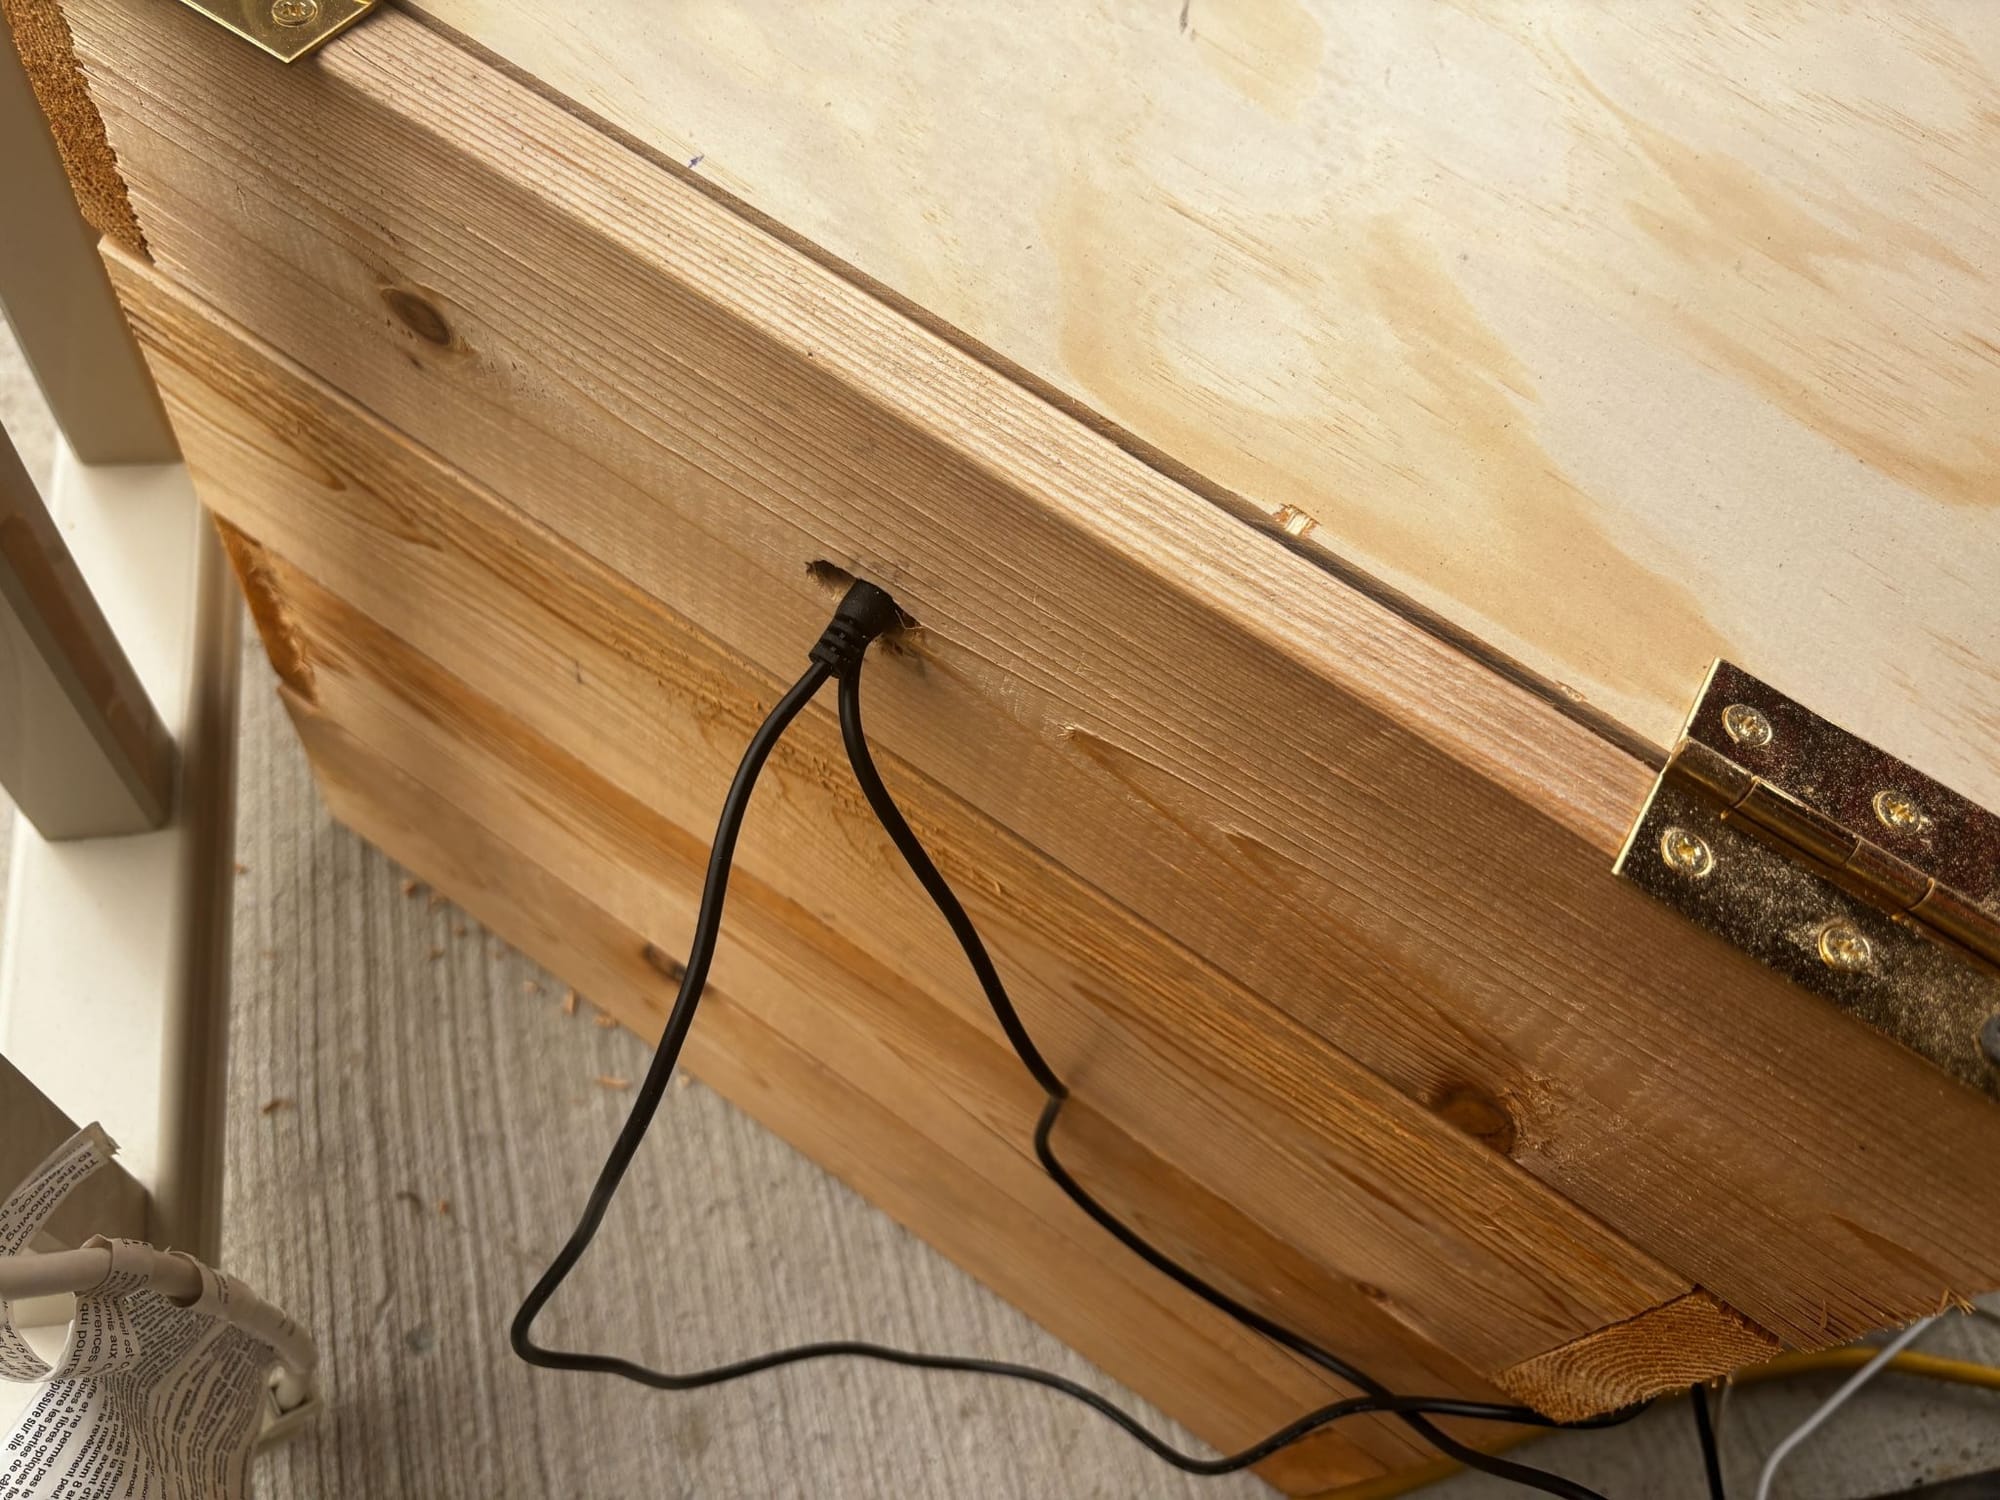
Drill a small hole for the power cord and keep the electronics inside the box, out of the weather, where the packages live.
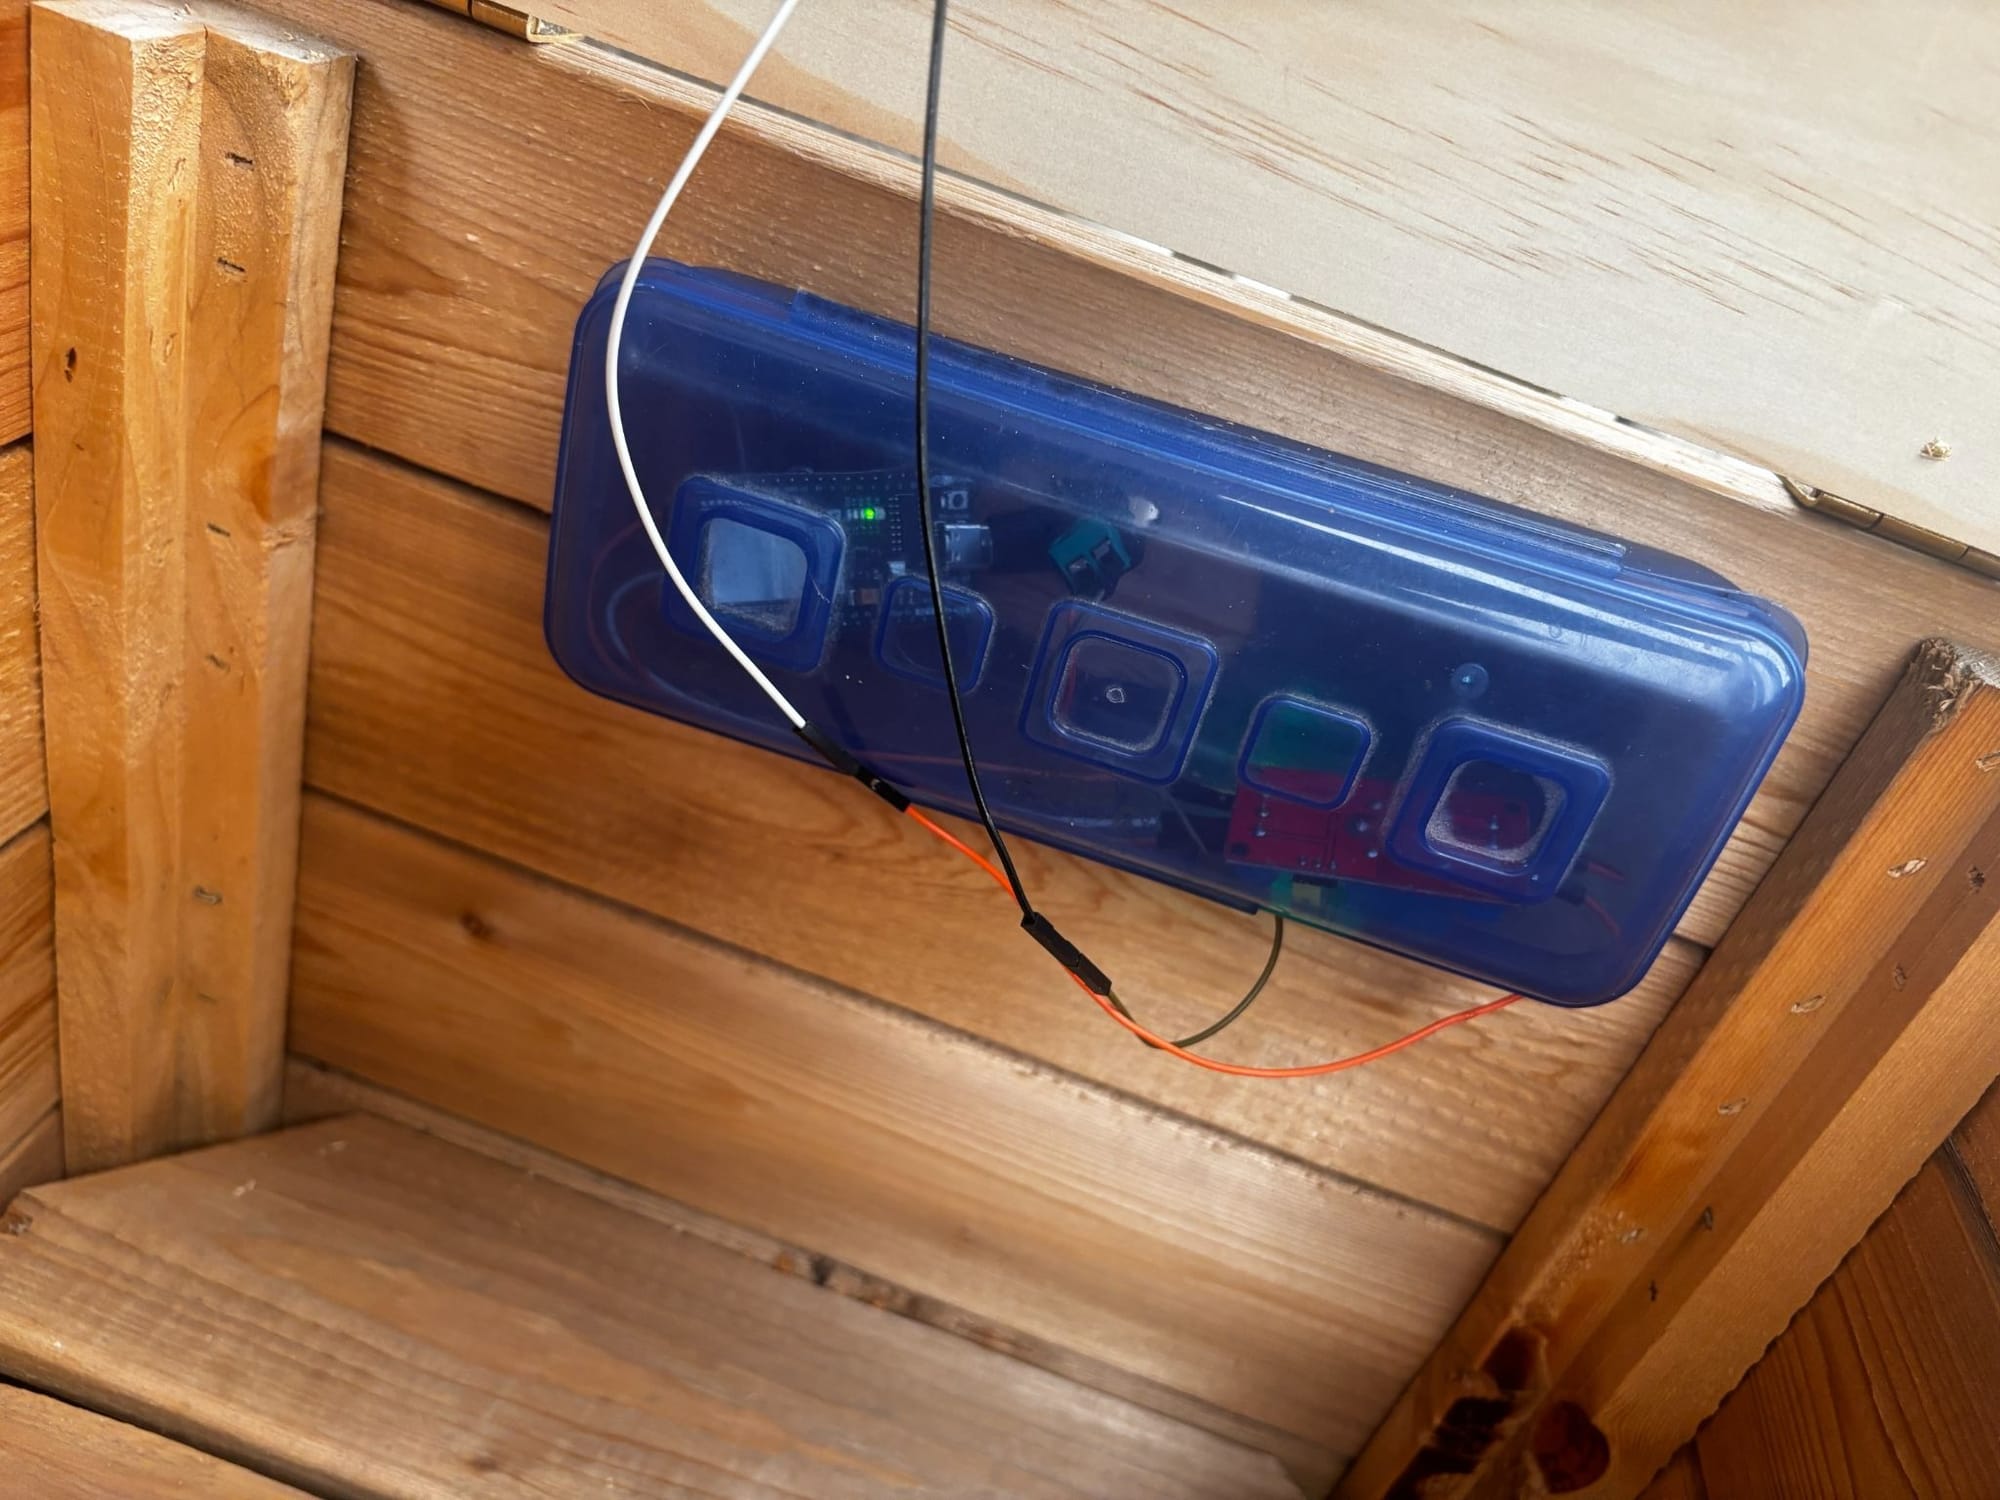
Wi-Fi passes through wood just fine. You can also choose to put your electronics in a container inside the box. I used a pencil case so they would never get in the way of any delivery.
The electronics
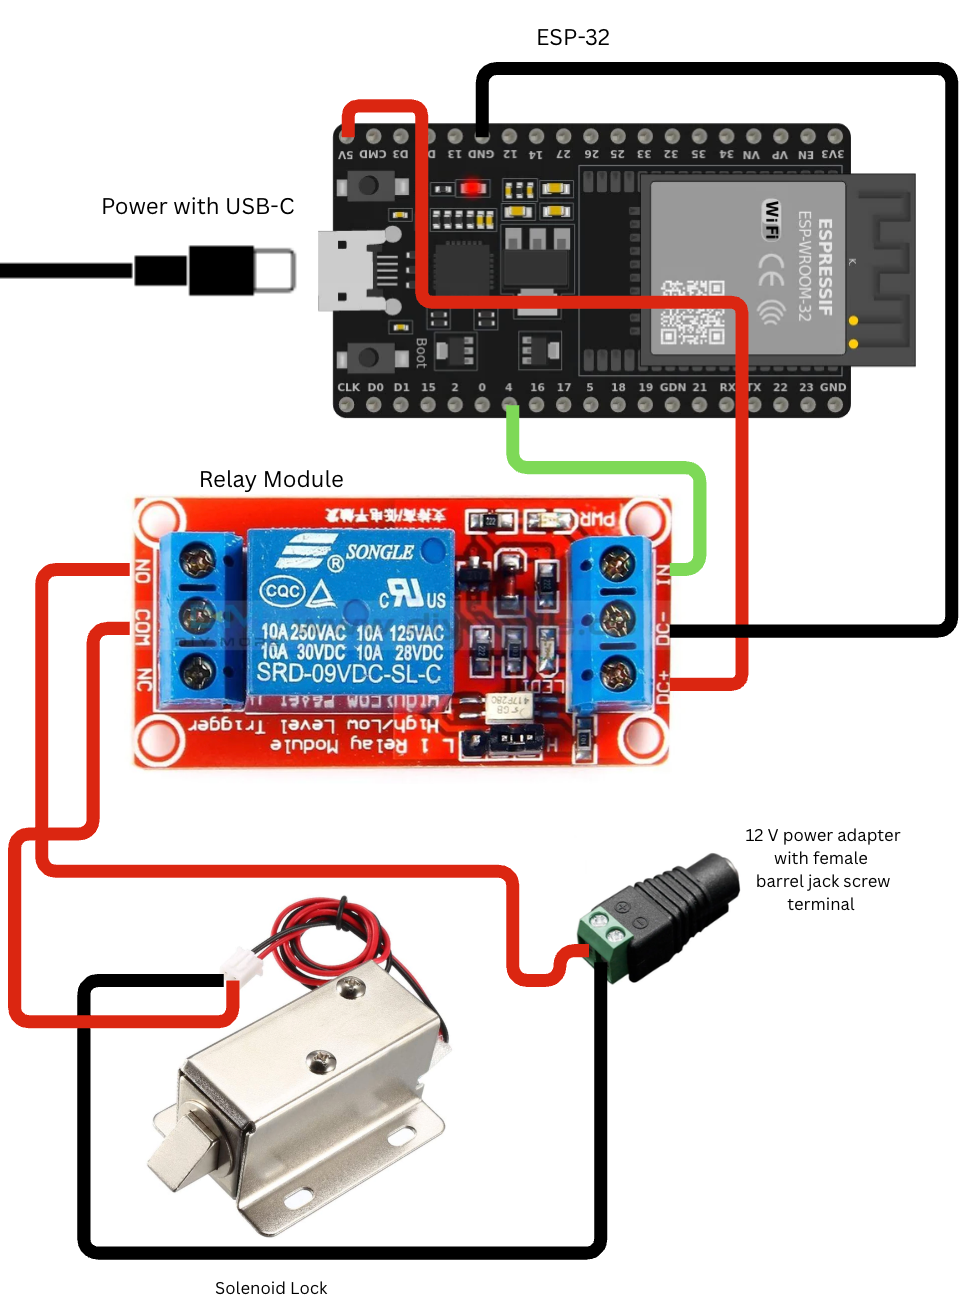
The relay is just an electrically controlled switch. The ESP32's signal pin flips it, and the relay's metal contact completes the 12V loop through the solenoid.
The firmware
The ESP32 sketch is about 100 lines of Arduino code (in the repo). It joins your Wi-Fi, announces itself on your network as lockbox.local, and serves four endpoints:
- GET /open energizes the coil for 13 seconds (the delivery window), then re-locks on its own timer
- GET /pulse gives a 1-second test click
- GET /toggle is manual open/close with a 30-second safety auto-relock
- GET /status returns the current state as JSON
Two protections live deliberately in the firmware rather than the app. The delivery window closes itself even if everything upstream crashes mid-delivery, and a thermal watchdog force-releases the coil after 30 continuous seconds, because lock solenoids are pulse-duty parts meant for seconds of current at a time, and they will let you know otherwise, with heat.
Setup is the usual Arduino process: credentials into credentials.h, select the board, upload. Then visit http://lockbox.local/pulse from your phone's browser and hear the clunk. The ESP32 also serves a tiny control page with buttons at http://lockbox.local/, which stays handy for the rest of the project.
Teaching it to see
You need a model that knows two classes: person and package.
Start a free Roboflow project from a packages dataset on Roboflow Universe, where there are several with thousands of labeled parcel images. Choose a dataset with a model that you like and clone the dataset.
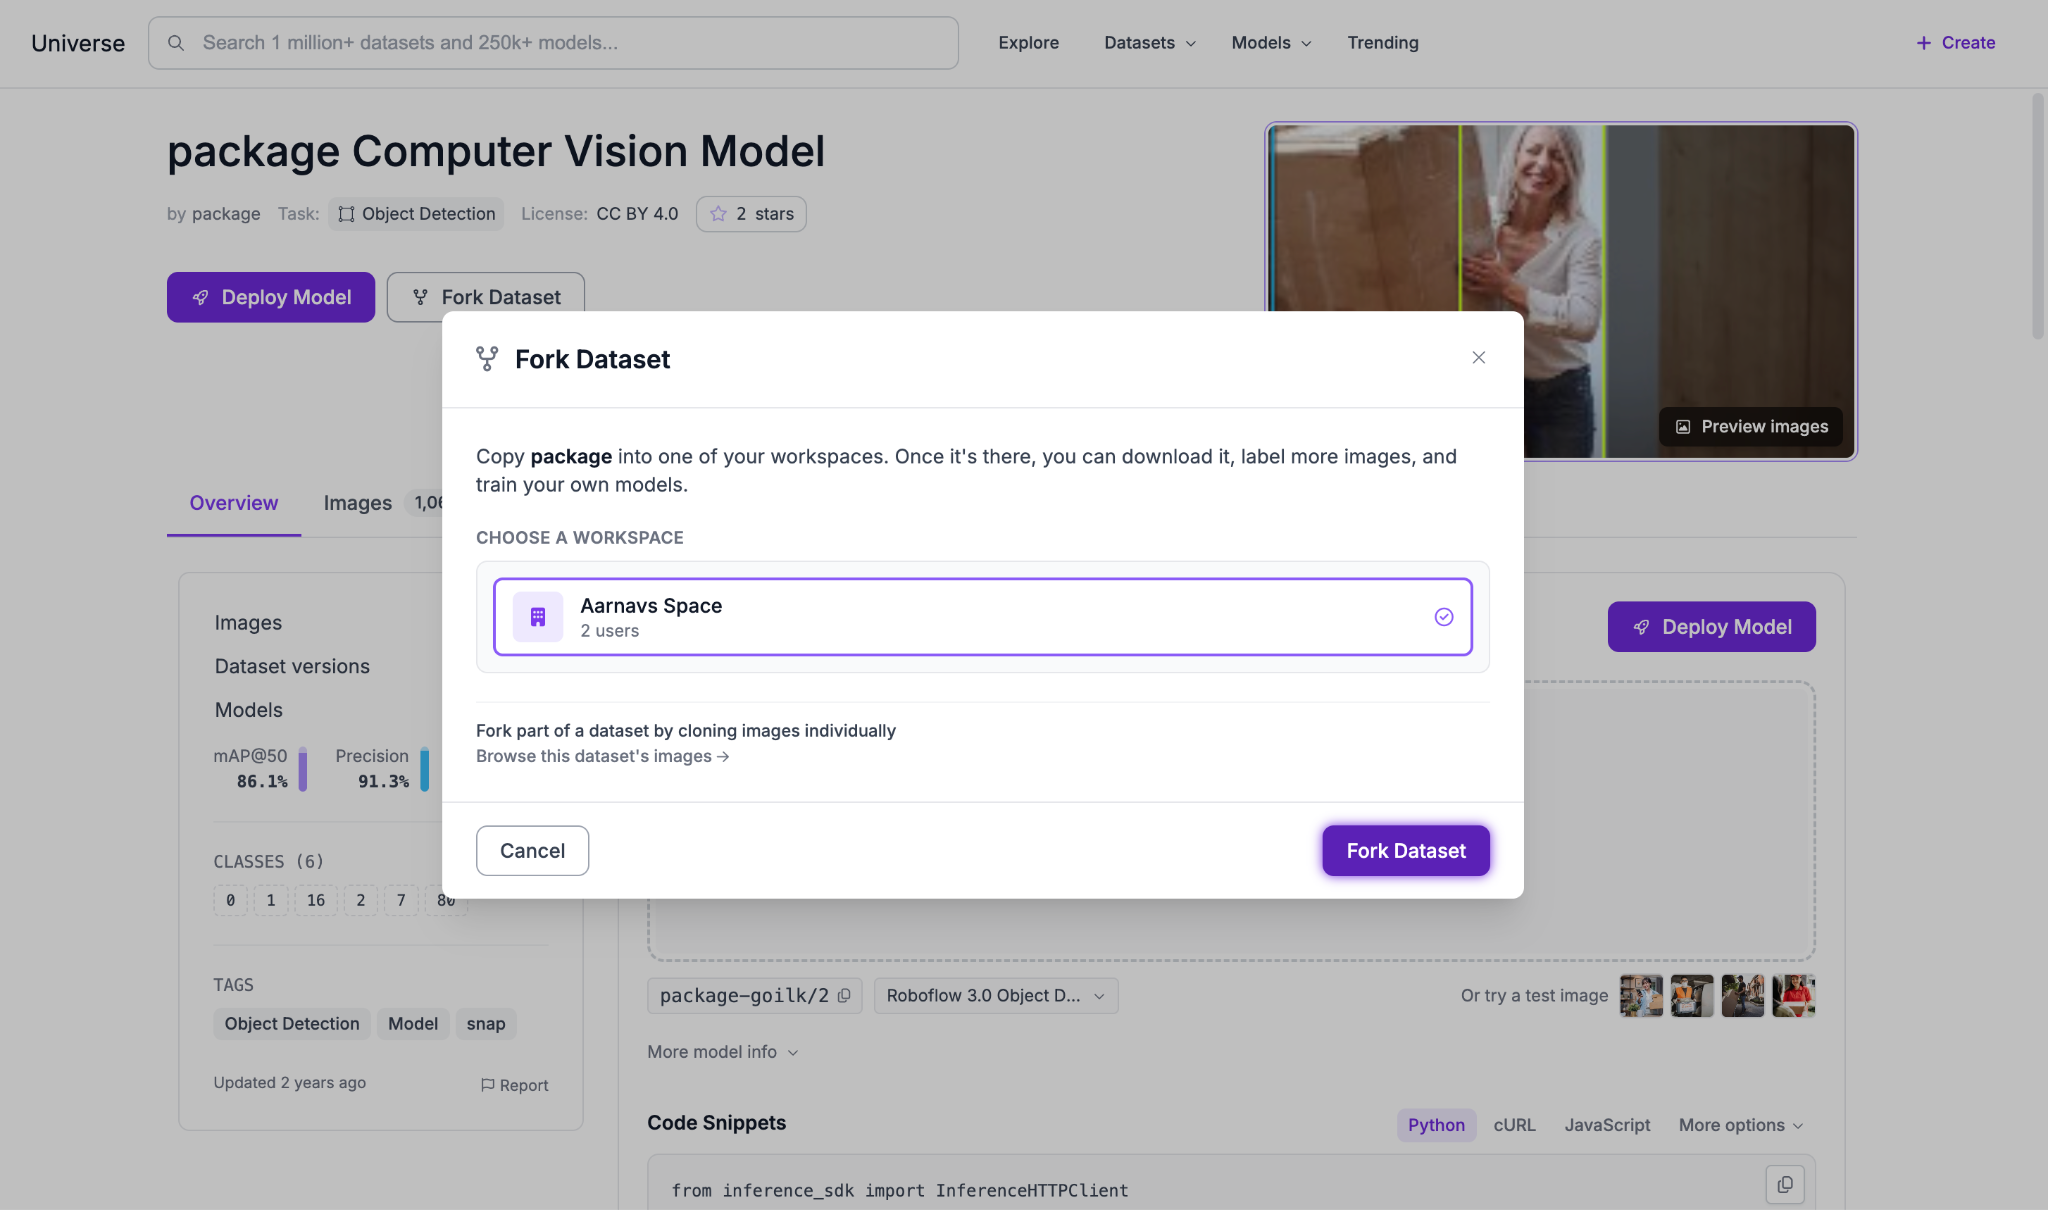
Then add photos of your own porch. A dozen shots from the actual camera position, with you holding a box, a box on the ground, and the empty porch, teach the model your railing, your light, and your angles. Once you’ve uploaded those photos, either manually annotate them or ask a model like SAM3 to do it, or build a workflow and annotate it with that.
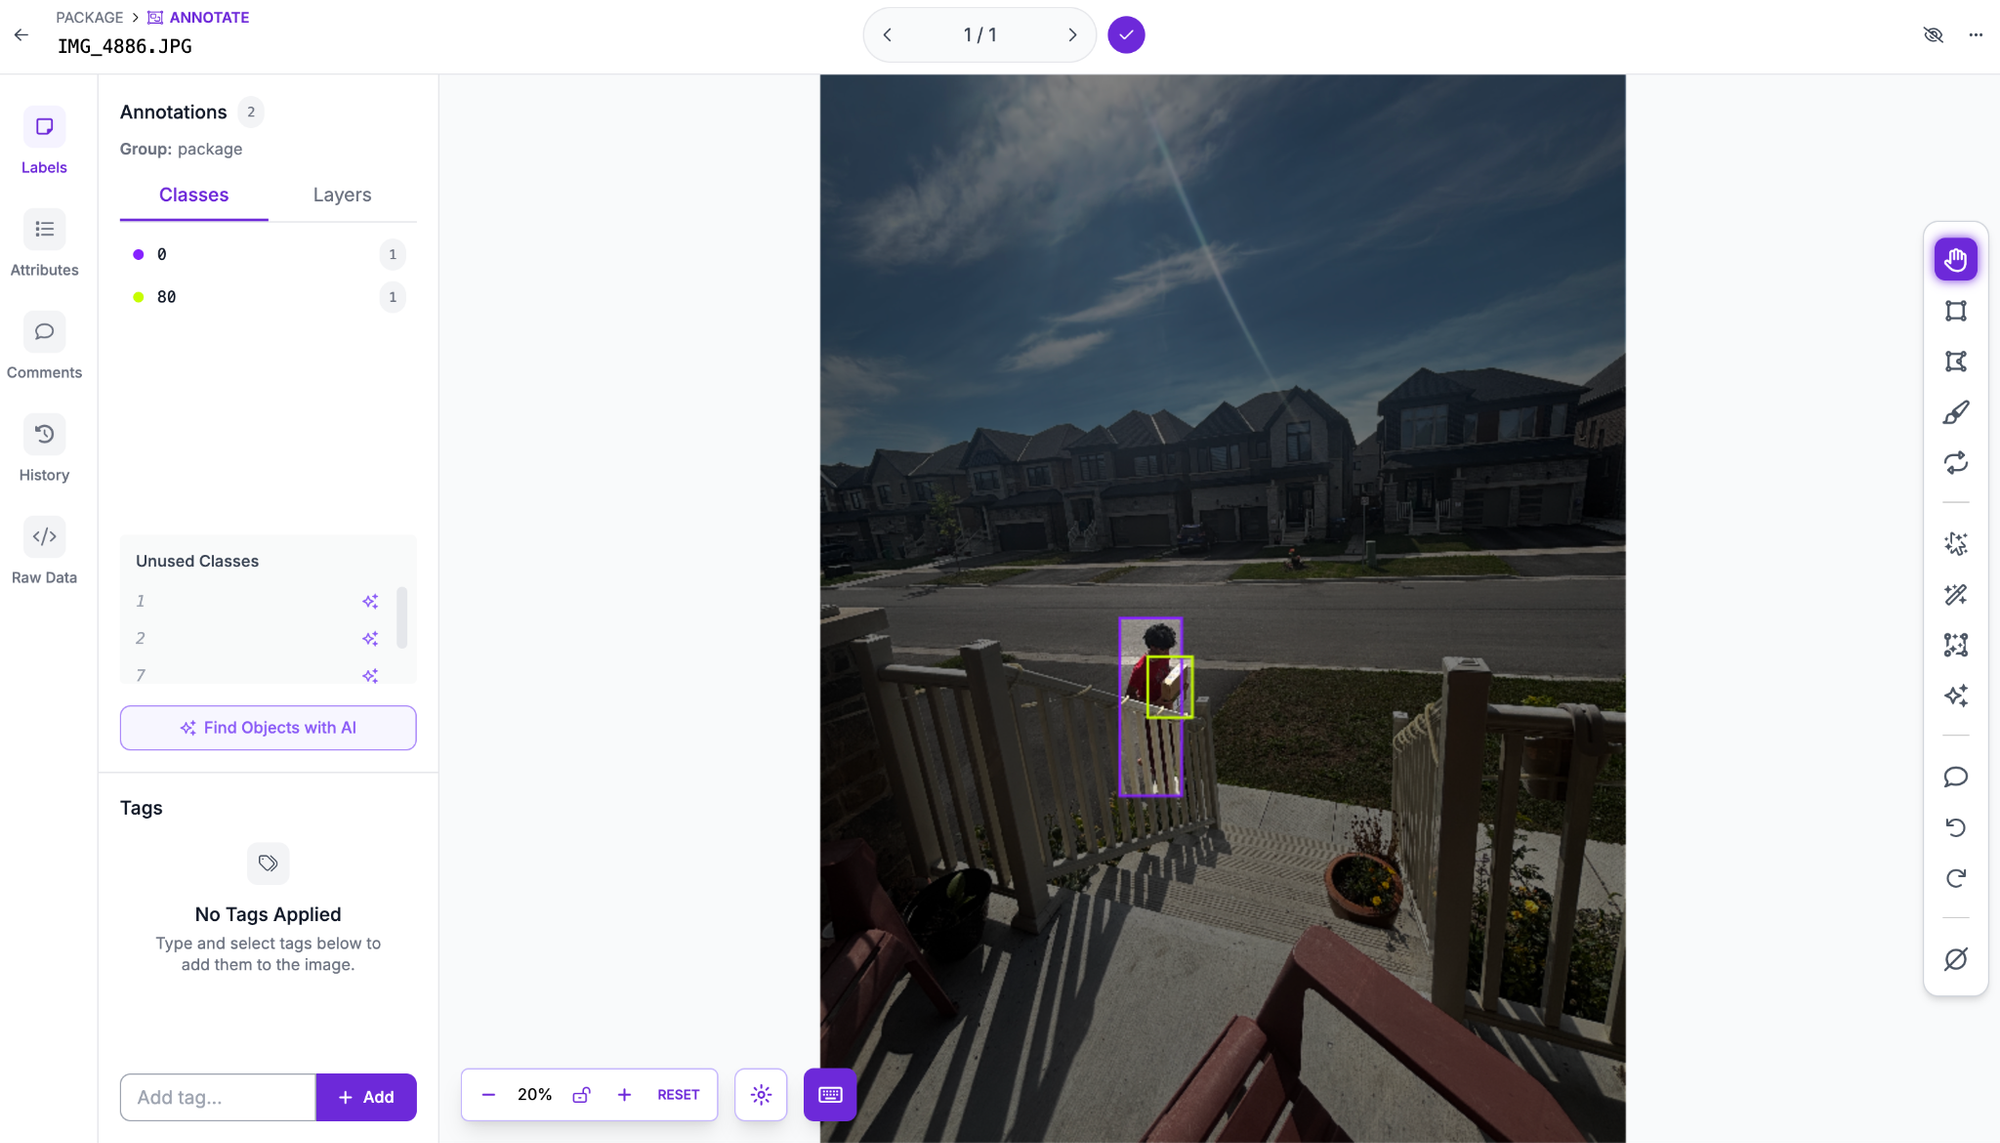
Then train your model. I used RF-DETR small to train the introductory model. Refer to the following video for the training process:
Then draw the porch zone: grab a frame from the mounted camera, open it in Polygon Zone, and click out the polygon that counts as "my porch." Only detections whose center lands inside it will matter, which is what stops the system reacting to sidewalk traffic. One field note from my first attempt: draw the zone where couriers stand, not just where packages land. A human's center point floats about waist-high, half a step behind the doorstep, and my original tight trace kept ignoring people whose feet were plainly on my porch.
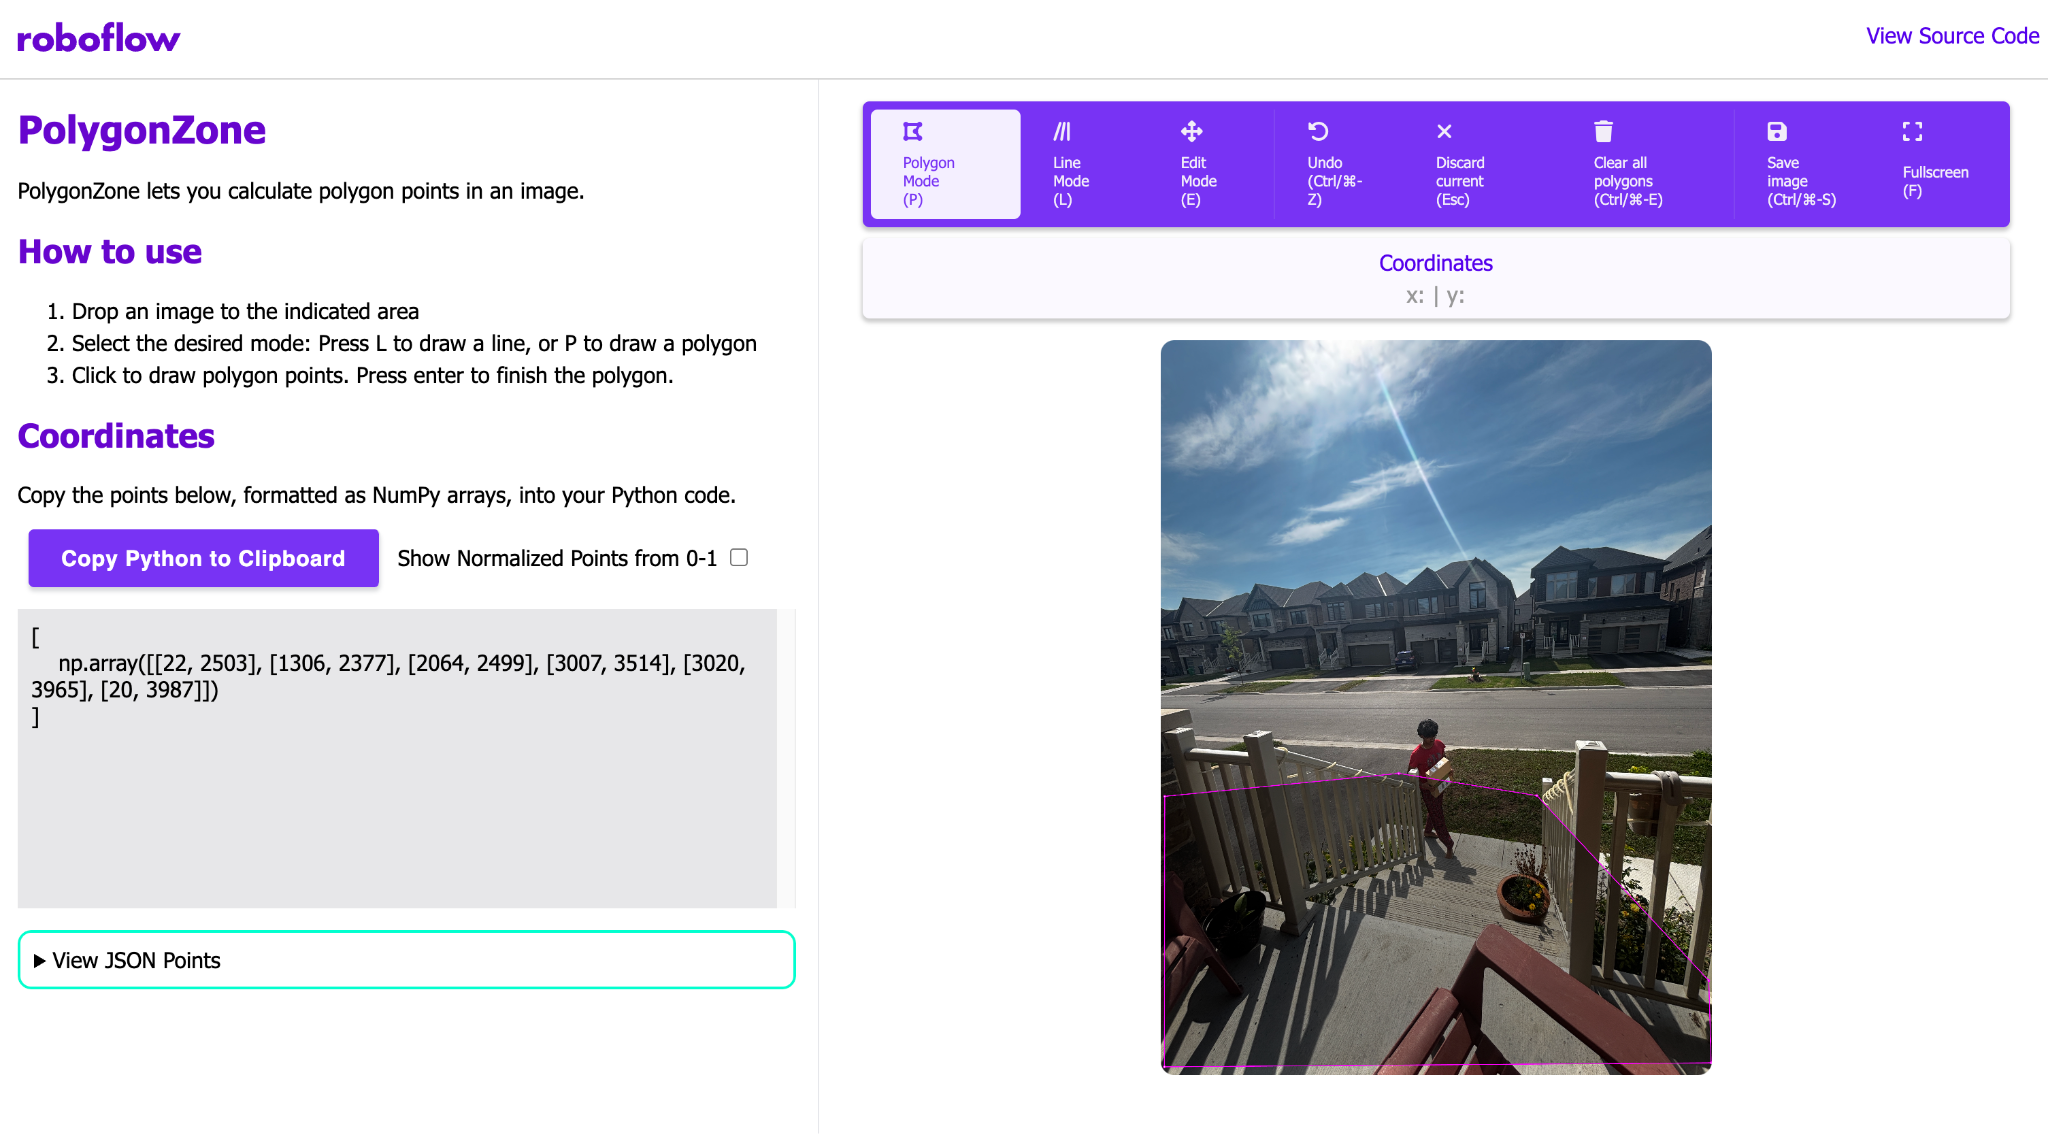
The tool hands you the polygon as pixel coordinates, like [[734, 412], [400, 450], ...]. Now normalize them by dividing every x by the image's width and every y by its height, so each point becomes a 0-to-1 fraction:
[[0.535, 0.550], [0.292, 0.600], [0.003, 0.912], ...]
That normalized list is what you'll paste into zoneNormalized in the app's LockboxConfig.swift (and PORCH_ZONE in lockbox_config.py if you're using the Mac test client).
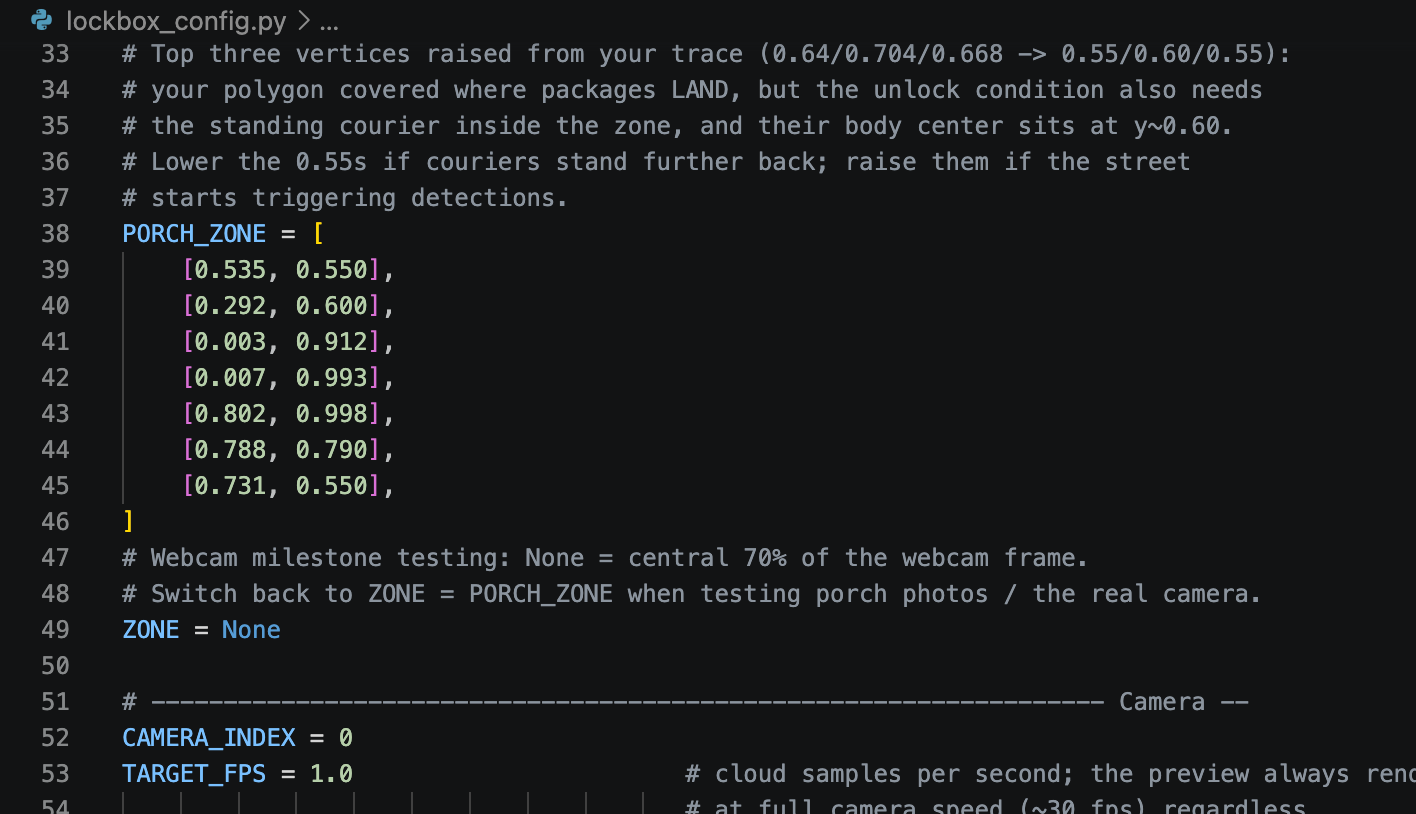
The reason normalization is useful here is that the workflow can process any frame size the client sends. The client stores the zone as normalized fractions and rescales it to each frame's exact pixel dimensions at request time. The same polygon works whether the frame is 640 or 1280 pixels wide, and you never need to modify the workflow itself because the zone is included with every request as the zone parameter, which you'll declare in the next section. Later, if you reposition the camera, you only need to retrace the zone and replace a single list.
Build the workflow, block by block
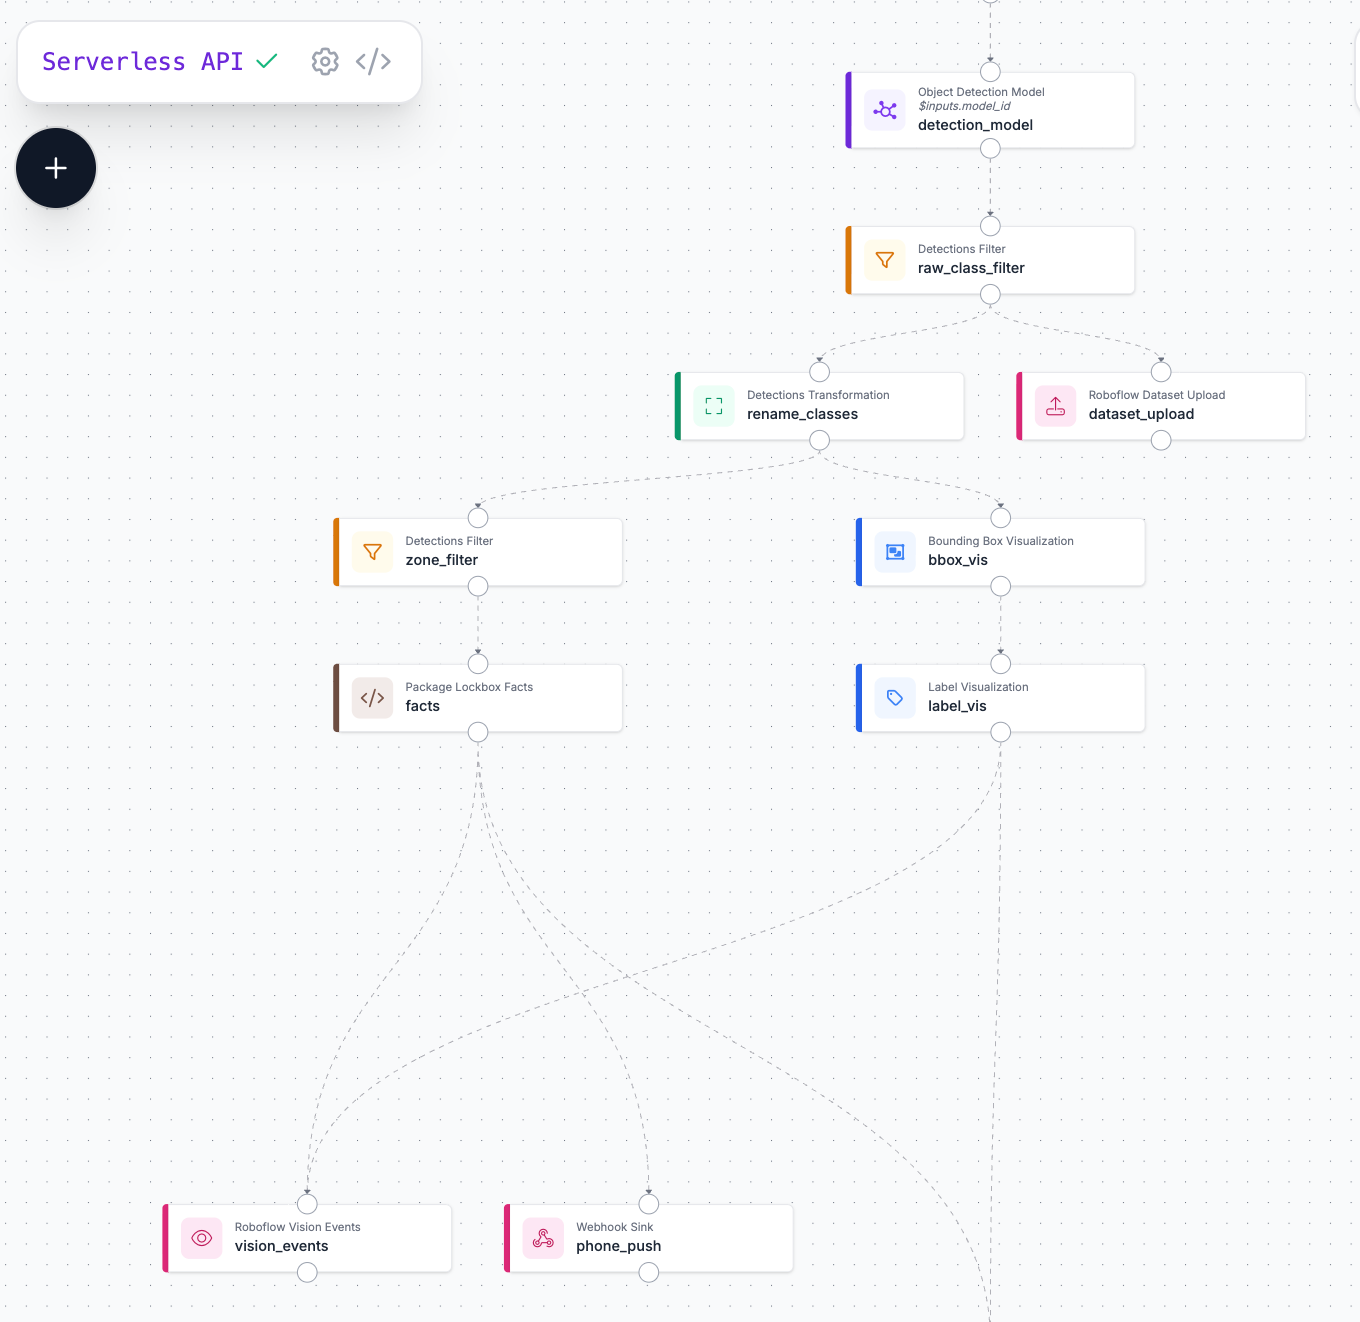
The judging pipeline is a Roboflow Workflow, assembled visually in the Workflows editor and deployed as a serverless API endpoint. Here's mine block by block, where each one is a block you drag in and configure.
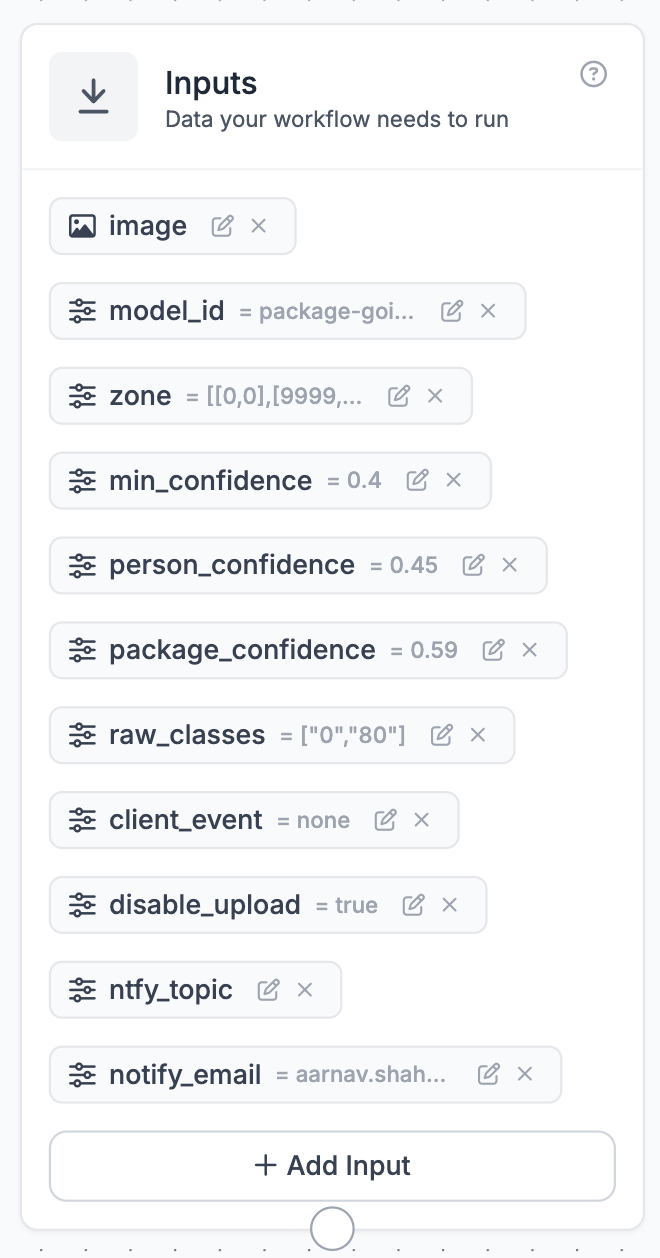
Inputs come first, and this is where a small decision pays off forever. Alongside the image, declare workflow parameters: zone (the polygon), person_confidence, package_confidence, client_event, and disable_upload. Parameters are values the phone sends with every request, which means you can tune thresholds or move the zone later without ever editing the workflow again.
Then comes the object detection model, pointed at your trained model ID, with confidence set permissively (0.4) because per-class strictness comes next. A class filter keeps only person and package and drops anything else your model learned along the way. A zone filter keeps only detections whose center point falls inside the zone polygon parameter. That block differentiates between "a person exists" and "a person is on my porch."
Next is a small facts block: a few lines that reduce the filtered detections to the booleans the phone actually needs, namely person_in_zone, package_in_zone, person_with_package, counts, and max confidences per class, checked against those per-class threshold parameters (mine settled at 0.45 for person and 0.59 for package).
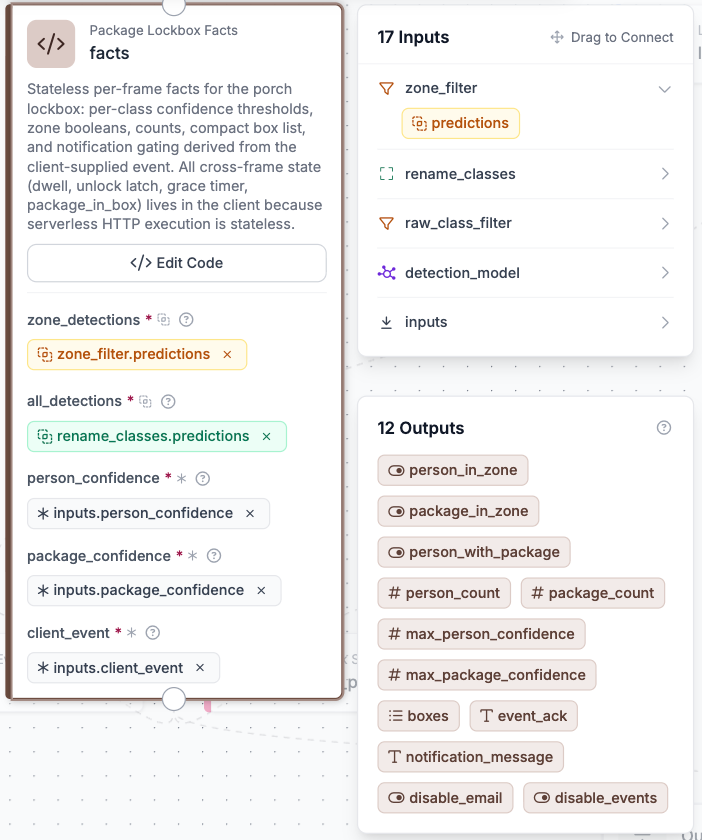
Why booleans instead of just returning detections? Because of the one architectural fact that shapes this whole design: serverless workflows are stateless. Every frame is judged in isolation, and the cloud cannot remember that a person was there one second ago. So anything that needs memory, like "person with package for three consecutive seconds," the unlock latch, or the verification timer, lives in the phone app. The cloud judges frames while the phone judges time, and giving the phone clean facts keeps its state machine simple.
Then we can add the sinks, three blocks gated on client_event that only activate when the phone re-sends a frame tagged with an event (more on that below):
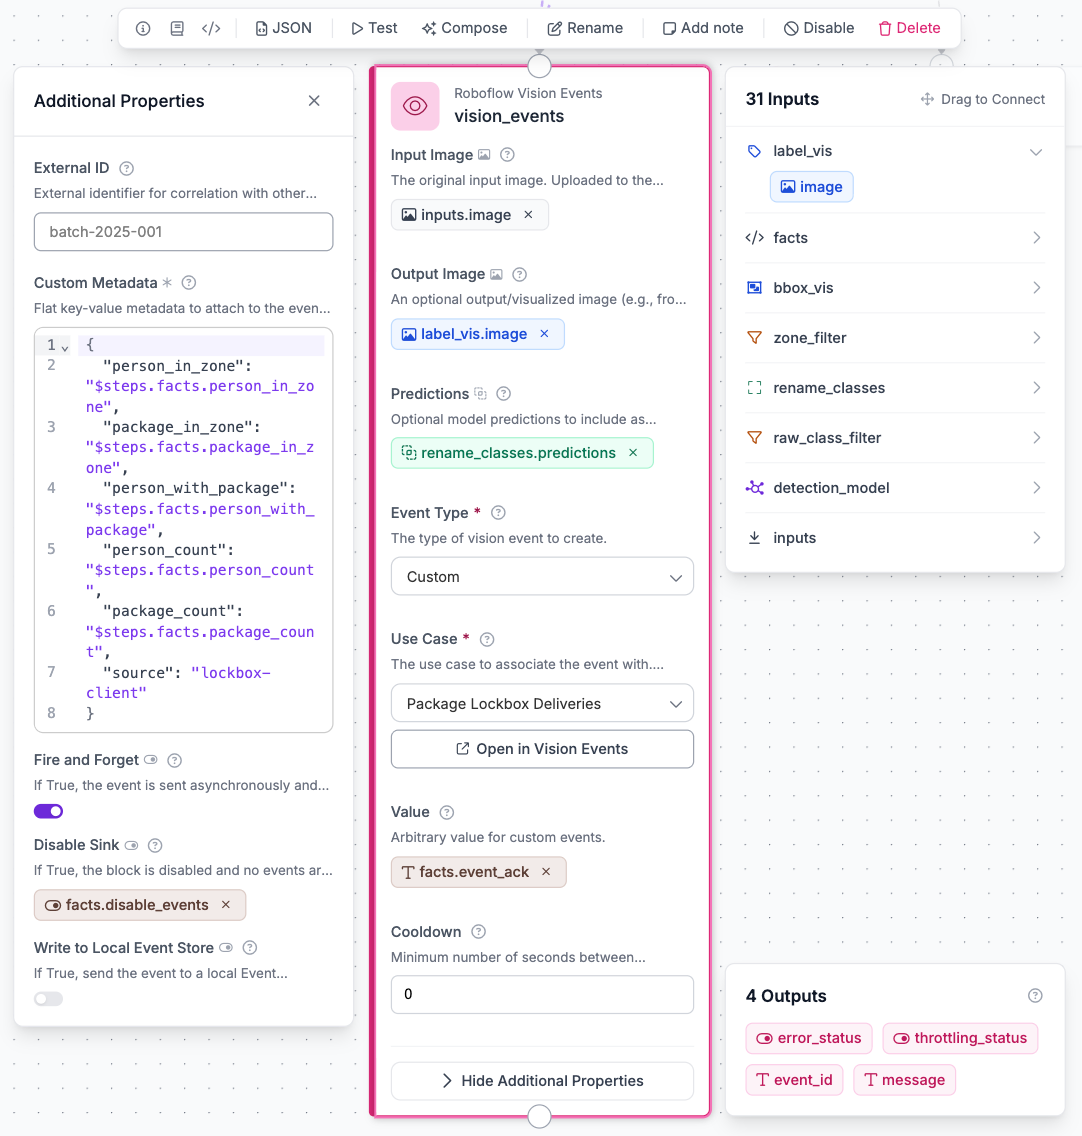
- Vision Events logs the event with its photo into a queryable history, which becomes your app's activity feed.
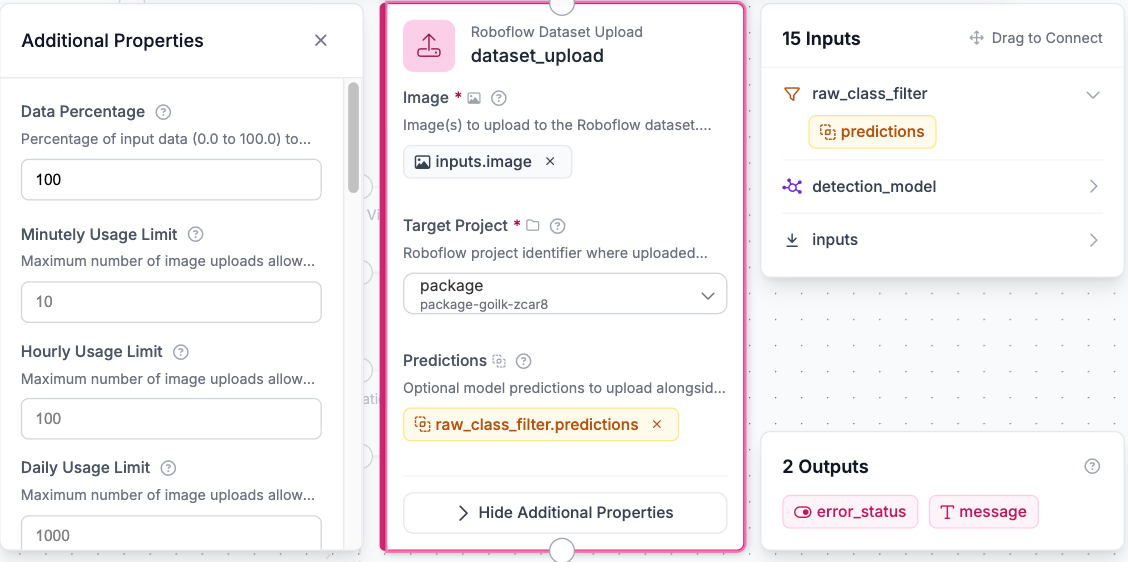
- Dataset Upload pushes the triggering frame back into your training dataset, tagged. This is the retraining flywheel, where every real delivery becomes tomorrow's training data, and the model gets better at your porch just by existing.
- A webhook to ntfy.sh sends the push notification. ntfy is a free pub/sub notification service: the workflow POSTs a message to your private topic, and every phone subscribed to that topic buzzes, anywhere in the world, with zero notification infrastructure.
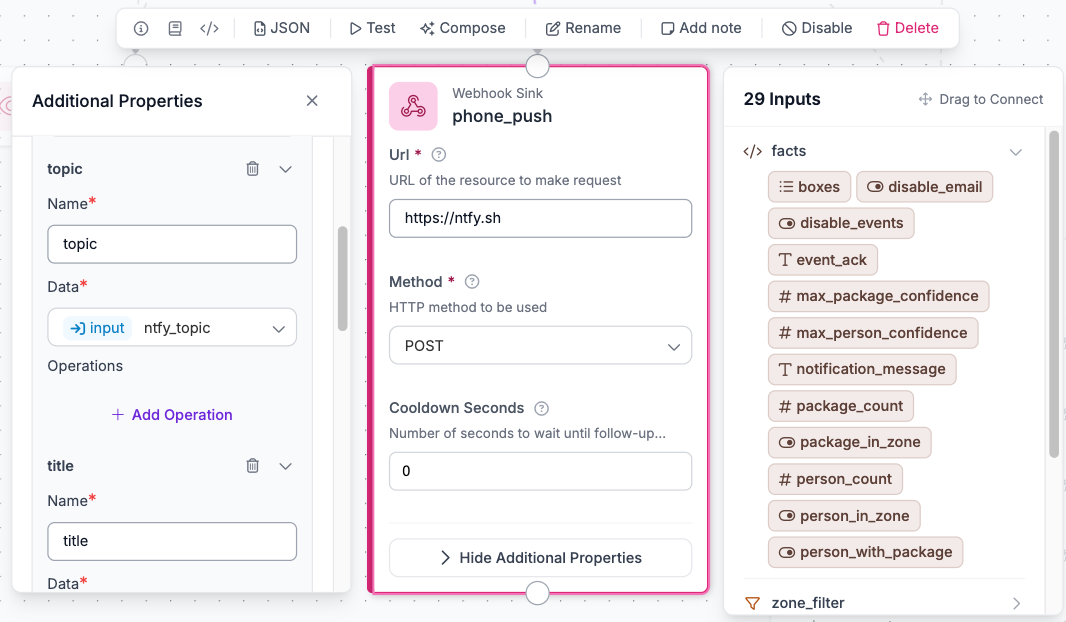
The gating is what makes one delivery equal to exactly one notification. Regular frames flow through the detection blocks and return facts while the sinks stay silent. When the phone's state machine reaches a verdict, it re-sends that one deciding frame with client_event=delivery_confirmed (or delivery_failed_package_on_ground), and that single request uses all three sinks at once.
Finally, outputs expose act as the workflow's JSON response:
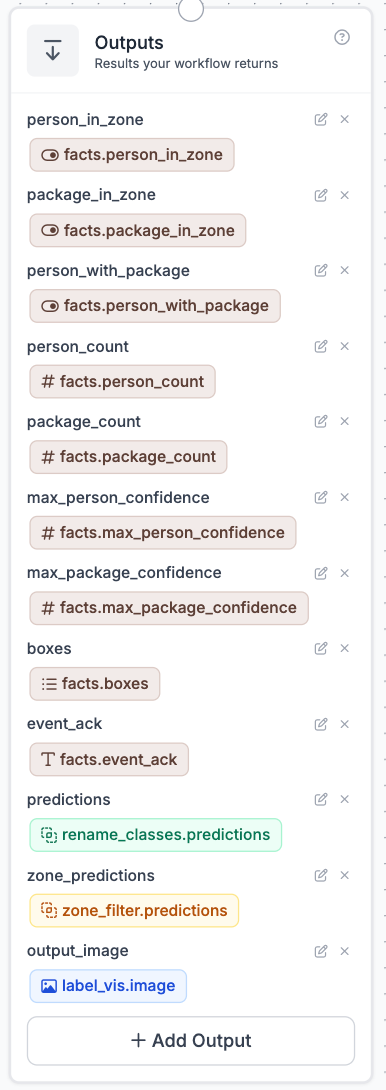
Next you can deploy, and you’ll get an HTTPS endpoint. You can test it in the editor's preview with still photos before any hardware exists, and a photo of you holding a box in the zone should return person_with_package: true.
The phone: tripwire, brain, and mirror
The window camera is an old iPhone running an app built on Roboflow's iOS SDK, with the full source in the repo and setup in the next section. The SDK downloads a CoreML build of the same model you trained and runs it on the neural engine at 25+ fps. That on-device model does three jobs.
It's the wake gate. The cloud only gets frames when the local model says so. A car or truck arriving starts the cloud stream, because delivery vehicles precede couriers by 10 to 60 seconds, which means the judge will be warm before the human reaches the porch. A person and package appearing together starts it too. Lastly, a person alone who stays for a couple of frames also starts the cloud stream, because couriers often carry boxes where the camera can't see them, and it's better to let the cloud decide. After thirty quiet seconds it's back to sleep. The reason for this is because continuously streaming on cloud will get very expensive. Hence, this combination is the best way to optimize your expenses. So here’s the process:
- A person with a package holds in the zone for about 3 seconds, with one flickered frame forgiven, since detection is noisy.
- Then, a five-second countdown begins, matching the sign on the box that reads "📦 Delivery detected — box opens in 5 seconds."
- Next, the ESP32 holds the bolt open for 13 seconds, then re-locks itself.
- After a grace period, three cloud frames vote. A clear zone means delivery confirmed ✅, while a still-visible package means package left outside ⚠️, the "go rescue it" alert
This can all also be seen in the dashboard, because every frame the phone judges, it also mirrors to the dashboard server. I’ll explain that in a bit.
Build the app onto the phone
To do what I explained in the last section, you'll need a Mac with Xcode (free on the Mac App Store), an Apple ID, and an iPhone on iOS 16.6 or newer. Anything with a neural engine, meaning iPhone XS onward, runs the model comfortably, and no paid developer account is required to start.
1. Open the project. From your clone, open ios/Roboflow Starter Project/Roboflow Starter Project.xcodeproj in Xcode.
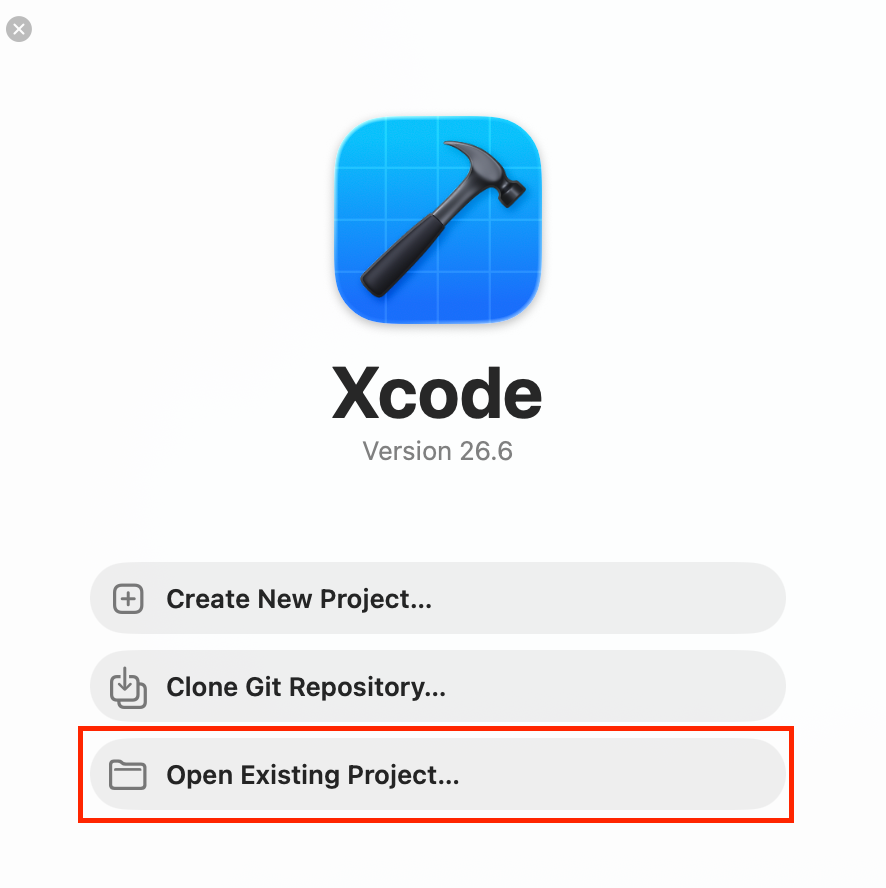
The app has exactly one dependency, the roboflow-swift SDK, declared through Swift Package Manager, so Xcode fetches it automatically the first time the project opens. Wait for the package resolution to finish in the status bar, and there is nothing to install by hand.
2. Point it at your model. At the top of ViewController.swift, set three values:
var API_KEY = "rf_your_publishable_key"   // workspace settings → API keys
var MODEL   = "your-project"              // the model you trained earlier
var VERSION = 1
That key is your publishable key, the one that starts with rf_. It's built to be embedded in apps, since it can download your models for on-device use but can't read or modify your account. On first launch, the SDK's rf.load(...) call downloads a CoreML-compiled copy of your model straight to the phone and caches it, and from then on, detection runs entirely on the neural engine with no network involved.
3. Set your tunables. LockboxConfig.swift holds every knob in one file: the workflow URL (your workspace plus workflow name, shown on the workflow's deploy tab), the model ID and class names your workflow expects, the zone polygon in normalized 0–1 coordinates (the app scales it to each frame), and the timing constants, meaning dwell frames, the 5-second countdown, the 13-second open window, and the verification grace period.
4. Create your secrets file. Duplicate LockboxSecrets.example.swift.txt like mentioned before, name the copy LockboxSecrets.swift, and fill in its five values: your private Roboflow API key (the workflow calls use this one), the ESP32's address (lockbox.local or its IP), your ntfy topic, and the dashboard's URL and access token. The file is gitignored, so your keys physically can't end up in a commit.
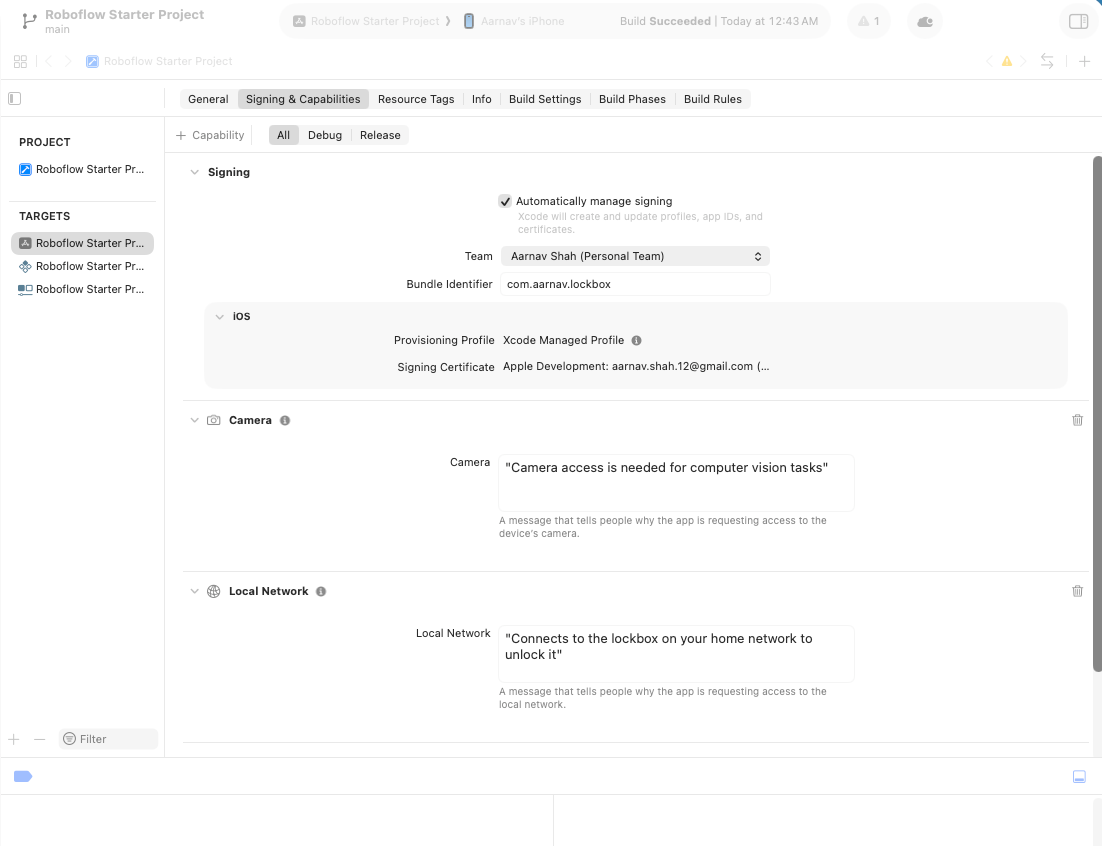
5. Sign it. Select the project in Xcode's left sidebar, then the app target, then Signing & Capabilities. Check Automatically manage signing, pick your team (add your Apple ID under Xcode → Settings → Accounts if the menu is empty), and change the bundle identifier to something unique, like com.yourname.lockbox.
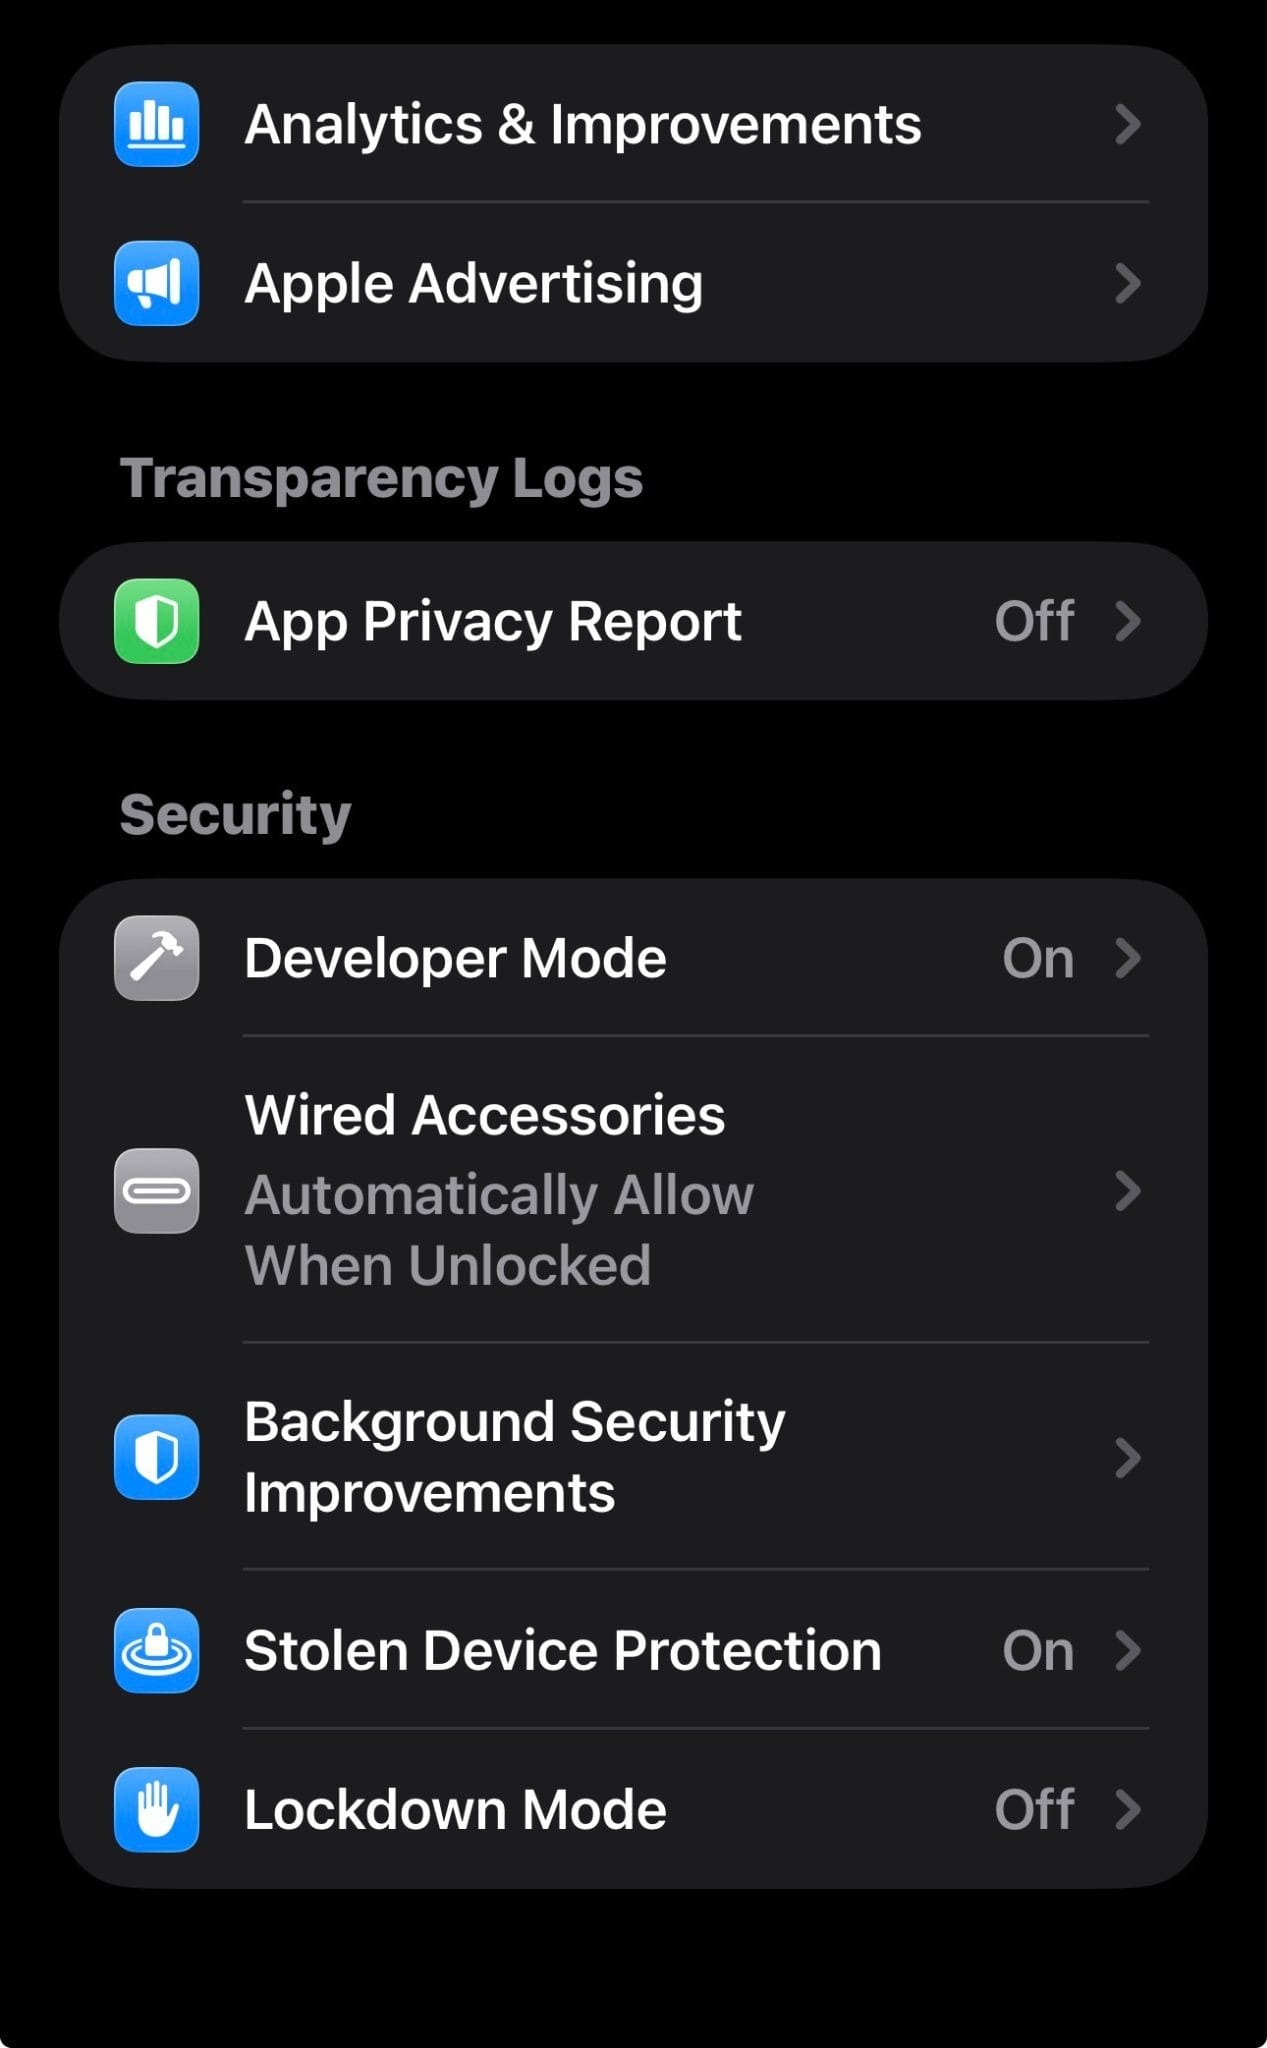
6. Run it on the phone. Plug the iPhone in and tap Trust on its screen. Enable Developer Mode under Settings → Privacy & Security → Developer Mode, which reboots the phone once.
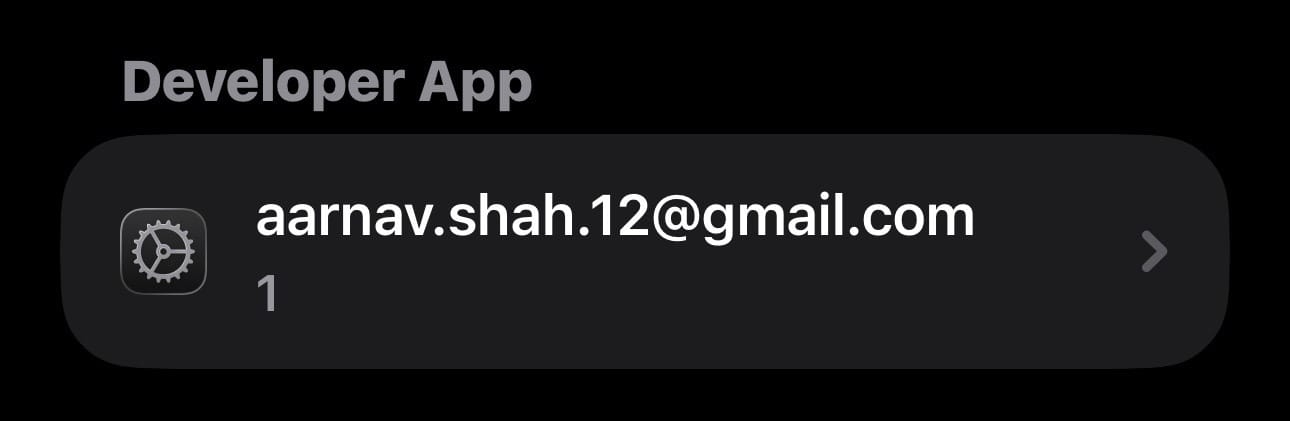
Pick the phone as the run destination in Xcode's toolbar and press ▶. The first install needs one more trust step on the phone, under Settings → General → VPN & Device Management → your Apple ID → Trust.
The app keeps its own screen awake, since it's a security camera now, so the last step is physical: suction-mount the phone to a window facing the porch, plug it into power, and leave it.
The dashboard
The repo includes a ~200-line, zero-dependency Node server plus a single-page UI. It shows the live stream, the lock's current state, and a photo gallery of every delivery moment, with Open box / Pulse / Box emptied buttons that work from anywhere. One shared access token protects everything: the page loads for anyone, but it shows nothing without the key.
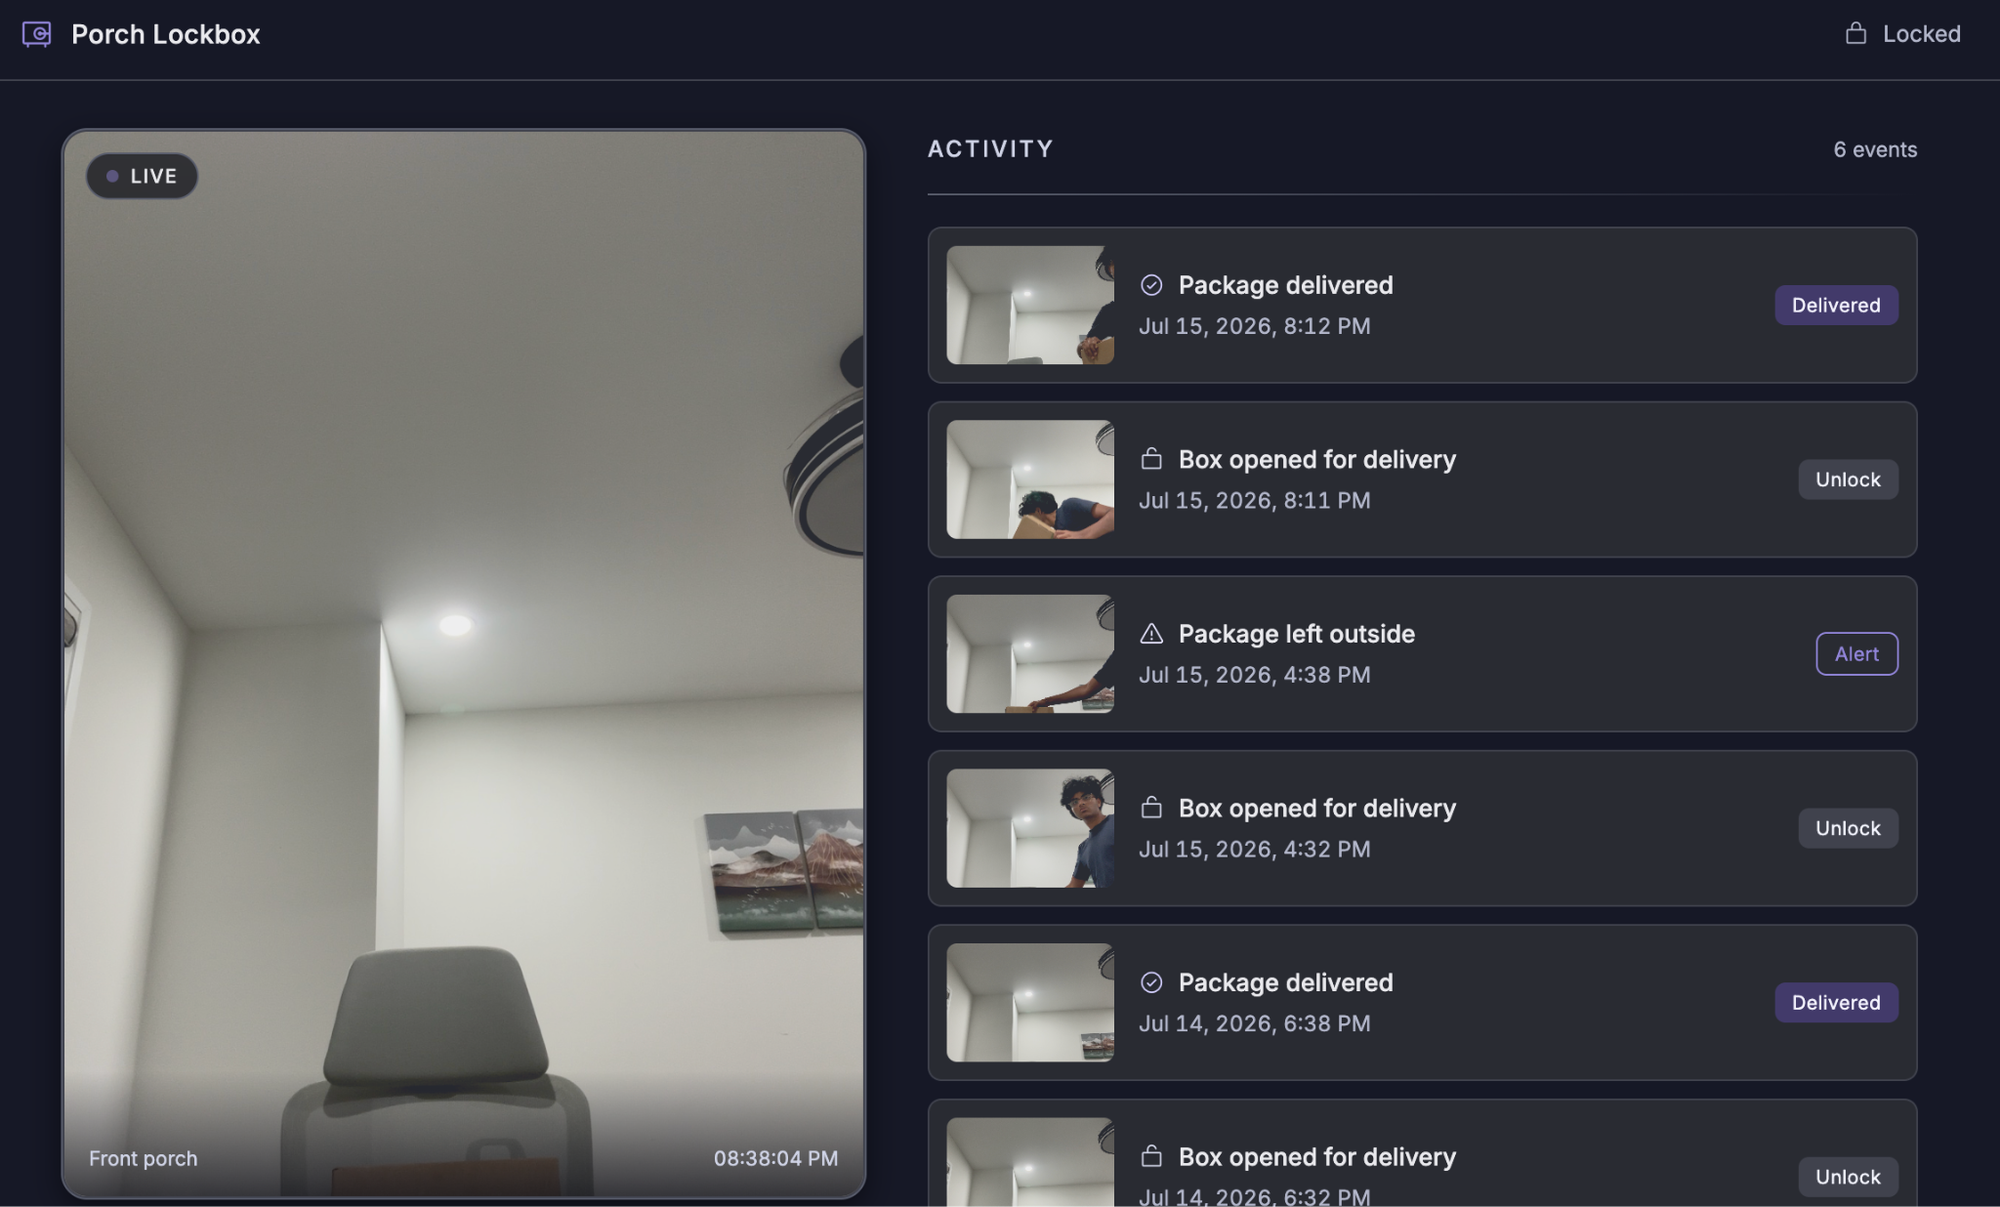
How the stream gets there
The phone POSTs JPEG frames to the server, and the server rebroadcasts them to every open browser as an MJPEG stream, the protocol where "video" is just JPEGs arriving quickly enough that browsers render it natively in an <img> tag. There's no WebRTC, no HLS, and no video infrastructure of any kind involved.
The stream is also viewer-aware. The phone checks in with the server every 3 seconds, and the reply includes how many browsers are watching. When nobody is watching, the phone sends one frame every 20 seconds as a heartbeat, and the moment someone opens the dashboard it ramps to ~8 fps within a few seconds. You get live video when you look and near-zero bandwidth when you don't, which is the same wake-word philosophy as the AI side.
That 3-second check-in doubles as the command channel. When you press Open box from the office, the server doesn't touch the lock, because it can't; the ESP32 is invisible from the internet. Instead, the server queues the command, the phone collects it on its next check-in, and the phone makes the LAN call itself. Queued commands expire after 60 seconds if unclaimed, so a phone that was off for an hour doesn't wake up to a backlog of unlocks. (If you run the server on a machine inside your home network instead, it skips the queue and calls the ESP32 directly.)
Deploy it on Render
Locally, the dashboard is one command: run node dashboard/server.js and open http://localhost:8321. To reach it from anywhere, the repo ships a Render blueprint (render.yaml), and Render's free tier hosts it comfortably:
- Push your clone to your own GitHub account.
- On render.com, choose New → Blueprint and connect the repo. Render reads render.yaml and configures the service on its own: Node runtime, dashboard/ as the root, node server.js as the start command.
- It prompts for one environment variable, DASH_TOKEN, which is your dashboard's access key. Paste something long and random (openssl rand -hex 8 is plenty). The blueprint marks it sync: false, so it lives only in Render's settings and never in the repo.
- Deploy, and you get a URL like https://your-lockbox.onrender.com.
- Put that URL and token into LockboxSecrets.swift (dashboardHost, dashboardToken) and rebuild the app. The phone starts mirroring to Render on its own, so you can open the URL, enter your key, and watch the porch appear.
What it costs to run
The tripwire gates the cloud to actual activity, so a normal day is a few thousand judged frames at about a second each, comfortably inside Roboflow's free tier. Render's free tier hosts the dashboard, ntfy is free, and the electronics were about $45, once. The most expensive component is a wooden box (if you’re to purchase it).
Build your own
Everything is at github.com/aarnavshah12/Package-Track: the ESP32 firmware, the full iOS app, the workflow definition, the dashboard, and example config files for every secret. The path, in order:
- Find a box, then add the flap, hinge, braces, and solenoid.
- Wire the ESP32 and relay, flash the firmware, and get your /pulse clunk.
- Train the model on Roboflow, starting from a Universe dataset and adding photos of your own porch.
- Assemble the workflow block by block, draw your zone, and test it with photos.
- Build the app onto any old iPhone and mount it at a window.
- Deploy the dashboard, subscribe to your ntfy topic, and print the sign.
The porch pirates got nothing, and we didn’t need a glitter bomb.


Cite this Post
Use the following entry to cite this post in your research:
Aarnav Shah. (Jul 17, 2026). Teaching a Porch to Recognize Delivery Drivers and Accept Packages. Roboflow Blog: https://blog.roboflow.com/teaching-a-porch-to-accept-packages/