
YOLOv11 (also known as YOLO11) is a family of models for object detection, classification, instance segmentation, keypoint detection, and oriented bounding box detection (OBB). For each task, the model comes in 5 variants of increasing size and accuracy: N, S, M, L, and X. You can find the comparison in the Model Leaderboard.
Try out YOLO11 Instance Segmentation in the workflow below.
You can fine-tune YOLOv11 to calculate segmentation masks that correspond to the specific region in which an object appears in an image.
In this article, we'll explore a medical use case by retraining YOLO11 on the Pelvis X-ray dataset from Roboflow Universe. You can access the full code in this Notebook. You can use any dataset you want.
This fine-tuned YOLO11 model can be applied across several areas:
- Medical Diagnosis: The model can assist physicians in diagnosing pelvis-related conditions, such as fractures or degenerative diseases, in areas like the Iliac, Obturator, Femur, Teardrop, Pubis, and Supracetabular regions, helping expedite treatment.
- Medical Training: It can be used as an educational tool for medical students and radiologists, aiding in the identification and differentiation of femur classes in pelvis AP X-rays.
- Injury Analysis: In sports medicine and physiotherapy, the model can track and analyze hip injury recovery, enabling more effective rehabilitation plans.
- Forensic Anthropology: Forensic experts can leverage the model to identify key pelvic features essential for determining sex, age, and other identifiers in unidentified remains.
- AI-Driven Prosthetics: The model can support advanced prosthetic development by providing precise data for hip joint alignment.

Let's train our model.
Prerequisites
To get started, you need to install the ultralytics package. Additionally, we shall use roboflow to retrieve the dataset and supervision to visualize the final results.
Run the following command in a Colab or Jupyter Notebook:
%pip install "ultralytics<=8.3.40" supervision roboflowimport os
HOME = os.getcwd()YOLO CLI
The ultralytics package includes a command-line interface (CLI) for YOLO, simplifying tasks like training, validation, and inference without the need for code modification. The CLI supports multiple modes, including detection, classification, pose tracking, and segmentation, making it an ideal starting point.
For example, you can run the model on a single image as follows:
!yolo segment predict model=yolo11n-seg.pt source='https://media.roboflow.com/notebooks/examples/dog.jpeg' save=true
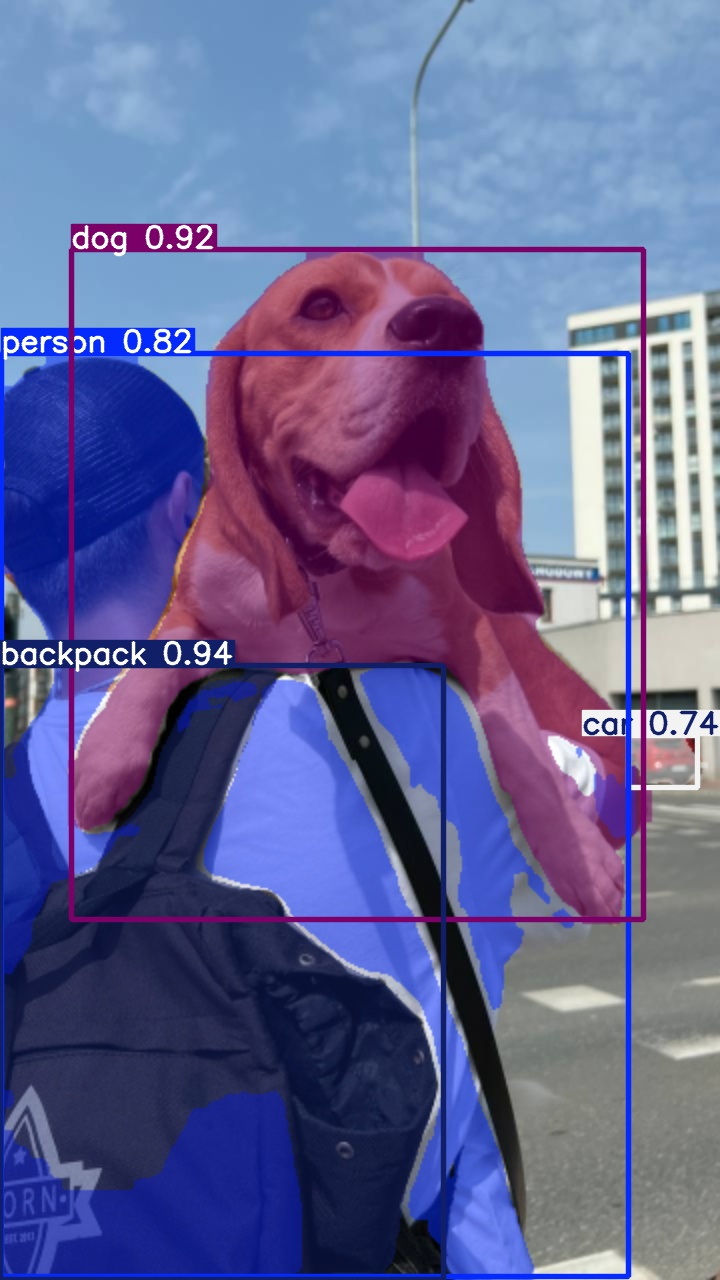
The results will be saved to ./runs/<task>/predict/<image_name>. Further prediction runs will create numbered task folders such as ./runs/<task>/predict2/.
Train YOLO11 on a Custom Dataset
We shall use the labeled Pelvis X-ray dataset from Roboflow Universe. Alternatively:
- If you have a set of unlabeled images, see How to Label Data data for Yolo11. It is also worthwhile to look at Labeling Data with Grounded SAM 2, as it can speed the process up significantly.
- If you have a labeled dataset in the correct format, you can use it directly.
- If you upload images to the dashboard, you can label them, form a dataset, apply post-processing & augmentation, and then download the dataset in the required format.
Step #1: Retrieve Dataset Download Code
Let's retrieve the dataset from Universe.
- Navigate to the dataset page.
- Click on
Dataseton the left. - On the right, click
Download Dataset. - Select
Yolov11, checkShow download code, and clickContinue.

Step #2: Download the Dataset
Make sure you are working in the datasets folder. Then, run the dataset download code.
!mkdir {HOME}/datasets
%cd {HOME}/datasets
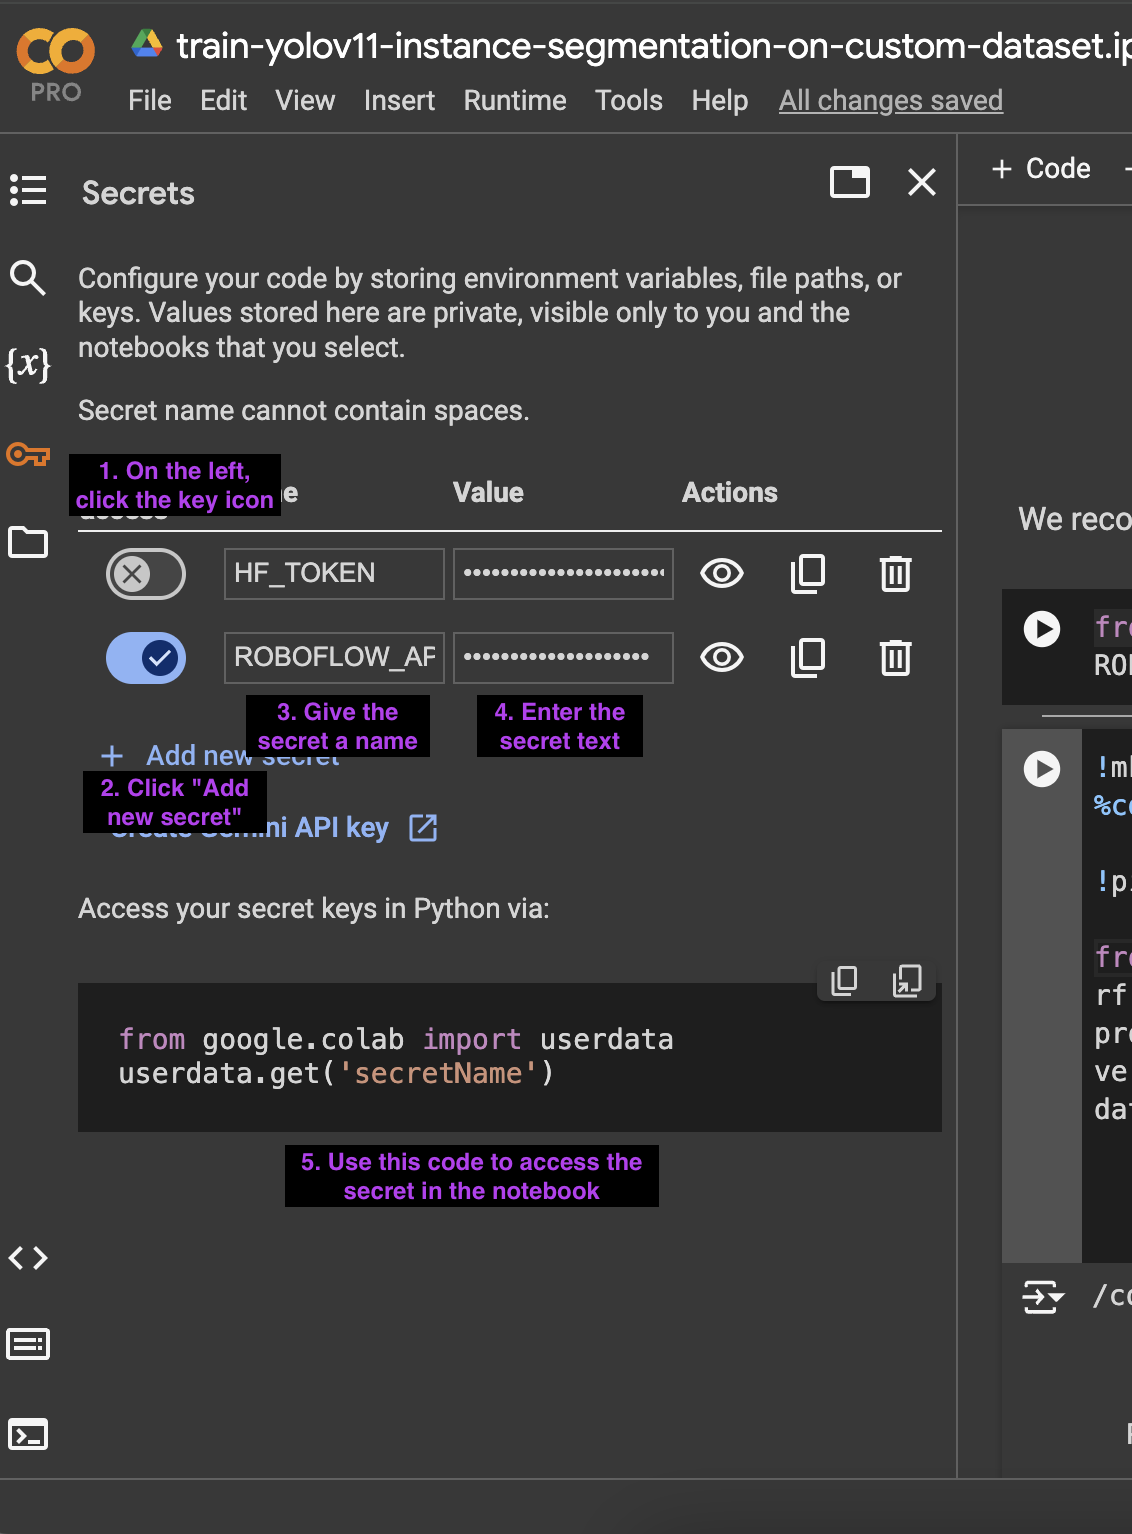
from roboflow import Roboflow
rf = Roboflow(api_key="<YOUR_API_KEY>")
project = rf.workspace("ks-fsm9o").project("pelvis-ap-x-ray")
version = project.version(3)
dataset = version.download("yolov11")
Step #3: Train a Custom YOLO11 Instance Segmentation Model
Now that you have your custom dataset, you can start training your YOLO11 instance segmentation model. Let's return to the home folder and start training.
%cd {HOME}

!yolo task=detect mode=train model=yolo11s-seg.pt data={dataset.location}/data.yaml epochs=10 imgsz=640 plots=True
After training, you can examine the results, including the confusion matrix, predictions, and validation batch, by executing the following code:
from IPython.display import Image as IPyImage

IPyImage(filename=f'{HOME}/runs/segment/train/confusion_matrix.png', width=600)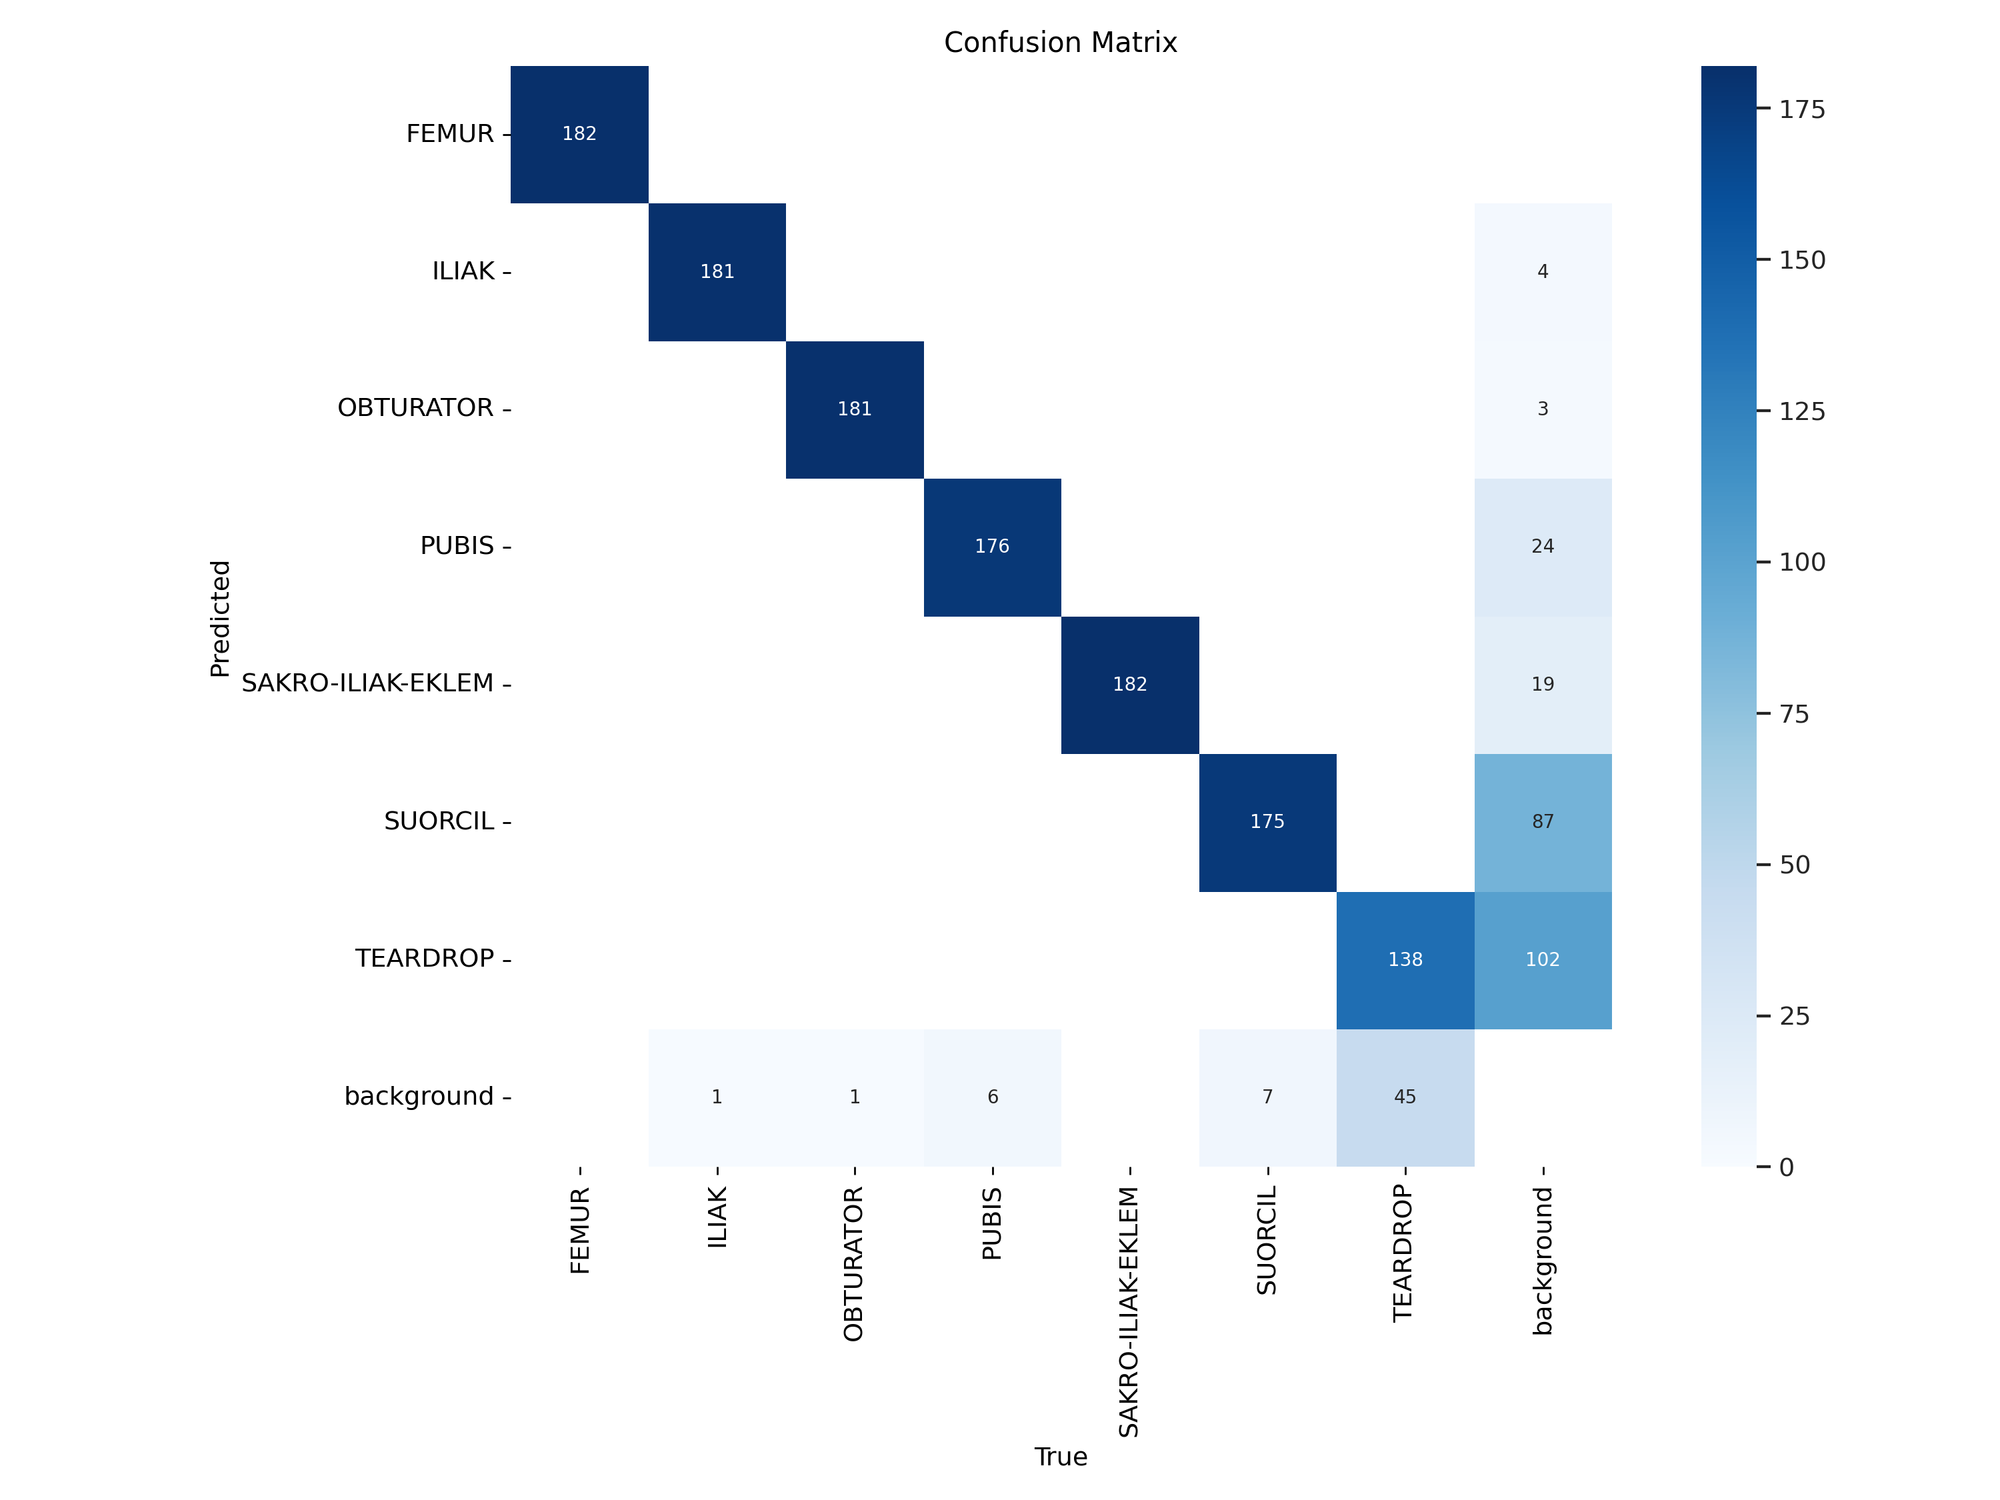
IPyImage(filename=f'{HOME}/runs/segment/train/results.png', width=600)
IPyImage(filename=f'{HOME}/runs/segment/train/val_batch0_pred.jpg', width=600)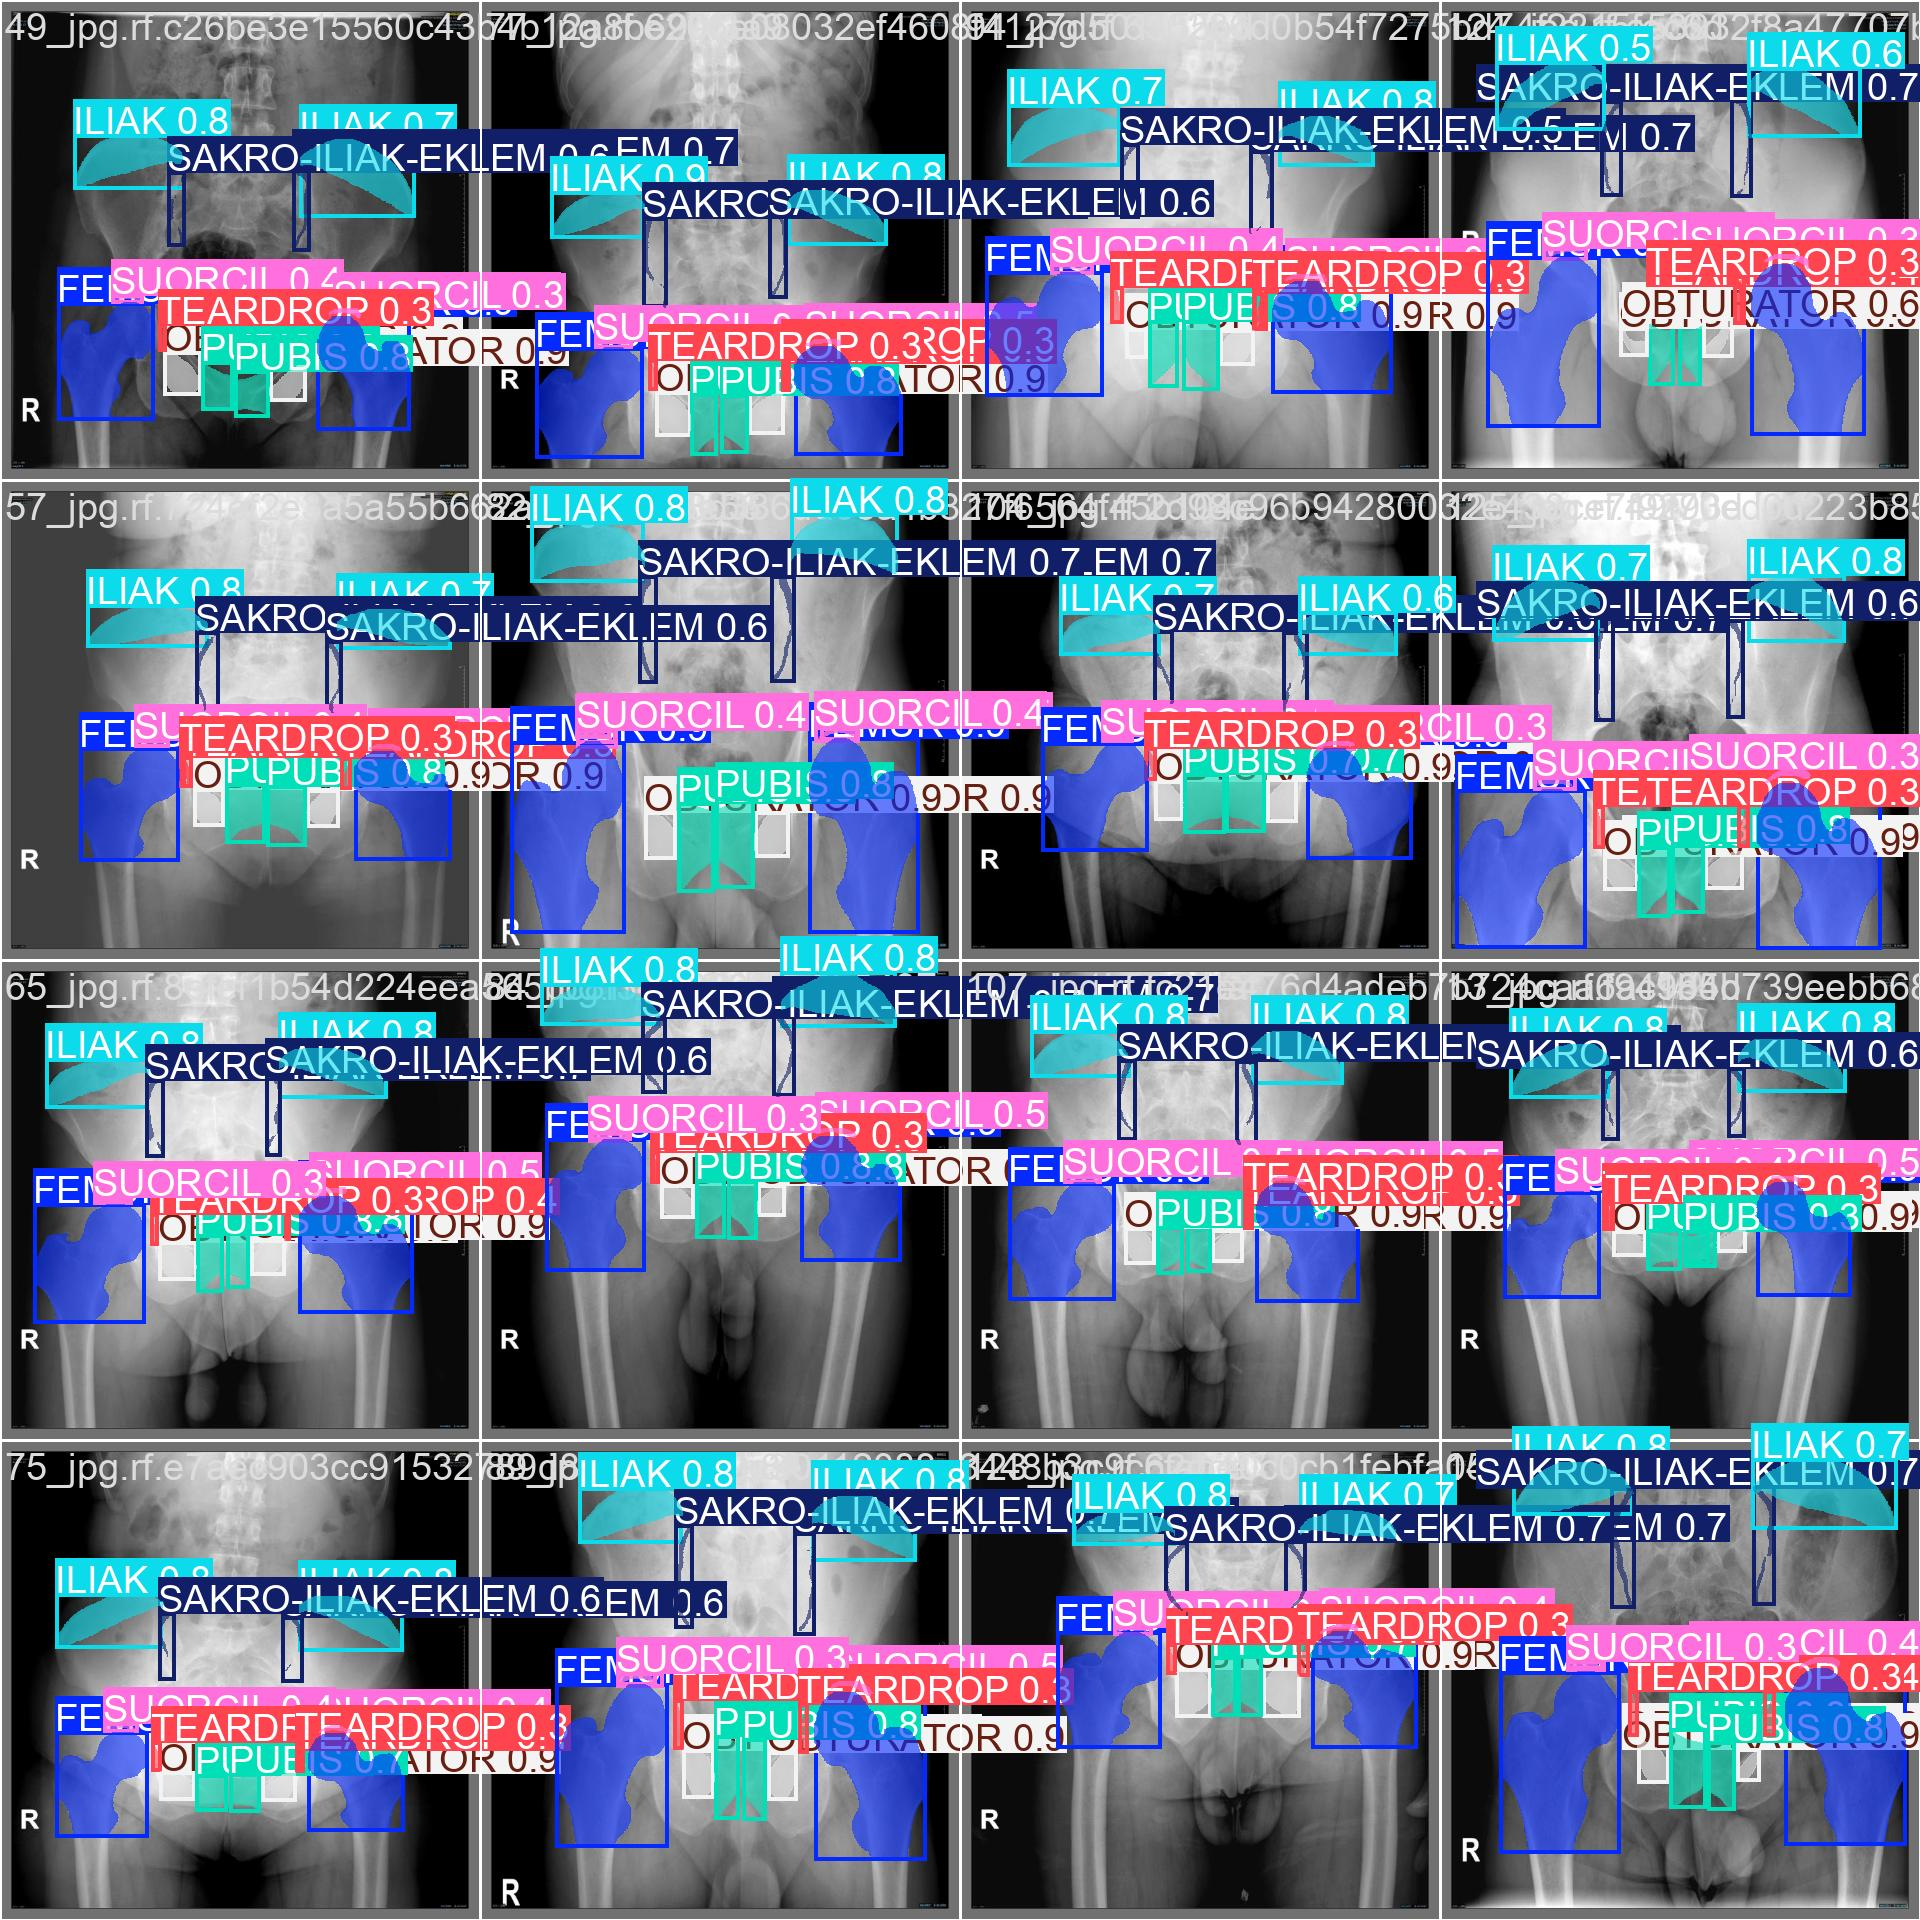
Step #4: Inference with a Custom YOLO11 Model
Once you have finished training your YOLOv11 model, you’ll have a set of trained weights ready for use. These weights will be in the /runs/detect/train/weights/best.pt folder of your project.
You can upload your model weights to Roboflow Deploy to use your trained weights on our infinitely scalable infrastructure. You can also run the model on your own hardware with Roboflow Inference.
To upload model weights, use the following code:
project.version(dataset.version).deploy(model_type="yolov11", model_path=f"{HOME}/runs/detect/train/")It may take a few minutes for your model weights to be processed. Then, an API will be made available that you can use to run your model.
We can then use the Roboflow Python package to query our model:
# Run inference on your model on a persistant, auto-scaling, cloud API

import os, random, cv2
import supervision as sv
import IPython

# load model
model = project.version(dataset.version).model

# choose random test set image
test_set_loc = dataset.location + "/test/images/"
random_test_image = random.choice(os.listdir(test_set_loc))
print("running inference on " + random_test_image)

pred = model.predict(test_set_loc + random_test_image, confidence=40, overlap=30)
detections = sv.Detections.from_inference(pred)

image = cv2.imread(test_set_loc + random_test_image)
Notice that some classes are in Latin, and some in Turkish. Let's change it to Latin & English.
name_dictionary = {
    "SUORCIL": "SOURCIL",
    "SAKRO-ILIAK-EKLEM": "SACROILIAC-JOINT",
    "ILIAK": "ILIUM"
}
detections.data["class_name"] = [
    name_dictionary.get(class_name, class_name) for class_name in detections.data["class_name"]
]
Now, we can visualize our model predictions:
mask_annotator = sv.MaskAnnotator()
label_annotator = sv.LabelAnnotator(text_color=sv.Color.BLACK, text_position=sv.Position.CENTER)

annotated_image = image.copy()
mask_annotator.annotate(annotated_image, detections=detections)
label_annotator.annotate(annotated_image, detections=detections)

sv.plot_image(annotated_image, size=(10, 10))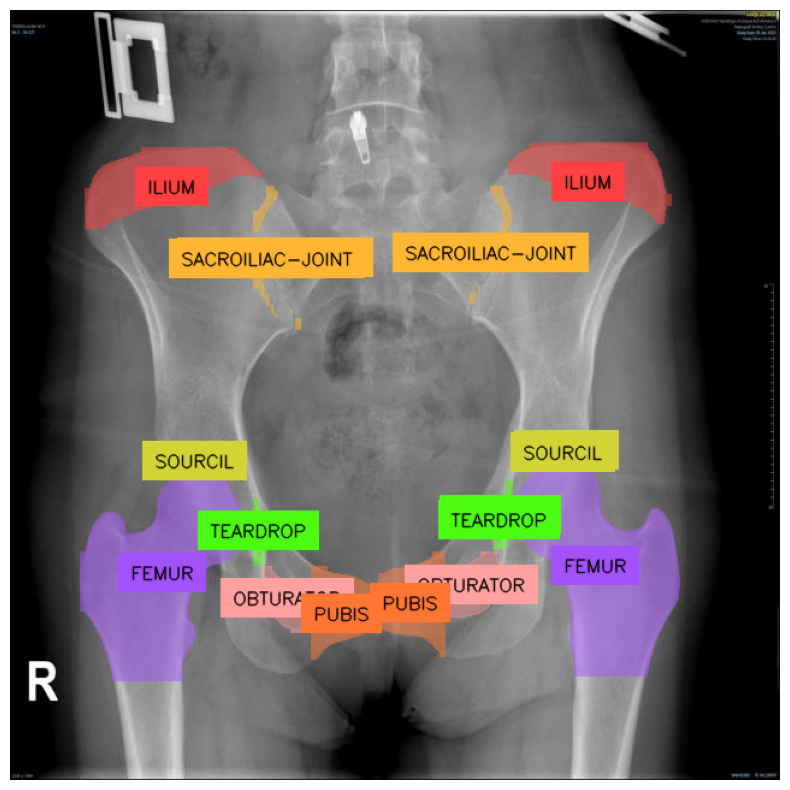
Deployment
Congratulations! You have successfully trained a YOLO11 model. Let's finish up by deploying it to Roboflow, and retrieving the results with inference.
Note: Your API key should be for your project! If you used our workspace thus far, deployment won't work until you create your own project.
project.version(dataset.version).deploy(model_type="yolov11-seg", model_path=f"{HOME}/runs/segment/train/")This might take a few minutes to complete. Once done, you'll be able to access the model from any device:
pip install inferenceimport cv2
import supervision as sv
from inference import get_model
model_id = project.id.split("/")[1] + "/" + dataset.version
model = get_model(model_id, "<ROBOFLOW_API_KEY>")
image = cv2.imread("<PATH_TO_IMAGE>")
result = model.infer(image)
detections = sv.Detections.from_inference(result)Conclusion
In this article we've shown how to train the YOLO11 model for instance segmentation. The model started off with knowledge of the 80 COCO classes, yet with the dataset found on Roboflow Universe, we brought it to the field of Medicine, teaching it to segment objects in X-ray image of pelvis. We then deployed it to Roboflow, allowing you to query it from other machines! The full code is available in our Notebook.
YOLO11 is the newest model in the YOLO family, featuring improved precision, at lower memory and runtime costs. My hope is - you now understand how to wrangle it to your instance segmentation needs. Best of luck!
Cite this Post
Use the following entry to cite this post in your research:
Linas Kondrackis. (Oct 3, 2024). How to Train YOLOv11 Instance Segmentation on a Custom Dataset. Roboflow Blog: https://blog.roboflow.com/train-yolov11-instance-segmentation/