
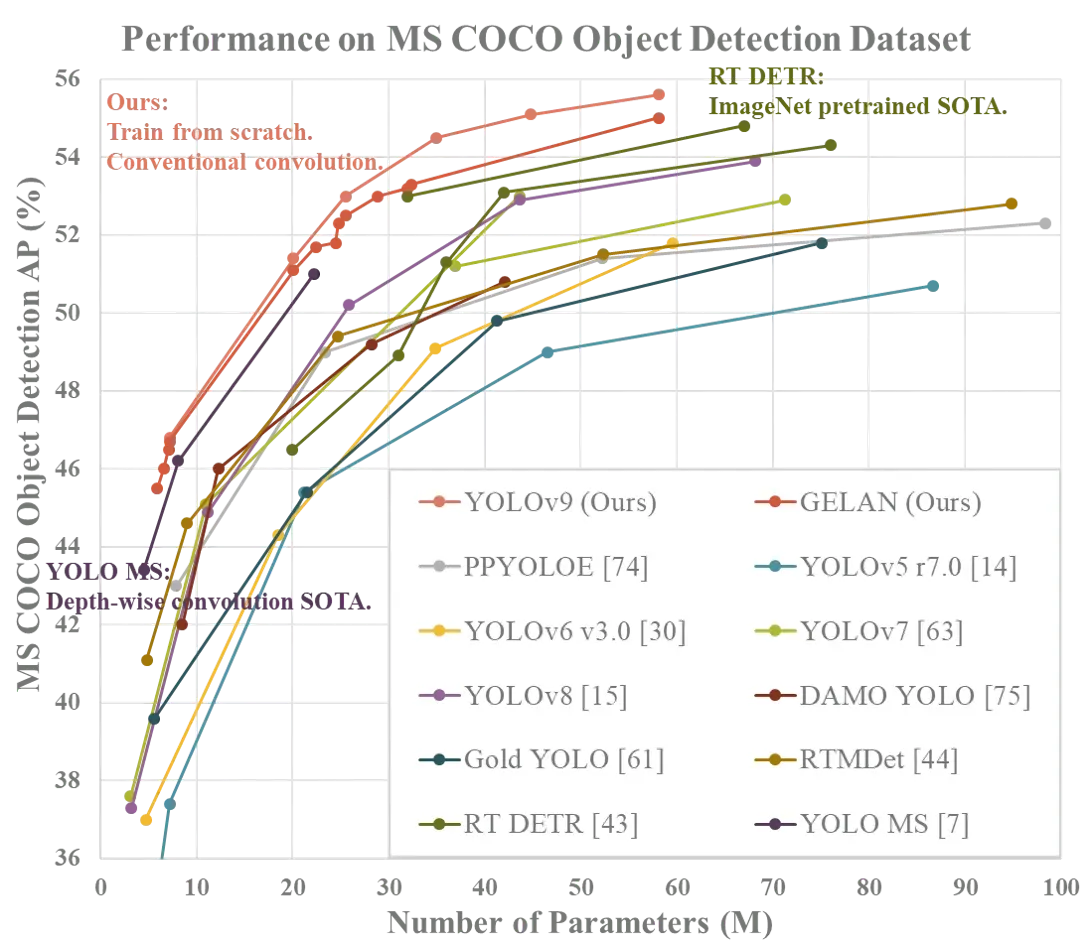
YOLOv9, introduced by Chien-Yao Wang, I-Hau Yeh, and Hong-Yuan Mark Liao, is an object detection architecture that benchmarks above YOLOv8, YOLOv7, and YOLOv5 on MS COCO across its four model sizes (v9-S through v9-E), with the largest reaching 55.6% AP. This tutorial walks through cloning the YOLOv9 repository, downloading pretrained weights, running inference on default COCO weights, then fine-tuning on a custom football players detection dataset. The guide also covers reviewing training graphs and the confusion matrix, then deploying the fine-tuned model on local hardware using Roboflow Inference.
On February 21st, 2024, Chien-Yao Wang, I-Hau Yeh, and Hong-Yuan Mark Liao released the “YOLOv9: Learning What You Want to Learn Using Programmable Gradient Information'' paper, which introduces a new computer vision model architecture: YOLOv9. Later, the source code was made available, allowing anyone to train their own YOLOv9 models.
According to the project research team, the YOLOv9 achieves a higher mAP than existing popular YOLO models such as YOLOv8, YOLOv7, and YOLOv5, when benchmarked against the MS COCO dataset.
In this guide, we are going to show how to train a YOLOv9 model on a custom dataset. We will walk through an example of training a vision model to identify football players on a field. With that said, you can use any dataset you want with this guide.
Without further ado, let’s get started!
Here is an example Workflow with which you can test a YOLOv9 model trained on COCO with any image that you upload:
What is YOLOv9?
YOLOv9 is a computer vision model developed by Chien-Yao Wang, I-Hau Yeh, and Hong-Yuan Mark Liao. Hong-Yuan Mark Liao and Chien-Yao Wang also worked on the YOLOv4, YOLOR, and YOLOv7, other popular model architectures. YOLOv9 introduces two new architectures: YOLOv9 and GELAN, both of which are usable from the yolov9 Python repository releasd with th epaper.
Using the YOLOv9 model, you can train an object detection model. Segmentation, classification, and other task types are not supported at this time.
YOLOv9 comes in four models, ordered by parameter count:
- v9-S
- v9-M
- v9-C
- v9-E
The weights for v9-S and v9-M are not available at the time of writing this guide.
The smallest of the models achieved 46.8% AP on the validation set of the MS COCO dataset, while the largest model achieves 55.6%. This sets a new state-of-the-art for object detection performance. The chart below shows the findings from the YOLOv9 research team.
YOLOv9 does not have an official license at the time of writing this guide. As of February 22nd, 2023, a lead researcher noted “I think it should by GPL3, I will check and update the license file.”. This indicates a license will be set soon.
How to Install YOLOv9
YOLOv9 is packaged as a series of scripts with which you can work. There is no official Python package or wrapper that you can use to interact with the model at the time of writing this guide.
To use YOLOv9, you need to download the project repository. Then, you can run either a training job or inference from an existing COCO checkpoint.
This tutorial assumes you are working in Google Colab. Adjust commands as necessary if you are working on your local machine outside of a Notebook environment.
There is a bug in YOLOv9 that prevents you from running inference on an image, but the Roboflow team is maintaining an unofficial fork with a patch until the fix is released. To install YOLOv9 from our patched fork, run the following commands:
git clone https://github.com/SkalskiP/yolov9.git
cd yolov9
pip3 install -r requirements.txt -q
Let’s set a HOME directory with which to work:
import os
HOME = os.getcwd()
print(HOME)
Next, you need to download the model weights. Only the v9-C and v9-E weights are available at the moment. You can download them using the following commands:
!mkdir -p {HOME}/weights
!wget -P {HOME}/weights -q https://github.com/WongKinYiu/yolov9/releases/download/v0.1/yolov9-c.pt
!wget -P {HOME}/weights -q https://github.com/WongKinYiu/yolov9/releases/download/v0.1/yolov9-e.pt
!wget -P {HOME}/weights -q https://github.com/WongKinYiu/yolov9/releases/download/v0.1/gelan-c.pt
!wget -P {HOME}/weights -q https://github.com/WongKinYiu/yolov9/releases/download/v0.1/gelan-e.pt
You can now use the scripts in the project repository to run inference on and train YOLOv9 models.
Run Inference on a YOLOv9 Model
Let’s run inference using the v9-C COCO checkpoint on an example image. Create a new data directory and download an example image into your notebook. You can use our dog image as an example, or any other image you want.
!mkdir -p {HOME}/data
!wget -P {HOME}/data -q https://media.roboflow.com/notebooks/examples/dog.jpeg
SOURCE_IMAGE_PATH = f"{HOME}/dog.jpeg"
We can now run inference on our image:
!python detect.py --weights {HOME}/weights/gelan-c.pt --conf 0.1 --source {HOME}/data/dog.jpeg --device 0Image(filename=f"{HOME}/yolov9/runs/detect/exp/dog.jpeg", width=600)
Our model returns:
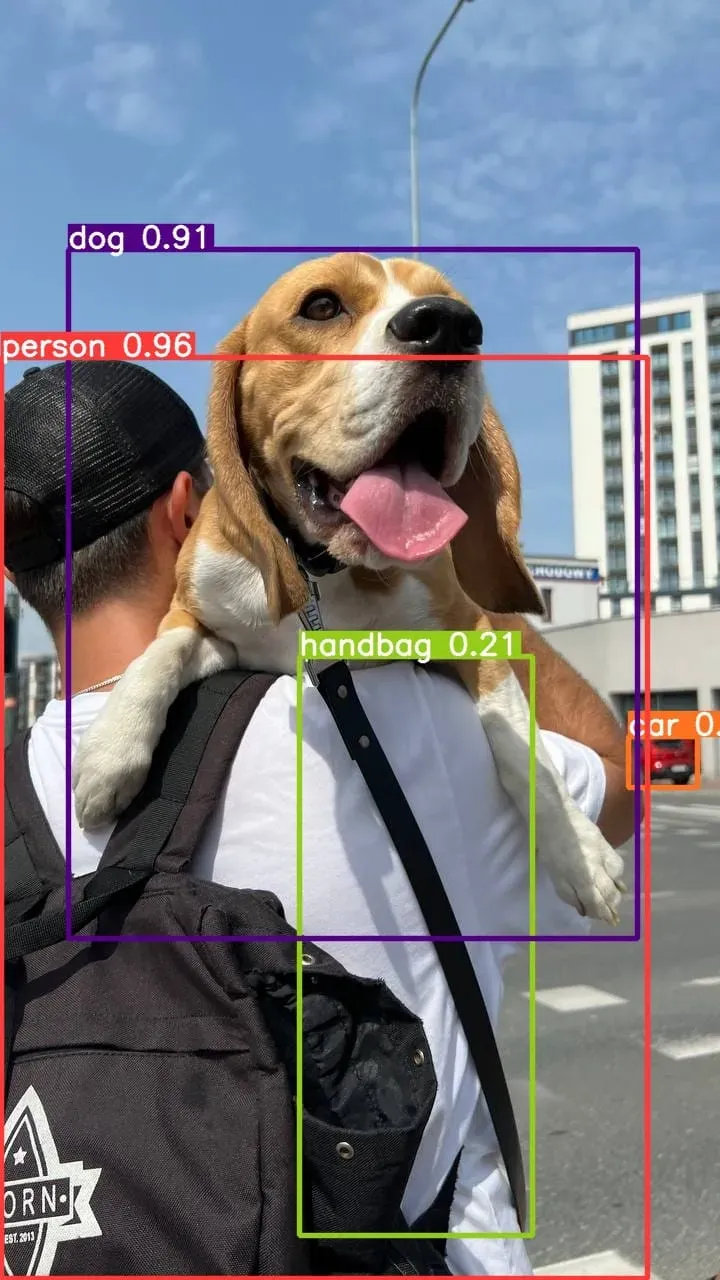
Our model was able to successfully identify a person, dog, and car in the image. With that said, the model misidentified a strap as a handbag and failed to detect the backpack.
Let’s try the v9-E model, the model with the most parameters:
!python detect.py --weights {HOME}/weights/yolov9-e.pt --conf 0.1 --source {HOME}/data/dog.jpeg --device 0Image(filename=f"{HOME}/yolov9/runs/detect/exp2/dog.jpeg", width=600)Our model returns:
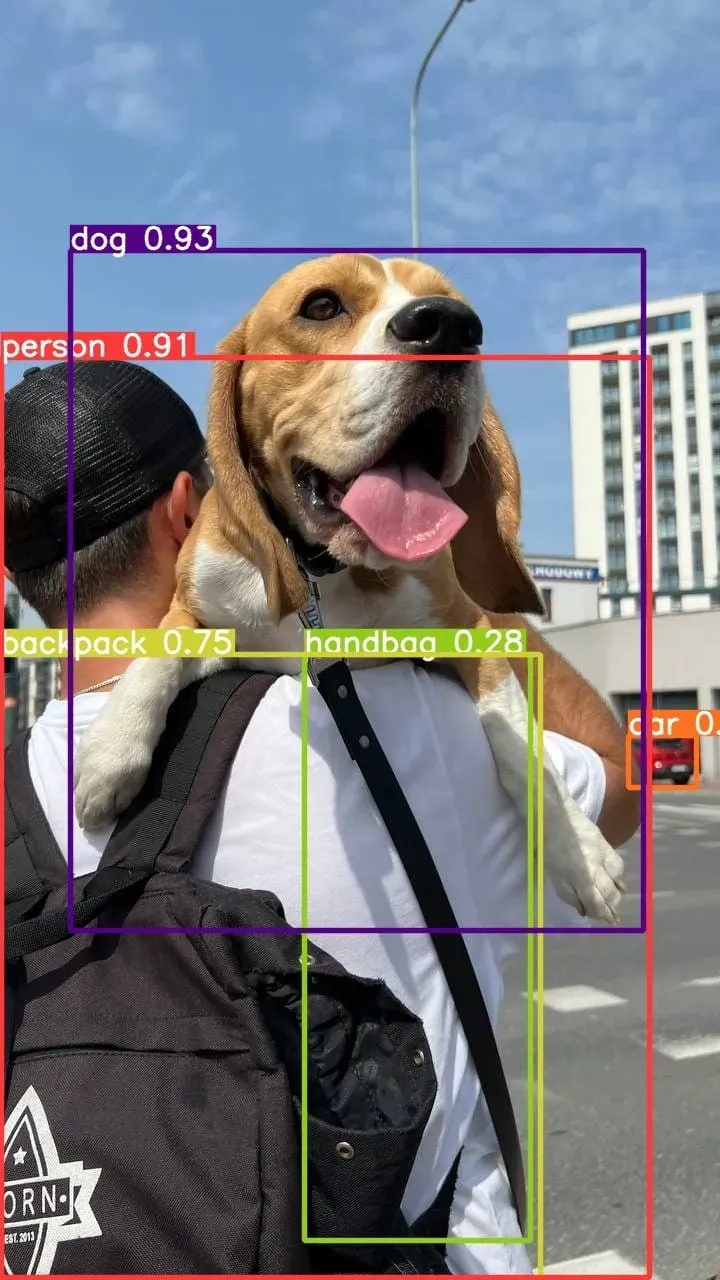
The model was able to successfully identify the person, dog, car, and backpack.
How to Train a YOLOv9 Model
You can train a YOLOv9 model using the train.py file in the YOLOv9 project directory.
Step #1: Download Dataset
To start training a model, you will need a dataset. For this guide, we are going to use a dataset of football players. The resulting model will be able to identify football players on a field.
If you do not have a dataset, check out Roboflow Universe, a community where over 200,000 computer vision datasets have been shared publicly. You can find datasets covering everything from book spines to football players to solar panels.
With Auto Label, you can use foundation models like Grounding DINO and Segment Anything to automatically label images in your dataset. Refer to our Auto Label launch post for more information about how Auto Label works, and how you can use it with your project.
Run the following code to download the dataset with which we will work in this guide:
%cd {HOME}/yolov9

roboflow.login()

rf = roboflow.Roboflow()

project = rf.workspace("roboflow-jvuqo").project("football-players-detection-3zvbc")
dataset = project.version(1).download("yolov7")
When you run this code, you will be asked to authenticate with Roboflow. Follow the link that appears in your terminal to authenticate. If you don’t have an account, you will be taken to a page where you can create an account. Then, click the link again to authenticate with the Python package.
This code downloads a dataset in the YOLOv7 format, which is compatible with the YOLOv9 model.
You can use any dataset formatted in the YOLOv7 format with this guide.
Step #2: Use YOLOv9 Python Script to Train a Model
Let’s train a model on our dataset for 20 epochs. We will do so using the GELAN-C architecture, one of the two architectures released as part of the YOLOv9 GitHub repository. GELAN-C is fast to train. GELAN-C inference times are fast, too.
You can do so using the following code:
%cd {HOME}/yolov9

!python train.py \
--batch 16 --epochs 20 --img 640 --device 0 --min-items 0 --close-mosaic 15 \
--data {dataset.location}/data.yaml \
--weights {HOME}/weights/gelan-c.pt \
--cfg models/detect/gelan-c.yaml \
--hyp hyp.scratch-high.yaml
Your model will start training. You will see training metrics from each epoch as the model trains.
Once your model has finished training, you can evaluate the training results using the graphs generated by the YOLOv9.
Run the following code to view your training graphs:
Image(filename=f"{HOME}/yolov9/runs/train/exp/results.png", width=1000)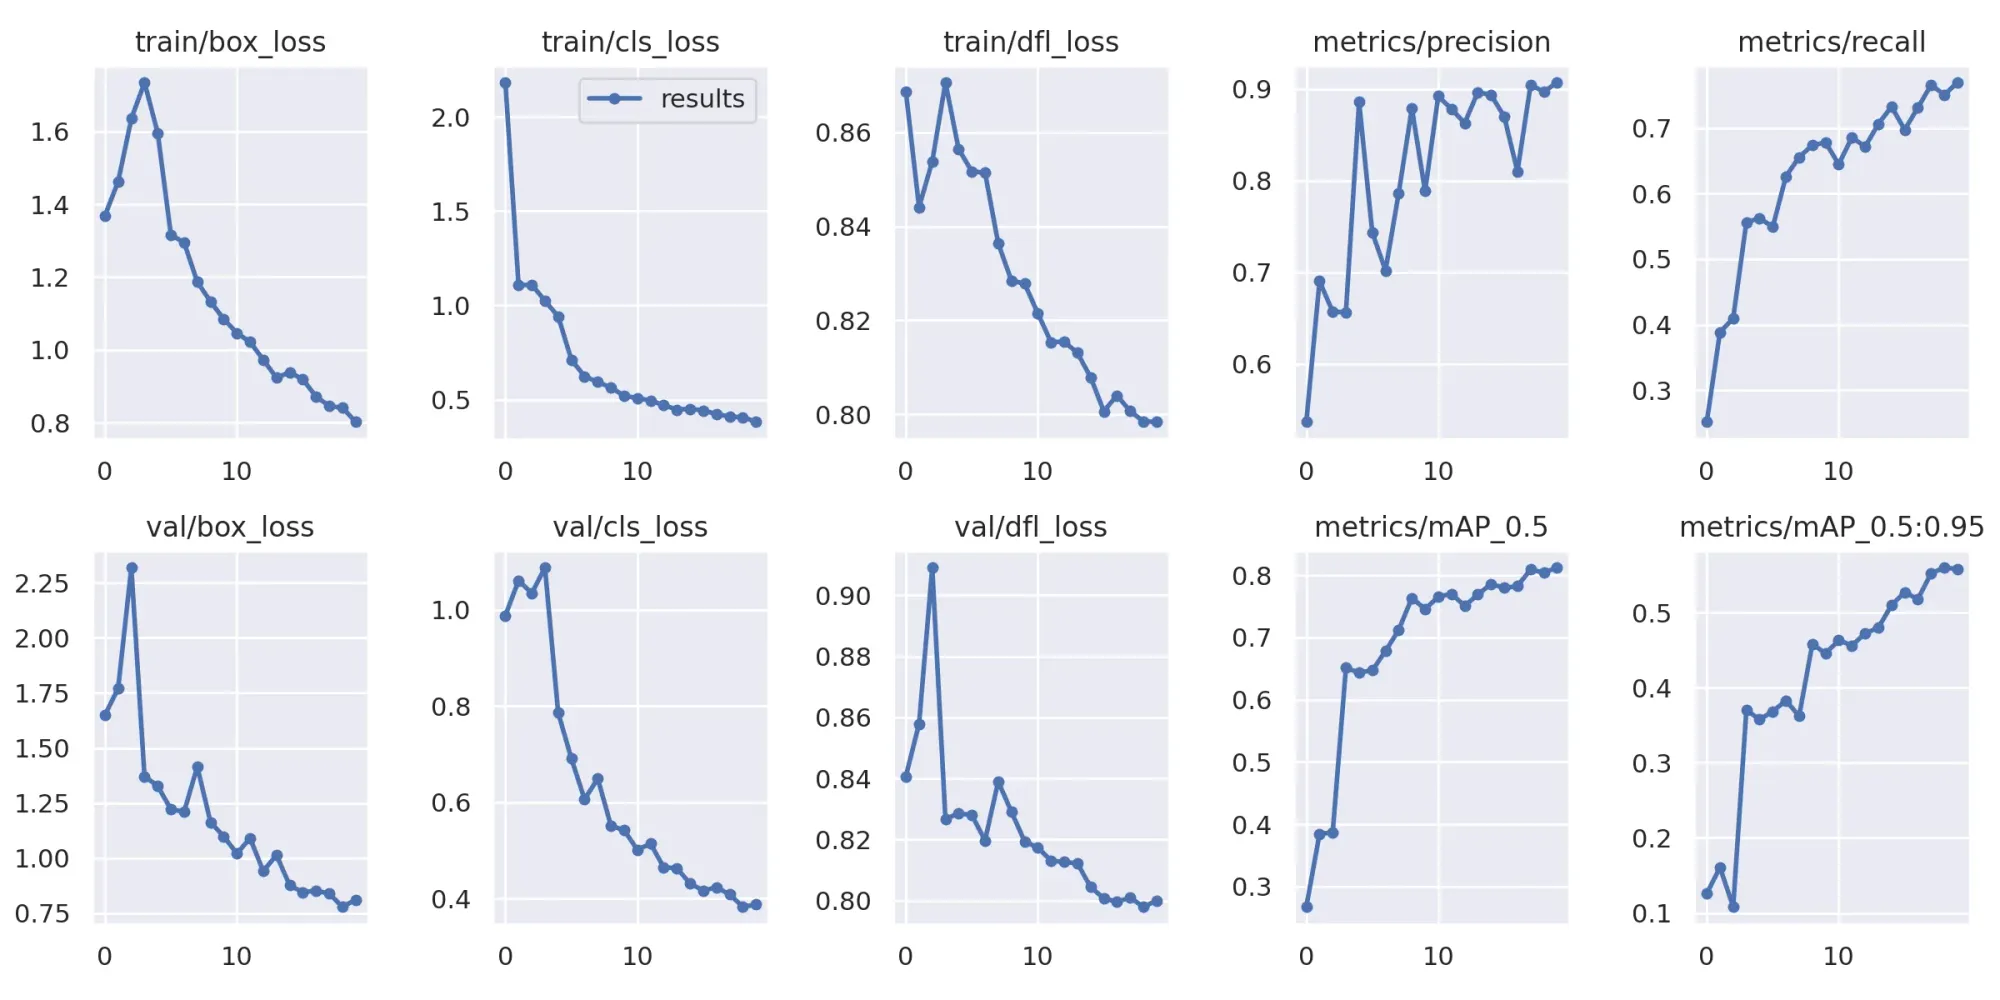
Run the following code to view your confusion matrix:
Image(filename=f"{HOME}/yolov9/runs/train/exp/confusion_matrix.png", width=1000)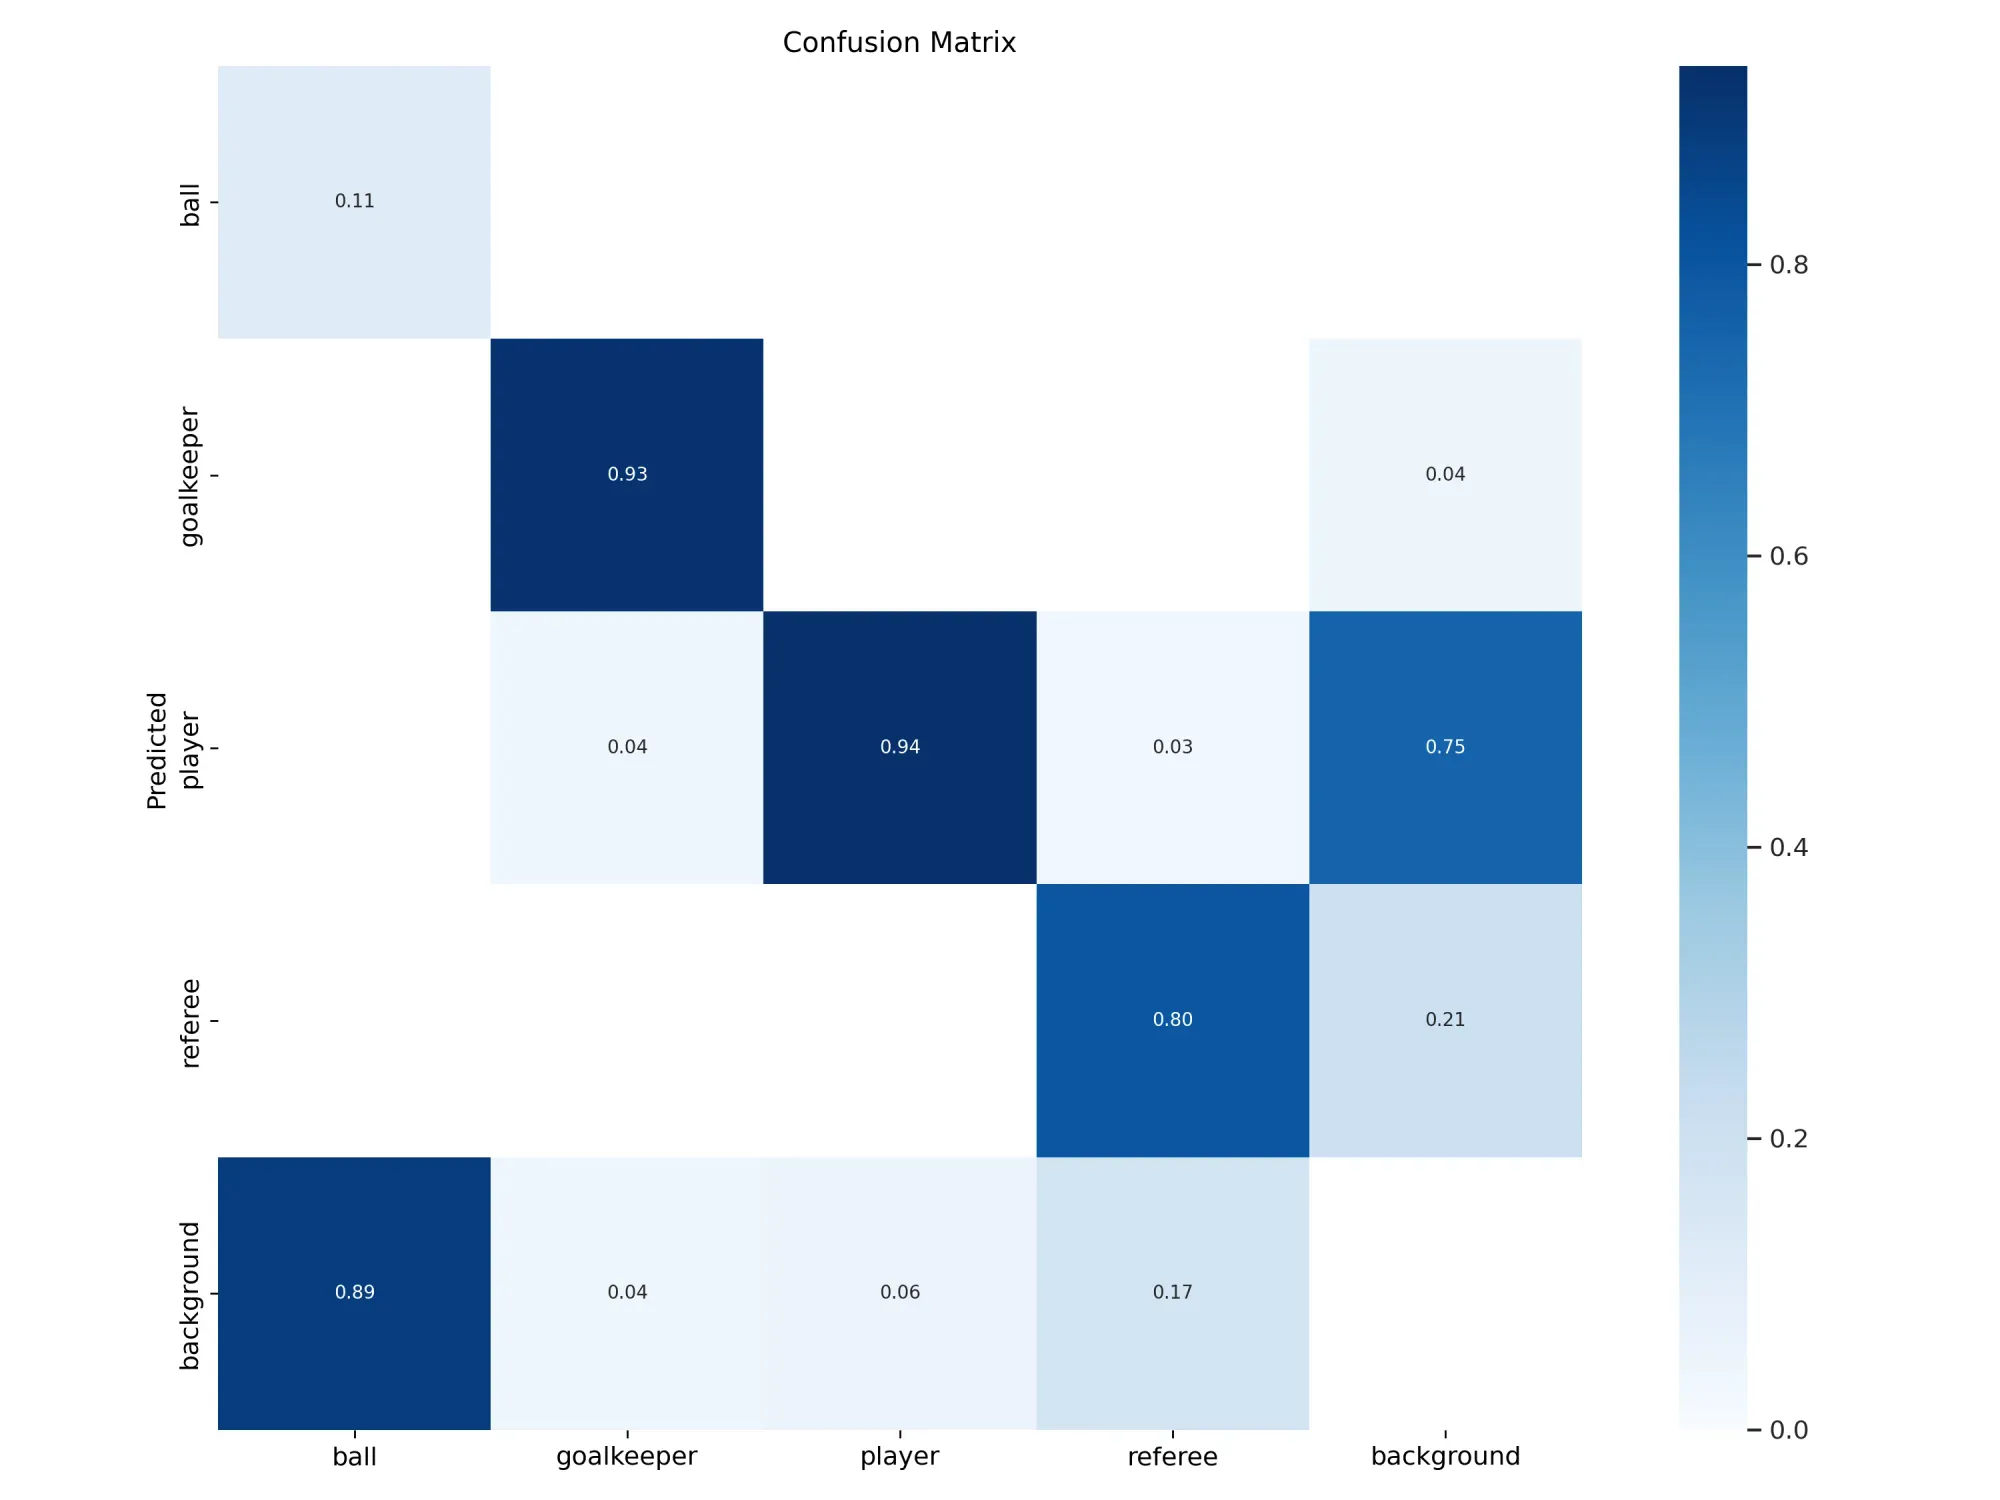
Run the following code to see results from your model on a batch of images in your validation set:
Image(filename=f"{HOME}/yolov9/runs/train/exp/val_batch0_pred.jpg", width=1000)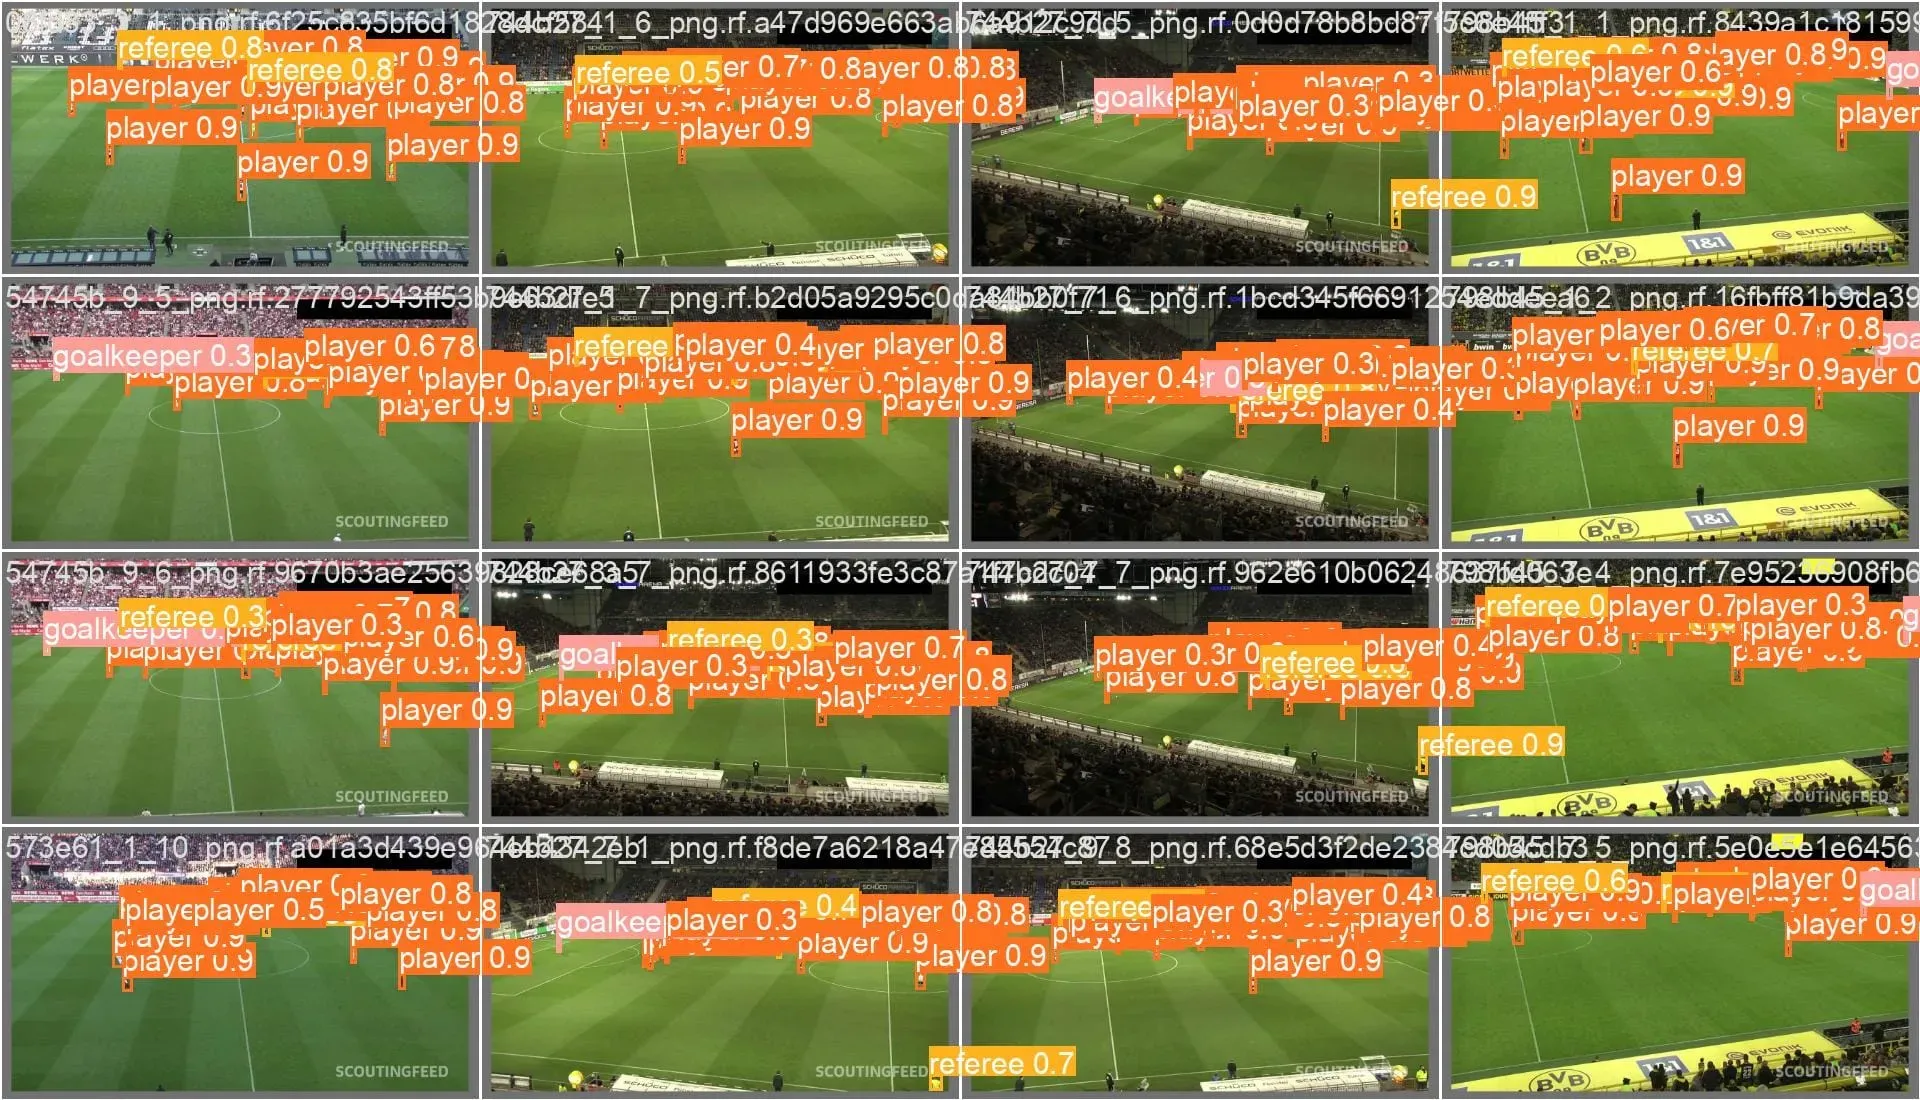
Step #3: Run Inference on the Custom Model
Now that we have a trained model, we can run inference. To do so, we can use the detect.py file in the YOLOv9 repository.
Run the following code to run inference on all images in your validation set:
!python detect.py \
--img 1280 --conf 0.1 --device 0 \
--weights {HOME}/yolov9/runs/train/exp/weights/best.pt \
--source {dataset.location}/valid/images

import glob
from IPython.display import Image, display

for image_path in glob.glob(f'{HOME}/yolov9/runs/detect/exp4/*.jpg')[:3]:
      display(Image(filename=image_path, width=600))
      print("\n")
We trained our model on images with a size of 640, which allows us to train a model with lesser computational resources. During inference, we increase the image size to 1280, allowing us to get more accurate results from our model.
Here are three examples of results from our model:
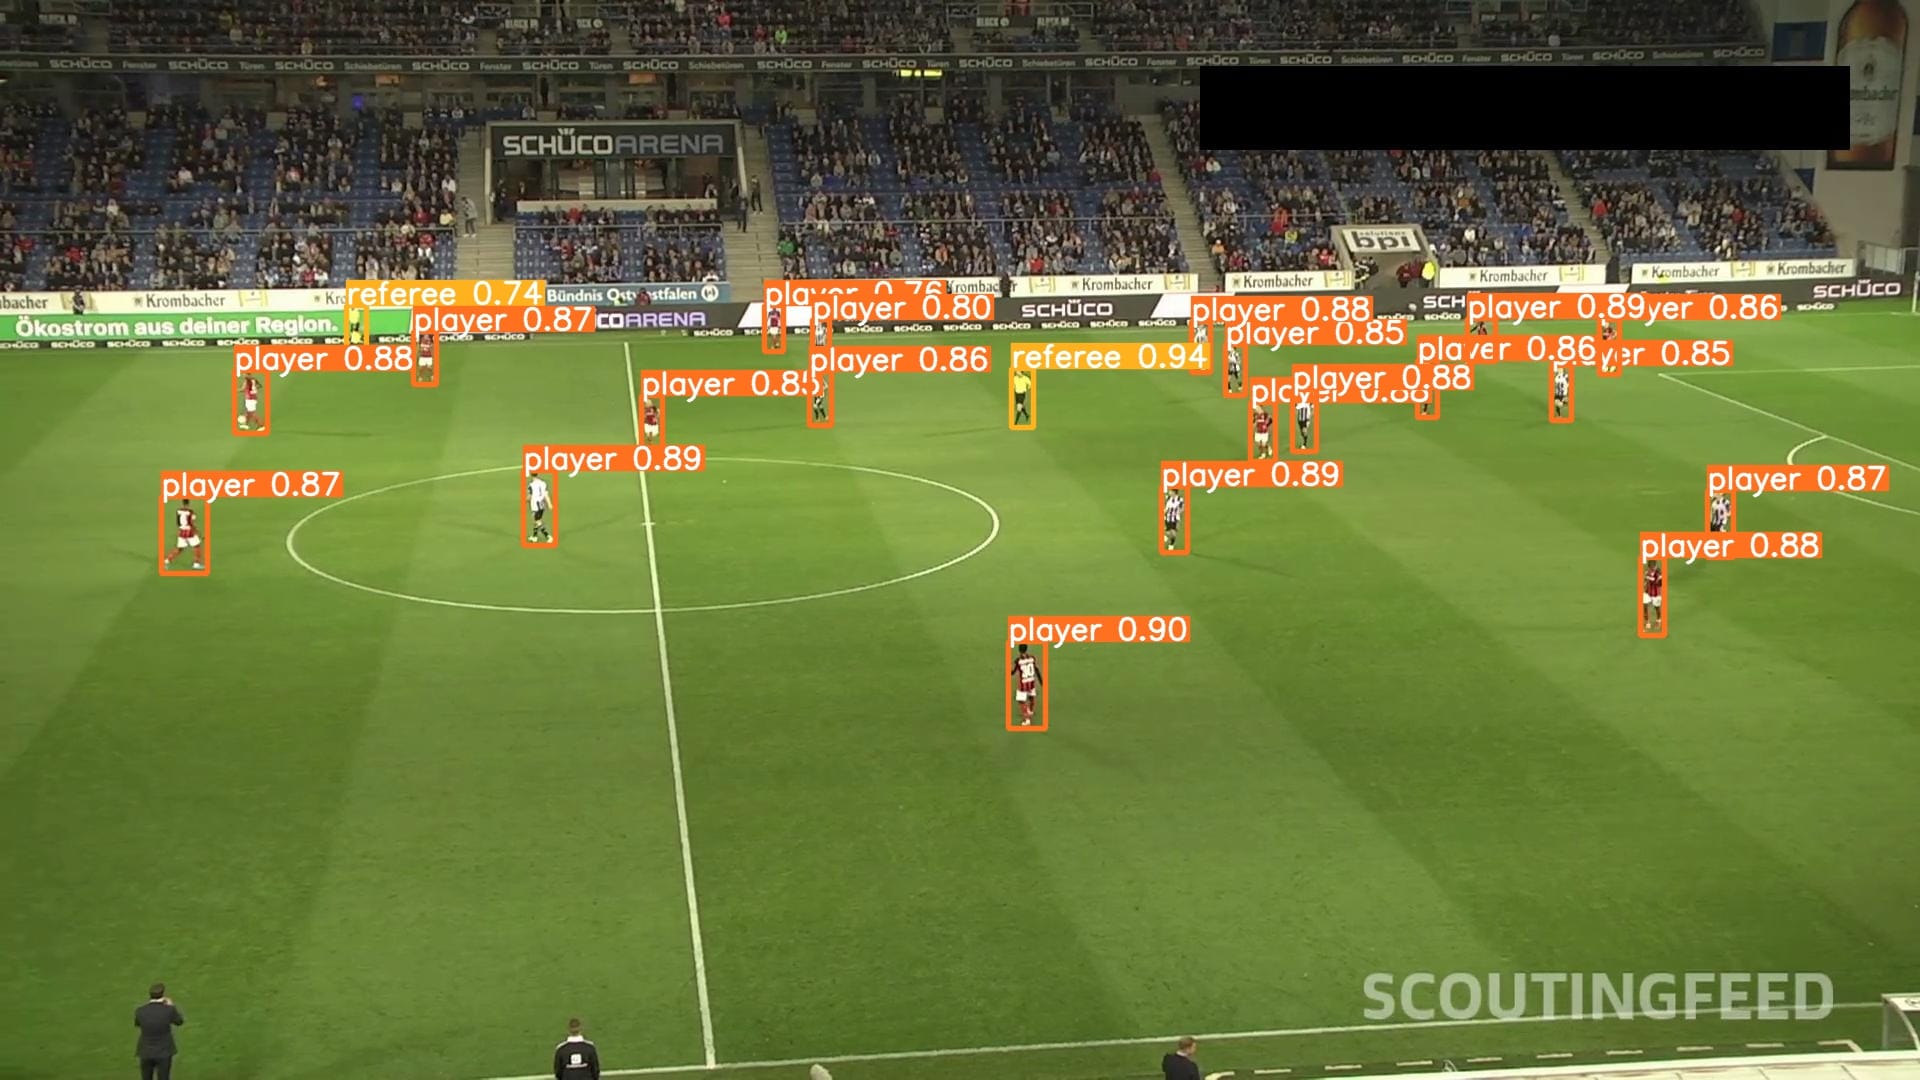
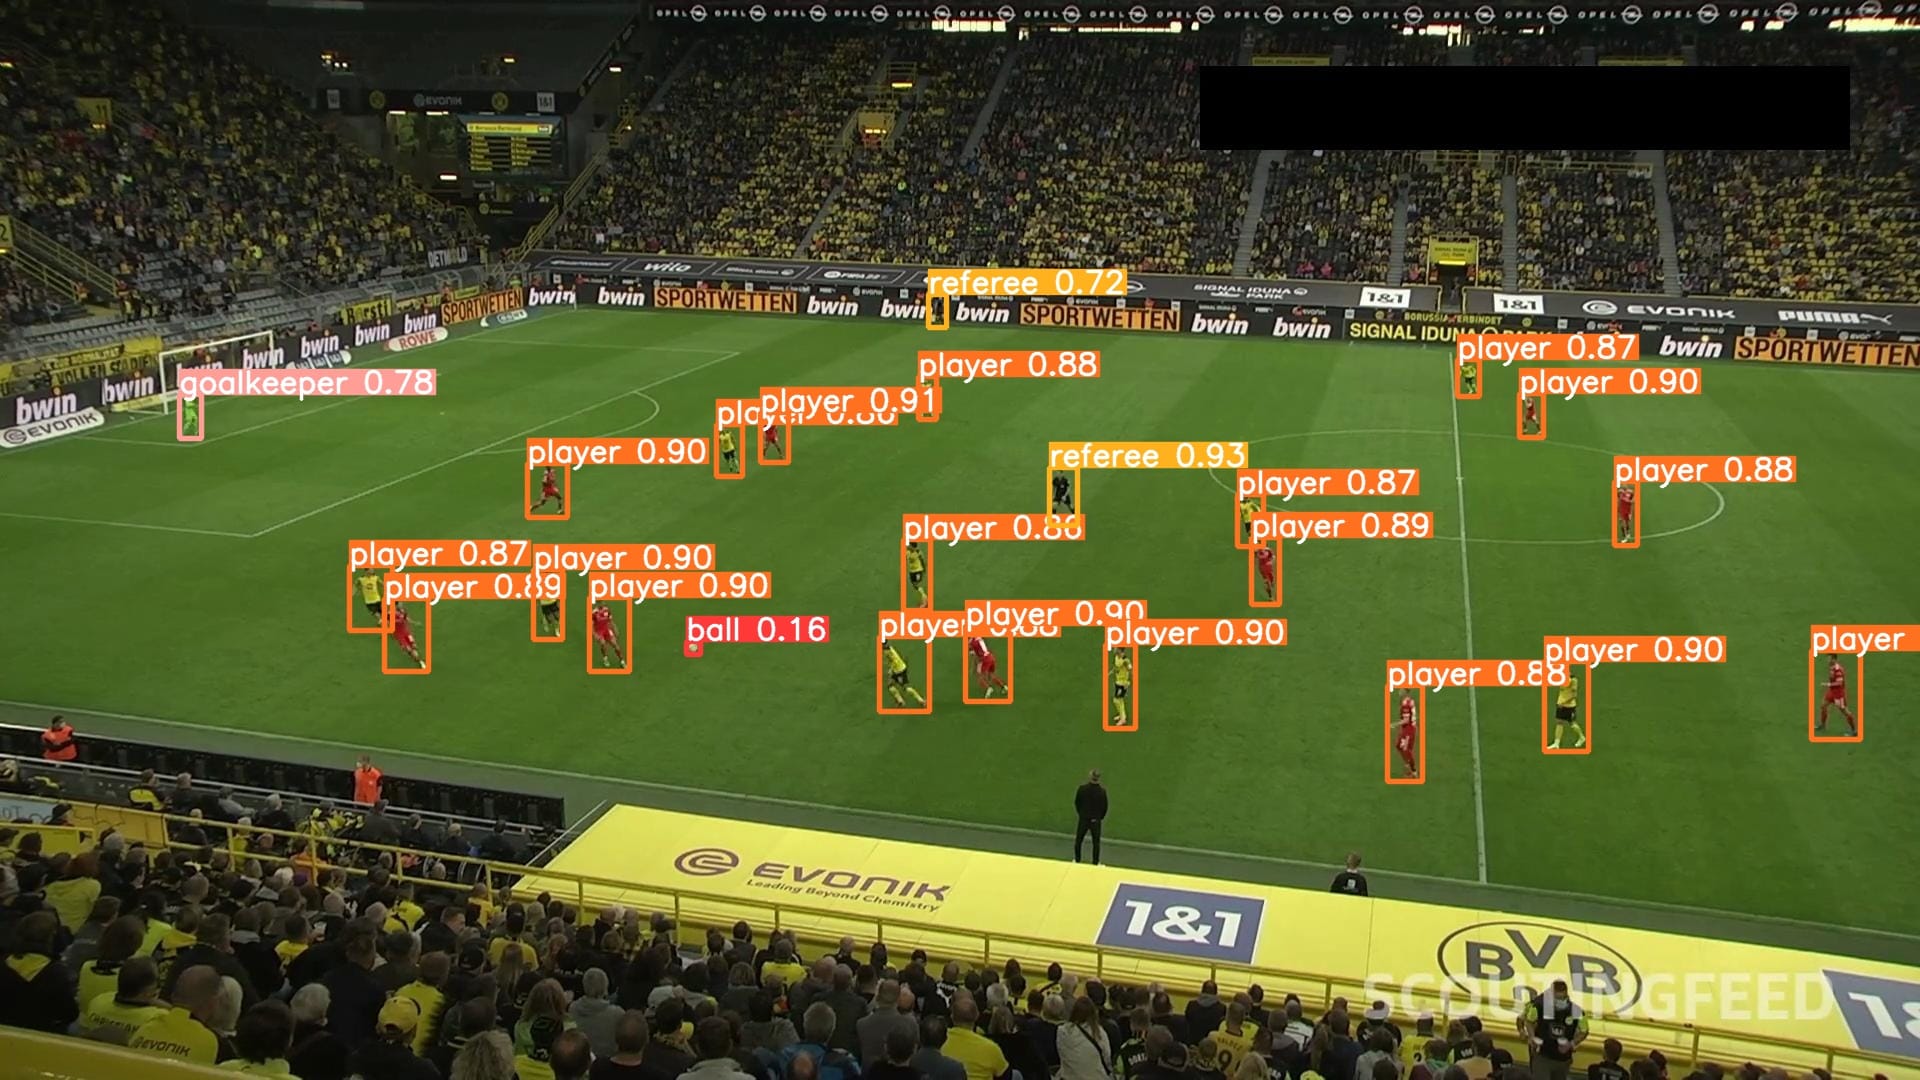
Our model successfully identified players, referees, and goalkeepers.
How to Deploy Your YOLOv9 Model
With a YOLOv9 model trained, there is one task left before getting your model into production: model deployment.
You can use Roboflow Inference, an open source computer vision inference server, for this task. With Inference, you can reference your model in your application logic with a Python SDK, or run your model in a Docker container that you can deploy as a microservice. In this guide, we will show how to deploy your model with the Inference Python SDK.
To get started, you need to upload your model weights to Roboflow. This will make a cloud API available for your model, and allow you to bring your weights into a local Inference deployment. You will need a project in your Roboflow account to which you can upload your weights.
Create a new project in your Roboflow account, then upload your dataset. Click "Generate" in the sidebar to generate a dataset version. With a dataset version ready, you can upload your model weights.
To upload your model weights, run the following code:
from roboflow import Roboflow

rf = Roboflow(api_key='YOUR_API_KEY')
project = rf.workspace('WORKSPACE').project('PROJECT')

version = project.version(1)
version.deploy(model_type="yolov9", model_path=f"{HOME}/yolov9/runs/train/exp")
Above, set your Roboflow workspace ID, model ID, and API key.
Once you run the code above, your weights will be available in your Roboflow account for use in your local Inference deployment.
To deploy your model to your device, first install Inference and supervision:
pip install inference supervisionYou can then use the following code to run your model:
from inference import get_model

model = get_model(model_id="model-id/version", api_key="API_KEY")

image_paths = sv.list_files_with_extensions(
    directory=f"{dataset.location}/valid/images",
    extensions=['png', 'jpg', 'jpeg']
)
image_path = random.choice(image_paths)
image = cv2.imread(image_path)

result = model.infer(image, confidence=0.1)[0]
detections = sv.Detections.from_inference(result)

label_annotator = sv.LabelAnnotator(text_color=sv.Color.BLACK)
bounding_box_annotator = sv.BoundingBoxAnnotator()

annotated_image = image.copy()
annotated_image = bounding_box_annotator.annotate(scene=annotated_image, detections=detections)
annotated_image = label_annotator.annotate(scene=annotated_image, detections=detections)

sv.plot_image(annotated_image)
Above, set your Roboflow model ID and API key.
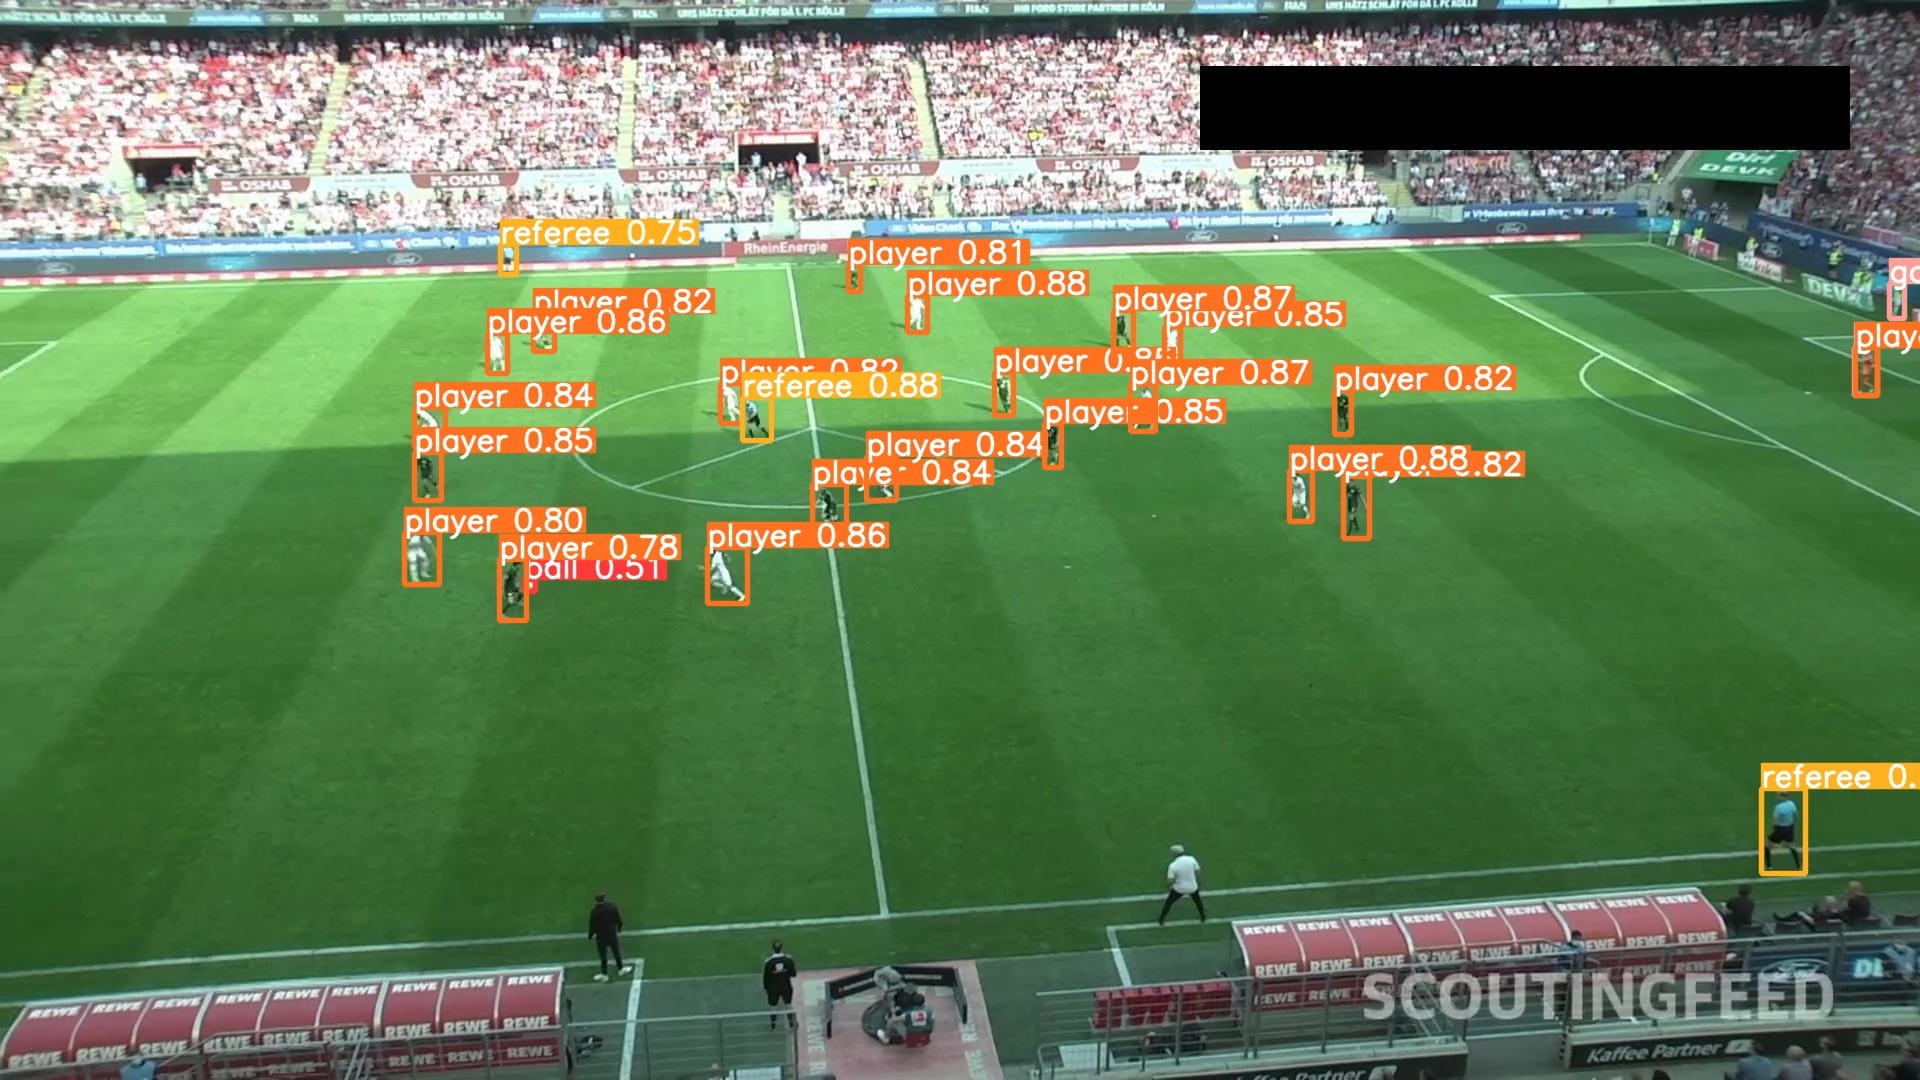
In the code above, we run our model on a random image in the valid set of our dataset. Here is an example output:
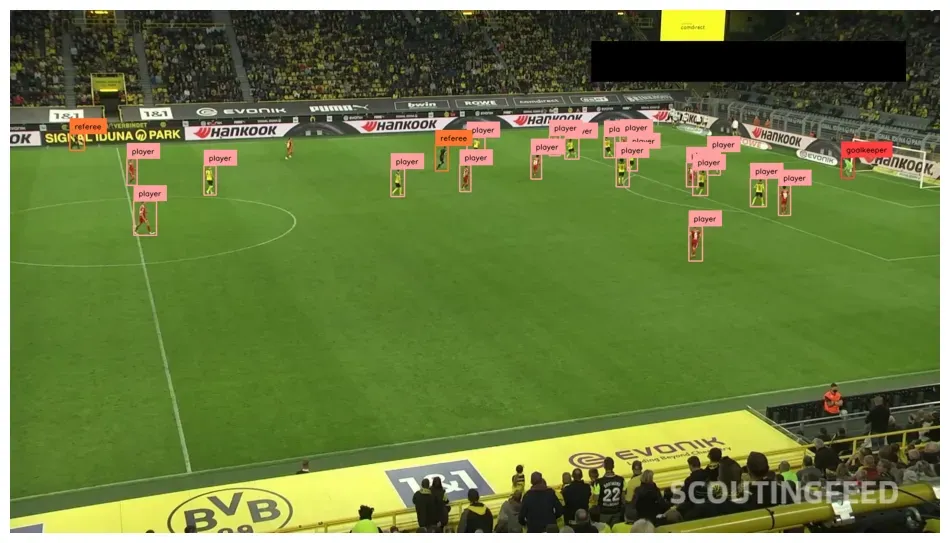
We have successfully deployed our model on our own hardware with Inference.
To learn more about deploying models with Inference, refer to the Inference documentation.
Conclusion
YOLOv9, released by Chien-Yao Wang, I-Hau Yeh, and Hong-Yuan Mark Liao, is a new computer vision model architecture. You can train object detection models using the YOLOv9 architecture.
In this guide, we demonstrated how to run inference on and train a YOLOv9 model on a custom dataset. We cloned the YOLOv9 project code, downloaded the model weights, then ran inference using the default COCO weights. We then trained a fine-tuned model using a football players detection dataset. We reviewed training graphs and the confusion matrix, then tested the model on images from the validation set.
Cite this Post
Use the following entry to cite this post in your research:
James Gallagher, Piotr Skalski. (Feb 23, 2024). How to Train YOLOv9 on a Custom Dataset. Roboflow Blog: https://blog.roboflow.com/train-yolov9-model/