
Meet Adam, a quality control engineer at a packaging factory. One morning, his manager walked in with a problem, "We need an AI model that can spot packaging errors in real-time. We have hours of security footage can you make use of it?"
You have hours of video, but raw footage alone isn’t enough to train an AI model. That’s where video annotation comes in. By breaking down video into individual frames and labeling objects of interest like misaligned labels on packaging boxes or damaged packaging you create a dataset that teaches an AI model what to look for.
In Adam’s case, video annotation tools helped him:
- Extract key frames from hours of footage efficiently.
- Label objects consistently across hundreds of images, even with slight variations.
- Speed up annotation with features like auto-propagation of labels between similar frames.
The result? A high-quality dataset that trained an AI model to spot defects in real-time saving time and reducing waste.
Video annotation is powerful for everything from manufacturing to sports analysis, but doing it well requires the right strategies and tools. In this guide, we’ll cover:
- Best practices for annotating video data.
- Key tools to streamline the process.
- How to prepare your video datasets for training AI models.
Whether you’re working with manufacturing and security footage, drone videos, or medical imaging, mastering video annotation unlocks the potential of your visual data. Let’s dive in.
What Is Video Annotation?
Video annotation is the process of labeling visual elements (typically objects) across video frames to prepare training data for computer vision models. Instead of annotating individual images, video annotation involves working with a continuous stream of frames extracted from a video. Each frame is treated like a still image, and objects of interest are marked using bounding boxes, segmentation masks, or other annotation tools. This lets you turn a short clip into dozens or hundreds of training samples with minimal effort.
In short, video annotation is the process of:
- Uploading a video file.
- Extracting frames (i.e., converting the video into a series of images).
- Annotating these frames just like you would with any image dataset.
Why Video Annotation?
In computer vision, we often think of datasets as collections of individual images. However, many real-world applications use video as the primary source of visual data, from security camera footage and YouTube clips to industrial surveillance and robotic perception.
How to Do Video Annotation Step-by-Step
Follow these steps to annotate video datasets using Roboflow.
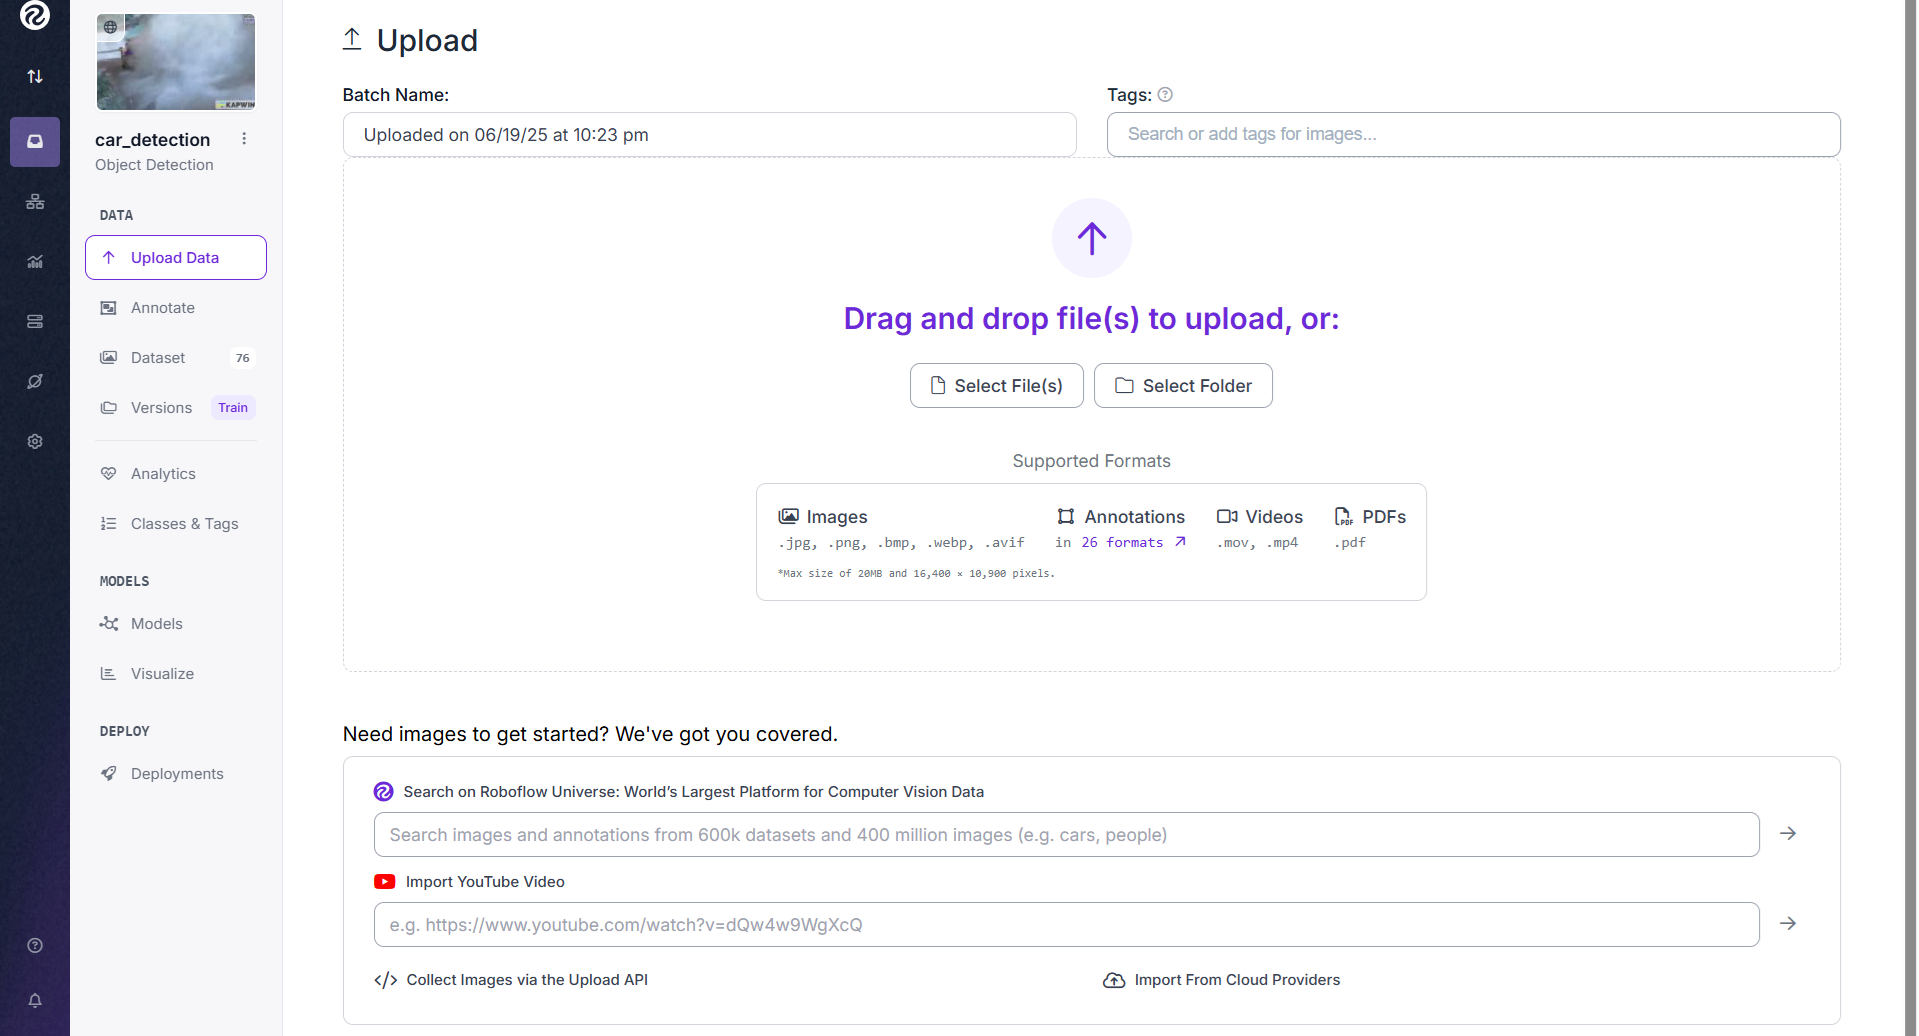
Step #1: Upload Your Video
Go to your Roboflow project. Click “Upload” and drag-and-drop a video file (.mp4, .mov, etc.). Roboflow will automatically detect it as a video and offer to extract frames.
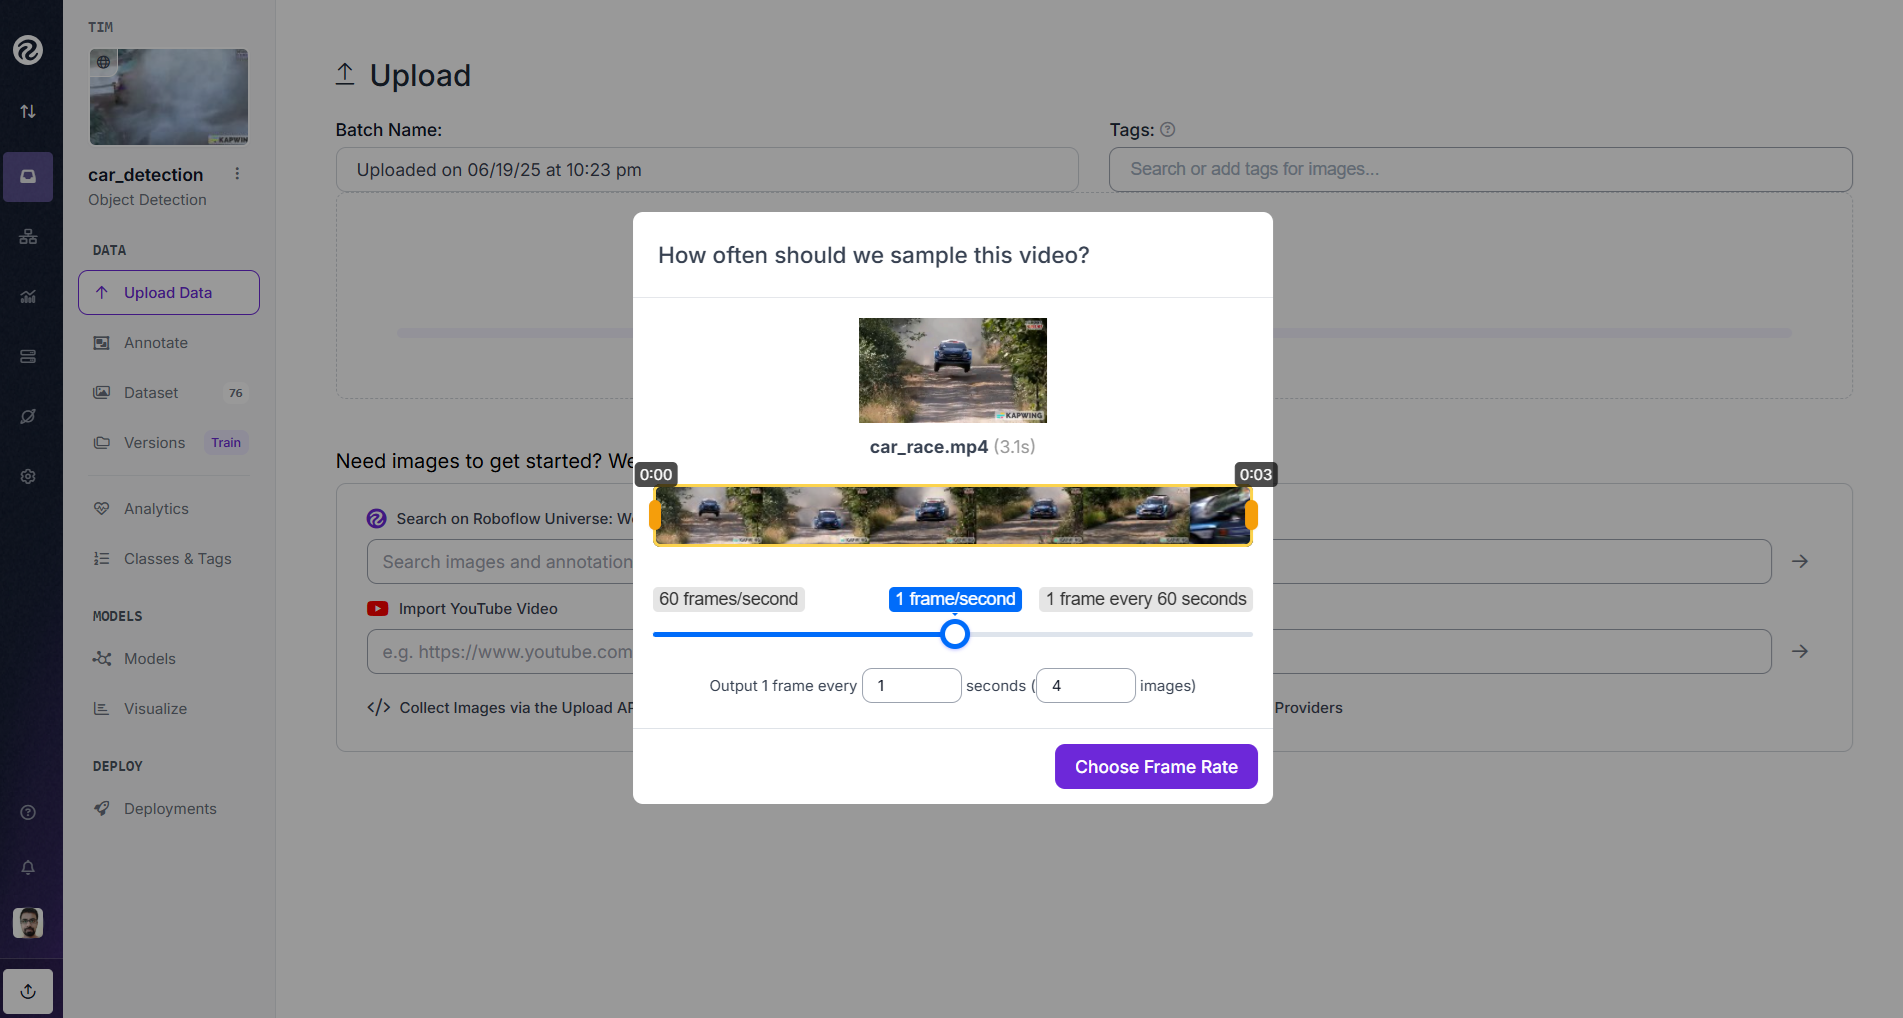
Step #2: Extract Video Frames
Choose a frame sampling rate (e.g., 1 frame per second or every 5th frame). The higher frame rates means more data, but may include repetitive frames and lower frame rates means less redundancy, easier annotation.
Once selected, Roboflow extracts the frames and adds them as images in your dataset.
Why Frame Sampling Rate Matters?
Choosing the right sampling rate is important for the following reasons:
- Avoids Redundant Data: Videos often contain many nearly identical frames (especially if the camera is stationary or the scene is slow-moving). A high frame rate like 30 fps can produce hundreds of similar frames that add little value. Sampling every 5th or 10th frame removes this redundancy and keeps only the most visually distinct moments.
- Balances Dataset Size: Extracting too many frames leads to a bloated dataset, which increases storage costs, slows down annotation, and makes model training longer without significant accuracy gains. Choosing a moderate sampling rate creates a manageable dataset that still captures key variations.
- Reduces Annotation Workload: Every extra frame you extract may need annotation. Lower frame rates mean fewer images to label, saving time and effort, especially when you’re doing manual or semi-automatic annotation.
- Preserves Essential Variations: If the frame rate is too low, you might miss critical events or object positions (like a car entering a scene or an item flipping on a conveyor belt). By sampling wisely, you ensure the dataset captures enough variation for the model to learn effectively.
- Improves Annotation Efficiency: With the right frame rate, tools like Repeat Previous and Box Prompting work more effectively since the objects in consecutive frames remain similar, allowing quicker reuse and adjustment of annotations.
The frame sampling rate is the bridge between raw video and quality training data. Choose too high, and you are drowning in duplicates. Choose too low, and you risk missing key learning signals. The right balance gives you a lean, diverse, and efficient dataset exactly what your model needs.
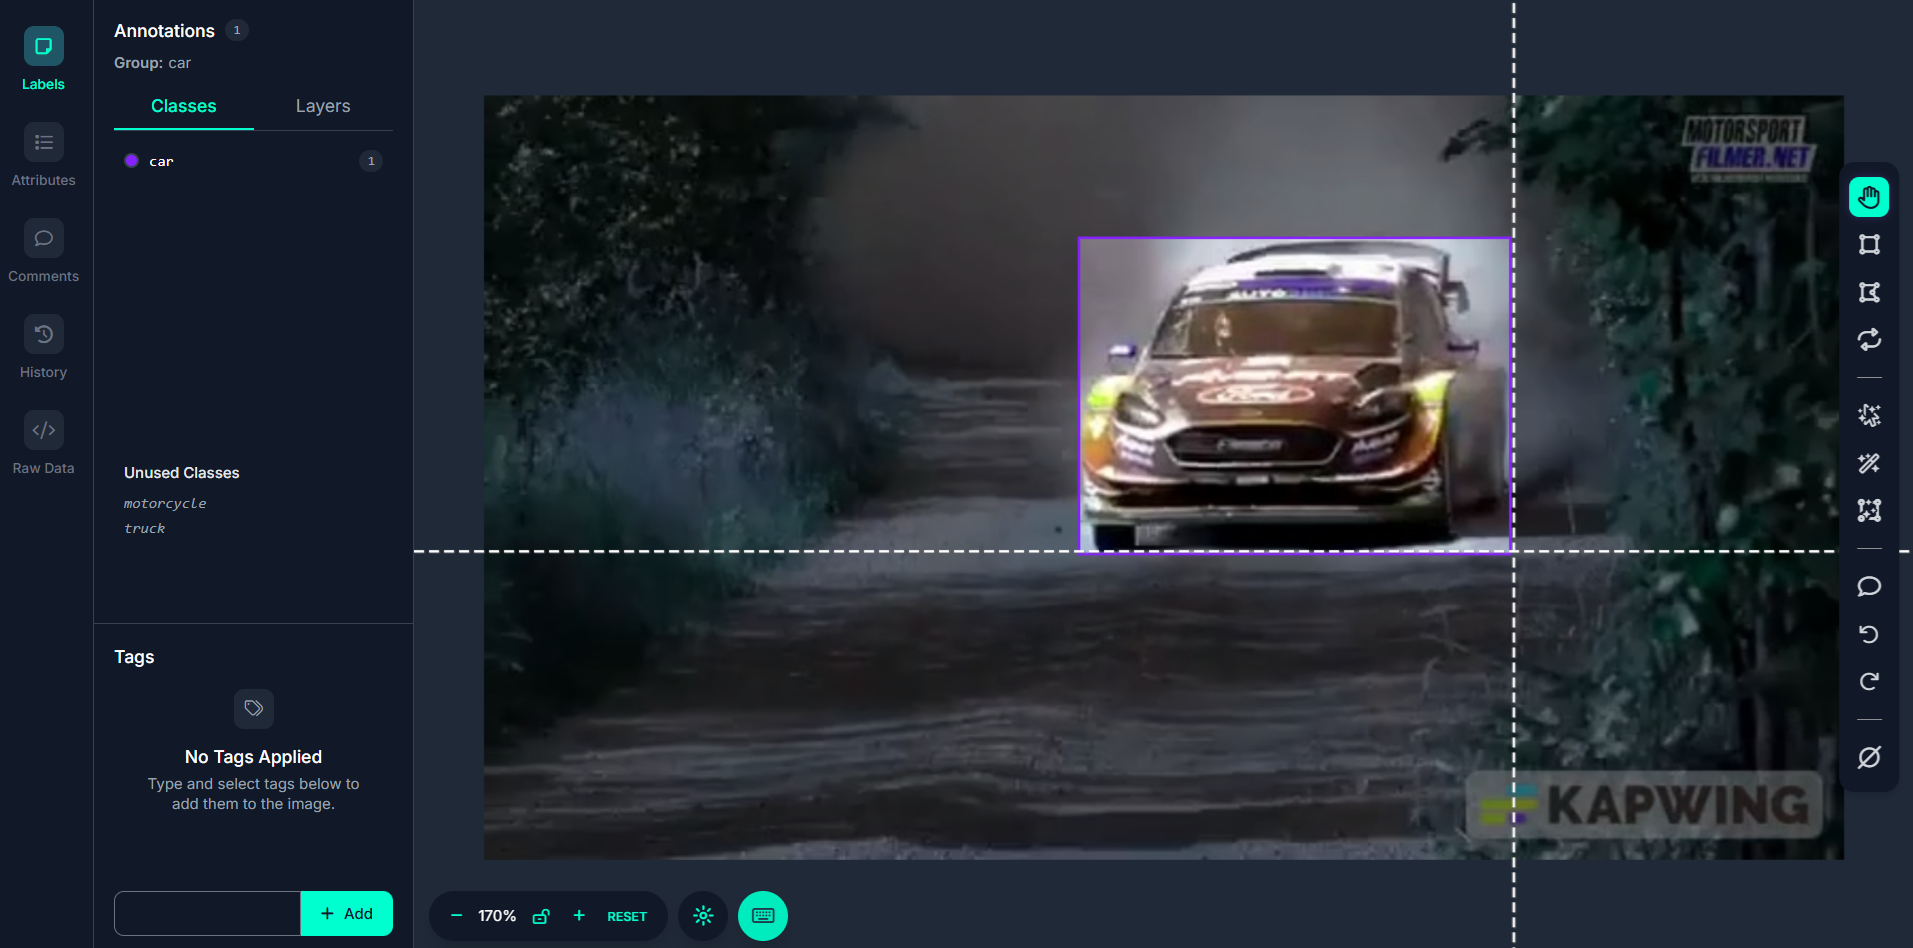
Step #3: Annotate Extracted Frames
Now that your frames are in the dataset, begin annotating using Roboflow Annotate. Draw bounding boxes or segmentation masks around objects of interest. You can use:
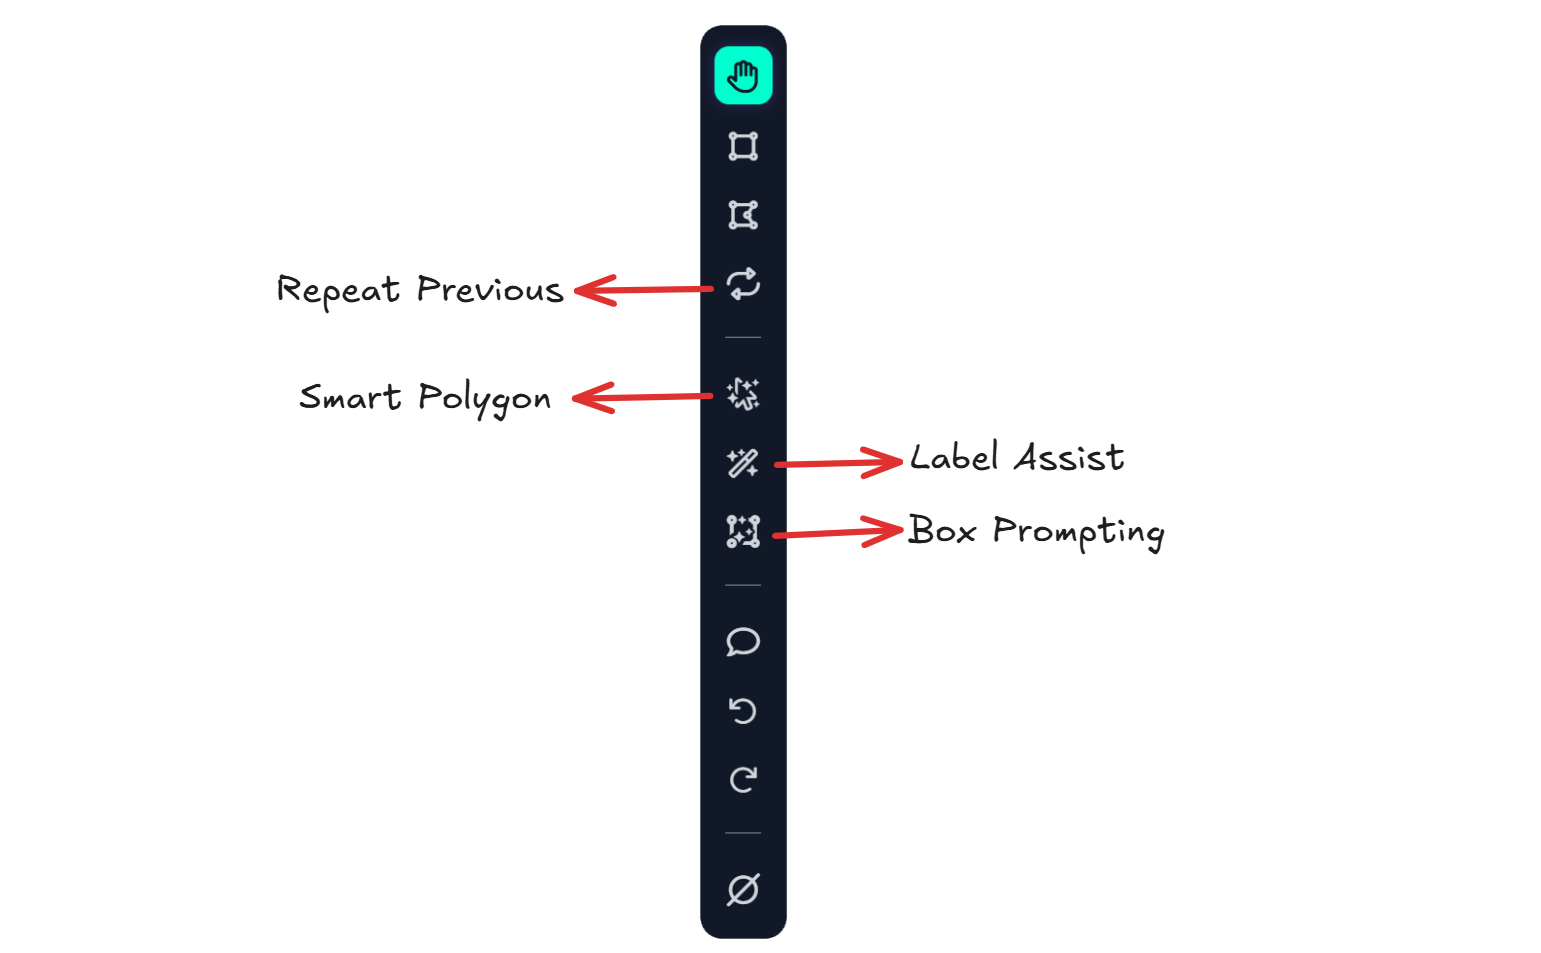
- Label Assist to auto-suggest boxes using a trained model.
- Smart Polygon (SAM-powered) for detailed object outlines.
- Box Prompting to detect repetitive objects quickly.
Auto Label to annotate all frames in bulk using foundation models like Grounding DINO.
Step #4: Use “Repeat Previous” for Video Efficiency
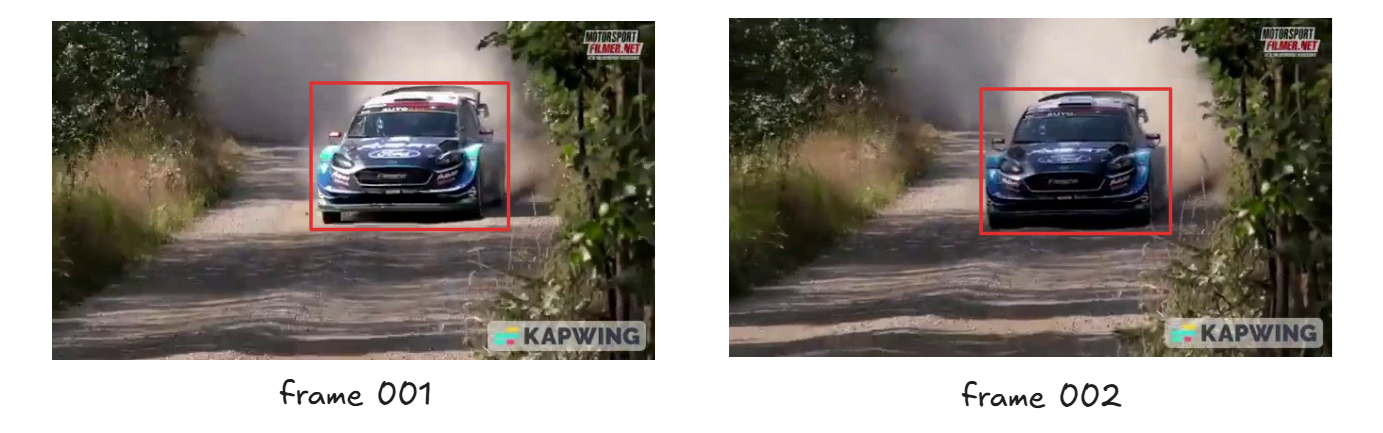
One tool especially helpful for video data is Repeat Previous. This tool lets you copy annotations from the previous frame to the current one. Since many video frames have the same objects in slightly different positions, you can reuse and adjust annotations instead of starting over every time. This creates a smoother workflow for tracking the same object across time ideal for object detection and motion labeling.
Best Video Annotation Tools: Making Frame-by-Frame Labeling Smarter and Faster
Annotating video frames manually can be repetitive and time-consuming, but Roboflow annotate offers a suite of powerful tools that turn this challenge into an efficient, intelligent workflow. Do you need AI-powered suggestions, pixel-perfect segmentation, or time-saving shortcuts? These video annotation tools help you annotate faster while maintaining high-quality labels. Let’s explore how Label Assist, Smart Polygon, Box Prompting, Auto Label, and Repeat Previous streamline video annotation frame by frame.
What Is Label Assist?
Label Assist is a feature in Roboflow Annotate that significantly speeds up the annotation process by leveraging pre-trained models (either your own or public ones from Roboflow Universe). Instead of manually labeling every object in every frame, Label Assist uses AI to automatically generate annotations (e.g., bounding boxes with labels) when you open an image, or in the case of video annotation, a video frame.
This is especially powerful when annotating videos, where large numbers of frames must be labeled consistently and accurately. It allows you to annotate video data faster and more efficiently by pre-labeling frames using the intelligence of an existing model.
How to use Label Assist for Video Frame Annotation
Here’s the step-by-step process.
Step #1: Open a Video Frame for Annotation
In Roboflow Annotate, select a frame (which is just like a regular image). These are the frames extracted from your video.
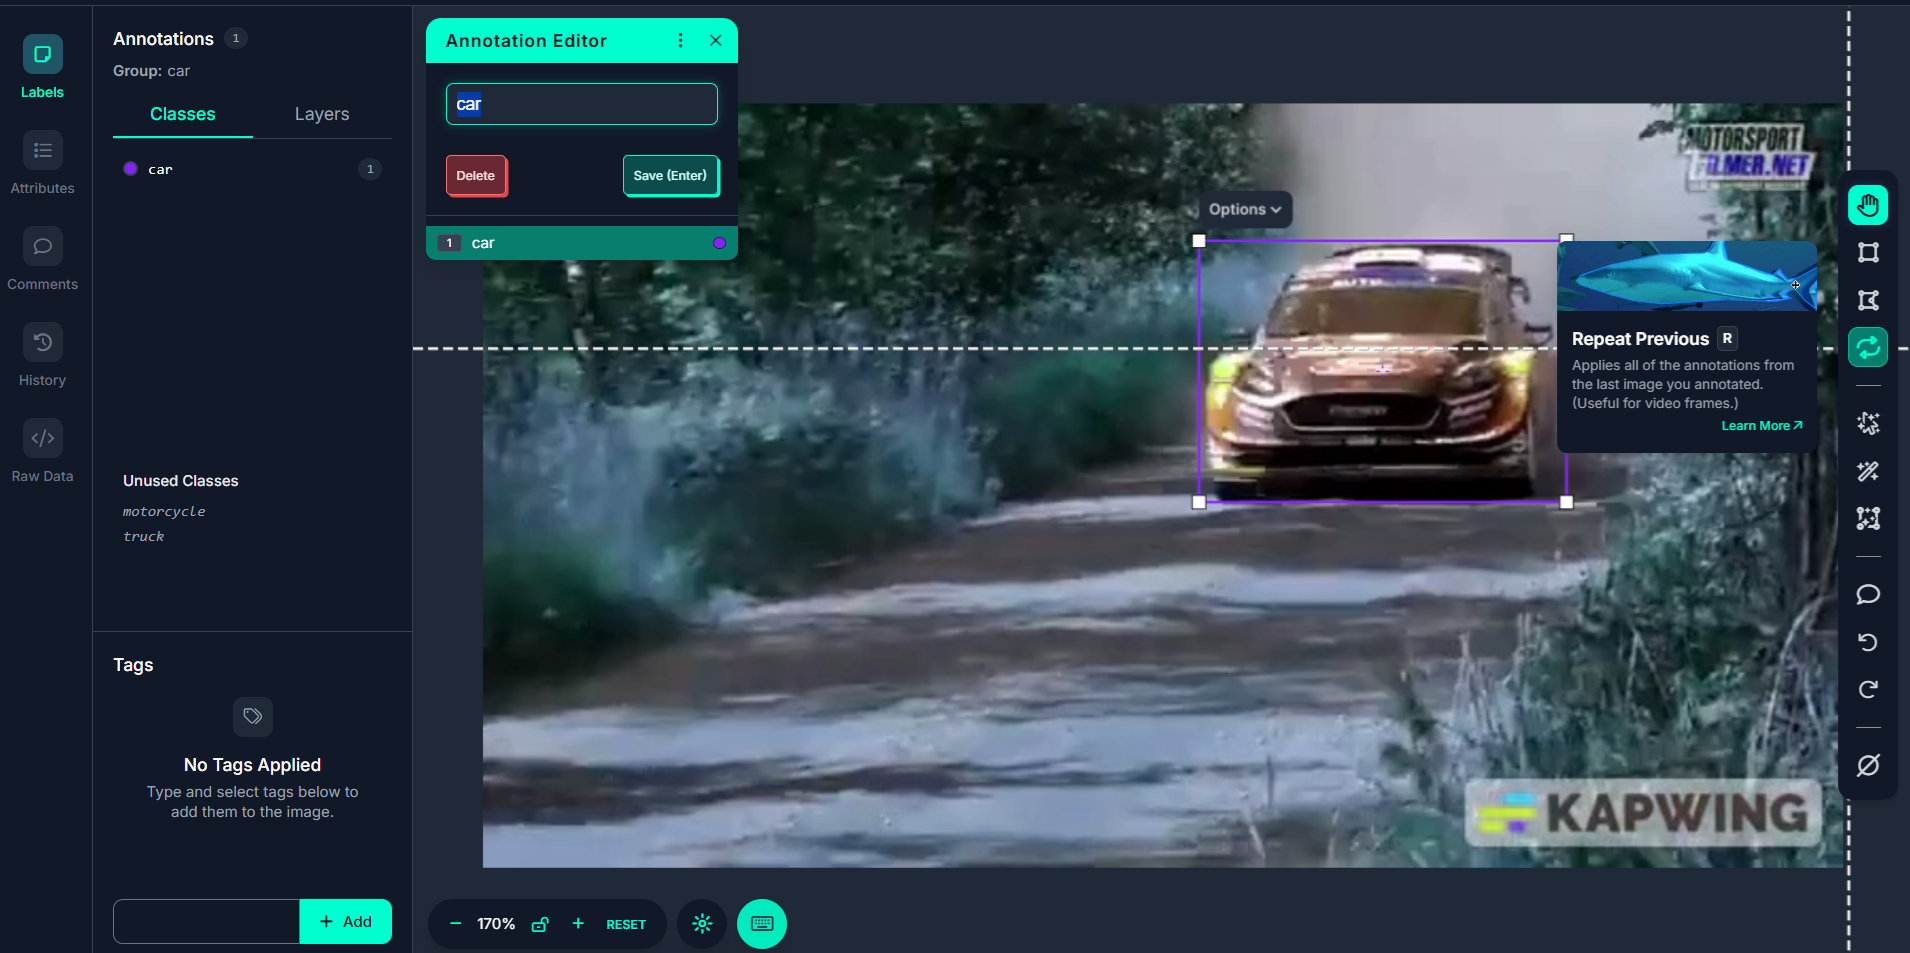
Step #2: Click the Magic Wand Icon
In the command tray (bottom or side toolbar), click the magic wand icon to activate Label Assist.
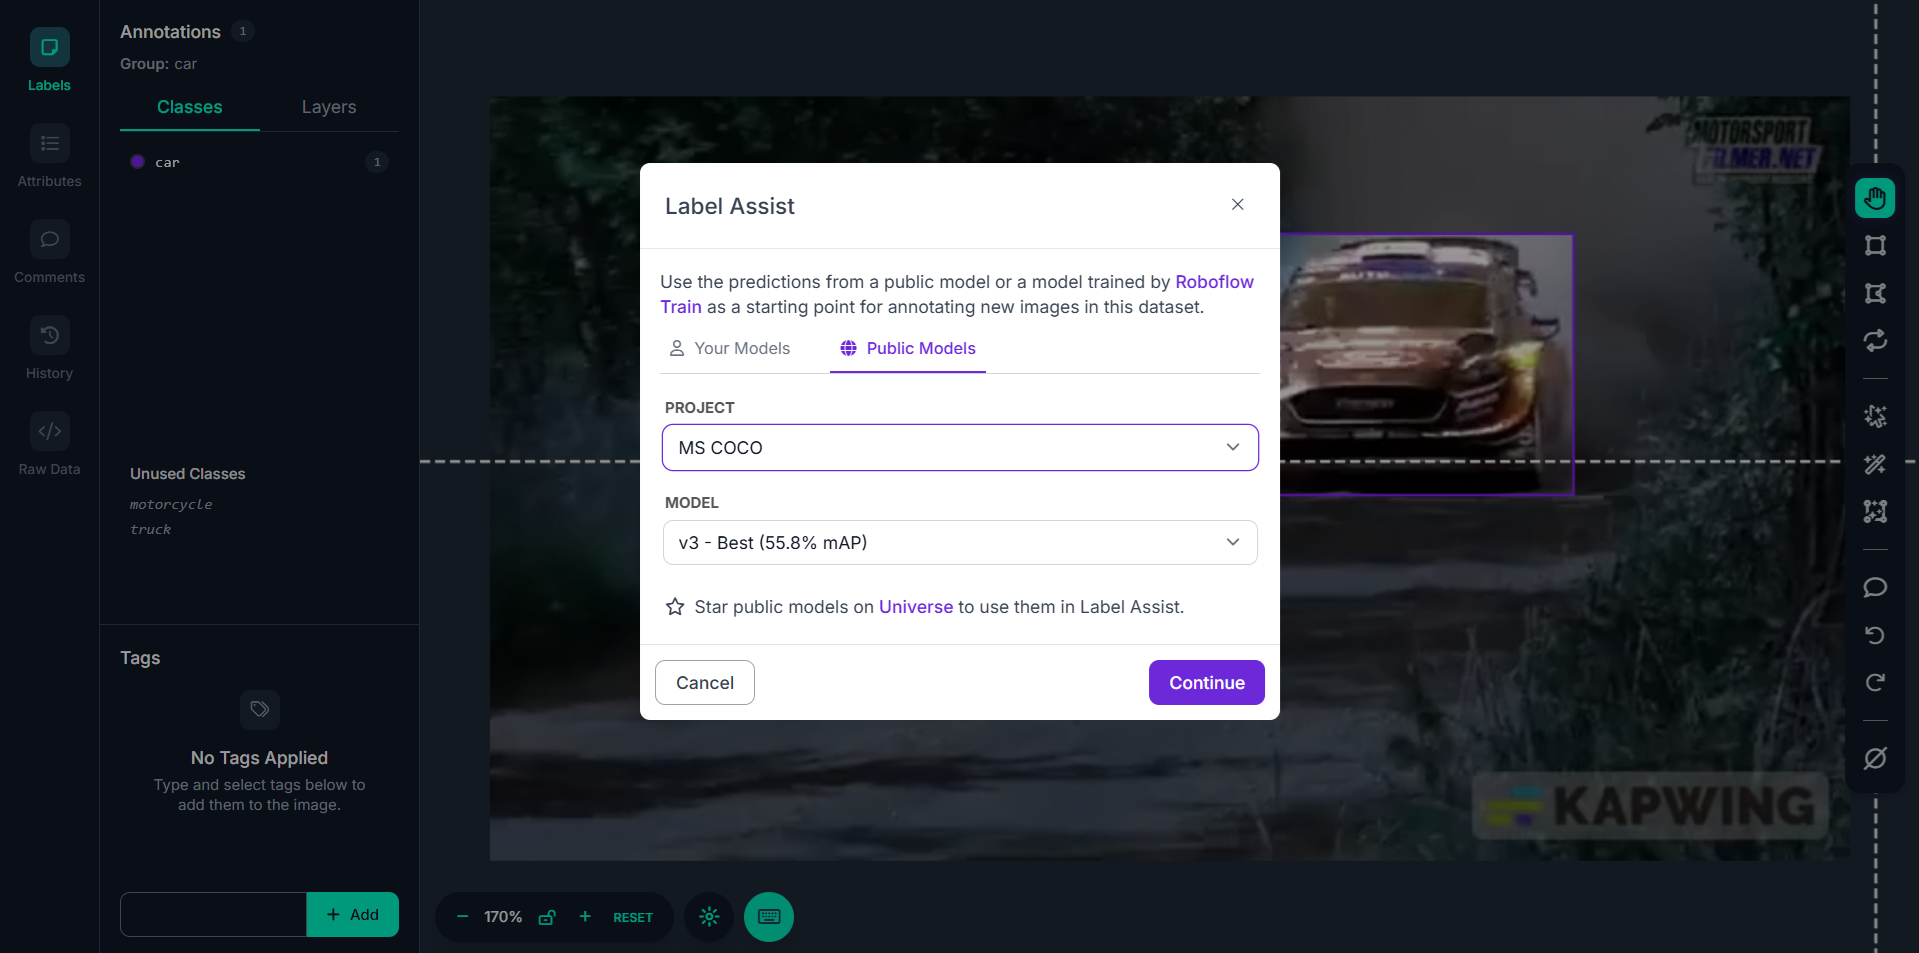
Step #3: Select a Model
A pop-up appears where you choose a model:
- Under Your Models, you’ll see models you've trained in your Roboflow workspace.
- Under Public Models, you’ll see models from Roboflow Universe (you must star the model for it to appear here).
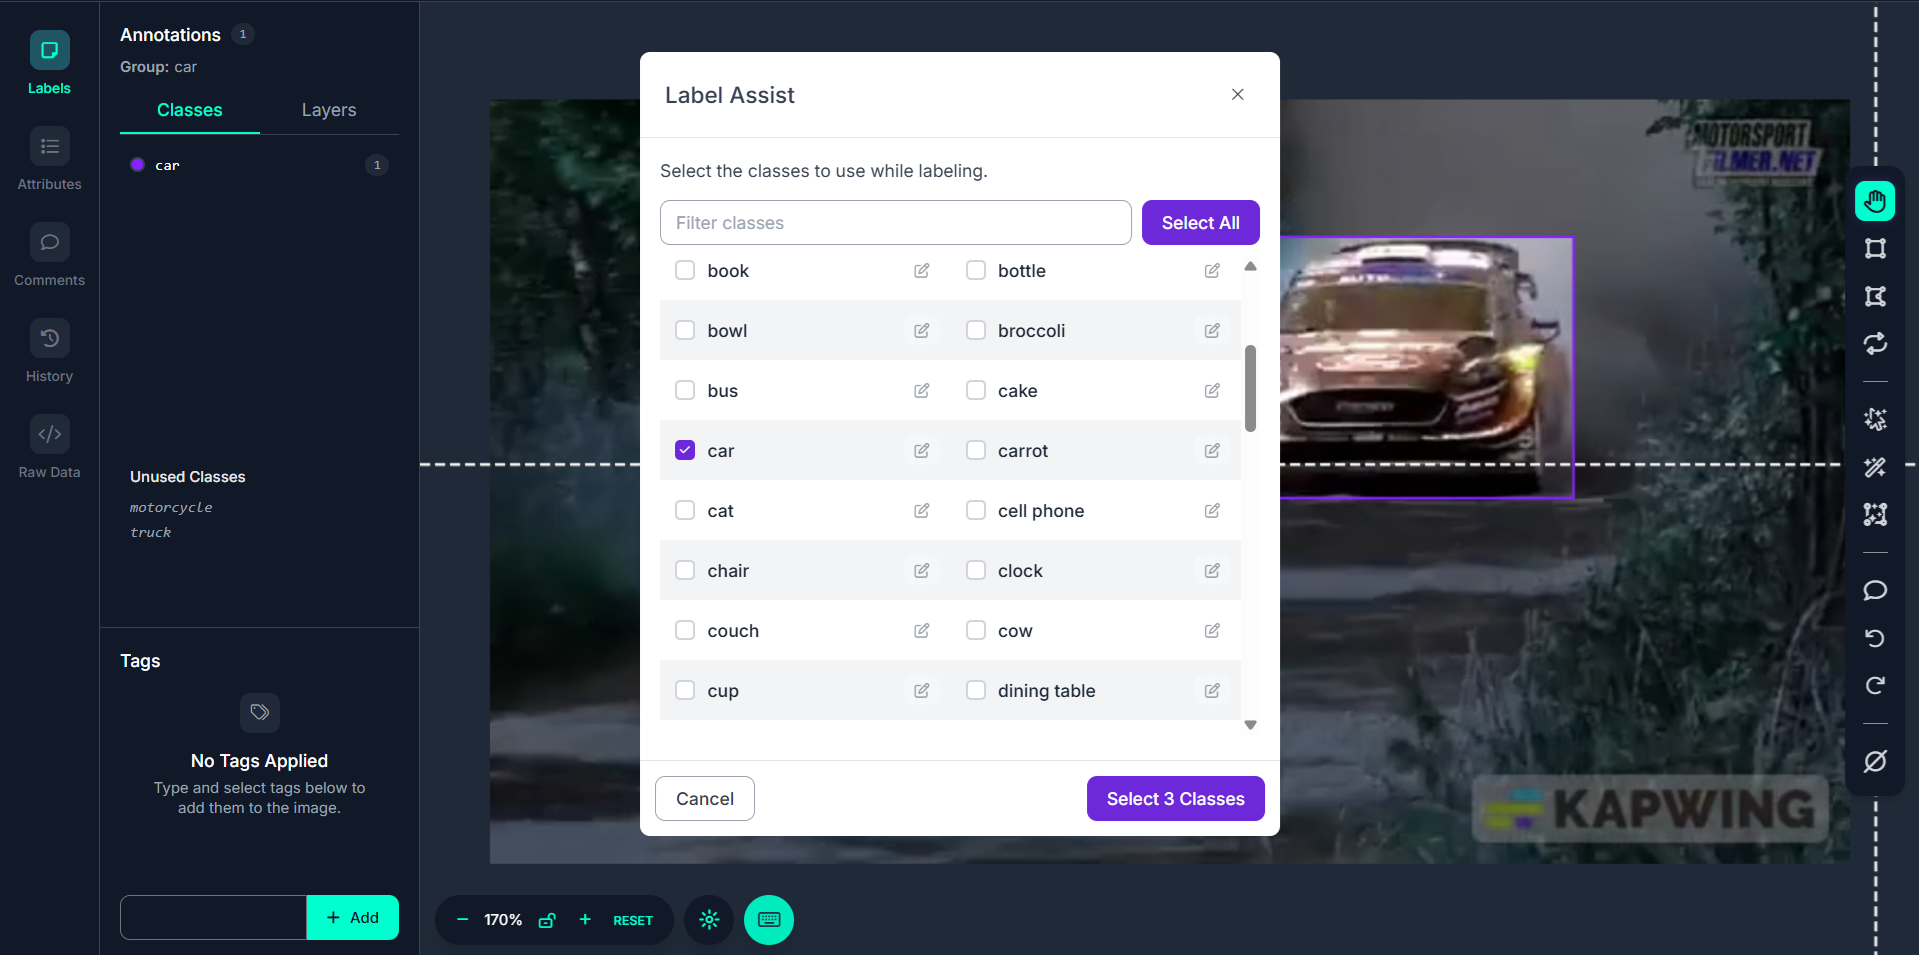
Step #4: Choose Classes to Detect
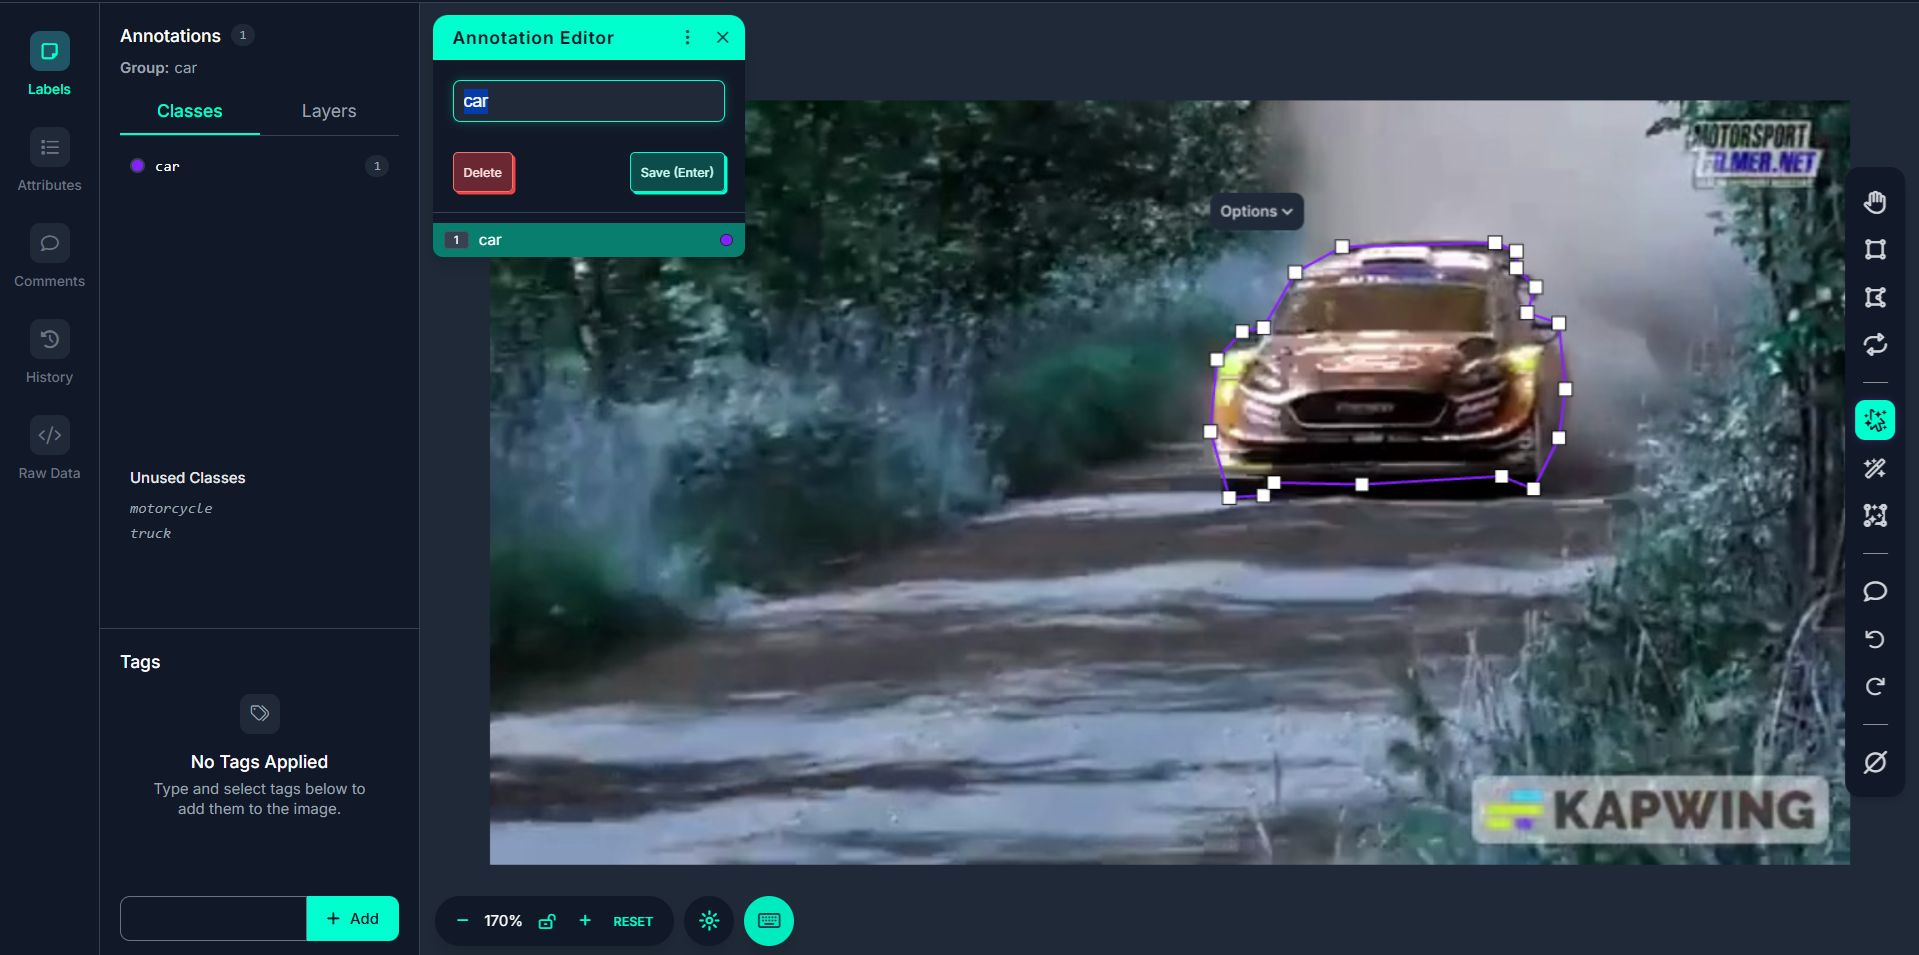
After selecting a model, you're asked which classes the model should detect. For example if you're labeling video frames for car detection, you might only select the car class. You can uncheck irrelevant classes.
Step #5: Remap Class Names (Optional)
If the model you selected labels objects as vehicle, but you want the label to be car, you can remap class names during this step.
Step #6: Run Label Assist
Once class configuration is complete, click “Select Classes.” Label Assist will automatically run the model on the current frame, predicting objects and adding bounding boxes directly.
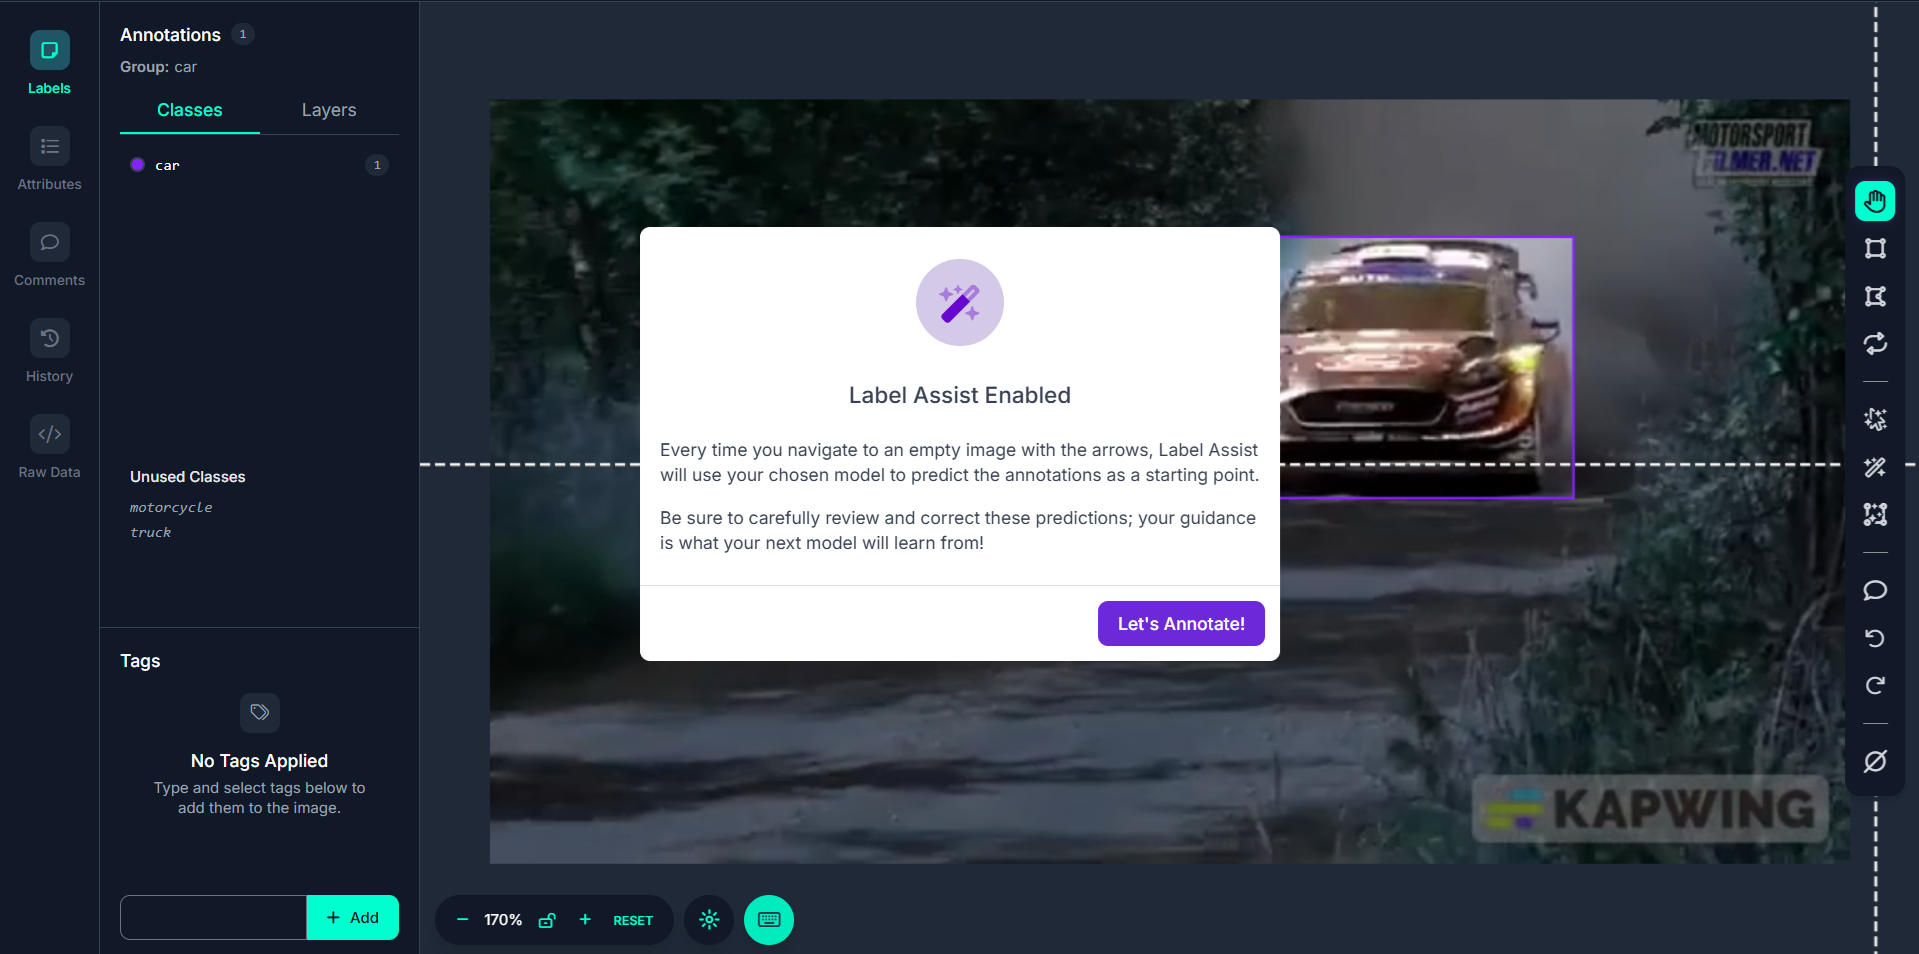
As you use the arrow keys or navigation buttons to move to the next or previous video frame, Label Assist continues assisting, automatically annotating each new frame based on model predictions. This enables semi-automatic bulk annotation of all your video frames.
Label Assist is a model-assisted annotation tool that brings automation into the labor-intensive task of labeling video frames. In video annotation workflows:
- It reduces annotation time by auto-labeling objects in each frame using a trained model.
- It ensures consistent object detection across multiple frames.
- It integrates seamlessly with Roboflow’s video-to-frame annotation flow.
Rather than drawing bounding boxes frame by frame, you can let a model predict most of the labels and simply validate or correct them, making your video annotation process faster, smarter, and scalable.
Best Practices for Label Assist
- Use a Model Aligned with Your Dataset: For best results, select a model trained on similar images or object types. The closer the training domain, the more accurate the predictions will be.
- Remap Class Names if Needed: If your selected model labels an object as vehicle but your project uses car, use the class remapping feature to align class names with your annotation schema.
- Filter Unneeded Classes: Disable irrelevant classes in the popup to prevent noisy predictions. For example, if you're only interested in bicycles, uncheck everything else.
- Review and Edit Predictions: Label Assist predictions are not always perfect. Manually verify and adjust them especially when working with complex or crowded scenes.
- Use It as a Starting Point: Don’t expect Label Assist to complete your annotations 100%. Think of it as a boost to speed up your initial labeling, which you can then refine manually.
Combine with Repeat Previous for Video: When labeling video frames, use Label Assist on the first frame, then Repeat Previous and adjust slightly as you move through frames to save time and maintaining accuracy.
What Is Smart Polygon?
Smart Polygon is an intelligent annotation tool in Roboflow that helps users create precise polygon masks for objects in images or video frames using SAM (Segment Anything Model) a powerful segmentation model developed by Meta AI.
In the context of video annotation, Smart Polygon allows you to segment and annotate objects with fine detail in each extracted frame from your video, providing a much more accurate shape than standard bounding boxes. This is especially useful when dealing with irregularly shaped objects (e.g., a car at an angle, a tree, a road cone, or any object that doesn’t fit well into a rectangle).
Step-by-Step: Using Smart Polygon in Video Frame Annotation
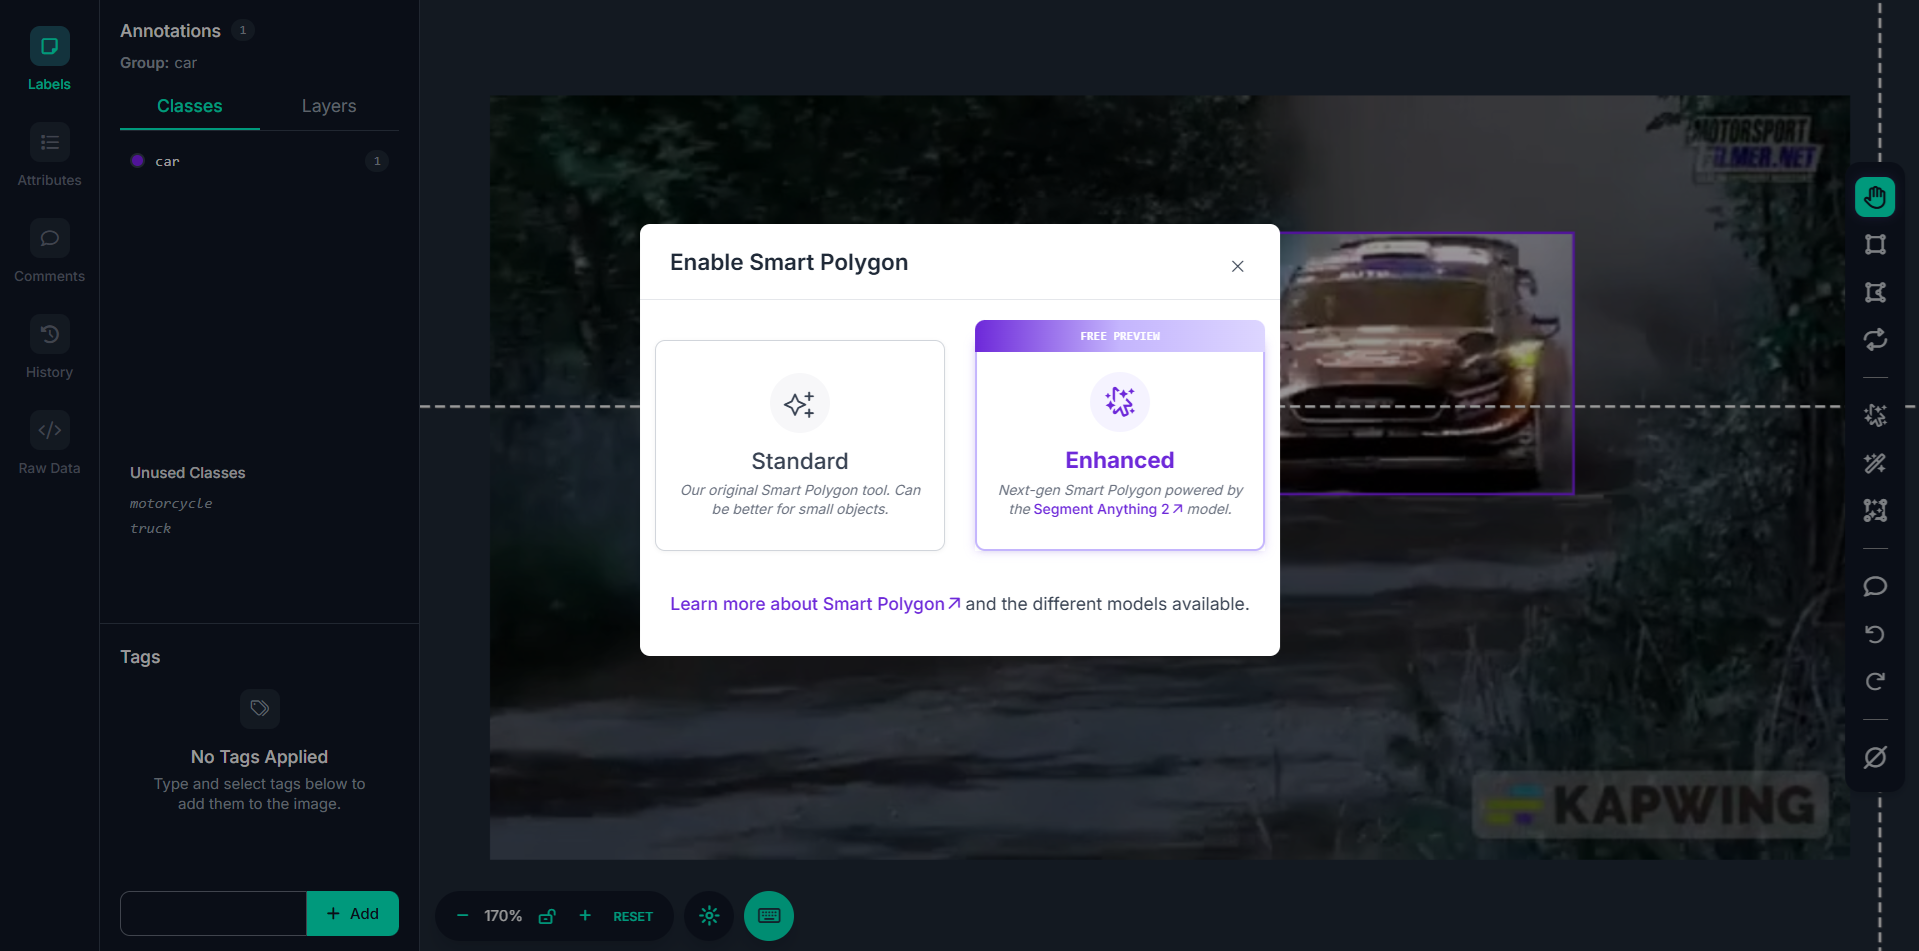
Step #1: Enable Smart Polygon
When you open a video frame in Roboflow Annotate, go to the annotation tool sidebar and enable Smart Polygon. You’ll be prompted to choose a mode. Select "Enhanced" mode, this enables the SAM-powered segmentation in your browser.
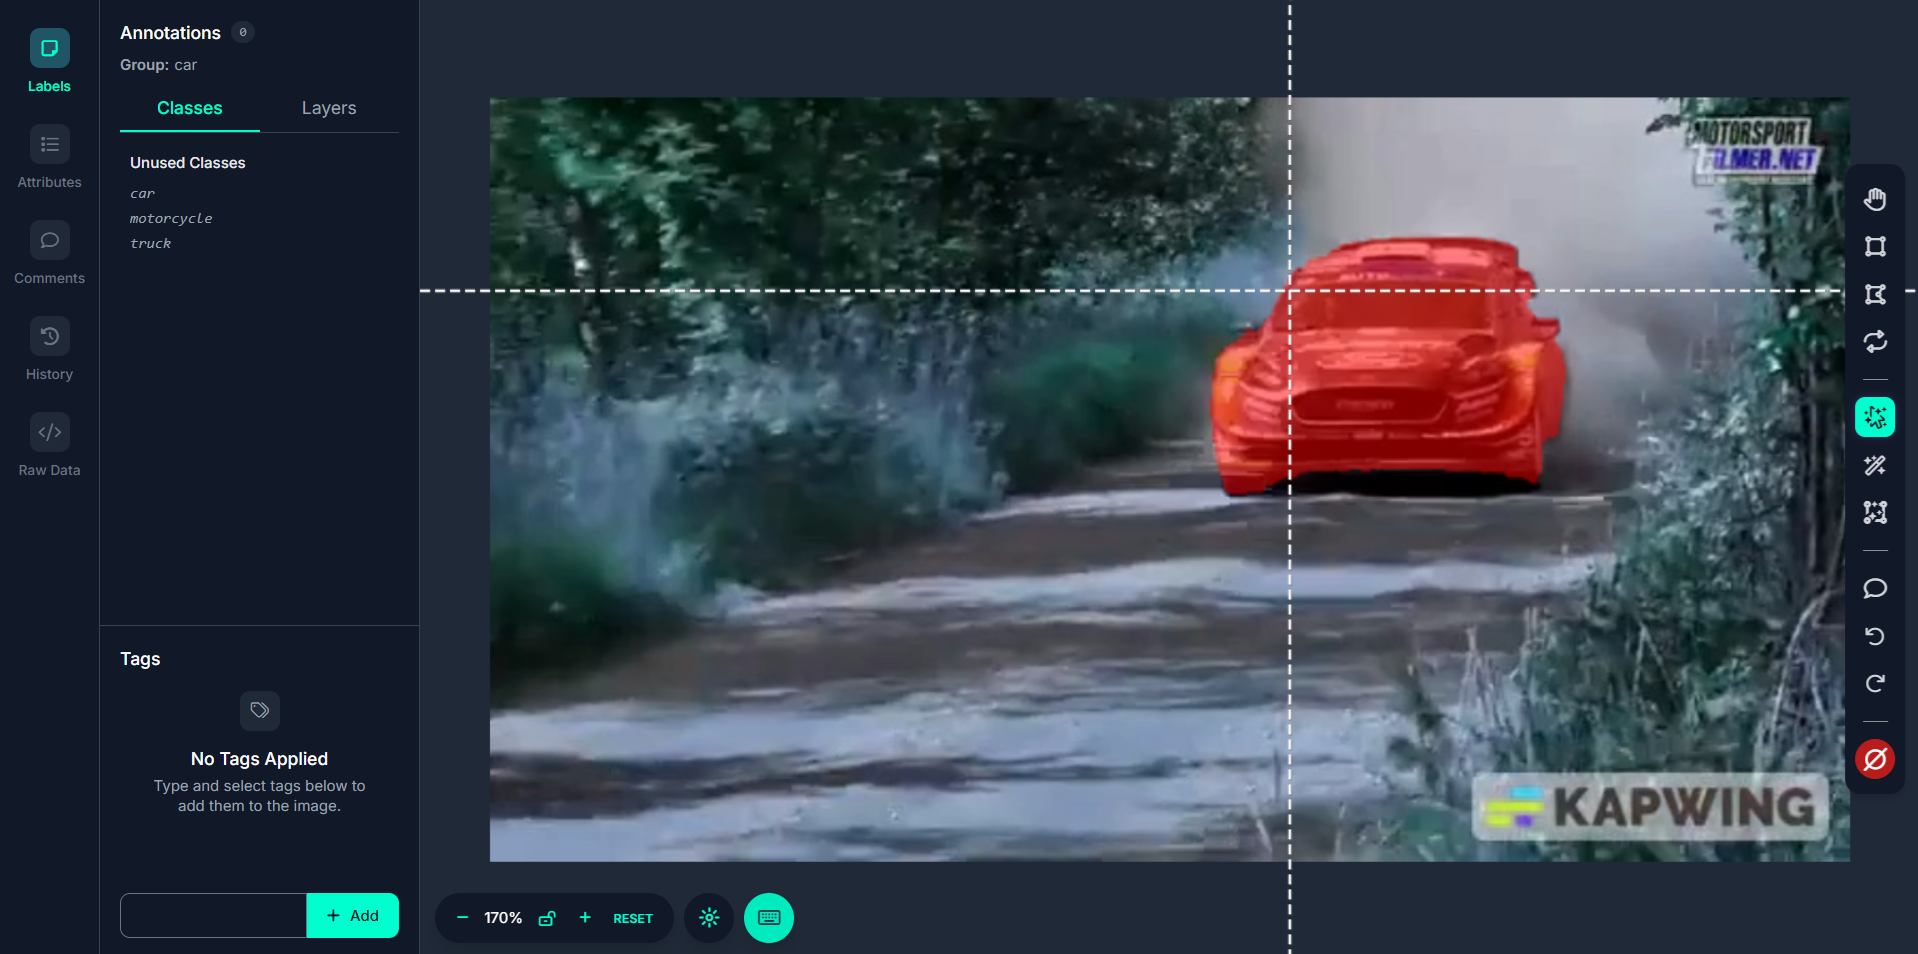
Step #2: Hover to Preview Masks
Once enabled, hover your mouse over any object in the frame. SAM runs in your browser and dynamically previews segmentation masks based on what object you're hovering over. This preview saves time, you can explore different parts of the frame before committing to a mask.
Step #3: Click to Generate a Polygon Mask
Click once on the object, and Smart Polygon will generate an initial polygon around it. The polygon is created by analyzing the shape and edges of the object. This is far more precise than manually placing each polygon point.
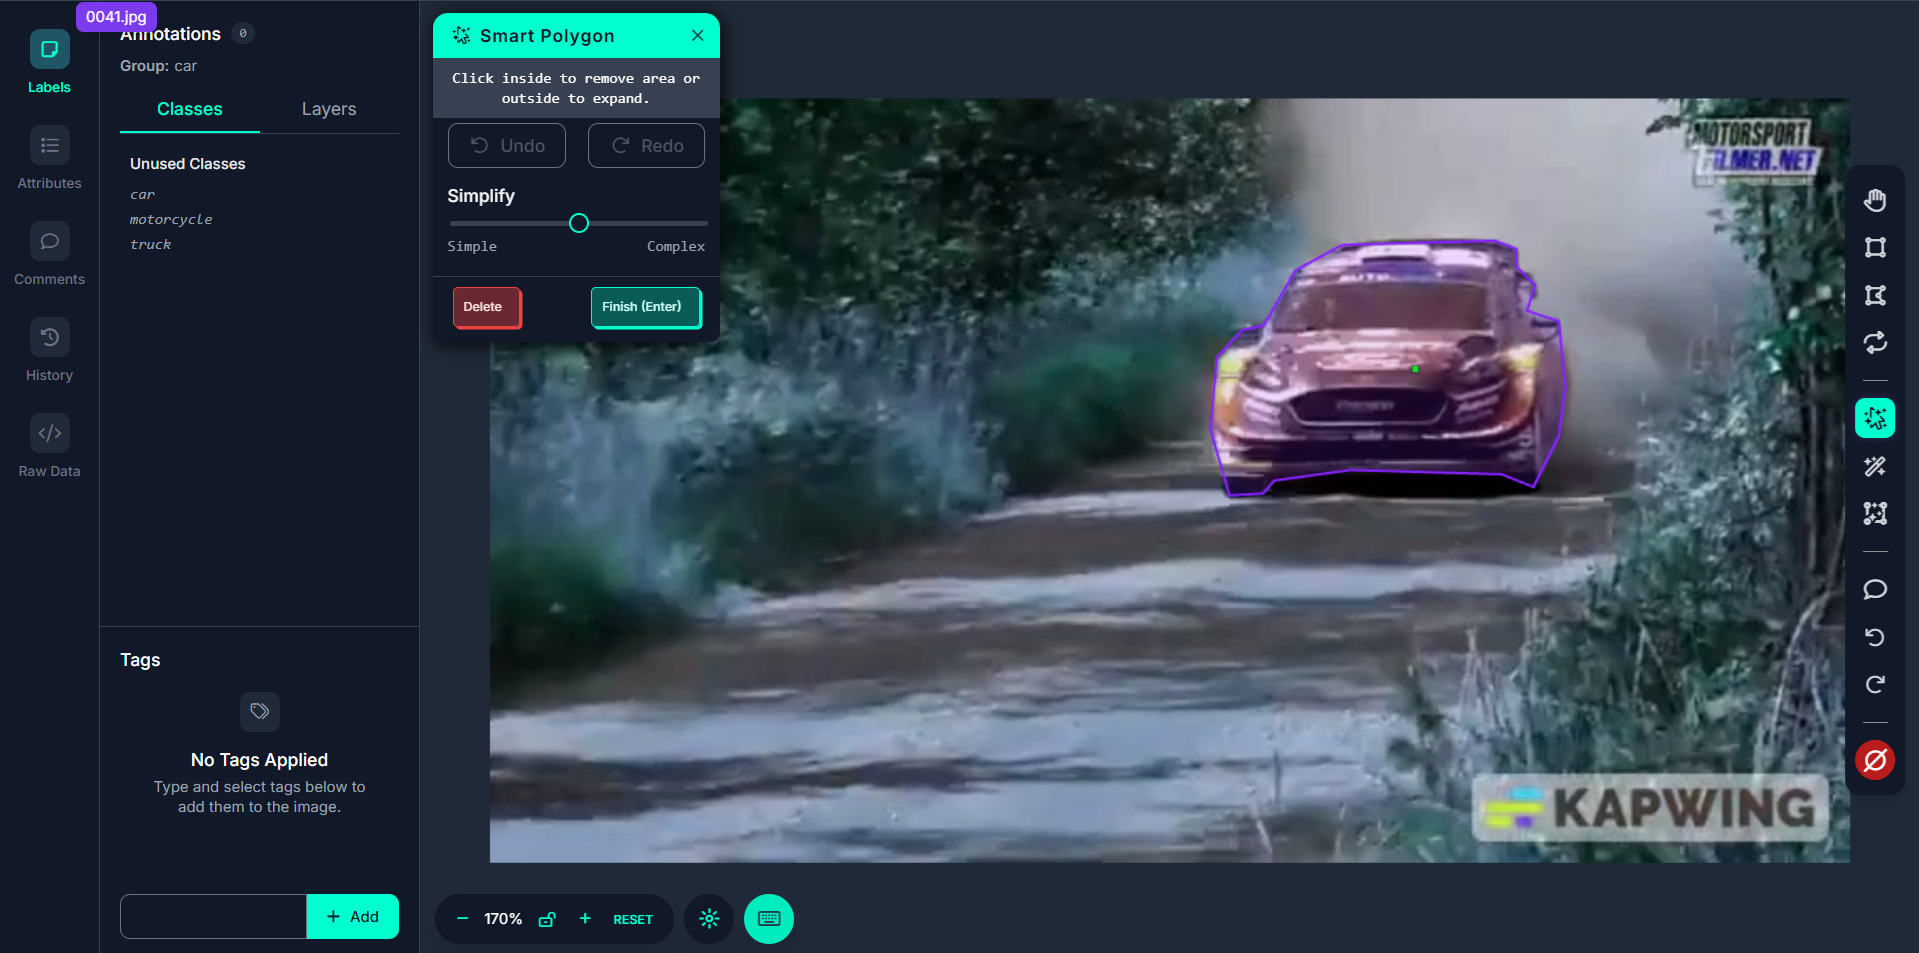
Step #4: Adjust Polygon Complexity
After generating a mask, you’ll be prompted to choose the polygon complexity. You can toggle between simplified and detailed versions of the polygon. The higher the complexity, the more points and the more accurate the shape.
Step #5. Interactively Edit the Polygon
You can refine the generated mask. Click outside the mask to expand it if something was missed. Click inside the mask to shrink or exclude any over-segmented areas.
Step #6: Click-and-Drag for Custom Mask Generation
If the one-click method fails to capture the whole object, you can click and drag a box around the object to force the model to consider the full region. This helps in segmenting larger or occluded objects.
Smart Polygon in Roboflow is a precision-focused annotation tool powered by SAM. When used in video annotation workflows, it enables:
- One-click mask generation for objects in video frames.
- Interactive previews and refinements of segmentation masks.
Accurate polygon annotations that surpass traditional bounding box quality.
Whether you're labeling 100 or 10,000 frames, Smart Polygon dramatically improves speed and quality especially when your dataset requires object masks that go beyond rectangular boxes. It's the go-to tool for fast, accurate frame-by-frame segmentation in video datasets.
Best Practices for Smart Polygon
- Use Clear, Well-Separated Objects: Smart Polygon performs best when the object has clear edges and is visually distinct from the background. Blurry, overlapping, or low-contrast objects may result in inaccurate masks.
- Hover Around for Best Preview: Don’t click immediately, move your cursor across the object and look for the most accurate mask preview before applying the polygon. This can save time correcting poorly placed masks later.
- Experiment with Click & Drag: If one-click masking doesn’t capture the full object (especially for large or oddly shaped ones), use click-and-drag to draw a box around the object for a better segmentation result.
- Adjust Polygon Complexity: After generating a mask, toggle between different polygon complexities to choose the one that best fits your needs (more points equals more precise but harder to edit).
- Refine with Add/Subtract Clicks: Use clicks inside the mask to remove unwanted areas or outside to expand the mask. This interactive editing is faster and more accurate than manual polygon drawing.
What Is Box Prompting?
Box Prompting is a semi-automated labeling tool in Roboflow that assists in quickly generating bounding boxes around multiple, similar objects in an image — or in this case, in frames extracted from a video.
When performing video annotation, you're often working with dozens or hundreds of nearly identical frames where similar objects (e.g., cars, people, cones) appear repeatedly. Instead of drawing boxes from scratch in every frame, Box Prompting learns from the boxes you draw and starts suggesting new boxes automatically as you move through frames. The more examples you provide, the smarter it gets.
Step-by-Step: Using Box Prompting in a Video Annotation Workflow
Step #1: Extract Video Frames
First, upload your video to Roboflow and extract key frames (e.g., every 5 frames) to create a frame-based dataset.
Step #2: Annotate at Least One Example per Class
Open a video frame in Roboflow Annotate. Manually draw a bounding box around one object (e.g., a car). You must label at least one example for the model to generate predictions.
Step #3: Activate Box Prompting
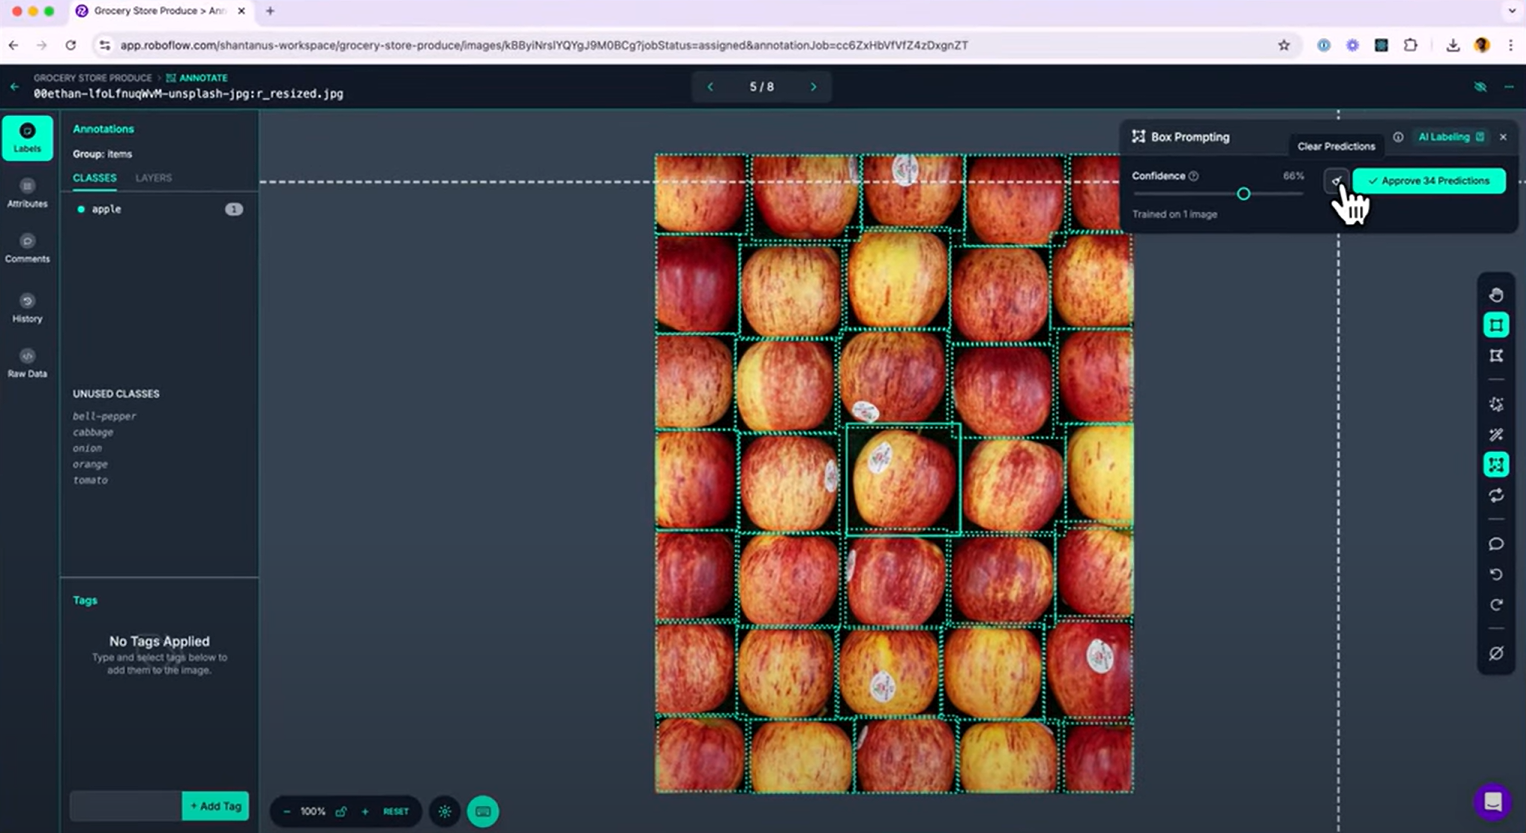
Click the Box Prompting icon from the toolbar in the annotation interface. Once activated, the model will use the example(s) you've drawn to generate similar bounding boxes in the same frame.
Suggested boxes appear as dotted outlines, these are predictions, not saved annotations yet.
Step #4: Fine-Tuning Predictions
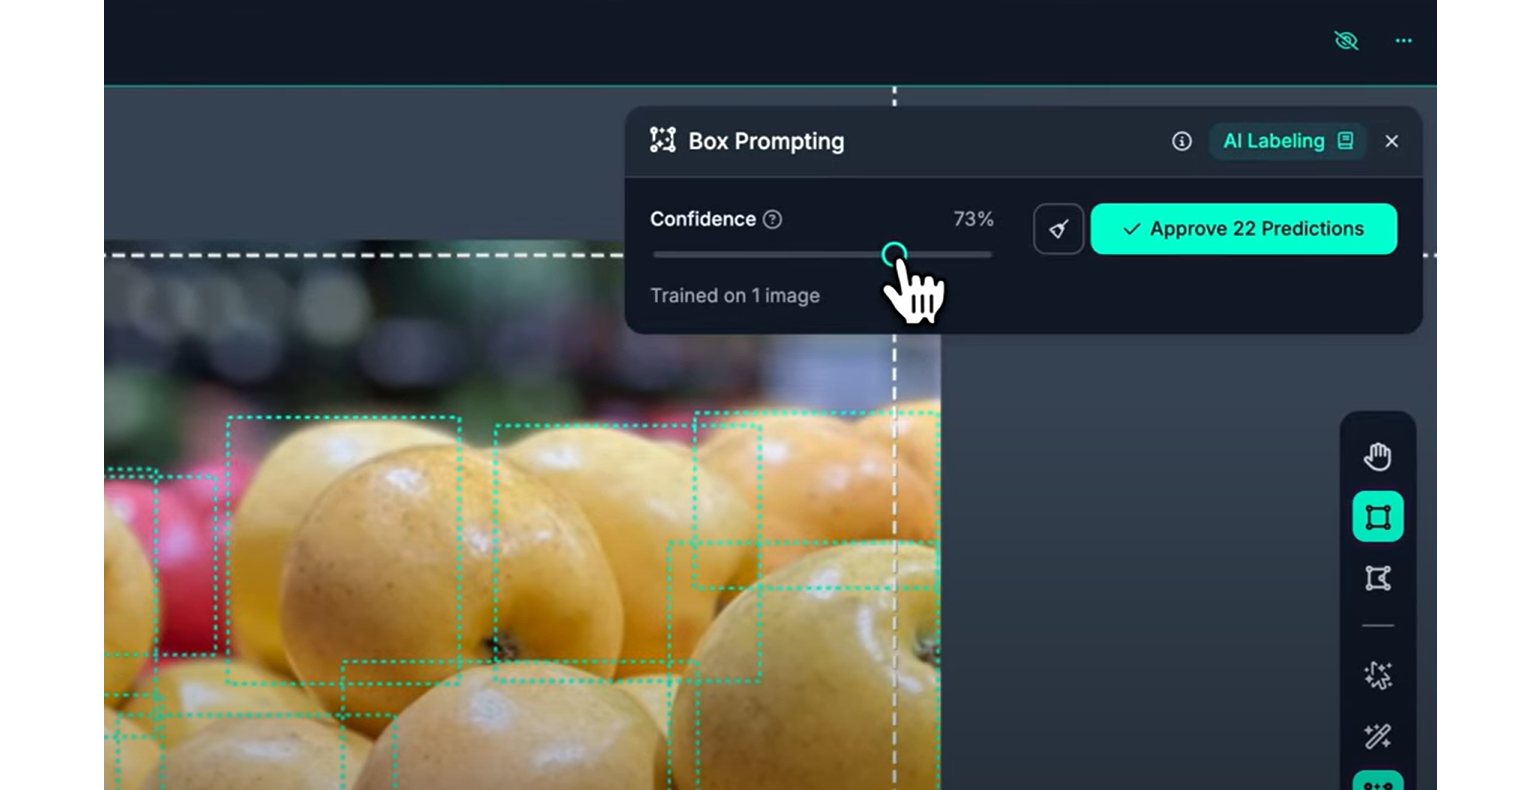
Once predictions appear in the frame, you can adjust confidence threshold. Use the slider to control how many predictions appear. Higher confidence means fewer boxes (only the most confident ones) and lower confidence means more boxes (may include false positives).
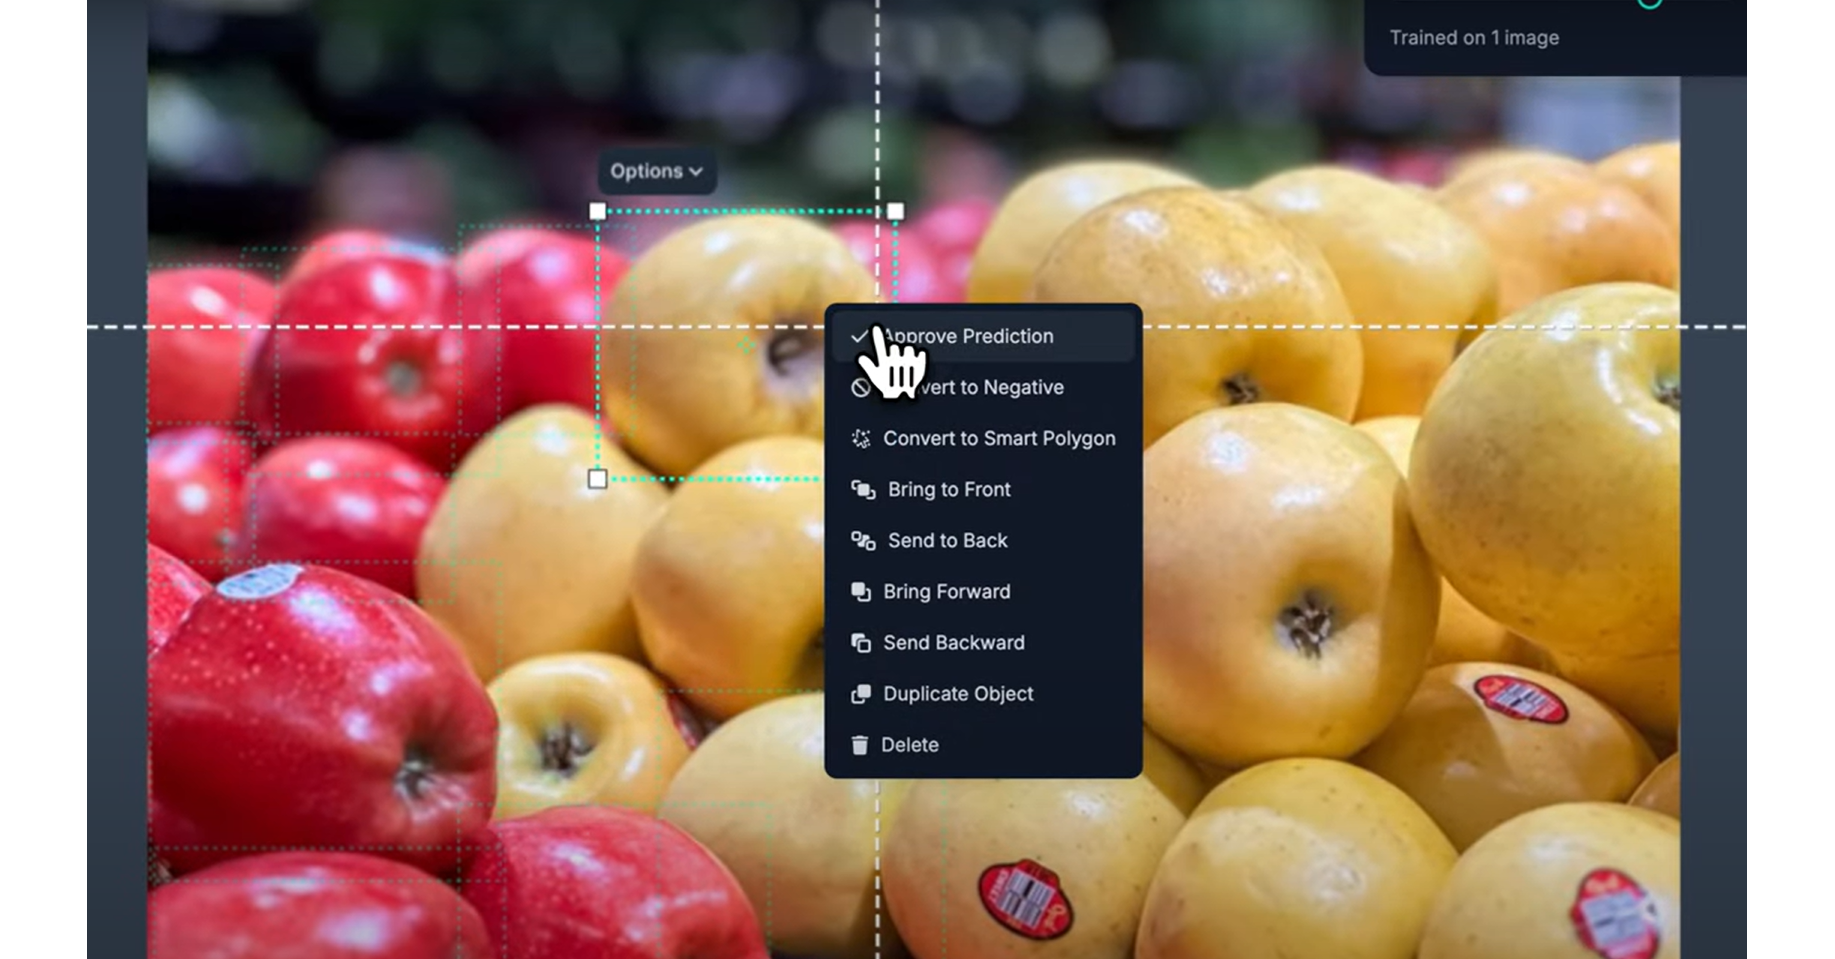
Provide negative examples if a prediction is incorrect, right-click it and choose “Convert to Negative”. This teaches the model what not to label in the future. Negative examples show up shaded to help visually distinguish them.
Add more examples by drawing additional boxes for objects of different shapes, sizes, or orientations. Each new example improves the model’s ability to recognize similar items in upcoming frames.
Step #5: Approve Predictions
Once you’re happy with the predictions in the frame, click “Approve Predictions.” This will convert all dotted suggestions into actual bounding boxes that are saved in your dataset. You can still manually adjust or delete these annotations later.
Box Prompting is a powerful in-session learning tool in Roboflow Annotate that:
- Learns from the boxes you draw on video frames.
- Automatically suggests similar annotations in current and future frames.
- Improves as you annotate more.
- Saves time by reducing repetitive box drawing in videos.
- Allows correction through negative prompts and confidence tweaking.
It is especially useful for repetitive object detection in video data like labeling cars, people, tools, animals, or any repeating object over time making your video annotation workflow much faster and smarter.
Best Practices for Video Annotation with Box Prompting
- Label Diverse Examples: If your video shows the same object from different angles or lighting conditions, draw at least one box for each variation.
- Annotate in the Same Session: Box Prompting learns within the current session so annotate similar-looking frames back-to-back for better predictions.
- Tighten Bounding Boxes: Don’t leave excess background in your box. Clean boxes lead to more accurate model suggestions.
- Use Negative Prompts: Regularly use “Convert to Negative” to avoid recurring false positives in future predictions.
What Is Auto Label?
Auto Label is an AI-assisted annotation feature in Roboflow that automatically labels objects in your images or video frames using powerful foundation models like Grounding DINO (for object detection), Grounded SAM (for segmentation), or models you’ve previously trained on Roboflow.
In the context of video annotation, Auto Label helps bulk-annotate frames extracted from a video, saving hours of manual labeling work especially when dealing with common objects like cars, people, packages, or industrial components.
Unlike Label Assist (which runs inference one frame at a time during annotation), Auto Label works in batch, allowing you to auto-label hundreds or thousands of frames at once after configuration.
Step-by-Step Guide: Using Auto Label for Annotating Video Frames
Step #1: Upload Video and Extract Frames
Upload your video file to Roboflow. Extract frames (e.g., every 5th frame) to generate an image dataset from the video. Once frames are extracted, they become regular images you can label.
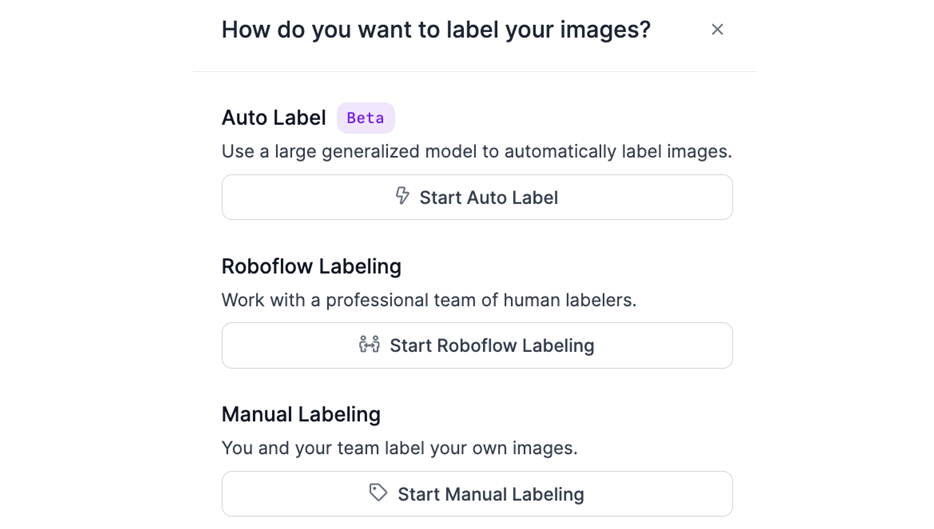
Step #2: Launch Auto Label
In the dataset workspace, after uploading images, choose “Auto Label” when asked how you want to annotate your data. This launches the Auto Label configuration interface.
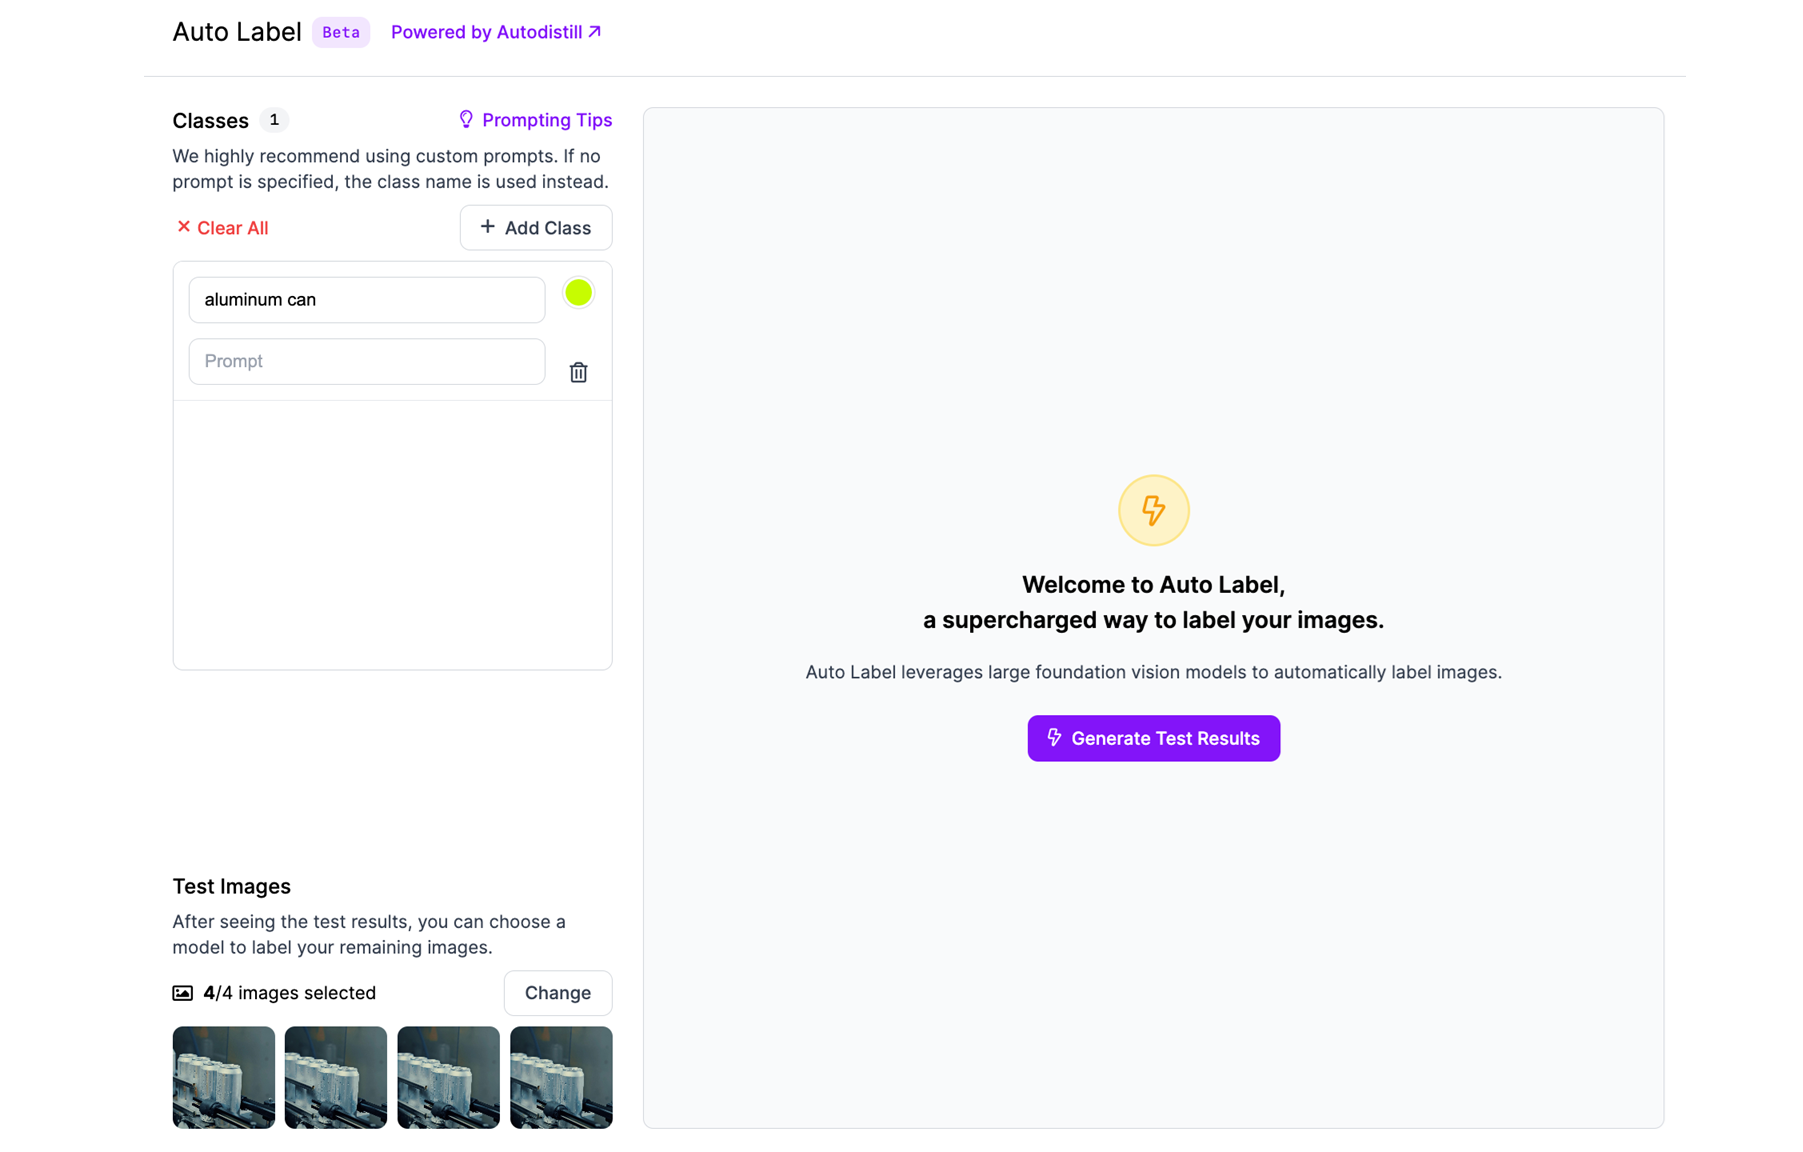
Step #3: Define Classes and Descriptions
In the configuration panel, add the classes (object categories) you want to detect, e.g., car, person, forklift, bottle. You can optionally provide visual descriptions for each class to improve detection. These are natural language prompts used by the foundation model to locate the object in images.
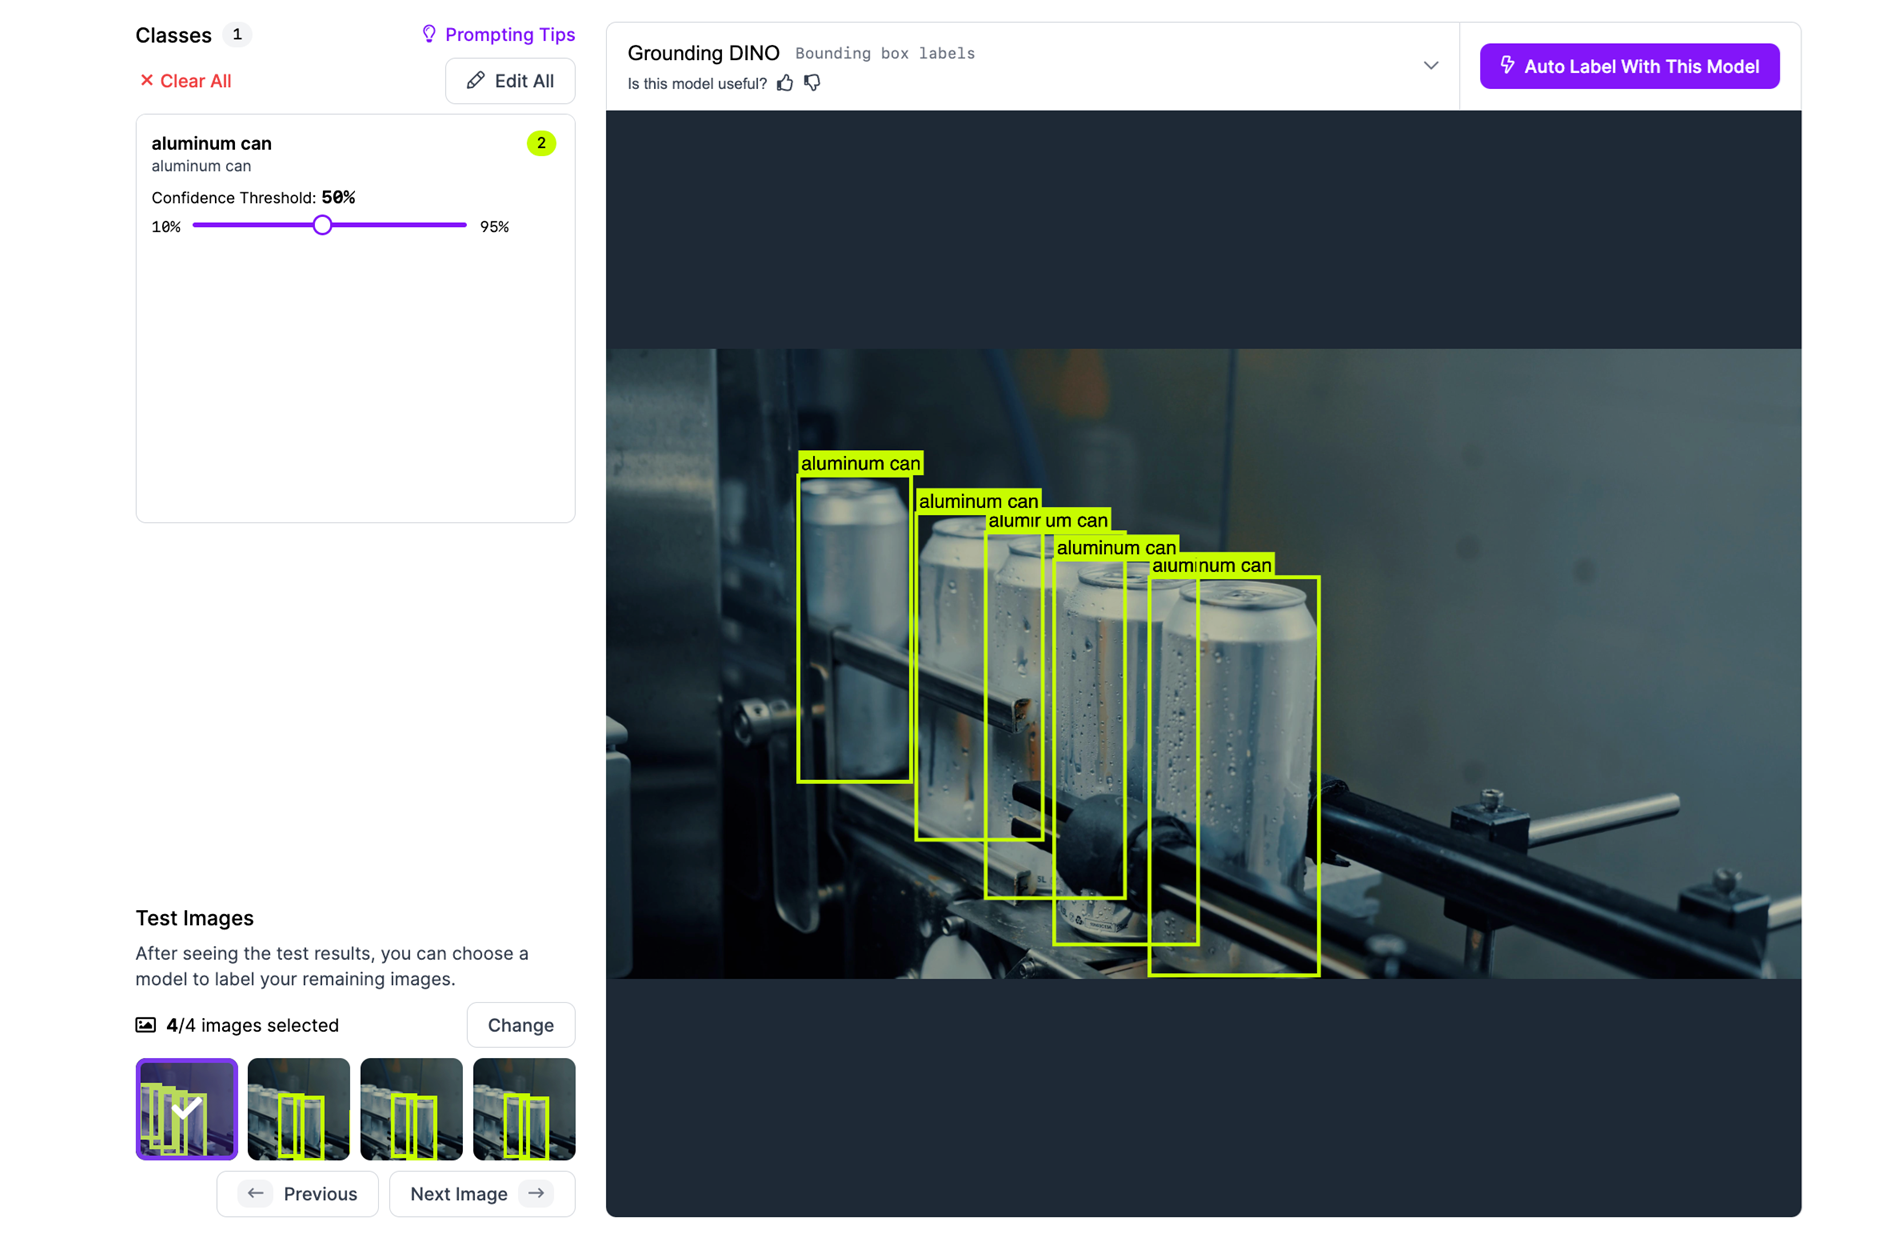
Step #4: Generate Test Results
Roboflow will auto-select a few test images (e.g., 4 frames) and run predictions. You’ll see bounding boxes or masks placed by the AI model. Adjust the confidence threshold for each class, higher confidence means more accurate but fewer boxes.
Step #5: Adjust and Optimize
If results aren’t satisfactory:
- Edit class descriptions (e.g., change bottle to “plastic water bottle”).
- Test on different images by selecting other frames.
- Modify the threshold to control sensitivity.
Step #6: Run Auto Label on Entire Batch
Once satisfied with test results, click “Auto Label with This Model.” Roboflow will apply the model to label all frames in the dataset. This can process hundreds or thousands of video frames automatically, in the background.
Auto Label is a batch annotation tool in Roboflow that lets you use cutting-edge AI models to label hundreds of video frames automatically. When used for video annotation, it:
- Converts extracted frames into annotated datasets rapidly.
- Uses large foundation models (like Grounding DINO) to detect objects via visual prompts.
- Offers a test-preview-edit loop before labeling the full dataset.
- Helps create a labeled video dataset without drawing a single box manually.
It’s ideal for building datasets from videos where the objects are visually common and consistent, like vehicles, tools, products, or people and helps turn raw footage into high-quality training data in minutes.
Best Practices for Auto Label in Video Annotation
- Use Clear Visual Descriptions: Describe the object’s look (e.g., “red fire extinguisher” instead of just “extinguisher”).
- Focus on Common Objects: Auto Label is best for general categories (car, person, can). It’s not suited for subtle distinctions (e.g., different brands or defect types).
- Evaluate Confidence Carefully: Avoid over-labeling or under-labeling by tuning the threshold after previewing results.
- Review Final Labels Before Training: You can manually review/edit the labels if needed to improve dataset quality.
Repeat Previous: Effortless Annotation Across Video Frames
When working with video frames, the same object often appears in multiple consecutive images with only slight changes in position. Manually redrawing annotations for each frame can quickly become tedious. That’s where Repeat Previous can be used. It allows you to copy annotations from the last frame and paste them into the current one, giving you a head start on your labeling.
How Repeat Previous Works in Video Annotation
Step #1: Activate Repeat Previous
Open a frame in Roboflow Annotate. When you’re ready to annotate the next frame, simply click the Repeat Previous button in the toolbar.
Step #2: Copy Annotations from the Previous Frame
Roboflow will bring over all annotations, bounding boxes or masks, from the last annotated frame into the current one. These copied annotations appear as editable elements.
Step #3: Adjust as Needed
Since objects may shift slightly between frames, you can drag, resize, or delete the copied annotations to align with their new positions. This is significantly faster than starting from scratch.
Step #4: Continue Through the Video
As you move frame-by-frame, Repeat Previous becomes a powerful shortcut, helping you track objects over time with minimal effort. You annotate once, adjust slightly, and move on.
When to Use Repeat Previous
You may use repeat previous when:
- Annotating videos where objects appear across many frames (e.g., people walking, cars driving).
- Labeling with minimal object motion between frames.
- Speeding up tracking-style object annotation without complex automation.
Roboflow Supervision: Programmatic Video Annotation for Custom Dataset Creation
When it comes to annotating video data, especially for training computer vision models on fine-grained object categories, manual labeling can be both time-consuming and repetitive. This is where Roboflow Supervision, an open-source Python library, becomes incredibly powerful.
It integrates easily with Roboflow's Inference API and models (like YOLOv8) to automate object detection workflows. While Roboflow Annotate offers a visual interface, Supervision gives you full control through code ideal for preprocessing, labeling, and exporting datasets at scale.
Using Supervision for Video Annotation
Roboflow Supervision can be used to automatically annotate video frames by extracting frames from a video, running inference using a YOLO or any other supported model, converting the results into COCO format or any desired format, and exporting and uploading them as a dataset ready for training in Roboflow.
Video Annotation Example #1: Creating a Custom Object (Vehicle) Detection Dataset
I wanted to train a model that doesn’t just detect cars in general but distinguishes between different types of cars like a red sports car, a white sedan, and a blue SUV. Since YOLOv8 (or most pre-trained models) typically labels every car as just "car", I followed this strategy:
- I recorded separate videos for each car type.
- Then I ran the Supervision pipeline on each video.
- I renamed the class in the annotation (e.g., from "car" to "sports_car", "sedan", etc.).
- I generated multiple datasets, one per car type, and uploaded them individually to Roboflow.
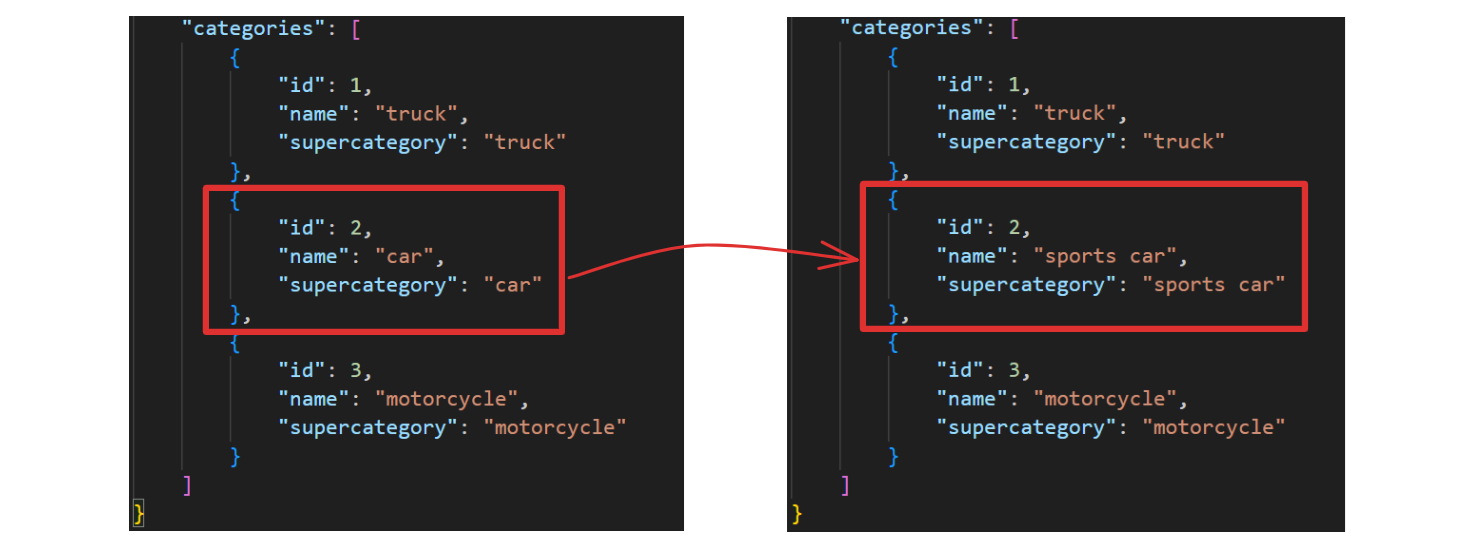
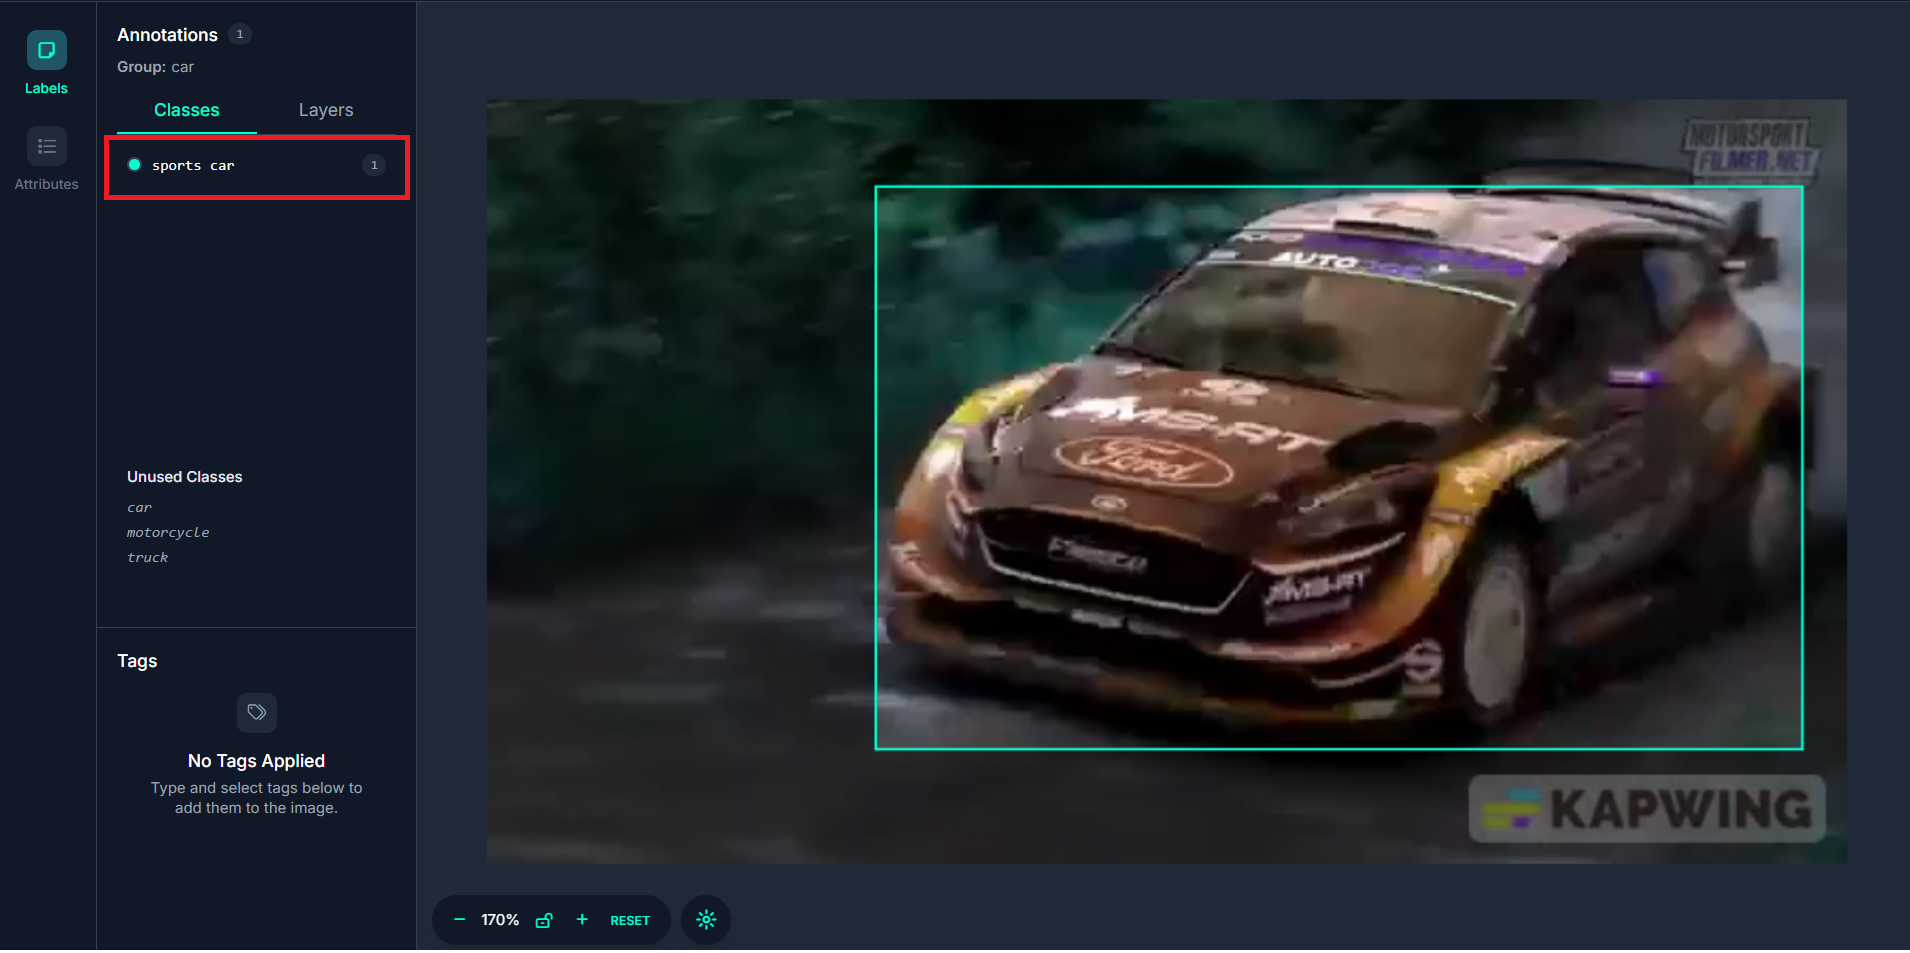
When you upload the annotation to Roboflow, you should see the annotation reflected.
Here’s the code to label video dataset.
# Import libraries
import os
import cv2
import json
import uuid
from tqdm import tqdm
from inference.models.utils import get_roboflow_model
import supervision as sv
from supervision.assets import download_assets, VideoAssets

# Set up output directories
os.makedirs("frames", exist_ok=True)
os.makedirs("annotations", exist_ok=True)

# sample video (or replace with your video)
video_path = "/content/car_race.mp4"

# Load Roboflow model (replace with your own model ID + API key)
model = get_roboflow_model(
    model_id="yolov8s-640",  # or your Roboflow model ID like "your-project-name/1"
    api_key="ROBOFLOW_API_KEY"  # ← replace with your actual key
)

# Setup COCO format containers
coco = {
    "images": [],
    "annotations": [],
    "categories": []
}

category_map = {}  # name to id
annotation_id = 1
image_id = 1

# Initialize frame generator
frame_gen = sv.get_video_frames_generator(video_path)
video_info = sv.VideoInfo.from_video_path(video_path)

# Process each frame and collect data
for frame_index, frame in tqdm(enumerate(frame_gen), total=video_info.total_frames):
    image_filename = f"{frame_index:04}.jpg"
    image_path = os.path.join("frames", image_filename)

    # Save frame as image
    cv2.imwrite(image_path, cv2.cvtColor(frame, cv2.COLOR_RGB2BGR))
    height, width = frame.shape[:2]

    # Run inference
    result = model.infer(frame)[0]
    detections = sv.Detections.from_inference(result)

    # Add image metadata
    coco["images"].append({
        "id": image_id,
        "width": width,
        "height": height,
        "file_name": image_filename
    })

    # Add detection annotations
    for det_index in range(len(detections.xyxy)):
        x_min, y_min, x_max, y_max = detections.xyxy[det_index]
        class_name = detections.data['class_name'][det_index]
        confidence = float(detections.confidence[det_index])

        # Assign category_id
        if class_name not in category_map:
            category_id = len(category_map) + 1
            category_map[class_name] = category_id
            coco["categories"].append({
                "id": category_id,
                "name": class_name,
                "supercategory": class_name
            })
        else:
            category_id = category_map[class_name]

        # Create COCO bbox (x, y, width, height)
        bbox = [
            float(x_min),
            float(y_min),
            float(x_max - x_min),
            float(y_max - y_min)
        ]

        coco["annotations"].append({
            "id": annotation_id,
            "image_id": image_id,
            "category_id": category_id,
            "bbox": bbox,
            "area": bbox[2] * bbox[3],
            "iscrowd": 0
        })
        annotation_id += 1

    image_id += 1

# Save annotations
with open("annotations/annotations.json", "w") as f:
    json.dump(coco, f, indent=4)

# Zip the dataset for Roboflow upload
!zip -r coco_dataset.zip frames/ annotations/
The code automatically annotates video frames using a YOLO model via Roboflow's Inference API, then formats the annotations into the COCO dataset format for training. It extracts each frame from a video, runs object detection on each frame, saves the results (bounding boxes and labels) as COCO-style annotations, and finally zips the frames and annotations into a ready-to-upload dataset. This workflow allows you to efficiently generate labeled training data from videos, especially useful when creating separate datasets for different object subtypes by modifying class names before uploading to Roboflow.
Video Annotation Example #2: Annotating Data for Multi-Object Tracking (MOT) using Supervision and ByteTrack
Beyond object detection, Roboflow Supervision can also be used to create annotated datasets for multi-object tracking (MOT) tasks, where each detected object is not only labeled but also assigned a unique ID that is tracked across frames. This is useful for building models that track the same object over time like following specific vehicles, people, or packages through a video sequence.
Here's the code.
# Import modules
import cv2
import numpy as np
import supervision as sv
from ultralytics import YOLO

# Load YOLOv8 model (pretrained or custom)
model = YOLO("yolov8n.pt")

# Initialize ByteTrack and annotators
tracker = sv.ByteTrack()
box_annotator = sv.BoxAnnotator()
label_annotator = sv.LabelAnnotator()

# Load video path
video_path = "/content/car_race.mp4"
output_path = "/content/annotated_video.mp4"
gt_path = "/content/gt.txt"

# Get class ID for 'car'
class_map = model.names
car_class_ids = [k for k, v in class_map.items() if v.lower() == "car"]
print("Car class IDs:", car_class_ids)

# MOT annotations list
frame_number = 0
mot_lines = []

# Define callback to process each frame
def callback(frame: np.ndarray, _: int) -> np.ndarray:
    global frame_number, mot_lines

    frame_number += 1
    results = model(frame, verbose=False)[0]
    detections = sv.Detections.from_ultralytics(results)

    # Filter only 'car' detections
    mask = [class_id in car_class_ids for class_id in detections.class_id]
    detections = detections[mask]

    # Track using ByteTrack
    tracked = tracker.update_with_detections(detections)

    # Export in MOT16 format
    for i in range(len(tracked.xyxy)):
        track_id = tracked.tracker_id[i]
        class_id = tracked.class_id[i]
        conf = float(tracked.confidence[i])

        x1, y1, x2, y2 = tracked.xyxy[i]
        bb_left = float(x1)
        bb_top = float(y1)
        bb_width = float(x2 - x1)
        bb_height = float(y2 - y1)

        line = f"{frame_number},{track_id},{bb_left:.2f},{bb_top:.2f},{bb_width:.2f},{bb_height:.2f},{conf:.2f},{class_id},1"
        mot_lines.append(line)

    # Annotate video frame
    labels = [f"#{track_id}" for track_id in tracked.tracker_id]
    annotated_frame = box_annotator.annotate(frame.copy(), detections=tracked)
    return label_annotator.annotate(annotated_frame, detections=tracked, labels=labels)

# Process video with callback
sv.process_video(
    source_path=video_path,
    target_path=output_path,
    callback=callback
)

# Save MOT16 txt file
with open(gt_path, "w") as f:
    f.write("\n".join(mot_lines))

print("Saved annotated video to:", output_path)
print("Saved MOT16 annotations to:", gt_path)
This code processes a video using a YOLOv8 object detector and ByteTrack, a tracking algorithm integrated into Supervision. It detects and tracks only 'car' objects (in our use case example) across all frames in the video. For each car detected, it assigns a persistent track ID, enabling the object to be followed from one frame to the next.
Each detection is exported in the MOT16 dataset format from MOTChallenge a widely used format for multi-object tracking benchmarks. In this format, each line in the gt.txt file contains:
<frame>, <id>, <bb_left>, <bb_top>, <bb_width>, <bb_height>, <conf>, <class_id>, <visibility>
Where,
- frame: Integer frame number (starting at 1)
- id: Unique object ID (persists across frames for that object)
- bb_left, bb_top: Top-left pixel coordinates of the bounding box
- bb_width, bb_height: Width and height of the box, in pixels
- conf:
- For ground truth, 1 = valid object, 0 = ignore
- For detections, it's the confidence score
- class_id: Annotated object class (e.g., 3 for “car”); optional for detections
- visibility: Fraction (0.0–1.0) of the object visible, used in ground truth for occlusion
The code also generates an annotated output video, where each tracked object is labeled with its tracking ID (e.g., #1, #2, etc.) and bounding box, visually confirming that the same object is being followed frame by frame.
Similarly, you can even convert to other formats, for example, training object tracking model in Vertex AI. See the format to prepare data for Vertex AI object tracking.
Roboflow Supervision is a powerful tool that allows to export annotations in various types such as bounding box, mask and even keypoints.
Video Annotation
Video annotation is the bridge between raw video footage and powerful AI models. By carefully labeling objects across frames, you can transform videos into structured datasets that teach models to recognize patterns, detect anomalies, or track movements whether in manufacturing, healthcare, sports, or beyond.
To make the process efficient, modern annotation tools offer features like:
- Frame sampling to extract the most relevant images.
- AI-assisted labeling to accelerate manual annotation.
- Propagation tools to maintain consistency across similar frames.
- Flexible annotation types (bounding boxes, polygons, etc.) for precise labeling.
With the right approach, video annotation unlocks real-world AI applications from real-time quality control to automated surveillance. The key is choosing tools that balance speed, accuracy, and scalability for your project’s needs.
Ready to turn your videos into structured training data? Try Roboflow, and start building your own computer vision models.
Cite this Post
Use the following entry to cite this post in your research:
Timothy M. (Jun 23, 2025). Video Annotation: Get Started Guide. Roboflow Blog: https://blog.roboflow.com/video-annotation/