
YOLOv10, released by researchers at Tsinghua University in May 2024, is a real-time object detection model that achieves lower latency and fewer parameters than earlier YOLO versions. This tutorial covers installing YOLOv10 from source, downloading a pre-labeled football player detection dataset from Roboflow Universe, fine-tuning a YOLOv10 model in a Colab notebook, and evaluating results using the confusion matrix and training loss graphs. The guide recommends training for at least 100 epochs to allow the model to converge properly.
YOLOv10, released on May 23, 2024, is a real-time object detection model developed by researchers from Tsinghua University. YOLOv10 follows in the long-running series of YOLO models, created by authors from a wide variety of researchers and organizations.
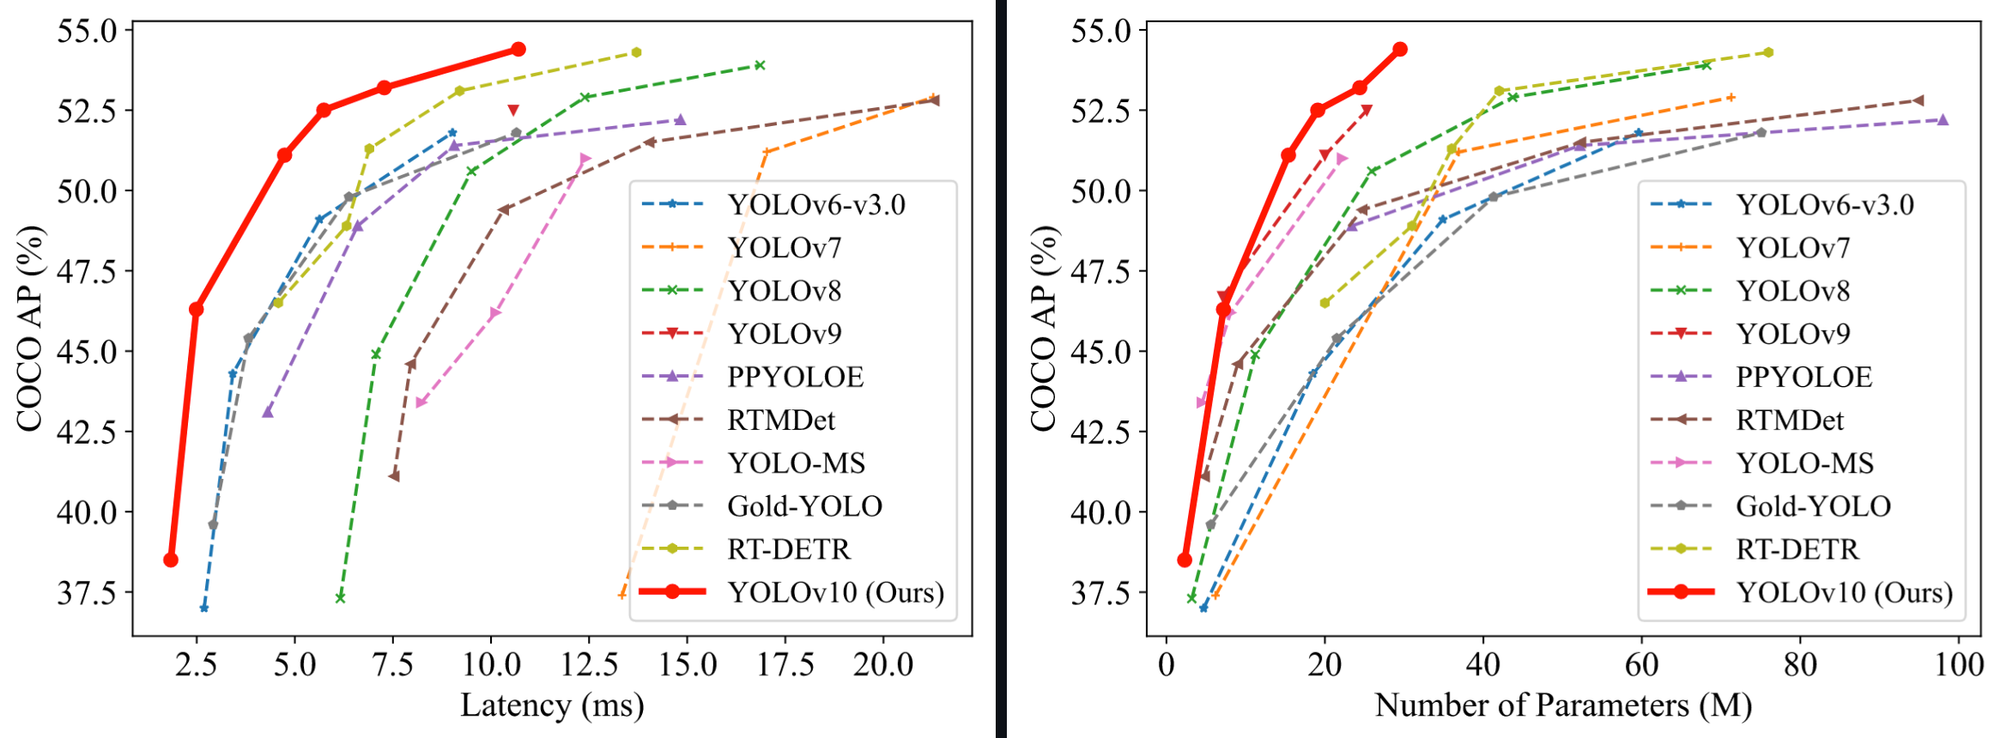
As of May 2024, YOLOv10 represents the state of the art in object detection, achieving lower latency than previous YOLO models with fewer parameters.
In terms of performance, the YOLOv10 paper notes “our YOLOv10-S is 1.8× faster than RT-DETR-R18 under the similar AP on COCO, meanwhile enjoying 2.8× smaller number of parameters and FLOPs. Compared with YOLOv9-C, YOLOv10-B has 46% less latency and 25% fewer parameters for the same performance.”
In this guide, we will show you how to fine-tune a YOLOv10 model using the code released by the Tsinghua University research team.
Here is the result of the basketball player detection model we will train running on an image:

Without further ado, let’s get started!
You can try a YOLOv10 model trained on COCO with the following Workflow:
How to Train YOLOv10 Model on a Custom Dataset
Below, we are going to walk through how to train a YOLOv10 model on a custom dataset. We will work with the official YOLOv10 training repository and train a model that detects football players on a field. We will use a pre-labeled dataset available on Roboflow Universe.
Step #1: Install YOLOv10
To get started, we need to install YOLOv10. YOLOv10 does not have an official Python package, so we will install the model from source.
We have created a Colab notebook with all the steps you need to follow this guide.
To install the model, run:
!pip install -q git+https://github.com/THU-MIG/yolov10.gitThen, you will need to download the model weights to use with the model. You can do so using the following commands:
!mkdir -p {HOME}/weights
!wget -P {HOME}/weights -q https://github.com/jameslahm/yolov10/releases/download/v1.0/yolov10n.pt
!wget -P {HOME}/weights -q https://github.com/jameslahm/yolov10/releases/download/v1.0/yolov10s.pt
!wget -P {HOME}/weights -q https://github.com/jameslahm/yolov10/releases/download/v1.0/yolov10m.pt
!wget -P {HOME}/weights -q https://github.com/jameslahm/yolov10/releases/download/v1.0/yolov10b.pt
!wget -P {HOME}/weights -q https://github.com/jameslahm/yolov10/releases/download/v1.0/yolov10x.pt
!wget -P {HOME}/weights -q https://github.com/jameslahm/yolov10/releases/download/v1.0/yolov10l.pt
!ls -lh {HOME}/weights
These weights are trained using the Microsoft COCO dataset.
YOLOv10 is based on Ultralytics’ model code, and contains a fork of their code for inference. Thus, we will see from ultralytics imports in this guide, which use the custom ultralytics codebase included in the YOLOv10 repository we pip installed earlier. You don’t need to run any additional commands to use this forked code.
We can test our model is working using the following code:
from ultralytics import YOLOv10

model = YOLOv10(f'{HOME}/weights/yolov10n.pt')
results = model(source=f'{HOME}/data/dog.jpeg', conf=0.25)
print(results[0].boxes.xyxy)
Let’s run our model using the default yolov10n weights on an image of a person and a dog.
Our model should return predictions like this:
tensor([[6.7041e+01, 2.5264e+02, 6.4549e+02, 9.6621e+02],
    	[7.4646e-01, 3.4156e+02, 5.4170e+02, 1.2773e+03]], device='cuda:0')
We can visualize our predictions using the supervision Python package. You can install supervision using the following command:
pip install supervisionYou can visualize the predictions using this code:
import cv2
import supervision as sv

detections = sv.Detections.from_ultralytics(results)

bounding_box_annotator = sv.BoundingBoxAnnotator()
label_annotator = sv.LabelAnnotator()

annotated_image = bounding_box_annotator.annotate(
	scene=image, detections=detections)
annotated_image = label_annotator.annotate(
	scene=annotated_image, detections=detections)

sv.plot_image(annotated_image)
Our code returns:
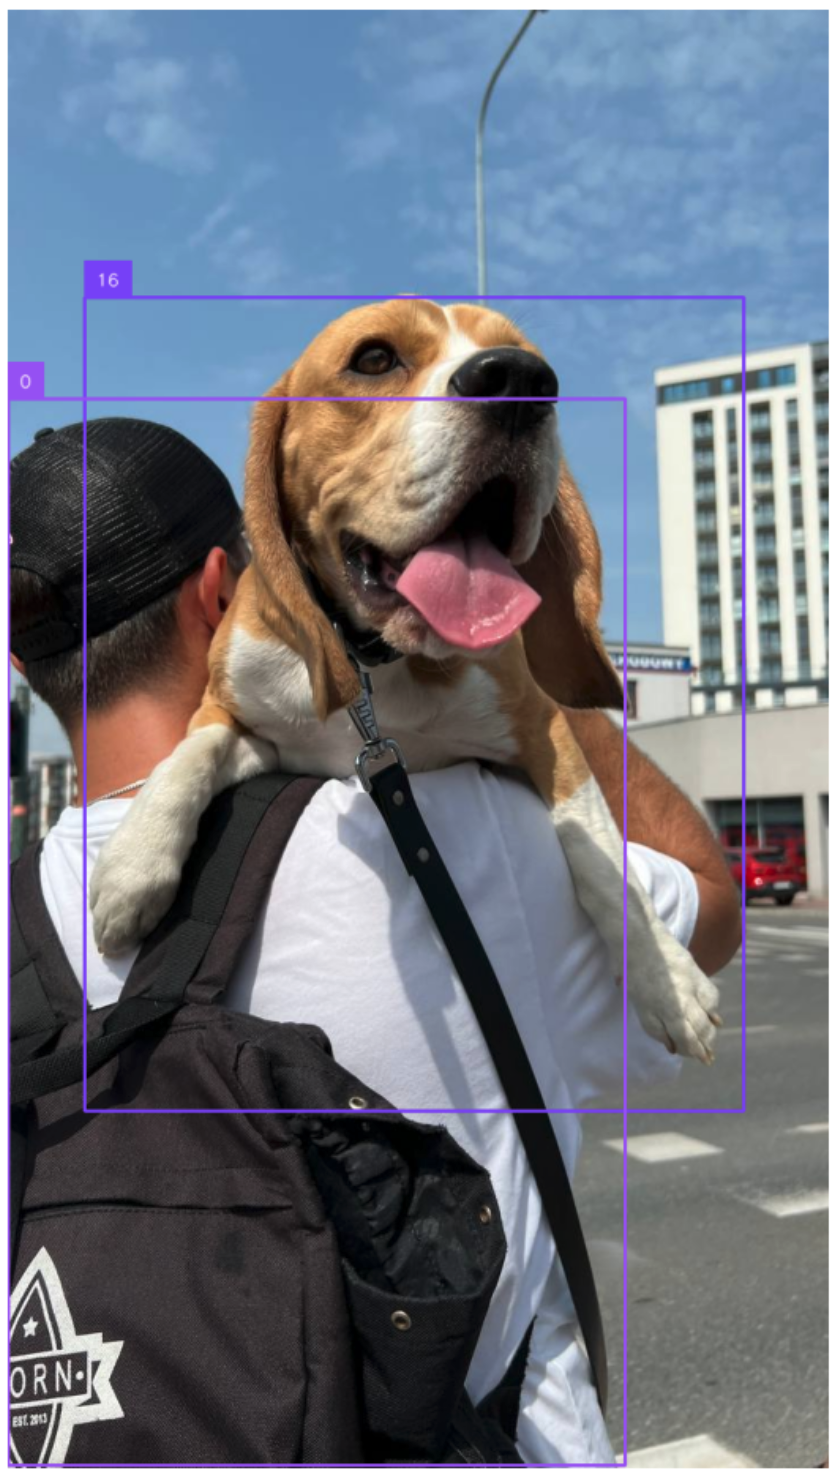
The model, the pre-trained checkpoint trained using the Microsoft COCO dataset, successfully identified the dog and person in the image.
Step #2: Prepare a Dataset
With our model installed and weights ready, the next step is to prepare a dataset for use in training.
If you do not already have a dataset, you can find over 250,000 public datasets for use in training models on Roboflow Universe, the largest community of open computer vision datasets on the web.
For this guide, we will train a model on a basketball player detection dataset available on Roboflow Universe. Here is an example of an annotated image in the dataset:

If you already have labeled data, make sure your data is in the YOLOv8 PyTorch TXT format, the format that YOLOv10 uses. You can convert your data into the YOLOv8 PyTorch TXT format using Roboflow. Learn how to convert your data.
To download our dataset from Universe, we can use the following code:
!mkdir {HOME}/datasets
%cd {HOME}/datasets

!pip install -q roboflow

from roboflow import Roboflow

ROBOFLOW_API_KEY = “”

rf = Roboflow(api_key=ROBOFLOW_API_KEY)
project = rf.workspace("roboflow-jvuqo").project("football-players-detection-3zvbc")
dataset = project.version(1).download("yolov8")
Above, replace:
- ROBOFLOW_API_KEY with your Roboflow API key.
- "Roboflow-jvuqo" with your Roboflow workspace ID.
- "Football-players-detection-3zvbc" with your Roboflow model ID.
- 1 with your Roboflow model ID.
Learn how to retrieve your Roboflow API key.
Learn how to retrieve your Roboflow workspace and model IDs.
This code will download our dataset for use in training our model.
Step #3: Train a YOLOv10 Model
With our dataset ready, we can start training our model. To do so, we can use the YOLO command line interface available with the YOLOv10 source code:
%cd {HOME}
!yolo task=detect mode=train epochs=10 batch=32 plots=True \
model={HOME}/weights/yolov10n.pt \
data={dataset.location}/data.yaml
In the above command, we start a training job for 10 epochs using our custom dataset. When you run this code, you will see a long output from the command line and training will start. You can monitor the performance of your training job as the model trains.
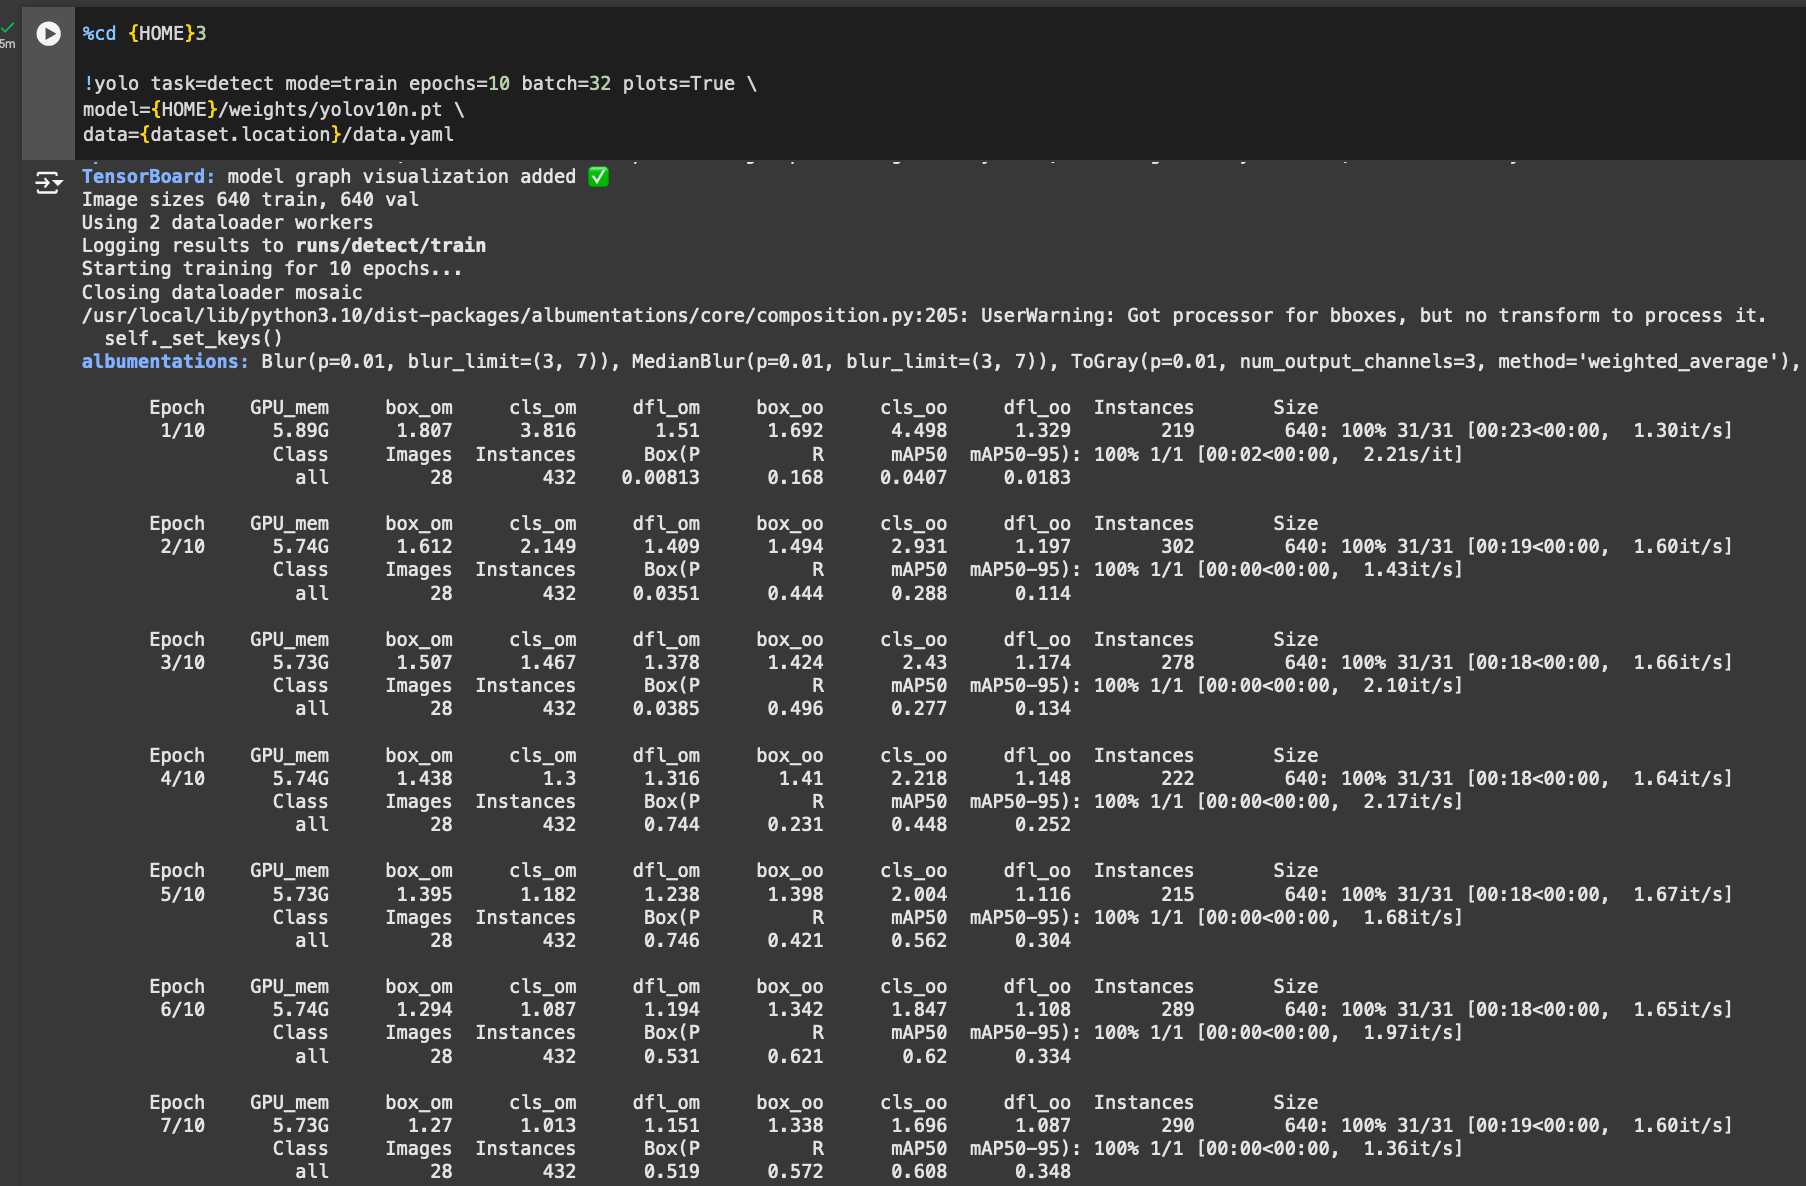
We recommend training for 100 epochs for optimal performance. We trained on 10 epochs above for testing purposes.
Step #4: Model Evaluation
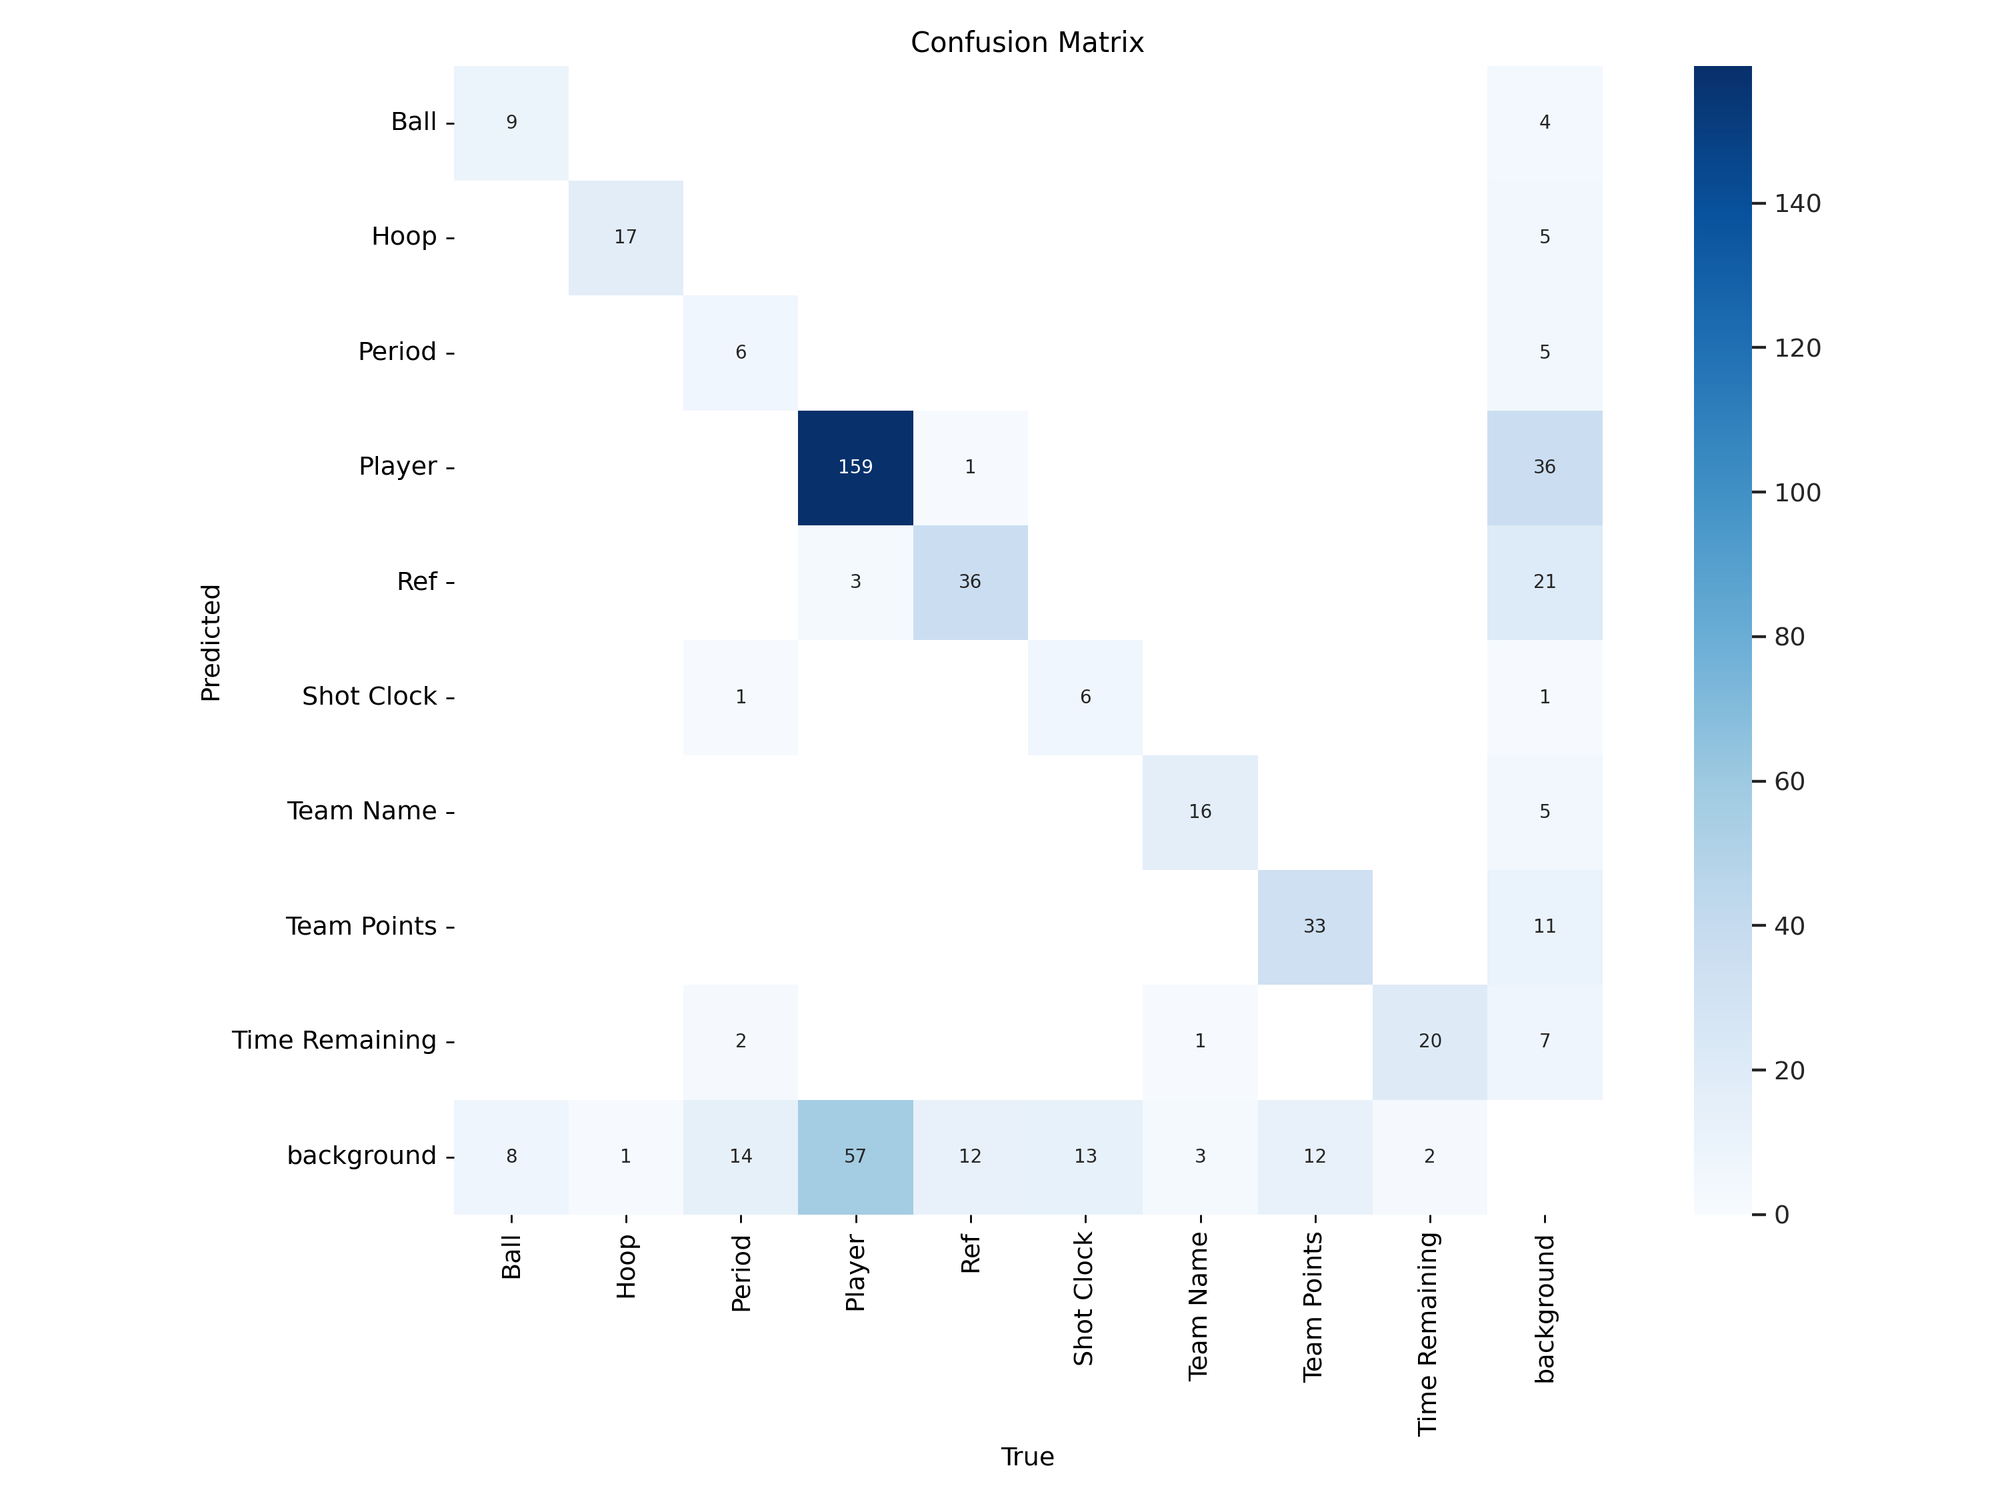
We can evaluate our model using the evaluation graphs generated after the model training process is completed. Let’s view our confusion matrix:
%cd {HOME}
Image(filename=f'{HOME}/runs/detect/train/confusion_matrix.png', width=600)
Here is the confusion matrix for our dataset:
We can also analyze our model training graphs:
%cd {HOME}
Image(filename=f'{HOME}/runs/detect/train/results.png', width=600)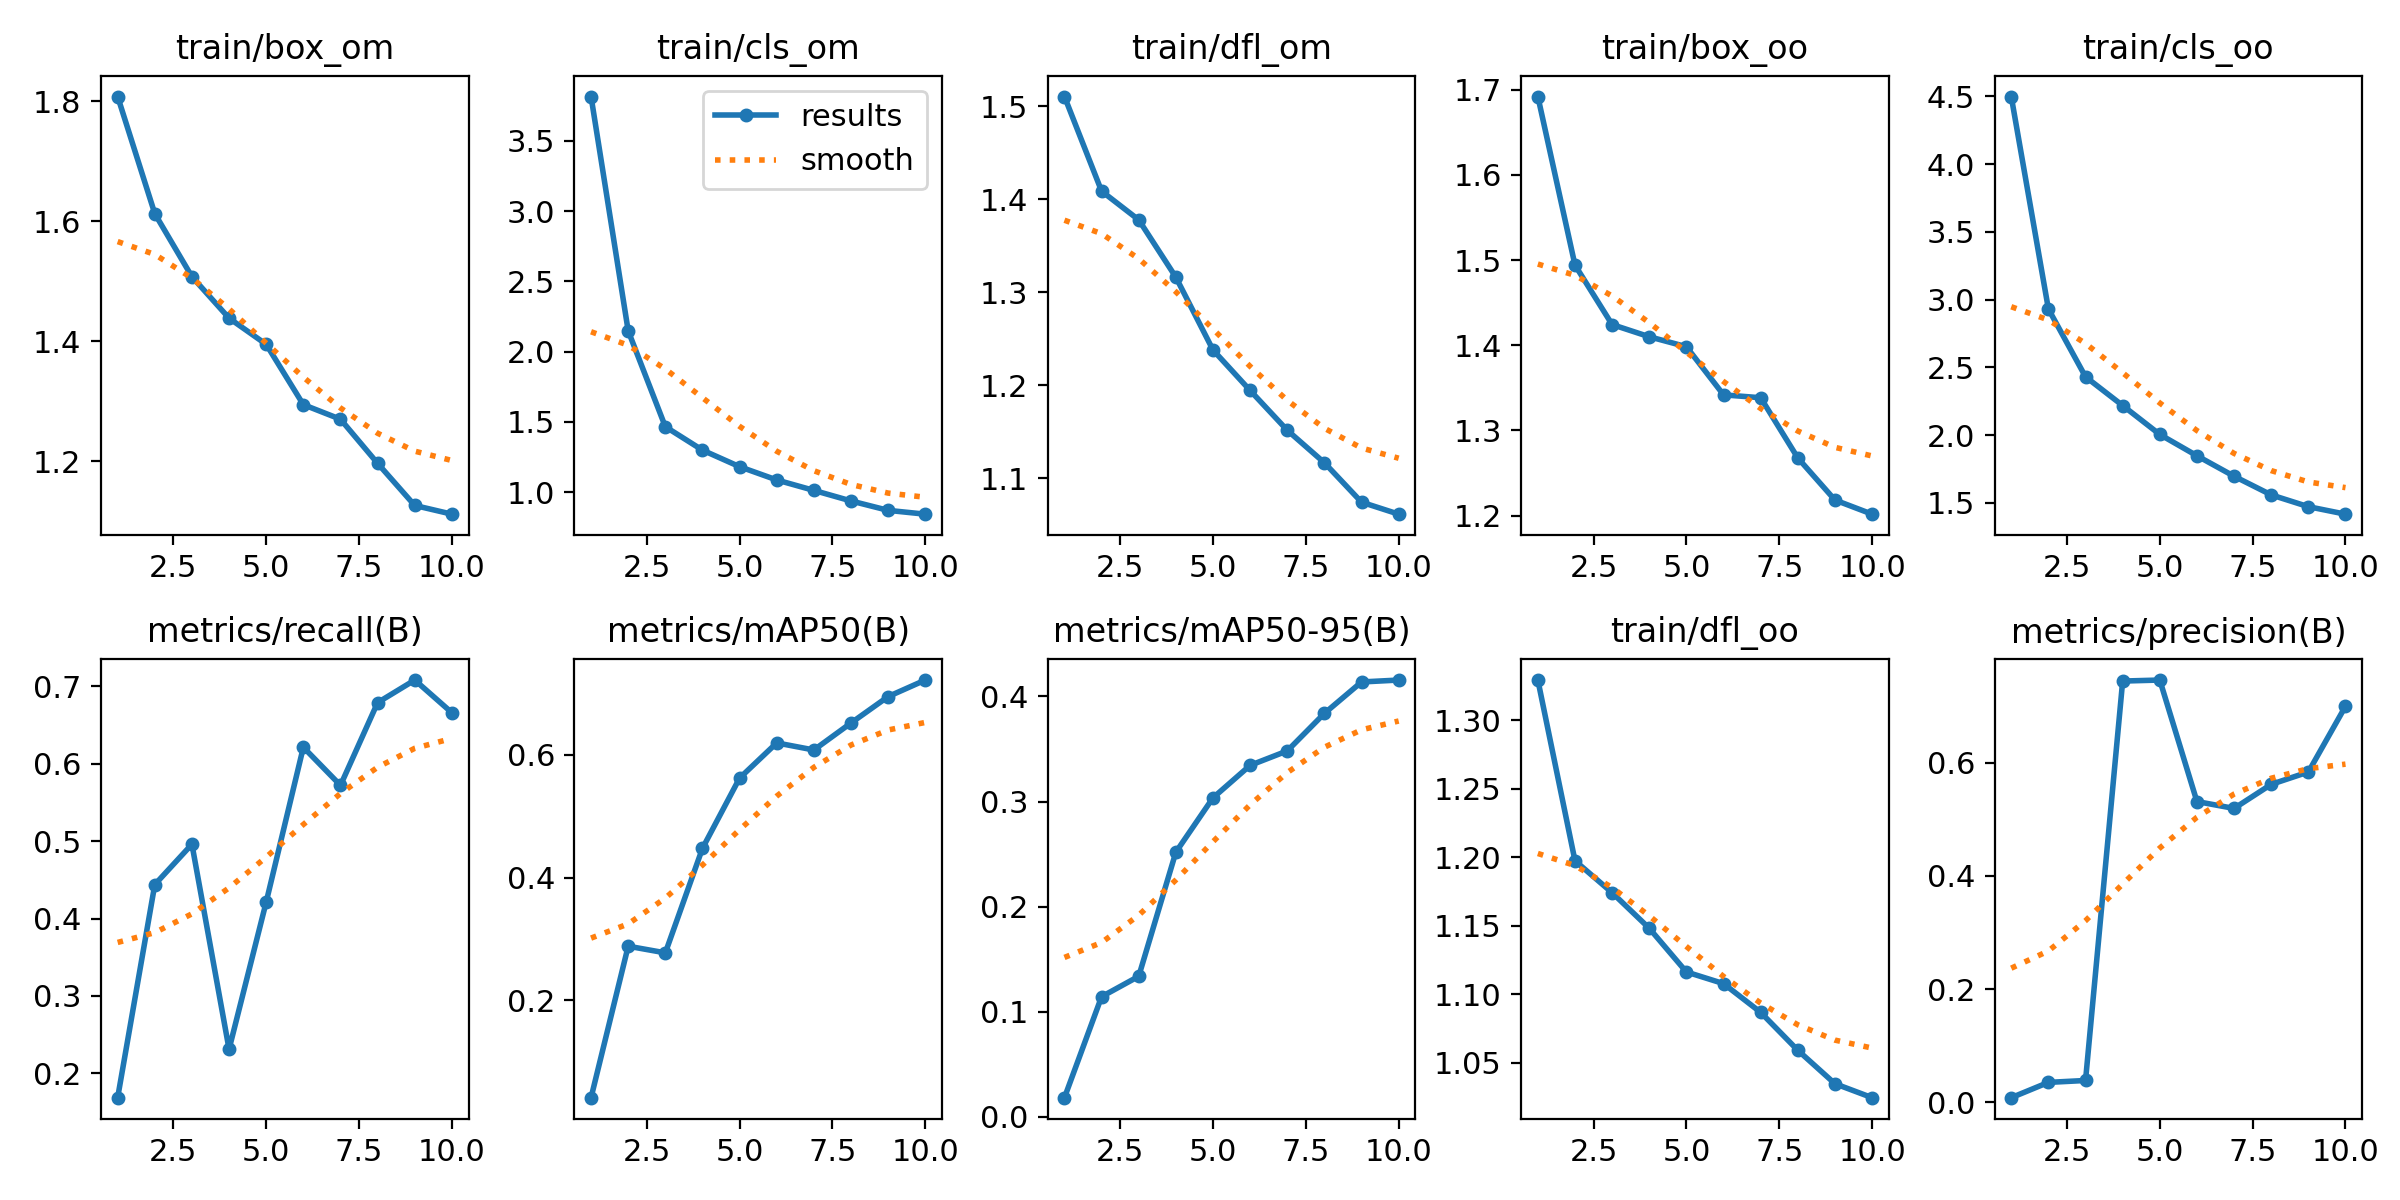
From the training graphs above, it is clear our model was continuing to reduce loss. 25 epochs was too soon to stop the training job, for the model did not have enough opportunity to converge. Thus, we recommend training for 100 epochs for optimal performance.
Here is an example of our model running on an image:
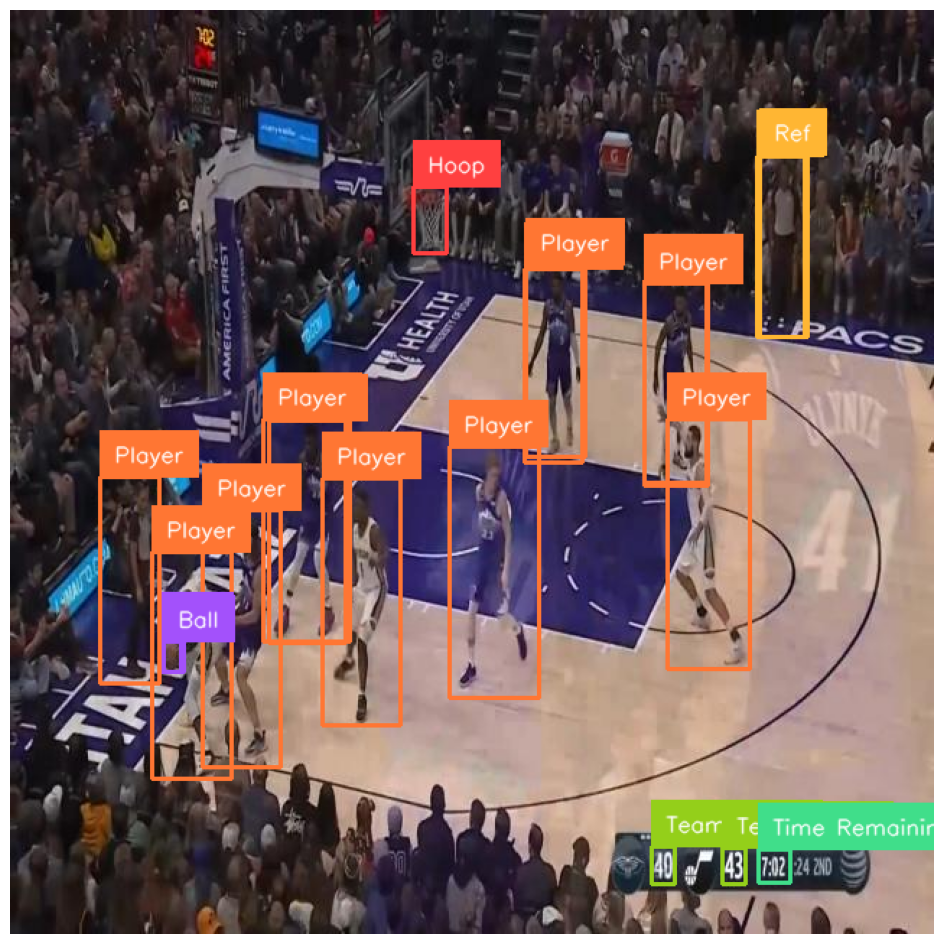
We have successfully trained a YOLOv10 model to identify basketball players.
Conclusion
YOLOv10 is a new real-time object detection model developed by researchers from Tsinghua University. YOLOv10 performs better in terms of speed and accuracy when compared with other YOLO models available such as YOLOv9 and YOLOv8.
In this guide, we walked through how to train a YOLOv10 model. We installed the model from source, downloaded a dataset for use in training our model, then trained the model. We then evaluated our model using the confusion matrix and training graph charts.
To learn more about YOLOv10, we recommend reading the full YOLOv10 paper.
Cite this Post
Use the following entry to cite this post in your research:
James Gallagher, Piotr Skalski. (May 24, 2024). How to Train a YOLOv10 Model on a Custom Dataset. Roboflow Blog: https://blog.roboflow.com/yolov10-how-to-train/