
YOLOv10, released by a team of researchers at Tsinghua University in May 2024, is a state-of-the-art computer vision model for object detection. When compared to previous YOLO models, YOLOv10 achieves both higher accuracy and lower latency, making it an ideal choice for applications in environments where you need a fast object detection model.
The new C4 instances on Google Cloud Platform, powered by Intel's Emerald Rapids system, are more efficient than and offer the best total cost of ownership compared to last generation C3 virtual machines.
You can train and deploy YOLOv10 models on the Intel Emerald Rapids CPU.
In this guide, we are going to walk through how to train and deploy a YOLOv10 model using an Emerald Rapids CPU deployed on Google Cloud Platform. We will deploy the YOLOv10 model using Roboflow Inference, a developer-friendly computer vision inference engine optimized for achieving high performance for commercial applications.
Without further ado, let’s get started!
Step #1: Annotate an object detection dataset
In this guide, we are going to train a model that detects shipping containers. To train this model, we need an annotated dataset of shipping containers. You can use Roboflow Annotate to label data for use in computer vision projects.
To get started, create a free Roboflow account. Then, navigate to your Roboflow dashboard and click “Create Project”:
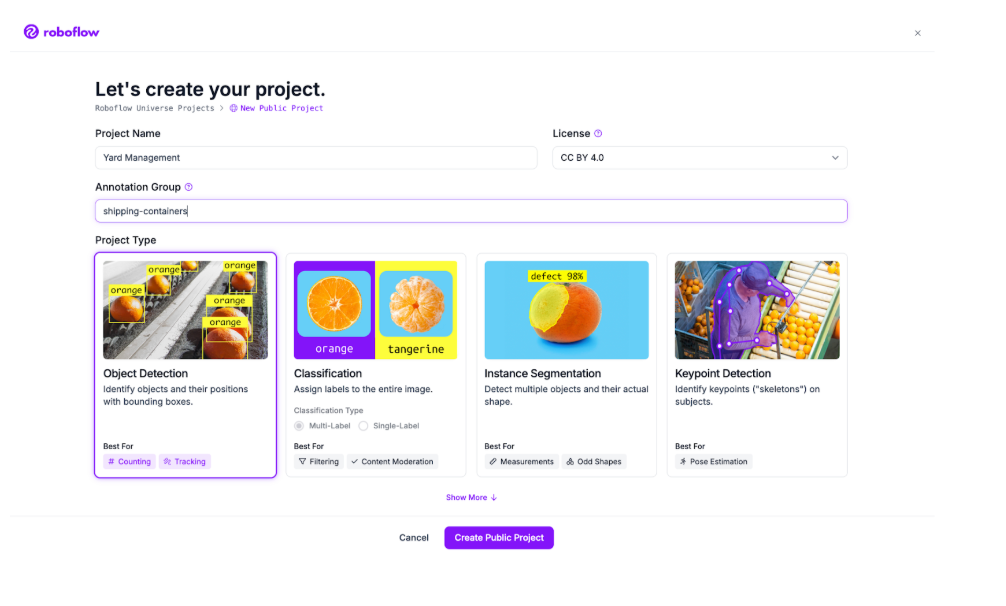
On this page, set a name for your project. Choose “Object Detection” as your project type.
Click “Create Project” to create your project.
Once you have created your project, you will be taken to a page where you can upload your data to Roboflow. You can upload either raw images or images with annotations. For this guide, we will upload raw images.
Drag and drop your images into the upload data panel on Roboflow:
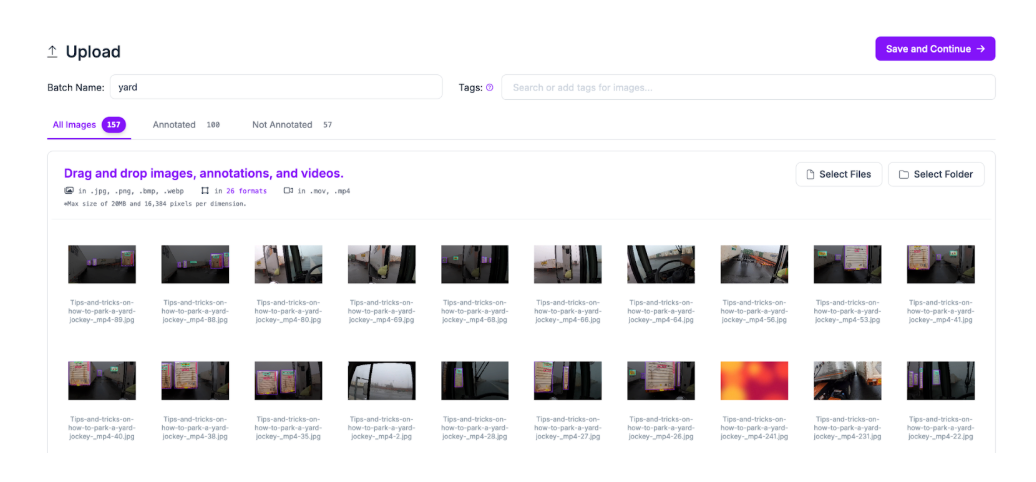
Once you have dragged your images onto the page, click “Save and Continue”. Your images will then be uploaded to Roboflow.
You can now label your images with Roboflow. To do so, navigate to the Annotate page from the sidebar and choose an image you want to label. You will be taken to the Roboflow Annotate interface in which you can label your data.
Roboflow Annotate offers an extensive range of features to assist in image annotation, including:
- Bounding box and polygon annotation tools;
- SAM-2-powered Smart Polygon, which lets you label objects with a single click;
- Commenting, ideal for collaborative annotation jobs;
- Annotation history, so you can see how annotations change over time, and more.
Here is an example showing the SAM-2 feature being used to annotate a shipping container in our dataset:
Once you have labeled your dataset, you are ready to generate a dataset version.
Step #2: Generate a Dataset Version
A dataset version is a version of a dataset that is frozen in time. You can apply preprocessing steps and augmentations to individual dataset versions. This allows you to experiment with different configurations as all steps are applied only to the version, not the raw dataset.
To generate a dataset version, click “Generate” in the left sidebar. You will be taken to the Roboflow dataset generation page.
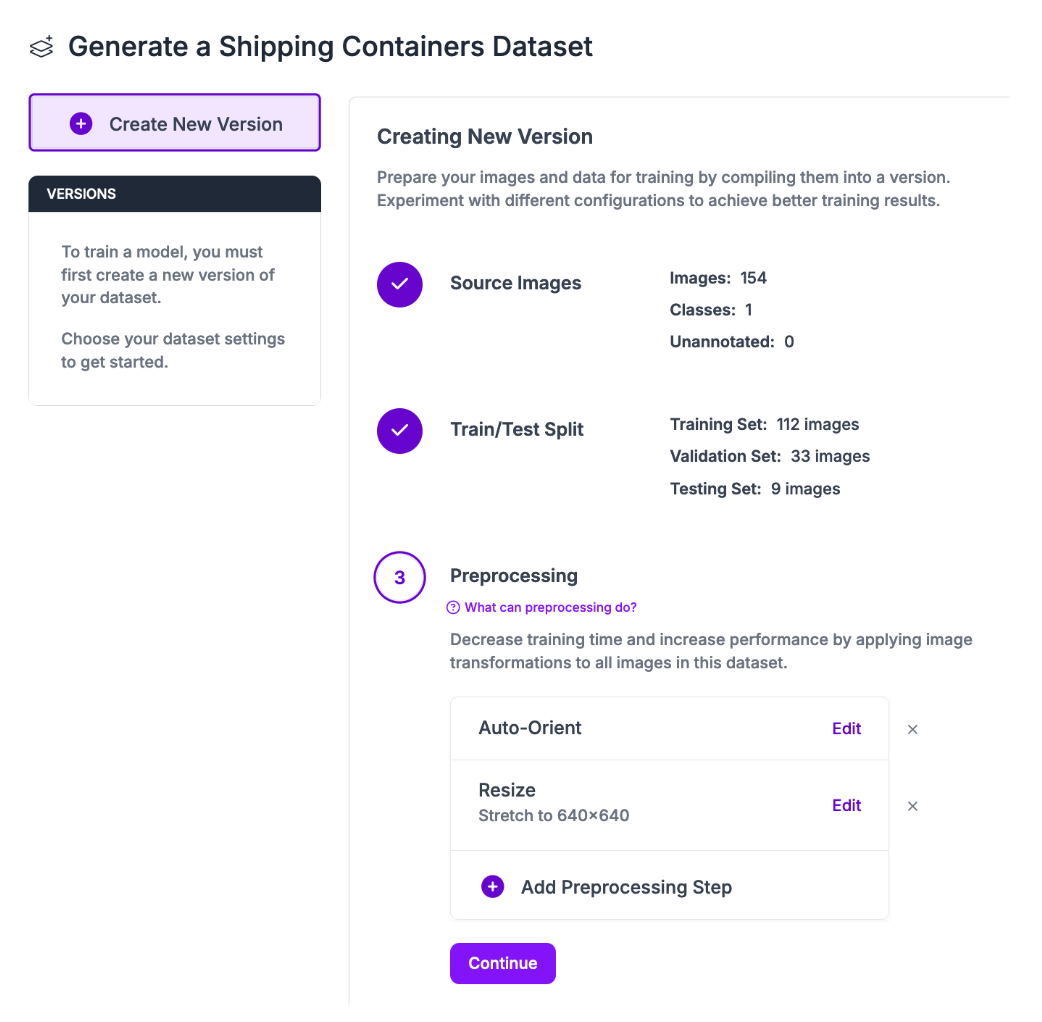
On this page, you can apply preprocessing steps and augmentations. For your first model version, we recommend leaving the preprocessing steps as the default and applying no augmentations. This will allow you to calculate baseline performance with your dataset.
Then, you can incrementally apply augmentations that may improve your dataset performance. To learn more about augmentations and preprocessing steps and how to apply them effectively, refer to our image preprocessing and augmentation guide.
Once you have configured your dataset version, click “Create” at the bottom of the page.
It may take a few moments for your dataset to be generated.
Step #3: Export the dataset
With a dataset generated, we can export it for use in training a YOLOv10 model on an Intel Emerald Rapids system. To export your dataset, click “Export Dataset”:
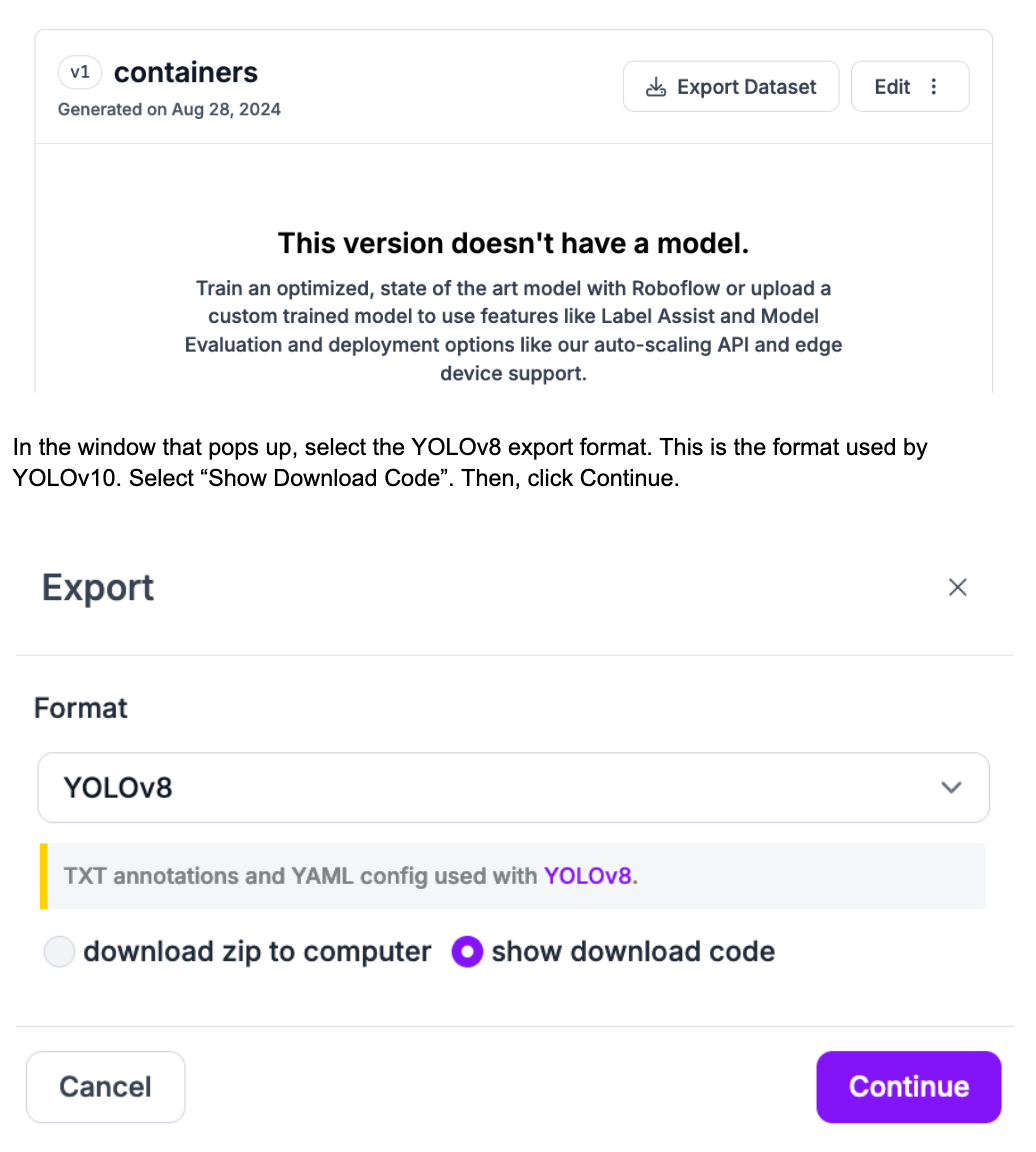
In the window that pops up, select the YOLOv8 export format. This is the format used by YOLOv10. Select “Show Download Code”. Then, click Continue.
A code snippet will appear which you can use to download your dataset onto an Intel Emerald Rapids system.
Step #4: Provision a server using Intel Emerald Rapids
To get started, we need to provision a server with an Intel Emerald Rapids CPU.
Open Google Cloud Platform and navigate to Compute Engine. Then, click “Create Instance” to provision a new instance.
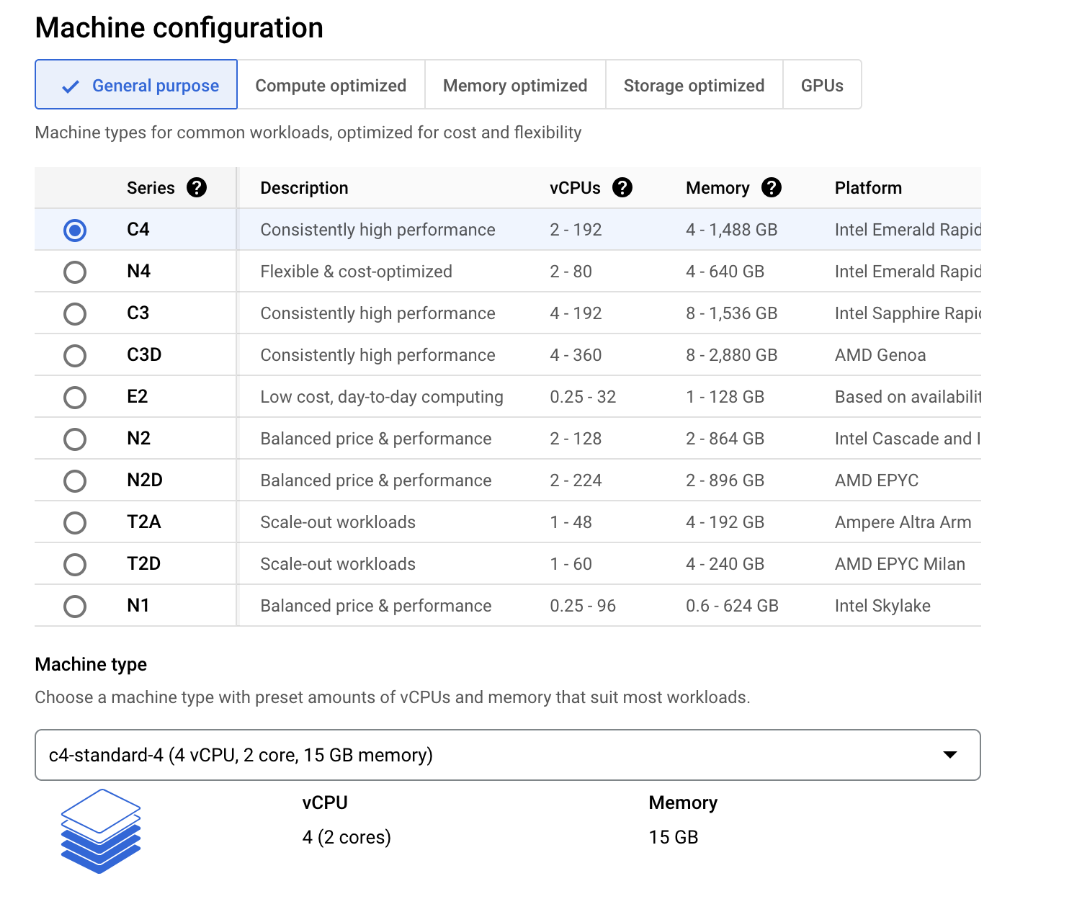
You will be taken to a page where you can set up your new machine. On this page, select the C4 server type. This server uses Emerald Rapids.
There are a wide range of server configurations available that offer different amounts of vCPUs and memory capacity. For this blog post, we will provision a C4 instance with 4 vCPUs and 14 GB of memory.
Machine learning projects tend to take up a lot of space on disk, so we recommend configuring your system with at least 100 GB of disk space.
Once you have configured your instance, click “Create” to create your server.
It may take a few minutes for your server to be available. When the server is available, navigate to the instance from your Compute Engine instances list and choose your preferred method of SSH. Then, in a new terminal, SSH into your server.
Step #5: Set up the server and download the dataset
With a new server set up, we need to do some configuration.
In a terminal session, run the following commands:
sudo apt install python3.11-venv
python3 -m venv venv
source venv/bin/activate
curl -sSL https://bootstrap.pypa.io/get-pip.py -o get-pip.py
python3 get-pip.py
pip3 install roboflow inference
sudo apt-get install ffmpeg libsm6 libxext6 git-all -y
These commands will install Python 3.11 virtual environment support, set up a virtual environment, install pip, and then install the Roboflow and Roboflow Inference Python packages. We also install ffmpeg and other dependencies we will need to train our model and run inference.
Next, we need to download our dataset. Create a new Python file and copy the export dataset code that you retrieved from the Roboflow dashboard. The code should look like this:
from roboflow import Roboflow

rf = Roboflow(api_key="")
project = rf.workspace("roboflow-universe-projects").project("shipping-containers-vhers")
version = project.version(1)
dataset = version.download("yolov8")
Then, run the code. This will download the dataset to your system.
Move your dataset to a folder called datasets:
mkdir datasets
mv your-dataset datasets/
Step #6: Train a YOLOv10 model
We are going to train our YOLOv10 model using the code released with the YOLOv10 paper.
To install YOLOv10, run the following command:
pip3 install git+https://github.com/THU-MIG/yolov10.gitNext, download the base model weights:
mkdir -p weights
wget -P weights -q https://github.com/THU-MIG/yolov10/releases/download/v1.1/yolov10n.pt
wget -P weights -q https://github.com/THU-MIG/yolov10/releases/download/v1.1/yolov10s.pt
wget -P weights -q https://github.com/THU-MIG/yolov10/releases/download/v1.1/yolov10m.pt
wget -P weights -q https://github.com/THU-MIG/yolov10/releases/download/v1.1/yolov10b.pt
wget -P weights -q https://github.com/THU-MIG/yolov10/releases/download/v1.1/yolov10x.pt
wget -P weights -q https://github.com/THU-MIG/yolov10/releases/download/v1.1/yolov10l.pt
Then, run the following code to train your model:
yolo task=detect mode=train epochs=10 batch=32 plots=True \
model=weights/yolov10n.pt \
data={dataset.location}/data.yaml
Above, replace dataset.location with the path of your dataset. Replace yolov10n.pt with the model type you want to train. For example, if you want to train a YOLOv10l model, replace yolov10n.pt with yolov10l.pt.
When you run the command above, your model will start training.

Step #7: Upload the model to Roboflow
Once your model has trained, you can deploy it with Roboflow Inference, an open source computer vision Inference server. Inference is trusted by enterprises around the world to run computer vision applications at scale. Inference is also used to power the Roboflow API, which itself processes millions of inferences a month.
To use a model with Inference, you need to upload the model weights to Roboflow. Create a new Python file and add the following code:
from roboflow import Roboflow
rf = Roboflow(api_key="")
project = rf.workspace("roboflow-universe-projects").project("shipping-containers-vhers")
version = project.version(1)

version.deploy("yolov10", "runs/detect/train/weights/", "best.pt")
Above, set:
- Your Roboflow API key.
- Your workspace, project ID, and version. These values were all set in the export data code snippet.
Run the script above to upload your model weights back to Roboflow.
Step #8: Deploy the model on-device with Inference
With your model weights on Roboflow, you can now deploy them with Inference on your Intel Emerald Rapids system.
Create a new Python file and add the following code:
import inference
model = inference.get_model("model-id/version")
results = model.infer(image="YOUR_IMAGE.jpg")
print(results)
Above, replace model-id/version with your Roboflow model ID and version. Replace YOUR_IMAGE.jpg with the name of the image on which you want to run your model.
Then, set your Roboflow API key in an environment variable called ROBOFLOW_API_KEY:
export ROBOFLOW_API_KEY="API_KEY"Then, run the script.
With Inference, you can run models on images, video files, and RSTP live streams. To learn more about running inference on video files and RTSP streams, refer to the “Predict on a Video, Webcam or RTSP Stream” documentation.
You will see results from the image like so:
[ObjectDetectionInferenceResponse(visualization=None, inference_id=None, frame_id=None, time=None, image=InferenceResponseImage(width=640, height=640), predictions=[ObjectDetectionPrediction(x=346.0, y=339.0, width=252.0, height=528.0, confidence=0.9941400289535522, class_name='container', class_confidence=None, class_id=0, tracker_id=None, detection_id='a805a8b5-526d-41c6-9916-efa029add247', parent_id=None), ObjectDetectionPrediction(x=547.5, y=319.0, width=183.0, height=634.0, confidence=0.8101404905319214, class_name='container', class_confidence=None, class_id=0, tracker_id=None, detection_id='3d2c6dcd-db6d-482b-a560-a0f202e87a8c', parent_id=None), ObjectDetectionPrediction(x=112.0, y=337.5, width=224.0, height=567.0, confidence=0.7658897042274475, class_name='container', class_confidence=None, class_id=0, tracker_id=None, detection_id='714fc575-ac64-4337-a914-4170a1e2b2c7', parent_id=None)])][add output]This object can be processed with Roboflow supervision, a Python package with utilities for processing computer vision predictions.
You can turn the above response into a structured supervision object like this:
import supervision as sv
results = sv.Detections.from_inference(results[0])
print(results)
The code above returns an object like this:
Detections(xyxy=array([[        220,          75,         472,         603],
       [        456,           2,         639,         636],
       [          0,          54,         224,         621]]), mask=None, confidence=array([    0.99414,     0.81014,     0.76589]), class_id=array([0, 0, 0]), tracker_id=None, data={'class_name': array(['container', 'container', 'container'], dtype='<U9')})
You can then process these predictions with a wide range of supervision functions, including:
- Annotate predictions
- Calculate evaluation metrics
- Implement object tracking
- Smooth detections between video frames
- And more.
How to Benchmark Model Performance
You can benchmark the performance of Inference on your device using the inference benchmark command. This command runs a specified model on images in a folder or your Roboflow dataset. Model latency and FPS is computed and returned in a table.
To use the Inference benchmark utilities, first install the Inference CLI:
pip3 install inference-cliThen, set your API key in an environment variable:
export ROBOFLOW_API_KEY=""Then, run the following command:
inference benchmark python-package-speed \
  -m {your_model_id} \
  -d {pre-configured dataset name or path to directory with images} \
  -o {output_directory}
Above, set your Roboflow model ID, the path of the directory with images you want to use, and the directory where you want to save inference results.
When you run the command, benchmark tests will start to run. Performance results will be printed in a table:
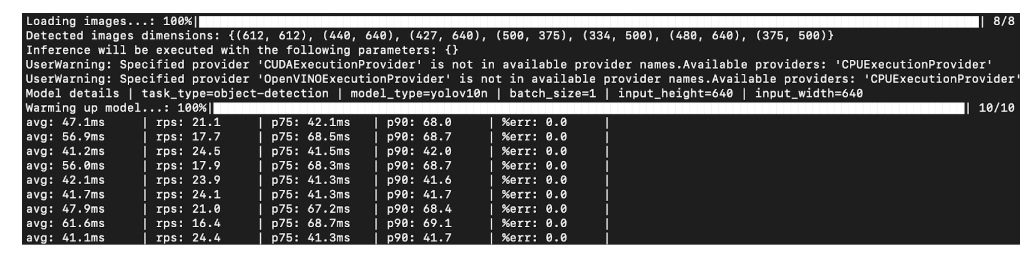
Inference Benchmark Results
We have benchmarked inference performance of YOLOv10 models on three systems:
- Intel Emerald Rapids (CPU)
- Intel Sapphire Rapids (CPU)
- AMD Genoa (CPU)
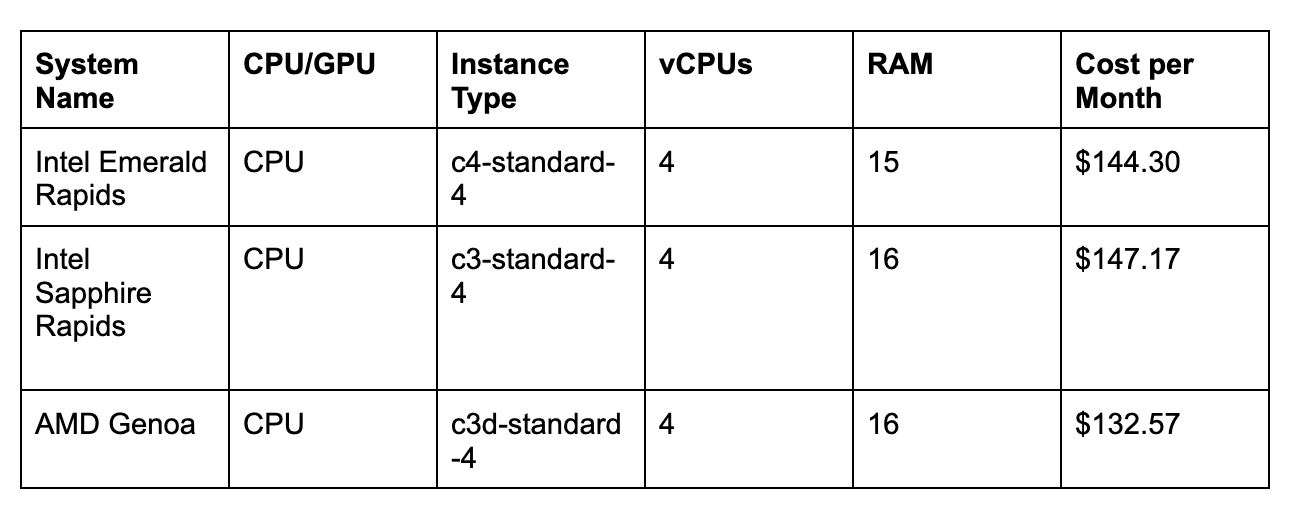
We chose the following system types in GCP:
Here are the results from our Inference benchmarks:
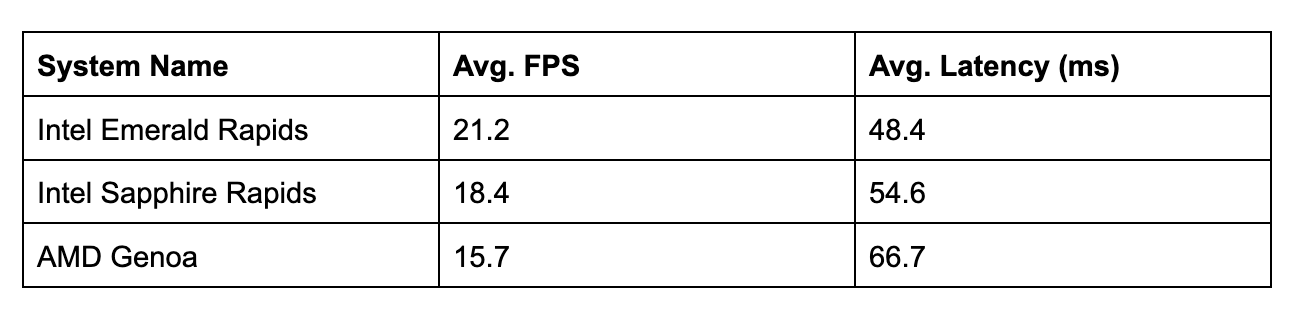
The Intel Emerald Rapids system (C4) achieves noticeably higher FPS and lower latency than Intel Sapphire Rapids and the AMD Genoa system. The Intel Emerald Rapids system is cheaper than the Intel Sapphire Rapids system.
The Intel Emerald Rapids instance is 8.8% more expensive than the AMD Genoa (C3d) virtual machine we tested. With that said, since the Emerald Rapids system is ~27% faster, the performance per dollar is best on C4 virtual machines.
Where your use case needs high FPS, you can attain strong performance from an Intel Emerald Rapids machine for computer vision workloads without upgrading to a GPU.
Conclusion
In this guide, we walked through how to train and deploy YOLOv10 models on Intel Emerald Rapids systems. We used Roboflow to annotate a dataset, applied preprocessing steps, then exported the dataset for use in training a model on an Intel Emerald Rapids system.
We provisioned a C4 (Intel Emerald Rapids) instance on GCP, set up the system, then trained our model. We uploaded the model back to Roboflow and downloaded it for use with Roboflow Inference. We then used the inference benchmark command to evaluate performance of the model.
To learn more about Roboflow Inference and deploying models on your own hardware, refer to the Roboflow Inference documentation.
Cite this Post
Use the following entry to cite this post in your research:
James Gallagher. (Sep 3, 2024). How to Train and Deploy YOLOv10 with Intel Emerald Rapids. Roboflow Blog: https://blog.roboflow.com/yolov10-intel-emerald-rapids/