
Dataset labeling is often the slowest and most grueling part of any computer vision project. If you are building a system to differentiate between cars, trucks, buses, and motorcycles, you typically have to manually draw thousands of bounding boxes.
However, recent progress in Vision-Language Models (VLMs) allows us to automate this. By using a VLM as an auto-labeler within Roboflow Workflows, you can turn a week-long labeling task into a process that takes minutes. Roboflow acts as the bridge, taking the high-level reasoning of a VLM and converting it into structured data to train a fast, production-ready RF-DETR model.
What is a Vision-Language Model (VLM)?
A Vision-Language Model is a type of AI that understands both images and text simultaneously. Traditional models are usually trained on a fixed set of labels. In contrast, a VLM is trained on billions of examples of images paired with descriptive text.
Because of this broad training, a VLM can "understand" concepts rather than just matching patterns. It doesn't just see a collection of pixels; it understands what a "school bus" or a "freight truck" looks like because it has learned the relationship between those words and their visual features.
What is Zero-Shot Object Detection?
Zero-shot object detection is the ability of a model to find and identify objects it was never explicitly trained to see in your specific dataset.
In a standard workflow, you would have to show a model thousands of pictures of motorcycles before it could find one. In a zero-shot workflow, you simply give the model a text prompt like "motorcycle." The model uses its general knowledge to locate the object. It is "zero-shot" because it requires zero new training examples from you to start working.
Why Use VLMs for Auto-Labeling?
Using VLMs for auto-labeling is helpful because it solves the "cold start" problem. When you start a new project, you have zero labeled images.
VLMs are great as auto-labelers because:
- They have "common sense": They already know what common vehicles look like.
- They are flexible: You can change your labels on the fly by just changing your text prompt.
- They save time: They can do the "first pass" of labeling for you, so you only have to review and correct boxes instead of drawing them from scratch.
While VLMs are smart, they are often too slow and expensive to run on a camera in real-time. This is why we use them to label data for smaller, faster models.

Meet Florence-2
Florence-2 is a powerful, open-source VLM from Microsoft that is designed for a variety of vision tasks. It is particularly effective at object detection because it can take a list of class names and return the exact coordinates for where those objects appear in an image.
Because Florence-2 is relatively small for a VLM, it runs quickly enough to be used as a high-volume labeler within the Roboflow ecosystem.
The Strategy: How We Bridge the Gap
Knowing that Florence-2 is powerful is one thing, but to actually use it as an auto-labeler, we need a pipeline. Our goal is to take a massive amount of unlabeled images and turn them into a "Gold Standard" dataset for training a faster model like RF-DETR.
The process we are about to follow has three main phases:
- The Brain (Workflow Construction): We will build a logic chain in Roboflow Workflows that tells Florence-2 exactly what to look for and how to format its "thoughts."
- The Engine (Batch Processing): We will run this workflow across your entire dataset at once, generating a mountain of raw VLM metadata.
- The Bridge (Data Conversion): We will use a custom script to translate that metadata into a standard COCO format, allowing us to re-import the labels into Roboflow for training.

By following this sequence, you are building an automated factory for computer vision data. This article will go through this process by creating an auto-labeler that detects “humans” as a simple example. Let’s start by setting up the environment where this process will run.
Building a Labeling Workflow in Roboflow
For more detailed technical specifications and advanced configurations, you can refer to the original Florence-2 Workflows guide.
Setting Up Your Compute Environment
Before you can start auto-labeling, you need to decide where the "heavy lifting" happens. Because Vision-Language Models like Florence-2 are computationally intensive, they require a GPU to run efficiently.
Roboflow offers several ways to deploy your Workflows depending on your needs:
- Serverless Hosted API: The easiest way to get started with no infrastructure management, billed per API call.
- Dedicated Deployments: Provisioned cloud GPUs (like NVIDIA T4s) that give you consistent performance for large foundation models without needing local hardware.
- Self-Hosted (Local/Edge): Running the Workflow on your own machine or edge devices like an NVIDIA Jetson.
For this tutorial, we will be using the local method. Running your workflow on your local machine is ideal because it supports real-time video, CUDA GPUs, all workflow blocks, and the ability to run custom code directly on your hardware.
The Local Inference Server
Roboflow's open-source inference package includes an easy-to-use executable inference app that makes starting a server on your local device simple. By using Docker, the application creates a "container" that holds all the complex AI dependencies, like PyTorch and CUDA drivers, so you don't have to manage them manually.
1. Install Docker: To run the model locally, you must have Docker installed. If you are using an NVIDIA GPU, ensure you also have the NVIDIA Container Toolkit installed so that the Docker container can access your hardware's acceleration. Refer to the official Docker installation instructions to learn how to set up Docker.
2. Launching the Server: Once Docker is ready, you can launch your local labeling engine with two simple commands in your terminal:
- Install the CLI: pip install inference-cli
- Start the Server: inference server start
This command automatically pulls the correct Docker image for your architecture and starts a local web service. This container runs a microservice that the Roboflow web editor can talk to directly.
If any of those commands fail, you can run the following command:
docker run -it --rm -p 9001:9001 roboflow/roboflow-inference-server-cpu:latest
This command maps port 9001 so the Roboflow editor can reach your local CPU. Use the --rm flag for initial testing to keep your environment clean, but switch to -d (detached mode) for production. This allows the inference server to run silently in the background after you close your terminal.
Building an Auto-Labeling Workflow in Roboflow
Let’s start with the primary steps to set up your workspace and information with Roboflow. For your reference, the workflow created in this article is provided here.
Ensure you have a workspace set up for your automotive projects. Navigate to Roboflow and sign in. If you don’t have an account, sign up for free.

Initialize the Workflow
Start by setting up the logic environment within Roboflow Workflows.
- Navigate to the Workflows tab on the left sidebar.

- Click "Create Workflow" and select "Build Your Own" to begin with a clean canvas.

Connecting Compute to the Workflows Editor
Once your local server is live, you need to tell the Roboflow Workflows editor to route the images to your machine for processing:
- Click the button in the top left corner under the workflow name:

- Then select "Local Device" once there, and connect your workflow to your computer.

By selecting Localhost, all visual processing and VLM reasoning happen on your own hardware, but you still get the intuitive interface of the web editor. This allows you to experiment interactively without having to write deployment code from scratch.
With your local compute connected, you can now build the logic chain that automates the labeling process.
Step 1: Initialize the Florence-2 Model Block
Add the Florence-2 Model block to your workflow canvas. This block serves as the "brain" of the operation. In the configuration settings:

- Task Selection: Set this to Object Detection.
- Prompting: Provide the list of classes you are targeting (e.g., "human"). Since Florence-2 is a VLM, it understands these words semantically. For this simple tutorial, we’ll ask it to identify a human.
Step 2: The "VLM as Detector" Block
Raw output from a VLM is often just text or unformatted coordinates. The VLM as Detector block is the most important part of the bridge. It parses the output from Florence-2 and converts it into a standard detection format. This ensures the "reasoning" from the VLM is translated into structured data that Roboflow can save as an annotation. For this, firstly, add the VLM as a Detector block into the workflow and connect it to the previous block. Select all inputs and ensure that the model is selected for Florence-2. Lastly, ensure that the task-type is set to object detection so that the model can detect the objects from the classes that you prompted.

Step 3: Visualizing and Outputting Results
To verify the workflow is performing correctly, use the Bounding Box Visualization and Label Visualization blocks. This overlays the VLM’s predictions onto your images in the Workflow preview.
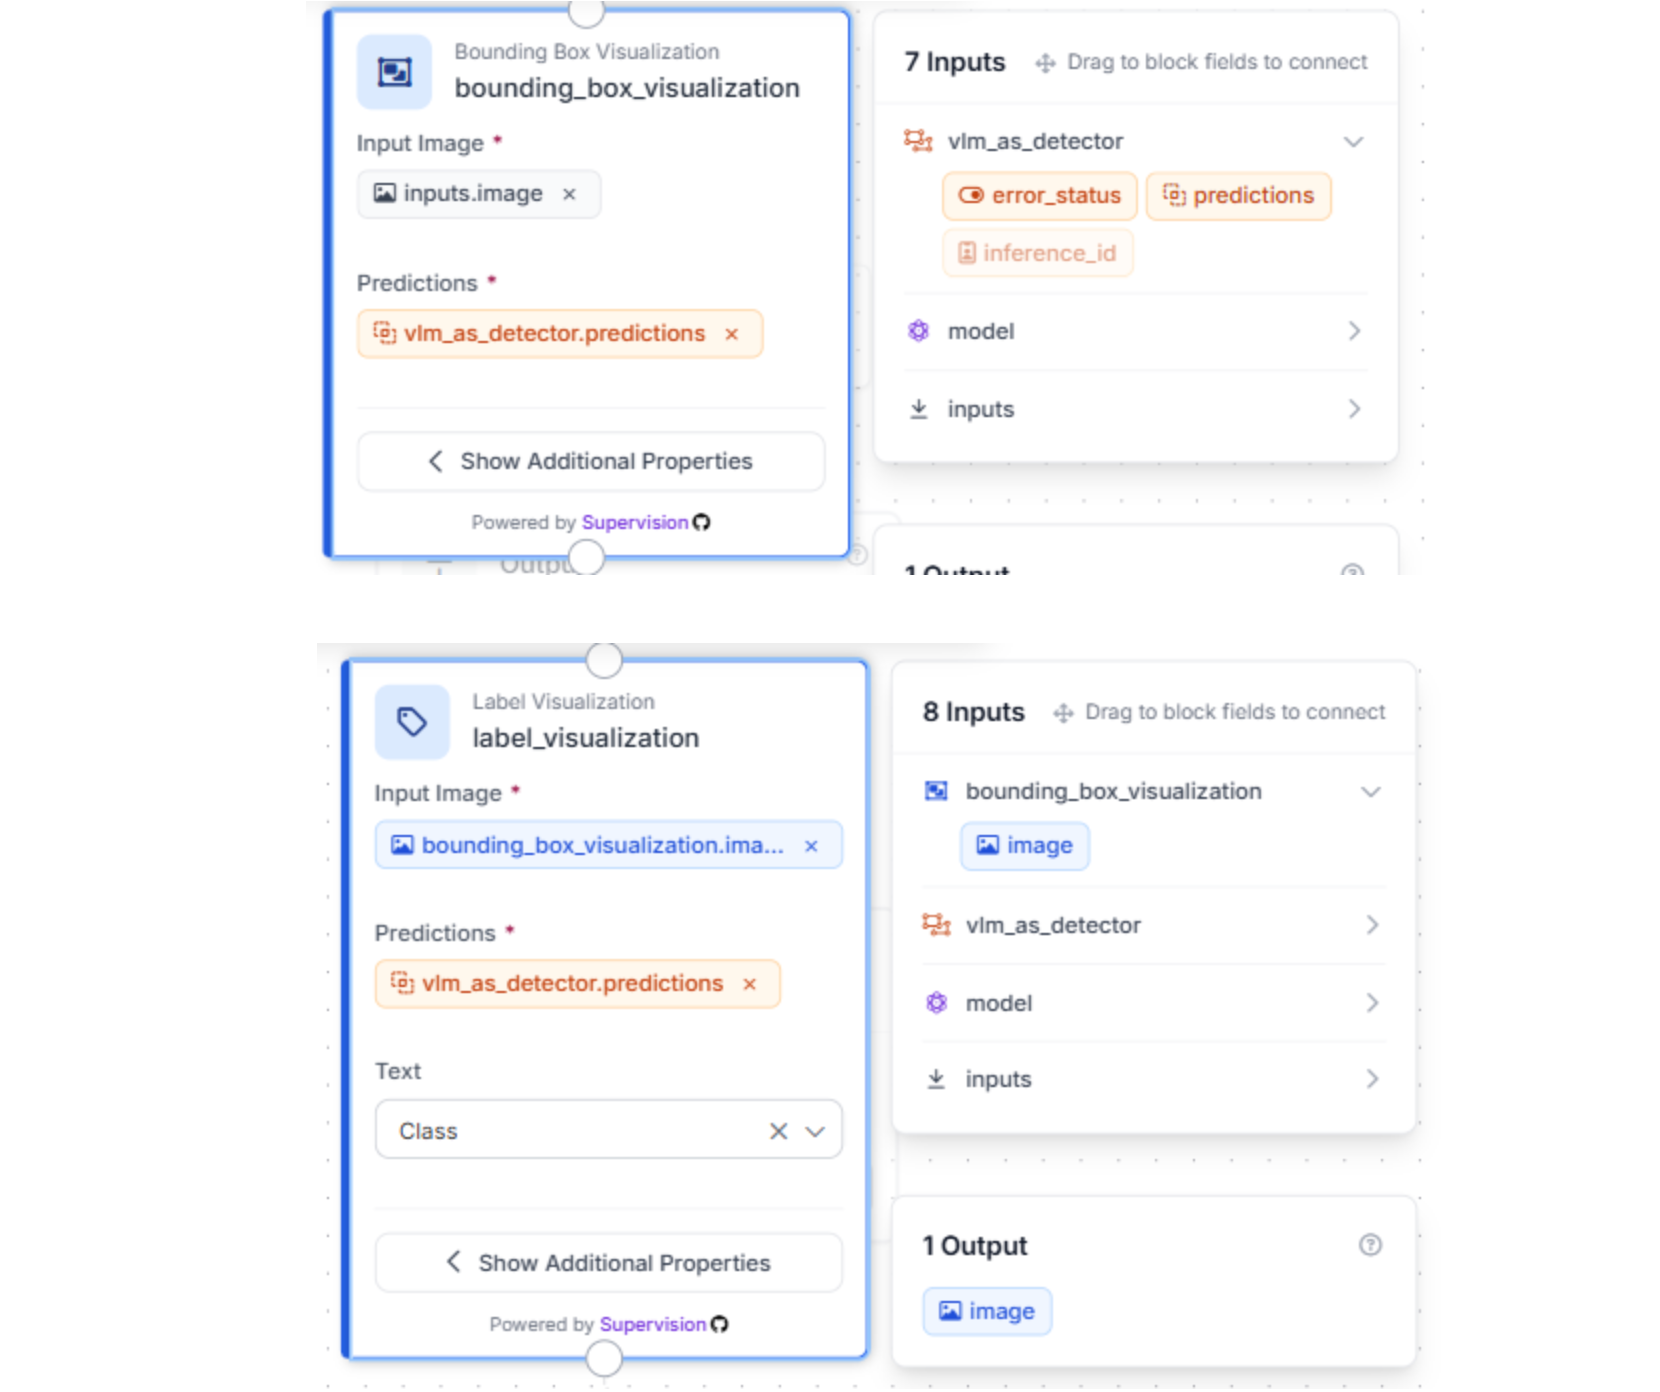
Step 4: Configure your Outputs
To ensure the conversion script can eventually turn the VLM's reasoning into usable labels, the workflow must export specific data fields.
Configure your output settings to include both the predictions from the VLM as Detector block and the raw output from the Florence-2 Model block. These fields provide the essential coordinates and stringified JSON that the Python script will later parse into the final COCO format.
Why these specific outputs?
- VLM Detector Predictions: This provides the structured bounding box data.
- Florence-2 Raw Output: This includes the image dimensions and class labels required to accurately map the boxes to your original images.

A Note on Naming: By default, Roboflow assigns IDs like “output_6” or “output_9” to these blocks. The Python script provided later in this guide relies on these specific keys to find the image dimensions and bounding box coordinates.
- If you rename your blocks: You must update the corresponding keys in the main.py script (e.g., changing “data["output_6"]” to “data["your_custom_name"]”).
Step 5: Test your workflow
Test with a sample image and check if your workflow works according to plan:
Scaling with Batch Processing
Once your workflow is finalized, you can scale your labeling efforts across your entire dataset using Batch Processing. This allows you to automate the reasoning process of Florence-2 across thousands of images simultaneously.
If you prefer a video walkthrough, the following clip goes through the process:
- Initiate the Batch Job: Navigate to the Deploy button in the top right corner of your workflow. From the dropdown menu, select Batch Processing and click on Create in-app batch job.

- Next, click “Batch processing” and choose “Create In-App batch Job”

- Choose the “Upload Images” tab and select the specific files you want Florence-2 to analyze. This is where the VLM begins to "see" your custom data for the first time.
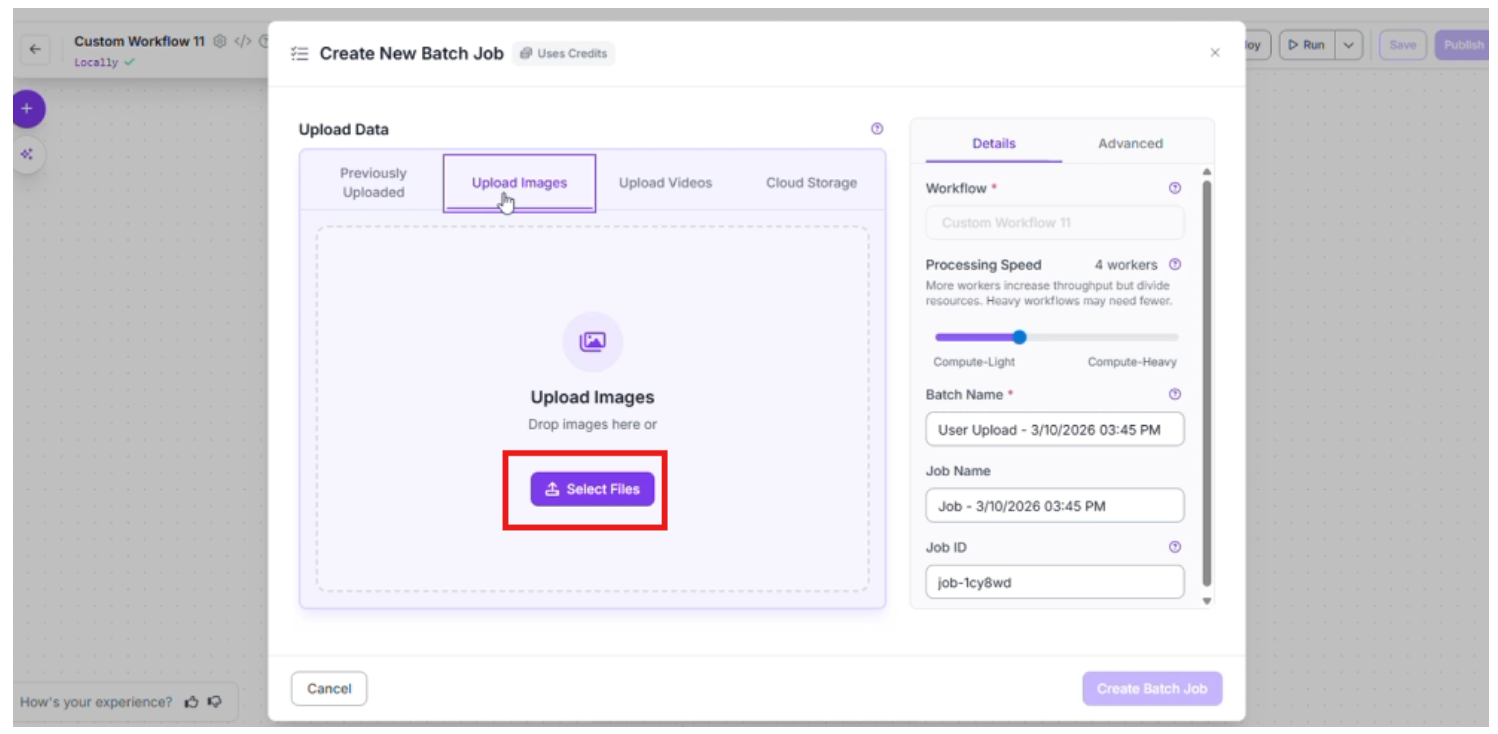
- Configure Processing Parameters
To optimize the speed and reliability of your job, you can adjust the following settings:
- Processing Speed: Select the number of workers for parallel processing. For example, using 4 workers significantly speeds up the labeling of large folders.
- Timeout: Set a maximum time limit for the process to save your laptop’s resources if the workflow is stuck for any reason
- Visualizations: Enable the Save Visualizations toggle. This is a crucial step for the "human-in-the-loop" phase, as it allows you to quickly verify that the VLM's bounding boxes are accurate before you proceed to training.
Once these configurations are set, start the batch job to begin generating your high-volume metadata.


- Review: Roboflow will process the images in the background (this might take some time). Once finished, you can quickly scan the results to ensure the VLM correctly distinguished between the trucks and buses.
This approach allows you to generate a high-quality dataset of thousands of images in a fraction of the time it would take to do it manually.
Download Batch Results
Next, navigate to the Cloud Deployments tab on your Roboflow homepage.
- Select the Batch Jobs heading to see a list of your running and completed tasks.
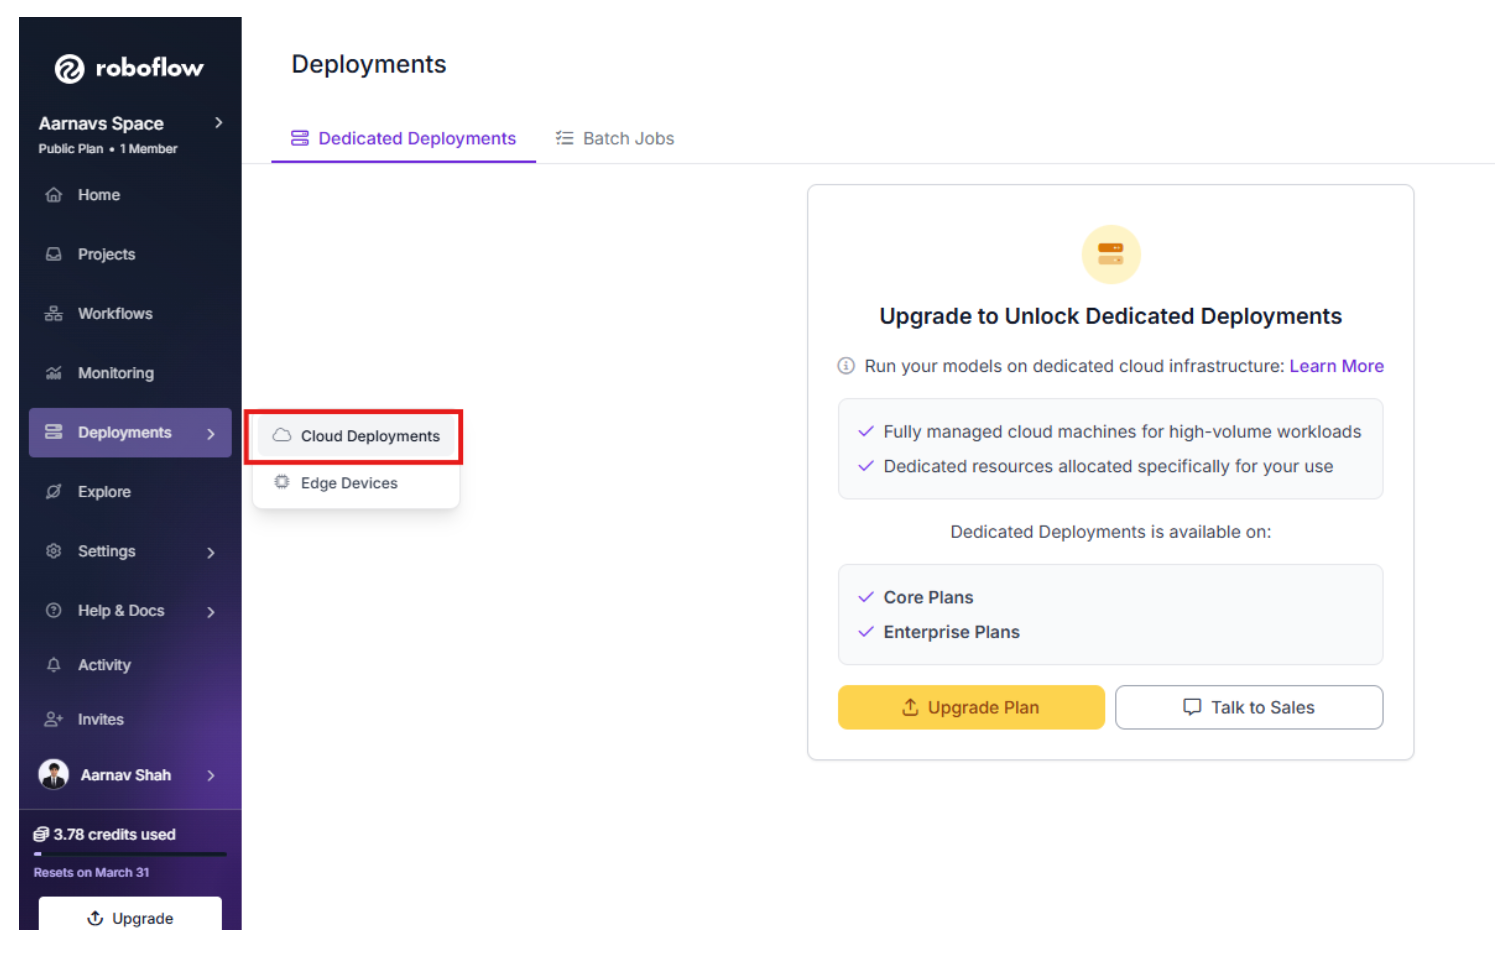
- Once your Florence-2 job is finished (this might take some time), select it and click the Download button.

- In the download options, choose Individual Results. This will download a zipped file containing the raw JSON metadata for every image processed.

- Extract the contents of the ZIP file into a new folder on your computer.
Prepare the Conversion Script
To turn these raw files into an uploadable Roboflow dataset, you need to consolidate them. Create a new folder for your project and move your extracted JSON folder inside it. Then, create a file named main.py and paste the following code:
import os
import json
from pathlib import Path


def convert_to_coco(input_folder, output_folder, filename="annotations.coco.json"):
    # Create the output directory if it doesn't exist
    os.makedirs(output_folder, exist_ok=True)


    # Initialize the COCO structure
    coco_output = {
        "images": [],
        "annotations": [],
        "categories": [
            {"id": 0, "name": "humans", "supercategory": "person"}
        ]
    }


    # Tracking IDs
    image_id = 0
    annotation_id = 0

    # Process every JSON file in the input directory
    for file_path in Path(input_folder).glob("*.json"):
        with open(file_path, 'r') as f:
            data = json.load(f)


        # 1. Extract Image Metadata
        # We derive the image name by replacing the .json extension with .jpg
        image_filename = file_path.stem + ".jpg"
        width = data["output_6"]["image"]["width"]
        height = data["output_6"]["image"]["height"]


        coco_output["images"].append({
            "id": image_id,
            "file_name": image_filename,
            "width": width,
            "height": height
        })


        # 2. Extract and Parse Bounding Boxes
        # output_9 is a stringified JSON, so it needs a second parse
        bbox_data = json.loads(data["output_9"])
        bboxes = bbox_data.get("bboxes", [])
        labels = bbox_data.get("bboxes_labels", [])


        for bbox, label in zip(bboxes, labels):
            if label == "humans":
                # Convert Florence-2 [x1, y1, x2, y2] to COCO [x, y, width, height]
                x1, y1, x2, y2 = bbox
                w = x2 - x1
                h = y2 - y1

                coco_output["annotations"].append({
                    "id": annotation_id,
                    "image_id": image_id,
                    "category_id": 0,  # "humans" mapped to 0
                    "bbox": [float(x1), float(y1), float(w), float(h)],
                    "area": float(w * h),
                    "iscrowd": 0
                })
                annotation_id += 1

        image_id += 1


    # Save the consolidated COCO file
    output_path = os.path.join(output_folder, filename)
    with open(output_path, 'w') as f:
        json.dump(coco_output, f, indent=4)


    print(f"Conversion complete. Found {image_id} images and {annotation_id} annotations.")
    print(f"File saved to: {output_path}")


# Configuration
if __name__ == "__main__":
    # Get the directory where this script is located
    script_dir = Path(__file__).parent

    SOURCE_DIR = script_dir / "YOUR_EXTRACTED_FOLDER_NAME"
    EXPORT_DIR = script_dir / "coco_export"

    convert_to_coco(SOURCE_DIR, EXPORT_DIR)
The script performs three main tasks: initializing a standard dataset structure, parsing the specific nested data from Florence-2, and converting spatial coordinates.
1. Initializing the COCO Structure
The COCO (Common Objects in Context) format is the industry standard for object detection. The script starts by creating a dictionary with three specific lists:
- Categories: Defines what your objects are (e.g., "humans").
- Images: A registry of every image file and its dimensions.
- Annotations: The actual "boxes" are linked to specific images and categories.
2. Navigating the Roboflow Workflow Export
The Florence-2 batch export produces a unique JSON structure. The script targets two specific keys (you might need to change them based on what you called your workflow output):
- data["output_6"]: This contains the image metadata, such as the width and height required for scaling.
- data["output_9"]: This is where the VLM's reasoning lives. Interestingly, Roboflow exports this as a "stringified" JSON, so the script uses json.loads() a second time to unlock the actual bounding box coordinates.
3. Converting Coordinates
Computer vision models use different "languages" for bounding boxes. Florence-2 outputs boxes in the format [x1, y1, x2, y2] (the top-left and bottom-right corners).
The COCO format requires [x, y, width, height]. The script performs the following calculation:
- Width: x2 - x1
- Height: y2 - y1
4. Customizing for Your Project
This is the part where readers need to pay attention to their specific use case. The script is currently hard-coded to look for the class "humans” and for specific outputs like “output_6.”
If you are detecting cars or trucks, you must update the “categories” list at the top, and the “if label == "humans" ”: check inside the loop to match the exact text prompts you gave Florence-2 in your workflow.
This is essential because...
Without this conversion, your VLM reasoning remains trapped in individual text files. By consolidating them into a single annotations.coco.json, you create a "Gold Standard" dataset. This allows you to train an RF-DETR model that is just as "smart" as the VLM but runs significantly faster in production environments.
Finalize the Bridge: Re-upload for Training
Running this script generates an “annotations.coco.json” file in the “coco_export” folder. This file serves as the structured translation of the VLM's reasoning.
To finish the process:
- Create a new Object Detection project in Roboflow.

- Drag and drop your original raw images along with the new “annotations.coco.json” file into the upload window.

- Roboflow will automatically match the JSON coordinates to the images, providing you with a fully labeled dataset.
Note: Since the script isn’t PERFECT, there might be certain unannotated images due to some discrepancies with the Florence-2 model output. In that case, they can still be manually annotated and added to the dataset (this is very rare).
Training RF-DETR for Production
You are now ready to train an RF-DETR model. This final step completes the workflow, moving your project from a massive, slow VLM to a specialized, high-speed model ready for real-world deployment.
RF-DETR is a state-of-the-art transformer model designed for speed and accuracy. While Florence-2 was your labeler, RF-DETR is your specialist. It learns from the labels generated by the VLM and becomes a fast, efficient model that can be deployed to the edge or a mobile device to monitor traffic in real-time.
Learn about how to train and deploy an RF-DETR model in Roboflow by following this tutorial.
Conclusion: Zero-Shot Auto-Labeling with VLMs with Roboflow
By using Roboflow as a bridge, you can:
- Use a VLM to understand your images without manual training.
- Use Workflows and Batch Processing to turn that understanding into labels.
- Use these labels to train a fast RF-DETR model for real-world use.
This workflow eliminates the manual labeling bottleneck and lets you go from raw images to a working model faster than ever before.
Ready to start? Try building a Florence-2 Workflow in your Roboflow dashboard today.
Written by Aarnav Shah
Cite this Post
Use the following entry to cite this post in your research:
Contributing Writer. (Mar 12, 2026). Zero-Shot Auto Labeling with VLMs using Roboflow. Roboflow Blog: https://blog.roboflow.com/zero-shot-auto-labeling-with-vlms/