
Flutter, Google’s open-source UI framework, empowers developers to craft stunning, natively compiled applications for mobile, web, and desktop from a single codebase. Its fast development cycle, rich widget library, and seamless performance make it an ideal choice for integrating advanced technologies like computer vision.
By combining Flutter with Roboflow, a powerful platform for building and deploying vision models, we can create intuitive apps that leverage AI to solve real-world problems, such as detecting and analyzing objects in images. This synergy enables developers to focus on building elegant user interfaces while offloading complex AI tasks to Roboflow's robust infrastructure, allowing for the rapid prototyping and deployment of vision-powered applications.
Here’s how I built an application leveraging Roboflow with Flutter, step by step:
How to Integrate Computer Vision into a Flutter App
Let’s dive in! As a disclaimer, for this tutorial, Flutter knowledge is assumed.
Part 1: Create an Object Detection Model
To enable real-time object detection in images, we need a robust object detection model. Roboflow simplifies this by providing access to pre-existing datasets, tools for fine-tuning, and workflows for seamless integration. Below, I detail a general process for forking a dataset, applying preprocessing and augmentations, training, and setting up a workflow for easy API-based inference in Flutter apps.
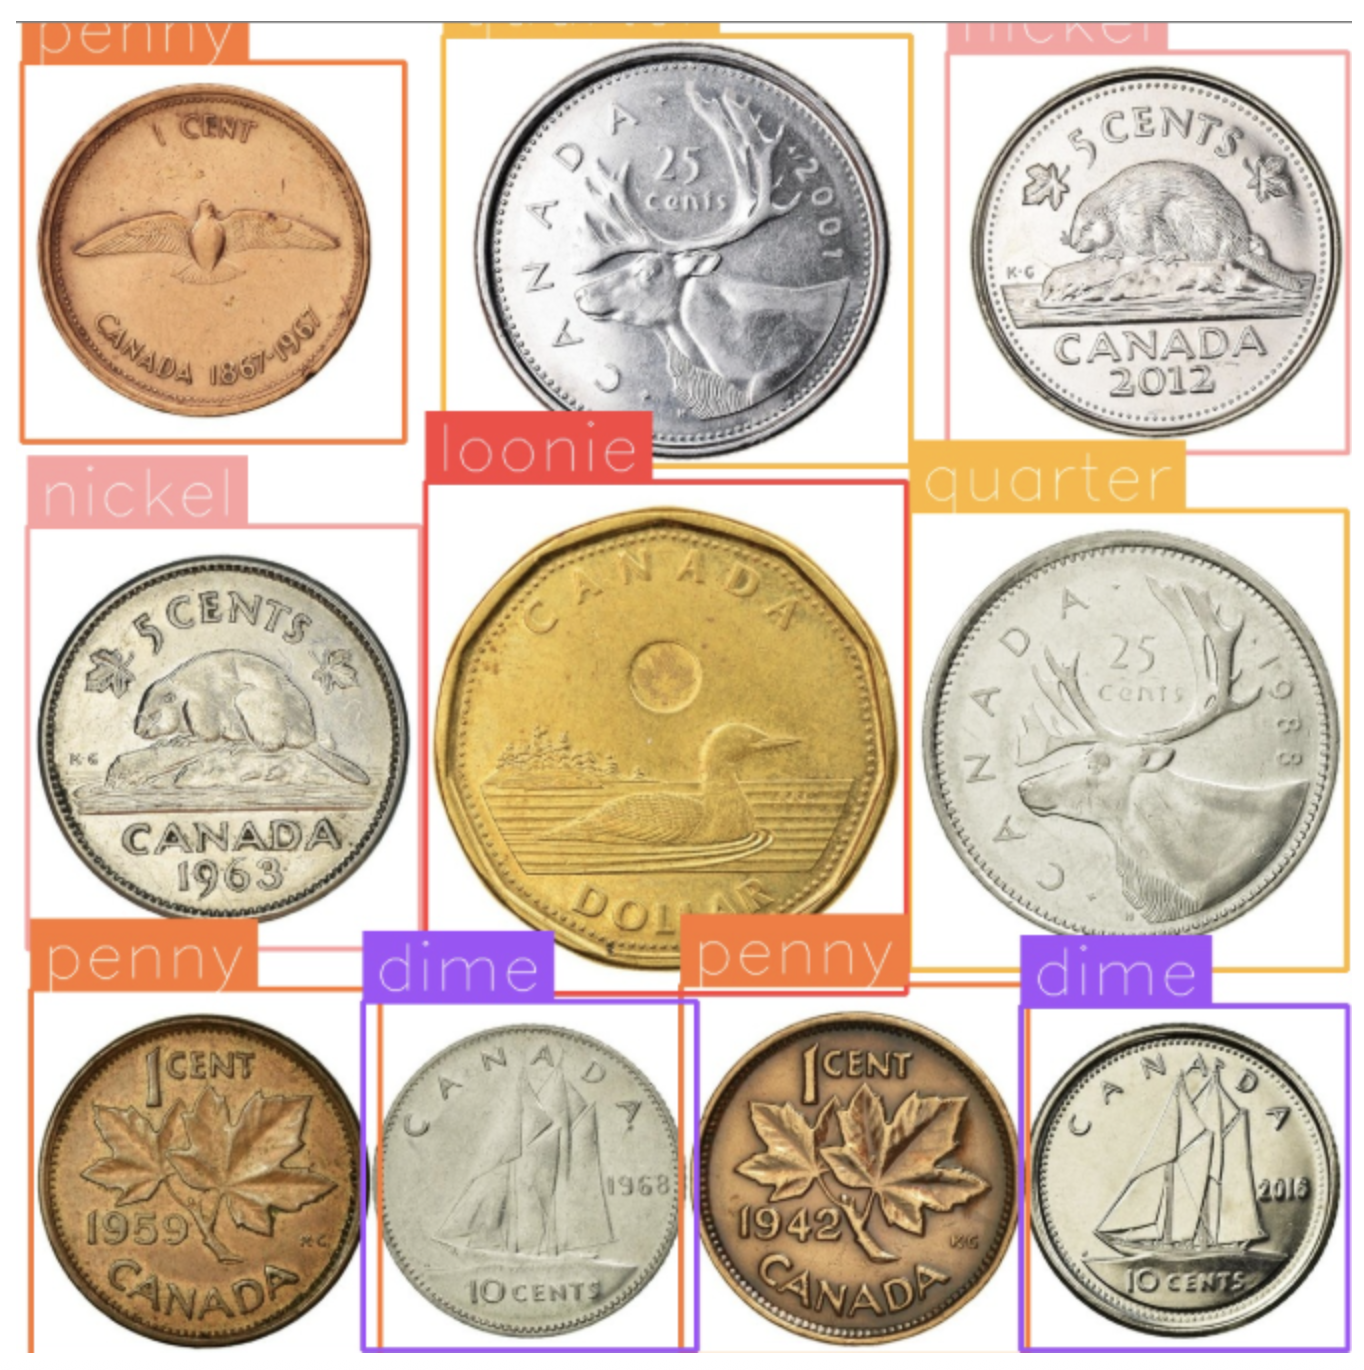
One way we can do this is by creating a coin counter app that detects and counts Canadian coins (penny, nickel, dime, quarter, loonie, toonie), calculates their total value, and visualizes the results.
But first, we need to fork a dataset.
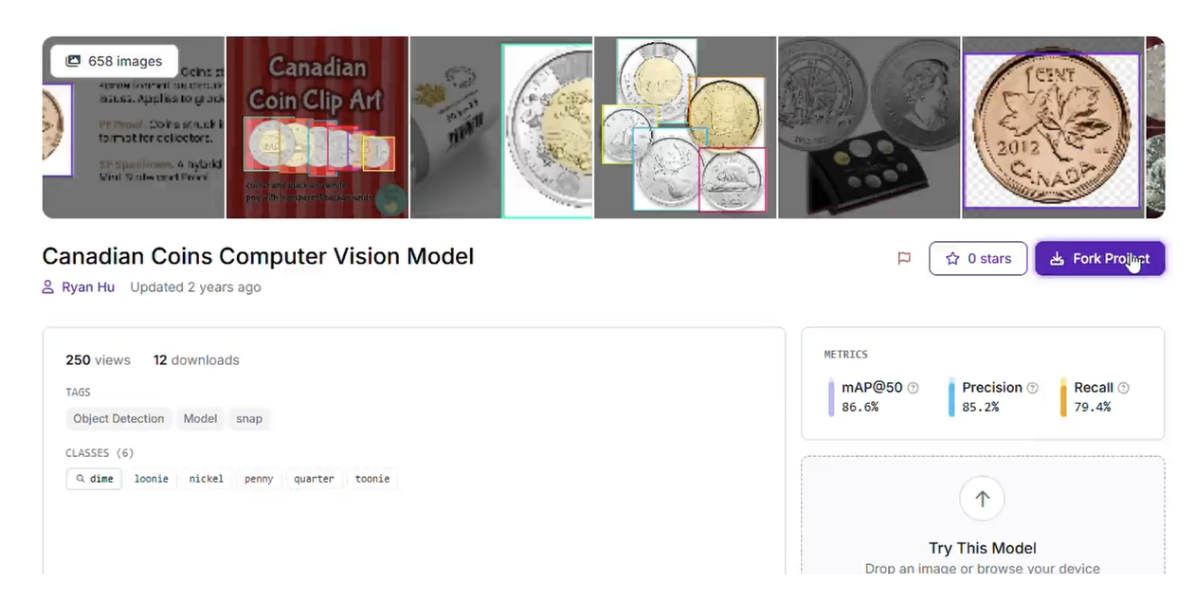
High-quality, annotated data is the backbone of any computer vision model. I began by forking the "Canadian Coins" dataset by Ryan Hu from Roboflow Universe. This open-source dataset includes hundreds of images with annotations for six coin classes: dime, loonie, nickel, penny, quarter, and toonie.
This is the full video tutorial on how to train your model. In case you can not follow this tutorial:
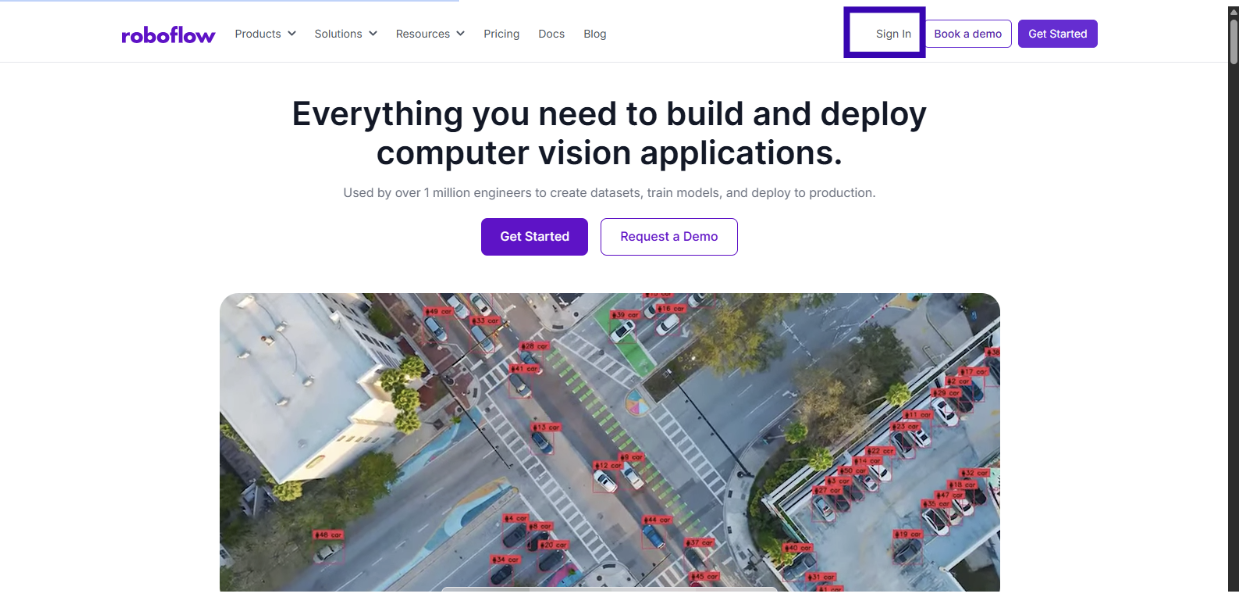
To fork, I first signed into Roboflow:
Then I clicked "Fork" on the provided Universe project to create a copy in my workspace after being signed in. This provided a ready-to-use dataset, saving time on manual annotation:
If needed, you can add images of coins in varied scenarios (e.g., overlapping or under different lighting) to enhance robustness, but the forked dataset was sufficient for this project.
Tips:
- Ensure dataset images reflect real-world conditions: varied angles, lighting, and coin arrangements.
- Use Roboflow’s collaborative annotation tools when adding images, which support precise bounding boxes.
- Since the dataset is pre-annotated, you can proceed directly to preprocessing.
Train the Model
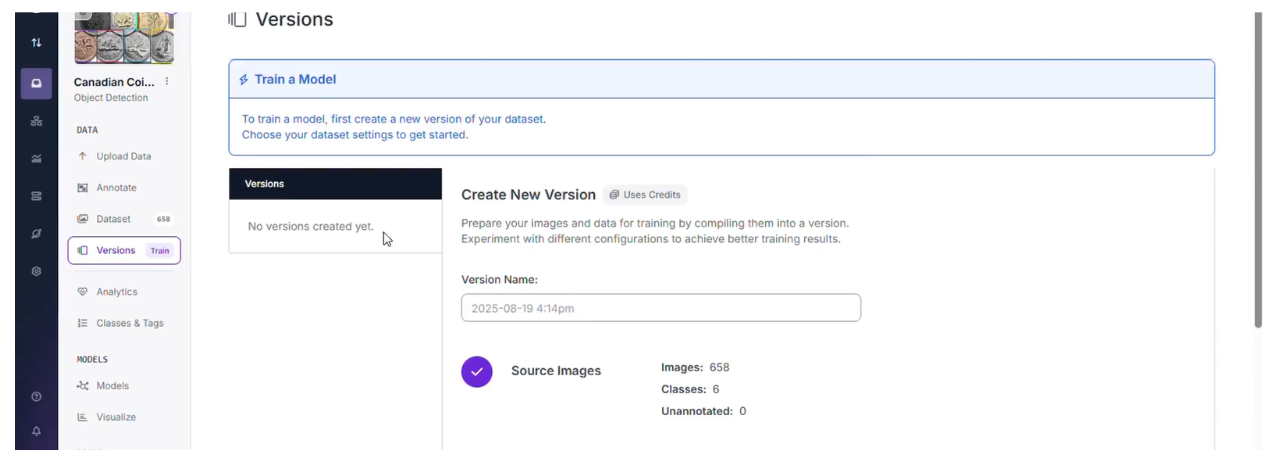
Next, I made a version for the datasets. Roboflow’s training pipeline simplifies the process, automatically handling data splits and hyperparameter tuning.
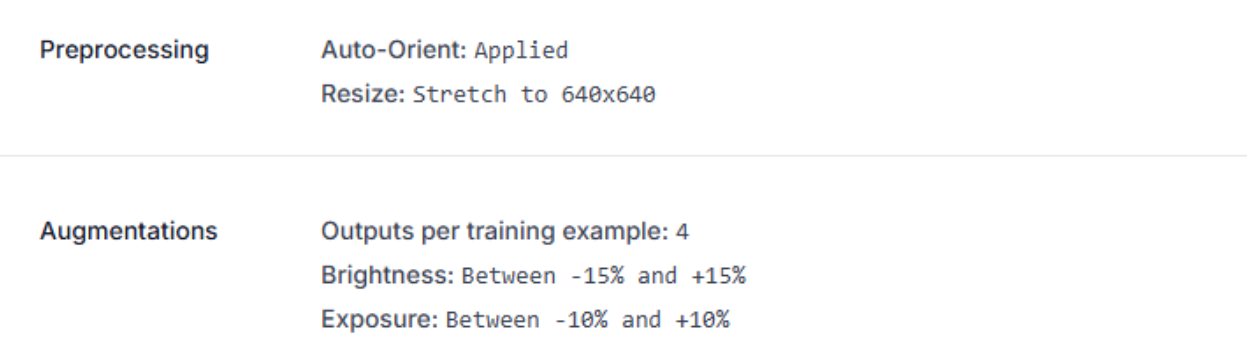
In the Roboflow workspace, under versions, I applied the following preprocessing and augmentations:
- Preprocessing:
- Auto-Orient: Applied to correct image rotations.
- Resize: Stretch to 640x640 for consistent input size.
- Augmentations:
- Outputs per training example: 4, generating multiple augmented versions per image.
- Brightness: Between -15% and +15% to simulate varying lighting.
Exposure: Between -10% and +10% to handle over/underexposure.
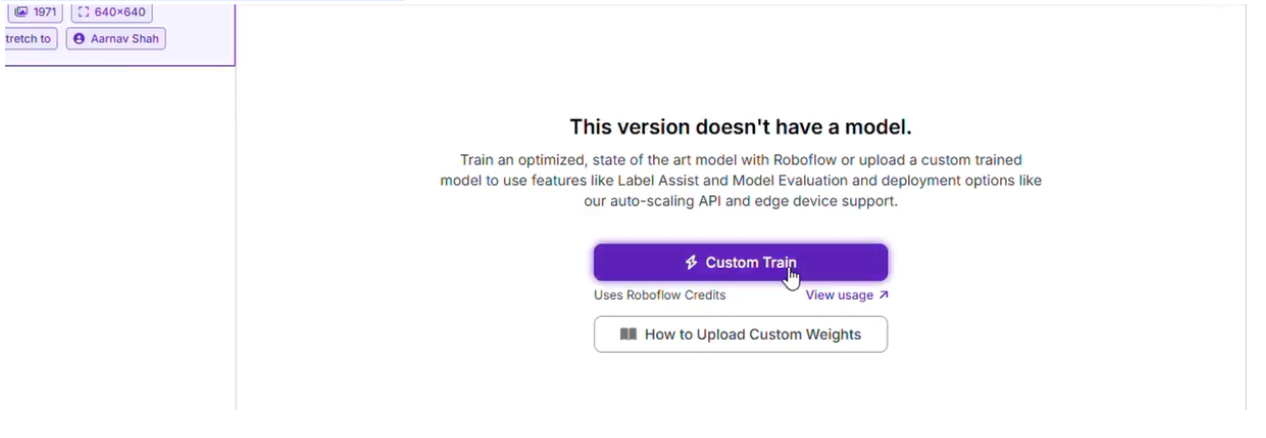
I trained the model using Roboflow’s RF-DETR (Small) architecture, which offers a balance of speed and accuracy, ideal for web-based inference. To train, once a version was created, I clicked the custom train button.
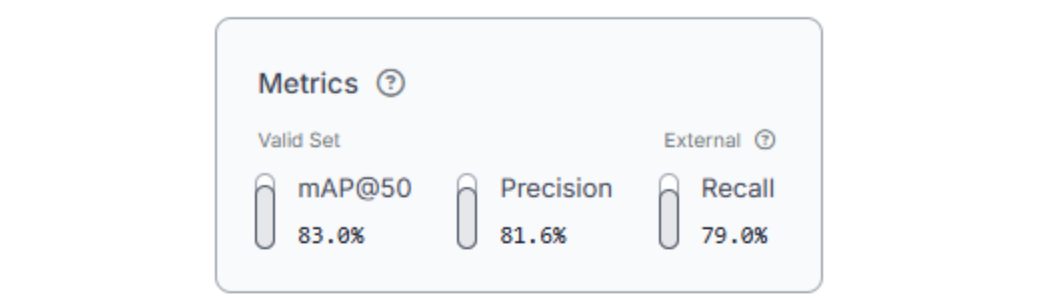
Training took half an hour on Roboflow’s cloud infrastructure. Post-training, we can evaluate metrics like precision, recall, and mAP (mean Average Precision). The model achieved an mAP of ~0.83, which isn’t too great, but for our case, it can complete the job. In real production datasets, you should aim for an mAP between 0.95-1, which demonstrates a strong performance. I tested it in Roboflow’s dashboard by uploading sample images, confirming semi-accurate bounding boxes and decent confidence scores.
This was the trained model.
Tips:
- Monitor validation metrics to detect overfitting or underfitting.
- If certain coins (e.g., shiny loonies) underperform, add targeted augmentations or images.
- Save the trained model version for reproducibility.
Create a Workflow
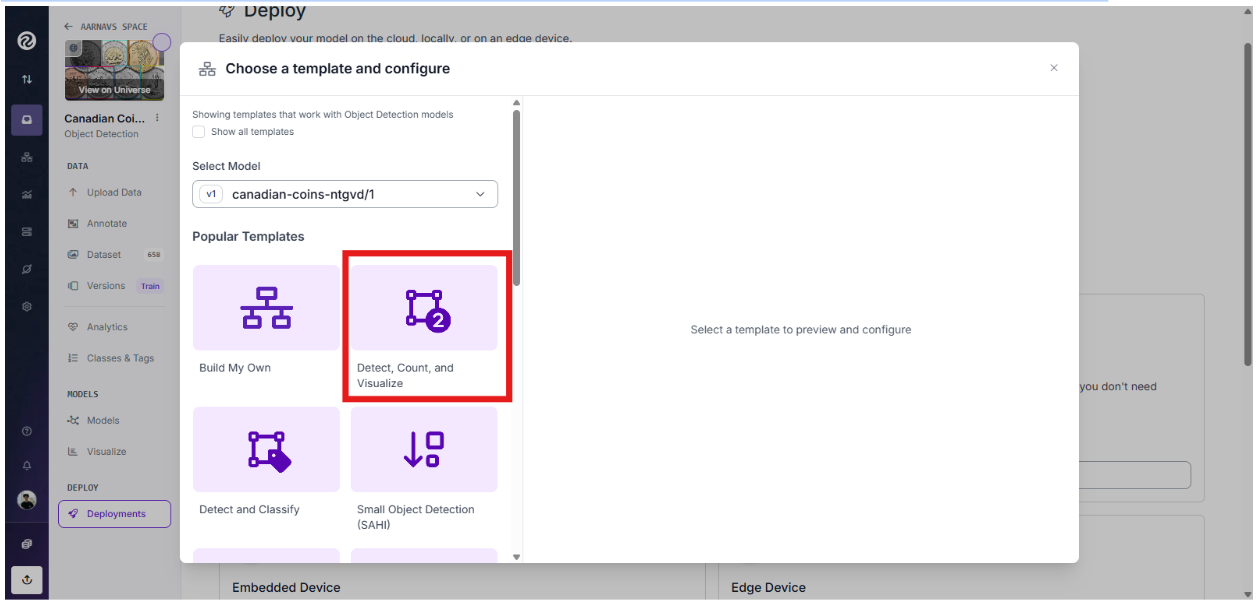
For integration with Flutter, I created a Roboflow Workflow using the "Detect, Count, and Visualize" template:
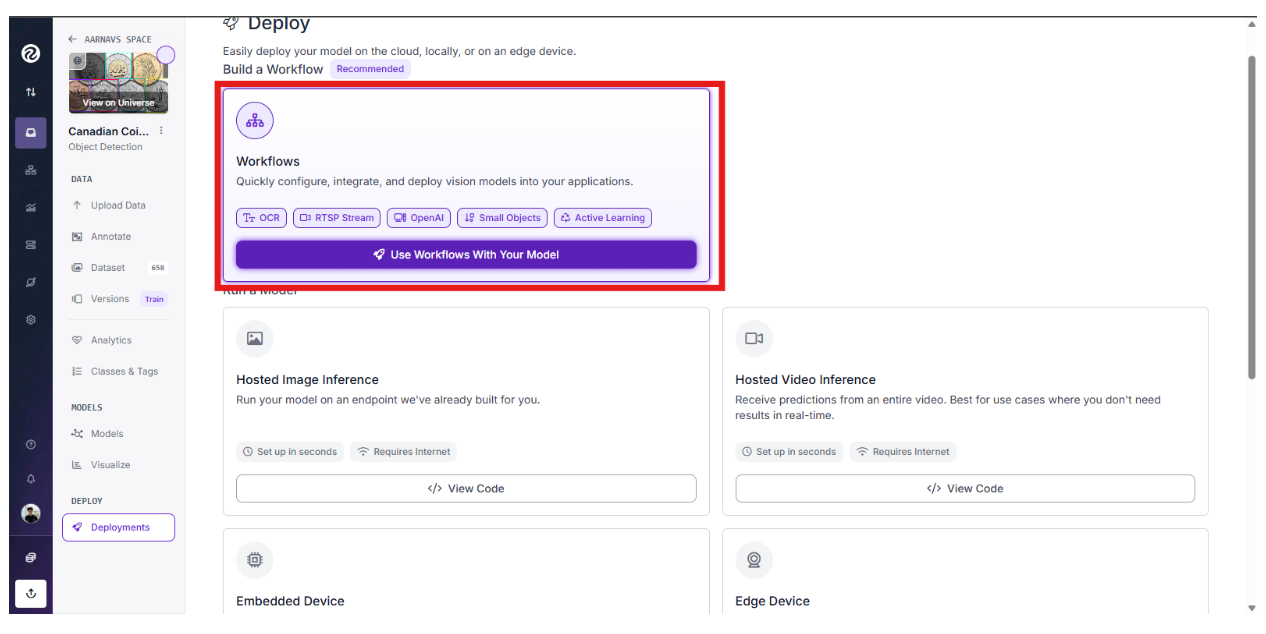
This workflow detects coins, counts instances per class, and generates a visualized image with bounding boxes and labels.
In Roboflow, I navigated to my project, selected "Workflows," and chose the template:
The workflow is provided here:
I set the confidence threshold to 0.1 because of the weaker model mAP to maximize outputs:
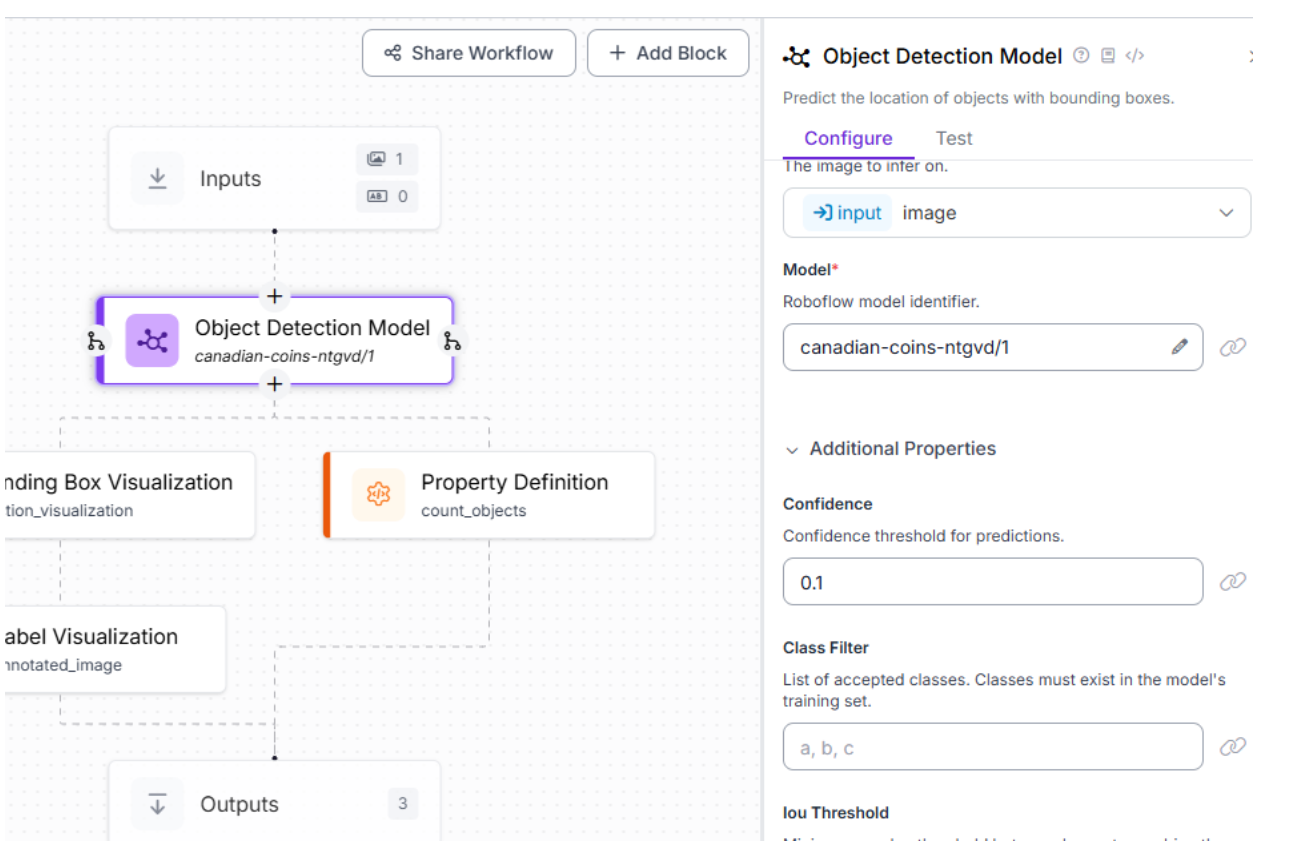
All the other blocks remained as they are. The workflow outputs:
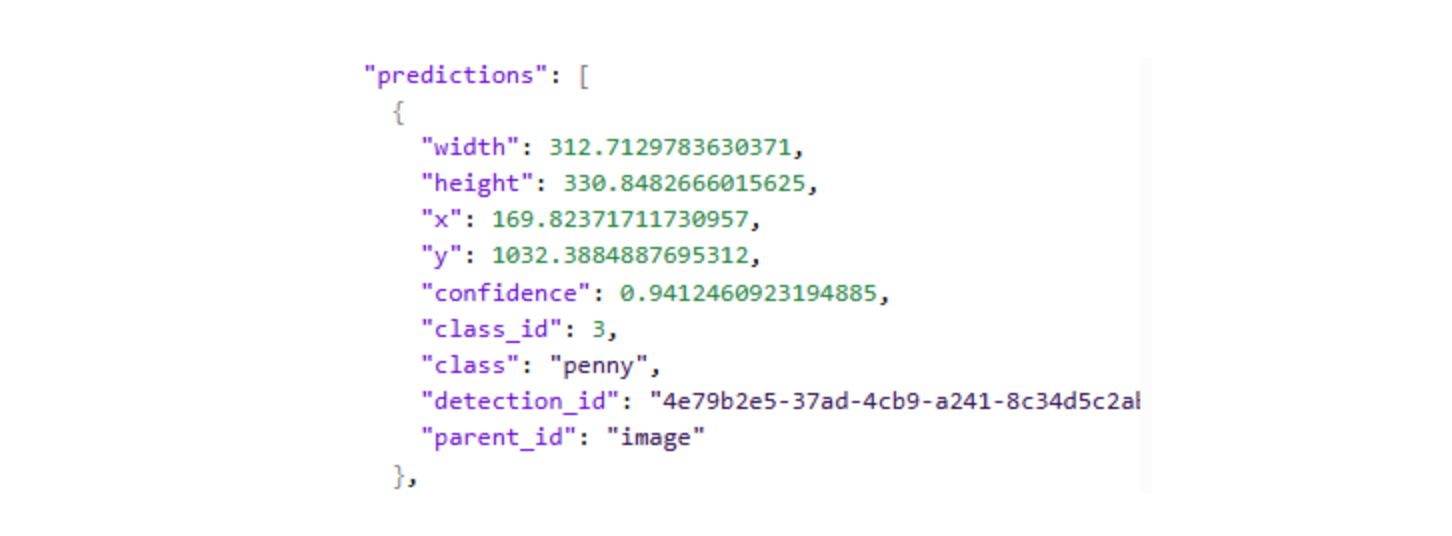
- model_predictions: A list of detections (class, confidence, position, size).
- label_visualization: A base64-encoded image with bounding boxes and labels.
- class_counts: Aggregated counts per coin type (derived from predictions).

No custom expression blocks were needed, as the template handles counting natively. I tested the workflow with sample images in Roboflow’s interface to verify outputs.
Tips:
- Adjust the confidence threshold (0.3–0.5) based on testing results and mAP.
- Ensure the JSON output structure aligns with your app’s parsing logic.
- Save the workflow for API deployment.
Deploy the Model
I deployed the workflow via Roboflow’s Hosted Inference API, providing a serverless endpoint for real-time calls from the Flutter app. The API returns the visualized image, predictions, and counts, which the app parses to compute the total monetary value. Next, we build the Flutter web app to create a user-friendly interface.
Part 2: Build the Flutter Application
The Flutter app is a web-based, responsive application. It enables users to pick an image, analyze it via the Roboflow workflow, view results (total coin count, monetary value, breakdowns. The app performs minimal local processing, relying on Roboflow for computer vision tasks.
Setup and Dependencies
Before proceeding, please follow the given documentation to properly download the Flutter Web SDK
I created a new Flutter project and set up dependencies using PowerShell commands:
- Navigate to the project directory: cd "c:\path\to\project".
- Create the project (if needed): flutter create coin_counter_app.
- Add dependencies: flutter pub add http image_picker flutter_dotenv.
- Create a .env file in the root with: ROBOFLOW_API_KEY=API_KEY (replace with your real key).
- Update pubspec.yaml to include assets: - .env.
- Fetch dependencies: flutter pub get.
- Run the app: flutter run -d chrome (or flutter run -d web-server --web-port 8083 for a specific port).
For production, use flutter build web --release. Note: The .env file is bundled in web builds, exposing the API key. Use a serverless proxy for secure production apps. For some more information on .env files and their integration, follow this article
Code Section 1: Imports and Main Setup
import 'package:flutter/material.dart';
import 'dart:typed_data';
import 'package:http/http.dart' as http;
import 'dart:convert';
import 'package:image_picker/image_picker.dart';
import 'package:flutter_dotenv/flutter_dotenv.dart';


Future<void> main() async {
  WidgetsFlutterBinding.ensureInitialized();
  try {
    await dotenv.load(fileName: '.env');
  } catch (_) {
    // If .env missing, continue; key may be injected another way.
  }
  runApp(MyApp());
}


class MyApp extends StatelessWidget {
  @override
  Widget build(BuildContext context) {
    return MaterialApp(
      title: 'Coin Counter',
      theme: ThemeData(
        primarySwatch: Colors.indigo,
        visualDensity: VisualDensity.adaptivePlatformDensity,
      ),
      home: CoinCounterPage(),
    );
  }
}
Purpose: Sets up the Flutter application, imports dependencies, and initializes the app’s entry point.
Location: lib/main.dart, the primary Dart file in the lib folder, executed by the Flutter engine via index.html (will be shown later).
Functionality:
- Imports:
- flutter/material.dart: Provides Material Design widgets for the UI.
- dart:typed_data: Enables handling of binary image data (Uint8List).
- http/http.dart: Facilitates HTTP requests to the Roboflow API.
- dart:convert: Supports JSON encoding/decoding and base64 conversions.
- image_picker/image_picker.dart: Allows image selection from the gallery (web-compatible).
- flutter_dotenv/flutter_dotenv.dart: Loads environment variables from .env for the Roboflow API key.
- Main Function:
- WidgetsFlutterBinding.ensureInitialized(): Ensures Flutter’s widget binding is ready for asynchronous operations.
- dotenv.load(fileName: '.env'): Loads the .env file containing ROBOFLOW_API_KEY, with a try-catch to handle cases where the file is missing, allowing alternative key injection (e.g., via --dart-define).
- runApp(MyApp()): Starts the app with the MyApp widget as the root.
- MyApp Class: Defines a MaterialApp with:
- title: 'Coin Counter': Sets the browser/device title.
- theme: Uses an indigo colour scheme (Colors.indigo) and adaptive visual density for responsive UI.
- home: CoinCounterPage(): Sets the main page to CoinCounterPage.
Key Details: The .env file is critical for development, but insecure for web production builds (bundled in JavaScript). The indigo theme ensures a professional look, and MyApp establishes the app’s foundation.
Code Section 2: State Management and Image Handling
class CoinCounterPage extends StatefulWidget {
  @override
  _CoinCounterPageState createState() => _CoinCounterPageState();
}


class _CoinCounterPageState extends State<CoinCounterPage> {
  Uint8List? _imageBytes;
  Uint8List? _annotatedImageBytes;
  bool _isLoading = false;
  bool _hasResults = false;
  Map<String, int> _classCounts = {};
  int _totalCount = 0;
  double _totalValue = 0.0;


  final ImagePicker _picker = ImagePicker();


  final Map<String, double> _coinValues = const {
    'penny': 0.01,
    'nickel': 0.05,
    'dime': 0.10,
    'quarter': 0.25,
    'loonie': 1.00,
    'toonie': 2.00,
  };


  Future<void> _pickImage() async {
    final XFile? image = await _picker.pickImage(source: ImageSource.gallery);
    if (image != null) {
      final bytes = await image.readAsBytes();
      setState(() {
        _imageBytes = bytes;
  _annotatedImageBytes = null;
        _classCounts.clear();
        _totalCount = 0;
        _totalValue = 0.0;
  _hasResults = false;
      });
    }
  }
Purpose: Manages state for images and results, and handles image selection.
Location: Part of lib/main.dart.
Functionality:
- CoinCounterPage Class: A StatefulWidget creating _CoinCounterPageState for dynamic UI updates.
- State Variables:
- _imageBytes: Stores the original image’s binary data (Uint8List).
- _annotatedImageBytes: Stores the annotated image from Roboflow.
- _isLoading: Tracks API call status for the loading indicator.
- _hasResults: Indicates if analysis results are available.
- _classCounts: Maps coin types to counts (e.g., {'penny': 5}).
- _totalCount: Total number of coins detected.
- _totalValue: Total monetary value in CAD.
- Constants:
- _picker: An ImagePicker instance for selecting images.
- _coinValues: A constant map of coin types to CAD values (e.g., 'penny': 0.01).
- _pickImage Method: Uses image_picker to select an image from the gallery, reads it as bytes, and updates state to store _imageBytes and reset _annotatedImageBytes, _classCounts, _totalCount, _totalValue, and _hasResults.
Key Details: The const keyword on _coinValues optimizes performance. ImageSource.gallery ensures web compatibility. State reset in _pickImage ensures a clean slate for new images. The method is asynchronous to handle file I/O.
Code Section 3: API Call and Result Parsing
Future<void> _analyzeImage() async {
    if (_imageBytes == null) return;


    setState(() {
      _isLoading = true;
    });


    try {
      final uri = Uri.parse('https://serverless.roboflow.com/infer/workflows/aarnavs-space/detect-count-and-visualize-2');
      final base64Image = base64Encode(_imageBytes!);
      final apiKey = dotenv.env['ROBOFLOW_API_KEY']?.trim() ?? '';
      if (apiKey.isEmpty || apiKey == 'REPLACE_WITH_YOUR_KEY') {
        _showError('Set ROBOFLOW_API_KEY in .env first');
        setState(() { _isLoading = false; });
        return;
      }
      final response = await http.post(
        uri,
        headers: { 'Content-Type': 'application/json' },
        body: json.encode({
          'api_key': apiKey,
          'inputs': {
            'image': { 'type': 'base64', 'value': base64Image }
          }
        }),
      );


      if (response.statusCode == 200) {
        final data = json.decode(response.body) as Map<String, dynamic>;
        _parseResults(data);
        setState(() { _hasResults = true; });
      } else {
        _showError('Error ${response.statusCode}: ${response.body}');
      }
    } catch (e) {
      _showError('Error: $e');
    } finally {
      setState(() { _isLoading = false; });
    }
  }


  void _parseResults(Map<String, dynamic> data) {
    _classCounts.clear();
    _totalCount = 0;
    _totalValue = 0.0;
    _annotatedImageBytes = null;


    void walk(dynamic node) {
      if (node is Map) {
        if (_annotatedImageBytes == null && node['output_image'] is Map<String, dynamic>) {
          final m = node['output_image'] as Map<String, dynamic>;
          if (m['type'] == 'base64' && m['value'] is String) {
            try { _annotatedImageBytes = base64Decode(m['value']); } catch (_) {}
          }
        }
        final clsVal = node['class'];
        if (clsVal != null) {
          final cls = clsVal.toString().toLowerCase();
            if (cls.isNotEmpty) {
            _classCounts[cls] = (_classCounts[cls] ?? 0) + 1;
          }
        }
        node.forEach((_, v) => walk(v));
      } else if (node is List) {
        for (final item in node) { walk(item); }
      }
    }
    walk(data);


    _totalCount = _classCounts.values.fold(0, (a, b) => a + b);
    _totalValue = _classCounts.entries.fold(0.0, (sum, e) {
      final v = _coinValues[e.key];
      return v == null ? sum : sum + v * e.value;
    });
  }


  void _showError(String message) {
    ScaffoldMessenger.of(context).showSnackBar(SnackBar(content: Text(message)));
  }
Purpose: Handles Roboflow API communication, result parsing, and error display.
Location: Part of lib/main.dart.
Functionality:
- _analyzeImage Method:
- Checks if _imageBytes exists; exits if null.
- Sets _isLoading to true to show a loading indicator.
- Encodes the image to base64 and retrieves the API key from .env.
- Validates the API key, showing an error via _showError if invalid.
- Sends a POST request to Roboflow’s workflow endpoint, passing the base64 image and API key.
- On success (HTTP 200), parses the response with _parseResults and sets _hasResults.
- Handles errors (non-200 status or exceptions) via _showError.
- Resets _isLoading in finally.
- _parseResults Method: Clears state, recursively traverses the JSON response to extract output_image (base64-decoded to _annotatedImageBytes) and class names (counted in _classCounts), then computes _totalCount and _totalValue using _coinValues.
- _showError Method: Displays error messages in a snackbar using ScaffoldMessenger.
Key Details: Recursive JSON parsing handles nested responses. Error handling covers invalid keys and network issues. The ! in _imageBytes! is safe due to the null check. _totalValue skips unknown classes gracefully.
Code Section 4: UI Build
@override
  Widget build(BuildContext context) {
    return Scaffold(
      appBar: AppBar(title: Text('Coin Counter')),
      body: Center(
        child: Container(
          constraints: BoxConstraints(maxWidth: 700),
          padding: const EdgeInsets.all(24.0),
          child: SingleChildScrollView(
            child: Column(
              crossAxisAlignment: CrossAxisAlignment.stretch,
              children: [
                ElevatedButton.icon(
                  icon: Icon(Icons.image),
                  label: Text('Pick Image'),
                  onPressed: _isLoading ? null : _pickImage,
                  style: ElevatedButton.styleFrom(padding: EdgeInsets.symmetric(vertical: 14)),
                ),
                SizedBox(height: 16),
                if (_imageBytes != null)
                  Column(
                    crossAxisAlignment: CrossAxisAlignment.start,
                    children: [
                      Text('Original', style: TextStyle(fontWeight: FontWeight.bold)),
                      SizedBox(height: 8),
                      ClipRRect(
                        borderRadius: BorderRadius.circular(8),
                        child: Image.memory(_imageBytes!, height: 220, fit: BoxFit.contain),
                      ),
                    ],
                  ),
                if (_annotatedImageBytes != null) ...[
                  SizedBox(height: 20),
                  Text('Detections', style: TextStyle(fontWeight: FontWeight.bold)),
                  SizedBox(height: 8),
                  ClipRRect(
                    borderRadius: BorderRadius.circular(8),
                    child: Image.memory(_annotatedImageBytes!, height: 260, fit: BoxFit.contain),
                  ),
                ],
                SizedBox(height: 20),
                ElevatedButton.icon(
                  icon: Icon(Icons.analytics),
                  label: Text('Analyze'),
                  onPressed: (_imageBytes != null && !_isLoading) ? _analyzeImage : null,
                  style: ElevatedButton.styleFrom(
                    backgroundColor: Colors.green,
                    padding: EdgeInsets.symmetric(vertical: 14),
                  ),
                ),
                if (_isLoading) ...[
                  SizedBox(height: 30),
                  Center(child: CircularProgressIndicator()),
                ],
                if (_hasResults && !_isLoading) ...[
                  SizedBox(height: 30),
                  Card(
                    elevation: 3,
                    child: Padding(
                      padding: const EdgeInsets.all(16.0),
                      child: Column(
                        crossAxisAlignment: CrossAxisAlignment.start,
                        children: [
                          Text('Results', style: Theme.of(context).textTheme.titleLarge),
                          SizedBox(height: 12),
                          Wrap(
                            spacing: 16,
                            runSpacing: 8,
                            children: [
                              _metric('Total Coins', _totalCount.toString(), Icons.confirmation_number_outlined, Colors.indigo),
                              _metric('Total Value', '\$' + _totalValue.toStringAsFixed(2), Icons.attach_money, Colors.green),
                            ],
                          ),
                          if (_classCounts.isNotEmpty) ...[
                            SizedBox(height: 16),
                            Text('Breakdown', style: TextStyle(fontWeight: FontWeight.bold)),
                            SizedBox(height: 8),
                            Wrap(
                              spacing: 10,
                              runSpacing: 6,
                              children: _classCounts.entries.map((e) {
                                final val = _coinValues[e.key];
                                final valueStr = val != null ? ' (\$' + (val * e.value).toStringAsFixed(2) + ')' : '';
                                return Chip(label: Text('${e.key} x${e.value}$valueStr'));
                              }).toList(),
                            )
                          ],
                        ],
                      ),
                    ),
                  ),
                ],
              ],
            ),
          ),
        ),
      ),
    );
  }


  Widget _metric(String label, String value, IconData icon, Color color) {
    return Container(
      padding: EdgeInsets.all(12),
      decoration: BoxDecoration(
        color: color.withOpacity(0.08),
        borderRadius: BorderRadius.circular(8),
        border: Border.all(color: color.withOpacity(0.3)),
      ),
      child: Row(
        mainAxisSize: MainAxisSize.min,
        children: [
          Icon(icon, color: color),
          SizedBox(width: 8),
            Column(
            crossAxisAlignment: CrossAxisAlignment.start,
            children: [
              Text(label, style: TextStyle(fontSize: 12, color: color)),
              Text(value, style: TextStyle(fontSize: 16, fontWeight: FontWeight.bold)),
            ],
          ),
        ],
      ),
    );
  }
}
Purpose: Builds a responsive UI with buttons, image displays, loading indicators, and result visualizations.
Location: Part of lib/main.dart.
Functionality:
- Scaffold Structure: Includes an AppBar (“Coin Counter”) and a centred Container (maxWidth: 700) with a SingleChildScrollView for responsiveness.
- UI Components:
- Pick Image Button: An ElevatedButton.icon with an image icon, calls _pickImage, disabled during loading.
- Original Image: Displays _imageBytes with an “Original” label (220px height, rounded corners).
- Annotated Image: Shows _annotatedImageBytes with a “Detections” label (260px height, rounded corners).
- Analyze Button: An ElevatedButton.icon (green, with analytics icon), calls _analyzeImage, enabled if an image is selected and not loading.
- Loading Indicator: Shows a CircularProgressIndicator when _isLoading.
- Results Card: Displays when _hasResults and not loading, showing “Total Coins” and “Total Value” in metric boxes, and a chip-based breakdown (e.g., “penny x5 ($0.05)”).
- _metric Method: Creates styled containers for metrics with a subtle background, border, and icon-label-value layout.
Key Details: The maxWidth: 700 ensures a clean layout. ClipRRect with borderRadius: 8 polishes images. The spread operator (...[]) conditionally includes widgets. Metric boxes use indigo and green colours for consistency.
Other Files
pubspec.yaml (coin_counter_app/pubspec.yaml):
The project’s configuration file, which defines metadata, dependencies, and assets. It specifies the app’s name (coin_counter_app), description, and version (1.0.0+1), sets the Dart SDK version (>=3.0.0 <4.0.0), and lists dependencies: flutter (core framework), http (API calls), image_picker (image selection), and flutter_dotenv (environment variables). Development dependencies include flutter_test and flutter_lints for testing and code quality. The assets section includes the .env file, enabling flutter_dotenv to read the Roboflow API key.
name: coin_counter_app
description: A Flutter web app to count coins using Roboflow.


publish_to: 'none'


version: 1.0.0+1


environment:
  sdk: '>=3.0.0 <4.0.0'


dependencies:
  flutter:
    sdk: flutter
  http: ^1.2.1
  image_picker: ^1.0.7
  flutter_dotenv: ^5.2.1


dev_dependencies:
  flutter_test:
    sdk: flutter
  flutter_lints: ^3.0.0


flutter:
  uses-material-design: true
  assets:
    - .env
.env (coin_counter_app/.env):
A text file in the root directory storing the ROBOFLOW_API_KEY for Roboflow’s API. It’s loaded in main.dart using flutter_dotenv. Note: In web builds, the .env file is bundled and exposed, so for production, use a serverless proxy or --dart-define to secure the API key.
ROBOFLOW_API_KEY=YOUR_REAL_KEY_HERE
manifest.json (coin_counter_app/web/manifest.json):
Located in the web folder, this file configures the app as a Progressive Web App (PWA). It defines the app’s name, icons, colours, and display mode (standalone), ensuring it looks like a native app when installed. It’s linked in index.html and supports icons in web/icons/.
{
  "name": "coin_counter",
  "short_name": "CoinCounter",
  "start_url": ".",
  "display": "standalone",
  "background_color": "#0175C2",
  "theme_color": "#0175C2",
  "description": "A simple Flutter web app for counting coins using Roboflow",
  "orientation": "portrait-primary",
  "prefer_related_applications": false,
  "icons": [
    {
      "src": "icons/Icon-192.png",
      "sizes": "192x192",
      "type": "image/png"
    },
    {
      "src": "icons/Icon-512.png",
      "sizes": "512x512",
      "type": "image/png"
    }
  ]
}
index.html (coin_counter_app/web/index.html):
Also in the web folder, this file is the entry point for the web app. It loads the Flutter engine (flutter.js), sets up PWA metadata, and links to manifest.json and icons. It initializes the Flutter app, triggering lib/main.dart to run the app’s logic and UI.
<!DOCTYPE html>
<html>
<head>
  <base href="$FLUTTER_BASE_HREF">


  <meta charset="UTF-8">
  <meta content="IE=Edge" http-equiv="X-UA-Compatible">
  <meta name="description" content="A new Flutter project.">


  <!-- iOS meta tags & icons -->
  <meta name="apple-mobile-web-app-capable" content="yes">
  <meta name="apple-mobile-web-app-status-bar-style" content="black">
  <meta name="apple-mobile-web-app-title" content="coin_counter_app">
  <link rel="apple-touch-icon" href="icons/Icon-192.png">


  <!-- Favicon -->
  <link rel="icon" type="image/png" href="favicon.png"/>


  <title>coin_counter_app</title>
  <link rel="manifest" href="manifest.json">


  <script>
    // The value below is injected by flutter build, do not touch.
    var serviceWorkerVersion = null;
  </script>
  <!-- This script adds the flutter initialization JS code -->
  <script src="flutter.js" defer></script>
</head>
<body>
  <script>
    window.addEventListener('load', function(ev) {
      // Download main.dart.js
      _flutter.loader.loadEntrypoint({
        serviceWorker: {
          serviceWorkerVersion: serviceWorkerVersion,
        },
        onEntrypointLoaded: function(engineInitializer) {
          engineInitializer.initializeEngine().then(function(appRunner) {
            appRunner.runApp();
          });
        }
      });
    });
  </script>
</body>
</html>
Why Is This Useful?
The integration of Flutter and Roboflow enables developers to build cross-platform applications that harness computer vision for diverse use cases, such as inventory management, quality control, retail automation, or educational tools. Features like image upload, result caching, error handling, and interactive UI elements enhance usability and scalability. Flutter’s ability to deliver consistent, high-performance interfaces across platforms, combined with Roboflow’s serverless computer vision capabilities, provides a powerful framework for creating accessible, AI-driven solutions. This approach can be extended to applications like object tracking, defect detection, or automated monitoring, making it a versatile solution for modern development needs.
Build Your Own Canadian Coins Counter
Ready to build? Fork a dataset from Roboflow Universe, train with appropriate preprocessing and augmentations, set up a workflow and adapt the provided Flutter code. Customize the logic for your specific use case, such as counting objects, classifying items, or visualizing detections.
Have fun building and exploring the possibilities of Flutter and Roboflow!
Written by Aarnav Shah
Cite this Post
Use the following entry to cite this post in your research:
Contributing Writer. (Aug 28, 2025). Build Flutter Applications Using Computer Vision with Roboflow. Roboflow Blog: https://blog.roboflow.com/build-flutter-computer-vision-applications/