
Roboflow Workflows is a no code/low code platform for building computer vision pipelines that can be accessed via APIs without writing any backend code. It is no code in the sense you can build complete computer vision pipelines without any code, and low code, as it allows room for custom code, too.
It provides a visual editor where you can construct end-to-end computer vision pipelines using ready to use workflow blocks for tasks such as object detection, image segmentation, and visualization. These blocks can be connected through a drag-to-connect interface that makes data flow explicit, allowing you to clearly see how components interact and what data moves between them at a glance.
In this blog, we will explore Roboflow Workflows for no-code computer vision development, and guide you through building a simple, fully no-code object detection visualization pipeline for images as shown below:
Why Choose Roboflow Workflows for No-Code Computer Vision?
- Run workflows fully in the cloud with no infrastructure management and easy scalability
- Use pre-deployed, production-ready models out of the box, including Qwen3-VL, SAM 3, YOLO, RF-DETR, and more
- Built-in visualizations and transformations, such as bounding boxes, label visualization, detection merging, and dynamic cropping, with a high degree of customizability
- Prebuilt workflow templates for common pipelines like small object detection, background removal, and active learning
- Support for 10+ vision tasks including classification, detection, segmentation, keypoint detection, and OCR
- Drag-and-drop interface for visually connecting workflow blocks and simplifying data flow
- Automatic dataset and annotation management within workflows
- Advanced blocks for alerts, QR code generation, and embedding similarity search
- Native video blocks such as time-in-zone, line counting, and motion detection
- Comprehensive API and SDK support for all major languages and frameworks
Building an Object Detection Visualization Workflow Completely with No Code
This is the detection workflow we’ll build. Its output is an image with detected objects, complete with labels and bounding boxes.
The workflow leverages various computer vision blocks in Roboflow Workflows, such as detection, visualization, and labeling, without requiring us to write any code.
Step 1: Setup Your Roboflow Workflow
To get started, create a free Roboflow account and log in. Then, create a workspace, click “Workflows” in the left sidebar, and click the “Create Workflow” button to get started.
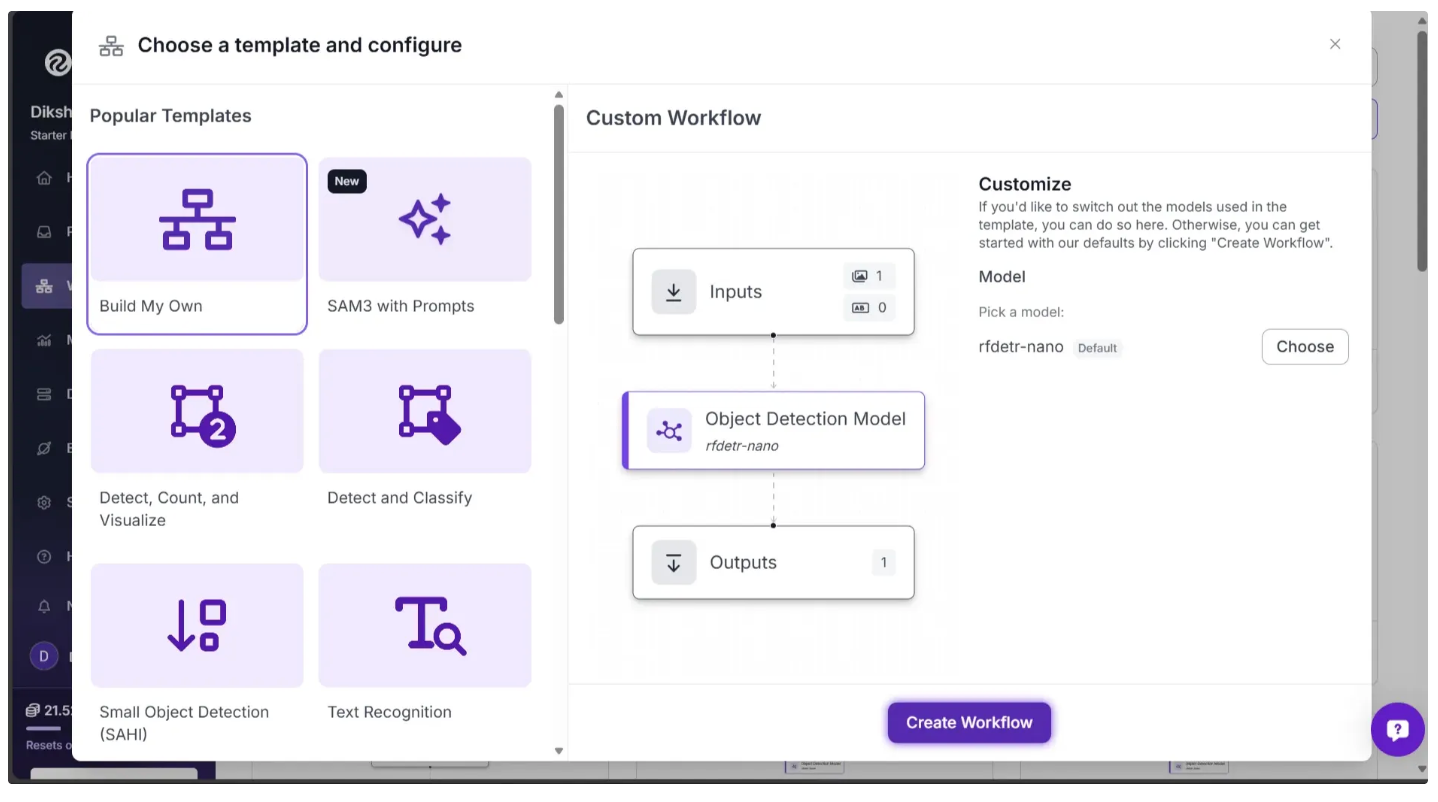
This will open a modal like the one shown below, where you can choose from various templates for segmentation, OCR, background removal, and more.
In our case, we select “Build My Own,” which comes pre-integrated with an object detection model by default. After choosing “Build My Own,” click “Create Workflow,” as shown below:
Then you’ll be taken to a blank workflow editor, ready to build your AI-powered workflow, where you’ll see three workflow blocks: Inputs, Outputs, and an Object Detection Model as shown below:
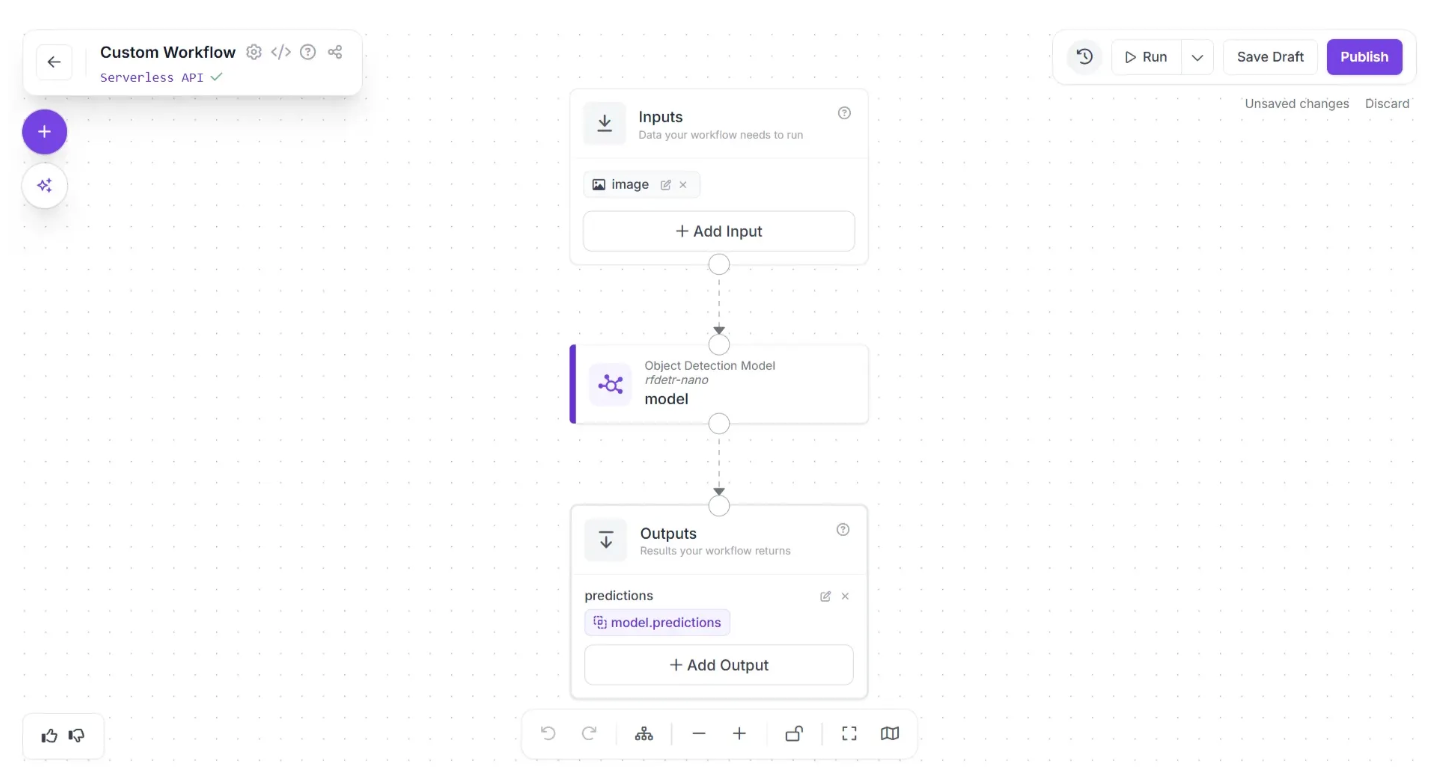
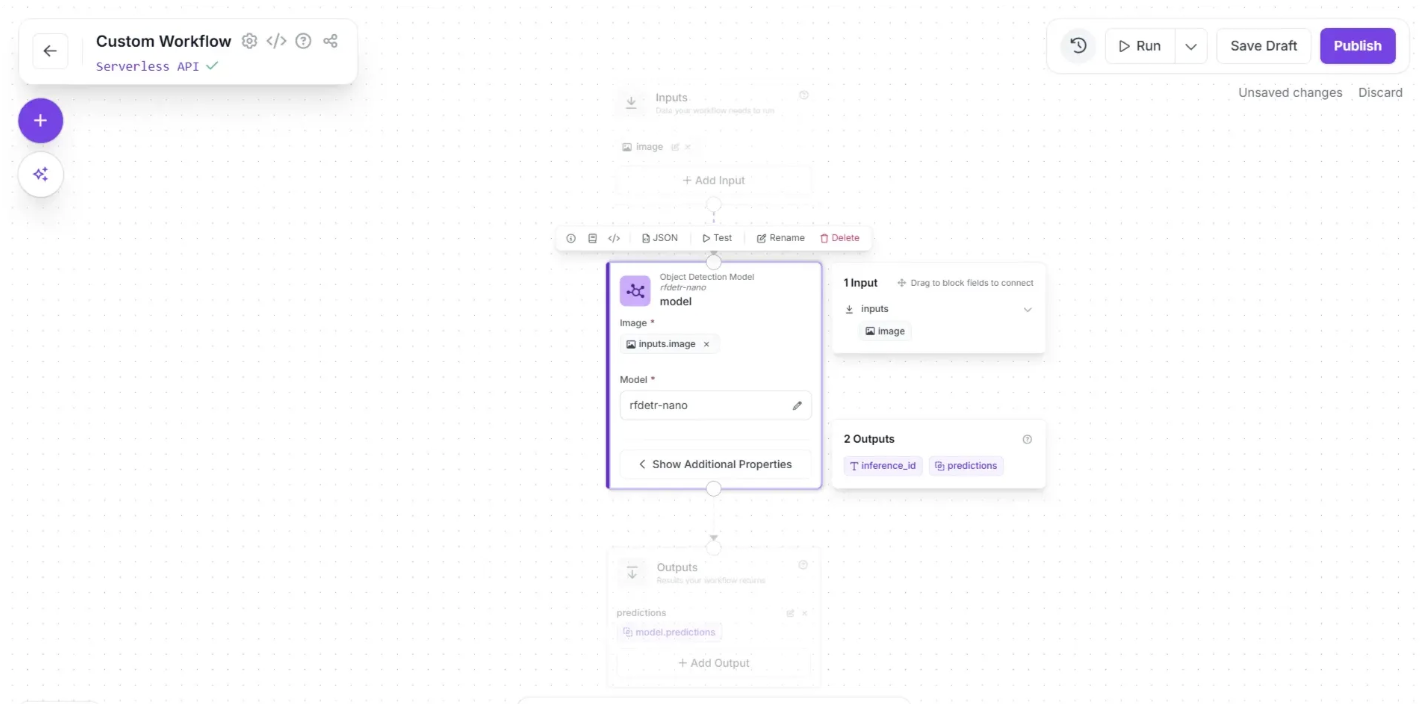
By default, the selected model in the Object Detection Model block is RF-DETR (Nano variant). You can configure how this model performs detection by clicking the block, which expands to reveal the “Show Additional Properties” option, as shown below:
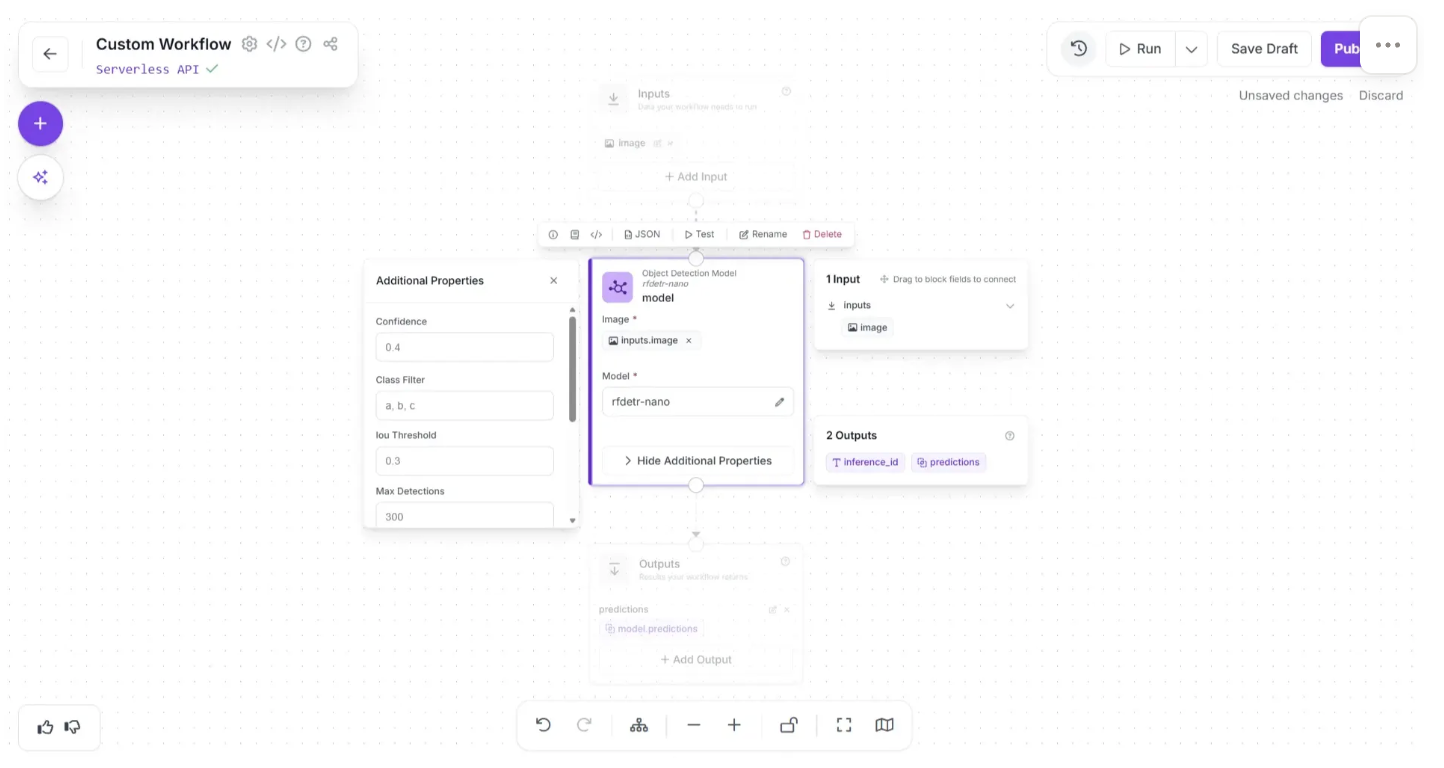
Clicking “Show Additional Properties” reveals additional model parameters, such as the confidence score, class filters, and more, as shown below. These settings allow you to fine-tune how the model detects objects and control its output behavior.
Within the same block, the Model parameter determines which model is used for object detection. Clicking the pencil icon (✏️) opens a popup, where you can navigate to “Public Models” to explore and select from a wide range of available options, as shown below:
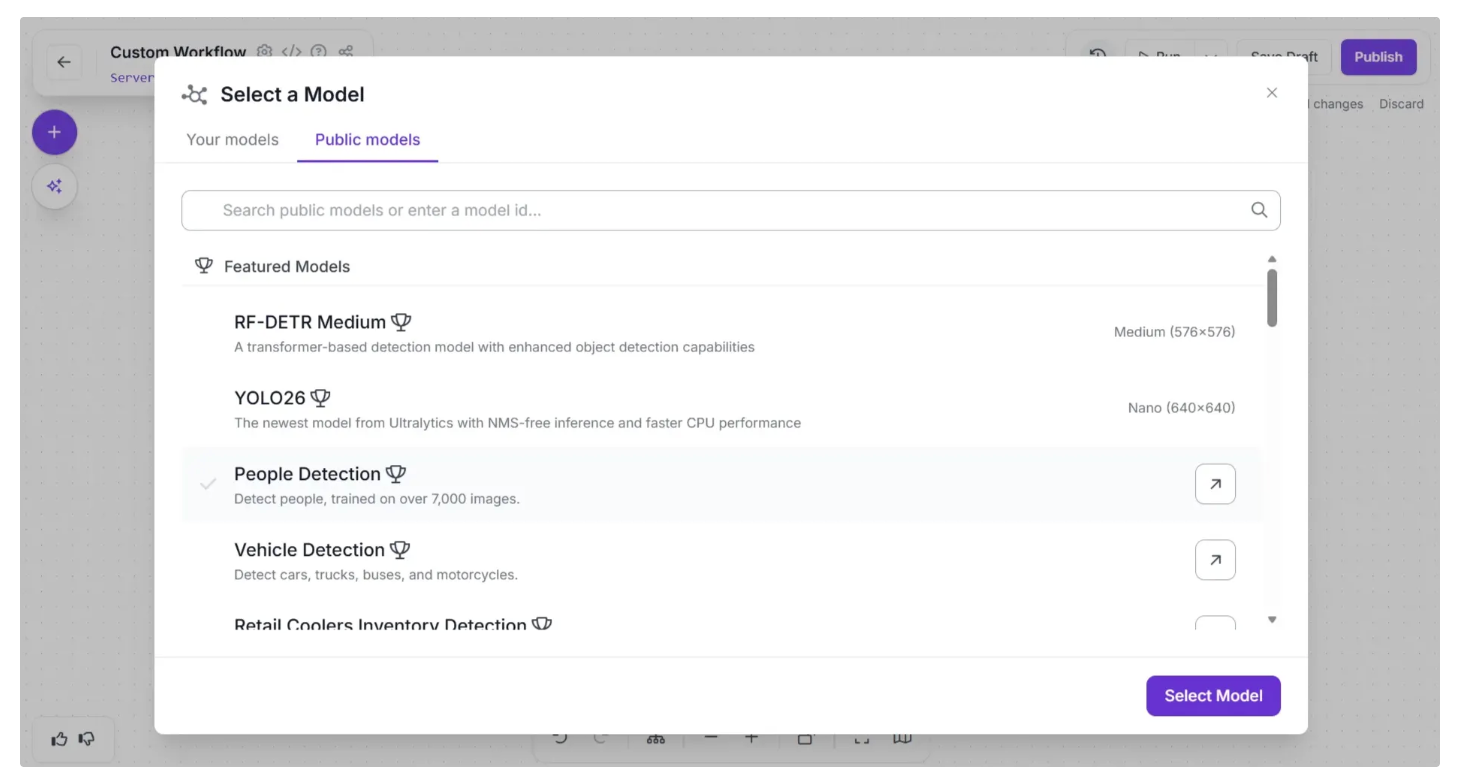
All available models are pre-deployed and require no coding, which reduces build times and allows for quick switching to test and identify the one that achieves the best results.
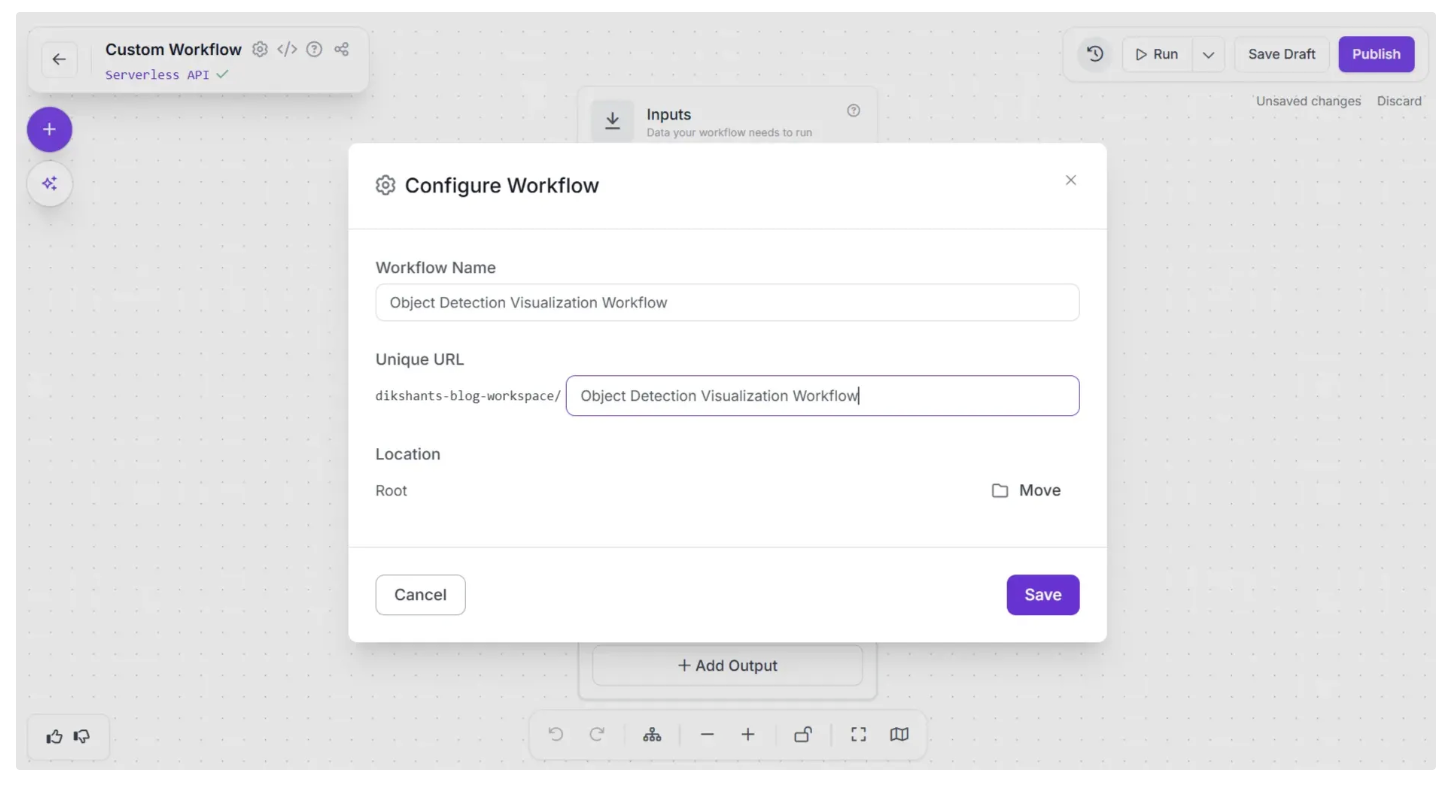
You can also configure the workflow name by clicking the ⚙️ icon in the top-left corner. This opens the workflow configuration modal, as shown below:
You can then return to the home page and, in the left sidebar under “Workflows,” open the renamed workflow to continue building.
Step 2: Add Bounding Boxes
Even though our workflow isn’t complete, you can run it at this stage to preview the results.
When we run the workflow on an image, the output appears as a JSON containing bounding box coordinates, visible in the Output tab at the bottom right, as shown below.
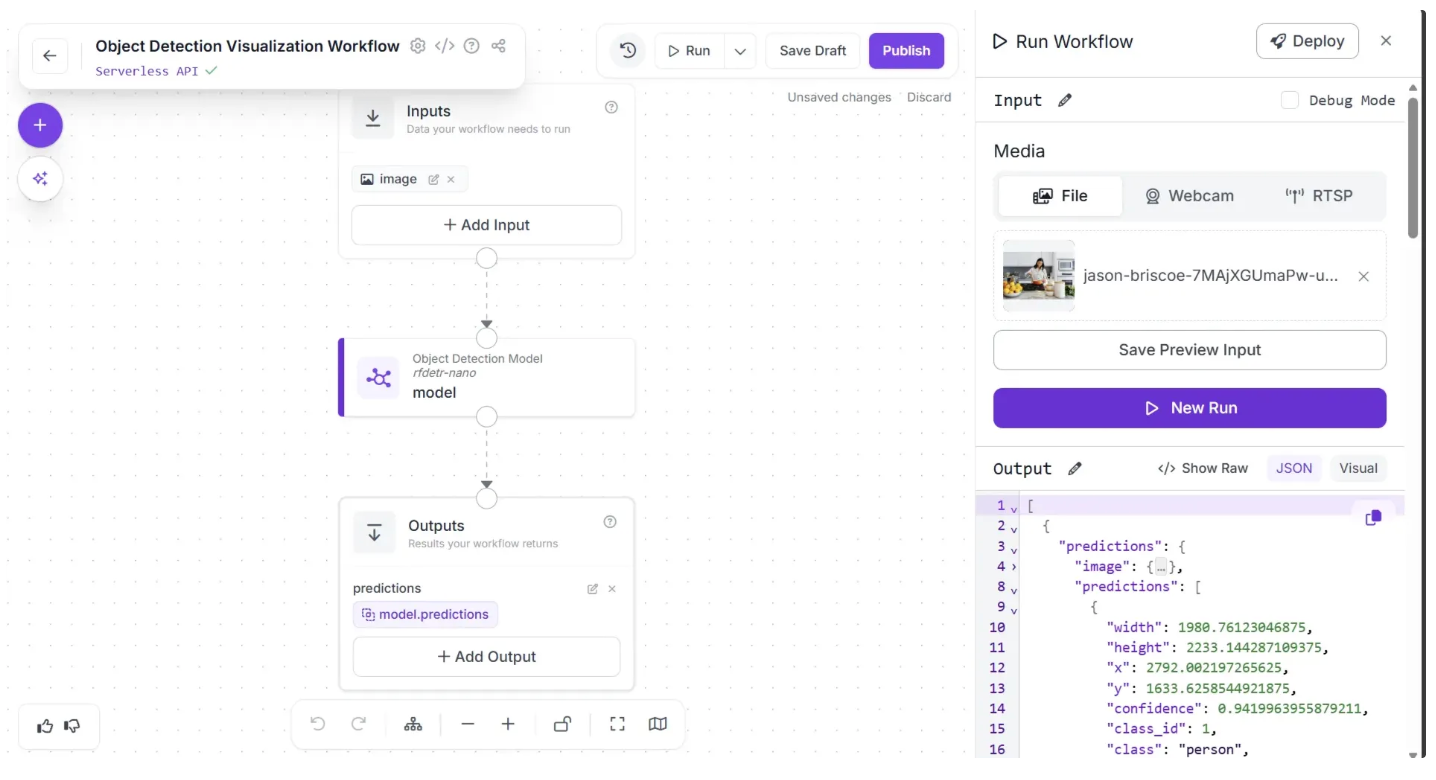
The object detection model identifies objects in the image, but its predictions are provided as coordinates. To make these predictions easier to interpret, we visualize them by drawing bounding boxes. Roboflow Workflows offers a Bounding Box Visualization block that takes model predictions and draws bounding boxes directly on the image.
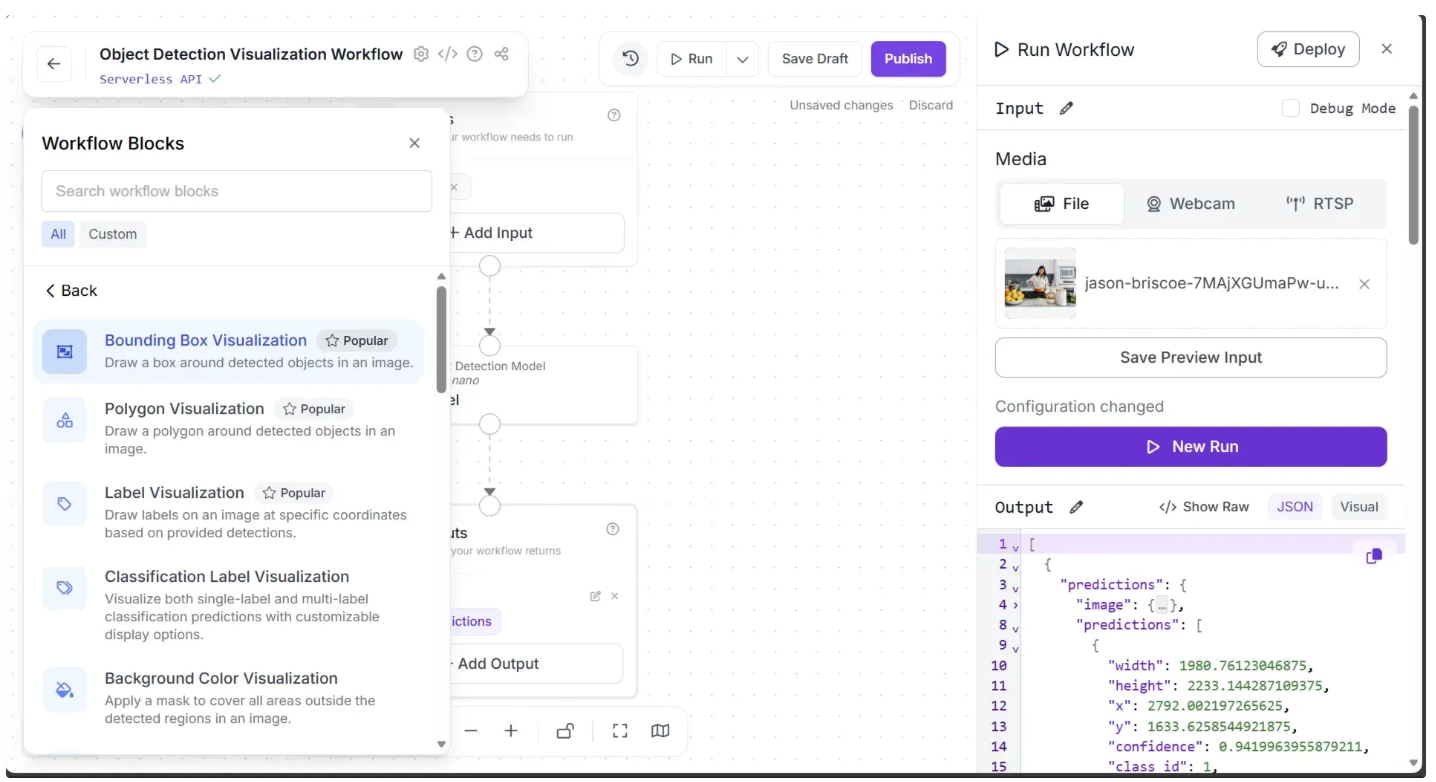
To add this block, click the “+” button in the top-left corner of the workflow canvas. A popup menu with workflow blocks will appear, as shown below. From there, click the “Visualization” option.

Now, inside the “Visualization” option, as shown below, click “Bounding Box Visualization” to add it to the workflow canvas.
Once added, the block should appear on the canvas, as shown below:
Now, create a connection from the Object Detection Model block to the Bounding Box Visualization block using the visual editor, and then create a connection from the Bounding Box Visualization block to the Outputs block.
You can remove the direct connection from the Object Detection Model block to the Outputs block by hovering over the connection and clicking the “×” icon. This is because we no longer need to output the raw coordinates, only the visualized image.
After making the connections, use the Auto Layout button, located to the left of the Zoom In and Zoom Out controls in the bottom menu, to automatically organize the workflow layout.
Your workflow should then appear as shown below:
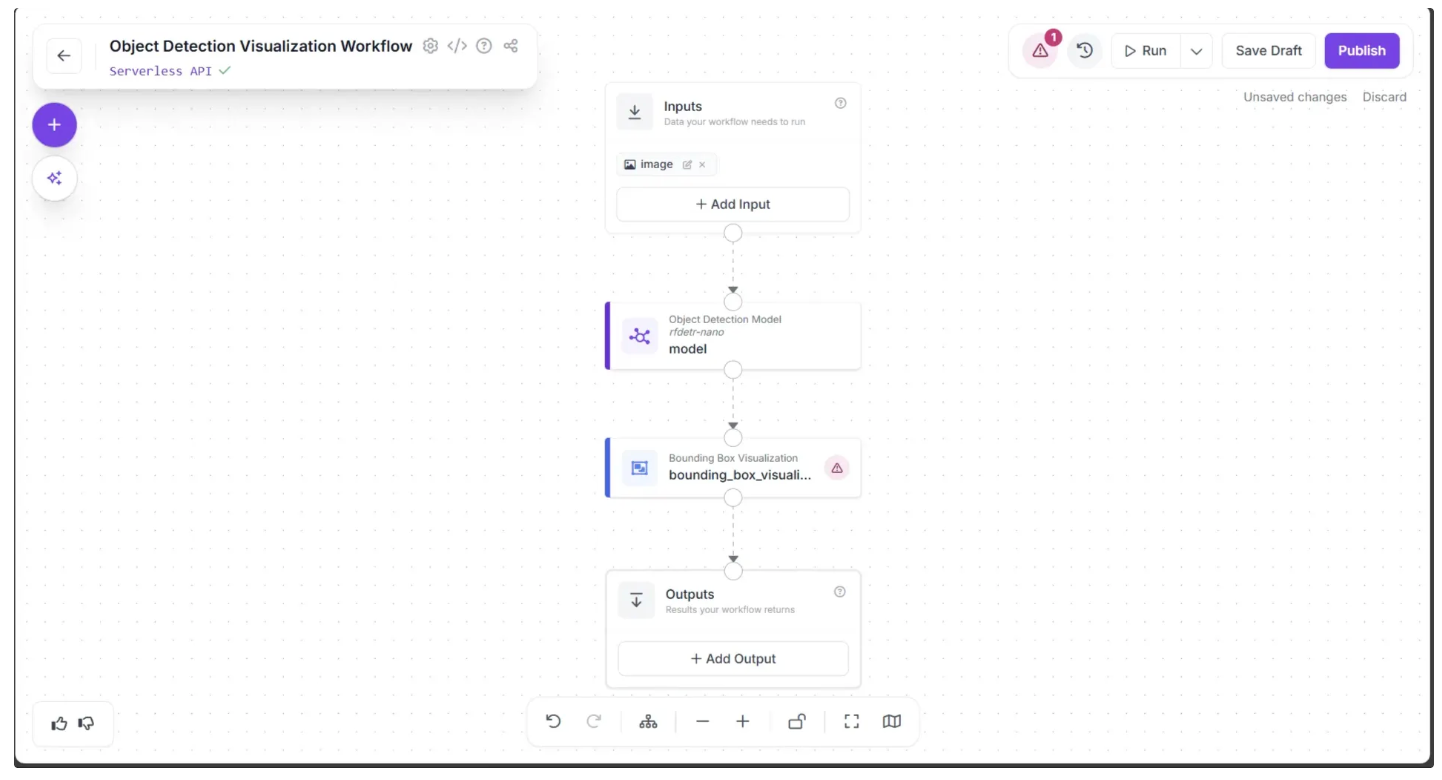
The Bounding Box Visualization block displays a warning (⚠️) icon. This indicates that, although it is connected to the Object Detection Model block, some required inputs for the visualization parameters are still undefined:
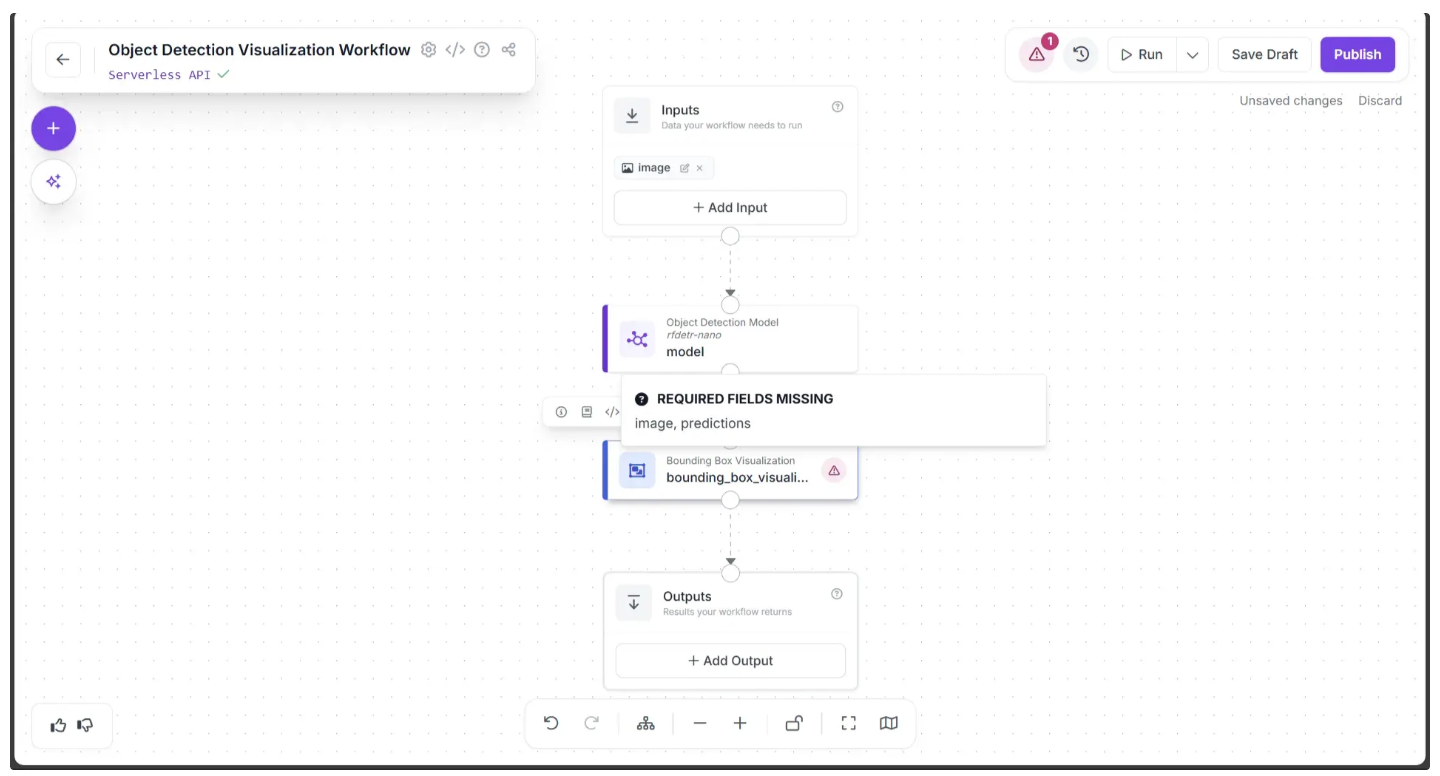
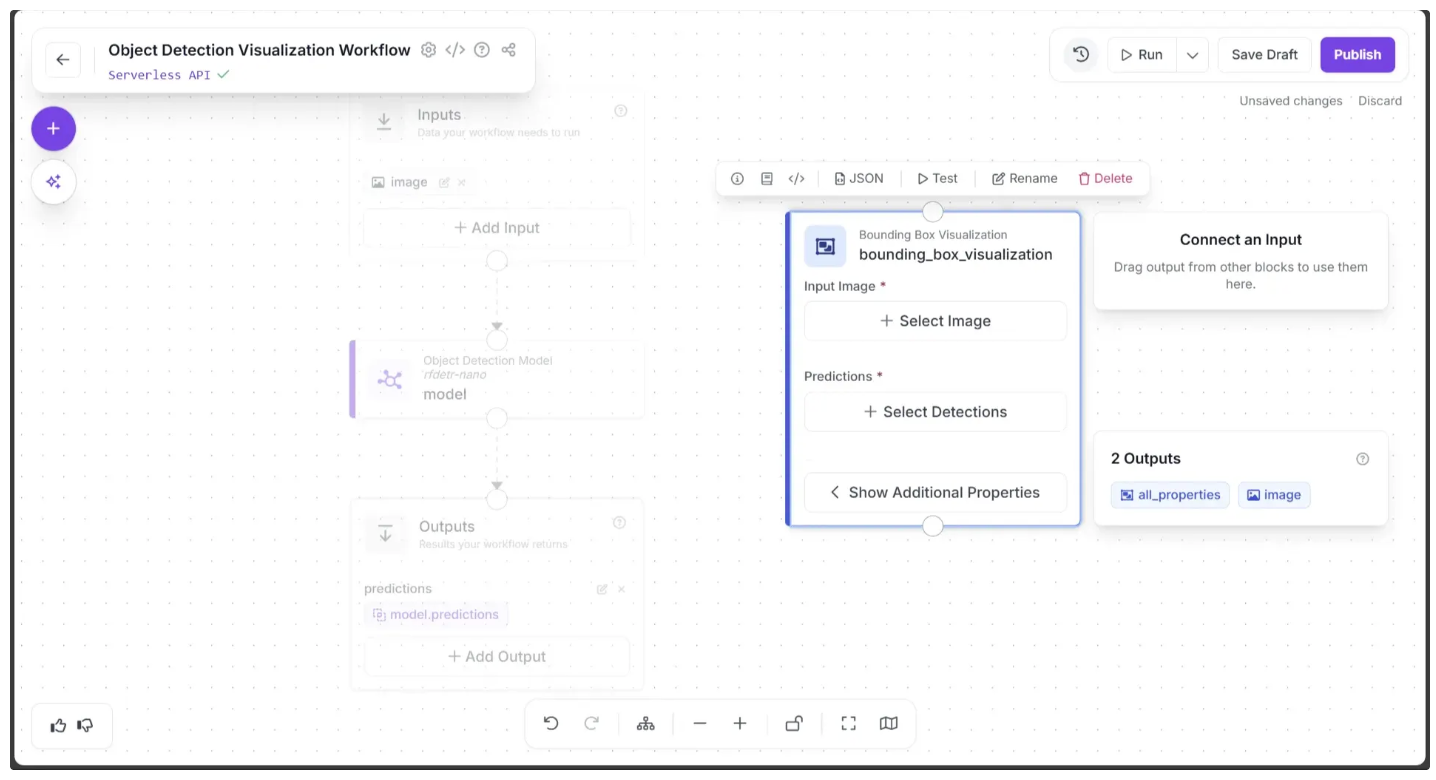
To resolve the “REQUIRED FIELDS MISSING” warning, we need to assign the required inputs for the Bounding Box Visualization block.
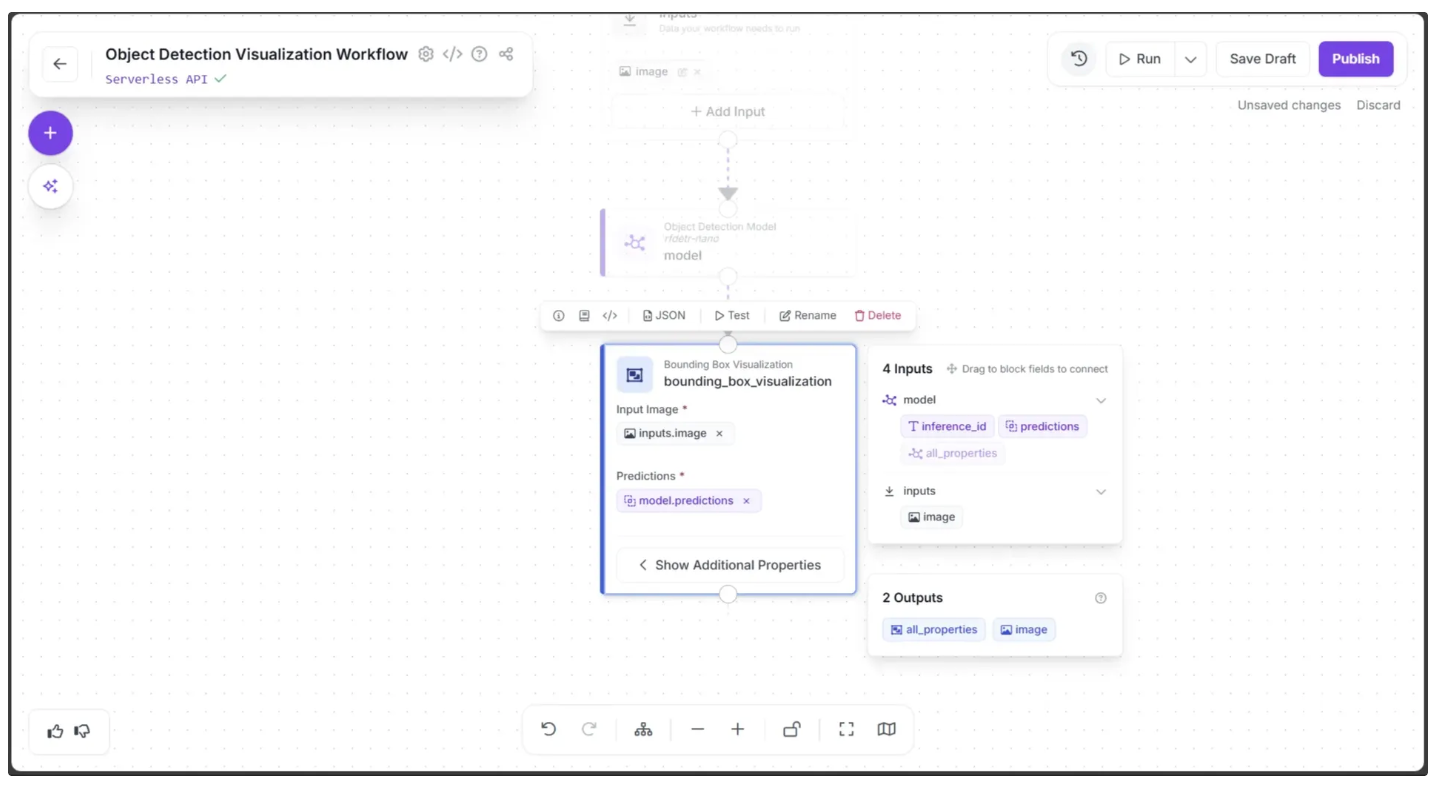
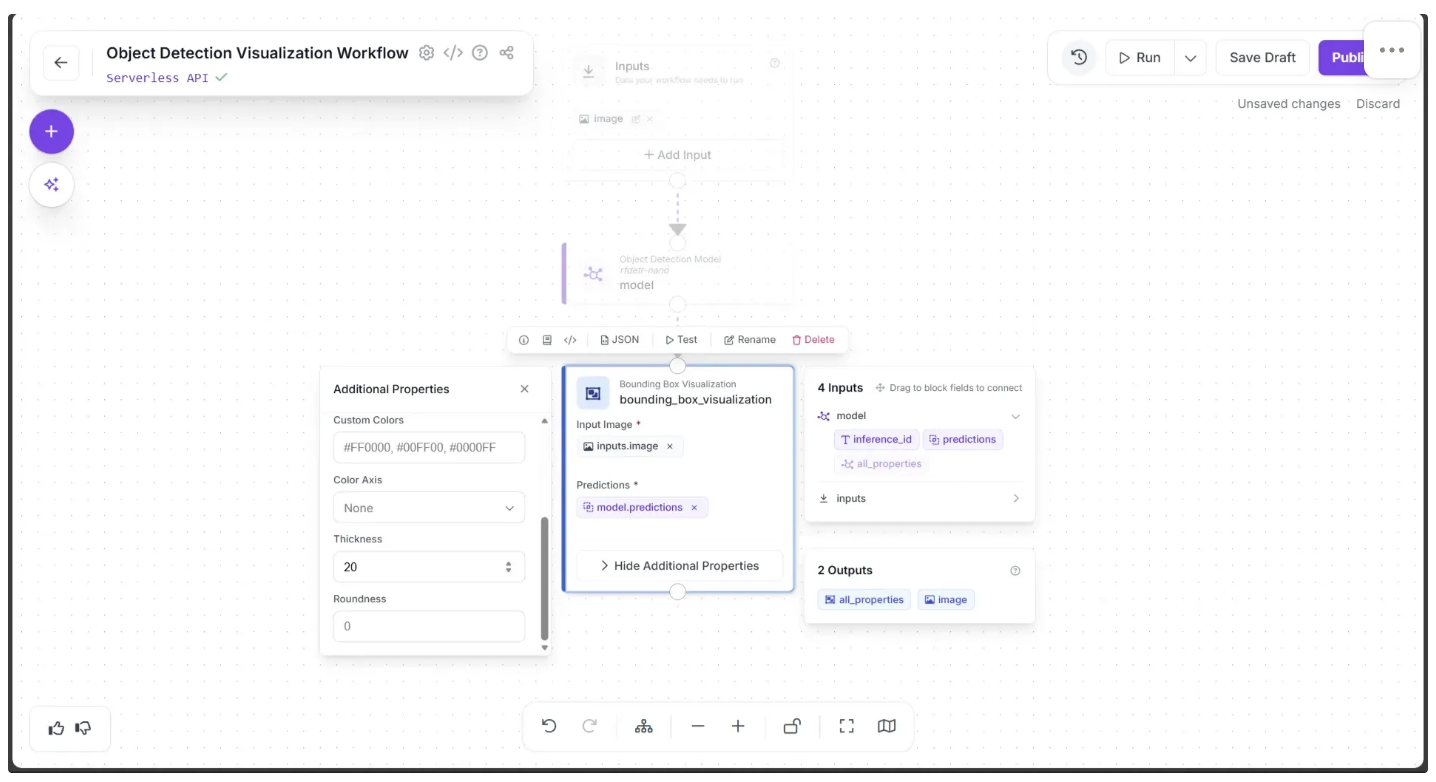
Click the block, which will display a popup, and drag the ‘image’ from the ‘inputs’ section of the popup into the Input Image parameter within the block. This specifies the image on which the bounding boxes will be drawn.
Next, drag the ‘predictions’ from the ‘model’ section of the same popup into the Predictions parameter within the block, which contains the detected object coordinates, as shown below:
Under “Show Additional Properties” you can also find various fields for controlling the visualization made by the block such as ‘Thickness’, Colors to be used etc. In order for the bounding box to be sufficiently visible input 20 as the ‘Thickness’.
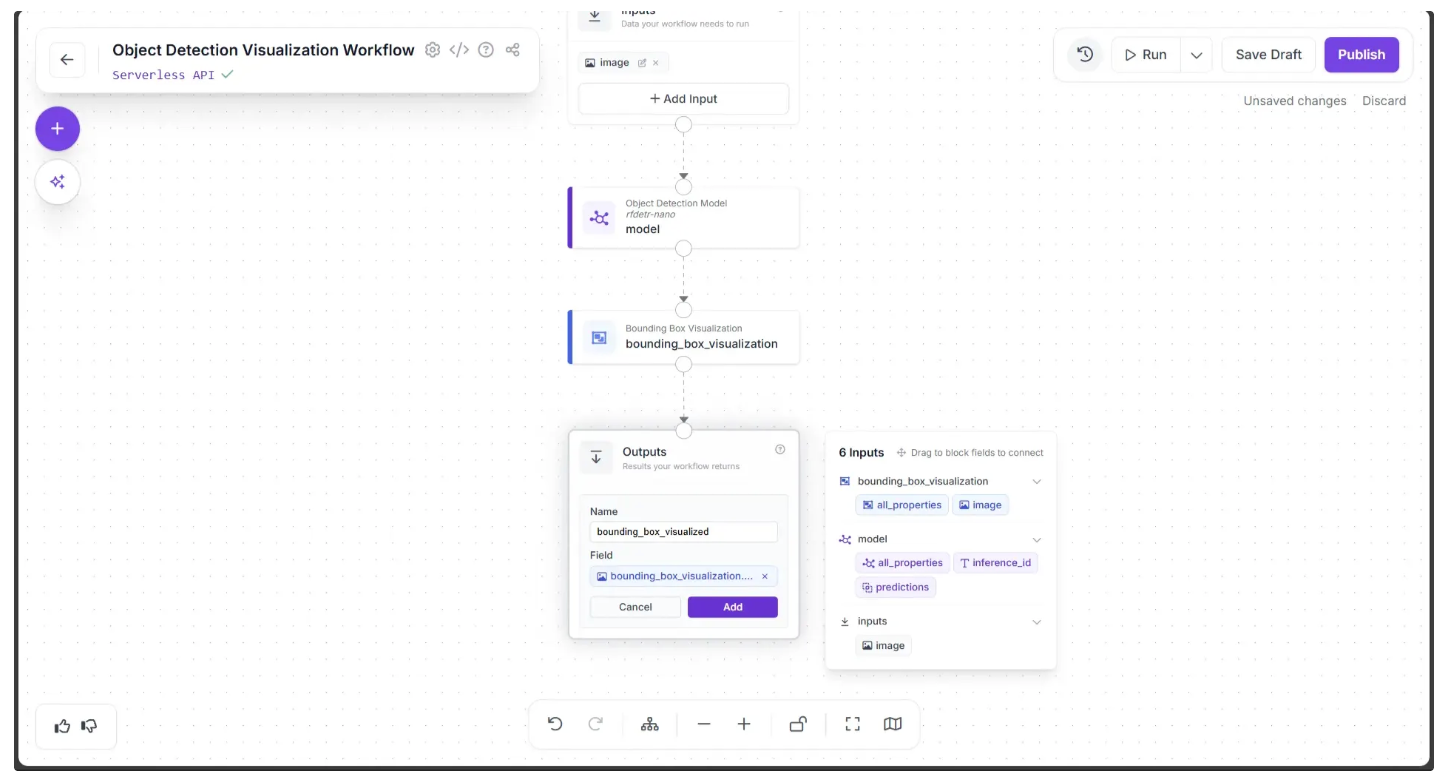
Now, create a connection from the Bounding Box Visualization block to the Outputs block, and add a new output to the workflow by clicking the “+ Add Output” button.
This will display input fields where you can specify the name of the variable that will hold the output. In our case, we named it ‘bounding_box_visualized,’ as shown below.
In the accompanying popup that appears when the Outputs block is clicked, drag and drop the ‘image’ under ‘bounding_box_visualization’ into the Outputs block’s Field parameter, as shown below, then click Add to save the output.
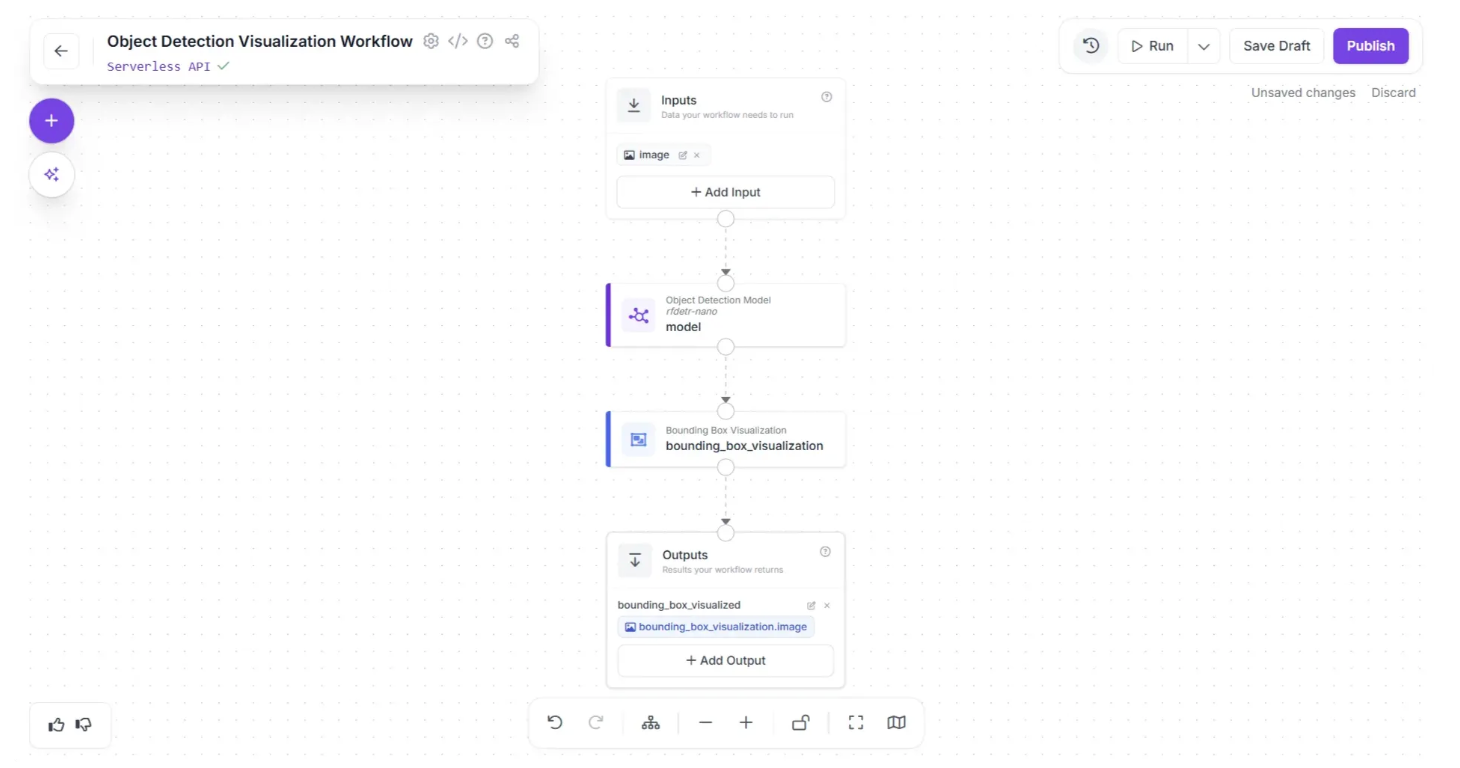
Once added, the workflow should appear like this:
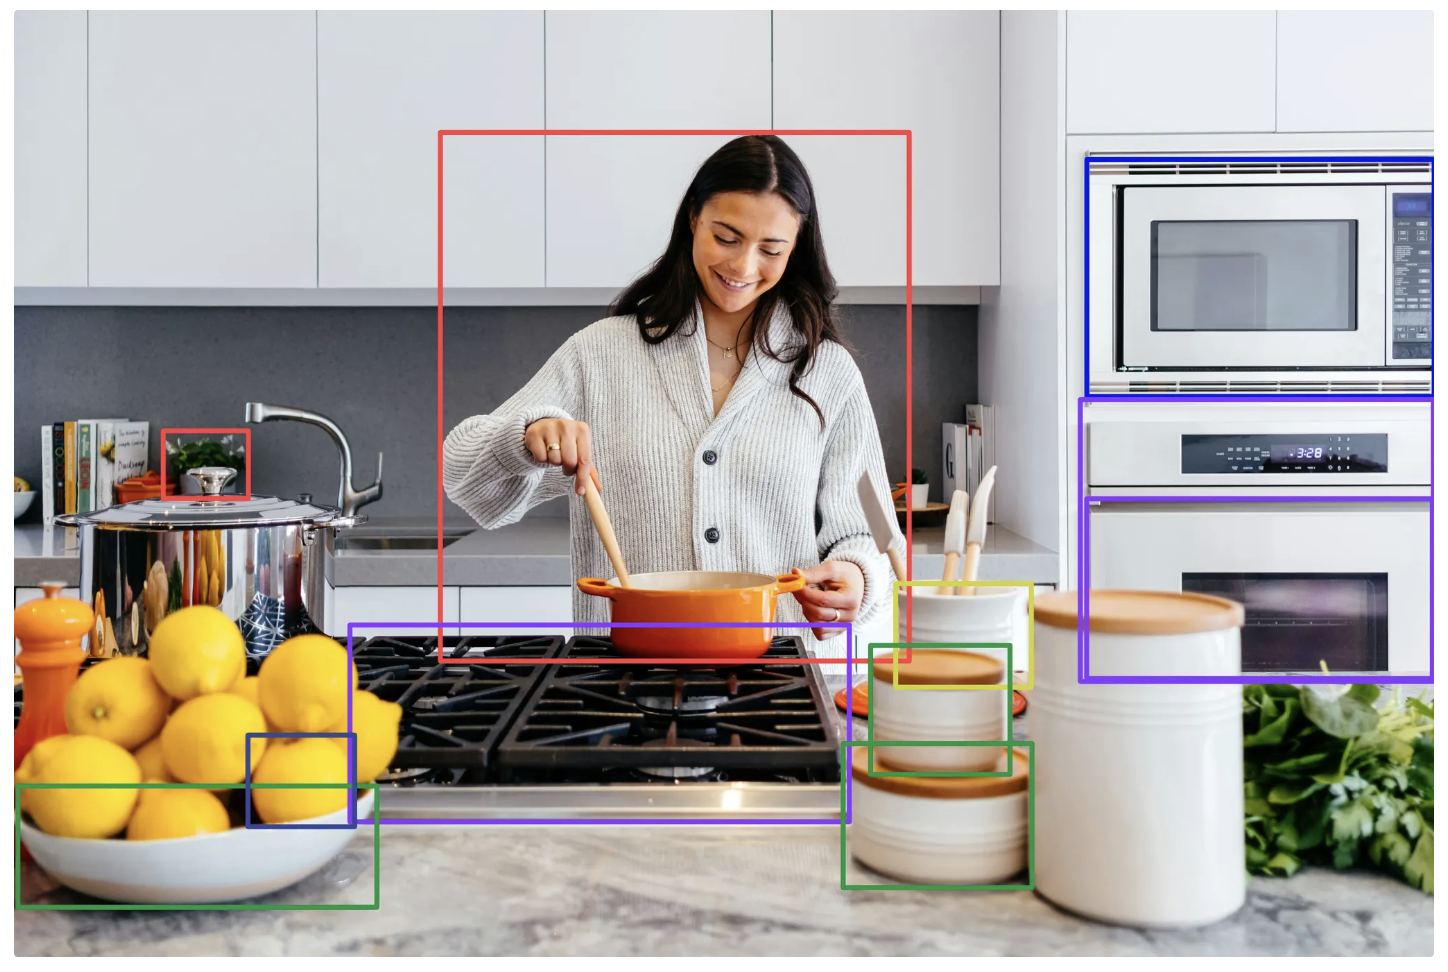
When you run the workflow on an image, the output should display the image with detected objects and their bounding boxes.
Step 3: Add Labels
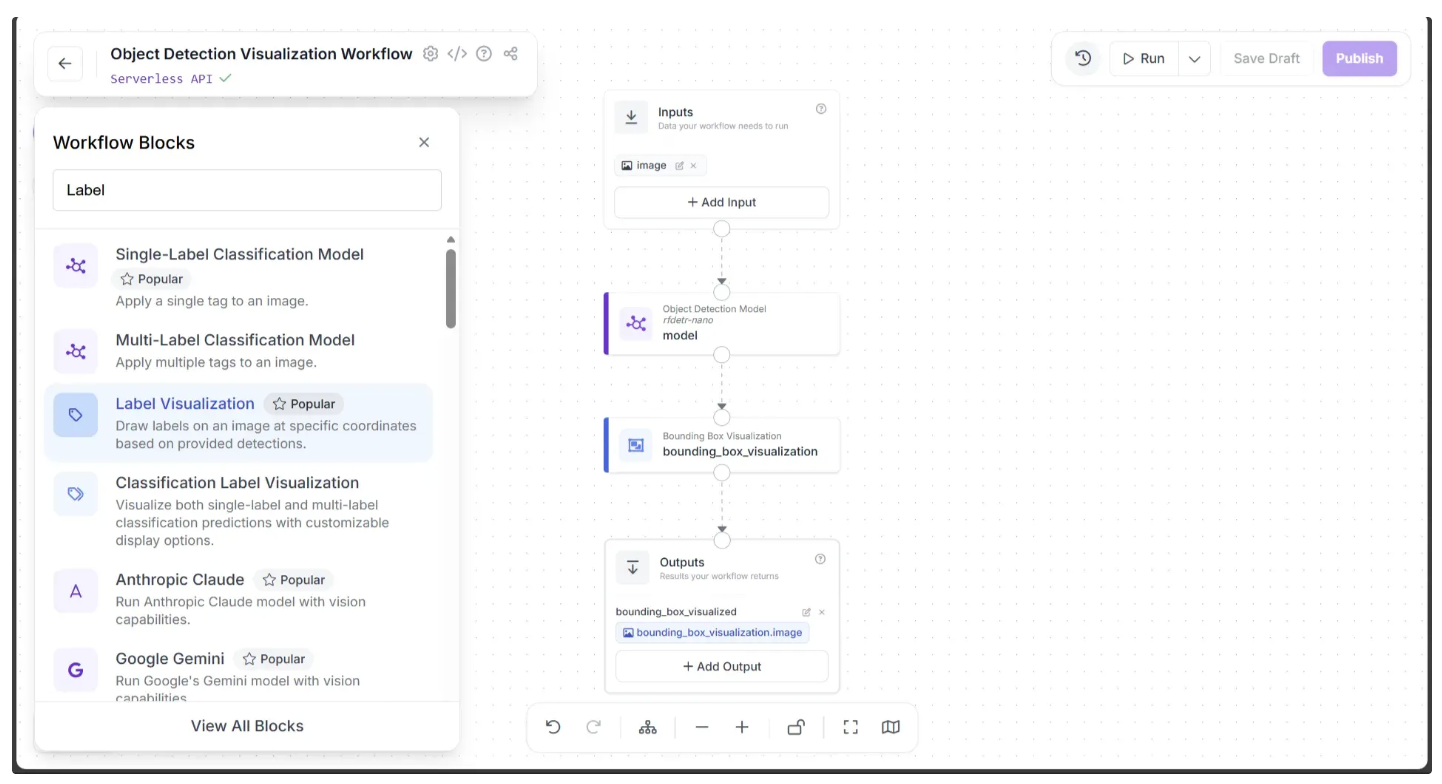
Now that we have added the bounding boxes, we need to add labels to the detected objects. Roboflow Workflows provides a “Label Visualization” block that makes this easy.
To add this block, click the “+” button in the top-left corner of the workflow canvas and from the menu of workflow blocks that appears, select the Label Visualization block, as shown below:
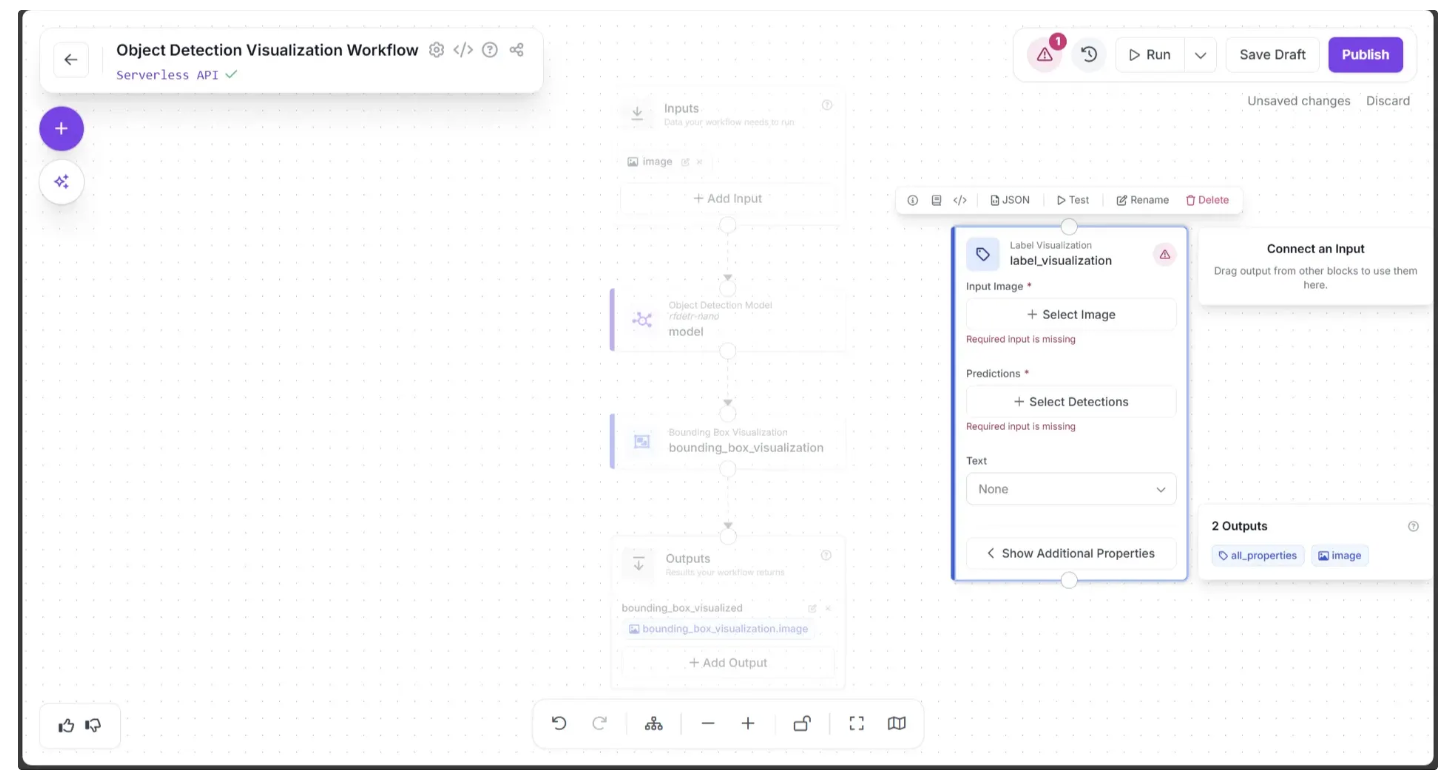
Once added, the Label Visualization block should appear on the canvas, as shown below:
Now, create a connection from the Bounding Box Visualization block to the Label Visualization block, and then from the Label Visualization block to the Outputs block.
You can remove the direct connection from the Bounding Box Visualization block to the Outputs block by hovering over the connection and clicking the “×” icon that appears. This is because we no longer need to output an image with only bounding boxes; instead, we want the final output image to include both bounding boxes and labels.
Next, in the popup that appears when the Label Visualization block is clicked, drag and drop the ‘image’ under the ‘bounding_box_visualization’ section into the Input Image parameter of the Label Visualization block, as shown below. This assigns the bounding box–visualized image as input for this block so that labels can be added to the image.
The labels are based on the prediction classes (names) generated by the Object Detection Model block. Therefore, drag and drop the ‘predictions’ from the ‘model’ section of the popup into the Predictions parameter of the Label Visualization block, as shown below, so that the block can use them to write the labels.
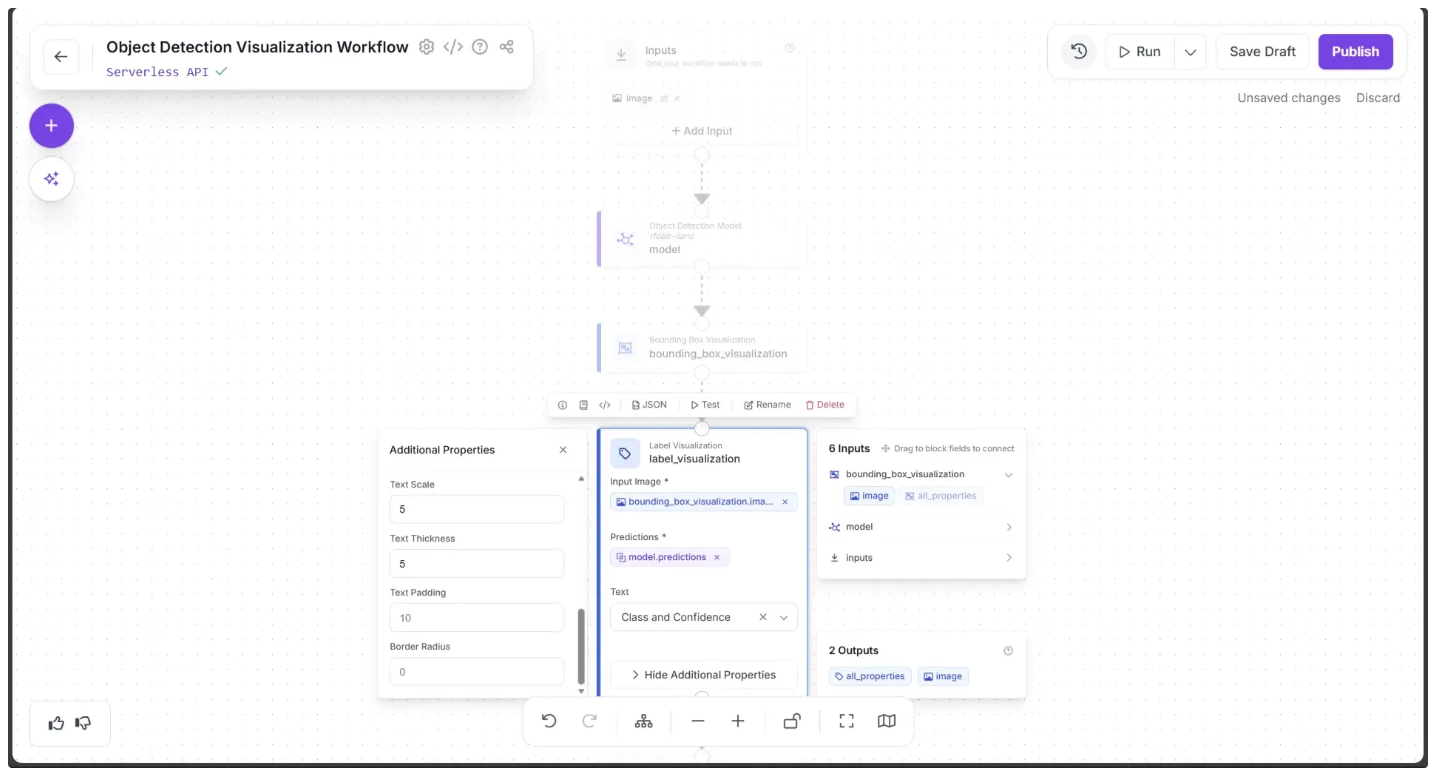
In the Label Visualization settings, select “Class and Confidence.” This will display both the detected object’s name and its confidence score within each label.
You can further customize the labels by opening the “Show Additional Properties” menu. Set the Text Scale to 5 and the Text Thickness to 5 to make the labels more prominent.
After completing these steps, click the Auto Layout button. Your workflow should then appear as shown below:

Step 4: Setup Outputs
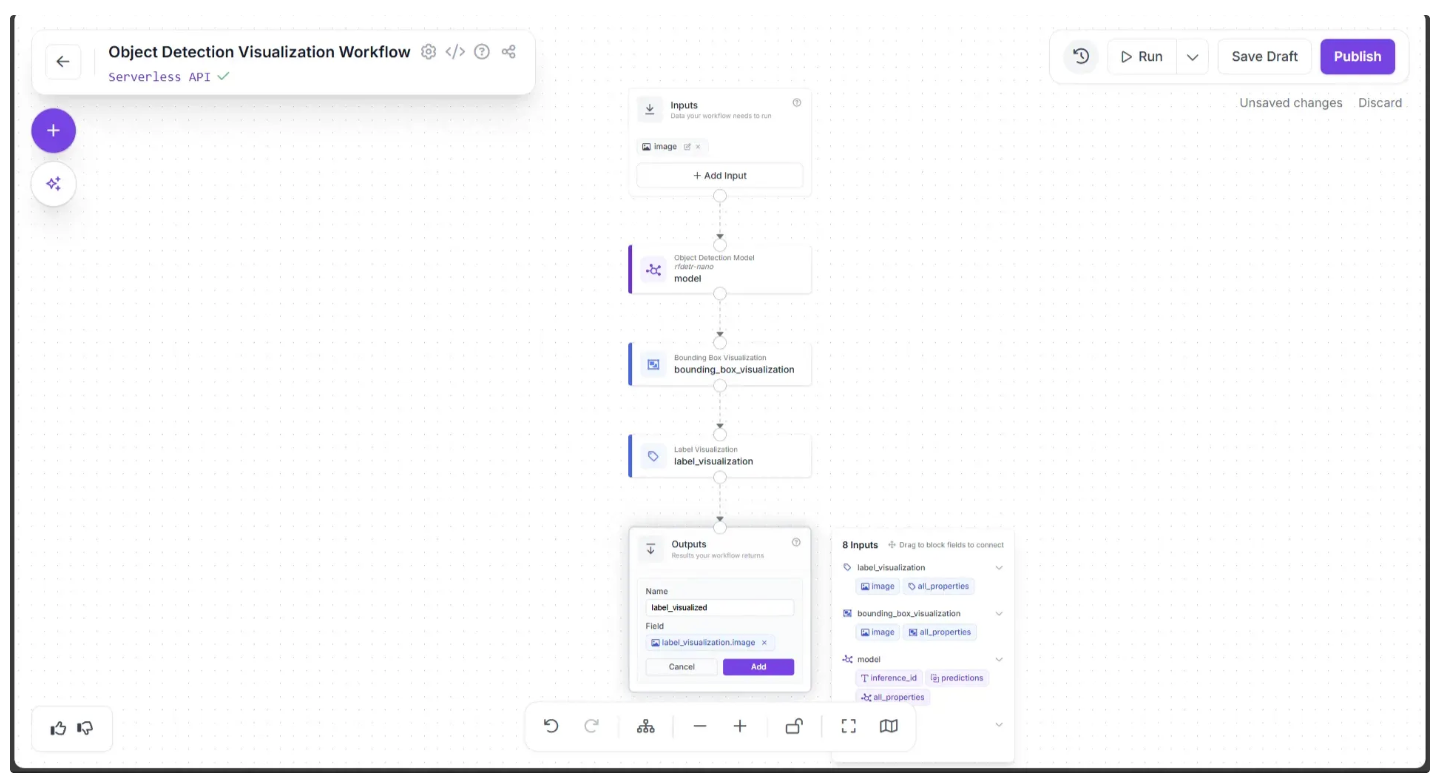
The Label Visualized image produced by the Label Visualization block serves as the final output of our workflow. To set this as the workflow output, we need to add it to the Outputs block.
Click on the Outputs block and enter ‘label_visualized’ in the Name field. In the Field section, drag and drop the ‘image’ under the ‘label_visualization’ section of the popup that appears when the Label Visualization block is clicked, then click Add, as shown below:
Once this is done, you can run the workflow by clicking the Run button in the top-right corner, as shown below:
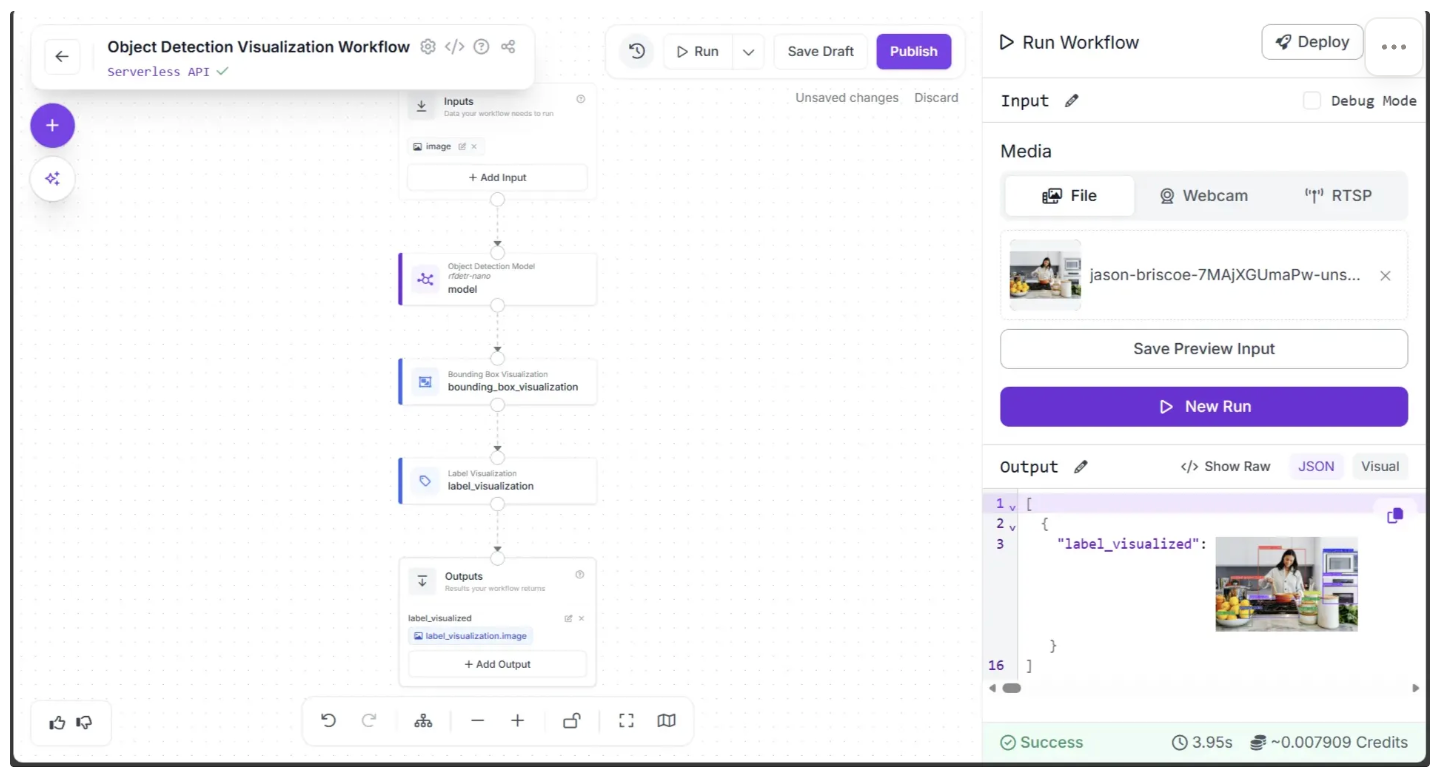
Below is the output produced by the workflow:
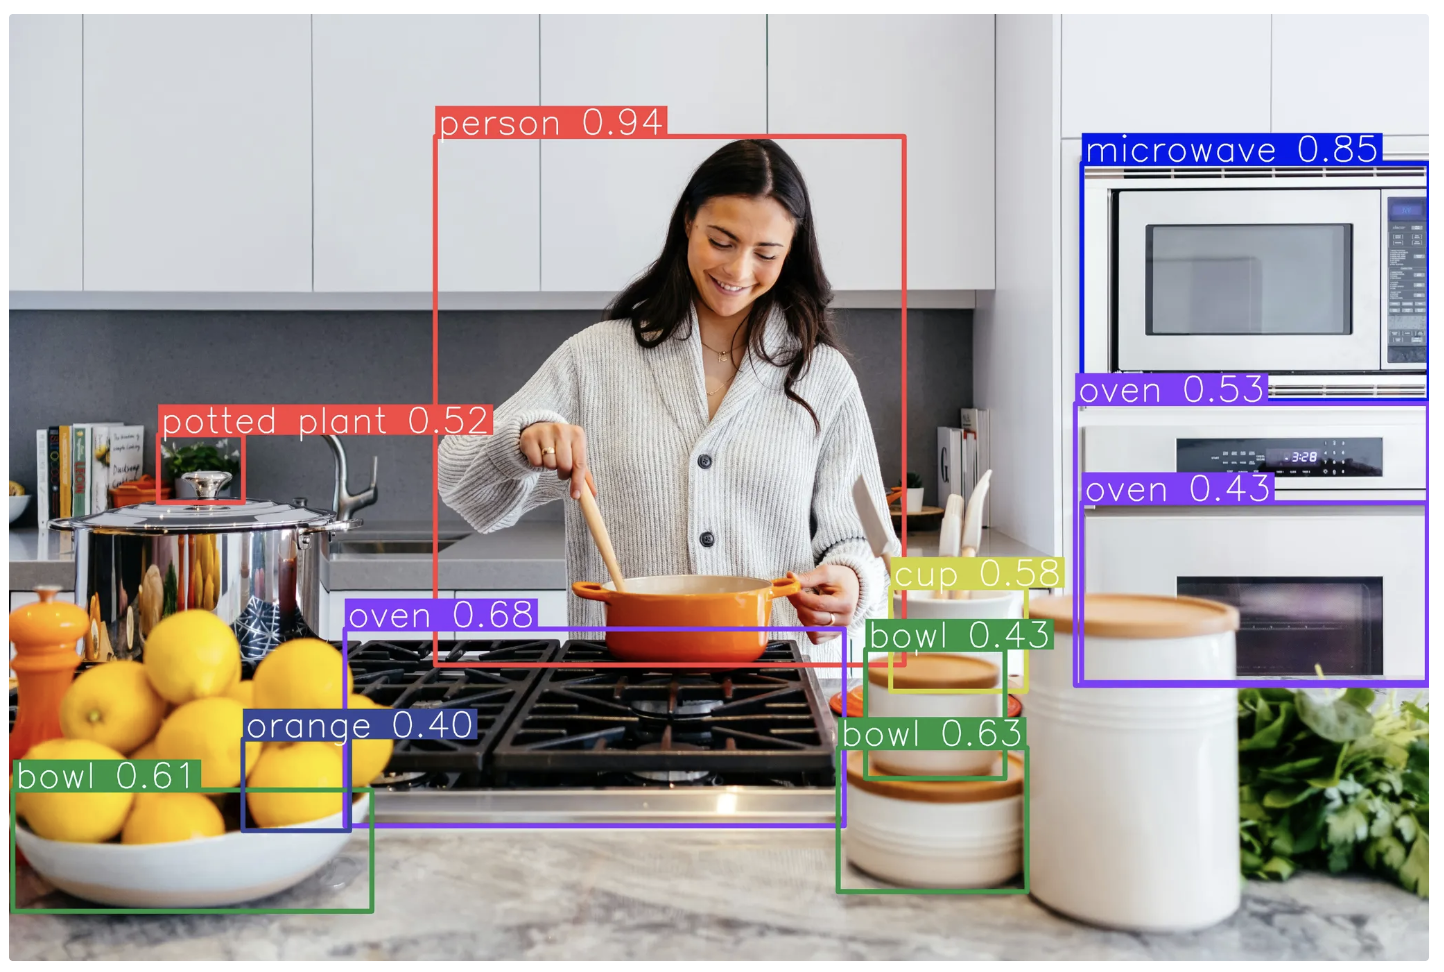
You can customize elements such as bounding box thickness, label content, which objects to detect or ignore, and the confidence score threshold by adjusting block parameters within the workflow, without writing any code.
Step 5: Run the Workflow via the API
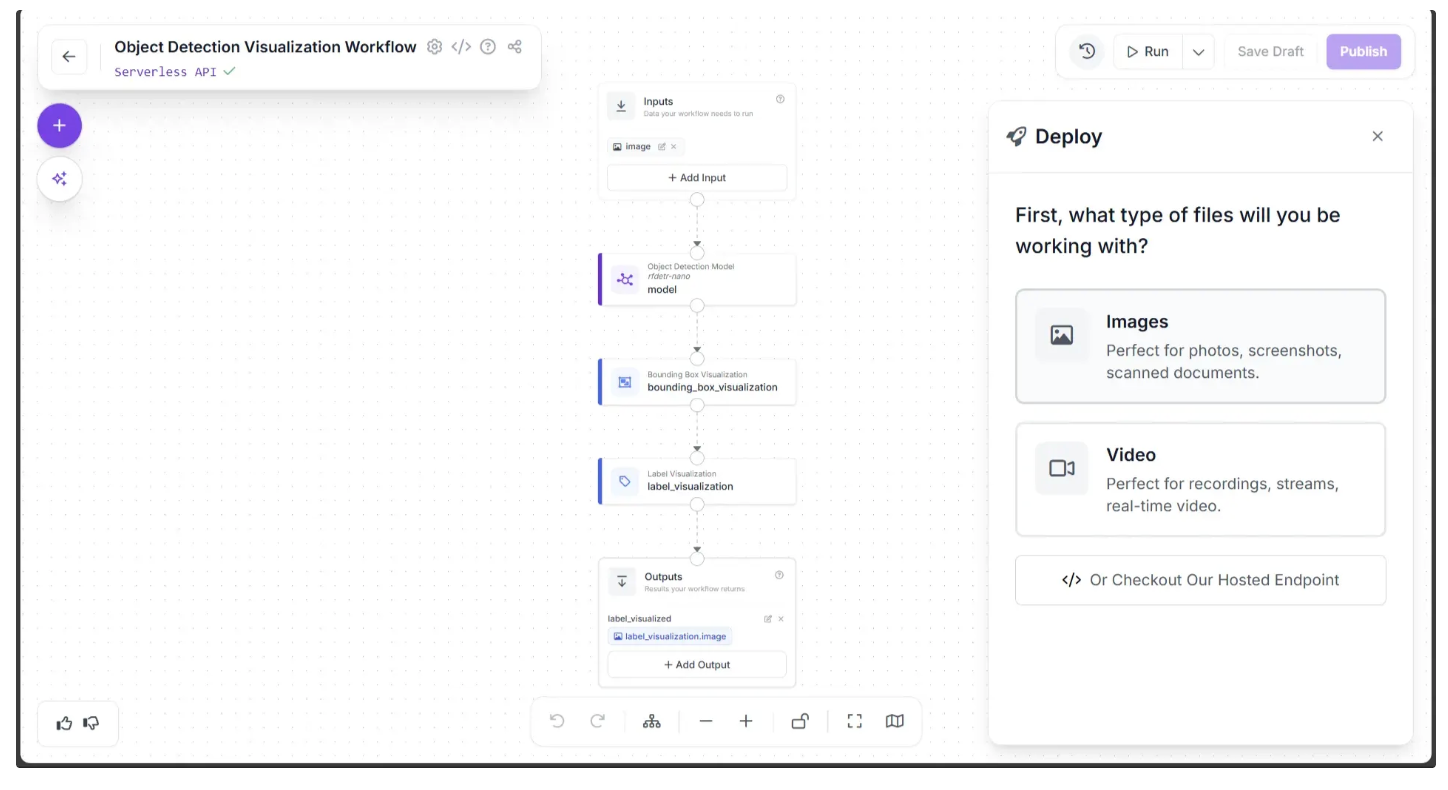
To run the workflow via an API, first click the dropdown icon to the right of the “Run” button in the top-right corner of the canvas, then click “Deploy,” as shown below:

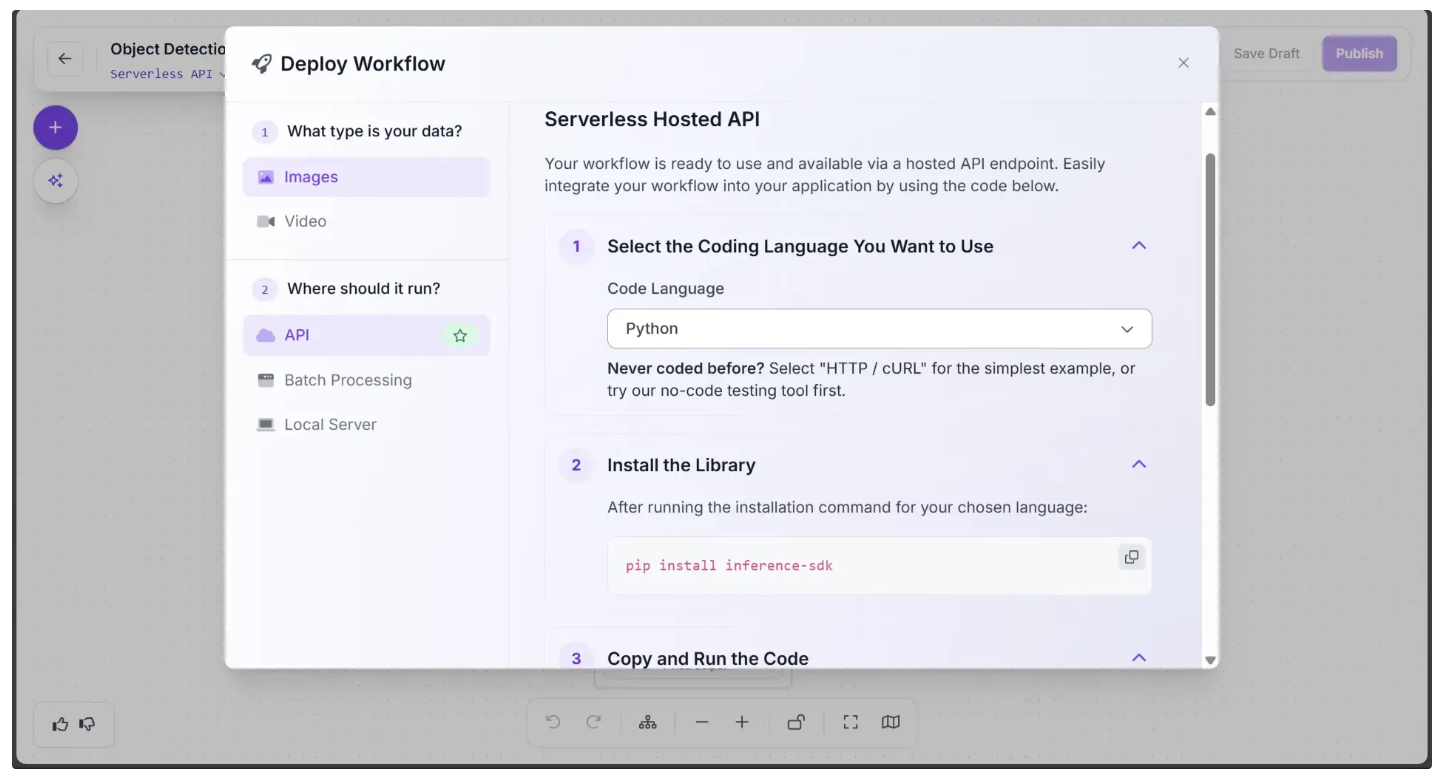
This opens the Deploy popup, where you can choose the type of files you’ll be working with either Videos or Images. In this example, we’ll select Images.
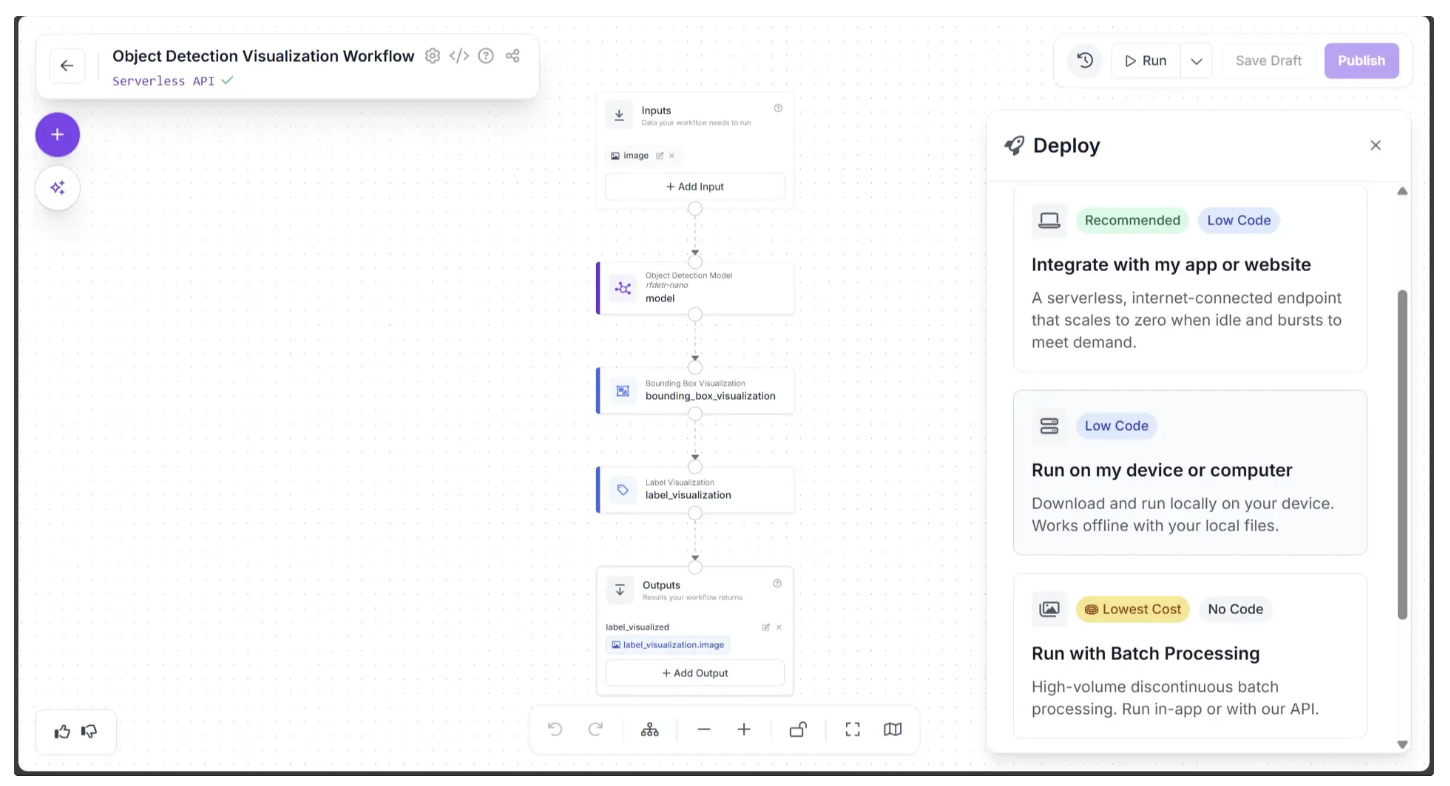
Next, you’ll see several deployment options that determine how you’ll interact with the workflow. Choose the option that fits your use case. For this example, select Integrate with my app or website, as shown below:
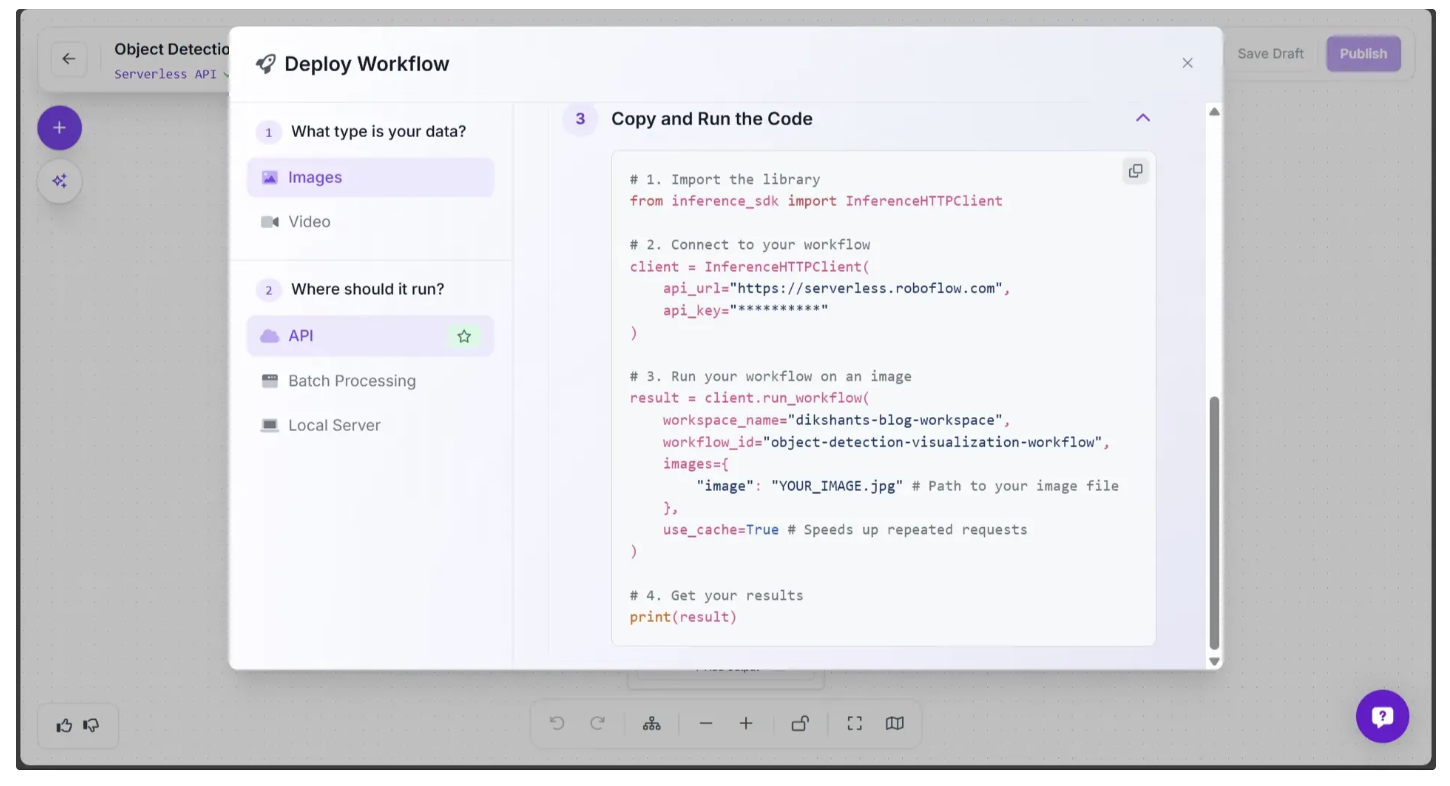
This displays a popup menu containing code snippets in multiple programming languages that you can use to run the workflow via the API and retrieve the output images.
In the “Copy and Run the Code” section, you’ll find a ready-to-use script for invoking the workflow through the API, as shown below.
Overview of Workflow Block Categories in Roboflow Workflows
The workflow we created above demonstrates only a small subset of the workflow blocks available in Roboflow. These workflow blocks can be grouped into the following categories:
- Models: Run a fine-tuned or foundation model, such as SAM 3, YOLO26-Pose, Depth Anything 3, etc.
- Visualizations: Visualize the output of a model using techniques like Keypoint Visualization, Polygon Visualization, Crop Visualization, etc.
- Logic and Branching: Control the flow of your workflow with blocks such as Continue If, Detections Filter, etc.
- Data Storage: Save data in a Roboflow dataset or an external database.
- Notifications: Send alerts, such as an SMS message or email.
- Video Processing: Analyze the contents of videos with tracking algorithms, time-in-zone analysis, and line-crossing checks.
- Transformations: Manipulate image and prediction data using transformations like Detection Offset, Detections Merge, etc.
- Classical Computer Vision: Run classical computer vision tasks, such as edge detection, template matching, and size measurement.
- Enterprise: Connect Roboflow to your enterprise systems, such as via MQTT or Modbus TCP.
- Advanced: Advanced blocks for specific use cases, like PASS/FAIL analysis, data caching, and embedding similarity.
- Custom: Create and run custom blocks using Python.
Conclusion: No-Code Computer Vision API Development
Roboflow Workflows allow you to build end-to-end computer vision pipelines without writing any code, while also providing seamless access through an API.
In this guide, we used Roboflow Workflows to create a fully no-code object-detection visualization pipeline, where the available workflow blocks provided enough flexibility to easily customize both visualizations and detections.
Roboflow Workflows support a wide range of workflow blocks, from simple image transformations like blurring to GPU-intensive models such as Segment Anything 3, all of which you can chain together with just a few clicks. This allows you to focus on solving real problems instead of worrying about coding, infrastructure, or deployment.
You can use Roboflow Workflows to build image segmentation, background removal, and document understanding pipelines entirely with no code. Get started today.
Written by Dikshant Shah
Cite this Post
Use the following entry to cite this post in your research:
Contributing Writer. (Feb 2, 2026). No-Code Computer Vision API Development. Roboflow Blog: https://blog.roboflow.com/computer-vision-api-development/