
Corrosion is the gradual degradation of metals caused by chemical or electrochemical reactions with their environment, often leading to rust, cracks, or loss of structural strength. It poses serious risks to infrastructure, machinery, pipelines, and cultural assets, making early detection essential for safety and cost savings.
Corrosion detection using computer vision uses image analysis and deep learning techniques such as classification, object detection, and segmentation to automatically identify and measure corroded areas in photos or videos. This approach enables faster, more accurate, and large-scale monitoring, helping industries maintain assets more efficiently and prevent failures.
Why Is Corrosion Detection Important?
Corrosion is often called the “silent destroyer” because it progresses gradually, often unnoticed, until serious damage has already occurred. Its impact spans across safety, environment, economy and manufacturing, and even cultural heritage.
Corrosion weakens materials, making structures brittle and prone to collapse. It can cause leaks from pipelines and tanks, leading to environmental pollution and safety hazards like fires or explosions. Beyond infrastructure, corrosion also damages historical monuments, artworks, and cultural assets.
Some forms, such as stress corrosion cracking, are particularly dangerous since they develop unnoticed until sudden failure occurs. Detecting corrosion early is critical to avoid costly repairs, protect the environment, and extend the life of assets.
Corrosion Detection Techniques in Computer Vision
Corrosion detection in computer vision is the process of using image or video analysis techniques to automatically identify and evaluate rust or material degradation on surfaces. Computer vision systems are trained on corrosion images to recognize its distinct visual cues such as color changes, texture variations, pits, or cracks.
Modern approaches use deep learning models, like classification, object detection, and segmentation to not only detect the presence of corrosion, but also locate affected areas, measure their extent, and monitor progression over time. This makes inspections faster, safer, and more objective, while enabling continuous monitoring of large or hard-to-reach structures such as bridges, pipelines, ships, and aircraft. Following are the three main computer vision techniques for corrosion detection:
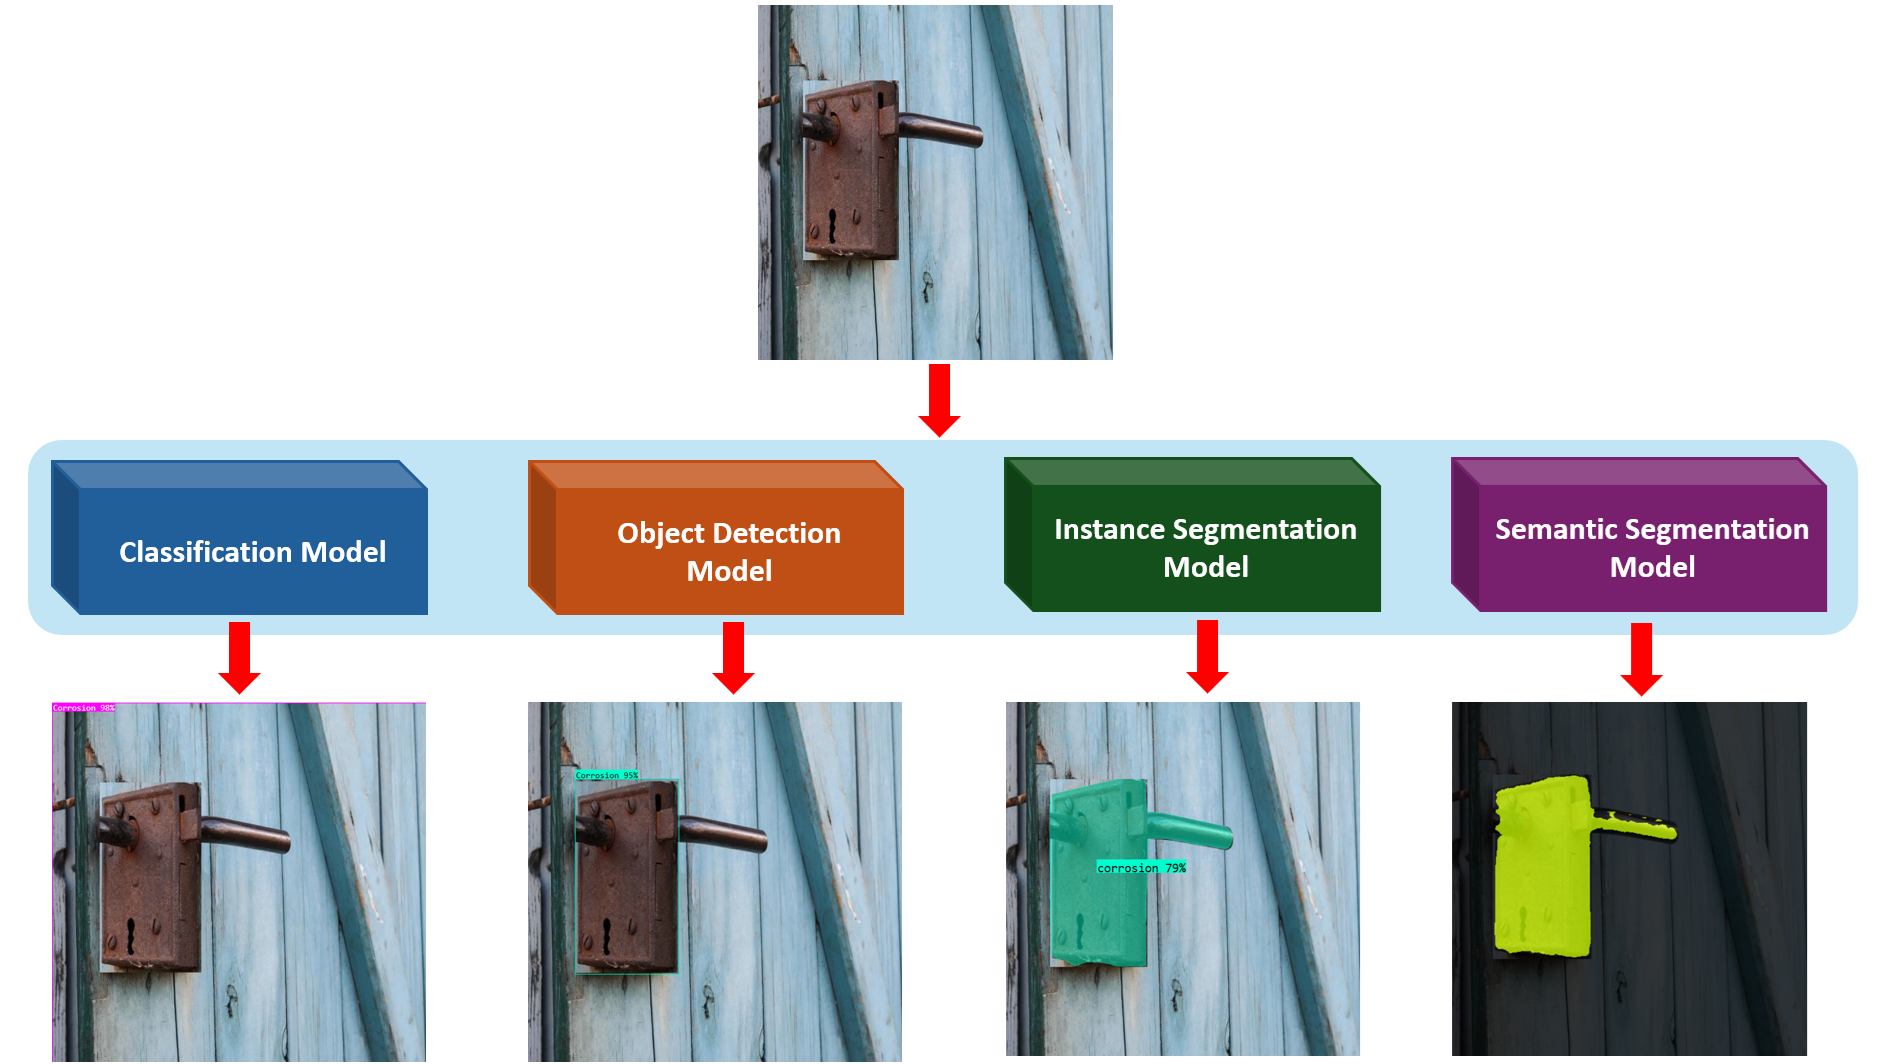
1. Image Classification
In this approach, the system is trained to answer a yes/no or multi-class question about an entire image. For corrosion, this means classifying whether an image shows corrosion or not, or even grading the severity level (e.g., “no corrosion,” “mild corrosion,” “severe corrosion”).
For example, a drone captures pictures of a bridge, and a classification model quickly flags which images contain corrosion for further inspection.
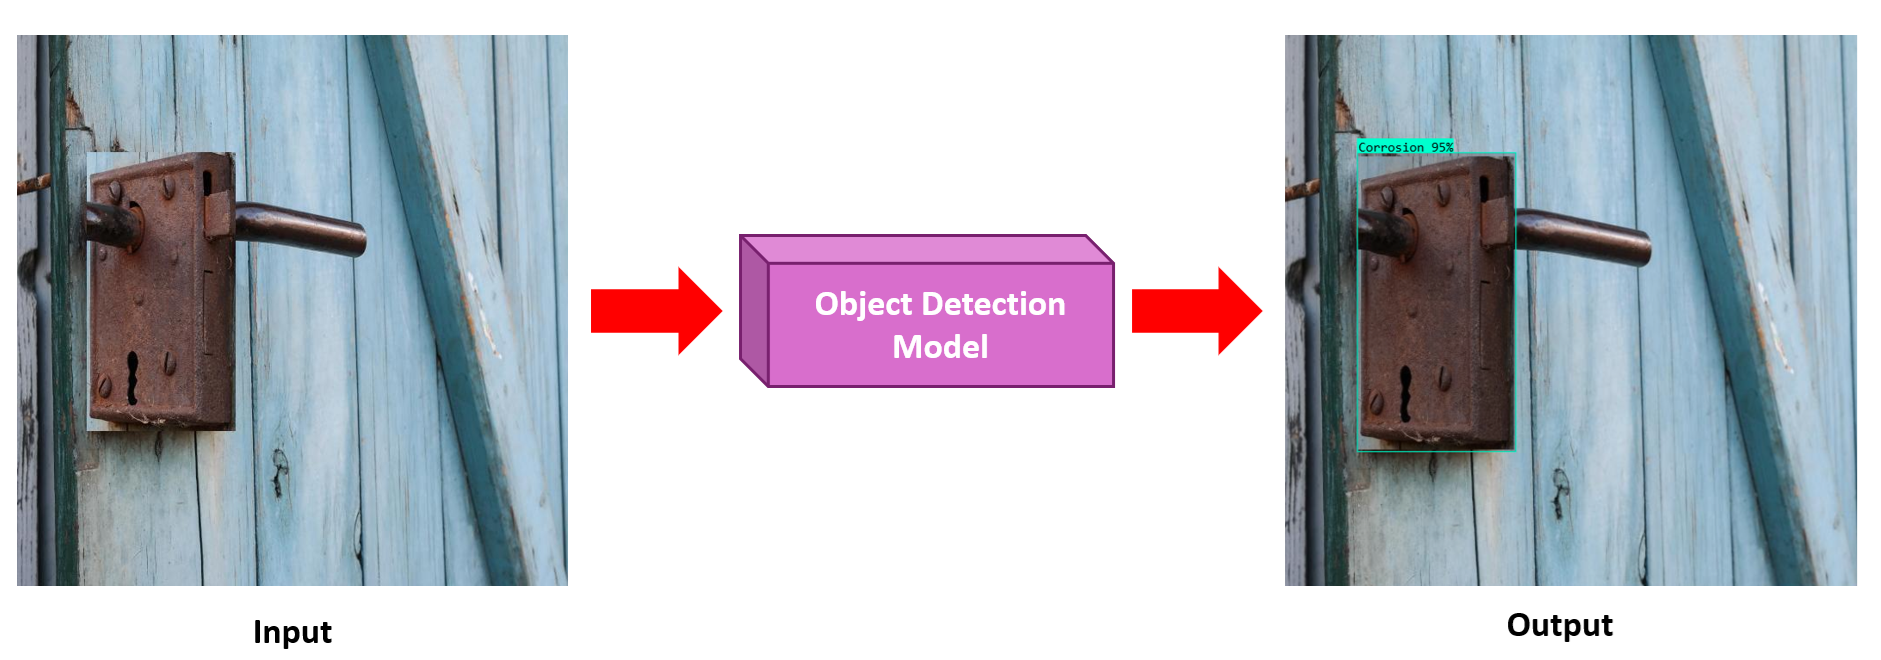
2. Object Detection
Object detection goes beyond classification by identifying where corrosion occurs in an image. It places bounding boxes around corroded areas, making it possible to localize the damage.
For example, on an oil pipeline image, an object detection model like YOLO or RF-DETR highlights each corroded spot with a box, allowing inspectors to see not just that corrosion exists but also its location.
3. Segmentation
Segmentation provides the most detailed analysis by labeling each pixel in an image as “corrosion” or “no corrosion.” This produces precise masks showing the exact shape, size, and coverage of corroded regions. Corrosion can be detected using instance segmentation or semantic segmentation.
For example, on a ship’s hull, a segmentation model creates a corrosion map, enabling engineers to calculate what percentage of the surface is corroded and plan repair work.
Explore the Best Corrosion Detection Tools
Detecting corrosion at scale requires not just training AI models, but also the right tools for data preparation, labeling, and deployment. A good tool, such as Roboflow, should make it easy to manage large image datasets, with streamlined upload, labeling, and version control.
Annotation speed and accuracy are critical, so features like AI-assisted labeling or smart drawing tools can help reduce manual effort when marking corrosion patches. For model development, platforms should support both training from scratch and fine-tuning of existing architectures, giving flexibility to adapt to rust detection tasks.
On the deployment side, teams need the ability to export models into their preferred environments - whether that’s a web application, mobile device, embedded edge hardware, or via an API.
Roboflow brings all of these capabilities together in one platform. It combines dataset management with AI-assisted annotation features like Label Assist, Smart Polygon, and Box Prompting to speed up corrosion labeling. Users can train directly within Roboflow or fine-tune leading models like YOLO and RF-DETR for corrosion detection.
Trained models can be deployed flexibly to web, mobile, or edge devices (like Raspberry Pi or Jetson) - or integrated directly via Roboflow’s Inference API. And with Roboflow Workflows, teams can quickly build computer vision applications that chain multiple models and tasks together, such as using object detection to localize corroded regions, then applying segmentation to precisely map the affected areas, and finally classifying severity levels.
How To Do Corrosion Detection with Roboflow
In this section, we will explore how to train models and build applications for corrosion detection using Roboflow. You’ll learn how to prepare and label datasets, train different types of models (classification, object detection, and segmentation), and then deploy them into real-world applications with Roboflow Workflows.
What you’ll learn:
- Dataset Preparation: How to upload, label, and manage corrosion datasets in Roboflow.
- Model Training: How to train classification, object detection, and segmentation models for corrosion detection.
- Building Applications: How to use trained model in Roboflow Workflow to build application and deploy the application using a web app built with NiceGUI.
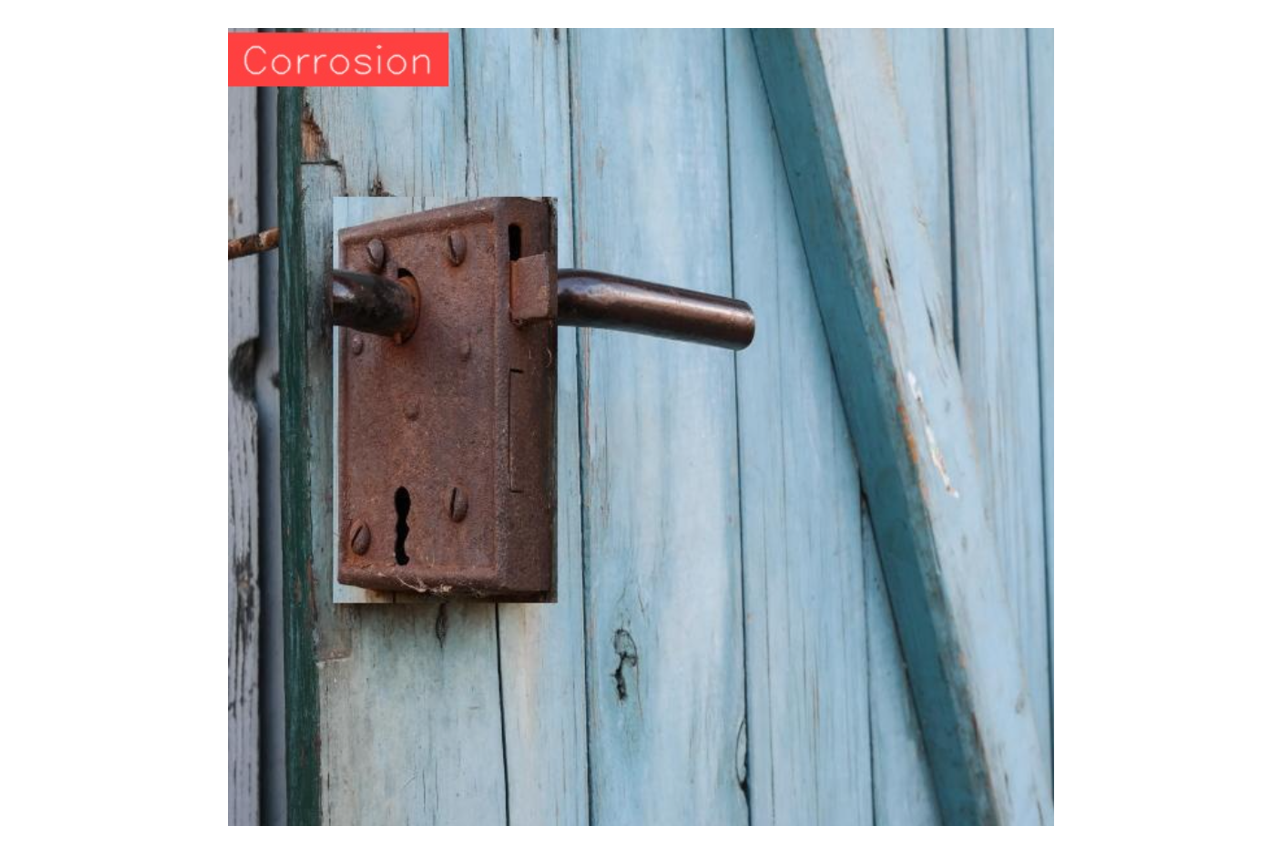
Example #1: Detecting Corrosion using Image Classification
In this example we will see how to build and use image classification model to detect corrosion in an image. The goal is to teach the model to decide if an image belongs to a certain class e.g., corroded vs not corroded.
The steps are following:
Step #1 Prepare a Dataset for Classification
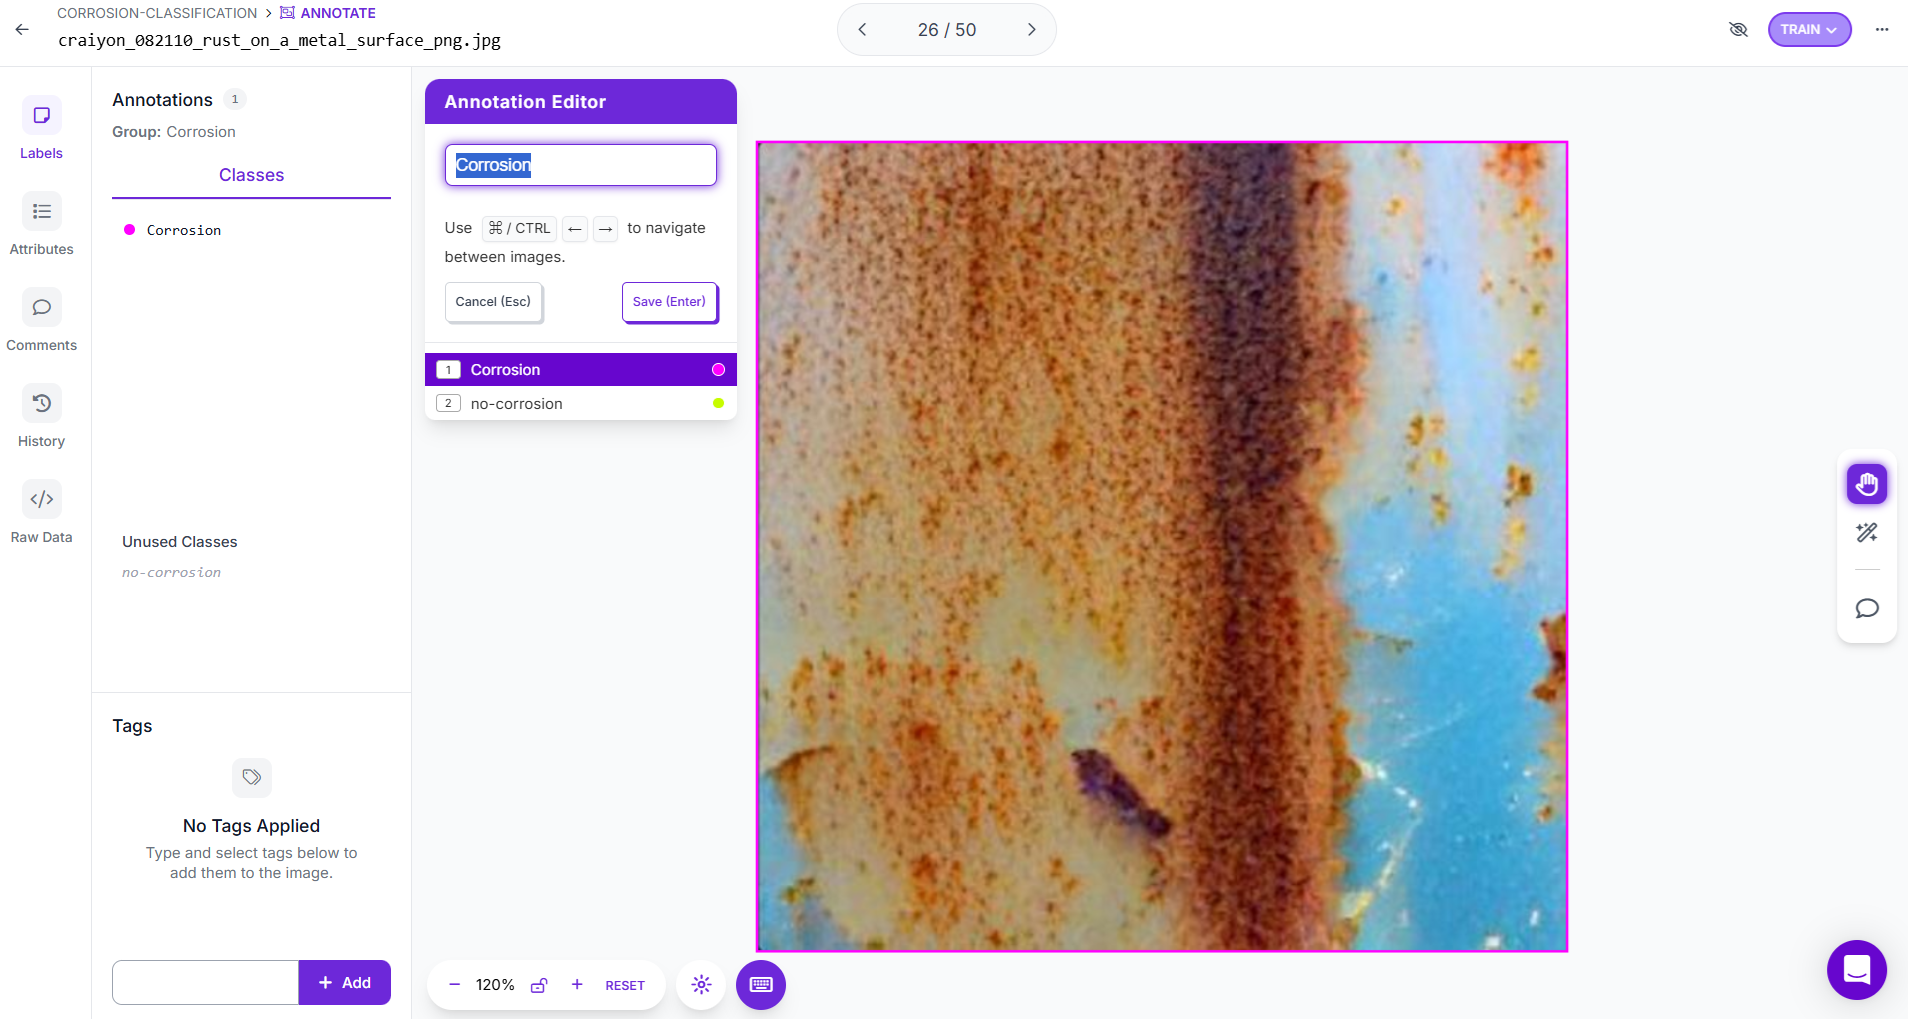
To create an image classification dataset in Roboflow, you first need to start a new Classification Project. After creating the project, upload all of your corrosion images into the workspace. Each image must then be assigned to a class label depending on what it represents. For example, you might use simple binary labels such as “corrosion” and “no corrosion,” or, if needed, define more fine-grained categories like “rust,” “pitting,” and “clean” or “mild”, “moderate”, and “severe” corrosion.
A key point in preparing a classification dataset is to keep the classes balanced. In other words, ensure you have a roughly similar number of images in each category. Balanced data prevents the model from being biased toward the more common class and improves fairness and accuracy in predictions.
General Corrosion Class Names Used in Datasets & Models
Corrosion/No-Corrosion: The simplest and most common binary classification.
Rust: A general label for visible iron/steel corrosion (often used as the single positive class).
Mild / Moderate / Severe Corrosion or Rust: Severity-level classes (popular in industry datasets for inspection).
Pitting: Localized corrosion spots (sometimes a separate class).
Once labeling is complete, you can generate different dataset versions in Roboflow by applying preprocessing or augmentations, such as rotations, flips, or brightness adjustments, to help the model generalize better to real-world conditions.
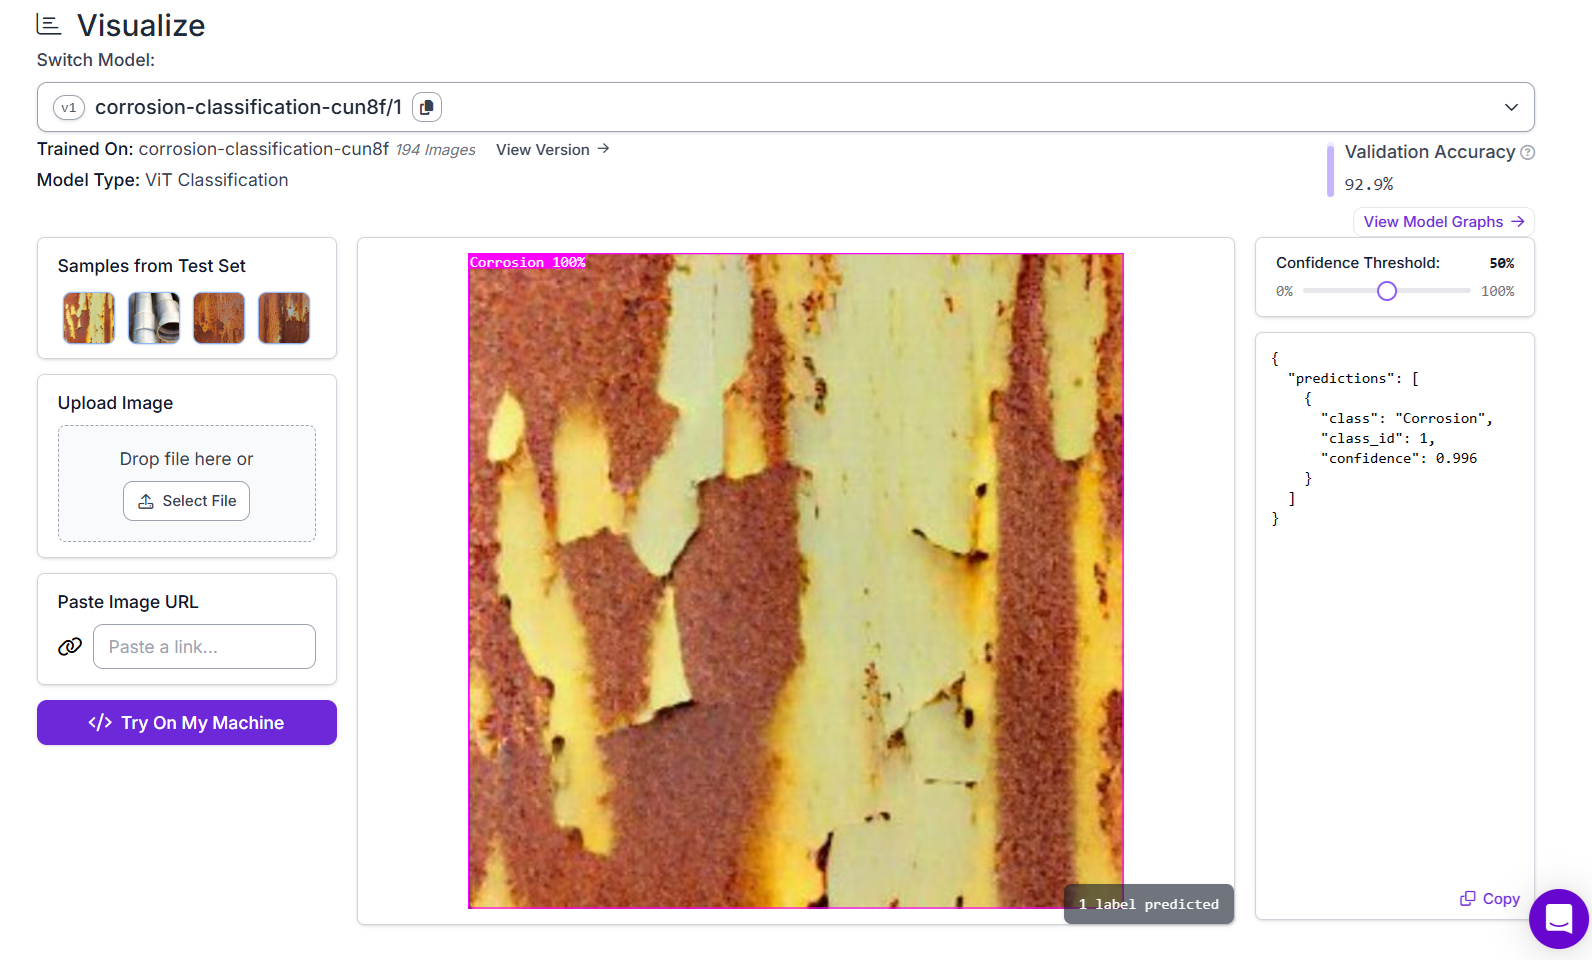
Step #2 Train the classification model
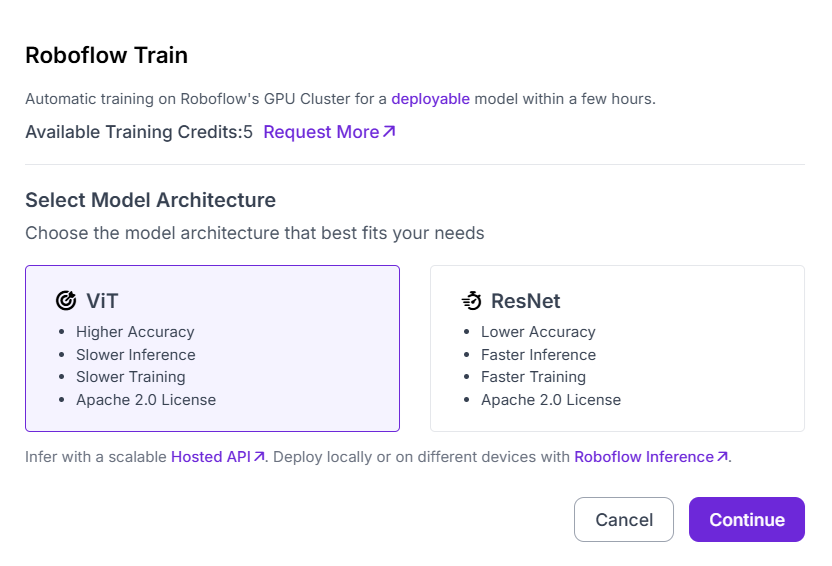
When you move to training, the first step is to select the model architecture. Roboflow offers choices such as ViT (Vision Transformer) and ResNet for classification tasks. ViT provides higher accuracy but comes with slower training and inference, making it ideal when accuracy is the priority. ResNet, on the other hand, trains and infers more quickly but may not reach the same level of accuracy, making it a better fit for lightweight or resource-constrained deployments. In this case, I selected ViT Classification for corrosion image classification.
On the next screen, Roboflow recommends starting from a pre-trained checkpoint, and for classification tasks this is typically ImageNet. Training from ImageNet gives the model prior knowledge of general visual features such as edges, textures, and shapes, which it can then adapt to corrosion images. This transfer learning approach significantly reduces training time and improves performance compared to starting from random initialization.
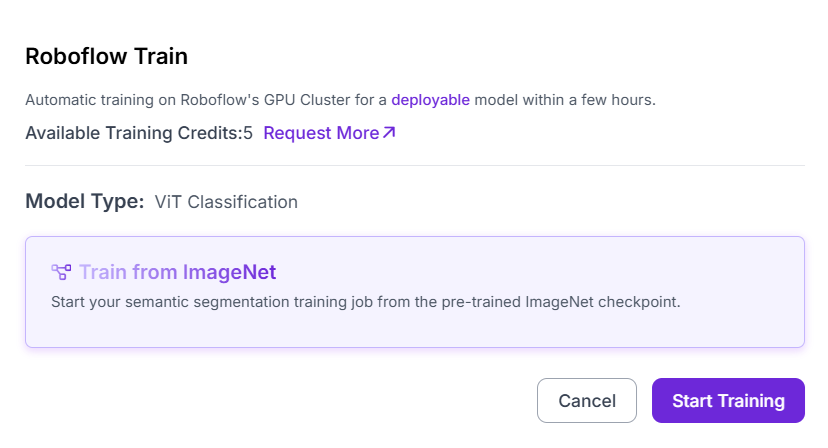
Finally, after confirming these settings, clicking Start Training launches the training job on Roboflow’s GPU cluster. Within a few hours, you receive a deployable image classification model that can be tested, evaluated, and integrated into applications through Roboflow Inference.
Step #3 Build the Roboflow Workflow
Create a corrosion classification workflow as shown below.

This workflow takes an input image and passes it through the trained corrosion classification model, then visualizes the result before producing the final output. It consists of the following blocks:
- Inputs: This block defines the incoming data for the workflow. In this case, the input is an image of a surface that may or may not show corrosion. The workflow is set up to accept a single image at a time.
- Single-Label Classification: This block represents the trained
corrosion-classification-cun8f/1model. It analyzes the input image and assigns it to one of the predefined classes (for example, “corroded” or “not corroded”). Since it is a single-label classifier, the model outputs exactly one class prediction per image. - Classification Label Visualization: This block takes the prediction from the model and generates a clear, human-readable visualization. It displays the assigned label (e.g., “corroded”) along with confidence scores if configured. This helps in quickly interpreting the model’s output without needing raw JSON results.
- Outputs: Finally, the results, predicted labels and visualizations, are passed to the output block. These outputs can then be integrated into applications, dashboards, or downstream automation pipelines.
The workflow takes an image, classifies it using the corrosion model, shows the label visually, and produces the result as output.
Step #4 Deploy the Roboflow Workflow
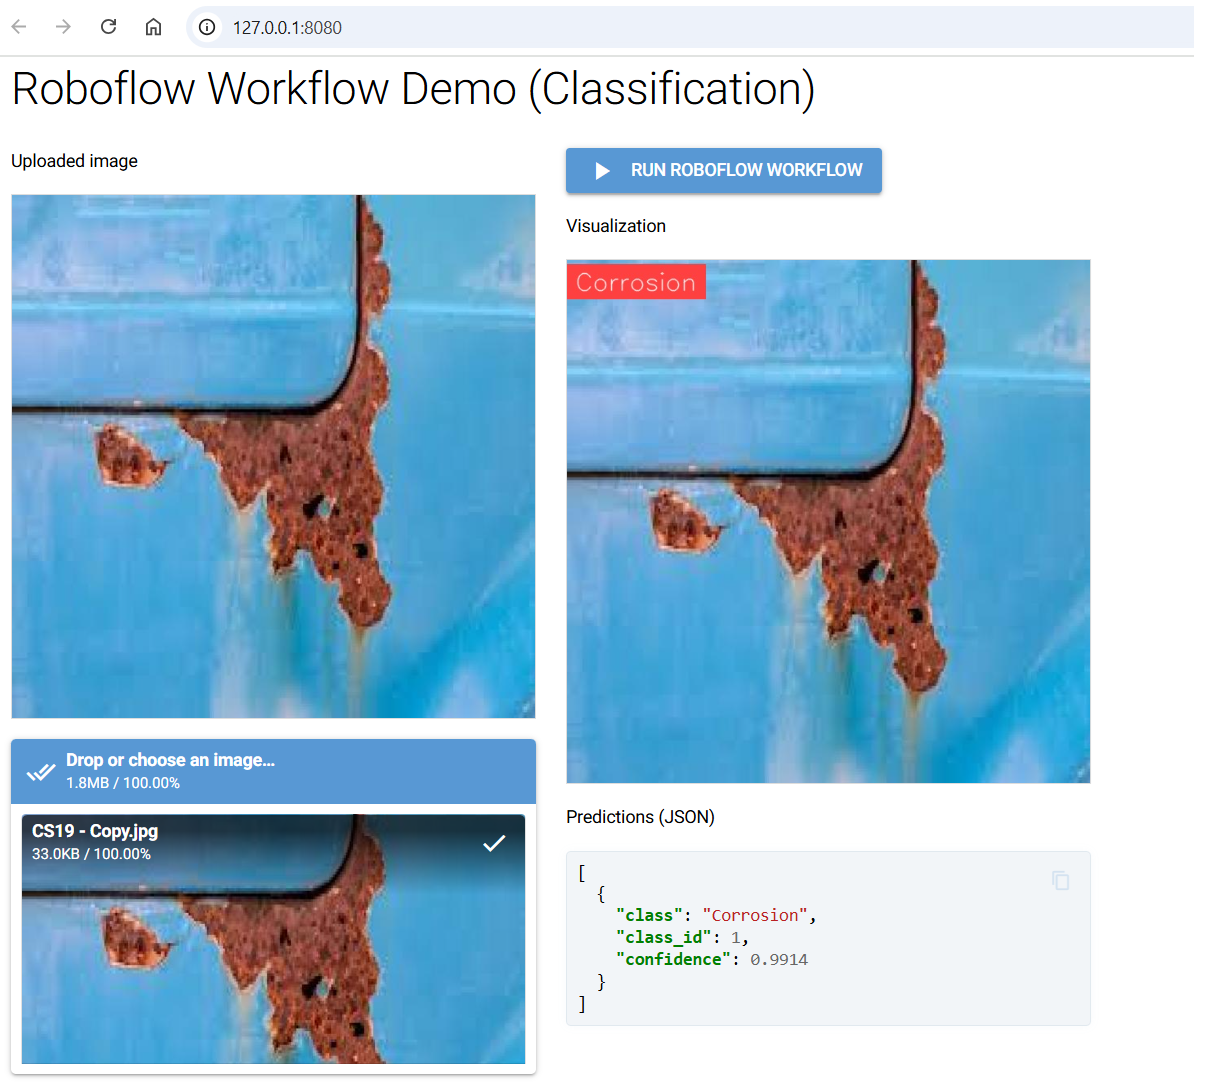
In this step, we deploy the corrosion classification workflow using a simple NiceGUI application. The idea is to create a web interface where a user can upload an image, run it through the trained corrosion classification model via Roboflow workflow, and immediately see both the visualized prediction and the JSON output returned by the model. This provides an interactive way to deploy Roboflow Workflow for the corrosion classification.
The app itself is quite straightforward. It allows you to upload a corrosion image, displays the uploaded image as a preview, and once you click the button to run the workflow, it shows the output visualization on the right side along with the structured JSON response below. The following libraries needs to be installed for this demo:
pip install nicegui inference-sdkUse the following code to deploy the application:
import json
import base64
import tempfile
from pathlib import Path
import uuid

from nicegui import ui
from inference_sdk import InferenceHTTPClient

# --- Roboflow config ---
WORKSPACE_NAME = "tim-4ijf0"
WORKFLOW_ID    = "corrosion-classification"
API_KEY        = "<ROBOFLOW_API_KEY>"
SERVER_URL     = "https://serverless.roboflow.com"
# ------------------------

def save_b64_to_png(b64_str: str) -> str:
    """Decode base64 string (supports data URLs) to a unique PNG file and return the path."""
    if b64_str.startswith("data:image"):
        b64_str = b64_str.split(",", 1)[-1]
    out = Path(tempfile.gettempdir()) / f"rf_viz_{uuid.uuid4().hex}.png"
    out.write_bytes(base64.b64decode(b64_str))
    return str(out)

@ui.page("/")
def main():
    ui.markdown("## Roboflow Workflow Demo (Classification)")

    state = {"image_path": None}

    with ui.row().style("gap: 24px; flex-wrap: wrap;"):

        # ---- Upload & preview ----
        with ui.column().style("min-width: 360px;"):
            ui.label("Uploaded image")
            preview = ui.image().style(
                "width: 420px; max-height: 420px; object-fit: contain; border: 1px solid #ddd;"
            )

            async def handle_upload(e):
                file = e[0] if isinstance(e, list) else e
                suffix = Path(file.name).suffix or ".jpg"
                tmp = Path(tempfile.gettempdir()) / f"rf_upload_{uuid.uuid4().hex}{suffix}"
                tmp.write_bytes(file.content.read())
                state["image_path"] = tmp
                preview.set_source(str(tmp))
                ui.notify(f"Uploaded: {file.name}", color="positive")

            ui.upload(
                label="Drop or choose an image…",
                auto_upload=True,
                max_files=1,
                max_file_size=25 * 1024 * 1024,
                on_upload=handle_upload,
            ).props('accept="image/*"').style("width: 100%;")

        # ---- Run & display results ----
        with ui.column().style("flex: 1; min-width: 360px;"):
            run_btn = ui.button("Run Roboflow Workflow").props("icon=play_arrow color=primary")

            ui.label("Visualization")
            viz_img = ui.image().style(
                "width: 420px; max-height: 420px; object-fit: contain; border: 1px solid #ddd; background: #fafafa;"
            )

            ui.label("Predictions (JSON)")
            result_box = ui.code("[]", language="json").style(
                "width: 100%; max-height: 480px; overflow: auto;"
            )

            async def on_run():
                if not state["image_path"]:
                    ui.notify("Please upload an image first.", color="warning")
                    return

                client = InferenceHTTPClient(api_url=SERVER_URL, api_key=API_KEY)
                result = client.run_workflow(
                    workspace_name=WORKSPACE_NAME,
                    workflow_id=WORKFLOW_ID,
                    images={"image": str(state["image_path"])},
                    use_cache=True,
                )

                # Expect: result is a list with one item
                item = result[0]

                # --- Predictions ---
                predictions = item["model_predictions"].get("predictions", [])
                if predictions:
                    result_box.set_content(json.dumps(predictions, indent=2))
                else:
                    result_box.set_content("[]")  # blank when nothing detected

                # --- Visualization ---
                viz_data = item.get("classification_label_visualization")
                if isinstance(viz_data, dict):
                    viz_data = viz_data.get("value") or viz_data.get("base64") or viz_data.get("data")
                if isinstance(viz_data, str):
                    viz_path = save_b64_to_png(viz_data)
                    viz_img.set_source(viz_path)
                    ui.notify("Visualization displayed.", color="positive")
                else:
                    viz_img.set_source("")  # clear old image if no viz
                    ui.notify("No visualization found.", color="warning")

            run_btn.on("click", on_run)

ui.run(title="Roboflow Workflow Demo", reload=False, port=8080)
The working of the code is simple. User can upload an image. The app saves this file to a temporary directory with a unique filename to avoid browser caching issues and displays it as a preview. There is a button to Run the Roboflow Workflow. When clicked, the app sends the uploaded image to the Roboflow serverless endpoint using the Inference SDK. The server responds with predictions, which the app processes into two forms, a visualized result image (with the predicted class label shown on the uploaded image) and a JSON response containing the predicted class, class ID, and confidence score. These results are then displayed in the interface for easy interpretation.
To run the app, save the code into a file called app.py. Launch the app with python app.py. This will start a local server at http://127.0.0.1:8080, which you can open in your browser.
The output of the app is shown in the attached screenshot. On the left, you can see the uploaded corrosion image, while on the right, the detections are visualized with a label. Just below, the JSON response displays the predicted class “corrosion,” its class ID, and the model’s confidence score. This completes the deployment, making the workflow fully interactive and testable through a lightweight graphical interface.
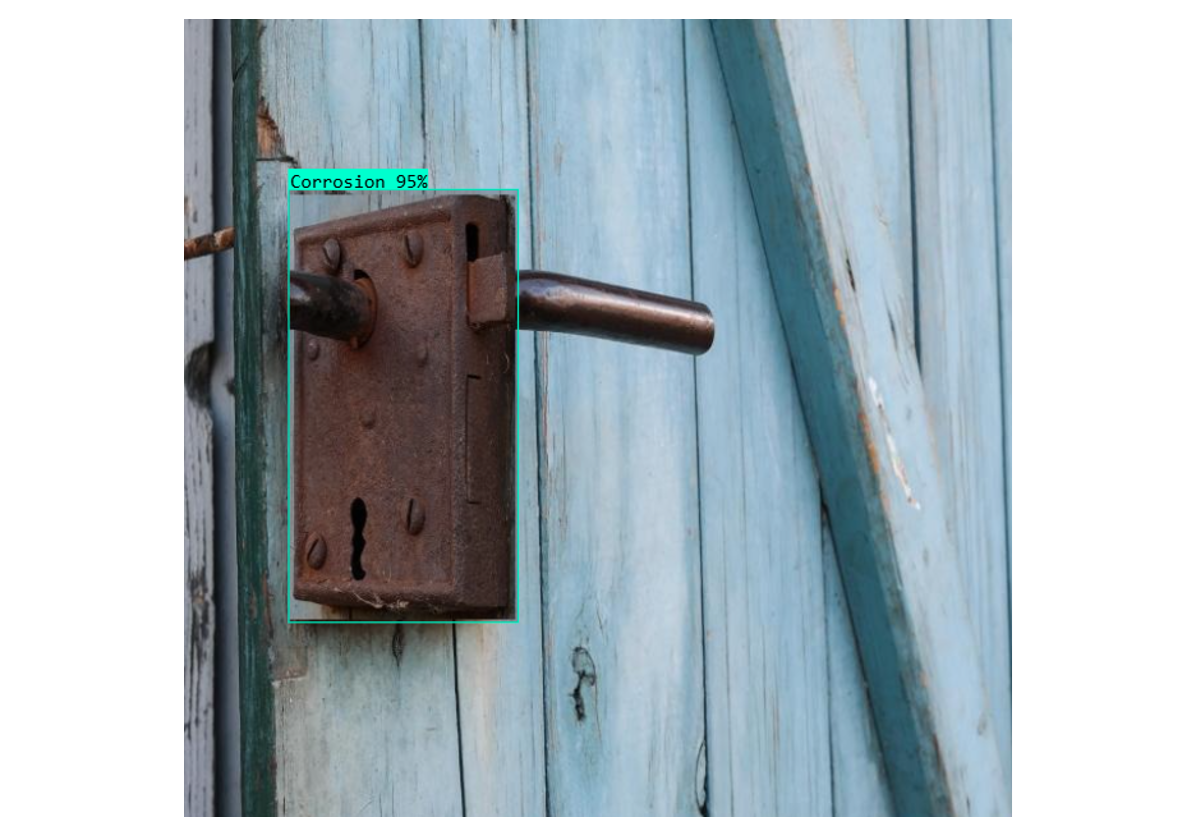
Example #2: Detecting Corrosion using Object Detection
In this example we will see how to build and use object detection model to detect corrosion in an image. The goal is to train the model to locate where corrosion is present in an image with bounding boxes. The steps are following:
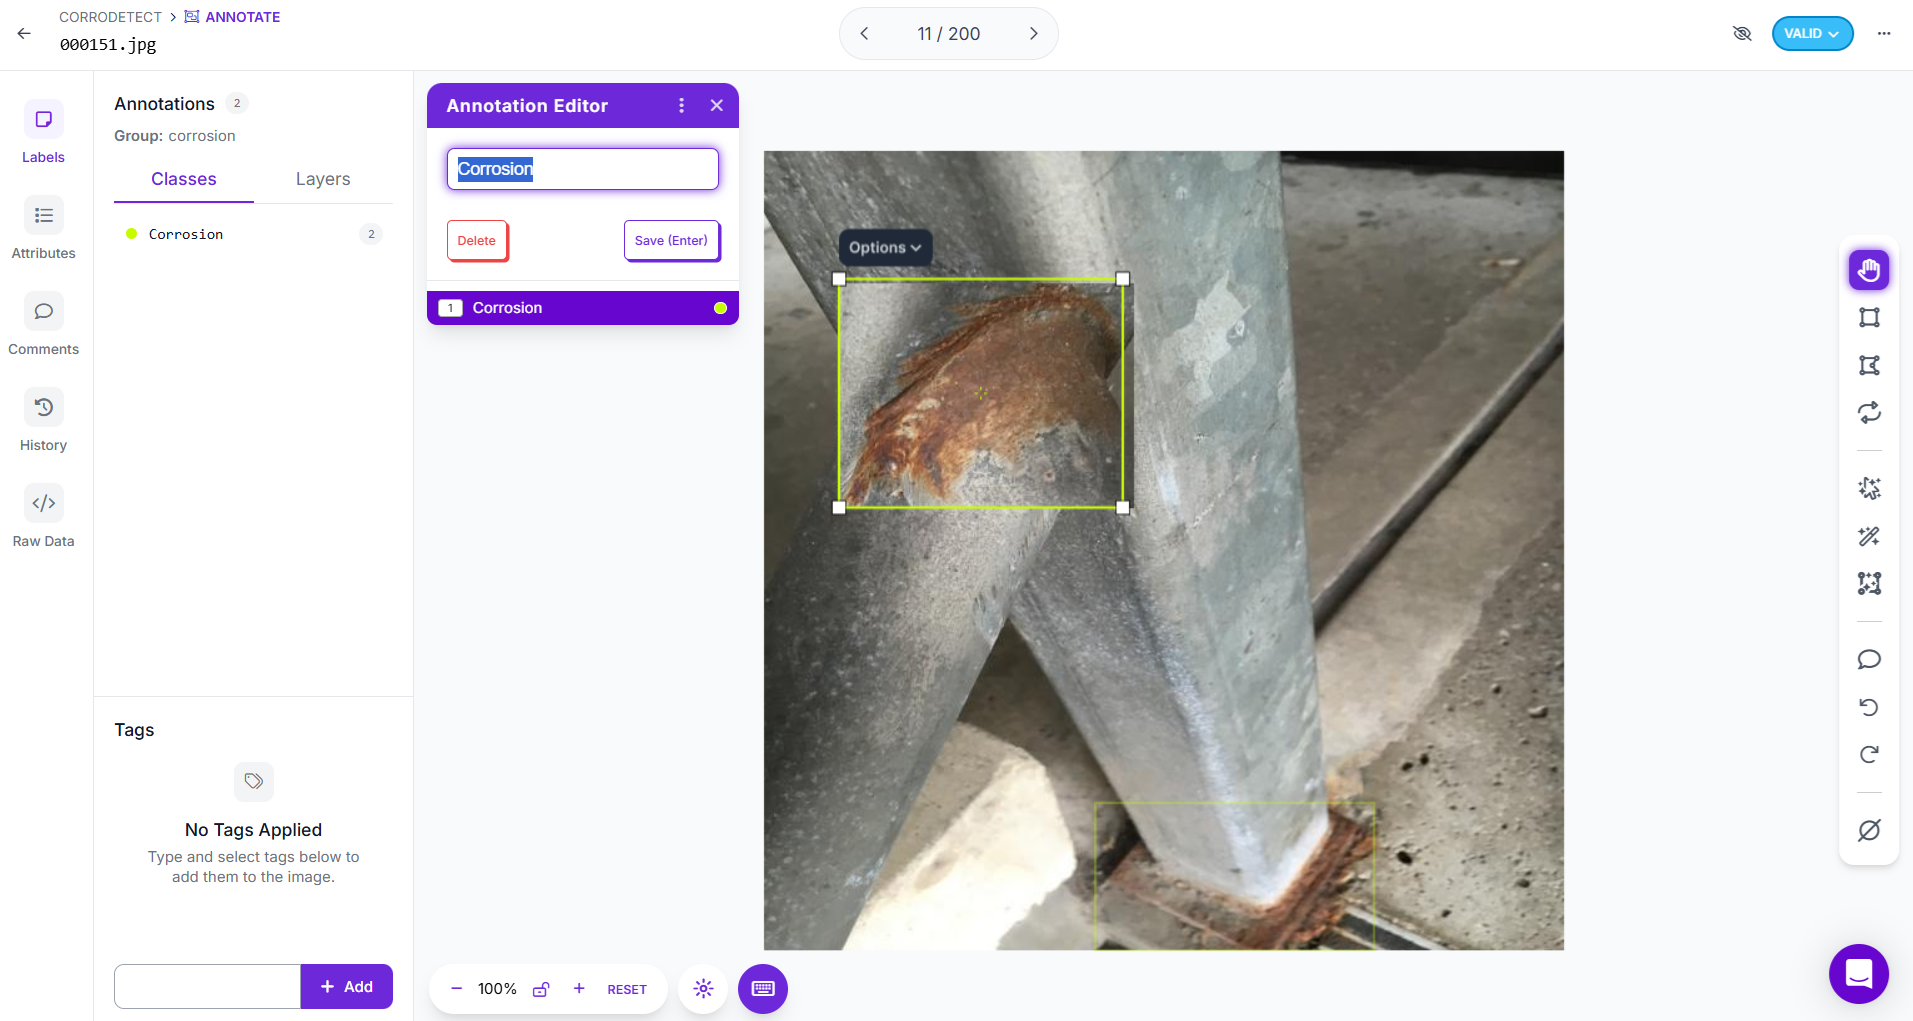
Step #1 Prepare a Dataset for Object Detection
To prepare a corrosion detection dataset in Roboflow, you begin by creating a new Object Detection project. Next, upload images that clearly show corroded surfaces. For each image, carefully draw bounding boxes tightly around every visible corroded patch. Each bounding box should be labeled as “corrosion”, or if you wish to distinguish between different types you can define multiple classes such as “rust”, “pitting”, or “scale.” It’s important to ensure the boxes are accurate and cover the entire area of visible damage without leaving gaps or including unnecessary background. This step ensures your dataset is clean, consistent, and ready for training high-quality models.
When preparing different versions of the dataset in Roboflow, you can create dataset versions that include augmentations, preprocessing, or splits for training, validation, and testing. For example, you might apply rotations, brightness changes, or cropping to simulate different real-world conditions and improve model robustness. Each version maintains the original annotations but applies the chosen transformations, so you can experiment with multiple training-ready datasets while keeping your raw dataset intact. This allows you to iterate quickly, compare results, and choose the version that produces the best-performing corrosion detection model.
Step #2 Train an object detection model
Training an object detection model in Roboflow Train starts with selecting the model architecture. Several choices are available, including RF-DETR, Roboflow 3.0, YOLOv11, YOLOv12, and YOLO-NAS. Each option has its advantages RF-DETR provides the highest accuracy but slower training, while Roboflow 3.0 is YOLOv8-compatible and optimized for a strong balance of speed and accuracy. For corrosion detection, I selected Roboflow 3.0, as it offers the right mix of performance and deployment efficiency. But if you prefer more accurate model, I recommend using RF-DETR.
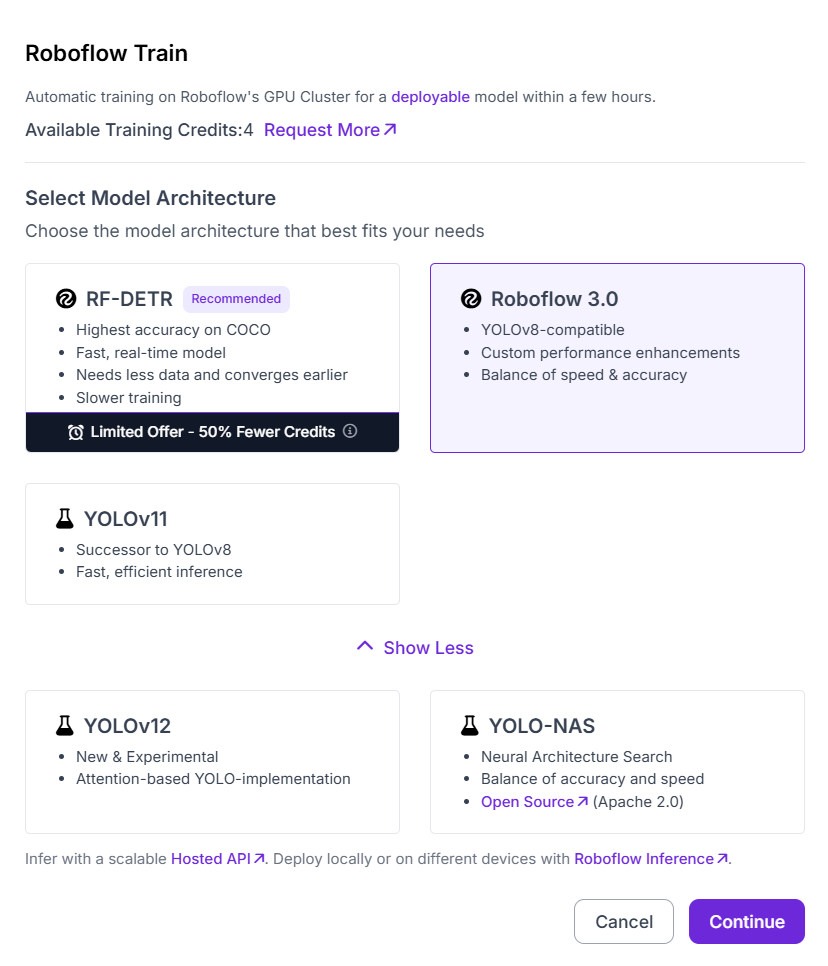
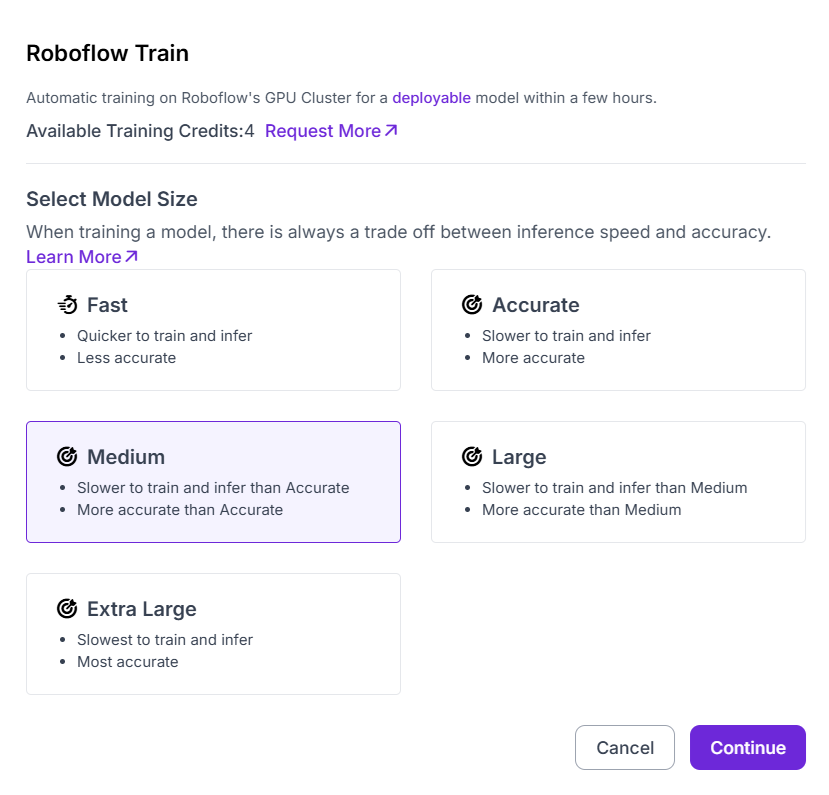
Next, you choose the model size, which controls the trade-off between inference speed and accuracy. The options range from Fast (quick training, lower accuracy) to Extra Large (slowest training, highest accuracy). To balance training efficiency with reliable predictions, I selected the Medium size, which offers improved accuracy compared to smaller models while keeping training and inference times manageable.
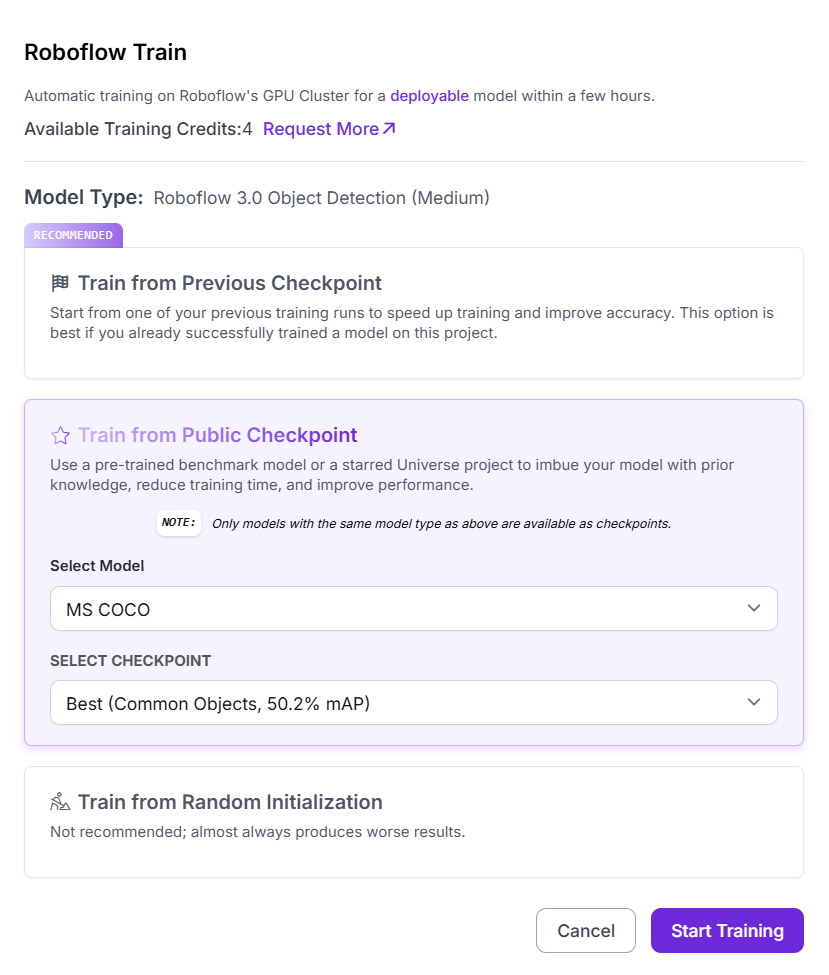
Finally, Roboflow provides different training strategies: training from a previous checkpoint, starting from a public checkpoint, or random initialization. Random initialization is not recommended, as it requires significantly more data and usually produces weaker results. Training from a previous checkpoint is valuable if you want to continue improving an already trained model. For this project, I chose Train from Public Checkpoint (MS COCO), which leverages pre-trained weights from a large benchmark dataset. This transfer learning approach enables the model to start with general object recognition skills, then adapt to corrosion-specific features more quickly and accurately.
After confirming the setup, clicking Start Training launches the process on Roboflow’s GPU cluster. The system automatically manages the training pipeline, and within a few hours, a fully deployable corrosion object detection model is ready for evaluation and integration into applications.
Step #3 Build the Roboflow Workflow
Create a corrosion object detection workflow as shown below.
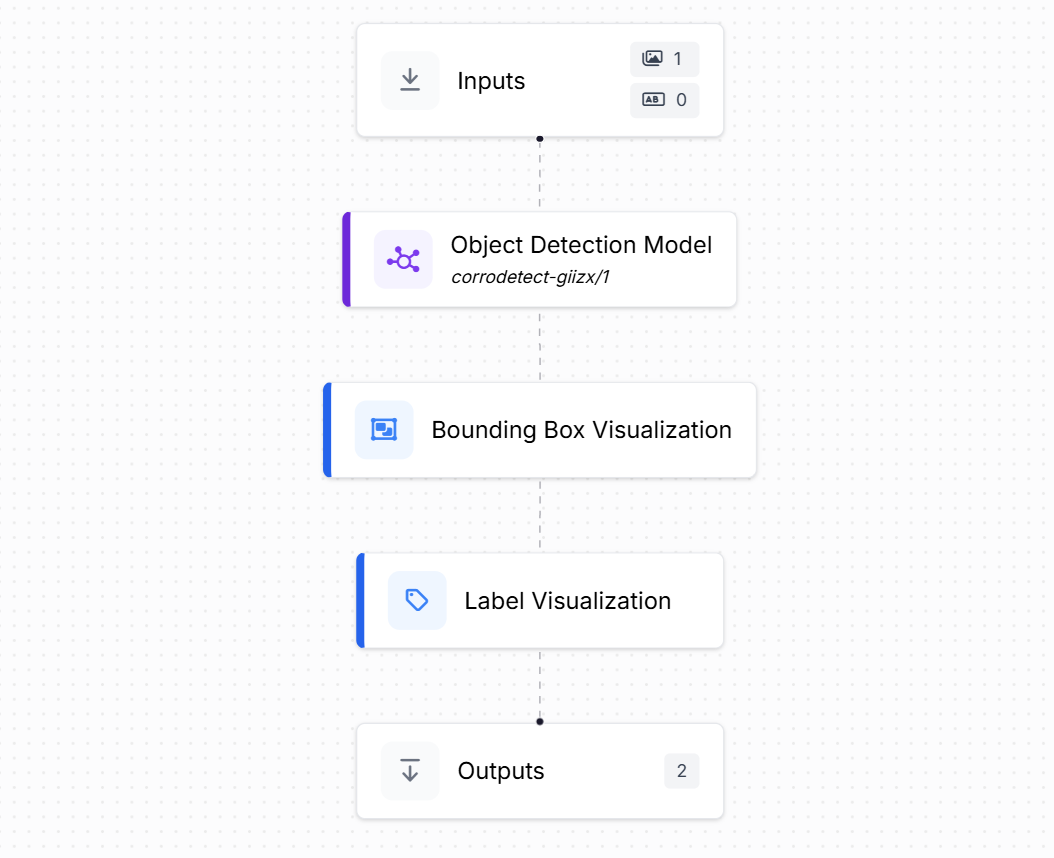
This workflow takes an input image, runs it through the trained corrosion detection model, and then produces both visual outputs (bounding boxes and labels) and structured prediction data (coordinates and confidence values). It includes the following blocks:
- Inputs: This block defines the incoming data to the workflow. In this case, the input is an image of a surface that may contain visible corrosion patches.
- Object Detection Model: The workflow uses the trained
orrodetect-giizx/1model to process the input image. The model predicts bounding boxes around each detected corrosion region. For every bounding box, the model outputs structured prediction data, including:- Image width and height
- Bounding box center coordinates (x, y)
- Bounding box width and height
- Prediction confidence score
- Bounding Box Visualization: This block takes the model predictions and overlays the bounding boxes directly onto the image, making it easy to visually verify where corrosion has been detected.
- Label Visualization: In addition to the bounding boxes, this block shows the class label (e.g., “corrosion”) along with the associated confidence score. This provides both location and classification information in an interpretable way.
- Outputs: The final block collects the results. It produces:
- Visual outputs: the image with bounding boxes and labels drawn on it.
- Structured JSON output: containing image size, bounding box coordinates, and confidence values. This structured data can be used for downstream tasks such as reporting, analysis, or integration into other systems.
The workflow takes an image, detects corrosion patches with bounding boxes, displays them with labels, and also provides precise numerical prediction data for further use. The code below handles this deployment.
import json
import base64
import tempfile
from pathlib import Path
import uuid

from nicegui import ui
from inference_sdk import InferenceHTTPClient

# --- Roboflow config ---
WORKSPACE_NAME = "tim-4ijf0"
WORKFLOW_ID    = "corrosion-detection"
API_KEY        = "<ROBOFLOW_API_KEY>"
SERVER_URL     = "https://serverless.roboflow.com"
# ------------------------

def save_b64_to_png(b64_str: str) -> str:
    """Decode base64 (supports data URLs) to a unique PNG file and return its path."""
    if b64_str.startswith("data:image"):
        b64_str = b64_str.split(",", 1)[-1]
    out = Path(tempfile.gettempdir()) / f"rf_viz_{uuid.uuid4().hex}.png"
    out.write_bytes(base64.b64decode(b64_str))
    return str(out)

@ui.page("/")
def main():
    ui.markdown("## Roboflow Workflow Demo (Object Detection)")

    state = {"image_path": None}

    with ui.row().style("gap: 24px; flex-wrap: wrap;"):
        # ---- Upload & preview ----
        with ui.column().style("min-width: 360px;"):
            ui.label("Uploaded image")
            preview = ui.image().style(
                "width: 420px; max-height: 420px; object-fit: contain; border: 1px solid #ddd;"
            )

            async def handle_upload(e):
                file = e[0] if isinstance(e, list) else e
                suffix = Path(file.name).suffix or ".jpg"
                tmp = Path(tempfile.gettempdir()) / f"rf_upload_{uuid.uuid4().hex}{suffix}"
                tmp.write_bytes(file.content.read())
                state["image_path"] = tmp
                preview.set_source(str(tmp))
                ui.notify(f"Uploaded: {file.name}", color="positive")

            ui.upload(
                label="Drop or choose an image…",
                auto_upload=True,
                max_files=1,
                max_file_size=25 * 1024 * 1024,
                on_upload=handle_upload,
            ).props('accept="image/*"').style("width: 100%;")

        # ---- Run & display results ----
        with ui.column().style("flex: 1; min-width: 360px;"):
            run_btn = ui.button("Run Roboflow Workflow").props("icon=play_arrow color=primary")

            ui.label("Detections (Visualization)")
            viz_img = ui.image().style(
                "width: 420px; max-height: 420px; object-fit: contain; border: 1px solid #ddd; background: #fafafa;"
            )

            ui.label("Predictions (JSON)")
            result_box = ui.code("[]", language="json").style(
                "width: 100%; max-height: 480px; overflow: auto;"
            )

            async def on_run():
                if not state["image_path"]:
                    ui.notify("Please upload an image first.", color="warning")
                    return

                client = InferenceHTTPClient(api_url=SERVER_URL, api_key=API_KEY)
                result = client.run_workflow(
                    workspace_name=WORKSPACE_NAME,
                    workflow_id=WORKFLOW_ID,
                    images={"image": str(state["image_path"])},
                    use_cache=True,
                )

                # Expect: result is a list with one item as per your schema
                item = result[0]

                # --- Predictions ---
                predictions = item["model_predictions"].get("predictions", [])
                if predictions:
                    result_box.set_content(json.dumps(predictions, indent=2))
                else:
                    result_box.set_content("[]")  # blank when no detections

                # --- Visualization ---
                viz_data = item.get("label_visualization")
                if isinstance(viz_data, dict):
                    viz_data = viz_data.get("value") or viz_data.get("base64") or viz_data.get("data")
                if isinstance(viz_data, str):
                    viz_path = save_b64_to_png(viz_data)
                    viz_img.set_source(viz_path)
                    ui.notify("Visualization displayed.", color="positive")
                else:
                    viz_img.set_source("")  # clear old image if no viz
                    ui.notify("No visualization found in response.", color="warning")

            run_btn.on("click", on_run)

ui.run(title="Roboflow Workflow Demo", reload=False, port=8080)
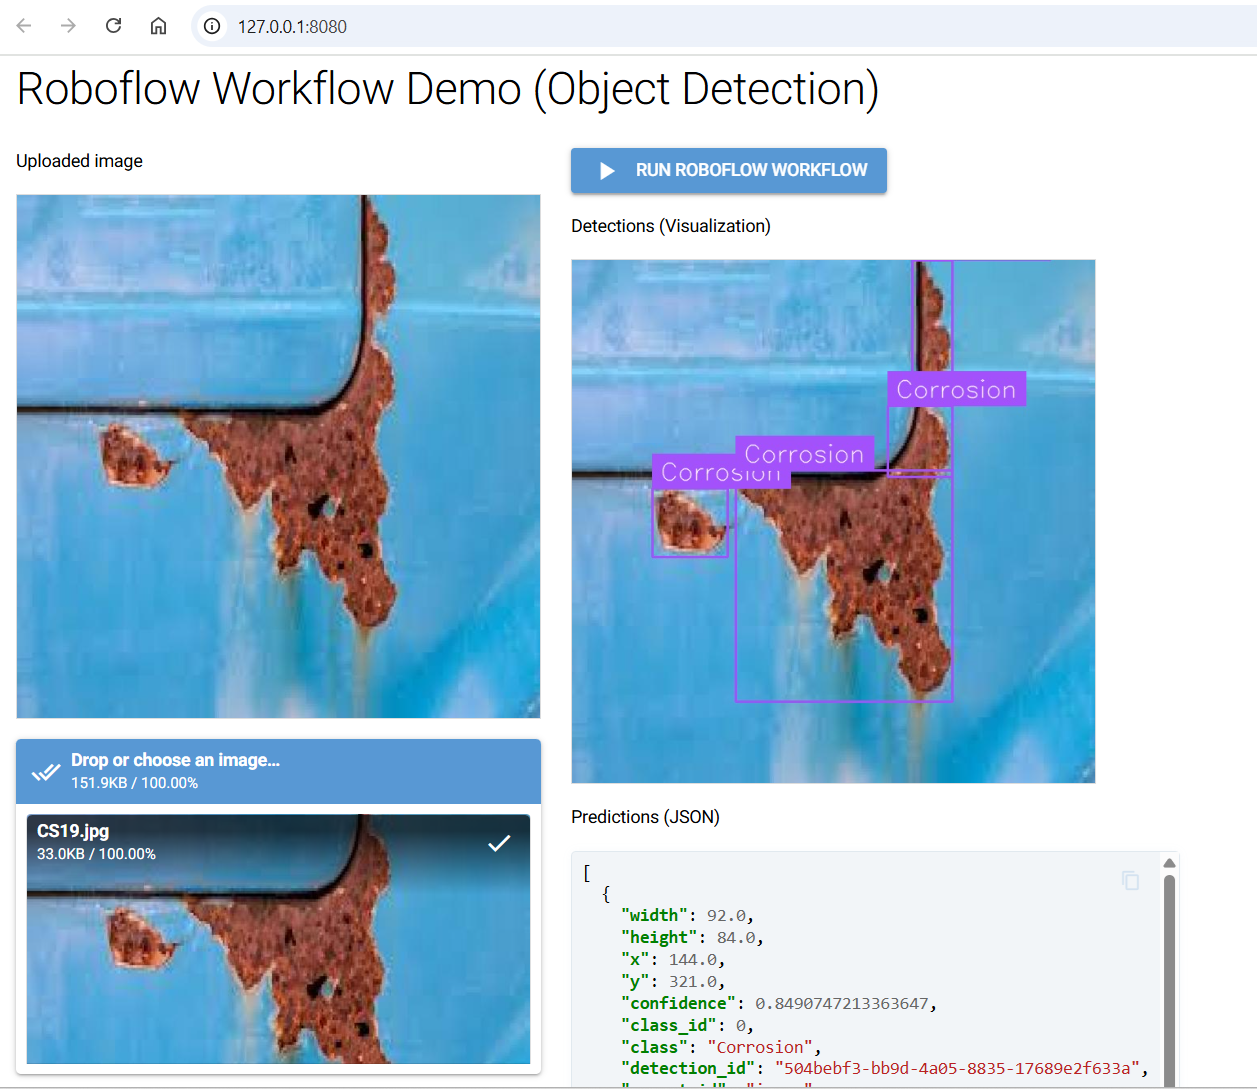
Clicking Run Roboflow Workflow sends the image to the detection workflow on Roboflow’s serverless endpoint. The model’s response includes bounding box coordinates (x, y, width, height) along with the predicted class label (in this case, “corrosion”) and a confidence score. The app extracts and displays the visualization image with bounding boxes on the right, and also prints the raw structured predictions as JSON below for further inspection.
You should see output similar to following. On the left is the uploaded image, while on the right the model has drawn bounding boxes around the corroded regions and labeled them as “Corrosion.” The JSON response panel lists the bounding box dimensions, coordinates, detection ID, class name, and confidence score.
Example #3: Detecting Corrosion using Instance Segmentation
In this example we will see how to build and use instance segmentation model to detect corrosion in an image. The goal is to train the model to precisely map the shape and extent of corrosion at the pixel level. The steps are following:
Step #1 Prepare a Dataset for Segmentation
For corrosion segmentation, the process begins by creating a Segmentation Project in Roboflow. After setting up the project, you upload corrosion images into the workspace. Unlike object detection, which uses bounding boxes, segmentation requires drawing the exact outline of the corroded regions. Using Roboflow’s polygon or brush tools, you carefully trace around each corroded patch. This pixel-level annotation allows the model to learn not just where corrosion occurs, but also its exact shape and spread across surfaces.
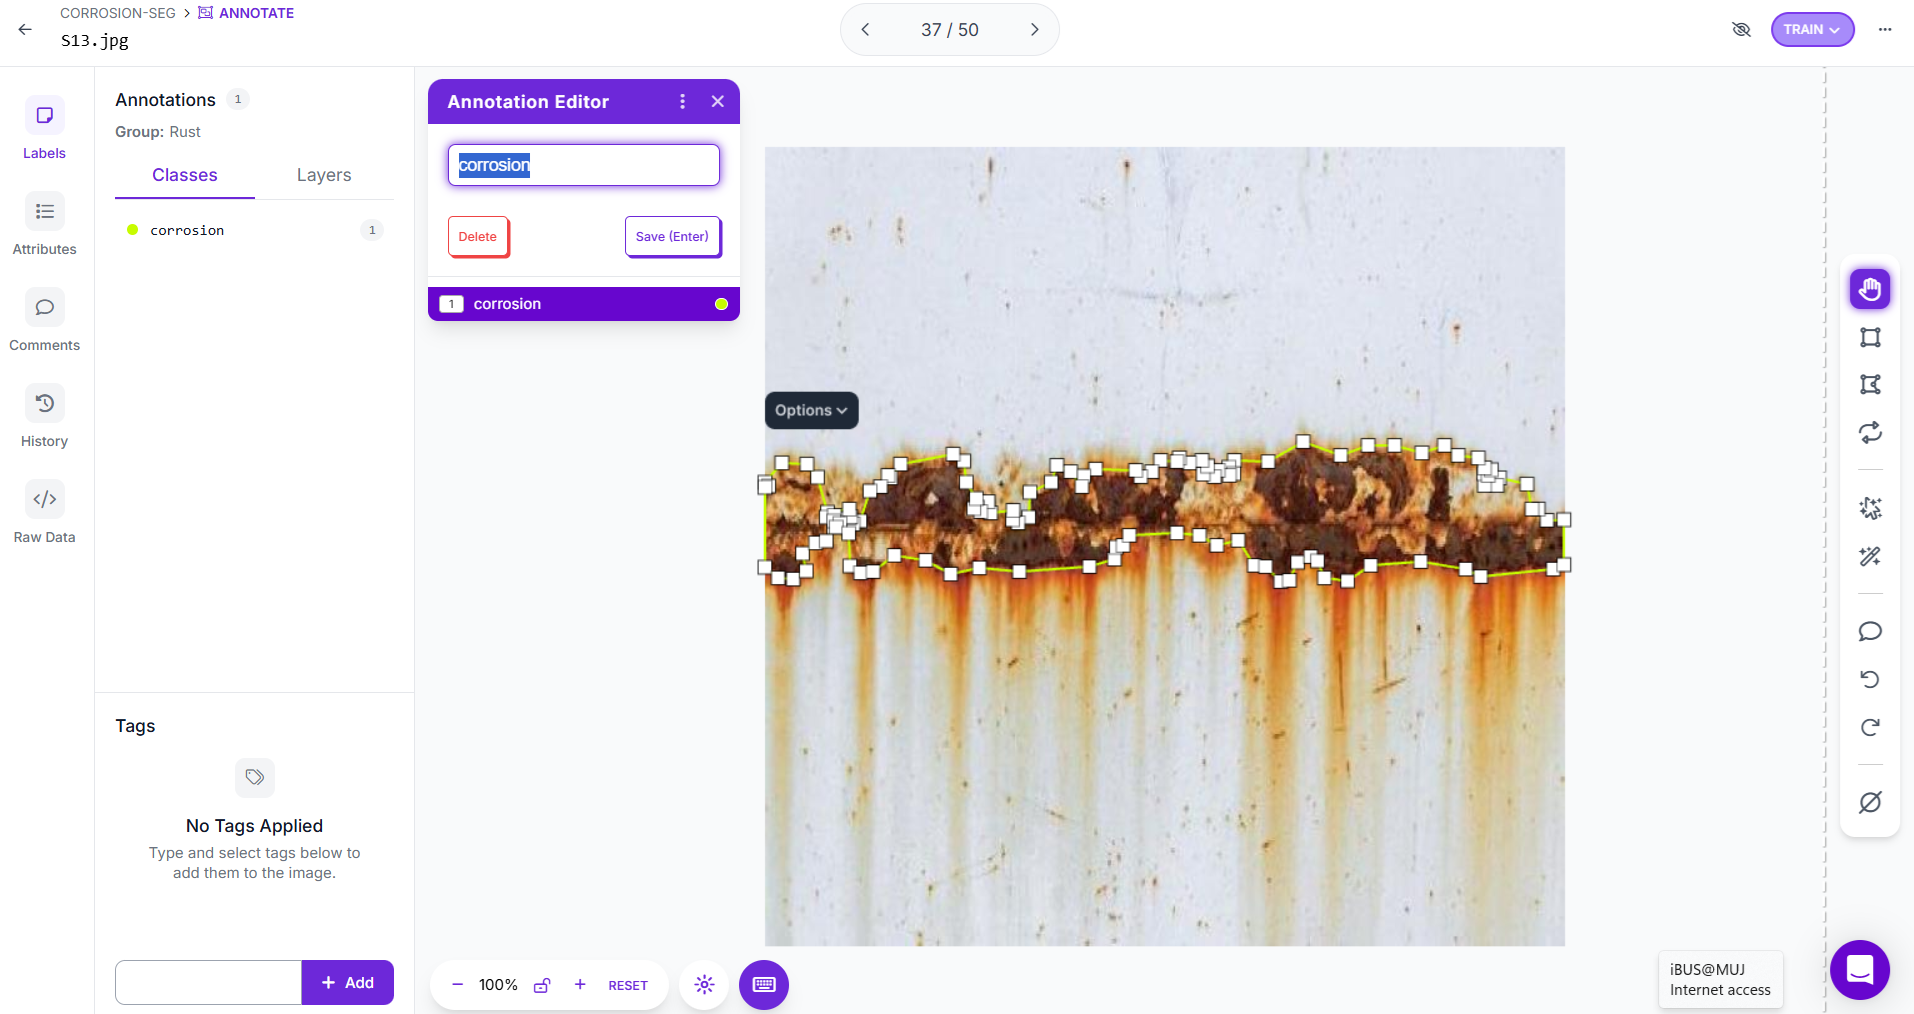
Each segmented region should be labeled as “corrosion.” While a single class works well for many projects, you can also define multiple classes to capture different types of surface damage. For example, you might add classes such as “rust,” “pitting,” “scaling,” or “paint peel.” Having multiple classes enables the model to distinguish between corrosion patterns, which can be valuable for advanced inspections. Roboflow also offers AI-powered tools like Smart Polygon, which can automatically snap annotations to object boundaries, speeding up the labeling process significantly.
Just as with other project types, you can then generate dataset versions with preprocessing and augmentations (e.g., rotation, blur, brightness changes) to improve generalization. Splitting the dataset into training, validation, and test sets ensures fair evaluation and prevents overfitting.
Step #2 Train the instance segmentation model
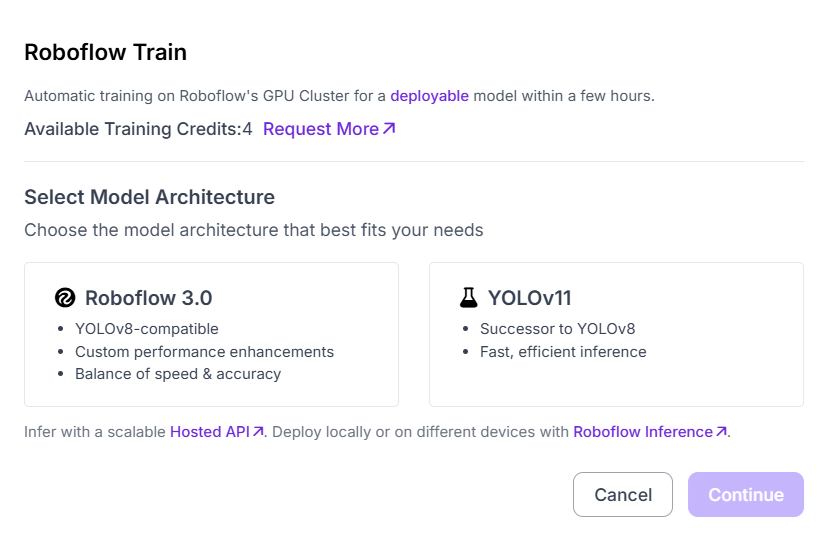
Training a segmentation model in Roboflow Train begins by selecting a model architecture. From the available options, you can choose Roboflow 3.0, which is YOLOv8-compatible and optimized for a balance of speed and accuracy, or YOLOv11, the successor to YOLOv8, known for fast and efficient inference. For this project, Roboflow 3.0 was selected, as it offers strong performance and smooth deployment support.
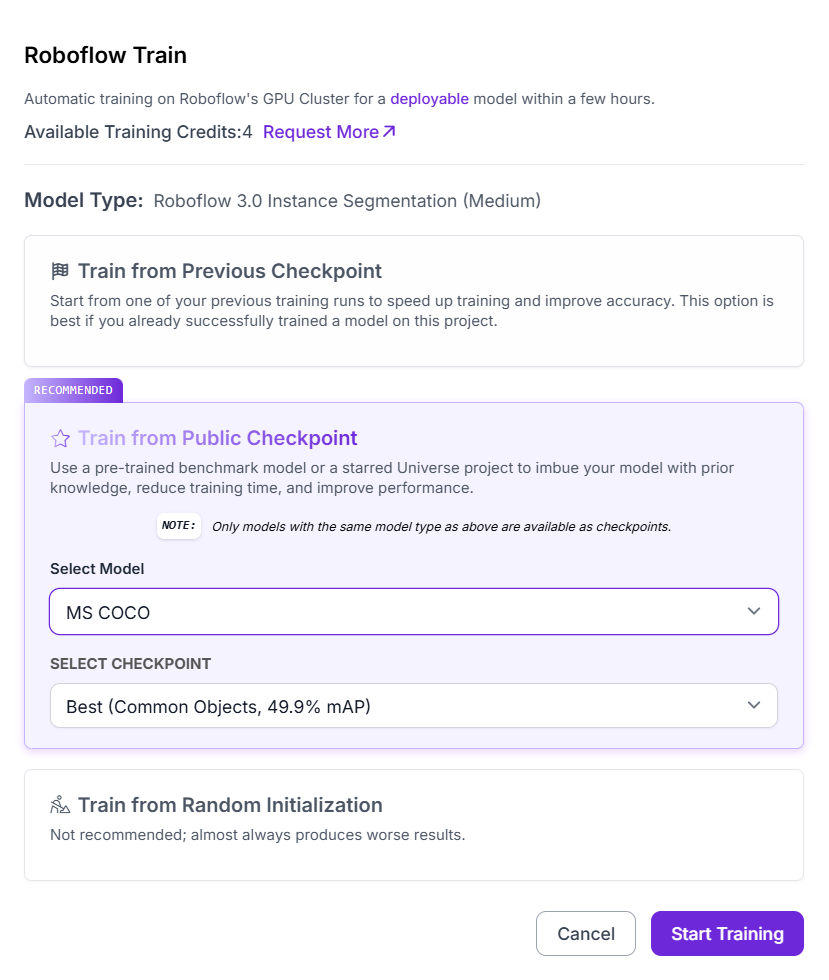
The next step is to decide on the model size, which determines the trade-off between accuracy and training speed. Options range from Fast (quickest but less accurate) to Extra Large (slowest but most accurate). A Medium model size was chosen to achieve a good balance providing higher accuracy than the smaller options while still keeping the training process efficient.
Finally, you select the training strategy. Roboflow offers three options:
- Train from Previous Checkpoint: continue improving an existing model.
- Train from Public Checkpoint: start from a benchmark model like MS COCO, which gives the model pre-trained knowledge of general shapes and textures.
- Train from Random Initialization: start from scratch (not recommended unless you have a very large dataset).

For this segmentation task, the training was started from a Public Checkpoint (MS COCO). This transfer learning approach reduces training time and boosts performance by leveraging pre-trained weights.
After confirming all the settings, clicking Start Training launches the job on Roboflow’s GPU cluster. Within a few hours, the result is a fully deployable instance segmentation model capable of detecting and outlining corroded regions with high precision.
Step #3 Build the Roboflow Workflow
Create a corrosion segmentation workflow as shown below.
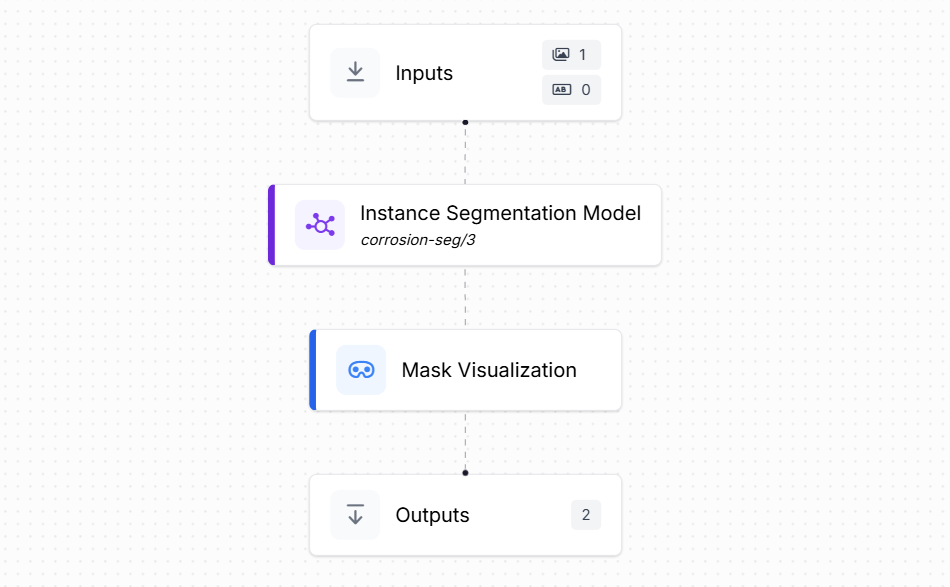
This workflow is designed to take an input image, apply the trained segmentation model, and return both a mask visualization and detailed pixel-level predictions. It consists of the following blocks:
- Inputs: The workflow begins with the Inputs block, which defines the incoming data. Here, the input is an image of a surface where corrosion may be present.
- Instance Segmentation: The core of the workflow is the trained corrosion-seg/3 model. This model predicts the exact pixel-level outline of each corroded area. Each prediction includes the shape of the corroded region as a polygon, providing highly detailed spatial information.
- Mask Visualization: This block generates an overlay image where the predicted segmentation mask is drawn directly on top of the input image. The mask highlights the detected corrosion regions, making it easy to interpret visually. This provides immediate feedback for human inspection. The Mask Visualization block uses Roboflow's
sv.MaskAnnotatorto draw detected polygons (segmentation masks) directly on images. - Outputs: The final block delivers two types of results:
- Mask Visualization Output: An image with the segmentation mask drawn over the corroded regions.
- Model Predictions (Structured Data): A JSON output containing precise details of each detection, including:
- Polygon coordinates (x, y) outlining the corroded region
- Predicted class label (e.g., "corrosion")
This workflow takes an input image, applies the corrosion-seg/3 segmentation model, overlays a mask visualization, and produces detailed polygon coordinates with labels and IDs as structured output.
Step #4 Deploy the Roboflow Workflow
In this step we deploy the instance-segmentation workflow with a small NiceGUI app similar to above examples. The app opens in your browser, lets you upload an image of a surface, sends it to your corrosion-segmentation workflow on Roboflow Serverless endpoint, and then shows a mask visualization (the predicted corrosion area overlaid on the image) and the raw JSON predictions returned by the workflow.
Use the code below to deploy the app.
import json
import base64
import tempfile
from pathlib import Path
import uuid

from nicegui import ui
from inference_sdk import InferenceHTTPClient

# --- Roboflow config ---
WORKSPACE_NAME = "tim-4ijf0"
WORKFLOW_ID    = "corrosion-segmentation"
API_KEY        = "<ROBOFLOW_API_KEY>"   # <-- your key
SERVER_URL     = "https://serverless.roboflow.com"
# ------------------------

def save_b64_to_png(b64_str: str) -> str:
    """Decode base64 (supports data URLs) to a unique PNG file and return its path."""
    if b64_str.startswith("data:image"):
        b64_str = b64_str.split(",", 1)[-1]
    out = Path(tempfile.gettempdir()) / f"rf_viz_{uuid.uuid4().hex}.png"
    out.write_bytes(base64.b64decode(b64_str))
    return str(out)

@ui.page("/")
def main():
    ui.markdown("## Roboflow Workflow Demo (Instance Segmentation)")

    state = {"image_path": None}

    with ui.row().style("gap: 24px; flex-wrap: wrap;"):
        # ---- Upload & preview ----
        with ui.column().style("min-width: 360px;"):
            ui.label("Uploaded image")
            preview = ui.image().style(
                "width: 420px; max-height: 420px; object-fit: contain; border: 1px solid #ddd;"
            )

            async def handle_upload(e):
                file = e[0] if isinstance(e, list) else e
                suffix = Path(file.name).suffix or ".jpg"
                tmp = Path(tempfile.gettempdir()) / f"rf_upload_{uuid.uuid4().hex}{suffix}"
                tmp.write_bytes(file.content.read())
                state["image_path"] = tmp
                preview.set_source(str(tmp))
                ui.notify(f"Uploaded: {file.name}", color="positive")

            ui.upload(
                label="Drop or choose an image…",
                auto_upload=True,
                max_files=1,
                max_file_size=25 * 1024 * 1024,
                on_upload=handle_upload,
            ).props('accept="image/*"').style("width: 100%;")

        # ---- Run & display results ----
        with ui.column().style("flex: 1; min-width: 360px;"):
            run_btn = ui.button("Run Roboflow Workflow").props("icon=play_arrow color=primary")

            ui.label("Masks (Visualization)")
            viz_img = ui.image().style(
                "width: 420px; max-height: 420px; object-fit: contain; border: 1px solid #ddd; background: #fafafa;"
            )

            ui.label("Predictions (JSON)")
            result_box = ui.code("[]", language="json").style(
                "width: 100%; max-height: 480px; overflow: auto;"
            )

            async def on_run():
                if not state["image_path"]:
                    ui.notify("Please upload an image first.", color="warning")
                    return

                client = InferenceHTTPClient(api_url=SERVER_URL, api_key=API_KEY)
                result = client.run_workflow(
                    workspace_name=WORKSPACE_NAME,
                    workflow_id=WORKFLOW_ID,
                    images={"image": str(state["image_path"])},
                    use_cache=True,
                )

                # Expect: result is a list with one item as per your schema
                item = result[0]

                # --- Predictions (polygons/masks) ---
                predictions = item["model_predictions"].get("predictions", [])
                if predictions:
                    result_box.set_content(json.dumps(predictions, indent=2))
                else:
                    result_box.set_content("[]")  # blank when no instances

                # --- Visualization image (mask overlay) ---
                viz_data = item.get("mask_visualization")
                if isinstance(viz_data, dict):
                    viz_data = viz_data.get("value") or viz_data.get("base64") or viz_data.get("data")
                if isinstance(viz_data, str):
                    viz_path = save_b64_to_png(viz_data)
                    viz_img.set_source(viz_path)
                    ui.notify("Visualization displayed.", color="positive")
                else:
                    viz_img.set_source("")  # clear stale image if no viz
                    ui.notify("No visualization found in response.", color="warning")

            run_btn.on("click", on_run)

ui.run(title="Roboflow Workflow Demo", reload=False, port=8080)
This code works just like the classification and detection examples, but tailored for segmentation. When you upload an image, it’s saved to a uniquely named temp file so the browser doesn’t cache old results. Clicking the run button creates an InferenceHTTPClient and calls run_workflow(...) with your workspace, workflow ID, and the uploaded image. The response always contains a mask_visualization field (a base64 overlay image), which is decoded and saved via save_b64_to_png(...) so the preview updates reliably. At the same time, the code pulls out the list under model_predictions["predictions"] and displays it as JSON. For segmentation, these predictions include polygon points ([{x, y}, ...]) that define the mask boundary, along with fields like class (e.g., "corrosion"), confidence, and unique IDs for each detected instance. If no masks are found, the JSON box is cleared and the overlay image is reset.
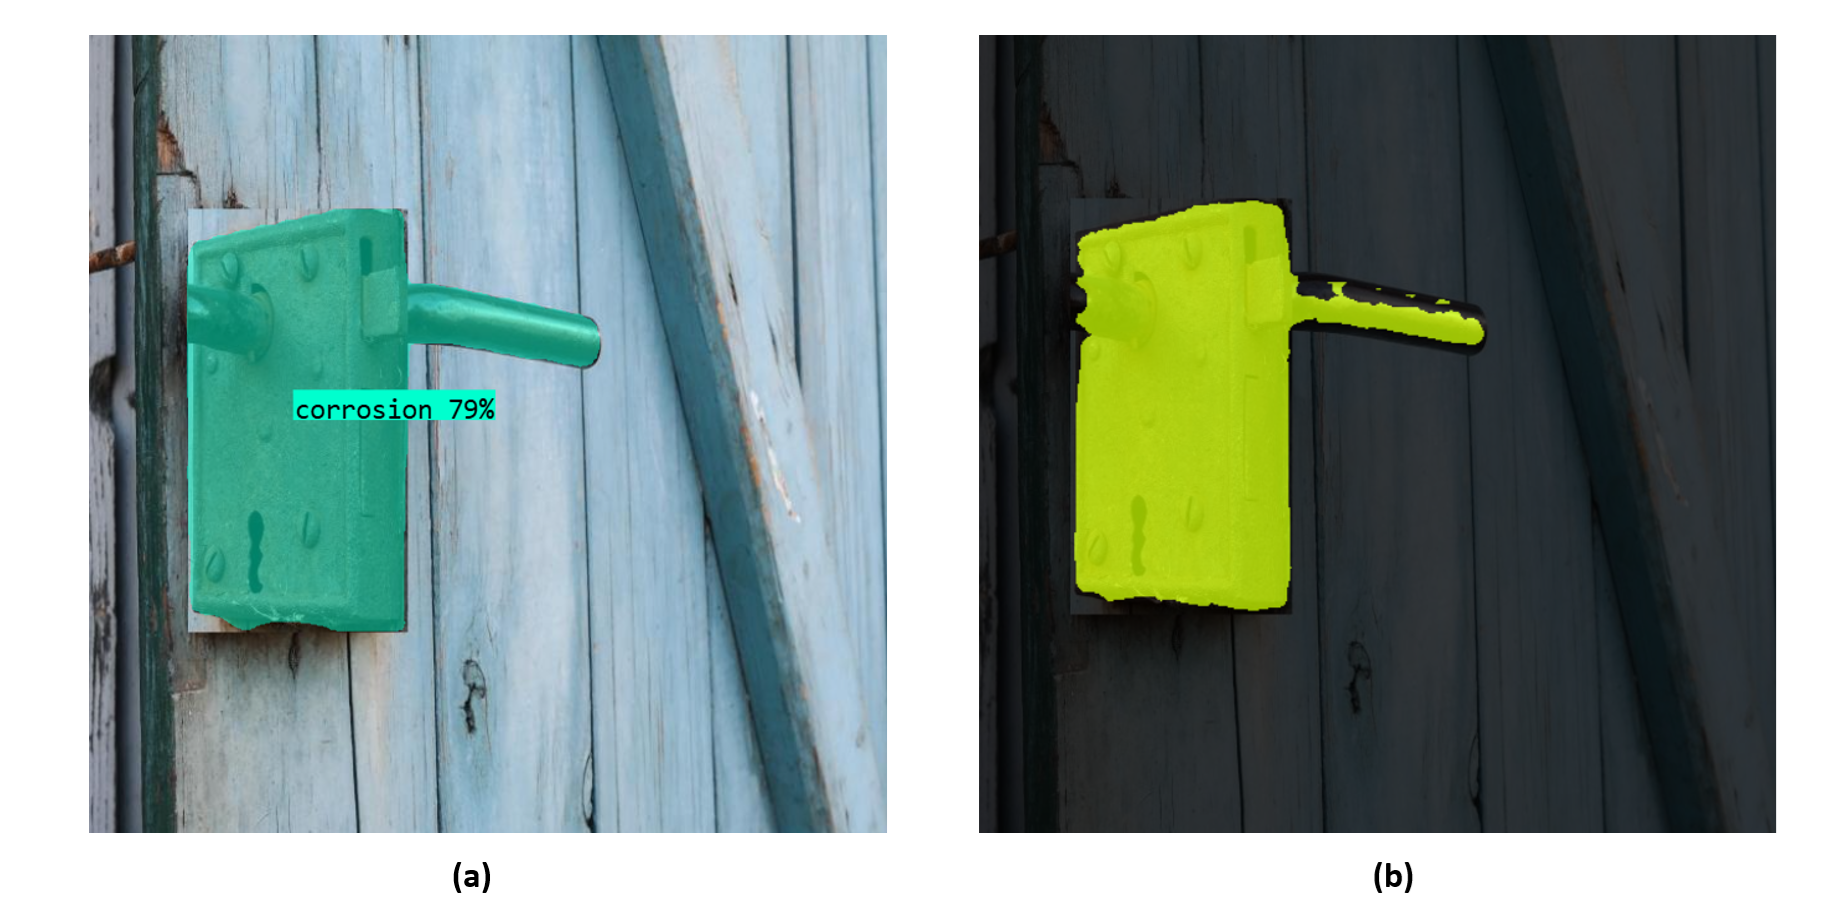
The result looks like following. The purple mask is displayed outlining the corroded region, and the JSON listing the polygon coordinates (x, y pairs) along with the class name and confidence.
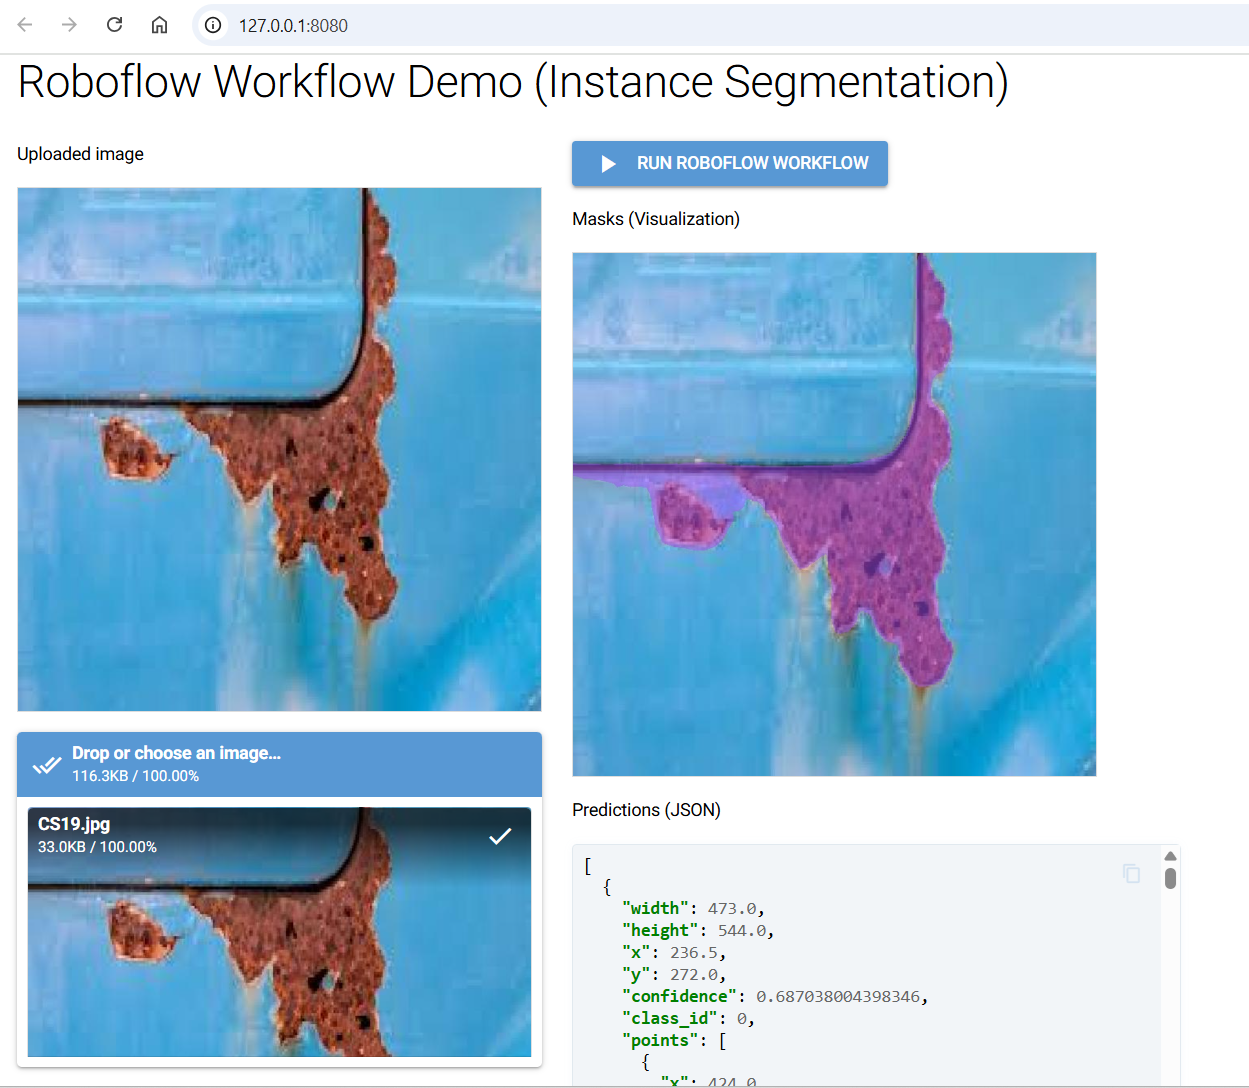
Beyond simple detection, segmentation can also be used to quantify the extent of corrosion. For example, on a ship’s hull, the segmentation model produces a corrosion map where the mask area can be measured against the total surface area. This lets engineers calculate the percentage of material affected, estimate structural impact, and prioritize repair work more accurately. You can estimate corrosion size from segmentation masks by counting mask pixels and comparing them to the total image pixels to get percentage area, or by converting polygon coordinates into real-world units if the scale is known.
Conclusion: Corrosion Detection with Computer Vision
Corrosion detection is no longer limited to slow, costly, and error-prone manual inspections. With the advancement of computer vision and deep learning, industries now have powerful tools to automatically classify, detect, and segment corrosion in images and videos.
From image classification to precise pixel-level segmentation, these techniques enable faster, safer, and large-scale monitoring of infrastructure, machinery, pipelines, and ships. Traditional methods such as color space and texture analysis remain useful for identifying early signs of rust, while modern AI-based approaches deliver accuracy and scalability for real-world deployment.
Get started free with Roboflow - upload images, label a few examples, click Train, and call your first prediction in minutes.
Cite this Post
Use the following entry to cite this post in your research:
Timothy M. (Sep 10, 2025). Corrosion Detection with Computer Vision. Roboflow Blog: https://blog.roboflow.com/corrosion-detection/