
Computer vision models have gotten remarkably good at seeing. Models such as Roboflow's RF-DETR can detect objects in real time with state-of-the-art accuracy and return clean, structured outputs: the items in your fridge, the parts on your line, the vehicles in your lot.
Vision agents take that perception and put it to work. By pairing a vision model's output with reasoning, action, and iteration in a closed loop, an agent doesn't just detect the items in your fridge: it suggests recipes, builds a meal plan, and drafts your shopping list. Perception becomes the foundation for decisions.
In this blog, we will explore what vision agents are, how they bridge the gap between detecting objects and reasoning about them, and how you can build one yourself without writing a single line of code.
What Is a Vision Agent?
A vision agent is an AI system that can see, reason, act, and iterate autonomously across multiple steps to complete a goal.
To understand how vision agents work in practice, let's break them down into layers. Each layer handles a different part of the pipeline, turning raw visual input into meaningful actions.
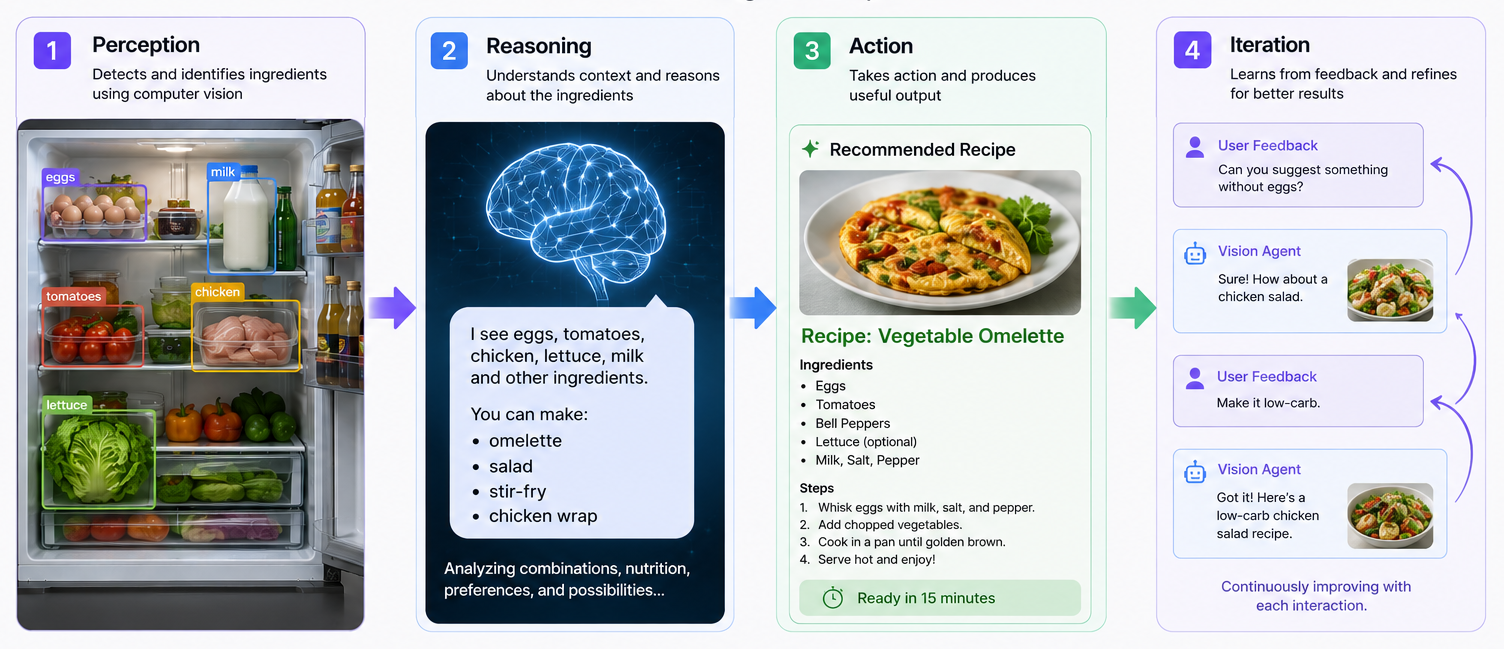
- Perception: The perception layer uses a computer vision model to process images or video frames. It extracts visual features and detects objects, including their classes, locations, and confidence scores, producing a structured representation of the scene and identifying regions of interest for further analysis.
- Reasoning: The reasoning layer uses the outputs from the perception layer, such as cropped regions of interest and detection metadata, to interpret the scene. Commonly powered by a large multimodal model (LMM), it enables the system to understand relationships, infer context, and reason about what is happening.
- Action: The action layer executes the decision by interacting with external systems. This can include calling APIs, updating databases, triggering workflows, or controlling devices to produce real-world effects.
- Iteration: The iteration layer ensures the system operates continuously rather than as a one-time process. It feeds new visual input back into the pipeline, updates internal state, and repeats the full cycle as new data becomes available.
Giving the Agent Eyes
A common misconception in vision agent systems is that large multimodal models (LMMs) can handle both perception and reasoning on their own. While LMMs are powerful at understanding and interpreting visual information, they are not ideal for the initial step of locating relevant objects in a complex scene.
This is where a dedicated computer vision model, such as Roboflow's RF-DETR, which can process visual data and produce structured outputs, becomes essential.
Why Full Images Break LLMs
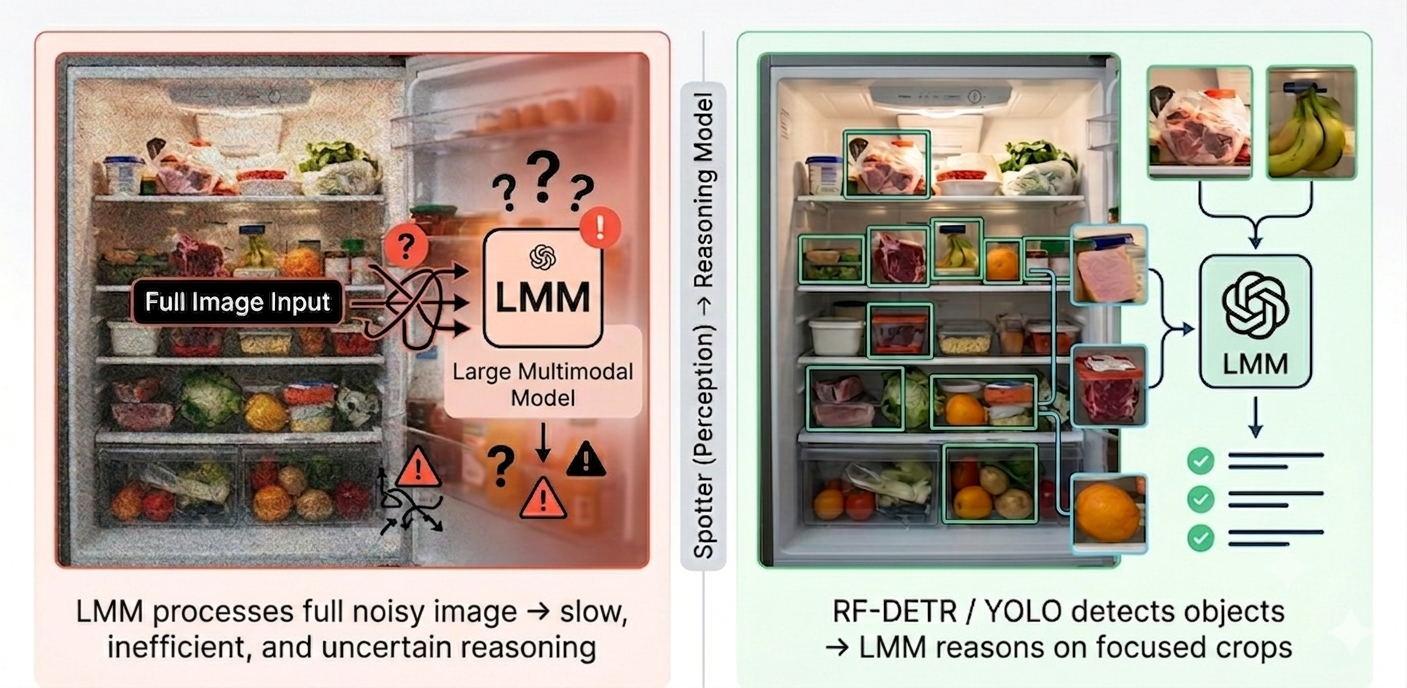
Feeding full, unprocessed images directly into an LMM creates several issues. Real-world scenes are often noisy, cluttered, and contain far more information than is necessary for a specific task. Processing the entire image at once is computationally expensive and slow, especially when scaling to real-time applications.
More importantly, LMMs lack precise spatial focus. Without explicit guidance on where to look, they may attend to irrelevant regions or miss critical details entirely. This can lead to inefficient reasoning and, in some cases, hallucinated outputs where the model attempts to infer details it cannot clearly observe.
The Solution: A Fast Spotter Model (RF-DETR Layer)
To solve this, vision agents use a specialized perception layer powered by fast object detection models such as RF-DETR created by Roboflow. This model acts as a real-time spotter, scanning the full scene at high frame rates (e.g., 30fps) to identify relevant objects and regions of interest.
Instead of passing the entire image to the LMM, the spotter isolates and crops only the most important areas at high resolution. These focused inputs are then forwarded to the reasoning model, allowing it to operate on clean, relevant visual data.
This separation of tasks makes the system significantly more efficient, accurate, and scalable.
The Reasoning Layer
The reasoning layer is powered by Large Multimodal Models (LMMs) such as Gemini 3.1 Pro, Claude Sonnet 4.5, or GPT-5.5, which act as the system's inspector.

Large Multimodal Models are AI systems that can process and understand multiple types of input at the same time, such as images, text, and structured data. In vision agents, they are responsible for interpreting visual information rather than simply detecting objects. This makes them well-suited for higher-level reasoning tasks that require understanding context and relationships within a scene.
This layer takes the cropped image output from the Perception Layer and uses it to answer complex, context-heavy questions that require interpretation rather than simple detection. By focusing only on relevant regions of the image, the inspector can apply reasoning over high-quality visual evidence instead of processing the full noisy scene - focusing on interpreting what those detections mean in context.
For example, it can determine whether a medical reading is physiologically possible, or evaluate whether a metal surface passes quality standards in an industrial inspection setting.
In this way, the reasoning layer transforms structured visual inputs into meaningful judgments, bridging the gap between detection and actionable understanding.
Orchestrating the Agent in Roboflow Workflows
Now that we understand what each layer does, it is time to build the pipeline. Roboflow Workflows gives you a low-code visual canvas where you can chain together every block described above with no custom code required. Here is a step-by-step walkthrough of exactly how to do it.
To bring this all together, we are going to build a real vision agent from scratch. The use case is simple but practical: a hydration monitoring agent that detects whether a bottle is present at a desk, crops it, and uses an LMM to reason about the scene before sending an email alert. It is a straightforward example that demonstrates every layer of the vision agent architecture, and the same pipeline can be adapted to almost any physical monitoring task by swapping out the detection class, the prompt, and the action block.
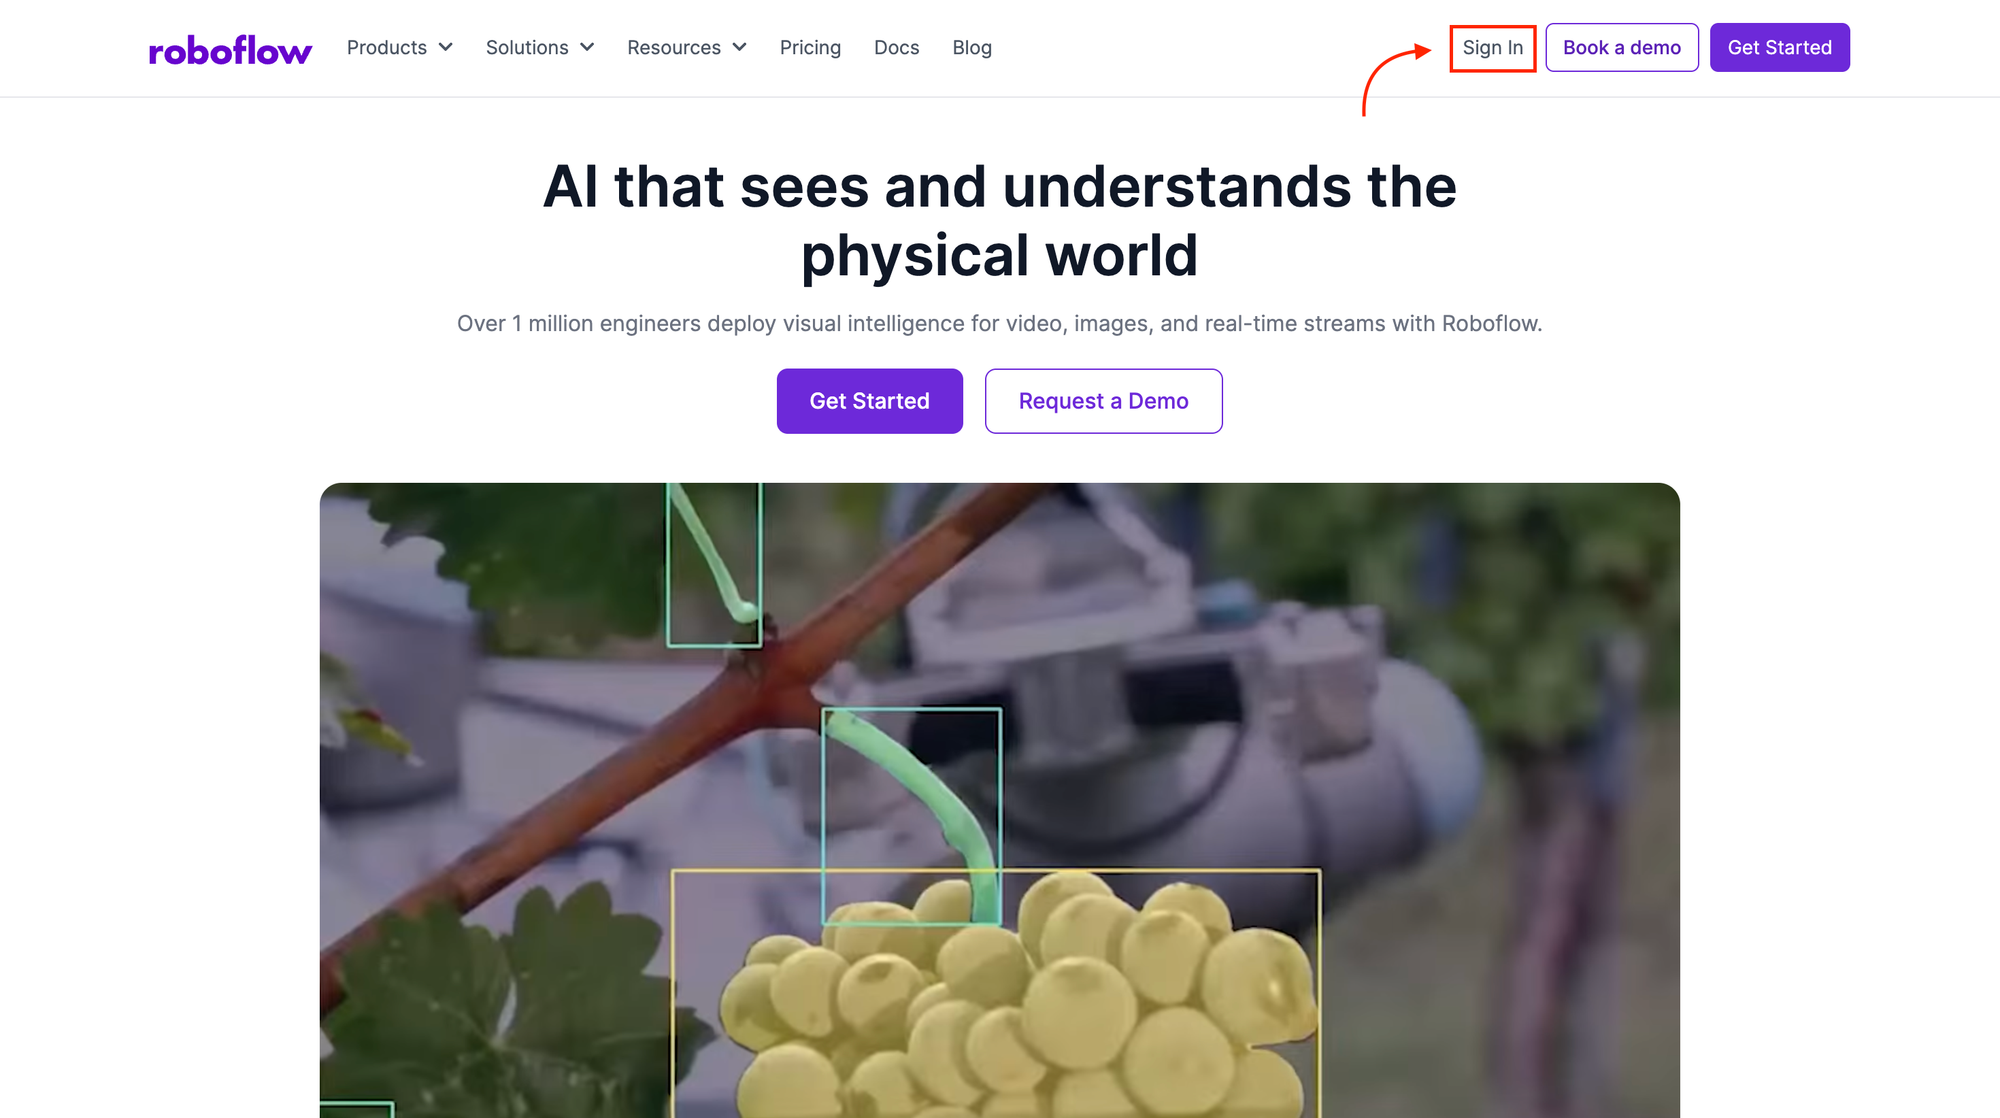
Step 1: Log in to Roboflow
Navigate to Roboflow and sign in. If you do not have an account, you can sign up for free; it only takes a minute. Once you are in, make sure you have a workspace set up. All your workflows and models will live here.
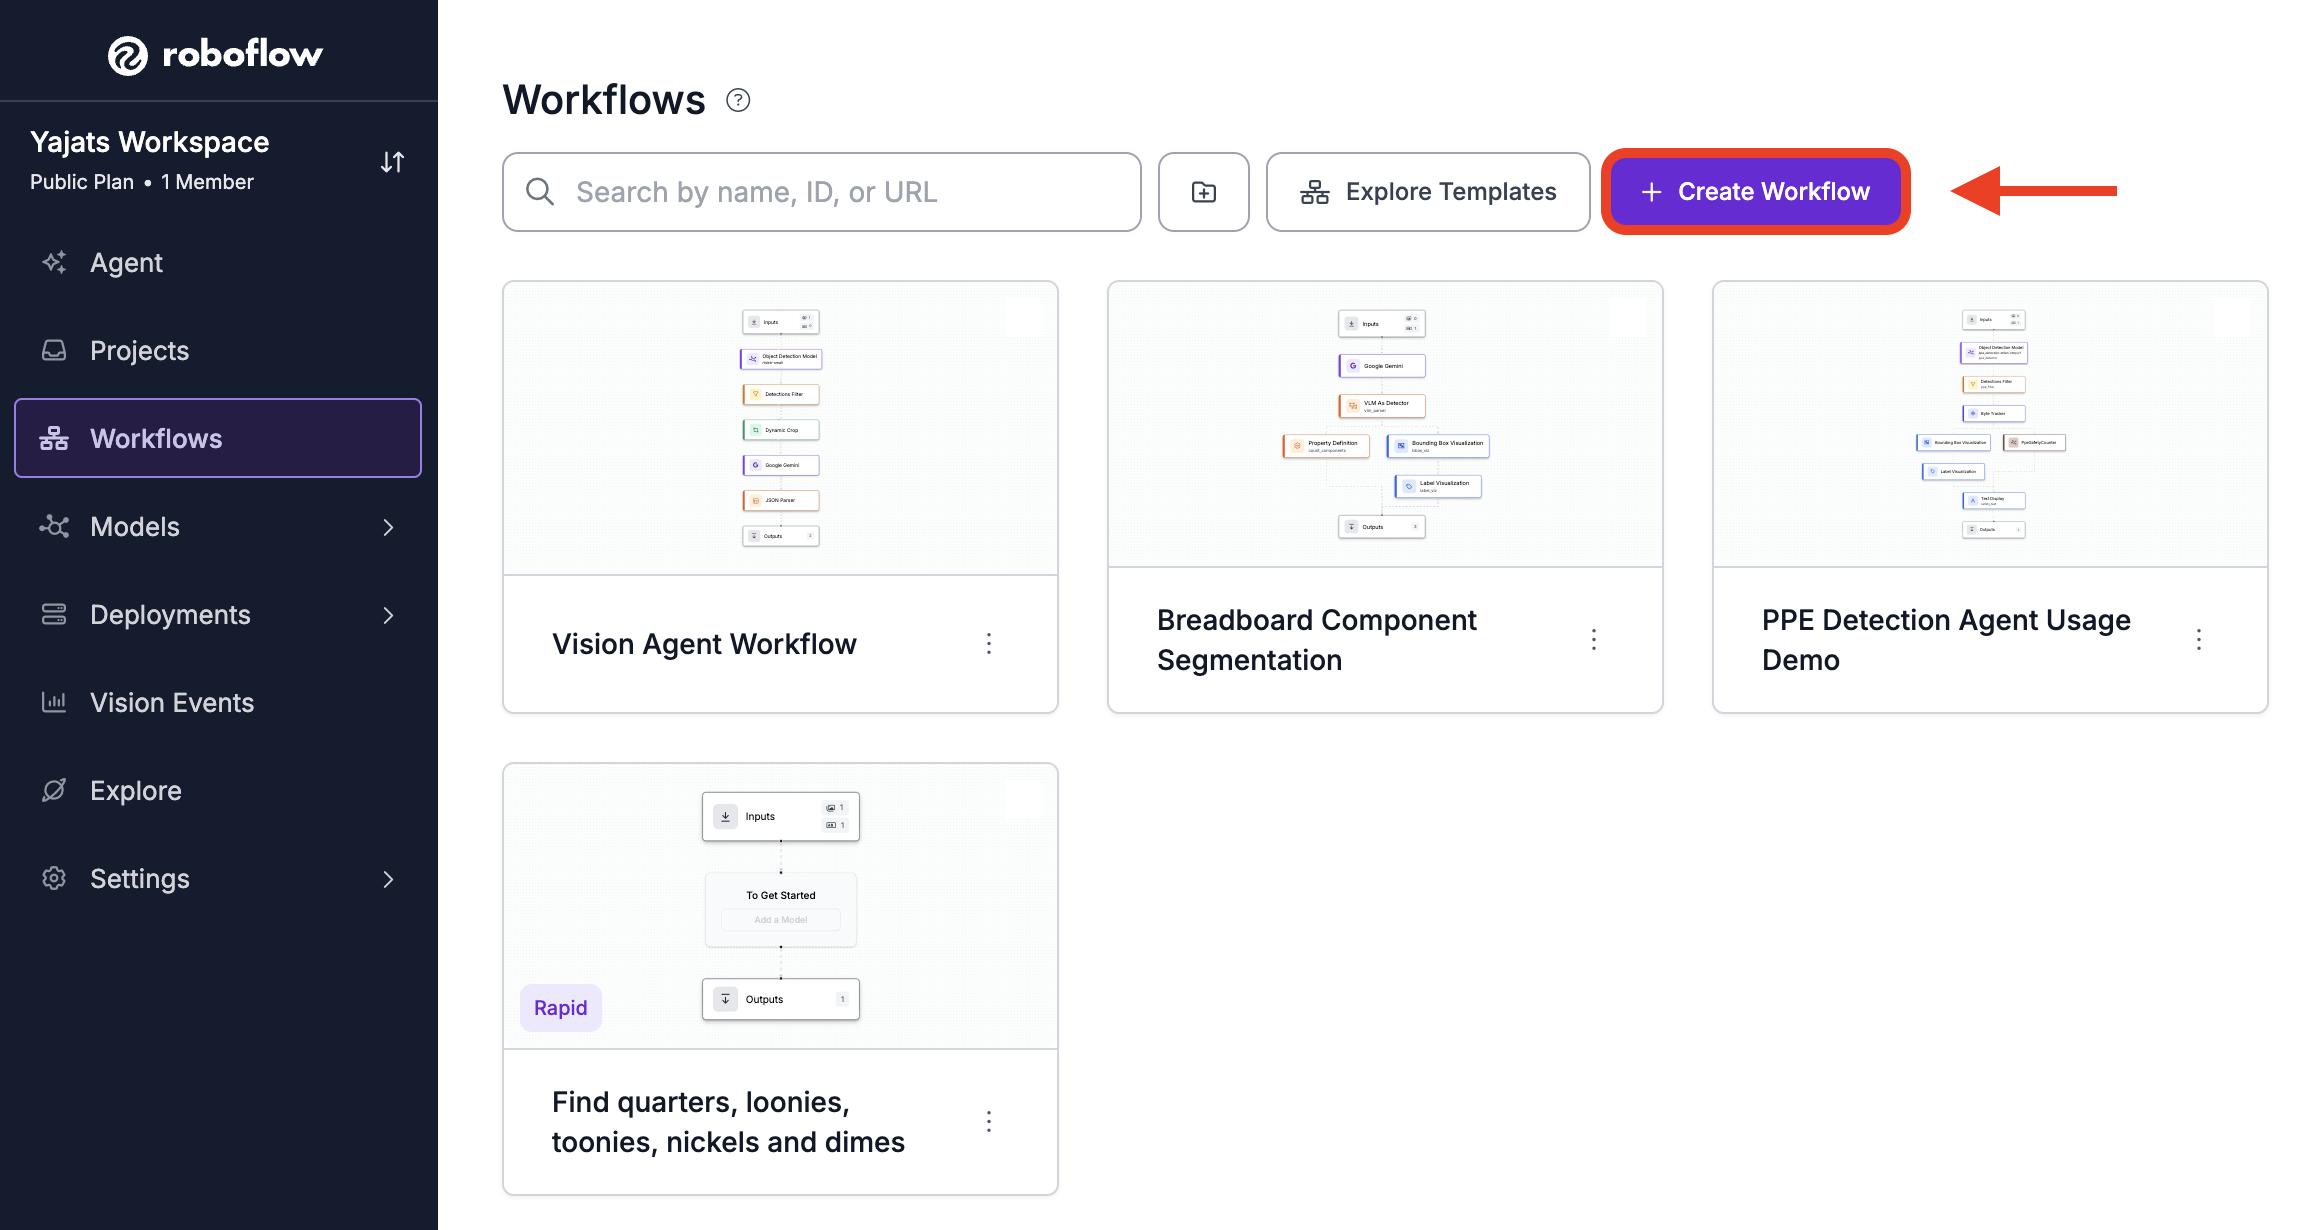
Step 2: Create a New Workflow
In the left-hand sidebar, click the Workflows tab and then select Create Workflow.
On the next screen, choose Build Your Own and click Create Workflow. This opens the visual canvas, a drag-and-drop editor where you will assemble your pipeline block by block.
This workflow will process images one frame at a time. The input can come from uploaded images, a connected camera feed, or periodic captures depending on your deployment setup.
Step 3: Add the Object Detection Block (RF-DETR)
The first block you will add is the object detection model. This is the perception layer, the Spotter that scans each incoming frame and tells the rest of the pipeline where to look.
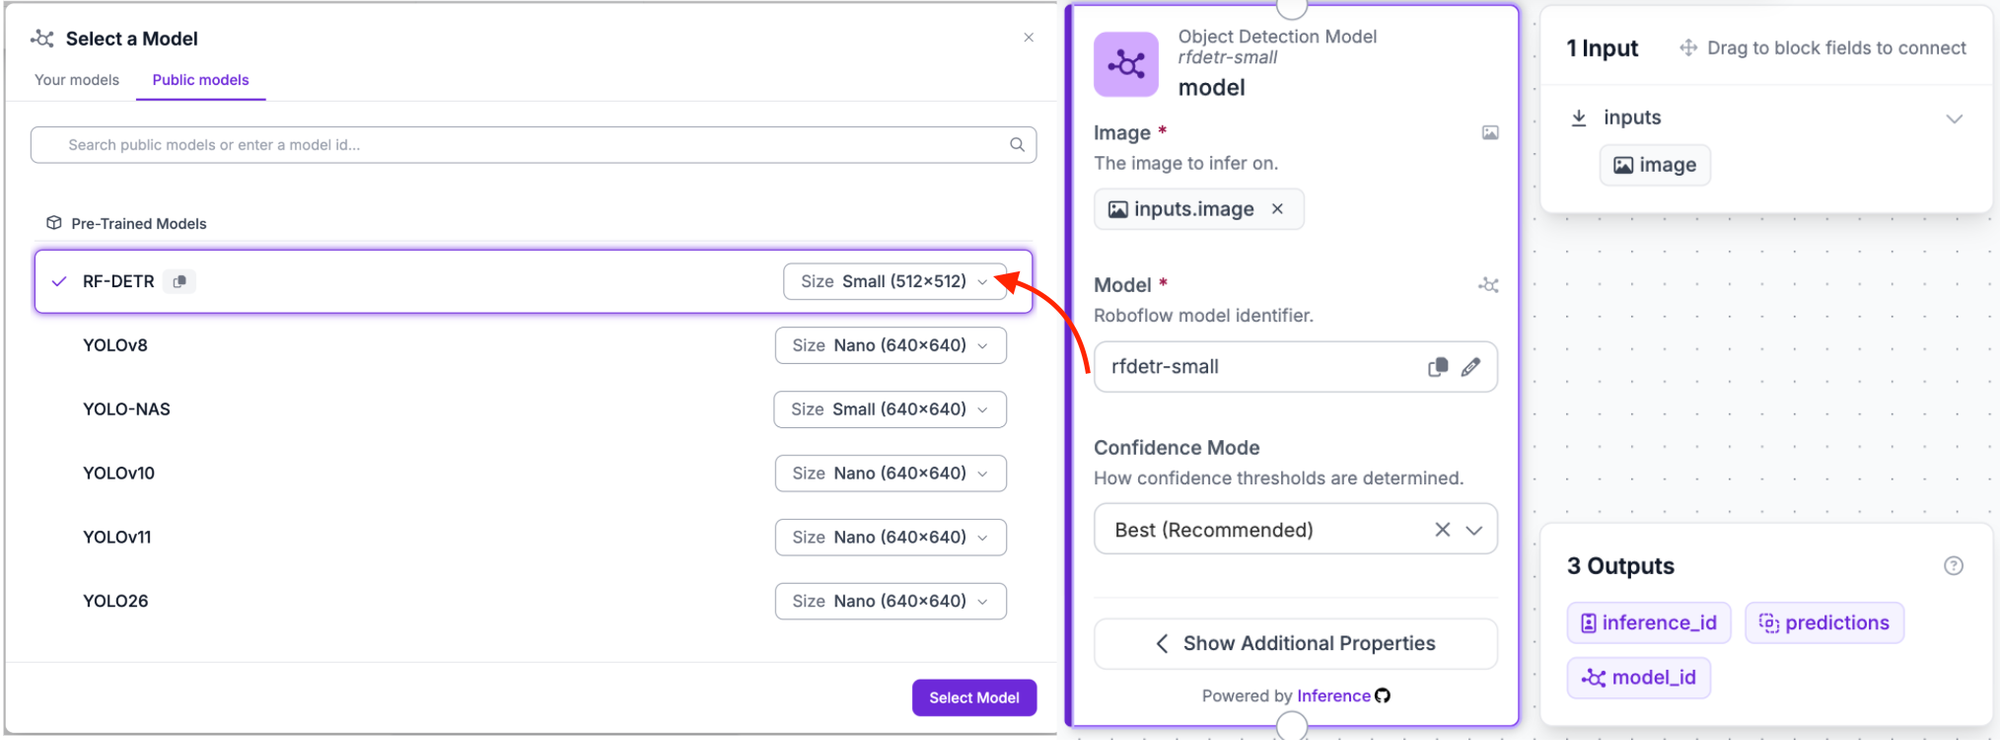
Click the Add Block icon and search for the Object Detection block. Connect it to the Image Input block already on the canvas. Once added, click on it to open the configuration panel on the right. Under the Model subheading, click Public Models. You will see a list of pre-trained models; select RF-DETR at the top of the list. Next to it, click the Size dropdown and switch it to Small (512x512). Then click Select Model.
Step 4: Add a Detections Filter
The raw detection output from RF-DETR Small will include every class it finds in the frame. Since it is pretrained on the Microsoft COCO dataset, it can detect 80 different object classes out of the box, including person, laptop, car, chair, and many more. In a real scene it will likely detect several of these at once, but for our hydration monitoring agent the only class we care about is bottle.
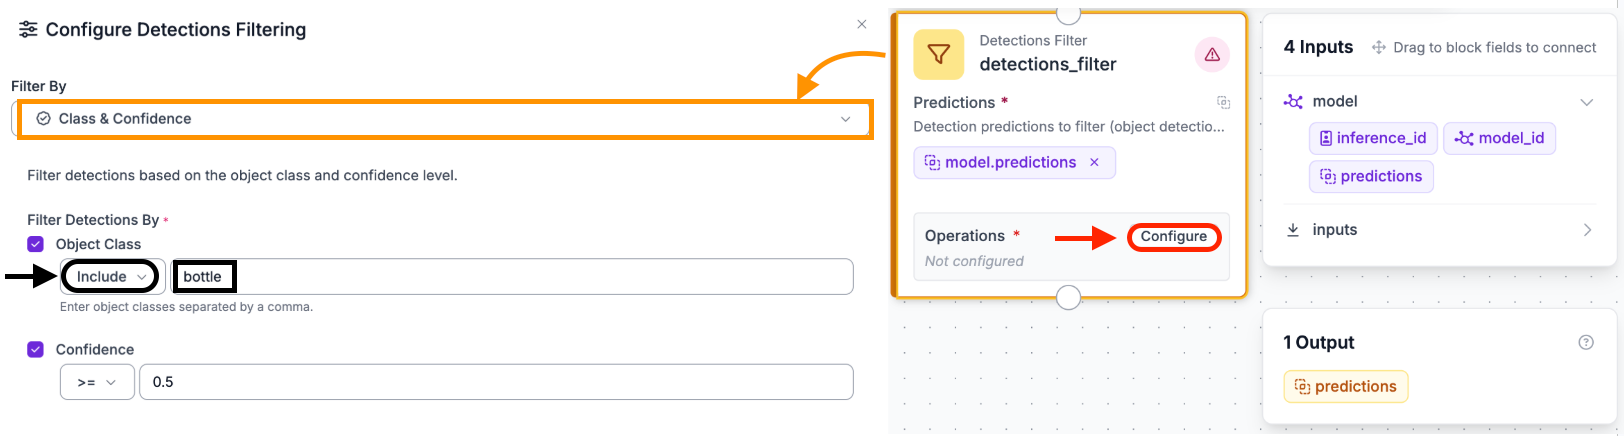
The Detections Filter block is inserted immediately after the Object Detection block to discard everything else. Click Add Block, search for Detections Filter, and connect it to the Object Detection block.
To configure the filter, click the block to open the Configure Detections Filtering panel. Set Filter By to Class and Confidence. Under Filter Detections By, check Object Class, set the operator to Include, and enter the following in the class name field: bottle
Any detection whose class name is not in this list is discarded before being passed downstream. The Confidence checkbox can be checked and set to a minimum score such as 0.5.
By filtering down to just the bottle, each crop produced in the next step will be tight and focused on exactly the right object, giving the reasoning layer clean, relevant visual evidence rather than a cluttered frame full of detections it does not need to reason about.
Step 5: Add a Dynamic Crop Block
Once the Detections Filter has isolated the bottle, the Dynamic Crop block uses its bounding box coordinates to extract a tight, high-resolution crop from the original image.

Click Add Block, search for Dynamic Crop, and connect it to the Detections Filter block. No additional configuration is needed; it automatically reads each filtered detection and extracts the relevant portion of the frame.
This is the step that makes the reasoning layer accurate and cost-efficient. Instead of passing the full cluttered scene to the LMM, you are giving it a clean, focused image of exactly the object it needs to reason about. This is what prevents hallucinations and keeps inference fast.
Step 6: Add the Vision Agent Block (LMM)
Now the reasoning layer kicks in. Click Add Block, search for Google Gemini, and connect it to the Dynamic Crop block.
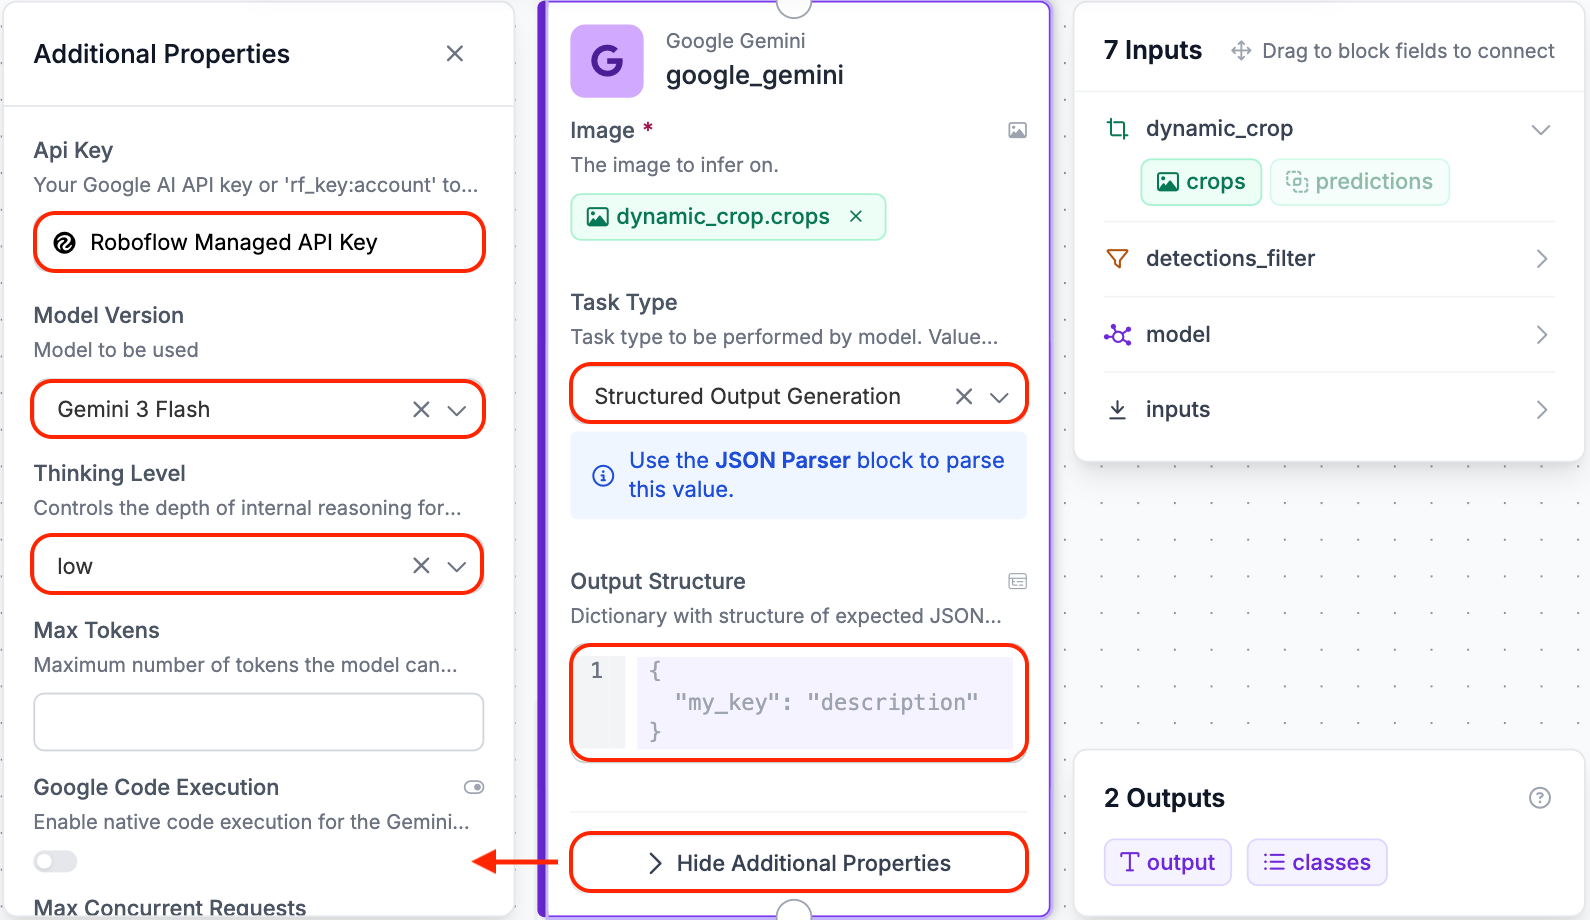
Click on Additional Properties and configure the following:
API Key: Select Roboflow Managed API Key to get started without any additional setup. If you have your own Google AI Studio API key you can paste it in here instead for more control over your usage limits. Note that Gemini 3 Pro is the most capable model on the list and ideal for complex reasoning tasks, however due to rate limiting on the shared managed key we used Gemini 3 Flash for this demo, which still produces excellent results for a task like this one.
Task Type: Set this to Structured Output Generation. This tells the block to expect a JSON schema rather than a free text response, which is essential for the next step.
Output Structure: This is where you define the JSON template you want Gemini to fill in. Paste in the following:
{
  "bottle_present": "true or false, whether a bottle is clearly visible in the crop",
  "bottle_status": "being held, on desk, empty, or unknown",
  "person_present": "true or false, whether a person or part of a person is visible near the bottle",
  "confidence": "number between 0 and 1",
  "reasoning": "brief explanation of the visual cues used to reach this conclusion. Base this only on what is visible in the crop"
}
Adjust the thinking level based on your needs. For simpler high-throughput tasks, a lower setting keeps latency low. For complex or high-stakes decisions, such as medical imaging or quality checks where errors are costly, set it higher to allow the model to reason more carefully before responding.
Because the model receives a focused crop rather than the raw scene, it applies its full reasoning capacity to high-quality visual evidence rather than background noise.
Step 7: Add a JSON Parser Block
Gemini returns its response as text. Even with Structured Output Generation enabled, you need the JSON Parser block to cleanly extract each field and make it available as an individual variable that downstream blocks can use.
Think of it this way: Gemini hands you a sealed envelope with everything inside it. The JSON Parser opens that envelope and sorts the contents into labeled folders so the next block can grab exactly what it needs without digging through everything.
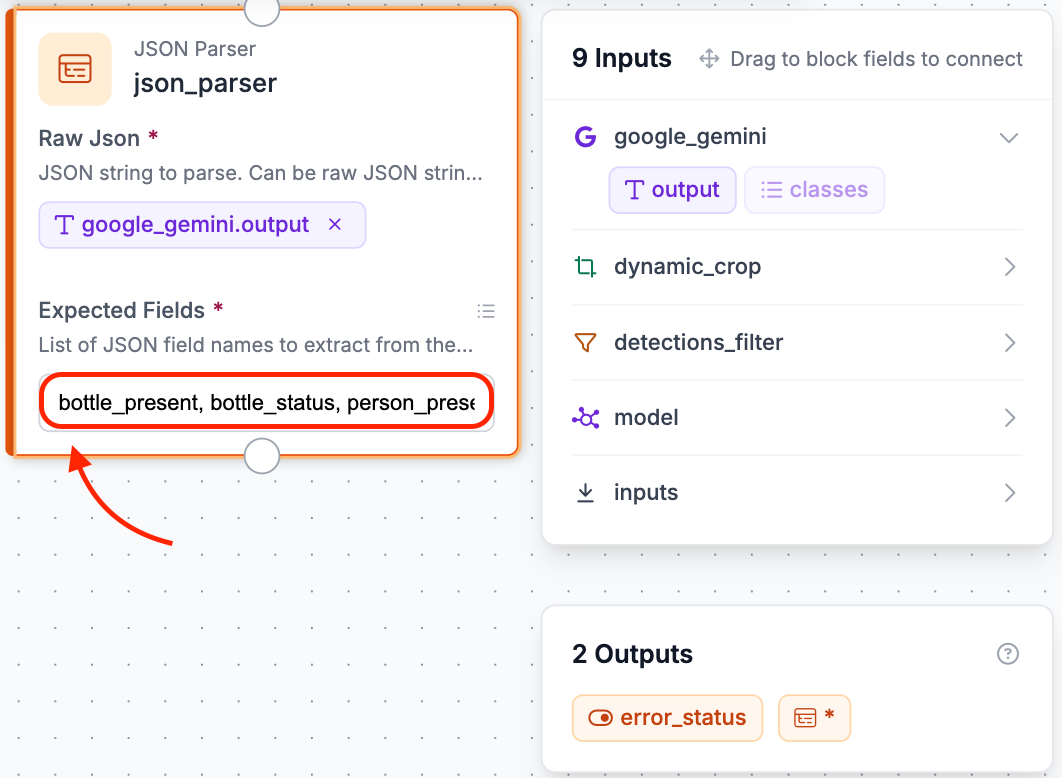
Click Add Block, search for JSON Parser, and connect it to the Google Gemini block. In the Expected Fields section, enter the following:
bottle_present, bottle_status, person_present, confidence, reasoning
These must match the key names in your Output Structure exactly, including spelling and underscores. If they do not match, the parser will return empty or false values instead of the real data.
Step 8: Add an Email Notification Block
With structured output in hand, the final step is to act on it. Click Add Block, search for Email Notification, and connect it to the JSON Parser block.
Configure it as follows:
Email Provider: Leave this as Roboflow Managed API Key.
Subject:
Hydration Reminder: Bottle Detected at DeskReceiver Email: Enter your email address where you want to receive the alerts.
Message:
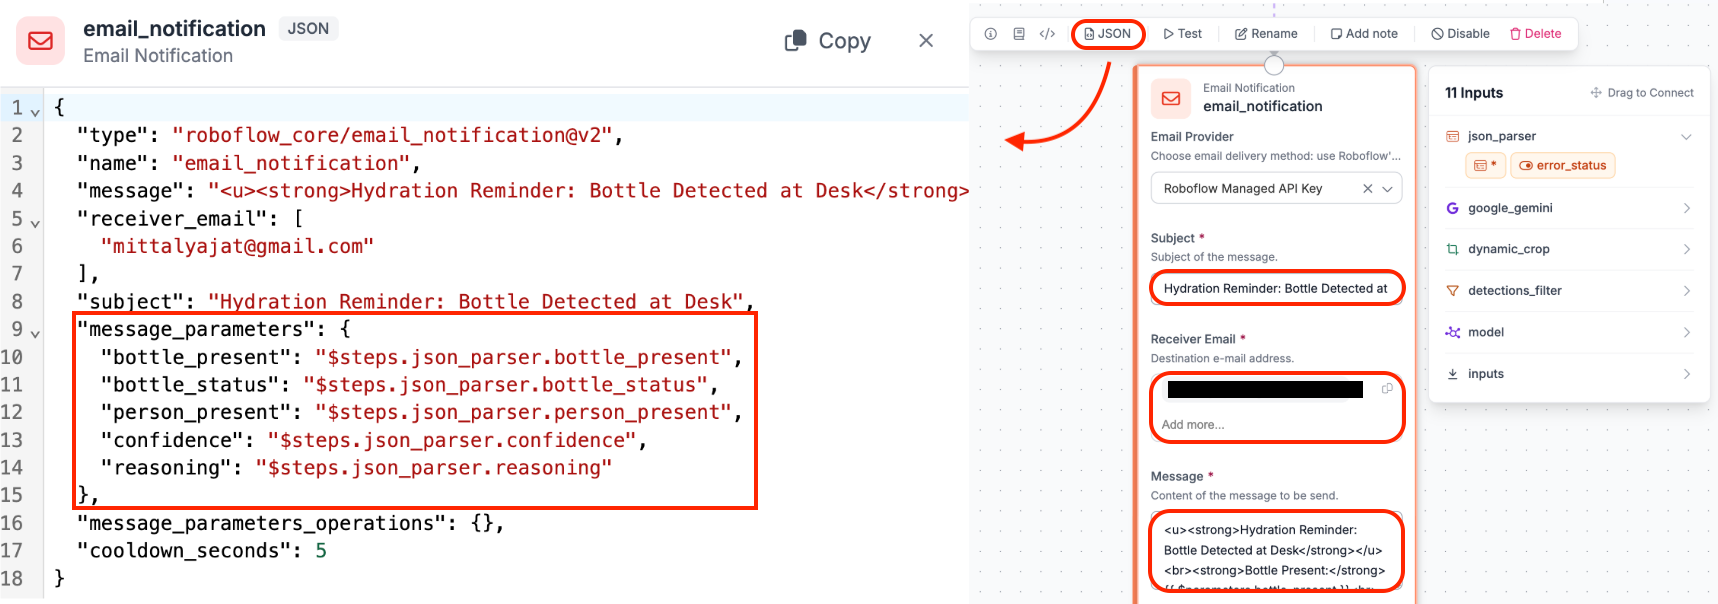
<u><strong>Hydration Reminder: Bottle Detected at Desk</strong></u><br><strong>Bottle Present:</strong> {{ $parameters.bottle_present }}<br><strong>Bottle Status:</strong> {{ $parameters.bottle_status }}<br><strong>Person Present:</strong> {{ $parameters.person_present }}<br><strong>Confidence:</strong> {{ $parameters.confidence }}<br><strong>Reasoning:</strong> {{ $parameters.reasoning }}Message Parameters: Click the JSON button at the top of the block to open the Advanced JSON Editor. Under message_parameters, map each field to its corresponding JSON Parser output as follows:
"message_parameters": {
    "bottle_present": "$steps.json_parser.bottle_present",
    "bottle_status": "$steps.json_parser.bottle_status",
    "person_present": "$steps.json_parser.person_present",
    "confidence": "$steps.json_parser.confidence",
    "reasoning": "$steps.json_parser.reasoning"
}
Cooldown Seconds: Leave at 5 for testing. In a production deployment you would raise this to avoid being flooded with repeated alerts.
Email is the simplest action to demonstrate here, but the same pattern applies to any downstream system. You could swap this block out for a Webhook to post results to a Slack channel, a database write, or an API call to trigger another workflow entirely. The structured JSON output makes it straightforward to connect to whatever system you need.
Step 9: Test the Workflow
With all blocks connected, it is time to validate the pipeline end to end. In the Roboflow Workflows editor, click the Test button and upload an image containing a bottle.
You will see the workflow run through each block in sequence: RF-DETR detects the bottle, the Detections Filter confirms it passes, the Dynamic Crop isolates it, Gemini 3 Flash reasons about the scene, the JSON Parser extracts the structured fields, and the Email Notification fires.
Within a few seconds you should receive an email with the full hydration check results including the bottle status, whether a person is present, the confidence score, and Gemini's reasoning about what it observed in the crop.
Alternative: Building the Workflow with the Roboflow Agent
If you want a faster way to get started, Roboflow Workflows has a built-in Agent panel on the left side of the editor. Instead of adding and configuring each block manually, you can just describe what you want and the agent will build the pipeline for you.
Open the Agent panel and enter the following prompt:
The agent will generate the workflow automatically. You may still need to go in and make small adjustments, but it gets you most of the way there without touching a single block manually. One thing to note is that the agent exposes every intermediate step as an output by default. Once the workflow is built, open the Outputs block and remove anything you do not need.
Give My Agent Eyes Conclusion
Vision agents represent a meaningful shift in what computer vision systems can actually do. By combining a fast specialist model for perception with a large multimodal model for reasoning, and wiring them together through Roboflow Workflows, you get a system that does not just detect things but understands them and acts on them.
The pipeline we walked through is the same architecture you can adapt to almost any physical task. Swap the detection model, rewrite the prompt, and change the action block. The structure stays the same. If you want to go deeper on how vision agents work conceptually, this guide covers the full architecture in detail. And if you are looking to extend your pipeline with code, check out the best coding agents for vision AI to find the right tools for the job.
Whether you prefer building block by block on the visual canvas or letting the Roboflow Agent generate the workflow from a single description, the tools are there and free to start with. Pick a physical task you want to automate, and start building.
Cite this Post
Use the following entry to cite this post in your research:
Yajat Mittal. (Jun 11, 2026). Give My Agent Eyes. Roboflow Blog: https://blog.roboflow.com/give-my-agent-eyes/