
PaliGemma, released by Google in May 2024, is a Large Multimodal Model (LMM). You can use PaliGemma for Visual Question Answering (VQA), to detect objects on images, or even generate segmentation masks.
While PaliGemma has zero-shot capabilities – meaning the model can identify objects without fine-tuning – such abilities are limited. Google strongly recommends fine-tuning the model for optimal performance in specific domains.
One domain where foundational models typically do not perform well is medical imaging. In this guide, we will walk through fine-tuning PaliGemma to detect fractures in X-ray images. To do this, we will use one of the datasets available on Roboflow Universe.
JAX/FLAX PaliGemma 3B is available in three different versions, differing in input image resolution (224, 448, and 896) and input text sequence length (128, 512, and 512 tokens respectively).
To limit GPU memory consumption and enable fine-tuning in Google Colab, we will use the smallest version, paligemma-3b-pt-224, in this tutorial. You will need a GPU runtime with at least 12GB of available RAM, and Google Colab with an NVIDIA T4 is sufficient.
To fine-tune PaliGemma, we will:
- Download the object detection dataset in PaliGemma JSONL format;
- Install the required dependencies;
- Download pre-trained PaliGemma weights and tokenizer from Kaggle;
- Finetune PaliGemma using JAX;
- Save our model for later use.
Without further ado, let’s get started!
Step #1: Download an object detection dataset
To fine-tune PaliGemma for object detection, you need a dataset in the PaliGemma JSONL format. This format is not typically used for training traditional computer vision models like YOLO but is commonly used for training language models. A dataset in JSONL format has each line as a separate JSON object, like a list of individual records.
In our case, each record contains the name of the associated image, a prefix (prompt) that will be passed to the model, and a suffix (expected response) from the model. Here is a single object from our dataset:
{'image': 'n_0_2513_png_jpg.rf.1f679ff5dec5332cf06f6b9593c8437b.jpg', 'prefix': 'detect fracture', 'suffix': '<loc0390><loc0241><loc0472><loc0440> fracture'}In the prompt, pay attention to the keyword detect followed by a list of classes we want to `detect`, separated by semicolons. The expected detection result is described by a bounding box in '<loc{Y1}><loc{X1}><loc{Y2}><loc{X2}>' and the class name. The values X1, Y1, X2, and Y2 describe the location of the bounding box, normalized to an image size of 1024x1024. Each value should have 4 digits; if a coordinate is shorter, it is padded with zeros.
Roboflow has full support for the PaliGemma JSONL format, and it can be used to export any of the 250,000+ datasets on Roboflow Universe.
First, install the required dependencies to download and parse a dataset:
pip install roboflow supervisionFor this guide, we will download a fracture detection dataset using a Roboflow API key:
from google.colab import userdata
from roboflow import Roboflow

ROBOFLOW_API_KEY = userdata.get('ROBOFLOW_API_KEY')

rf = Roboflow(api_key=ROBOFLOW_API_KEY)
project = rf.workspace("srinithi-s-tzdkb").project("fracture-detection-rhud5")
version = project.version(4)
dataset = version.download("PaliGemma")
Before we start fine-tuning, let's ensure the dataset is correctly formatted by visualizing one of the examples from our dataset.
from PIL import Image
import json

first = json.loads(open(f"{dataset.location}/dataset/_annotations.train.jsonl").readline())
print(first)

image = Image.open(f"{dataset.location}/dataset/{first.get('image')}")
CLASSES = first.get('prefix').replace("detect ", "").split(" ; ")
detections = from_pali_gemma(first.get('suffix'), image.size, CLASSES)

sv.BoundingBoxAnnotator().annotate(image, detections)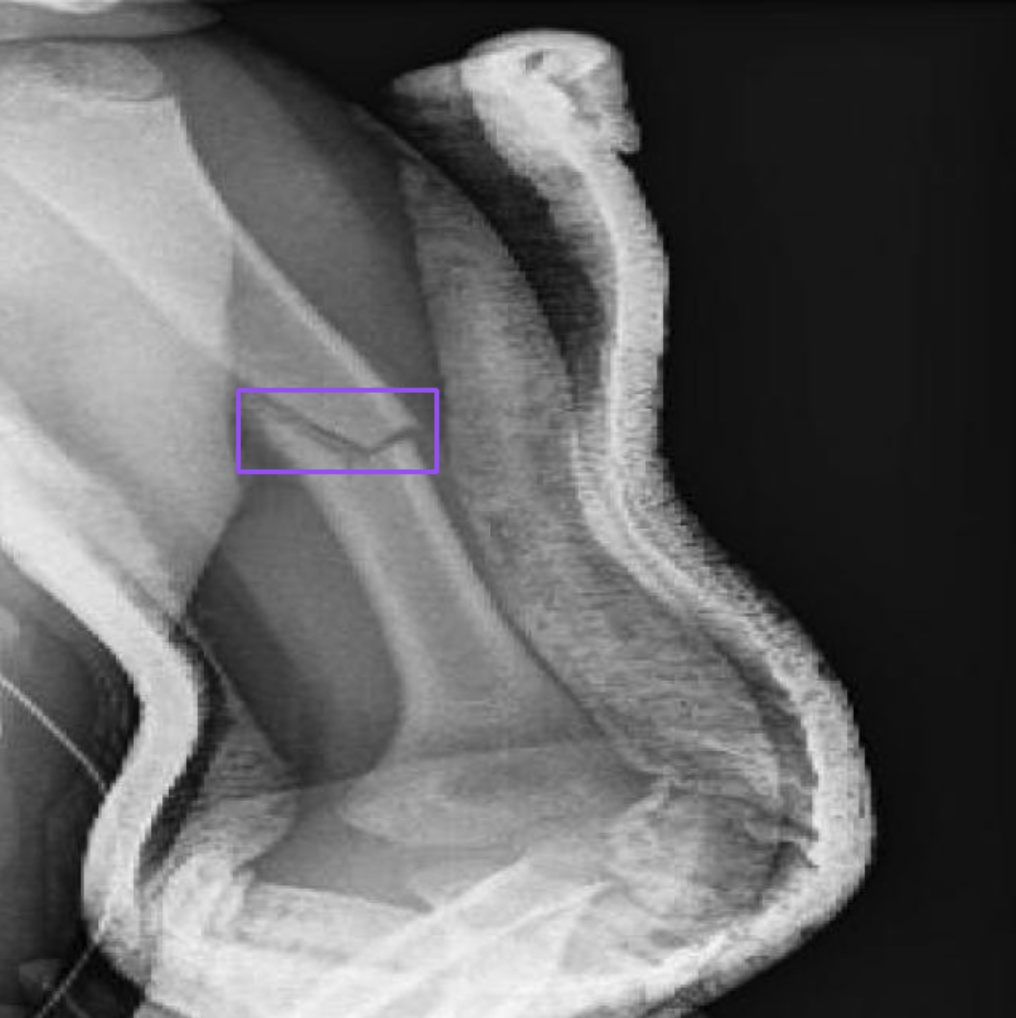
Now that we know our annotations are correctly displayed, we can set up our Python environment and start fine-tuning. Most of the code in this section comes from the official Google Colab released by the PaliGemma team.
Step #2: Model setup
To train a PaliGemma model for object detection, we are going to use the big_vision project maintained by Google Research. We can install this project using the following code:
import os
import sys

# TPUs with
if "COLAB_TPU_ADDR" in os.environ:
  raise "It seems you are using Colab with remote TPUs which is not supported."

# Fetch big_vision repository if python doesn't know about it and install
# dependencies needed for this notebook.
if not os.path.exists("big_vision_repo"):
  !git clone --quiet --branch=main --depth=1 \
     https://github.com/google-research/big_vision big_vision_repo

# Append big_vision code to python import path
if "big_vision_repo" not in sys.path:
  sys.path.append("big_vision_repo")

# Install missing dependencies. Assume jax~=0.4.25 with GPU available.
!pip3 install -q "overrides" "ml_collections" "einops~=0.7" "sentencepiece"
Once you have installed big_vision, you next need to download the PaliGemma model weights. These weights are available on Kaggle. You will need a Kaggle account to download the weights. You must agree to the PaliGemma terms of service in Kaggle in order to use the model weights.
Once you have set up your Kaggle account and agreed to the terms of service, you can download the PaliGemma weights using the following code:
import os
from google.colab import userdata

# Note: `userdata.get` is a Colab API. If you're not using Colab, set the env
# vars as appropriate or make your credentials available in ~/.kaggle/kaggle.json

os.environ["KAGGLE_USERNAME"] = userdata.get('KAGGLE_USERNAME')
os.environ["KAGGLE_KEY"] = userdata.get('KAGGLE_KEY')

import os
import kagglehub

MODEL_PATH = "./PaliGemma-3b-pt-224.f16.npz"
if not os.path.exists(MODEL_PATH):
  print("Downloading the checkpoint from Kaggle, this could take a few minutes....")
  # Note: kaggle archive contains the same checkpoint in multiple formats.
  # Download only the float16 model.
  MODEL_PATH = kagglehub.model_download('google/PaliGemma/jax/PaliGemma-3b-pt-224', MODEL_PATH)
  print(f"Model path: {MODEL_PATH}")

TOKENIZER_PATH = "./PaliGemma_tokenizer.model"
if not os.path.exists(TOKENIZER_PATH):
  print("Downloading the model tokenizer...")
  !gsutil cp gs://big_vision/PaliGemma_tokenizer.model {TOKENIZER_PATH}
  print(f"Tokenizer path: {TOKENIZER_PATH}")
Step #3: Train a PaliGemma model for object detection
With the model weights downloaded, we are now ready to train a PaliGemma model on a custom object detection dataset. The code for this step is long, so this guide will not include the code. Follow the accompanying notebook for all of the code you need to train your model.
The steps that we need to follow to train a model are:
- Import all of the required dependencies
- Construct the model using the ml_collections library.
- Load the model weights into RAM for use in training.
- Move parameters to GPU/TPU memory for use in training.
- Define preprocessing functions for images and tokens.
- Define a training loop that will iterate over all of the train and validation examples, using the PaliGemma jsonl format.
- Run a training loop with a specified learning rate and number of examples to fine-tune the model.
All of these steps are documented in the Colab notebook that accompanies this post.
In our Colab, we set the batch size to 8, the learning rate to 0.01, and define the number of train and evaluation steps as:
BATCH_SIZE = 8
TRAIN_EXAMPLES = 512
LEARNING_RATE = 0.01

TRAIN_STEPS = TRAIN_EXAMPLES // BATCH_SIZE
EVAL_STEPS = TRAIN_STEPS // 8
With a trained model, we can now test it.
Step #4: Test the fine-tuned object detection model
In our Colab notebook, we declare a function called make_predictions which takes in a function that iterates over images and runs inference on each image.
We can use this function to test our fine-tuned object detection model:
html_out = ""
for image, caption in make_predictions(validation_data_iterator(), batch_size=4):
  html_out += render_example(image, caption)
display(HTML(html_out))
Here is a selection of results from our model when run on the validation dataset for our project:
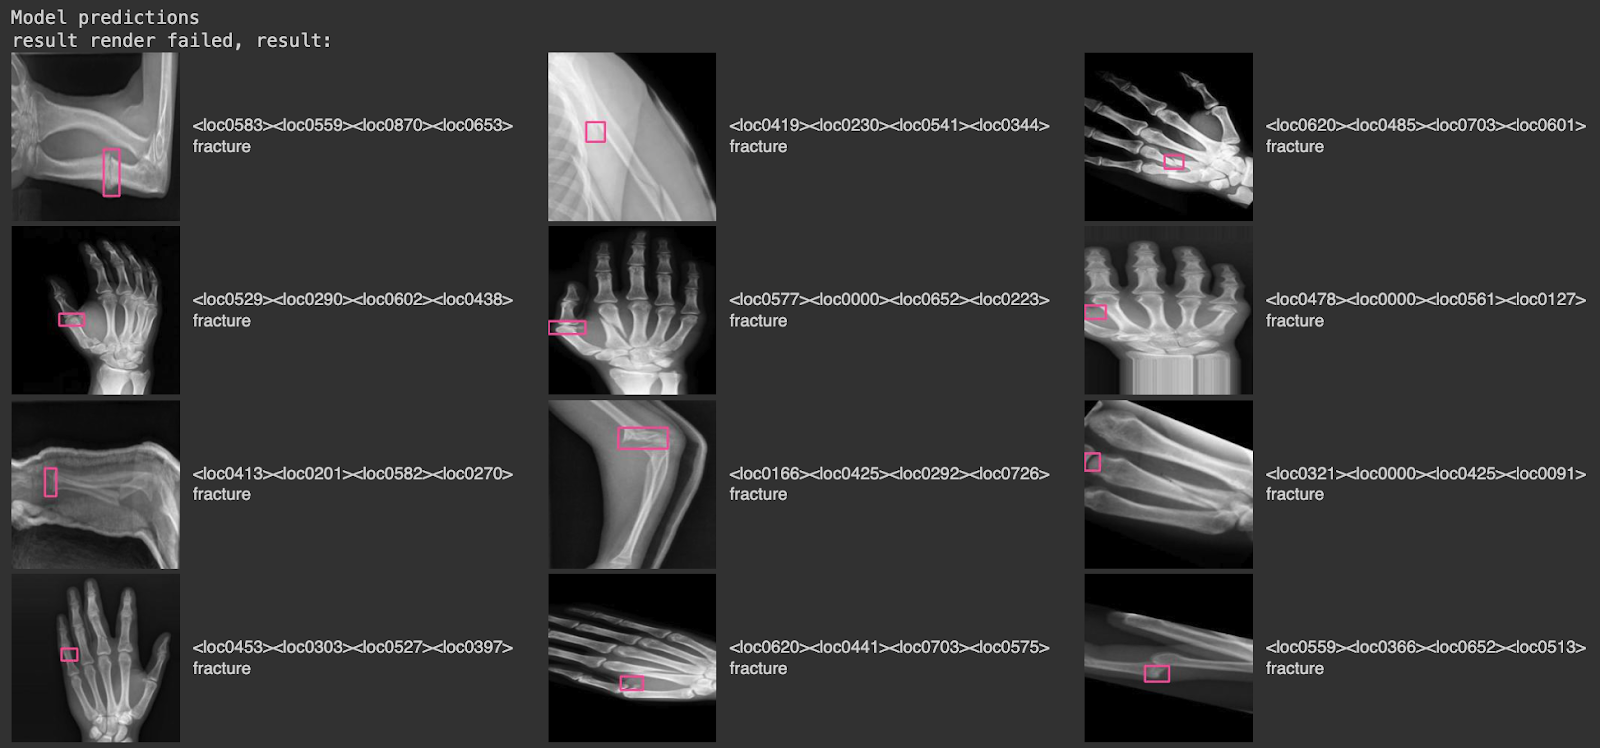
In this image, there are images from the validation set, with pink bounding boxes that correspond to detections from the model, and text labels on the right that tell us what class was identified (“fracture”).
You can save your model using the following code for later use:
flat, _ = big_vision.utils.tree_flatten_with_names(params)
with open("/content/fine-tuned-PaliGemma-3b-pt-224.f16.npz", "wb") as f:
  np.savez(f, **{k: v for k, v in flat})
Step #5: Upload Model Weights
With your model weights ready, you can deploy them onto your hardware with Roboflow Inference.
You can upload your model weights to Roboflow using the following code:
import roboflow
rf = Roboflow(api_key="API_KEY")
project = rf.workspace("workspace-id").project("project-id")
version = project.version(VERSION)
version.deploy(model_type="paligemma-3b-pt-224", model_path="/content/paligemma-lora")
Above, replace:
API_KEYwith your Roboflow API key.workspace-idandproject-idwith your workspace and project IDs.VERSIONwith your project version.
If you are not using our notebook, replace /content/paligemma-lora with the directory where you saved your model weights.
When you run the code above, the model will be uploaded to Roboflow. It will take a few minutes for the model to be processed before it is ready for use.
Step #6: Deploy PaliGemma Model
When your model is ready, you can download it from Roboflow on any device on which you want to deploy your model. To do so, you can use Roboflow Inference, our open source computer vision inference server.
First, install inference:
pip install inference
Then, create a new Python file and add the following code:
import os
from inference import get_model
from PIL import Image
import json

lora_model = get_model("model-id/version-id", api_key="KEY")

image = Image.open("image.jpg")
response = lora_model.infer(image)
print(response)
Above, replace:
model-idwith your Roboflow model ID;version-idwith your project version, and;KEYwith your Roboflow API key.
When you run the code above, you will receive predictinos from your model on the image you have supplied.
You can then visualize the results from the model with the supervision Python package. First, you will need to install supervision:
pip install supervisionThen, add the following code to your Python file:
import supervision as sv

detections = sv.Detections.from_inference(response)

box_annotator = sv.BoxAnnotator()
annotated_frame = box_annotator.annotate(
    scene=image.copy(),
    detections=detections
)

sv.plot_image(image=annotated_frame, size=(16, 16))
Conclusion
PaliGemma is a multimodal vision model developed by Google. PaliGemma can be used to identify the location of objects in an image, and identify segmentation masks that correspond with specific objects in an image.
In this guide, we walked through how to fine-tune PaliGemma for object detection using a custom dataset, with reference to a notebook adapted from Google’s official PaliGemma fine-tuning notebook.
We downloaded a compatible dataset from Roboflow Universe, visually checked to ensure annotations were correctly stored in the PaliGemma format, then ran a training job on Google Colab. We then tested our model with the corresponding validation dataset for our project, achieving strong results.
Cite this Post
Use the following entry to cite this post in your research:
James Gallagher, Piotr Skalski. (May 17, 2024). How to Fine-tune PaliGemma for Object Detection Tasks. Roboflow Blog: https://blog.roboflow.com/how-to-fine-tune-paligemma/