In this post, we will walk through how you can train MobileNetV2 to recognize image classification data for your custom use case.
MobileNetV2(research paper) is a classification model developed by Google. It provides real-time classification capabilities under computing constraints in devices like smartphones.
This implementation leverages transfer learning from ImageNet to your dataset.
We use a public flowers classification dataset for the purpose of this tutorial. However, you can import your own data into Roboflow and export it to train MobileNetV2 to fit your own needs.
The MobileNetV2 notebook used for this tutorial can be downloaded here.
Thanks to the Tensorflow Team for publishing the base notebook that formed the foundation of our notebook.
To apply transfer learning to MobileNetV2, we take the following steps:
- Download data using Roboflow and convert it into a Tensorflow ImageFolder Format
- Load the pre-trained model and stack the classification layers on top
- Train & Evaluate the model
- Fine Tune the model to increase accuracy after convergence
- Run an inference on a Sample Image
Innovations With MobileNetV2
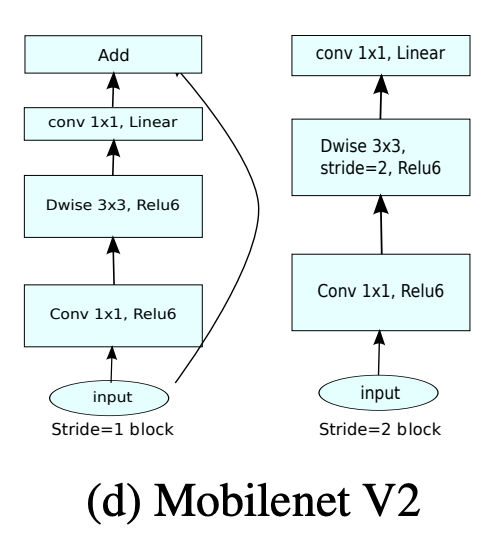
The MobileNetV2 architecture utilizes an inverted residual structure where the input and output of the residual blocks are thin bottleneck layers.
It also uses lightweight convolutions to filter features in the expansion layer. Finally, it removes non-linearities in the narrow layers. The overall architecture looks something like this:
As a result, MobileNetV2 outperforms MobileNetV1 with higher accuracies and lower latencies:

Build and delpoy with Roboflow for free
Use Roboflow to manage datasets, train models in one-click, and deploy to web, mobile, or the edge. With a few images, you can train a working computer vision model in an afternoon.
Downloading Custom Data Using Roboflow
We will be using this flowers classification dataset but you are welcome to use any dataset.
To get started, create a Roboflow account if you haven't already. Then go to the dataset page and click on raw images:
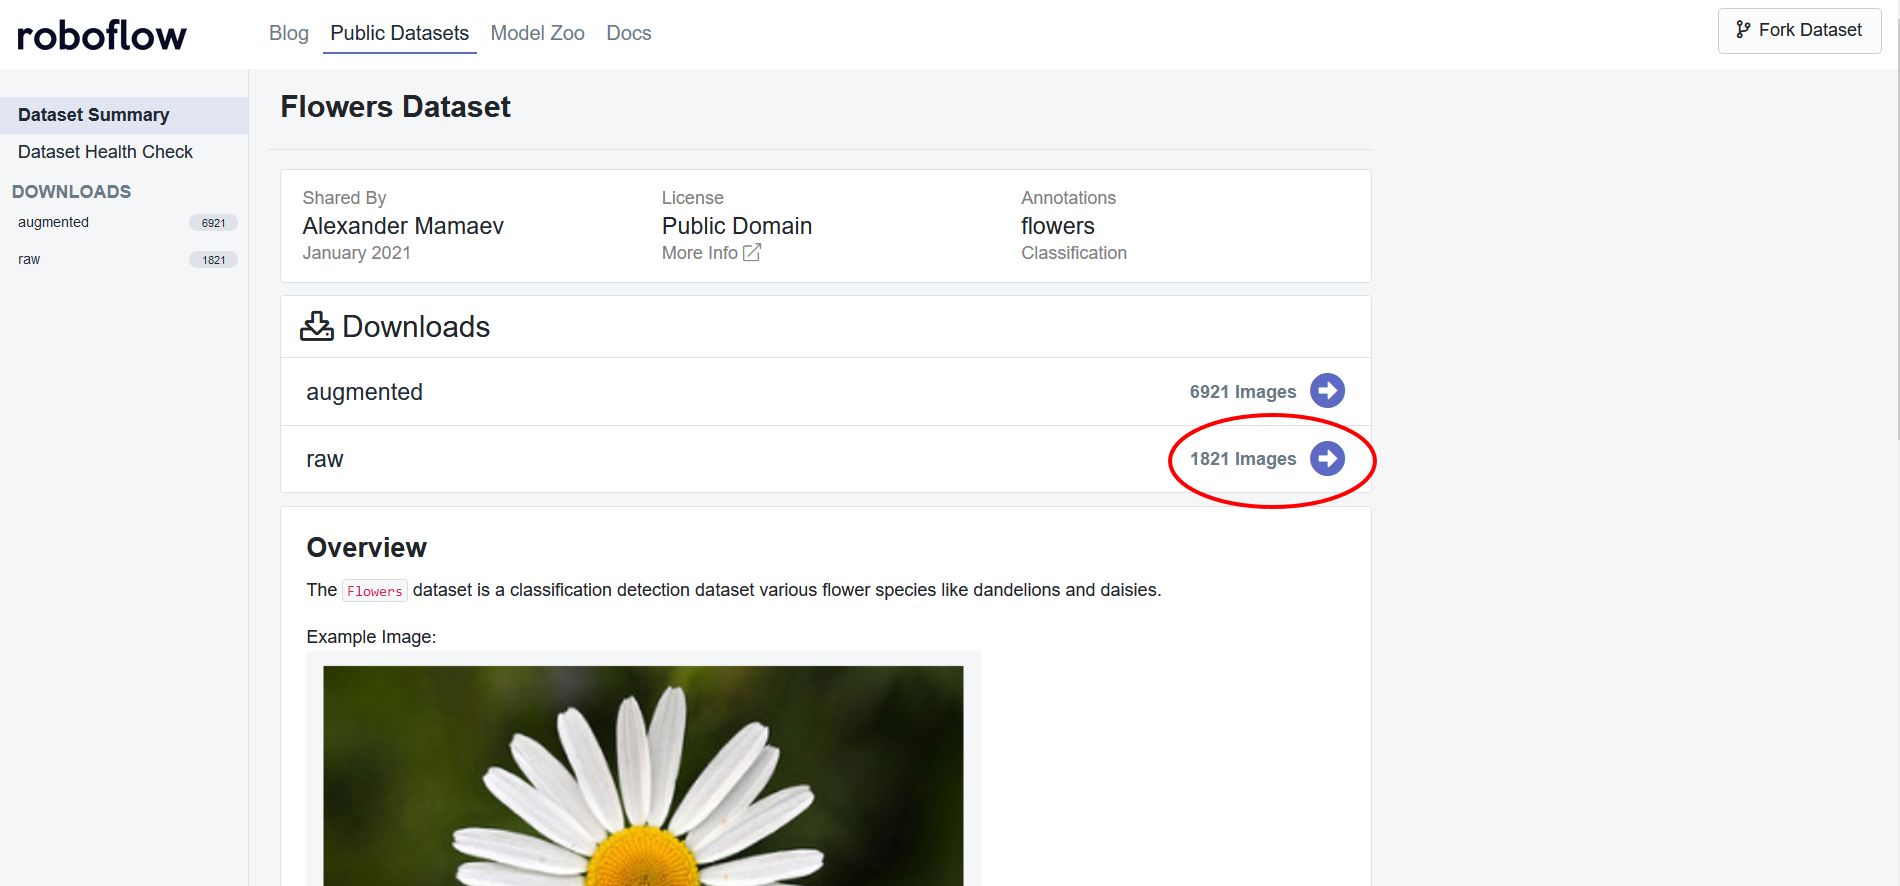
Then simply generate a new version of the dataset and export with a "Folder Structure". You will recieve a Jupyter notebook command that looks something like this:
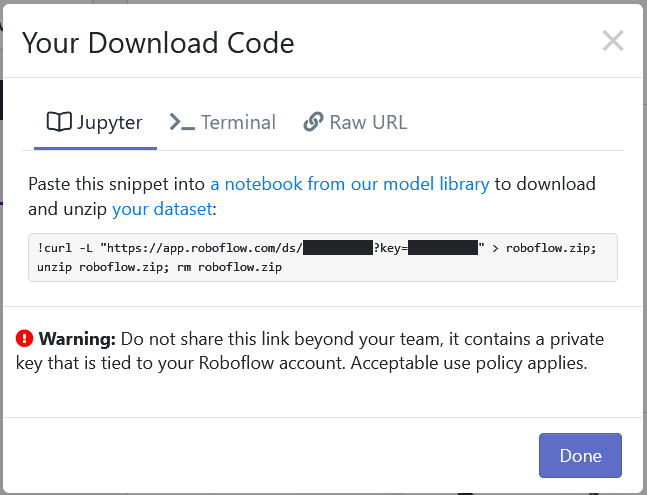
Copy the command, and replace the line below in the MobileNetV2 classification training notebook with the command provided by Roboflow:
!curl -L "https://app.roboflow.com/ds/[YOUR-KEY-HERE]" > roboflow.zip; unzip roboflow.zip; rm roboflow.zip
Using Your Own Data
To export your own data for this tutorial, sign up for Roboflow and make a public workspace, or make a new public workspace in your existing account.
Label and Annotate Data with Roboflow for free
Use Roboflow to manage datasets, label data, and convert to 26+ formats for using different models. Roboflow is free up to 10,000 images, cloud-based, and easy for teams.
Converting Data into a Tensorflow ImageFolder Dataset
In order to use the MobileNetV2 classification network, we need to convert our downloaded data into a Tensorflow Dataset.
To do this, Tensorflow Datasets provides an ImageFolder API which allows you to use images from Roboflow directly with models built in Tensorflow.
To convert our dataset into a Tensorflow Dataset, we can do this:
import tensorflow_datasets as tfds
builder = tfds.folder_dataset.ImageFolder('images/')
print(builder.info)
raw_train = builder.as_dataset(split='train', shuffle_files=True)
raw_test = builder.as_dataset(split='test', shuffle_files=True)
raw_valid = builder.as_dataset(split='valid', shuffle_files=True)
You will see your custom data properly load in with the following command tfds.show_examples(raw_train, builder.info).

Constructing the MobileNetV2 Model
First we will create the base MobileNetV2 model:
IMG_SHAPE = (IMG_SIZE, IMG_SIZE, 3)

# Create the base model from the pre-trained model MobileNet V2
base_model = tf.keras.applications.MobileNetV2(input_shape=IMG_SHAPE,
                                               include_top=False,
                                               weights='imagenet')
Here we are instantiating a MobileNetV2 model where the classification layers will depend on the very last layer before the flatten operation. This can be changed by the include_top parameter but generally is not very useful because it does not retain the generality of images when compared to bottom layers.
Next, we will want to freeze the convolutional layers to use the base model as a feature extractor. We can do this as follows:
base_model.trainable = False
You may want to experiment with unfreezing convolutional layers if your dataset is vastly different than ImageNet (PDF documents for example).
We will need to convert the feature vectors into actual predictions. To do this, we can apply a Global Average Pooling 2D layer to convert the feature vector into a 1280 element vector.
Then we can push this through a Dense layer to obtain the final prediction:
global_average_layer = tf.keras.layers.GlobalAveragePooling2D()
prediction_layer = tf.keras.layers.Dense(1)
Finally, we can stack these into a sequential model and compile the model with a Binary Crossentropy loss and RMSProp optimizer:
model = tf.keras.Sequential([
  base_model,
  global_average_layer,
  prediction_layer
])

base_learning_rate = 0.0001
model.compile(optimizer=tf.keras.optimizers.RMSprop(learning_rate=base_learning_rate),
              loss=tf.keras.losses.BinaryCrossentropy(from_logits=True),
              metrics=['accuracy'])
Train and Evaluate the MobileNetV2 Model
Prior to training the model. we can obtain the initial loss and accuracy of the model:
validation_steps=20
initial_epochs = 20

loss0,accuracy0 = model.evaluate(validation_batches, steps = validation_steps)
We can then start training the model to increase the accuracy and decrease the loss:
history = model.fit(train_batches,
                    epochs=initial_epochs,
                    validation_data=validation_batches)
To evaluate the model's performance during training and validation, we can plot the loss and accuracy:
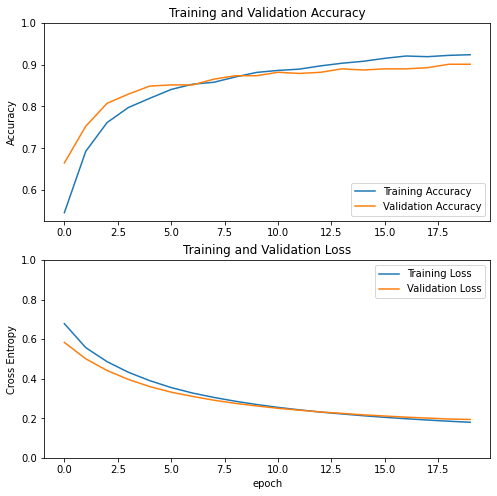
It looks like the model performed quite well and was able to converge. However, there is still some room for improvement. We can improve its accuracy through fine tuning the model.
Fine Tune the MobileNetV2 Model
To fine tune the model, we first need to unfreeze the base model and freeze all the layers before a certain layer; in this case we will freeze all layers before the 100th layer:
base_model.trainable = True

# Let's take a look to see how many layers are in the base model
print("Number of layers in the base model: ", len(base_model.layers))

# Fine-tune from this layer onwards
fine_tune_at = 100

# Freeze all the layers before the `fine_tune_at` layer
for layer in base_model.layers[:fine_tune_at]:
  layer.trainable =  False
We can then recompile and start training the model:
model.compile(loss=tf.keras.losses.BinaryCrossentropy(from_logits=True),
              optimizer = tf.keras.optimizers.RMSprop(learning_rate=base_learning_rate/10),
              metrics=['accuracy'])

fine_tune_epochs = 10
total_epochs =  initial_epochs + fine_tune_epochs

history_fine = model.fit(train_batches,
                         epochs=total_epochs,
                         initial_epoch =  history.epoch[-1],
                         validation_data=validation_batches)
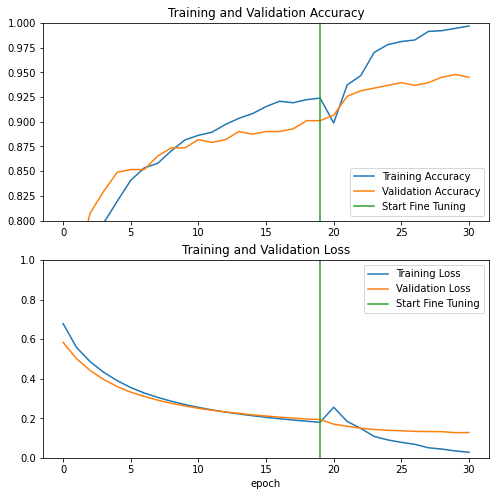
Looking at the accuracy and loss now, we can see dramatic improvements to both metrics:
Use MobileNetV2 to Infer on a Sample Image
Now, lets try using our trained model on a sample image:
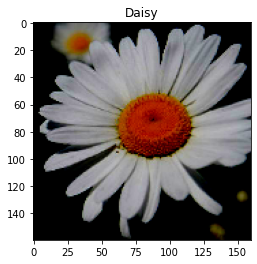
From the looks of it, MobileNetV2 seems to be working pretty well!
Conclusion
MobileNetV2 is a powerful classification model that is able to reach state-of-the-art performance through transfer learning. In this tutorial we were able to:
- Use Roboflow to download images to train MobileNetV2
- Construct the MobileNetV2 model
- Train the MobileNetV2 model for Binary Classification
- Improve performance post-convergence through fine tuning
- Run an inference on a sample image
You can get the full code in our MobileNetV2 Colab notebook.
Cite this Post
Use the following entry to cite this post in your research:
Samrat Sahoo. (Jun 14, 2021). How to Train MobileNetV2 On a Custom Dataset. Roboflow Blog: https://blog.roboflow.com/how-to-train-mobilenetv2-on-a-custom-dataset/
