
This tutorial covers training a YOLOv8 instance segmentation model on a custom car parts dataset using the Ultralytics package and Roboflow for dataset preparation and export. The post walks through creating a Roboflow project, uploading and annotating images, generating a versioned dataset, running the YOLOv8 segmentation training loop, and deploying the resulting weights back to Roboflow for inference. Car part segmentation is used as the example use case because it requires precise pixel-level delineation of individual components.
Whether you're working on object detection, instance segmentation, or classification tasks, having a reliable and easy-to-use computer vision model is essential.
In this blog post, we'll explore how you can leverage the power of Roboflow and YOLOv8 Instance Segmentation to streamline your workflow and achieve outstanding results.
Why Use YOLOv8 Instance Segmentation?
YOLOv8 is a state-of-the-art object detection algorithm known for its high accuracy and real-time performance. It's particularly effective when it comes to instance segmentation, which involves identifying and delineating individual objects within an image. YOLOv8 provides precise bounding boxes and accurate masks, making it an excellent choice for tasks that require pixel-level analysis.
You can try the YOLOv8 nano checkpoint without fine-tuning in the interactive playground below. Upload an image that contains any Microsoft COCO class (i.e. cat, laptop, car, microwave) and see the results on an image:
You can fork the Workflow above and update it to use any model you fine-tune and upload to Roboflow.
Custom Instance Segmentation Use Case
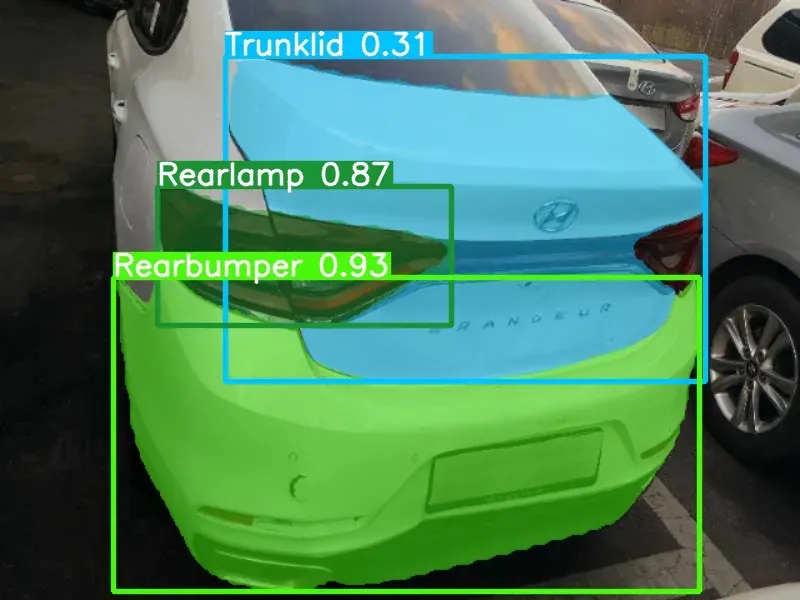
We'll work with a custom dataset of car parts and utilize this Colab notebook to run the following code. Car part segmentation is an ideal instance segmentation use case due to its requirement for precise identification and delineation of individual parts. Segmentation offers pixel-level analysis, enabling accurate and detailed understanding of car parts.
Custom trained YOLOv8 Instance Segmentation model enables the development of various applications, including:
- Autonomous vehicle systems: Accurate car part segmentation helps autonomous vehicles comprehend their surroundings and make informed decisions.
- Car repair and maintenance: The model assists in identifying damaged or faulty car parts, aiding mechanics in diagnosis and repair.
- Manufacturing and quality control: By segmenting car parts on production lines, the model ensures component quality, streamlining quality control processes.
Here's an example image demonstrating car part segmentation achieved using the YOLOv8 model:
Now let's dive into the tutorial and learn how to train YOLOv8 Instance Segmentation on your own custom dataset using Roboflow.
Install Ultralytics to access YOLOv8 Instance Segmentation
To get started, you need to install the necessary packages. Open your Jupyter notebook and execute the following command to install the required version of Ultralytics:
!pip install ultralytics==8.0.28Accessing YOLOv8 Instance Segmentation CLI Basics
The Ultralytics YOLO package comes with a command-line interface (CLI) that simplifies training, validation, and inference tasks. You can perform these tasks without modifying the code, making it an ideal starting point. The CLI supports various modes such as detection, classification, and segmentation. You can specify the desired model and other arguments based on your requirements.
Sample Inference with Pre-trained COCO Model
If you want to quickly perform instance segmentation on a sample image using a pre-trained COCO model, you can use the following CLI command:
%cd {HOME}
!yolo task=segment mode=predict model=yolov8s-seg.pt conf=0.25 source='https://media.roboflow.com/notebooks/examples/dog.jpeg' save=true

%cd {HOME}
Image(filename='runs/segment/predict/dog.jpeg', height=600)
This code segment downloads the pre-trained YOLOv8 COCO model, applies instance segmentation on the provided image, and saves the resulting image with bounding boxes and masks.
Use Roboflow for Custom Datasets
Creating a custom dataset for training a YOLOv8 instance segmentation model can be a time-consuming task. However, Roboflow simplifies the process significantly. Follow these steps to prepare your custom dataset:
1. Creating a Project
Start by creating a Roboflow account and a new project in the Roboflow dashboard. Select the "Instance Segmentation" project type.
2. Upload Images
Add your dataset to the project either through the API or the web interface. If you have a directory with images in a supported format, Roboflow automatically reads the images and annotations together when you drag and drop the directory.
With Auto Label, you can use foundation models like Grounding DINO and Segment Anything to automatically label images in your dataset. Refer to our Auto Label launch post for more information about how Auto Label works, and how you can use it with your project.
3. Generate Dataset Version
After adding images and annotations, generate a dataset version. You can optionally apply preprocessing and augmentations at this stage to improve the model's robustness.
4. Exporting Dataset
Once the dataset version is generated, export it in the YOLO v5 PyTorch format. This format allows you to easily load the dataset into your Jupyter notebook for training.
!mkdir {HOME}/datasets
%cd {HOME}/datasets

!pip install roboflow --quiet

from roboflow import Roboflow
rf = Roboflow(api_key="YOUR_API_KEY")
project = rf.workspace("alpaco5-f3woi").project("part-autolabeld")
dataset = project.version(5).download("yolov8")
Training YOLOv8 Instance Segmentation Model
Now that you have your custom dataset, you can start training your YOLOv8 instance segmentation model. Execute the following code to train the model with the downloaded dataset:
%cd {HOME}
!yolo task=segment mode=train model=yolov8s-seg.pt  data={dataset.location}/data.yaml epochs=10 imgsz=640!ls {HOME}/runs/segment/train/
After training, you can examine the results, including the confusion matrix, predictions, and validation batch, by executing the following code:
%cd {HOME}
Image(filename=f'{HOME}/runs/segment/train/confusion_matrix.png', width=600)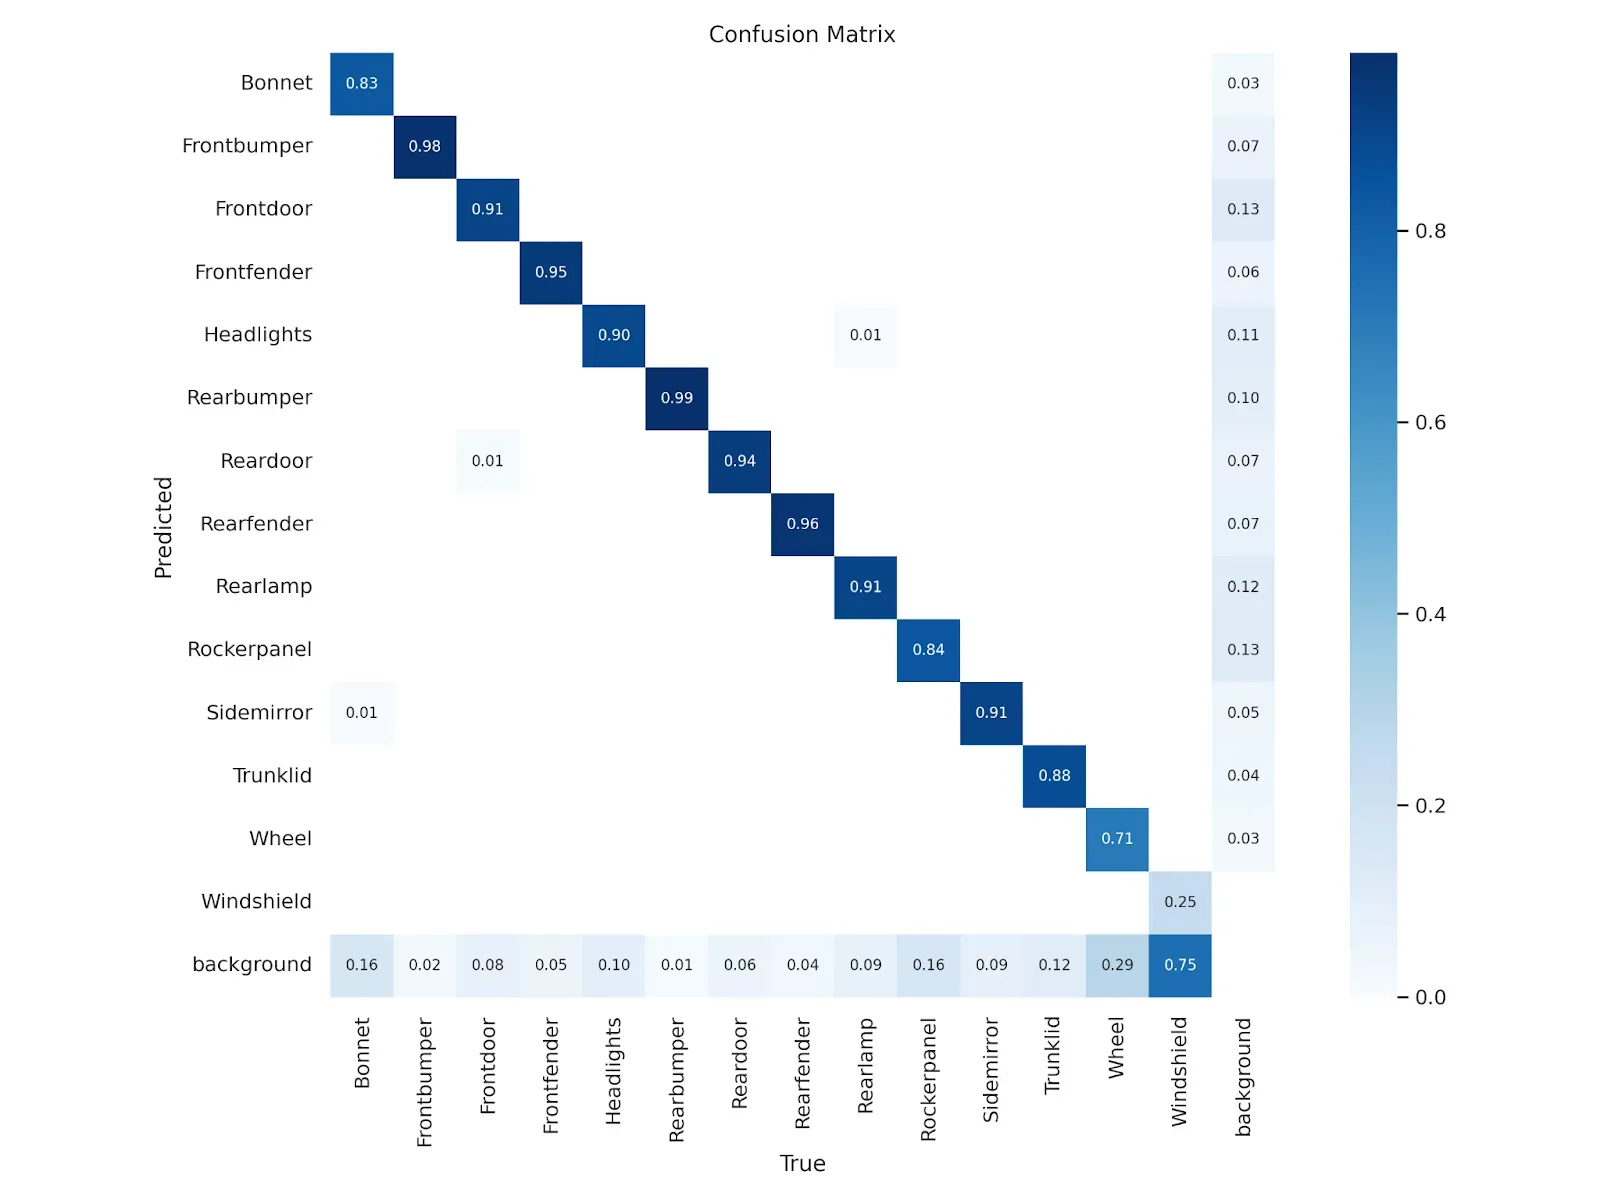
%cd {HOME}
Image(filename=f'{HOME}/runs/segment/train/results.png', width=600)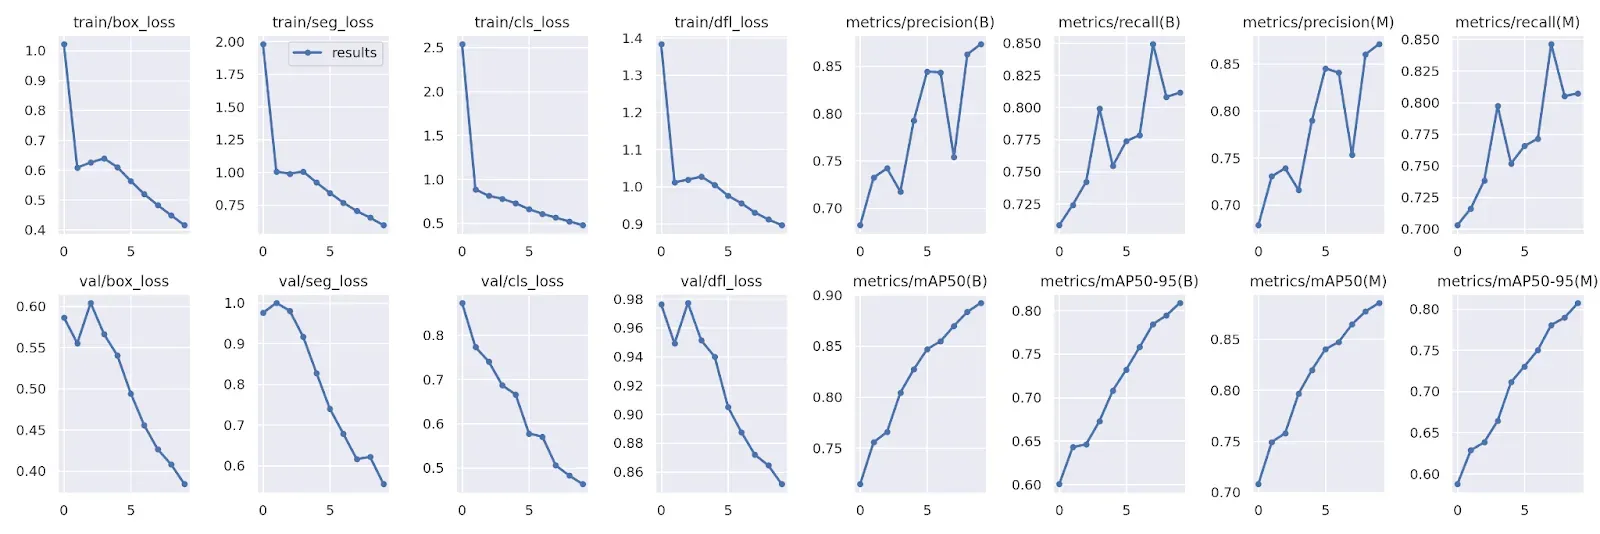
%cd {HOME}
Image(filename=f'{HOME}/runs/segment/train/val_batch0_pred.jpg', width=600)
Predict with Your Custom YOLOv8 Instance Segmentation Model
Once your custom model is trained, you can validate its performance on a separate dataset using the following CLI command:
!yolo task=segment mode=val model={HOME}/runs/segment/train/weights/best.pt data={dataset.location}/data.yamlTo perform instance segmentation on new images using your trained model, use the following CLI command:
!yolo task=segment mode=predict model={HOME}/runs/segment/train/weights/best.pt conf=0.25 source={dataset.location}/test/images save=trueThis code segment predicts instances in the test images and saves the resulting images with bounding boxes and masks.
Deploy the Trained Model to Roboflow
To deploy the trained model back to Roboflow, follow these steps:
First, retrieve your workspace and project names using the following code:
rf = Roboflow(api_key="API_KEY")
print(rf.workspace())
Next, use the following code to upload the trained model back to your desired project in Roboflow:
project = rf.workspace("roboflow-ngkro").project("car-parts-ecsse")
project.version(3).deploy("yolov8", "runs/segment/train/")
Conclusion
By combining the power of Roboflow and YOLOv8 Instance Segmentation, you can streamline your engineering workflow and achieve accurate and efficient image analysis. Roboflow simplifies the dataset preparation process, while YOLOv8 provides excellent performance in instance segmentation tasks.
Remember, successful image analysis relies on the quality and diversity of your dataset. Explore Roboflow Universe, a repository of over 200,000 open-source datasets, to find the perfect dataset for your project. Happy engineering!
Cite this Post
Use the following entry to cite this post in your research:
Arty Ariuntuya. (May 26, 2023). How to Train YOLOv8 Instance Segmentation on a Custom Dataset. Roboflow Blog: https://blog.roboflow.com/how-to-train-yolov8-instance-segmentation/