
A segmentation mask isolates the exact pixels belonging to a detected object rather than drawing a bounding box around the whole region, which matters when you need to inspect shape, highlight specific areas for human review, or feed a cropped result into a downstream classifier. This tutorial explains the difference between detection and instance segmentation output, then walks through converting polygon points from a Roboflow-hosted segmentation model into a binary mask using Python. The resulting mask can be used to cut objects out of frames, apply image transformations, or build labeled databases for follow-on model training.
Imagine that you’re employed at a farm. The farm needs to regularly audit plants to ensure they do not show symptoms of disease. Diseased plants need to be quarantined and neighboring plants need to be monitored for symptoms. You could deploy a computer vision system that monitors plants and reports the location of an infected plant if one is found.
What if you want to not only record a photo of the plant but also the exact pixels on the leaf where the disease was identified. This would help speed up an initial analysis of images to check for false positives before plants were investigated further. This is possible with a technique called “segmentation masking”.
In this guide, we’re going to talk about how to make a segmentation mask with Roboflow.
By the end of this blog post, you should be able to:
- Understand the difference between a segmentation detection and a segmentation mask
- Identify when a segmentation mask would be more useful than a detection
- Implement segmentation masks into your workflow
Without further ado, let’s begin.
What is a Segmentation Mask?
A segmentation mask is a specific portion of an image that is isolated from the rest of an image. You can use the output of a segmentation mask to copy exact areas of an image that have been assigned a label in a computer vision model. For instance, a segmentation mask could be used to isolate diseased leaves on a plant.
You may be wondering: what’s the difference between a segmentation mask and detection? Let’s answer that question.
Detection vs Segmentation Masks
Given an image, how can we detect objects (such as people, dogs, apples, etc.) and use those detections in a meaningful way? We define the act of identifying the object in the image as detection.
Once we’ve detected an object and know where it exists within an image, we could then cut out the object from the rest of the image. This is useful when you want to highlight part of an image for manual inspection. We call this process creating a mask.
With a mask, you can focus only on the part of an image that interests you – for example, a diseased leaf on a plant. Additionally, masks can be useful when lots of similar objects in an image exist or the space between objects causes lots of problems with classification.
Segmentation Mask Use Cases
There are many scenarios in which a segmentation mask would be useful, such as:
- Detecting and classifying types of products on busy grocery shelves
- Detecting and classifying the make/model of cars in a packed parking lot
- Distinguishing between people in a crowded shopping mall
- Tracking individual packages through a shipping center
In all of these cases, being able to isolate a particular item in an image is useful.
Consider the case where you want to detect and classify products on busy grocery shelves. With a segmentation mask, you could segment all of the boxes on a shelf and then process them individually (i.e. through an Optical Character Recognition algorithm to read the letters on boxes, or using QR codes on the product).
In the case of detecting cars in a packed parking lot, you could segment out all cars into individual images with masks. Then, you could run a classification algorithm on each car to identify the make and model of each car. A tightly packed parking lot tends to have many similar colored cars, so cutting out the extra background noise tends to be more useful than less (a sparsely used parking lot, or parking carbs on the curb, might be better for an object detection approach)
Solving a Problem with Segmentation Masks
In this section, we’re going to build a model that identifies infected leaves on a plant and classifies the type of scab on a leaf based on its shape. This is a real-world problem that could be applied on farms, research labs, and in agricultural processing facilities to identify signs of disease and prevent diseased crops from entering into the same place as healthy crops.
We’re going to build our model upon a publicly available Roboflow universe model that detects infected leaves. We shall classify the type of scab based on its shape.
The steps to solve this problem are:
- Leverage a pre-existing Roboflow Universe plant disease model to perform instance segmentation (although you could train your own model to identify something else).
- Parse the inference results – the data from Roboflow that tells us where disease appears on a plant – to get the polygon data of the scabs.
- Create masks with the results of our inference.
Let’s talk through each of these stages step-by-step.
Step 1: Performing Instance Segmentation Detection
You can use any segmentation model on Roboflow Universe to perform instance segmentation. If you would like to learn more about how to create your own model, check out our guide on creating a custom instance segmentation model. But, for this tutorial, we’re going to use an existing dataset hosted on Universe. Let’s get started by trying out our pre-trained model that detects scabs on plants.
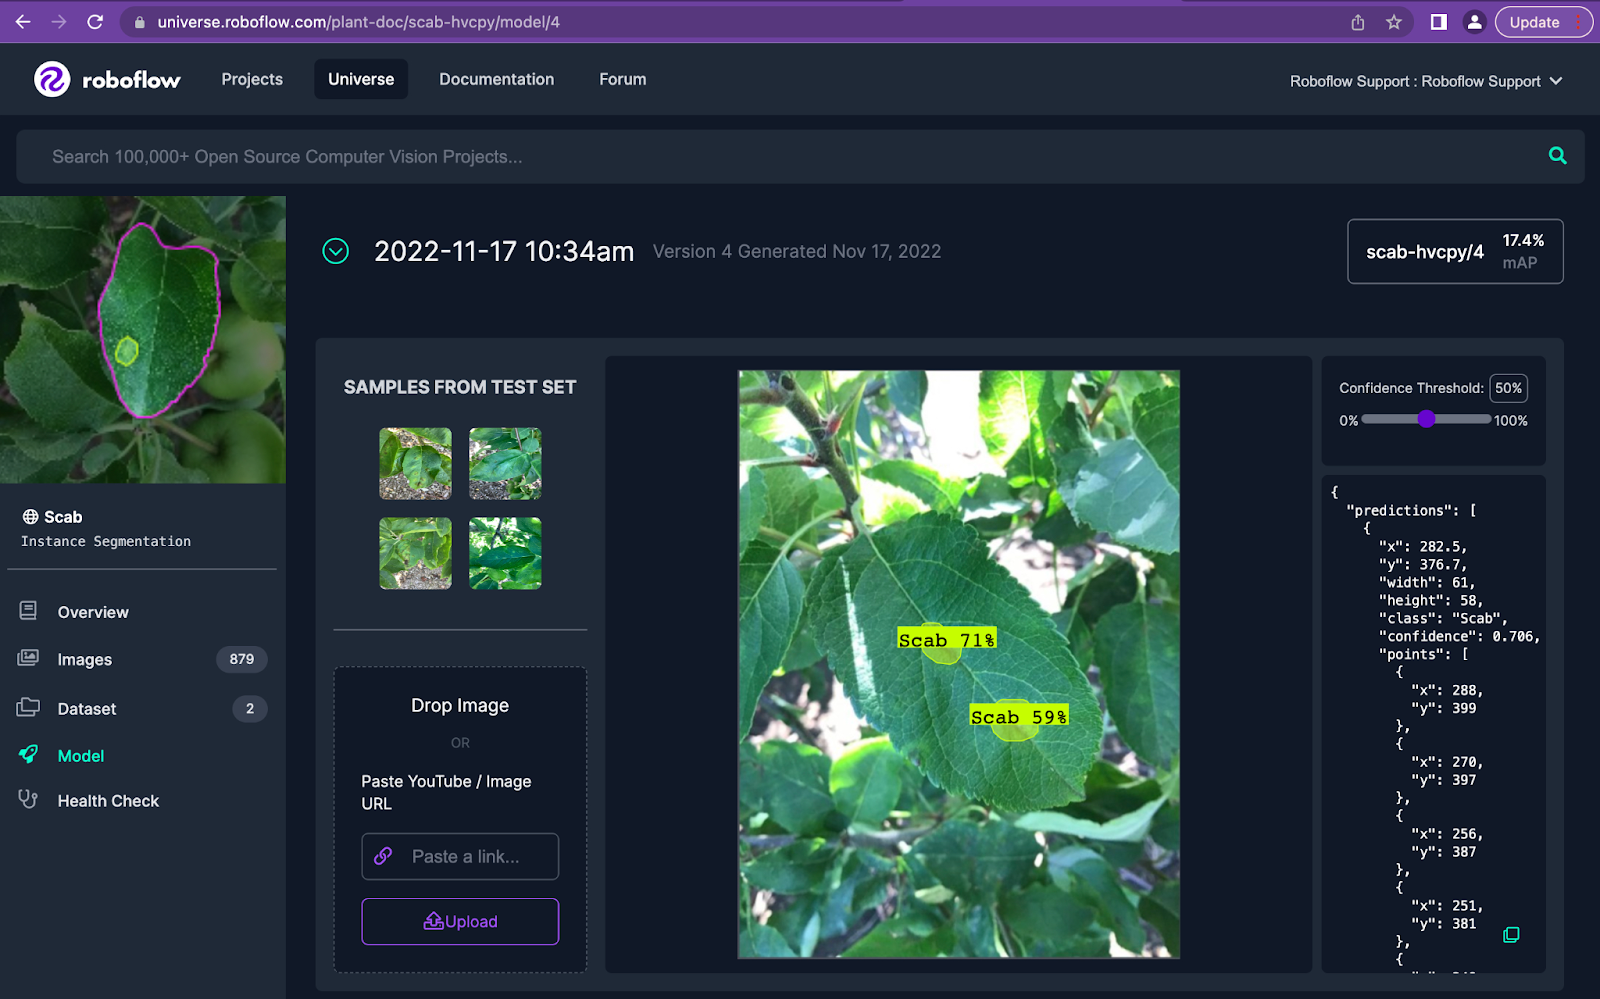
We can do this by going to the Universe page, clicking “Model” in the sidebar, and then dropping an image into the upload widget. Alternatively, you can select an image from the test set on the left of the page to see how the model performs on images on which the dataset was tested.
This will show us, in our browser, how our model performs on the given image.
In the image below, our model identifies two scabs in a leaf:
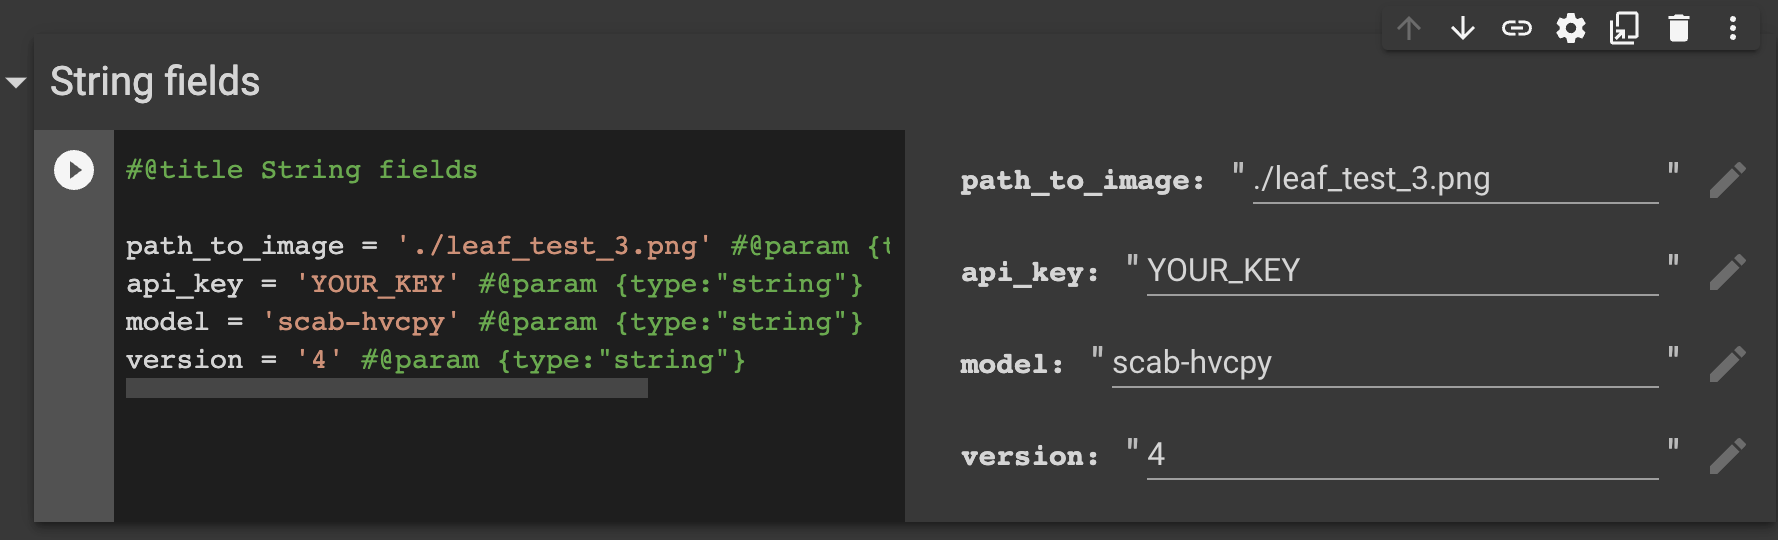
At the bottom of this page, you will see the project’s `api_key`, `model`, and `version` can all be found at the bottom of the deploy tab, and documentation on how to access the model via the remote endpoint. Using this documentation, you can get yourself set up with using the model in a Python environment.
In the Python notebook associated with this blog post, we have already done a lot of the heavy lifting for you. You should replace the path to your test image, your API key, your model name, and model version number in the “String fields” section in the notebook:
There is a “Helper Functions” section that includes a function to infer the location of predictions on an image using the Roboflow inference API.
Step 2: Transform the polygon `points` into a workable format
The inference results will return in a `json` object such as this when using the remote endpoint:
{
  "predictions": [
    {
      "x": 282.5,
      "y": 376.7,
      "width": 61,
      "height": 58,
      "class": "Scab",
      "confidence": 0.706,
      "points": [
        {
          "x": 288,
          "y": 399
        },
        {
          "x": 270,
          "y": 397
        },
        {
          "x": 256,
          "y": 387
        },
        {
          "x": 251,
          "y": 381
        },
		...
	},
    ...
  ]
}
This JSON object contains the coordinates of a positive identification of a “Scab” on an image. Using these coordinates, we can cut out (create a mask of) the diseased plant leaf.
To process the detection using the Python3 Pillow package, we can convert the coordinates into a list of `(x,y)` tuple pairs. We do this using a list comprehension in our code, which looks like this:
polygon = [(point_obj["x"], point_obj["y"]) for point_obj in prediction[“predictions”]["points"]]
Step 3: Creating a Segmentation Mask from the Polygon Results
Now we have both results from the Roboflow inference API that shows where the scabs are on our image as well as a list of tuples that show the coordinates for each identified scab.
For each prediction in the inference results, we want to:
- Transform the coordinate points as described in step two into a list of tuple objects;
- Create a new mask layer (the gray background);
- Use the polygon coordinate points to cut out a shape for the part of the image to be revealed through the mask;
- Convert image to numpy array, which enables easier transformations and;
- Save an image that only contains the mask.
The code for this appears in the “Main Code” section in our notebook”. We go through all of these steps then save our resulting image in a file called “mask_{index}.png”, where the index corresponds with the order in which predictions were made by our model.
Here is what our segmentation mask looks like:
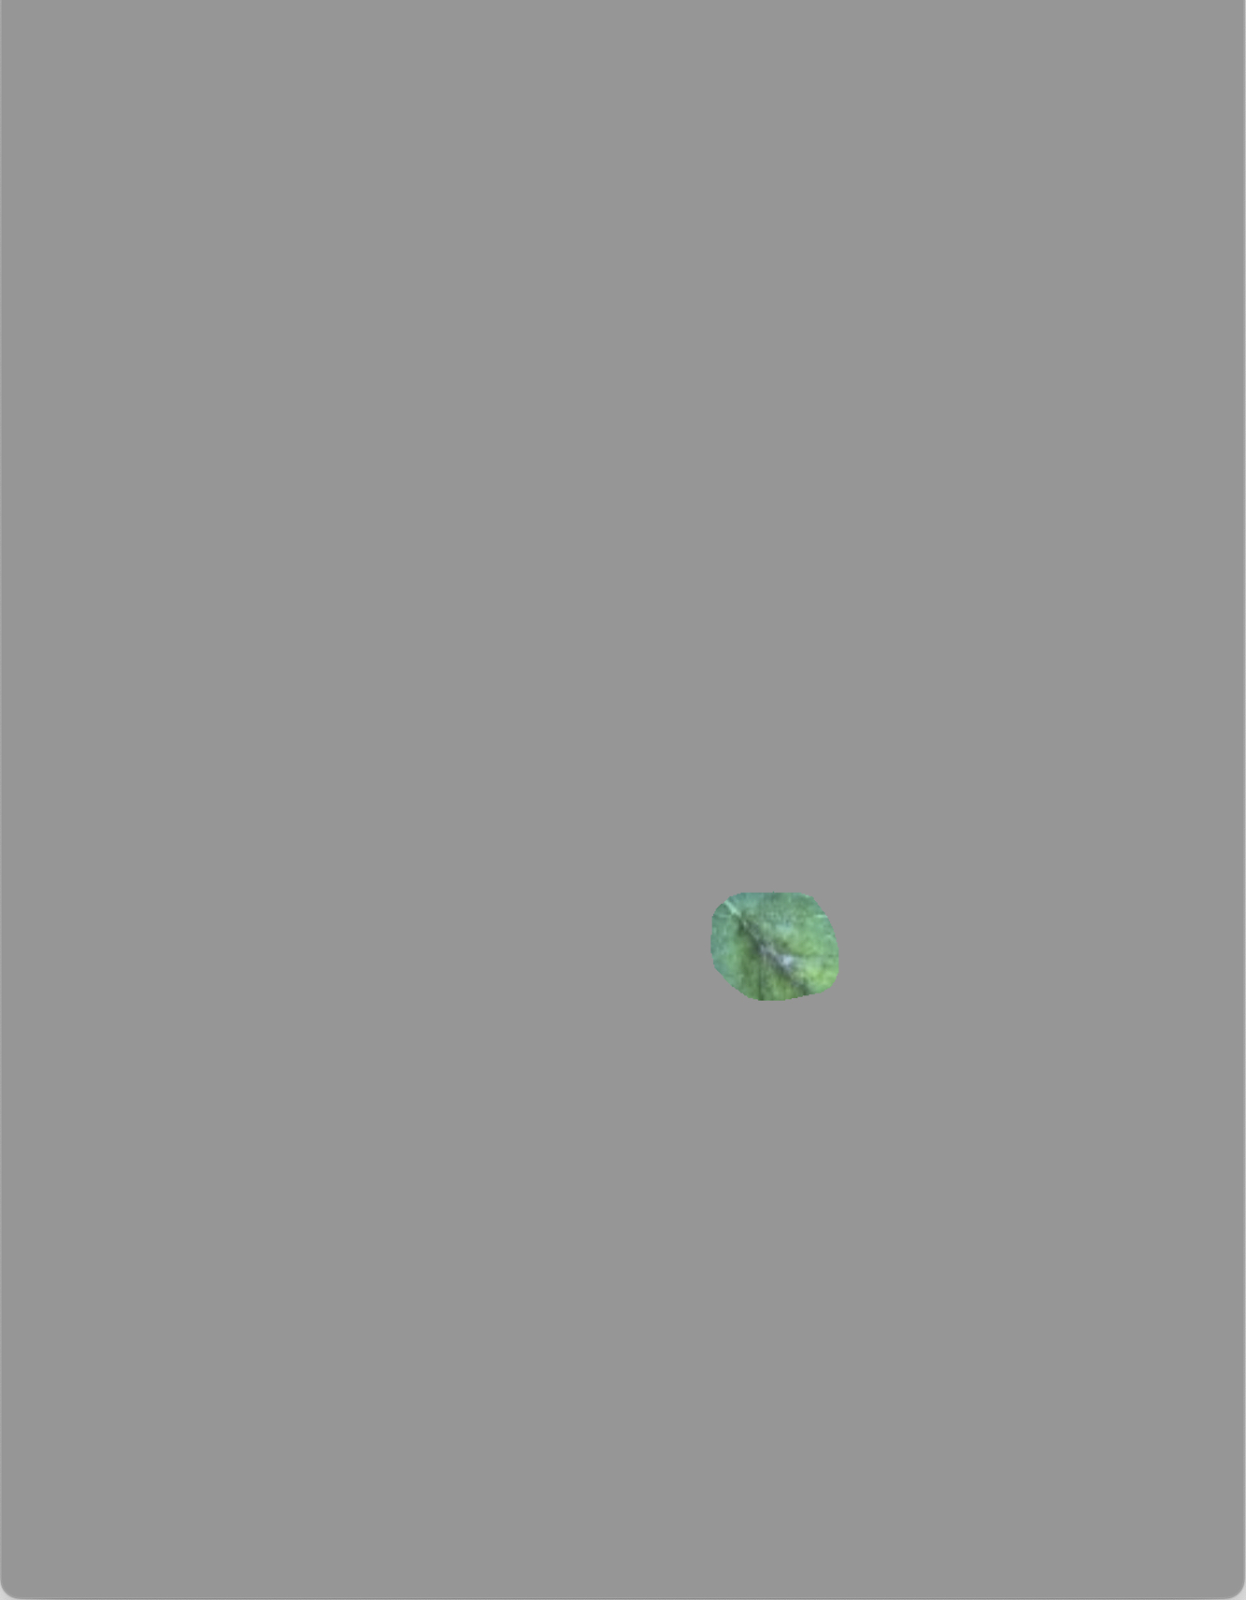
Voila! We now have a segmentation mask depicting only the detected object within the image.
This segmentation mask could then be used with a classifier to identify the specific type of disease that is present. We could also create a database of diseased leaves that we use as part of training for a later model, or as a reference material that can be searched and indexed later.
Conclusion
In this tutorial, we have spoken about segmentation masks and how they enable you to cut out positive identifications returned by a segmentation model. Using the contents in a segmentation masks, you can run additional models on a specific region of an image. This is particularly useful when you want to use a fine-tuned image classifier that may not perform as well if there is a lot of objects in the background.
You can use the code in the notebook we provided alongside this tutorial and adapt it to your use case. For example, you may add different image transformations to a mask (i.e. a different background color or a transparent background), or use different logic after an inference is returned.
Now you have the tools you need to make your own segmentation masks. Happy building!
Cite this Post
Use the following entry to cite this post in your research:
Jay Lowe. (Nov 30, 2022). What is a Segmentation Mask? An Introduction. Roboflow Blog: https://blog.roboflow.com/how-to-create-segmentation-masks-with-roboflow/