
FastSAM is an open source image segmentation model that runs roughly 50 times faster than SAM by replacing the Transformer backbone with a CNN-based detector and splitting the task into all-instance segmentation followed by prompt-guided selection. This tutorial walks through installing FastSAM alongside SAM, running text-prompted segmentation on pill and chip part images, extracting binary masks, and generating a side-by-side visual comparison of masks produced by each model.
Segment Anything (SAM) is a powerful vision foundation model that can segment any object within an image based on user interaction prompts. SAM gained significant traction in the computer vision community on release for its accuracy. However, SAM's extensive use of the computationally expensive Transformer (ViT) architecture limits its practical applications, particularly in real-time scenarios.
FastSAM is an open source image segmentation model trained on 2% of the SA-1B dataset on which SAM was trained. FastSAM reportedly runs 50 times faster than SAM.

FastSAM overcomes the computation requirements barrier associated with using SAM by employing a decoupled approach. FastSAM divided the segmentation task into two sequential stages: all-instance segmentation and prompt-guided selection.
In this blog post, we will explore FastSAM, highlighting its advantages over SAM, and provide practical code examples for various image segmentation tasks including segmenting pills and chip parts.
How to Use FastSAM
In this guide, we will use SAM and FastSAM together to visually compare their performance. If you are only interested in FastSAM, you can skip the parts where we show installing and using SAM below. Let’s dive into FastSAM!
Step #1: Install FastSAM and SAM
First, let’s install FastSAM and SAM along with their required dependencies:
!git clone https://github.com/CASIA-IVA-Lab/FastSAM.git
!pip -q install -r FastSAM/requirements.txt
!pip -q install git+https://github.com/openai/CLIP.git roboflow supervision

!pip -q install git+https://github.com/facebookresearch/segment-anything.git
!wget -P FastSAM/weights https://huggingface.co/spaces/An-619/FastSAM/resolve/main/weights/FastSAM.pt
!wget -P FastSAM/weights https://dl.fbaipublicfiles.com/segment_anything/sam_vit_h_4b8939.pth
Step #2: Import Libraries
Next, we'll import the required libraries and load the FastSAM model:
from fastsam import FastSAM, FastSAMPrompt
from segment_anything import sam_model_registry, SamAutomaticMaskGenerator, SamPredictor
import supervision as sv
import roboflow
from roboflow import Roboflow

model = FastSAM('./weights/FastSAM.pt')
Step #3: Visualize Masks using FastSAM
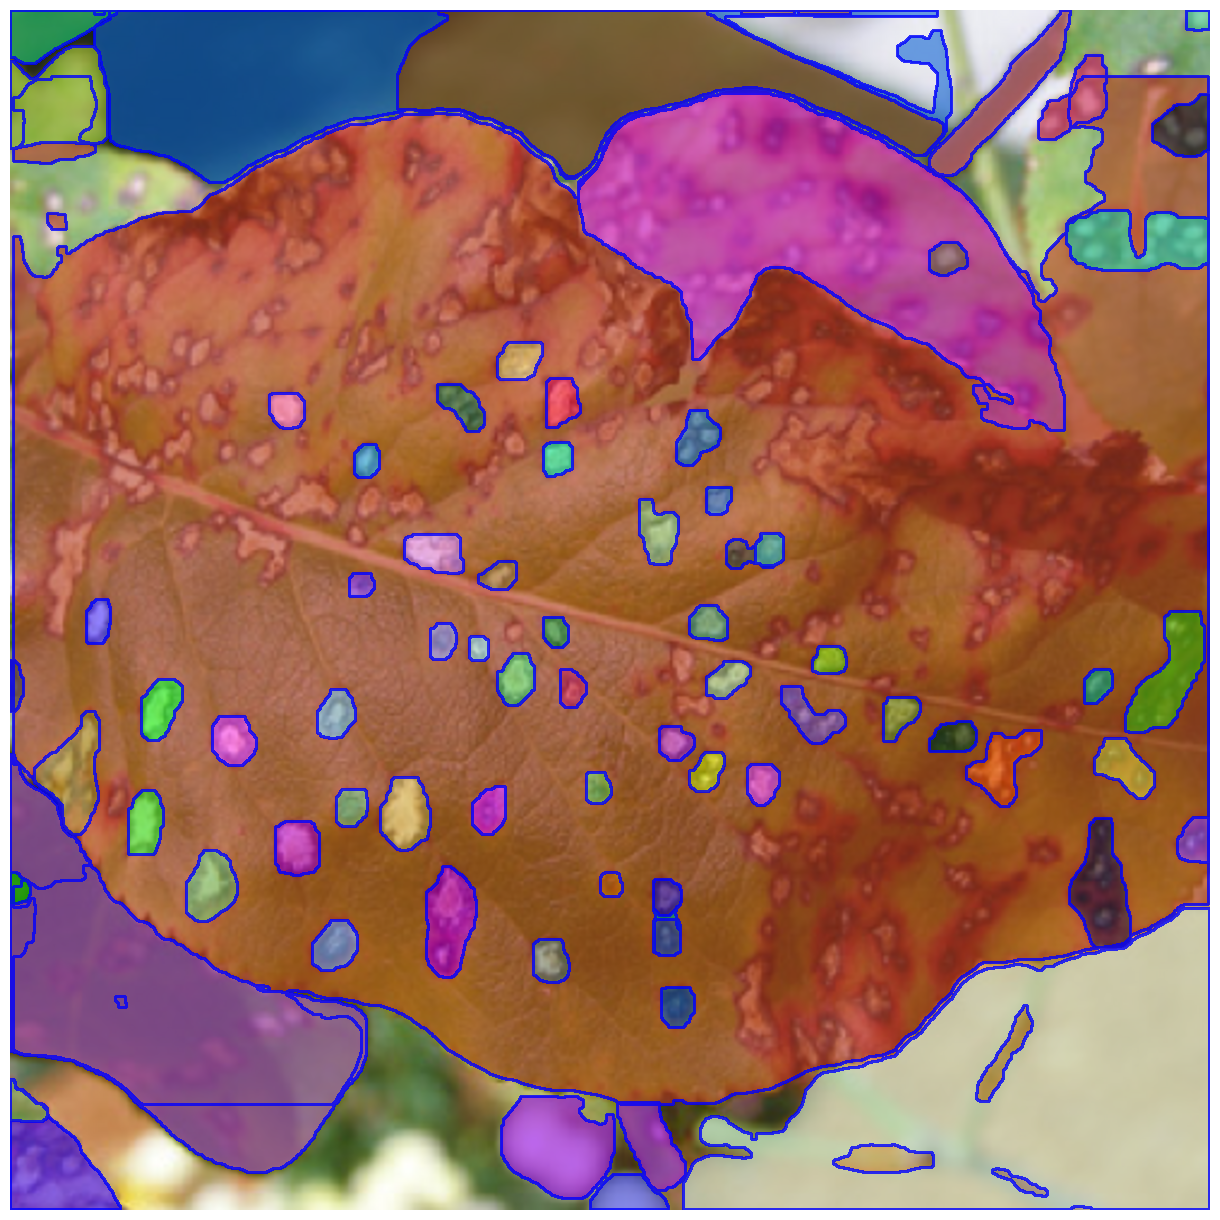
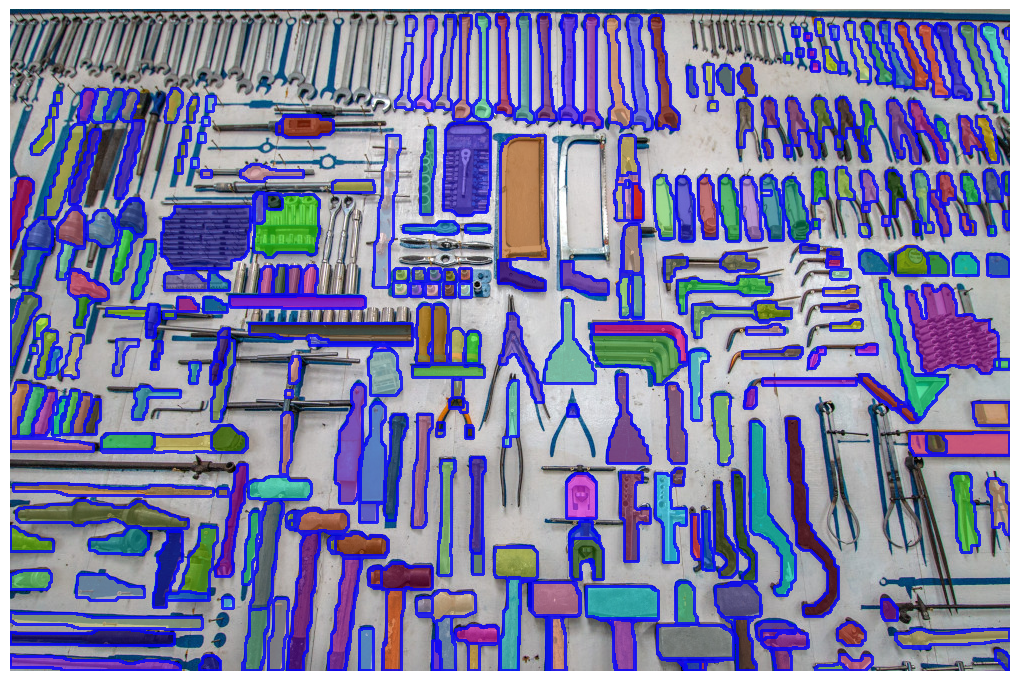
Let's visualize the segmentation masks generated by FastSAM on a few example images.
retina_masks=Trueparameter determines whether the model uses retina masks for generating segmentation masks.imgsz=1024sets the input image size to 1024x1024 pixels for processing by the model.conf=0.4sets the minimum confidence threshold for object detectioniou=0.9sets the minimum intersection over union threshold for non-maximum suppression to filter out duplicate detections.
folder = './images/'

Images = ['tool1.jpg', 'bone.jpg', 'stamp.jpg', 'plant1.jpg', 'chip.jpeg', 'pill1.png']

for idx, img_name in enumerate(Images):
    path = os.path.join(folder, img_name)
    everything_results = model(path, device=DEVICE, retina_masks=True, imgsz=1024, conf=0.4, iou=0.9)
    prompt_process = FastSAMPrompt(path, everything_results, device=DEVICE)
    ann = prompt_process.everything_prompt()
    output_filename = f'output_{idx}.jpg'
    output_path = os.path.join('./output/', output_filename)
    prompt_process.plot(annotations=ann, output=output_path)
The above code snippet loops through a list of example images and generates segmentation masks using FastSAM. The resulting masks are then visualized and saved as output images.
FastSAM with a Roboflow Benchmark Dataset
To further demonstrate FastSAM's capabilities, let's apply it to a Roboflow 100 benchmark dataset. We will use text prompts to guide the segmentation process.
Download the Roboflow Benchmark Dataset
Next, we'll download the Roboflow benchmark dataset from Roboflow Universe, specifically the images from the training set:
roboflow.login()

rf = Roboflow()
project = rf.workspace("roboticfish").project("underwater_object_detection")
dataset = project.version(8).download("yolov8")
train_folder = os.path.join(dataset.location, 'train', 'images')
Apply FastSAM with Text Prompts
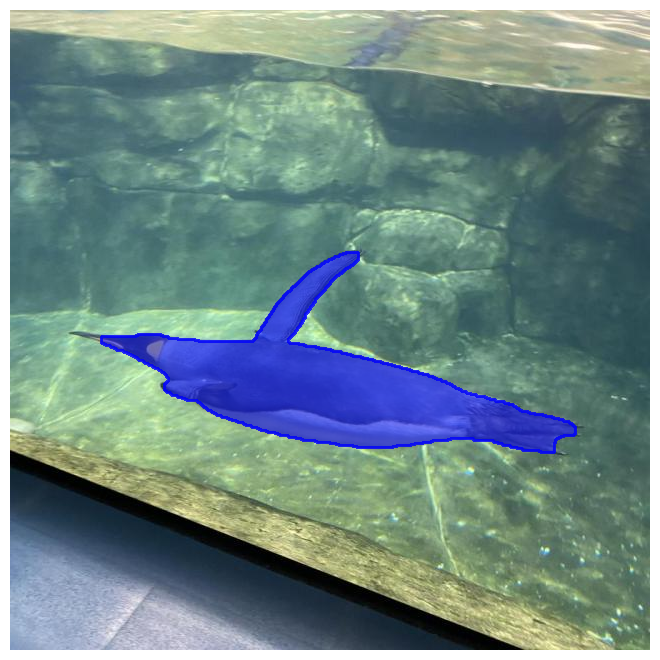
Now, let's apply FastSAM to an image from the Roboflow benchmark dataset using text prompts. In this example, we'll use pick one image and provide the prompt "Penguin" to guide the segmentation process.
everything_results = model(image_path, device=DEVICE, retina_masks=True, imgsz=1024, conf=0.4, iou=0.9,)
prompt_process = FastSAMPrompt(image_path, everything_results, device=DEVICE)
ann = prompt_process.text_prompt(text='Penguin')
prompt_process.plot(annotations=ann, output='./output/')
The code snippet above loads an image from the Roboflow dataset and applies FastSAM with the text prompt "Penguin". The resulting segmentation mask is visualized and saved as an output image.
SAM vs. FastSAM: Visualization of Distinct Masks
To compare the segmentation masks generated by SAM and FastSAM, let's extract the masks from both models and visualize them.
Extract Binary Mask from FastSAM
We apply FastSAM to an example image and extract the segmentation mask using the everything_prompt() function. The resulting mask is visualized and saved as an output image.
IMAGE_PATH = './images/real3.jpeg'
everything_results = model(IMAGE_PATH, device=DEVICE, retina_masks=True, imgsz=1024, conf=0.4, iou=0.9,)
prompt_process = FastSAMPrompt(IMAGE_PATH, everything_results, device=DEVICE)
ann = prompt_process.everything_prompt()
prompt_process.plot(annotations=ann, output='./output/')
Extract Segmentation Mask from SAM
In the below code snippet, we extract the segmentation mask using SAM for the same example image. The resulting mask is stored in the sam_masks variable.
image = cv2.cvtColor(cv2.imread(IMAGE_PATH), cv2.COLOR_BGR2RGB)
sam_checkpoint = "sam_vit_h_4b8939.pth"
model_type = "vit_h"
sam = sam_model_registry[model_type](checkpoint=sam_checkpoint)
sam.to(device=DEVICE)
mask_generator = SamAutomaticMaskGenerator(sam)
sam_masks = mask_generator.generate(image)
fastsam_mask_np = ann.cpu().numpy()
Compare between FastSAM and SAM Segmentation Masks
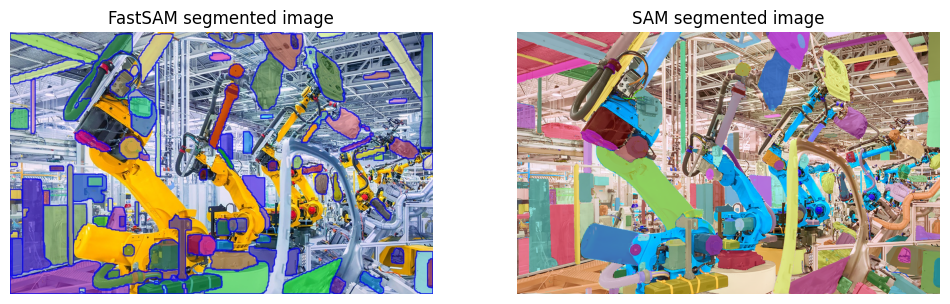
The code below compares the segmentation masks generated by FastSAM and SAM. The FastSAM output image and the annotated image with SAM masks are displayed side by side for visual comparison.
fastsam_output = cv2.imread("./output/real3.jpeg")
image_bgr = cv2.imread(IMAGE_PATH)
mask_annotator = sv.MaskAnnotator()
detections = sv.Detections.from_sam(sam_result=sam_masks)
annotated_image = mask_annotator.annotate(scene=image.copy(), detections=detections)

sv.plot_images_grid(
    images=[fastsam_output, annotated_image],
    grid_size=(1, 2),
    titles=['FastSAM segmented image', 'SAM segmented image']
)
Visualize Distinct Masks
We visualize the distinct masks by comparing the masks generated by FastSAM and SAM. The masks with an intersection over union (IOU) below 0.05 are considered distinct and displayed on top of the original image.
Conclusion
FastSAM is a powerful addition to the SAM for image segmentation tasks. FastSAM overcomes the computational limitations of SAM by employing a decoupled approach and utilizing a Convolutional Neural Network (CNN)-based detector. This allows FastSAM to achieve real-time segmentation without compromising performance quality significantly.
By training the CNN detector on only 2% of the SA-1B dataset, a practice known as dataset distillation, FastSAM achieves comparable performance to SAM while running 50 times faster. This makes FastSAM more suitable for scenarios where speed is essential.
The code examples provided above demonstrate how to install and use FastSAM, visualize segmentation masks generated by the model, apply FastSAM with text prompts, and compare the segmentation masks of FastSAM and SAM. FastSAM proves to be an efficient and accurate tool for various image segmentation tasks, including segmenting pill count and chip parts.
Cite this Post
Use the following entry to cite this post in your research:
Arty Ariuntuya. (Jul 3, 2023). How to Use FastSAM. Roboflow Blog: https://blog.roboflow.com/how-to-use-fastsam/