
Automate medical device assembly verification: in a Roboflow Workflow, Gemini identifies the device from a single photo, infers the components it should have from its own knowledge, checks them against what's visible, and returns a pass/fail with the exact missing part and a confidence score.
ICU Medical recalled IV gravity burette sets in late 2025. According to Becker's Hospital Review, the recall covered three product lots and was triggered by a missing component: a shutoff valve inside the burette chamber. Without it, fluid could flow into the patient without any control.
Issues like this often occur when a component is missed on the production line, replaced incorrectly, or skipped during packaging, even though the final product still looks normal from the outside. In many cases, the problem is only discovered after shipment.
The traditional approach is to train a detection model to identify every required part of every device. This involves collecting images, labeling data, training models, and repeating the process whenever the product design changes.
This guide shows how to build that same check in Roboflow Workflows. Gemini identifies the device from a single image, infers its standard required components from its own knowledge, checks them against what's visible, and flags anything that is missing.
How Medical Device Assembly Verification Works
The Workflow starts with a vision block that identifies the device in the image. It then infers the standard components based on a known medical device structure. For a manual blood pressure monitor, this may include the cuff, the inflation bulb, the air release valve, the aneroid manometer (gauge), and the tubing. This inferred set becomes the reference used to check whether anything is missing.
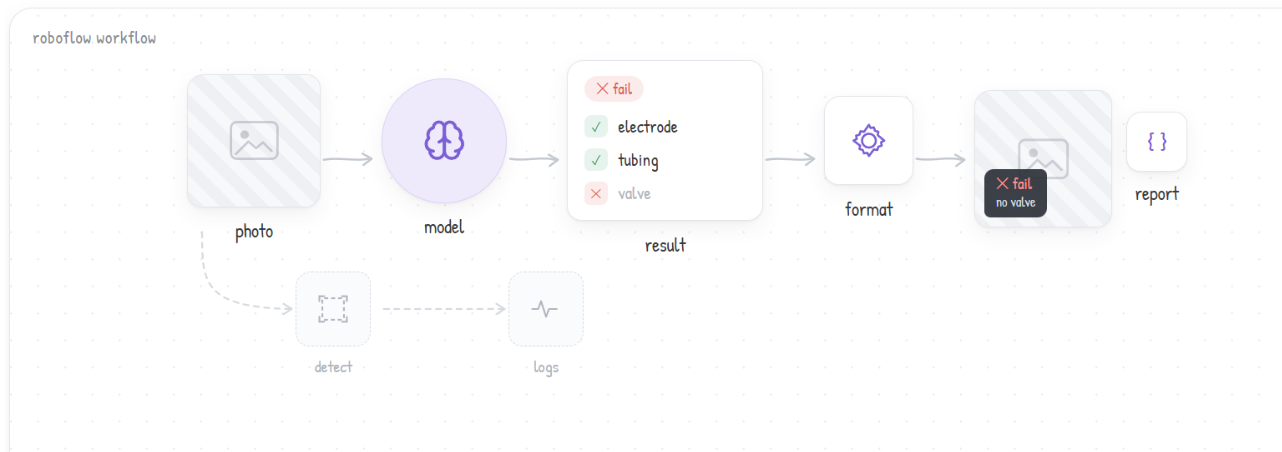
That block returns a single JSON response containing the device name, detected components, missing parts, pass/fail status, and confidence score. A Python block then formats this into a structured report, while a Text Display block overlays a quick summary directly onto the image. Everything runs seamlessly as one modular Roboflow Workflow, meaning you can swap the vision model anytime, and the rest of your pipeline keeps working untouched.
Build the Medical Device Assembly Verification Workflow
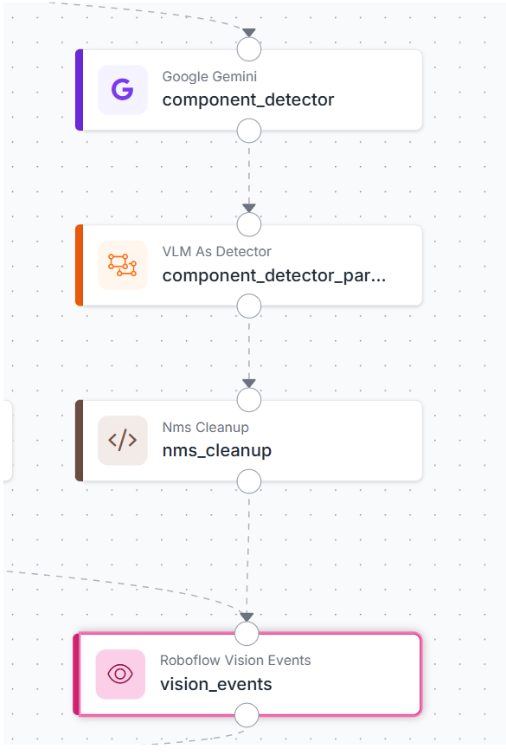
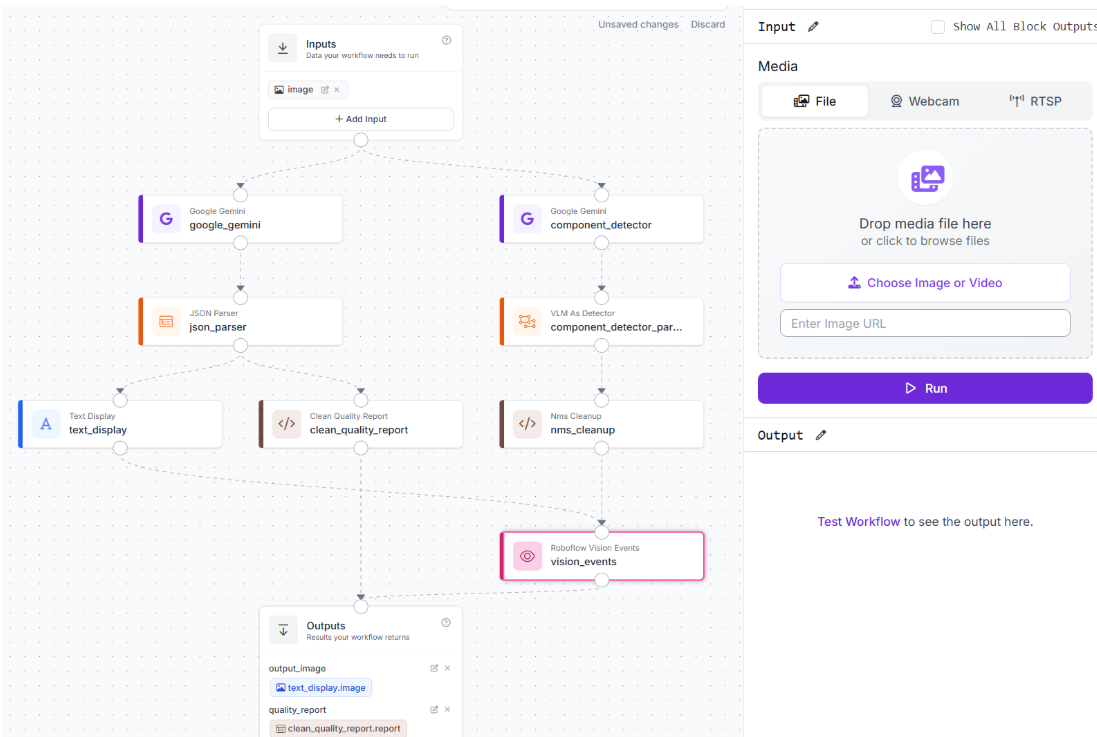
Here is the workflow we'll build. Here is what each block does in the chain.
- Image Input: Receives the image for analysis.
- Google Gemini: Identifies the device, infers expected components, and compares them with what is visible.
- JSON Parser: Extracts device name, status, confidence, failure type, and expected, present, and missing components.
- Custom Python Block: Formats the parsed output into a structured inspection report.
- Text Display: Overlays a short summary on the image.
- Google Gemini (detector): Detects individual components in the image.
- VLM As Detector: Converts detection output into bounding boxes.
- Custom Python Block (NMS cleanup): Removes duplicate and overlapping detections.
- Vision Events: Logs image, detections, and results for tracking.
- Outputs: Returns the annotated image and the inspection report.
Step 1: Start the Workflow
Open the Workflows tab in the left sidebar and create a new Workflow from scratch. Roboflow automatically adds an Image Input block and an Outputs block to the canvas as the starting point.
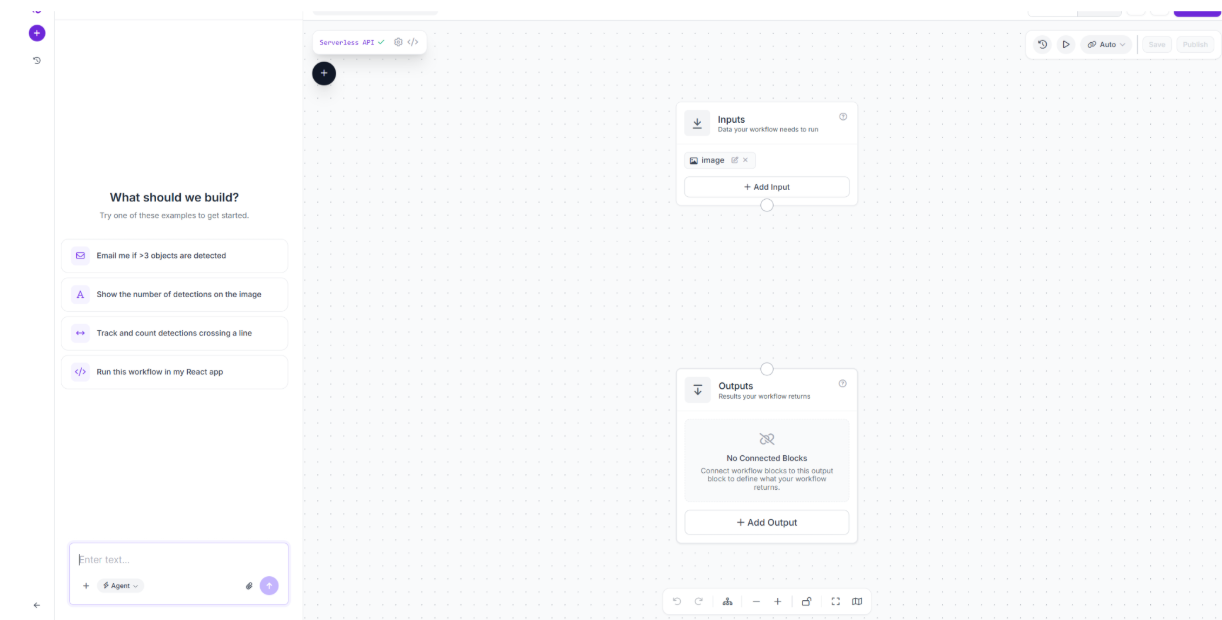
From here, everything else gets added by clicking the plus icon on the canvas.
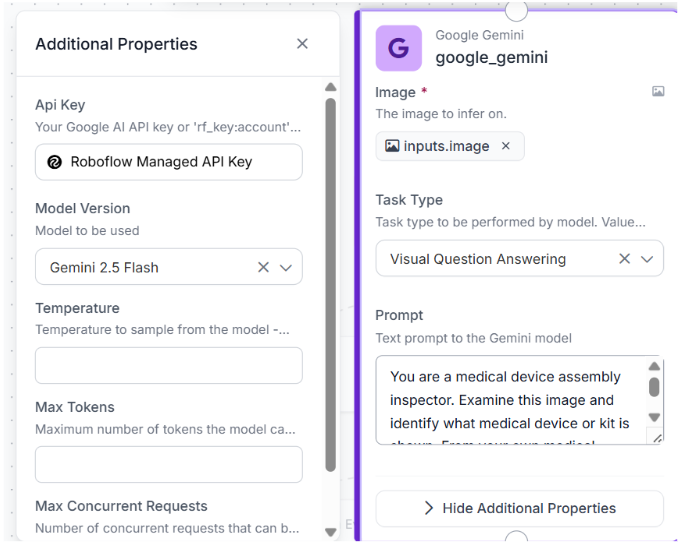
Step 2: Add Google Gemini
Click the plus icon and search for Google Gemini. Connect Image to inputs.image, set Task Type to Visual Question Answering, and choose gemini-2.5-flash.
Paste this into the prompt:
You are a medical device assembly inspector. Examine this image and identify what medical device or kit is shown. From your own medical device knowledge, infer the standard required physical components for that device or kit, then compare them to what is visible in the image.
Return ONLY a valid JSON object with this structure:
{
  "device_name": "most_likely_device_name",
  "status": "pass" or "fail",
  "inspection_confidence": "high" or "medium" or "low",
  "failure_type": "missing_component" or "uncertain_device" or "unclear_image" or "none",
  "summary": "short human readable inspection summary",
  "expected_components": ["component_name_1", "component_name_2"],
  "present_components": ["component_name_if_present"],
  "missing_components": ["component_name_if_absent"],
  "components": {
    "component_name_1": "present" or "absent",
    "component_name_2": "present" or "absent"
  }
}
Rules:
- Do not require any user-provided expected component list.
- Infer the expected components yourself from the device or kit type.
- Use lowercase component names with underscores instead of spaces.
- Use concrete physical component names, not broad category names.
- If multiple alternatives satisfy the same required role, mark the requirement present when any acceptable alternative is visible.
- Status is "pass" only if all expected components are visible or an acceptable alternative is visible.
- Set failure_type to "none" when status is "pass", "missing_component" when required components are missing, "uncertain_device" when the device is unclear, and "unclear_image" when blur, crop, glare, or occlusion blocks inspection.
- Keep summary concise, one sentence.
- Do not include markdown or extra text.
One Gemini block handles device identification, component inference, and the comparison against what's visible in the image, all from this single prompt.
Step 3: Add JSON Parser
Search for JSON Parser and connect its input to google_gemini.output. Pull out nine fields: device_name, status, inspection_confidence, failure_type, summary, expected_components, present_components, missing_components, components.

These nine fields are what the next two blocks rely on to make decisions and produce the final output.
Step 4: Add a Custom Python Block
Search for Custom Python Block. Add nine inputs, one for each field from json_parser, and one output named report.
def run(self, device_name, status, inspection_confidence, failure_type, summary, expected_components, present_components, missing_components, components):
    def as_list(value):
        if value is None:
            return []
        if isinstance(value, list):
            return value
        if isinstance(value, str):
            text = value.strip()
            if not text:
                return []
            return [item.strip() for item in text.split(",") if item.strip()]
        return [value]
    return {
        "report": {
            "device_name": device_name or "unknown",
            "status": status or "fail",
            "inspection_confidence": inspection_confidence or "low",
            "failure_type": failure_type or "uncertain_device",
            "summary": summary or "Inspection result could not be summarized.",
            "expected_components": as_list(expected_components),
            "present_components": as_list(present_components),
            "missing_components": as_list(missing_components),
            "components": components or {}
        }
    }

This block guards against missing or malformed fields and packages everything into one clean dictionary, ready to feed the Text Display and the final report output.
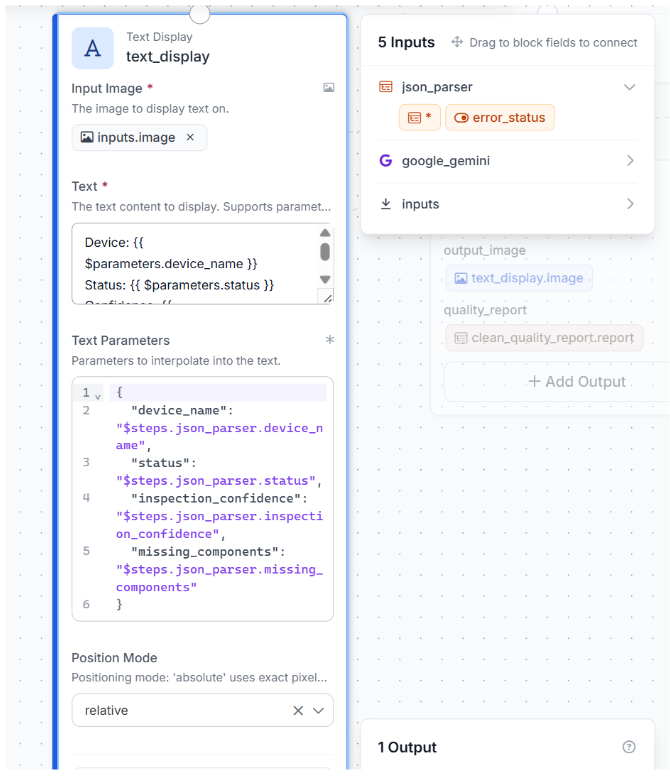
Step 5: Add Text Display
Search for Text Display. Connect Image to inputs.image, and set the text to:
Device: {{ $parameters.device_name }}
Status: {{ $parameters.status }}
Confidence: {{ $parameters.inspection_confidence }}
Missing: {{ $parameters.missing_components }}
Bind device_name, status, inspection_confidence, and missing_components to the matching outputs from json_parser. Set the overlay style to white text on a semi-transparent black background, anchored to the bottom-left corner.
This writes the inspection result directly onto the image, so anyone viewing it sees the device, status, confidence, and any missing parts at a glance.
Step 6: Add the evidence branch
This branch runs in the background. It doesn't change output_image or quality_report, but it records what the model detected, useful once this Workflow is running in production.
Add a second Google Gemini block named component_detector. Connect Image to inputs.image, set Task Type to Object Detection, and paste this class list:
blood_pressure_cuff, aneroid_manometer, gauge, inflation_bulb, air_release_valve, tubing, connector, nebulizer_chamber, corrugated_tube, face_mask, mouthpiece, oxygen_mask, needle, needle_cap, syringe, catheter, cannula, iv_bag, drip_chamber, flow_regulator_clamp, clamp, luer_lock, adapter, filter, elastic_strap, nose_clip, reservoir_bag, sensor, electrode, cable, probe, gauze, swab, test_strip, lancet, vial, bottle, inhaler, spacer, bag, tray
Add a VLM As Detector block named component_detector_parser. Connect image to inputs.image, vlm_output to component_detector.output, set model_type to google-gemini, task_type to Object Detection, and use the same class list.
Add a Custom Python Block named nms_cleanup, with one input predictions connected to component_detector_parser.predictions, and one output predictions:
def run(self, predictions):
    if predictions is None:
        return {"predictions": predictions}
    try:
        n = len(predictions)
    except Exception:
        return {"predictions": predictions}
    if n <= 1:
        return {"predictions": predictions}
    xyxy = np.array(predictions.xyxy, dtype=float)
    conf = np.array(predictions.confidence if predictions.confidence is not None else [1.0] * n, dtype=float)
    class_names = []
    try:
        class_names = [str(c) for c in predictions.data.get("class_name", [""] * n)]
    except Exception:
        class_names = [""] * n
    order = conf.argsort()[::-1]
    keep = []
    suppressed = np.zeros(n, dtype=bool)
    broad_aliases = {
        "tube": "tubing",
        "clear_medical_tubing": "tubing",
        "oxygen_supply_tubing": "tubing",
        "corrugated_tubing": "corrugated_tube",
        "pump": "inflation_bulb",
        "valve": "air_release_valve",
        "dial": "gauge",
        "tub_connector": "connector",
        "tubing_adapter": "connector",
    }
    def canonical(name):
        return broad_aliases.get(str(name).lower(), str(name).lower())
    def iou(box_a, box_b):
        x1 = max(box_a[0], box_b[0])
        y1 = max(box_a[1], box_b[1])
        x2 = min(box_a[2], box_b[2])
        y2 = min(box_a[3], box_b[3])
        inter = max(0.0, x2 - x1) * max(0.0, y2 - y1)
        area_a = max(0.0, box_a[2] - box_a[0]) * max(0.0, box_a[3] - box_a[1])
        area_b = max(0.0, box_b[2] - box_b[0]) * max(0.0, box_b[3] - box_b[1])
        union = area_a + area_b - inter
        return inter / union if union > 0 else 0.0
    for idx in order:
        if suppressed[idx]:
            continue
        keep.append(idx)
        for j in order:
            if j == idx or suppressed[j]:
                continue
            same_label = canonical(class_names[idx]) == canonical(class_names[j])
            overlap = iou(xyxy[idx], xyxy[j])
            if same_label and overlap >= 0.20:
                suppressed[j] = True
    keep = sorted(keep)
    return {"predictions": predictions[keep]}
Finally, add a Vision Events block called vision_events. Connect inputs.image to input_image, text_display.image to output_image, nms_cleanup.predictions to predictions, and json_parser.status to qc_result.
evidence branch wired to Vision Events
This gives every inspection a logged record of what was detected and how it was scored, without adding anything to the visible output.
Step 7: Set the Outputs
Add two outputs: output_image from text_display.image, and quality_report from clean_quality_report.report.
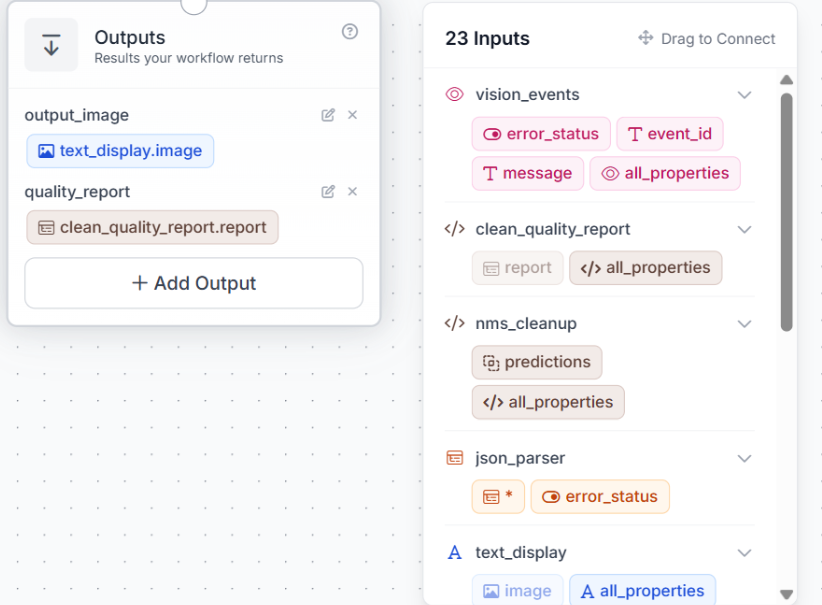
Save the Workflow. Every run now returns the image with the result written on it, and one structured report, with detection evidence logged quietly alongside.
That's the core pipeline, four blocks producing one image with the result overlay and one structured report, with no model training required.
Medical Device Assembly Verification Results
Test case 1: status pass
Gemini examines the image, identifies the device as an aneroid sphygmomanometer, and infers the components it should have: the cuff, inflation bulb, air release valve, aneroid manometer, and tubing.

All five are visible, so missing_components comes back empty, and status returns pass with high confidence.
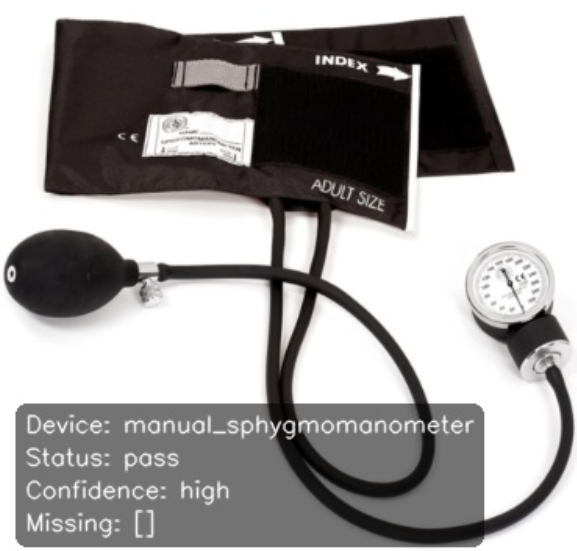
The overlay shows the device name, a pass status, high confidence, and an empty missing list, all from one Gemini call.
Test case 2: status fail
This image shows the cuff, inflation bulb, and tubing without the gauge. Gemini identifies it as a manual sphygmomanometer kit, infers the components that the kit should include, and marks the manometer as absent.
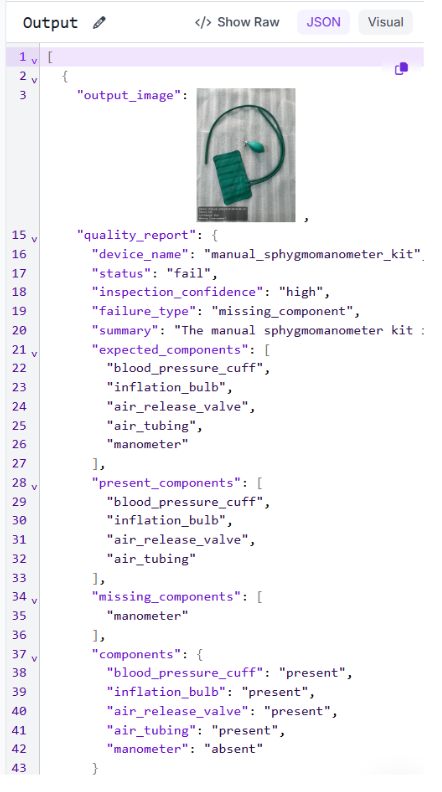
The system identifies a missing manometer, classifies the issue as a missing component, and returns a fail status with high confidence.
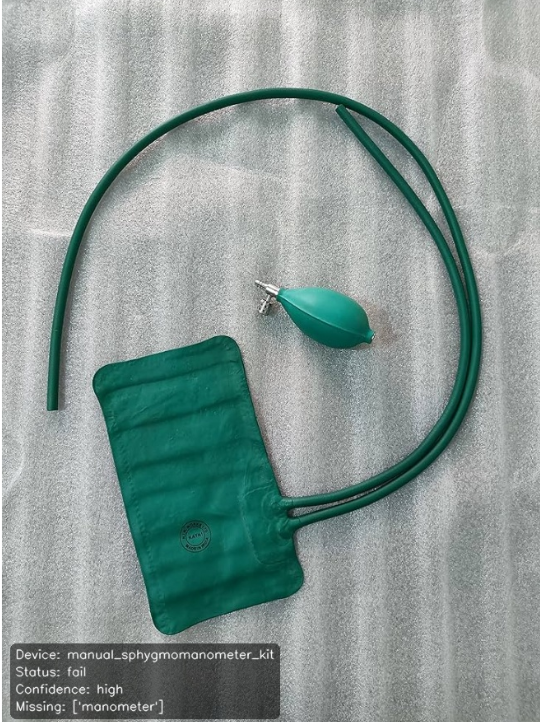
One image goes in, one Gemini call runs, and the output names exactly what's missing and how confident the model is, without a component list written ahead of time for this device.
Production Deployment
Not all inspection results should be handled the same way. High-confidence passes can move forward automatically, while high-confidence failures can trigger immediate webhooks to systems like PLC controllers or Slack for fast response. Uncertain cases are routed to human reviewers.
Vision Events records each inspection, including the input image, detected components, and final output, creating a full audit trail. This data can also be reused for active learning, feeding edge cases back into Roboflow to improve smaller, faster models over time.
The Workflow can run in the cloud via API or be deployed on edge devices like NVIDIA Jetson for low-latency inference. The pipeline itself stays unchanged, making it possible to run A/B tests in parallel before rolling updates into production.
Build It Faster with the Roboflow Agent
If you'd rather not add each block by hand, use Roboflow Agent. Instead of configuring blocks one at a time, you describe the pipeline you want in plain text and the Agent builds it for you. Here's an example:
Medical Device Assembly Verification Conclusion
You built a pipeline that takes a single photo of a medical device, identifies what the device is, works out what it should contain, and checks that against the image, returning a pass or fail result with a confidence level and a one-line summary. A second pair of block logs provides detection evidence for every run.
Point this Workflow at a different device, an infusion set, a nebulizer, a blood pressure cuff, and it works the same way, with nothing to edit: no prompt change, no component list, no separate setup step.
Further reading:
Cite this Post
Use the following entry to cite this post in your research:
Mostafa Ibrahim. (Jun 16, 2026). Medical Device Assembly Verification. Roboflow Blog: https://blog.roboflow.com/medical-device-assembly-verification/