

This project builds a local basketball shot tracker that logs makes, misses, release velocity, shot arc angles, body positioning and form. We use an RF-DETR object detection model trained in Roboflow to locate the ball and rim, paired with an RF-DETR keypoint estimation model to track shooter posture. The entire system runs locally on a laptop.
I’ve been playing basketball since middle school. Yet, there have still been afternoons where I’m taking shots in my park, feeling like I haven’t made any progress. I wanted to fix that with computer vision. The goal is to create an analysis tool that records makes, misses, release speed, entry angle, and form automatically.
Everything will run on your own machine using a custom RF-DETR detection model and zero-shot keypoint tracking. I'll show you how you can build it too. Follow along with this GitHub repository.
How to Use Computer Vision to Analyze Shot Mechanics
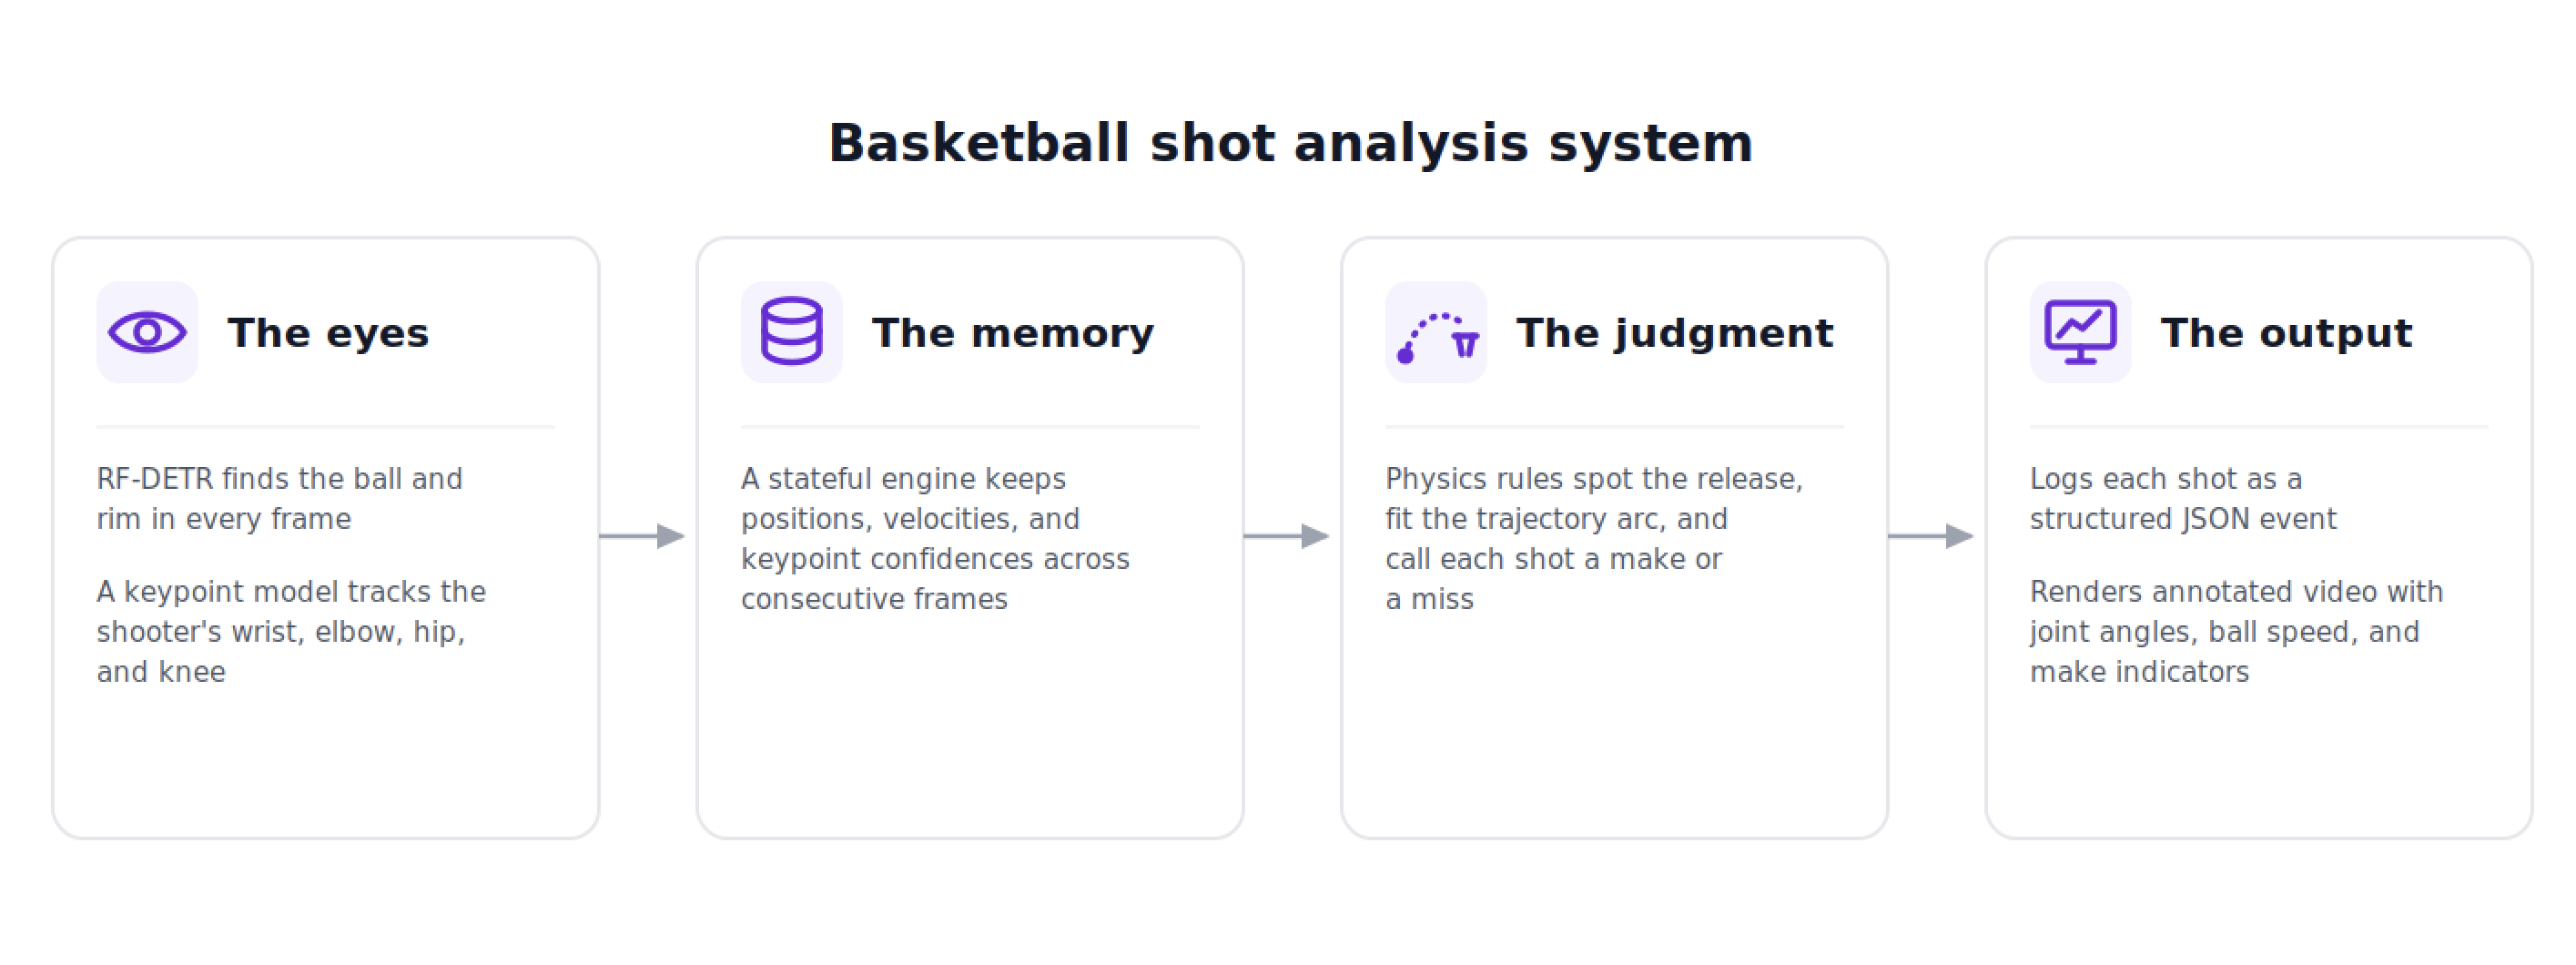
To turn video frames into nice shooting stats, the pipeline contains four parts.
- The eyes are an RF-DETR object detector that locates the ball and rim in every frame, while an RF-DETR keypoint model tracks the shooter's wrist, elbow, shoulder, hip, and knee locations.
- The memory involves a stateful engine that maintains a history of positions, velocities, and keypoint confidence scores across consecutive frames.
- The judgment involves rule-based physics models that evaluate when a shot is released, calculate trajectory arc, measure physical distance, and determine whether the ball clears or misses the rim.
- Lastly, the system logs event JSON lines to a file and renders an annotated video that includes joint angle info and live speed tracking.
Train the Detection and Pose Models
The pipeline works with two models: one custom detector and one zero-shot keypoint estimator.
For ball and rim tracking, we trained an RF-DETR-small model in the Roboflow UI using a fork of the public University of Arizona "Basketball Shooting Robot" dataset on Roboflow Universe (~9.8k images).
The original dataset includes labels for multiple classes like people and shooting actions, but we don't need anything except the ball and rim. The trained model achieved an mAP50 of 88.84, a precision of 75.7, and a recall of 84.9. In our test footage, it detected the ball in 98.1% of in-flight frames (759 out of 774 frames).
For mechanics tracking, we used RF-DETR Keypoint (RFDETRKeypointPreview from the rfdetr package version 1.9.2). This COCO 17-keypoint model runs with no custom training, no dataset creation, and no manual labeling. It consistently scored 0.98 to 1.00 keypoint confidence on visible joints. In our tests, the pose model detected keypoints on 99% of frames and logged elbow and knee metrics on 23 out of 23 shot attempts.
The reason we chose RF-DETR Keypoint over another model is ease of use. If zero-shot tracking ever failed for any reason, we could fine-tune it inside the same Roboflow workspace. Since it was already good on the pre-trained checkpoint, it worked out, so no additional training was needed.
Model identifiers and package versions are stored in models/registry.py, making it straightforward to swap in retrained model IDs as your dataset expands.
Set Up the Repository
To set up the tracker locally, clone the repository, set up a virtual environment using uv, and install the required dependencies.
git clone https://github.com/aarnavshah12/shot-tracker.git
cd shot-tracker
uv venv --python 3.12 .venv
uv pip install -p .venv -e ".[dev,video,models]"
echo 'ROBOFLOW_API_KEY=your_key_here' > .env
.venv/bin/python -m app.server
The engine/ package handles tracking, state transitions, spatial calibration, and metric calculations. The models/ directory isolates model API calls and registry keys. Video file and camera interfaces live in sources/ and rendering and event logging is done by render/ and stats/.
Edge Cases from Real Court Footage
Calibrating physical space using the rim
Measuring shot speed in km/h and release height in meters requires converting pixel distances into physical measurements. Standard camera calibration usually involves placing calibration grids or checkerboards on the court, but we took a different approach.
A standard regulation basketball rim has an inner diameter of 18 inches (0.4572 meters). Because the rim stays at the same spot throughout a shooting session, the system calculates the median bounding box width of the detected rim across frames. This median pixel width can allow us to calculate a pixels-per-meter conversion ratio for the entire video clip, which acts as the ratio for all other measurements.
Detecting shot release using pose estimation
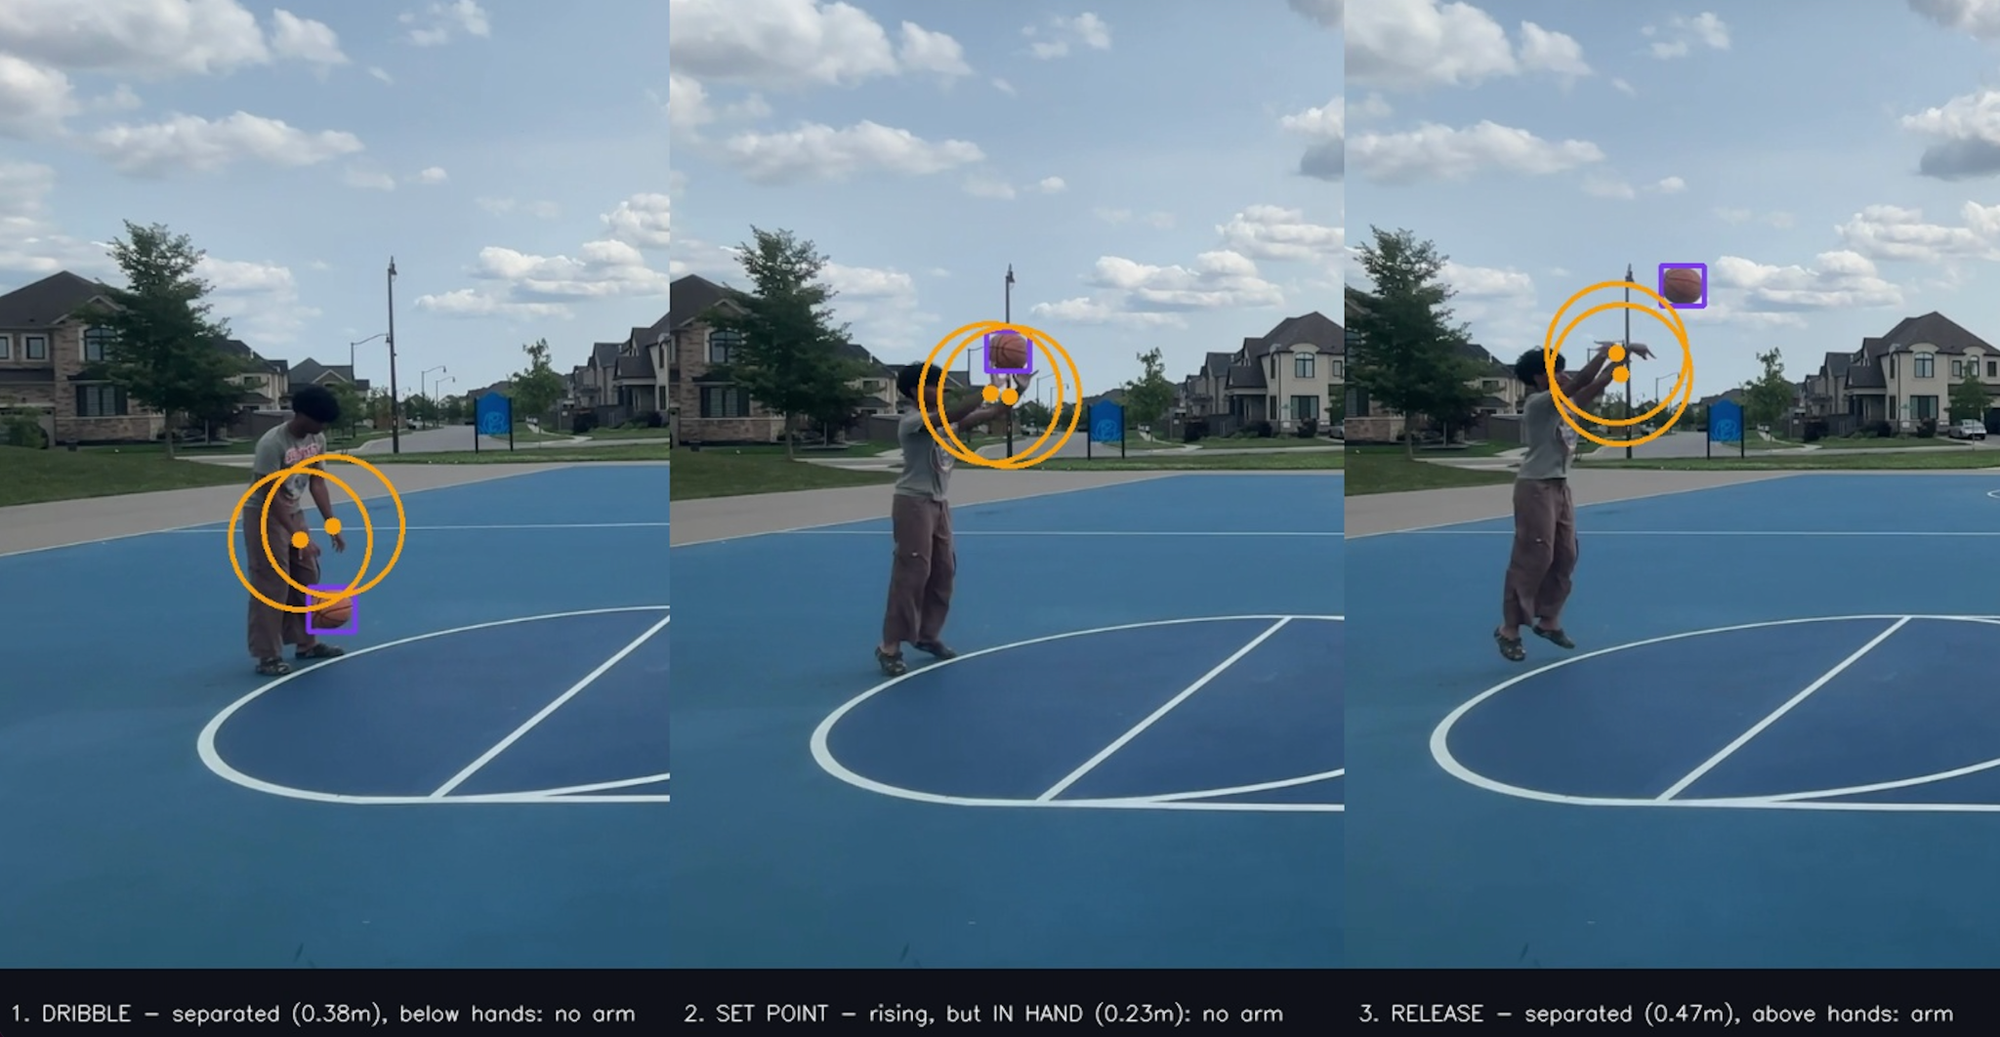
Pinpointing when a ball leaves the shooter's hand is tricky in single-camera video.
The initial approach logged a shot release whenever the ball moved upward above a set speed threshold for three consecutive frames. When tested, this rule repeatedly triggered false releases when the player tried to pump fake or windups.
The fix was that a release event can only trigger when the ball physically separates from the shooter's wrist area (0.35 meters scaled to physical units) while moving upward.
This rule also keeps dribbles from logging as shots. When a dribble separates from the hand, it stays below the shooter's wrists. But if a player dribbles aggressively, the ball may rise fast enough to satisfy the velocity check, which could trick the pipeline into thinking a shot attempt just started. So to solve that, the state machine also calculates the parabolic trajectory of the ball across consecutive frames and projects where that arc leads. If the projected arc doesn't have a path pointing toward the rim bounding box, the shot attempt isn’t recorded.
Net Occlusion and Physics
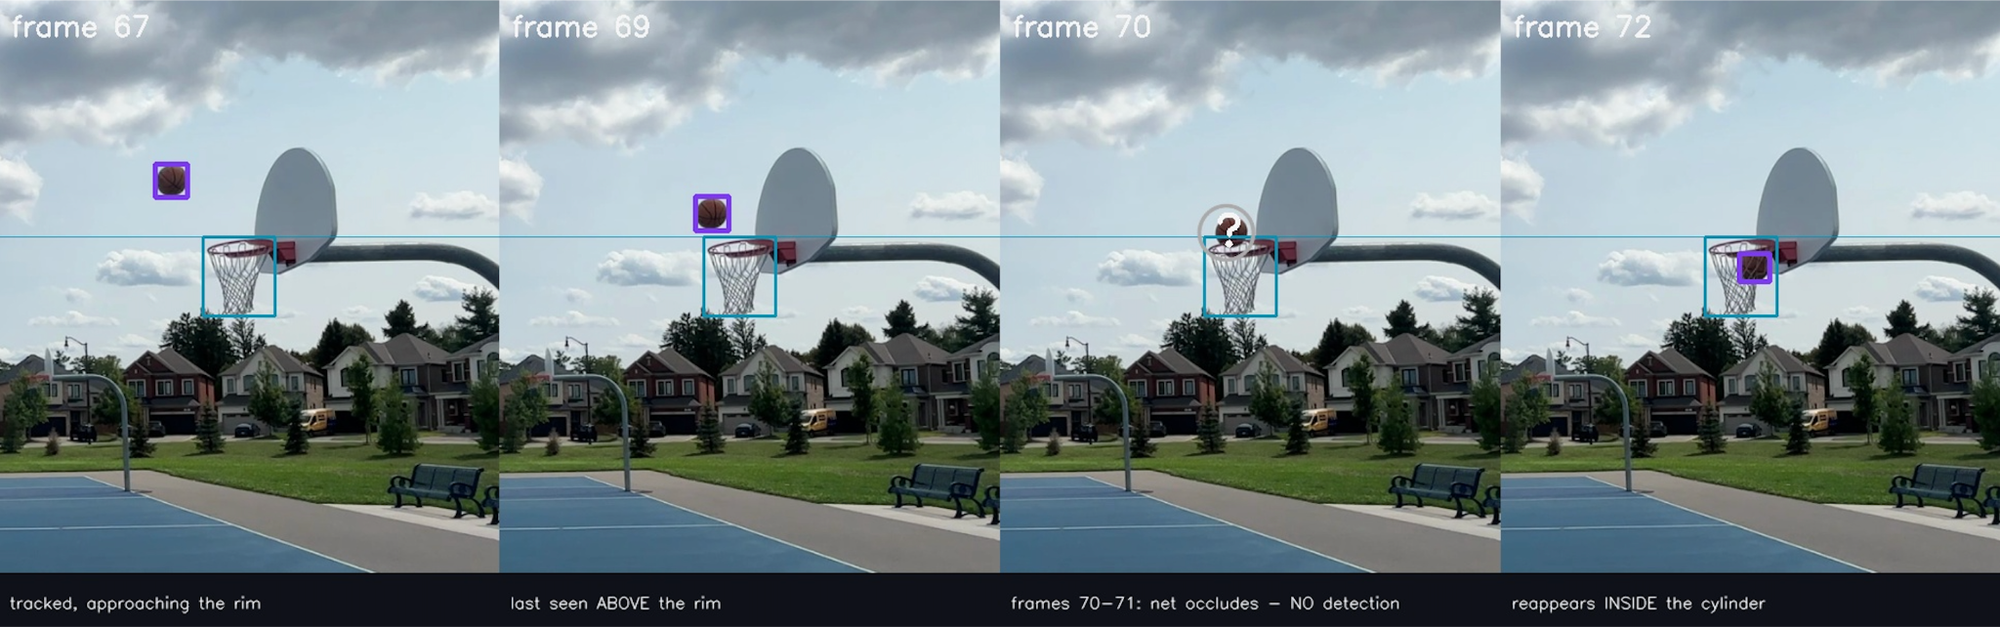
The instant a basketball clears the rim, the net occludes the ball. This creates a major tracking challenge.
In our test dataset, two shots that actually went in were recorded as misses because the camera lost sight of the ball right at the hoop. The net hid the ball for two frames as it went through the rim. A basic tracker needs to see the ball the whole time, so that short gap tricked the system into thinking the shots missed.
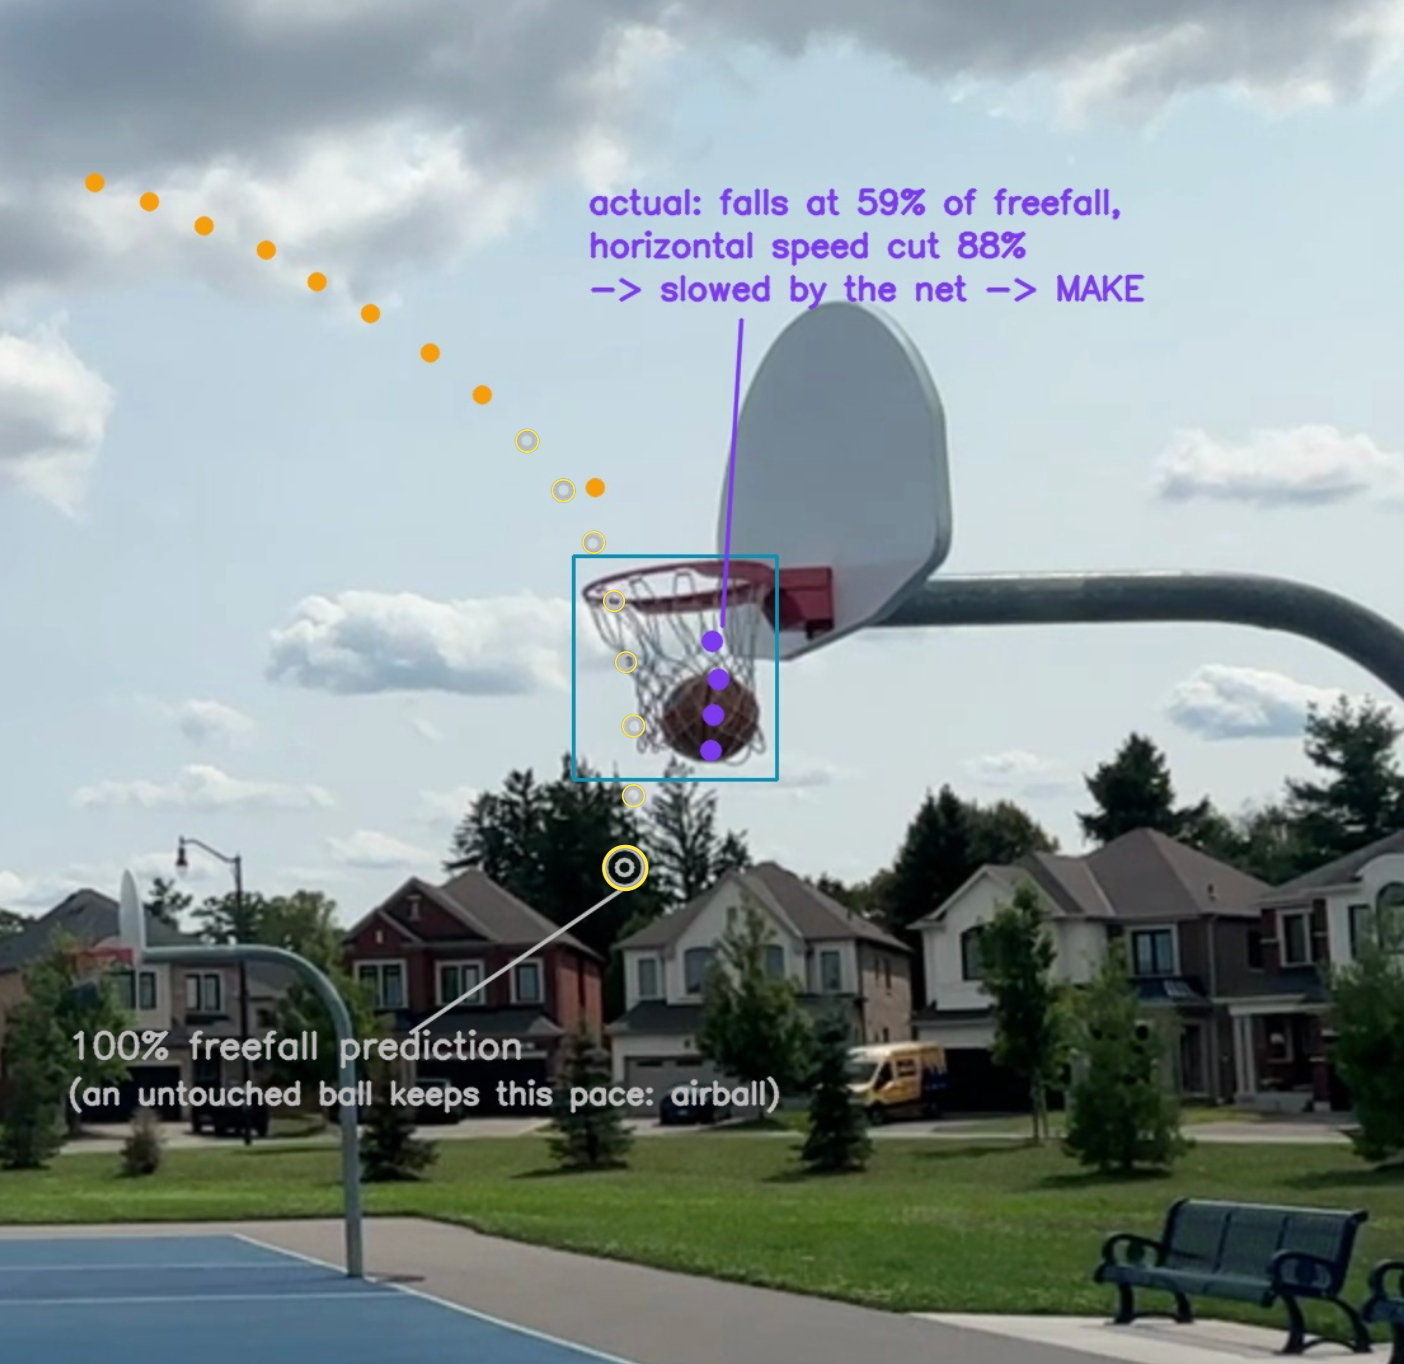
Furthermore, in a two-dimensional video, a ball passing behind the rim looks almost identical to a ball going through the net. If you automatically assume any missing detection near the hoop is a make, an airball that passes behind the rim will count as a shot that went in.
This was fixed by checking how fast the ball falls when it comes back into view. According to Newton's first and second laws of motion, we know how fast an untouched ball should accelerate. But when a ball passes through a net, friction slows it down to between 10% and 90% of normal freefall speed. That drag is proof the ball actually went through the rim.
The pipeline compares the ball's drop speed against three checks:
- Net make: the ball slows down to 10% to 90% of freefall speed, confirming that a shot made it into the net.
- Behind rim airball: the ball stays at 100% of normal freefall speed, proving it never touched the net.
- Random court balls: the speed drops to 0%, rejecting extra balls lying on the court that the detector picked up in the brief moments of occlusion.
Rim Bounces and Single-Camera Limits
Bounces off the rim also created another headache.
Early on, a shot that rattled off the rim logged as two separate events: a miss on the first bounce, followed by a make when it fell through the net.
We fixed this by pausing the call while the ball bounces near the hoop. If a bounce stays within one rim-width of the net and goes in, the engine logs a rattled make. If it bounces high and away, it logs a rattled miss.
Single camera angles still have 2D limits. Certain front-rim bounce-outs look identical to rattle-in makes from one pov. Instead of guessing, the engine tags questionable calls as rattled or occluded in shots.jsonl.
To solve this, our next step would be to train a custom rim-keypoint model on about 150 images. Tracking the front, back, and side edges will let the engine model the hoop as an ellipse instead of a bounding box. This article doesn’t build that model, but it’s a clear next step for anyone interested in sharper decisions.
The Local Web App
For users who prefer a graphical interface over CLI commands, the repository includes a FastAPI server.
Navigating to http://127.0.0.1:7878 after running the code opens a dark dashboard. You can drag and drop a video clip, observe a frame-by-frame processing bar, and review summary tiles showing total attempts, makes, shooting percentage, and current streak.
What it Costs to Run
Running this system locally costs nothing in ongoing fees. Dataset hosting and model training use Roboflow's free tier. Model weights download once and cache locally on your machine. There are no external cloud API calls, no per-video bills, and your video footage never leaves your device.
Build Your own Shot Tracker
You can build and customize your own computer vision shot tracker in five steps:
- Fork a basketball dataset on Roboflow Universe (such as the Basketball Shooting Robot dataset) and train an RF-DETR-small model in the Roboflow UI.
- Clone the shot-tracker repository, install dependencies with uv, and add your Roboflow API key to
.env. - Add your custom model ID into
models/registry.py. - Mount your phone on a tripod at the edge of the court, keeping the rim in the upper third of the frame, and record a shooting session.
- Upload your clip through the local web interface, and receive your analysis.
Further reading
To explore more sports analytics and object detection projects, check out these guides:


Cite this Post
Use the following entry to cite this post in your research:
Aarnav Shah. (Aug 14, 2026). How to Build an AI Basketball Shot Evaluator. Roboflow Blog: https://blog.roboflow.com/how-to-build-an-ai-basketball-shot-evaluator/