

Sobel Edge Detection is a computer vision technique used to identify the boundaries of objects and regions in an image or video frame by measuring changes in pixel intensity. It uses horizontal and vertical Sobel kernels to calculate gradient information, which represents the strength and direction of these changes.
Edges play an important role in computer vision by helping identify the boundaries of objects, shapes, and regions within an image. Detecting these boundaries can simplify an image while preserving important visual information, making it easier to analyze and process before applying more advanced computer vision techniques. Several edge detection techniques can be used for this purpose, including Canny Edge Detection, Laplacian Edge Detection, and Sobel Edge Detection.
Among them, Sobel is commonly used when a simple and computationally efficient method for edge detection is needed. Unlike Canny, it does not require additional steps such as non-maximum suppression, double thresholding, and edge tracking by hysteresis. Compared with the Laplacian, Sobel calculates the horizontal and vertical gradients separately, making it useful when the direction of intensity changes is also important.
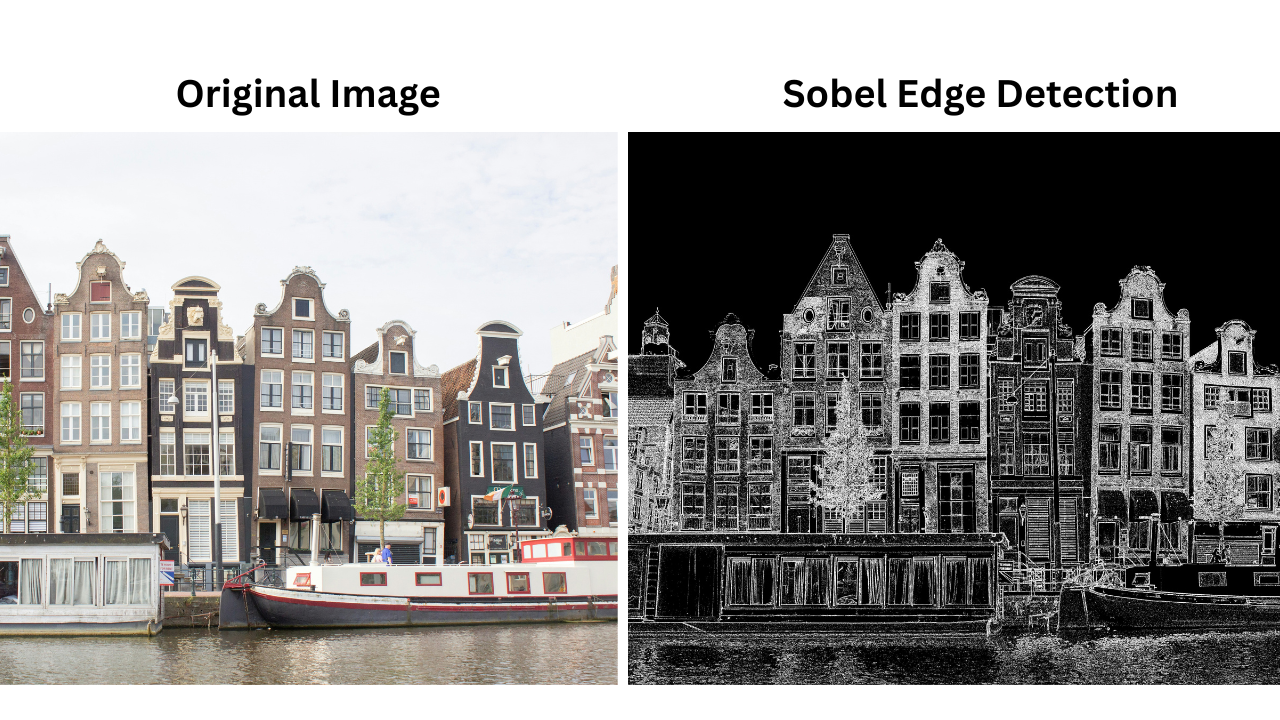
In this guide, you’ll learn what Sobel Edge Detection is, how it works, why it is useful, how it differs from Canny Edge Detection, and how to implement it using Roboflow Workflows.
What Is Sobel Edge Detection?
Sobel Edge Detection is a computer vision technique used to detect edges in an image by measuring changes in pixel intensity in the horizontal and vertical directions. It uses two 3×3 kernels, known as Sobel operators, to calculate these changes and determine the strength and direction of edges.
Sobel Edge Detection generally involves the following steps:
- Convert the image to grayscale.
- Apply the horizontal Sobel kernel.
- Apply the vertical Sobel kernel.
- Calculate the gradient magnitude to measure edge strength.
- Optionally calculate the gradient direction to determine edge orientation.
- Generate an edge image using a threshold to create a binary image.
Advantages of Sobel Edge Detection
Sobel Edge Detection has several advantages:
- Computationally Efficient: The small kernels and relatively simple calculations make Sobel fast enough for many image-processing applications.
- Provides Gradient Information: Produces both gradient magnitude, which represents edge strength, and gradient direction, which indicates the orientation of the edge.
- Provides Some Noise Reduction: The weighted structure of the Sobel kernels provides a small amount of smoothing while calculating gradients, making it somewhat less sensitive to noise than simpler derivative operators.
Limitations of Sobel Edge Detection
Sobel Edge Detection also has some limitations:
- Sensitive to Noise: Although the Sobel kernels provide some smoothing, the method can still respond to noise and small intensity variations.
- Produces Thick Edges: Sobel generally produces edges that can be several pixels wide, so additional processing may be needed when thin, well-defined edges are required.
- May Detect Unwanted Edges: Textures, shadows, reflections, and other intensity changes can produce strong gradient responses, even when they do not correspond to the object boundaries of interest.
How Does Sobel Edge Detection Work?
Sobel Edge Detection works by calculating changes in pixel intensity across an image. It applies separate kernels to measure horizontal and vertical intensity changes, then combines these gradients to calculate the gradient magnitude. The gradient magnitude can then be thresholded to generate an edge image.
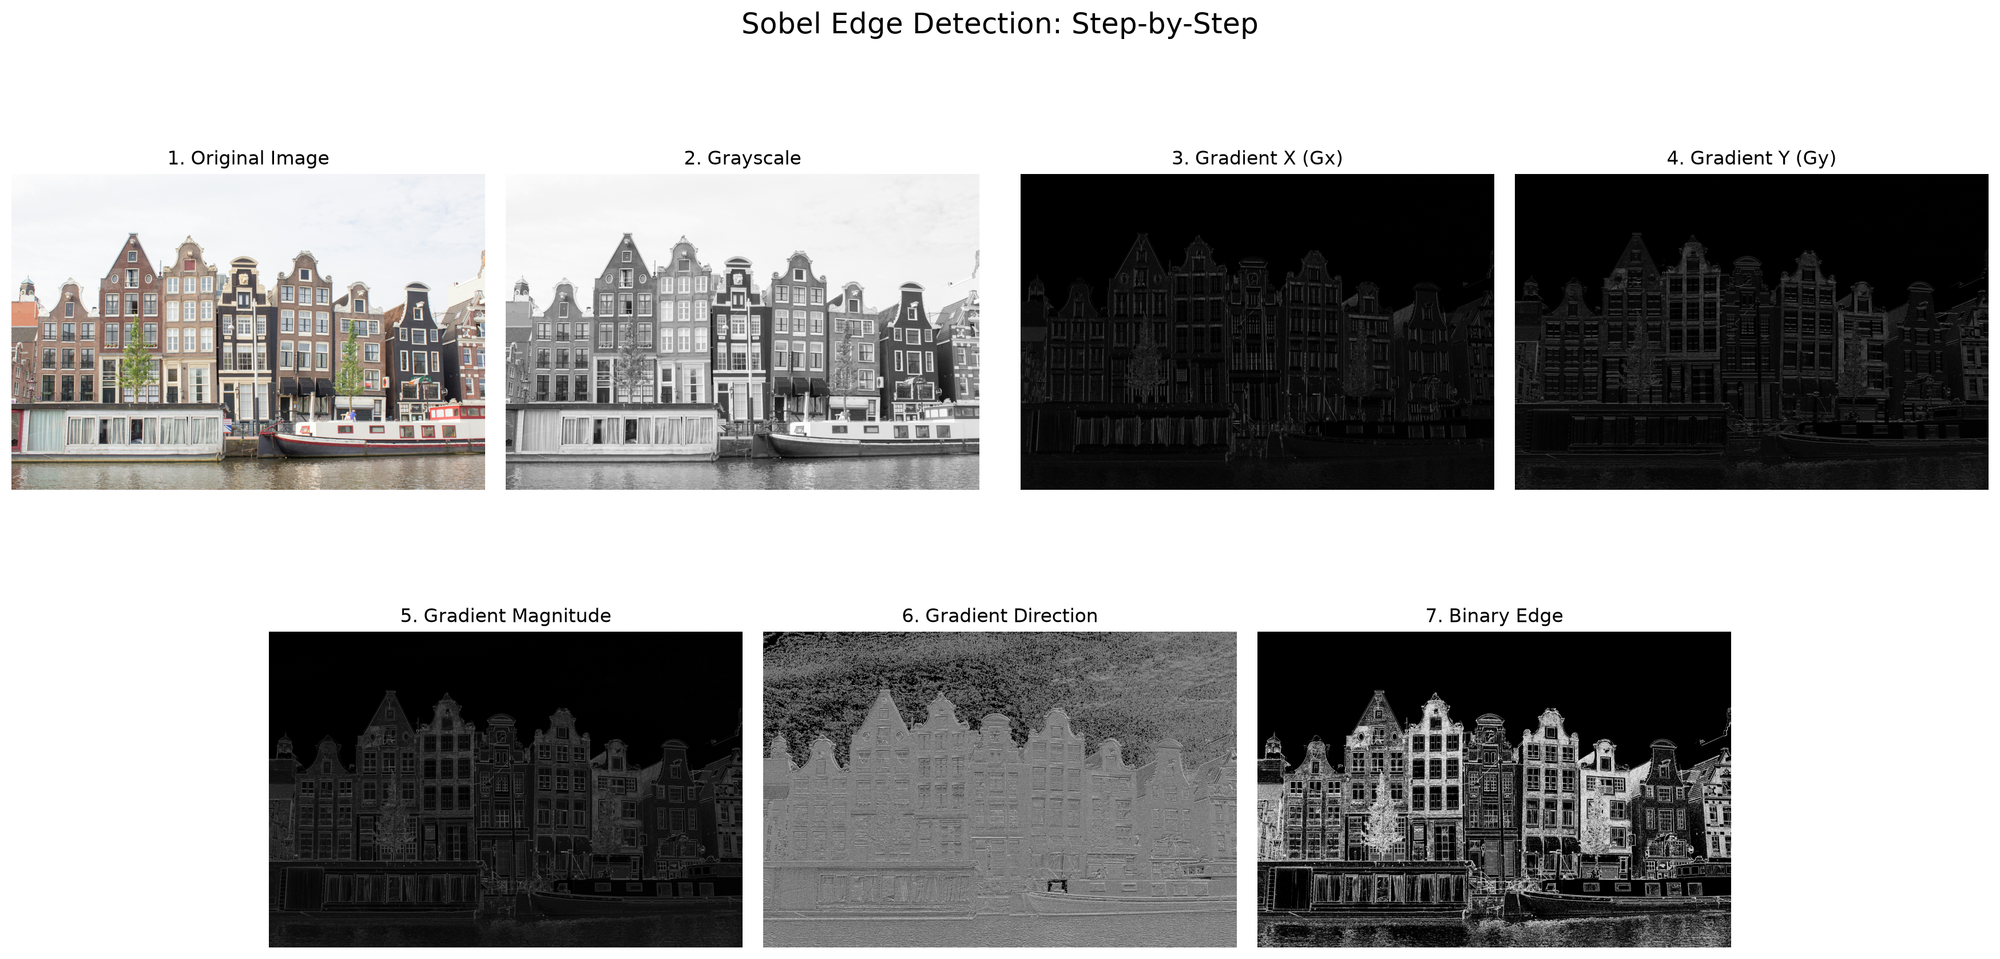
The process can be broken down into the following steps:
Step 1: Convert the Image to Grayscale
The input image is first converted to grayscale. This reduces the image to a single intensity value for each pixel, making it easier to calculate changes in brightness.
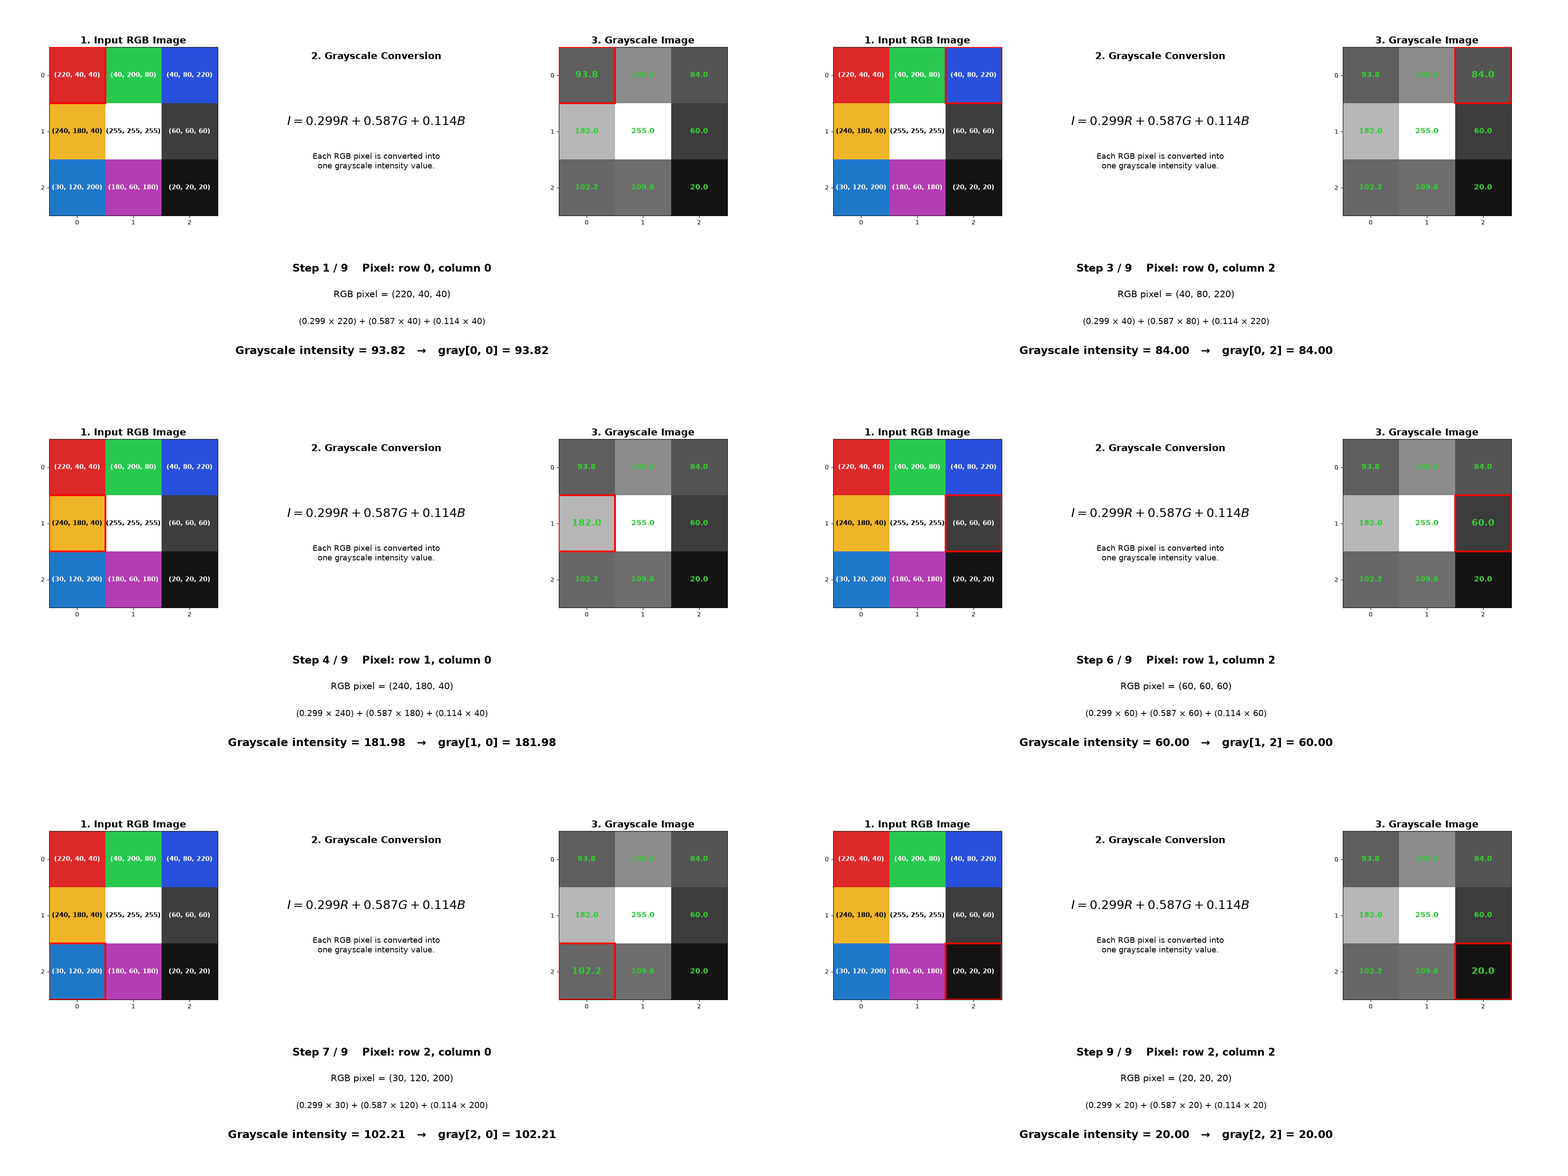
A common grayscale conversion combines the red, green, and blue intensity values of each pixel using the following weighted formula:

Here, (R), (G), and (B) represent the red, green, and blue intensity values of each pixel, while (I) represents the resulting grayscale intensity.
The visualization below shows how a RGB color image is converted into a grayscale image using the weighted formula:
Step 2: Apply the Sobel Kernels
Sobel Edge Detection uses two 3×3 kernels to measure changes in pixel intensity in the horizontal and vertical directions.
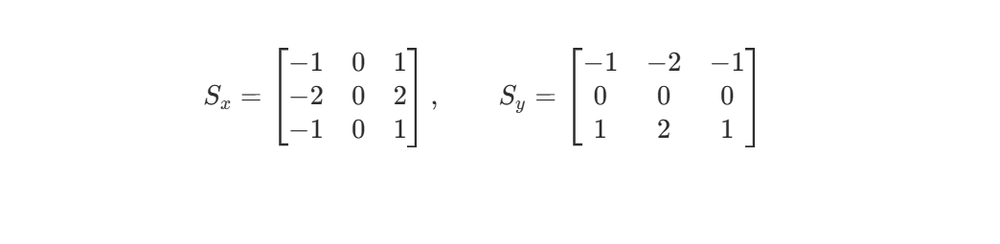
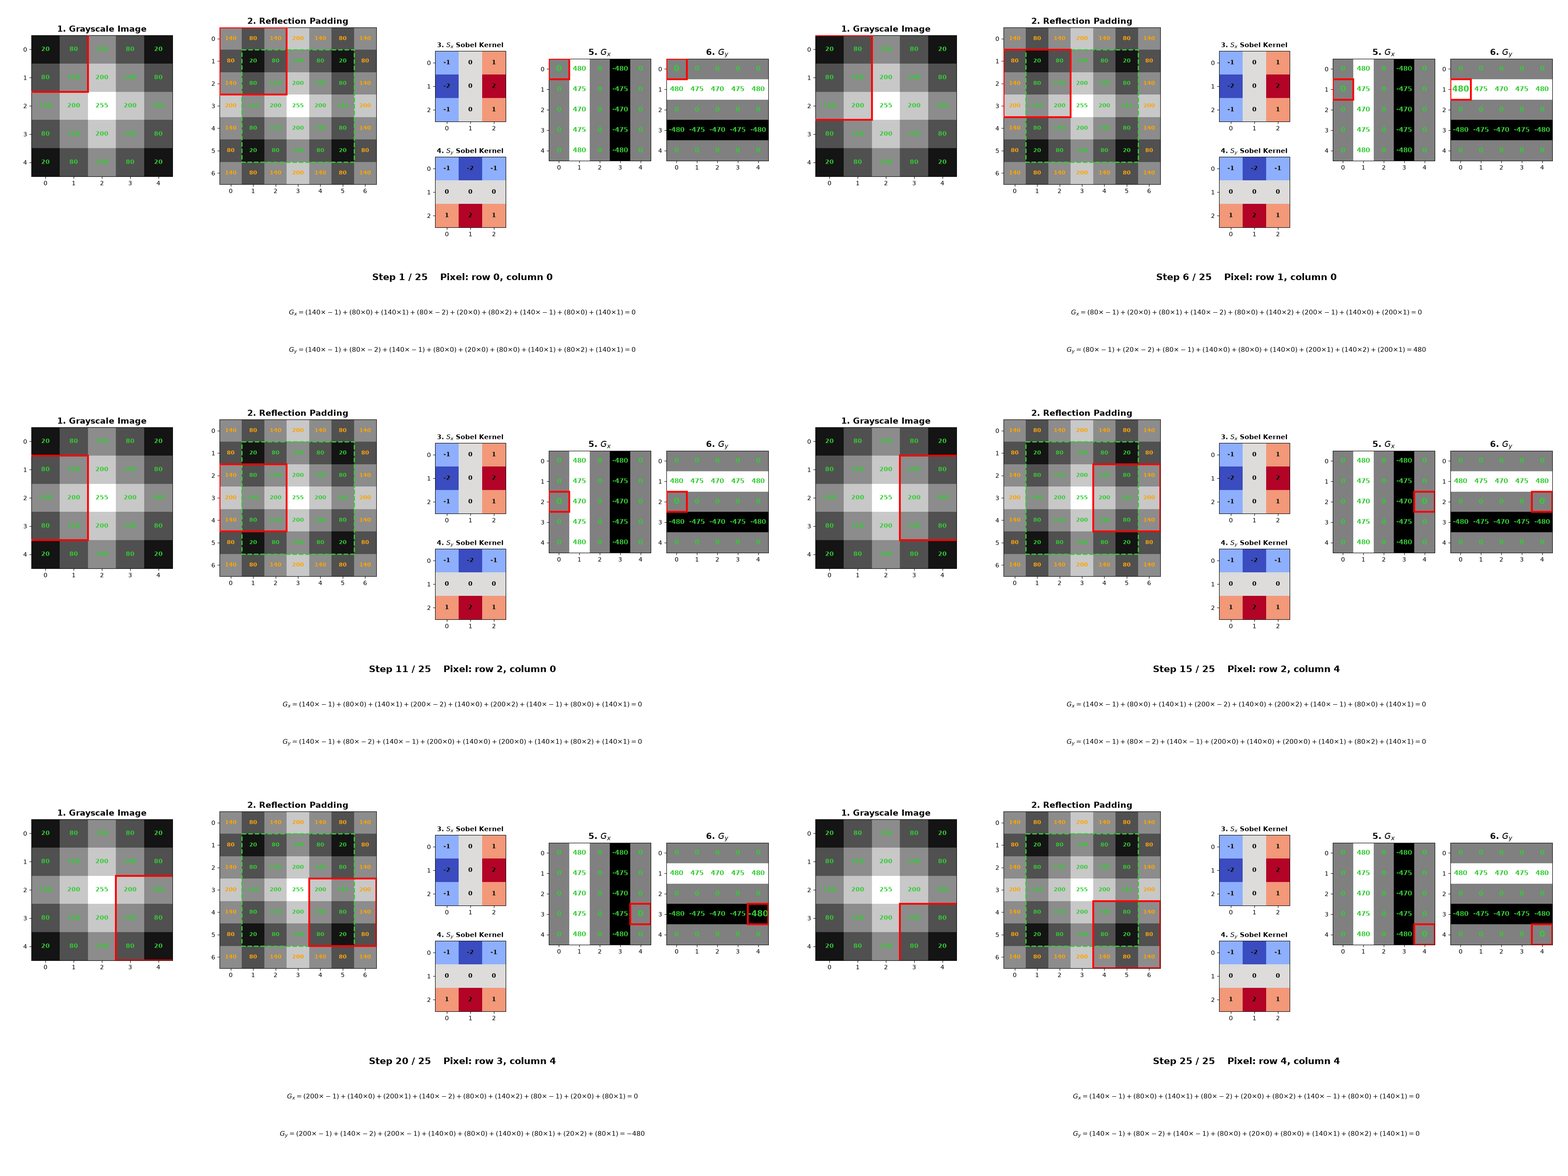
The kernels are applied using an operation called convolution, where a Sobel kernel is placed over a 3×3 region of the image and each pixel is multiplied by its corresponding value in the kernel. The resulting values are then added together, and the sum becomes the gradient value for the center pixel, representing the intensity change measured in the horizontal or vertical direction, depending on the kernel being applied.
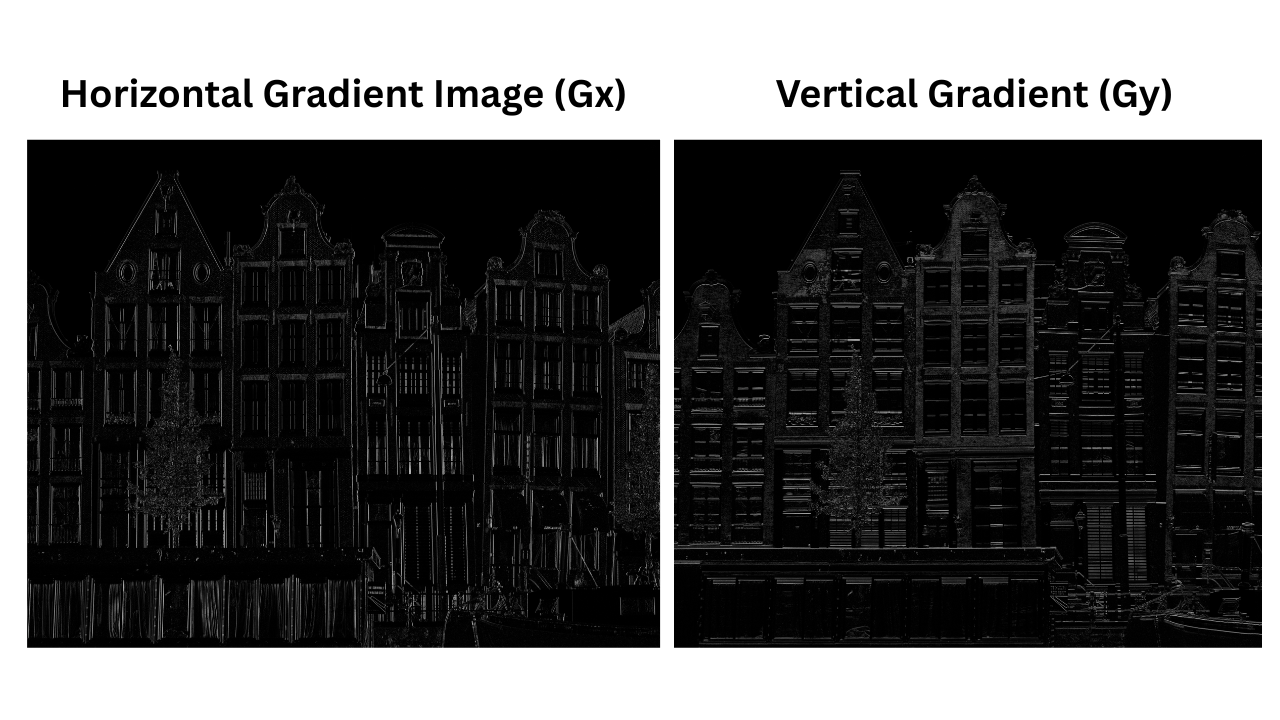
This process is repeated as the kernels move across the image, one pixel at a time. For each pixel, applying (Sx) produces a (Gx) value and applying (Sy) produces a (Gy) value. This results in two gradient images, one containing the horizontal gradients and the other containing the vertical gradients.
For pixels near the image boundaries, reflection padding can be used to provide the neighboring pixel values needed to apply the 3×3 kernels.
The visualization below shows how the Sobel operators calculate the horizontal (Gx) and vertical (Gy) gradients:
The example below shows the Gx and Gy gradient images produced from a real image.
Step 3: Calculate the Gradient Magnitude
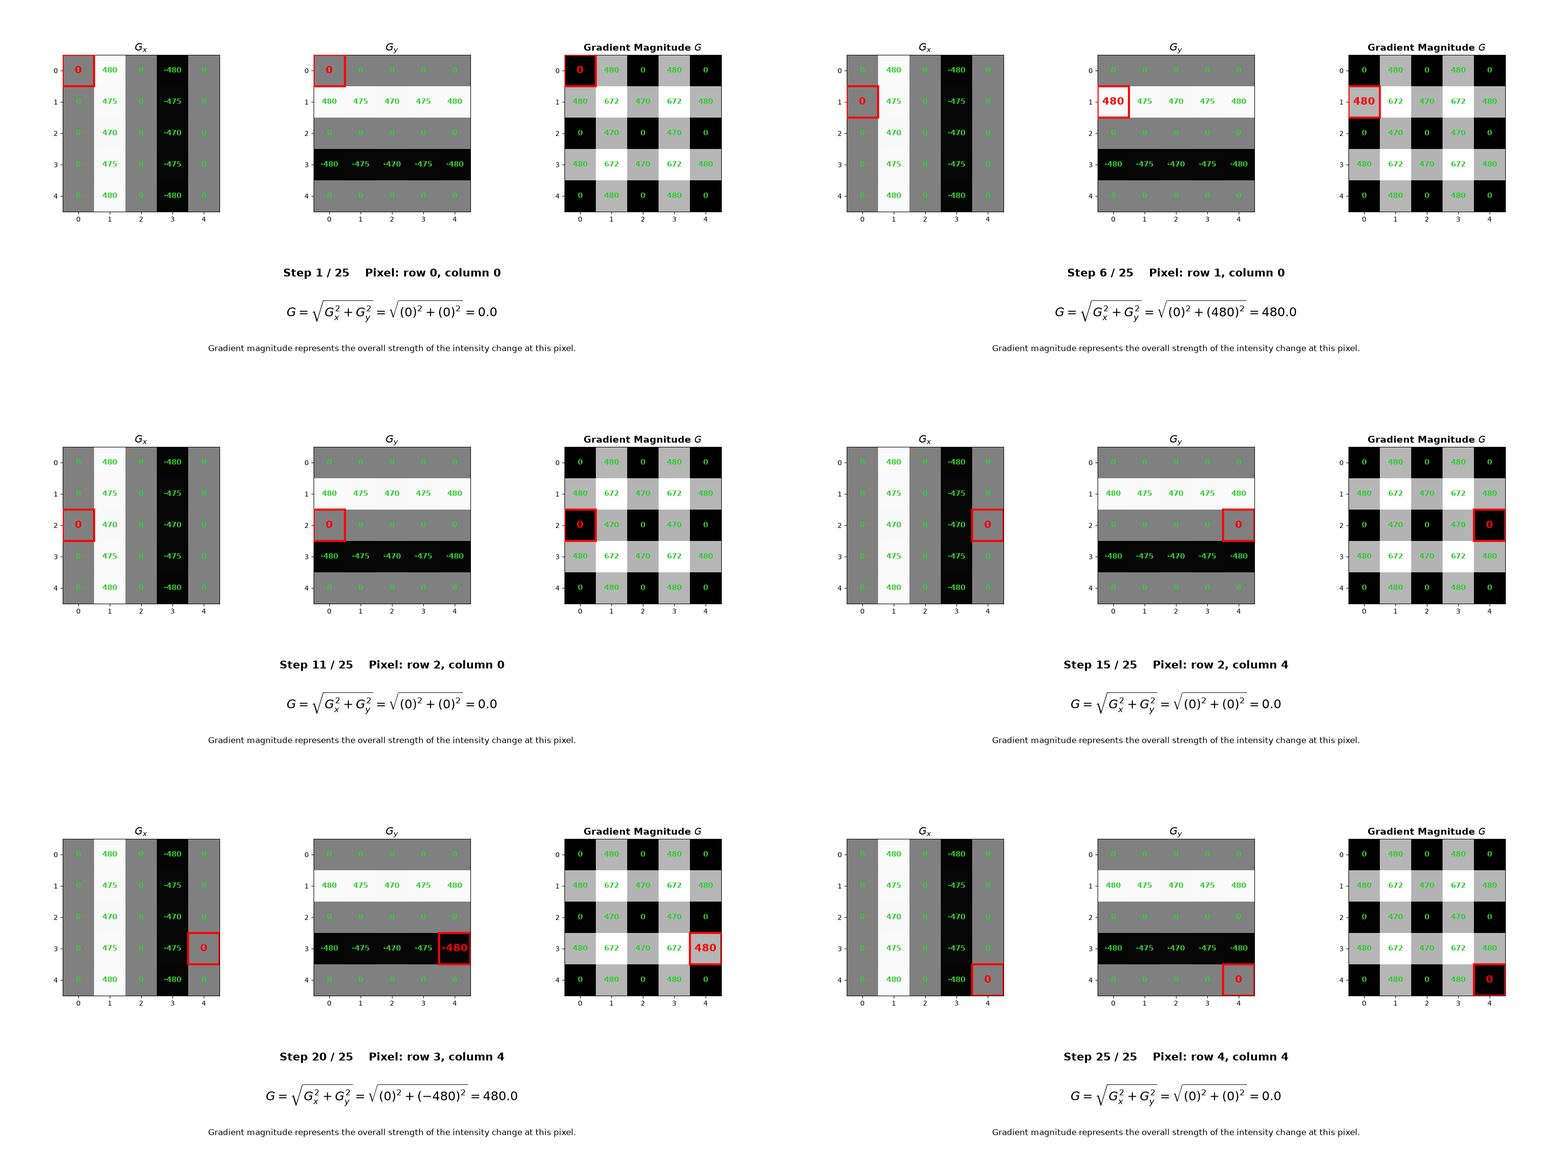
The horizontal gradient (Gx) and vertical gradient (Gy) are combined to determine the overall strength of the intensity change at each pixel.

Here, (G) represents the gradient magnitude, while (Gx) and (Gy) represent the horizontal and vertical gradients.
A larger gradient magnitude indicates a stronger change in pixel intensity, which often corresponds to a stronger edge. A value close to zero indicates little or no change in intensity.
This visualization below shows how the overall gradient magnitude, G, is calculated by combining the horizontal gradient, Gx, and vertical gradient, Gy.
For faster computation, an approximation can also be used:

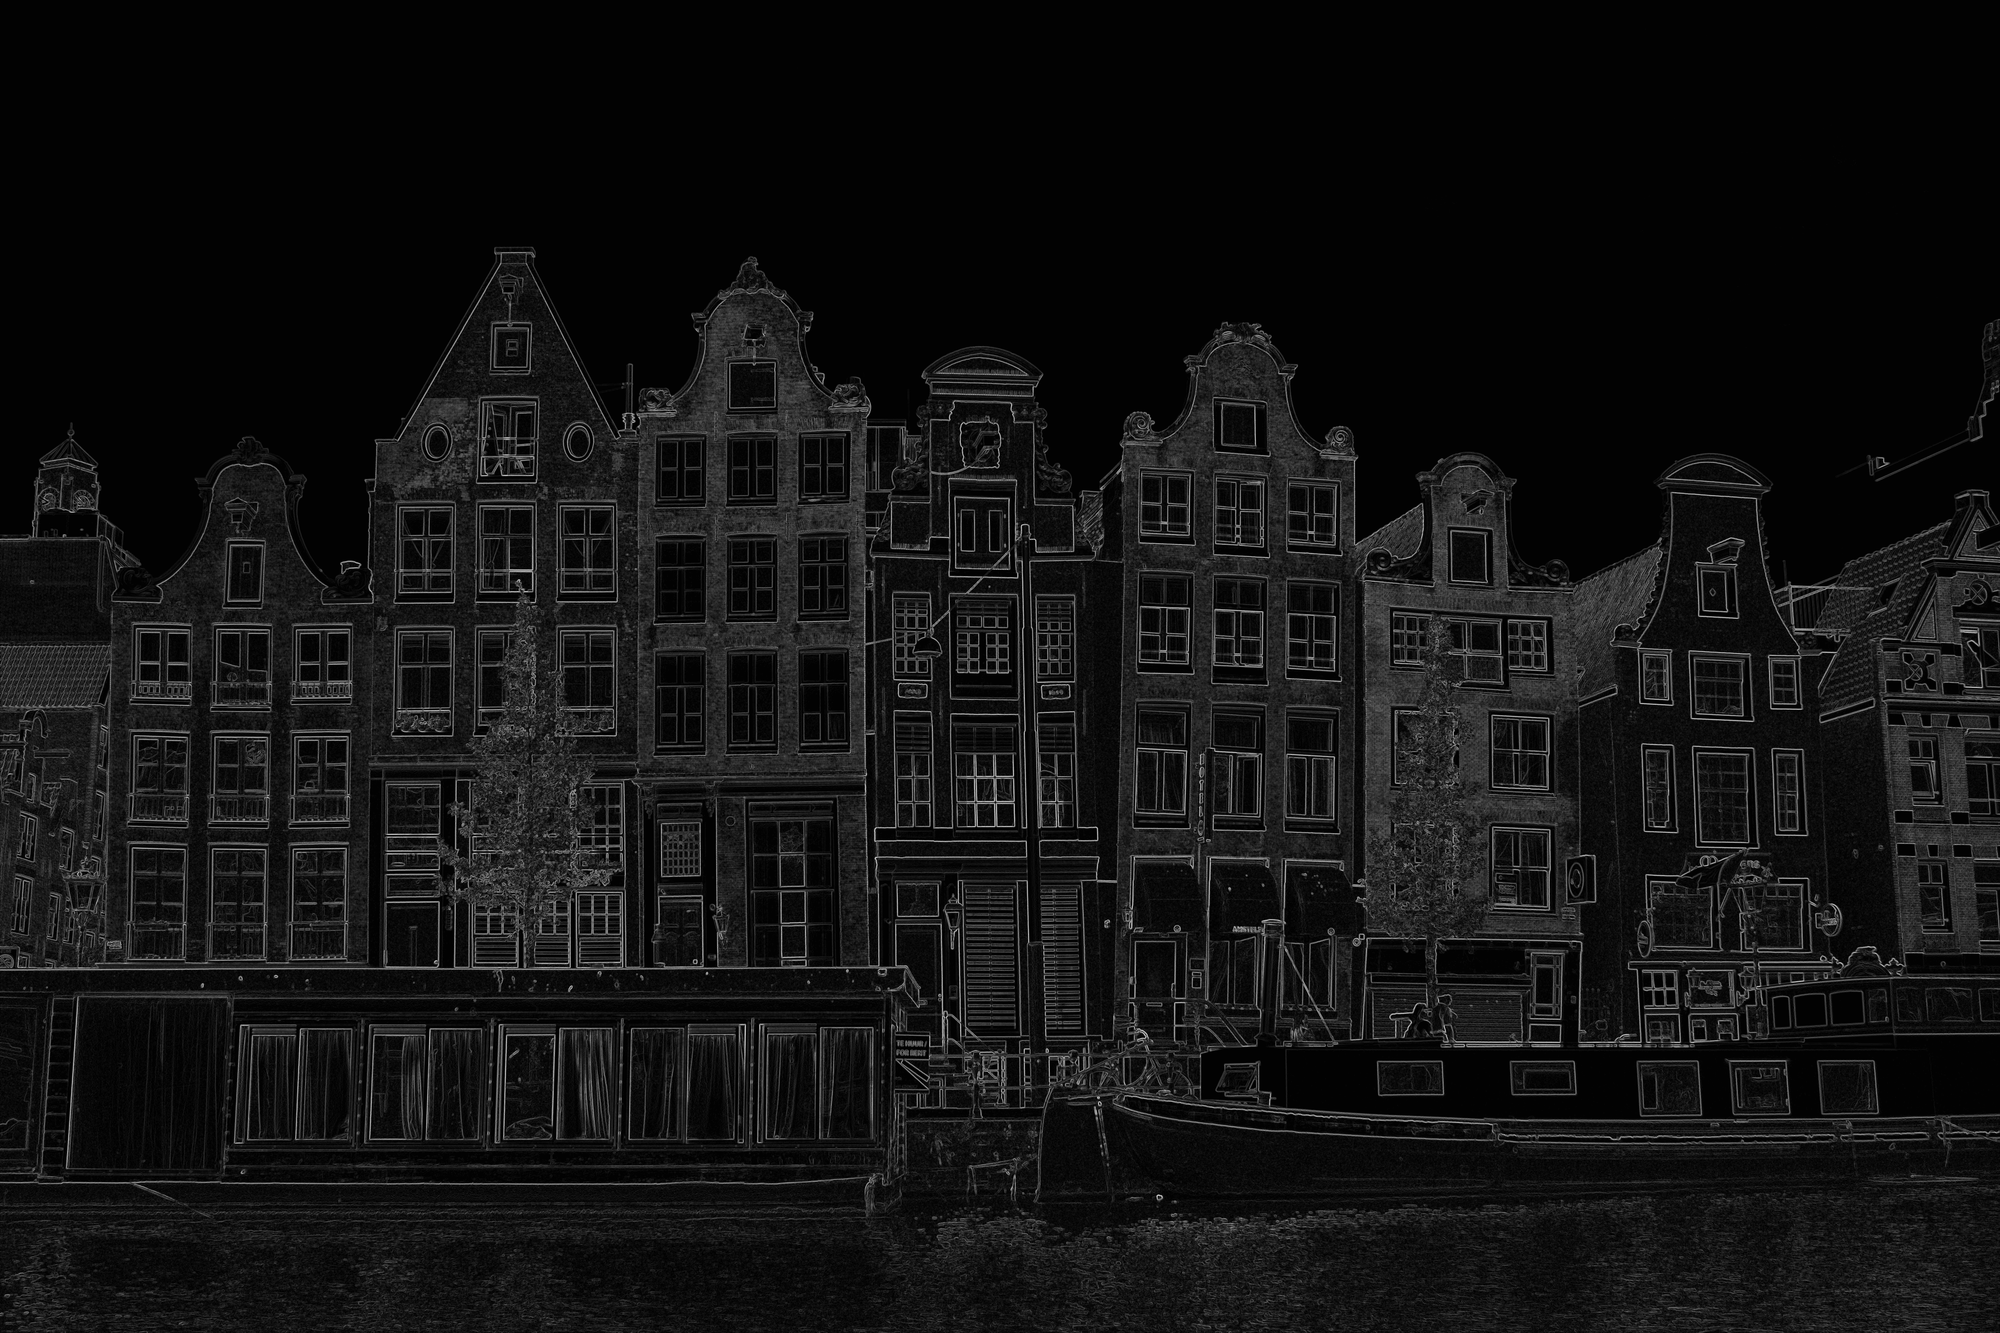
The resulting gradient magnitude forms an edge map, where stronger edges have higher pixel values.
The example below shows how the edge map, represented by the gradient magnitude, appears for a real image.
Step 4: (Optional) Calculate the Gradient Direction
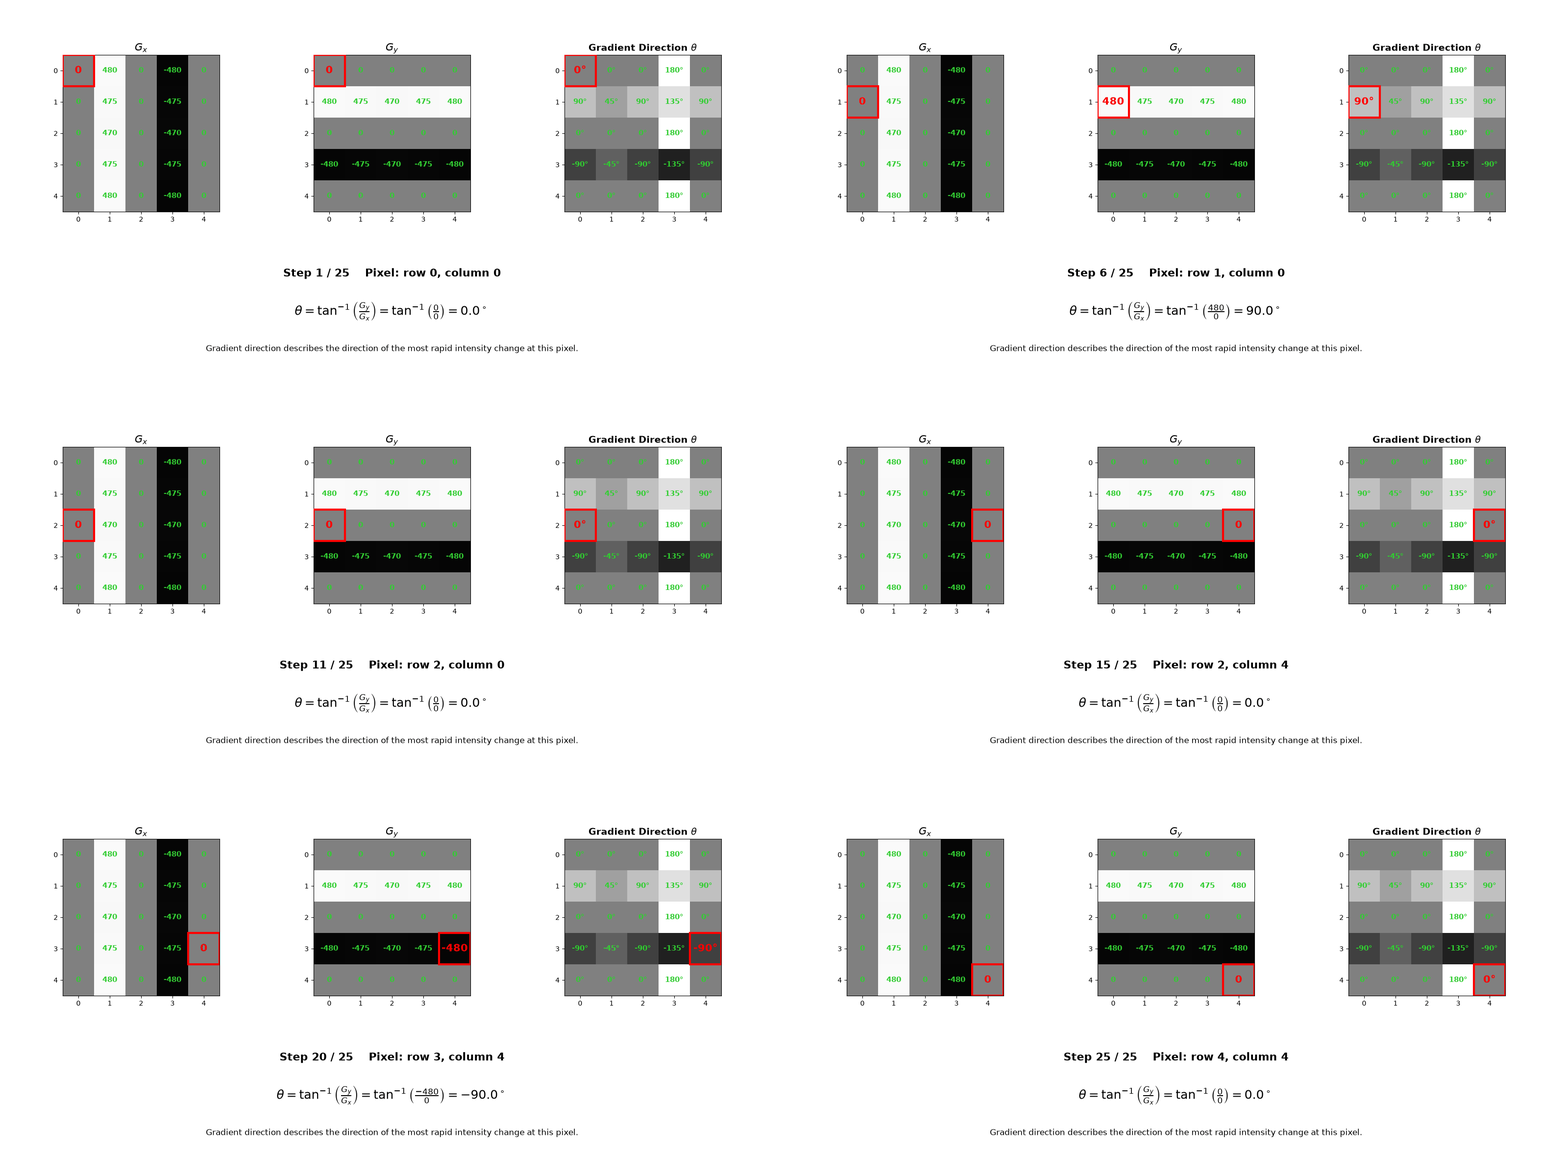
Gradient direction describes the direction in which pixel intensity changes most rapidly in an image. The horizontal gradient (Gx) and vertical gradient (Gy) can be used to determine the gradient direction.
The gradient direction does not represent the orientation of the edge itself. Instead, the edge orientation is perpendicular to the gradient direction. The gradient direction, θ, is calculated as:

The values of Gx and Gy determine the direction of the gradient. For example, when Gx is large compared to Gy, the intensity changes primarily in the horizontal direction. When Gy is large compared to Gx, the intensity changes primarily in the vertical direction.
Gradient direction is useful for understanding edge orientation and can also be used in further image processing tasks, such as determining how pixels should be grouped or processed based on the direction of an edge.
The visualization below shows how the gradient direction, θ, is calculated from the horizontal gradient Gx and vertical gradient Gy.
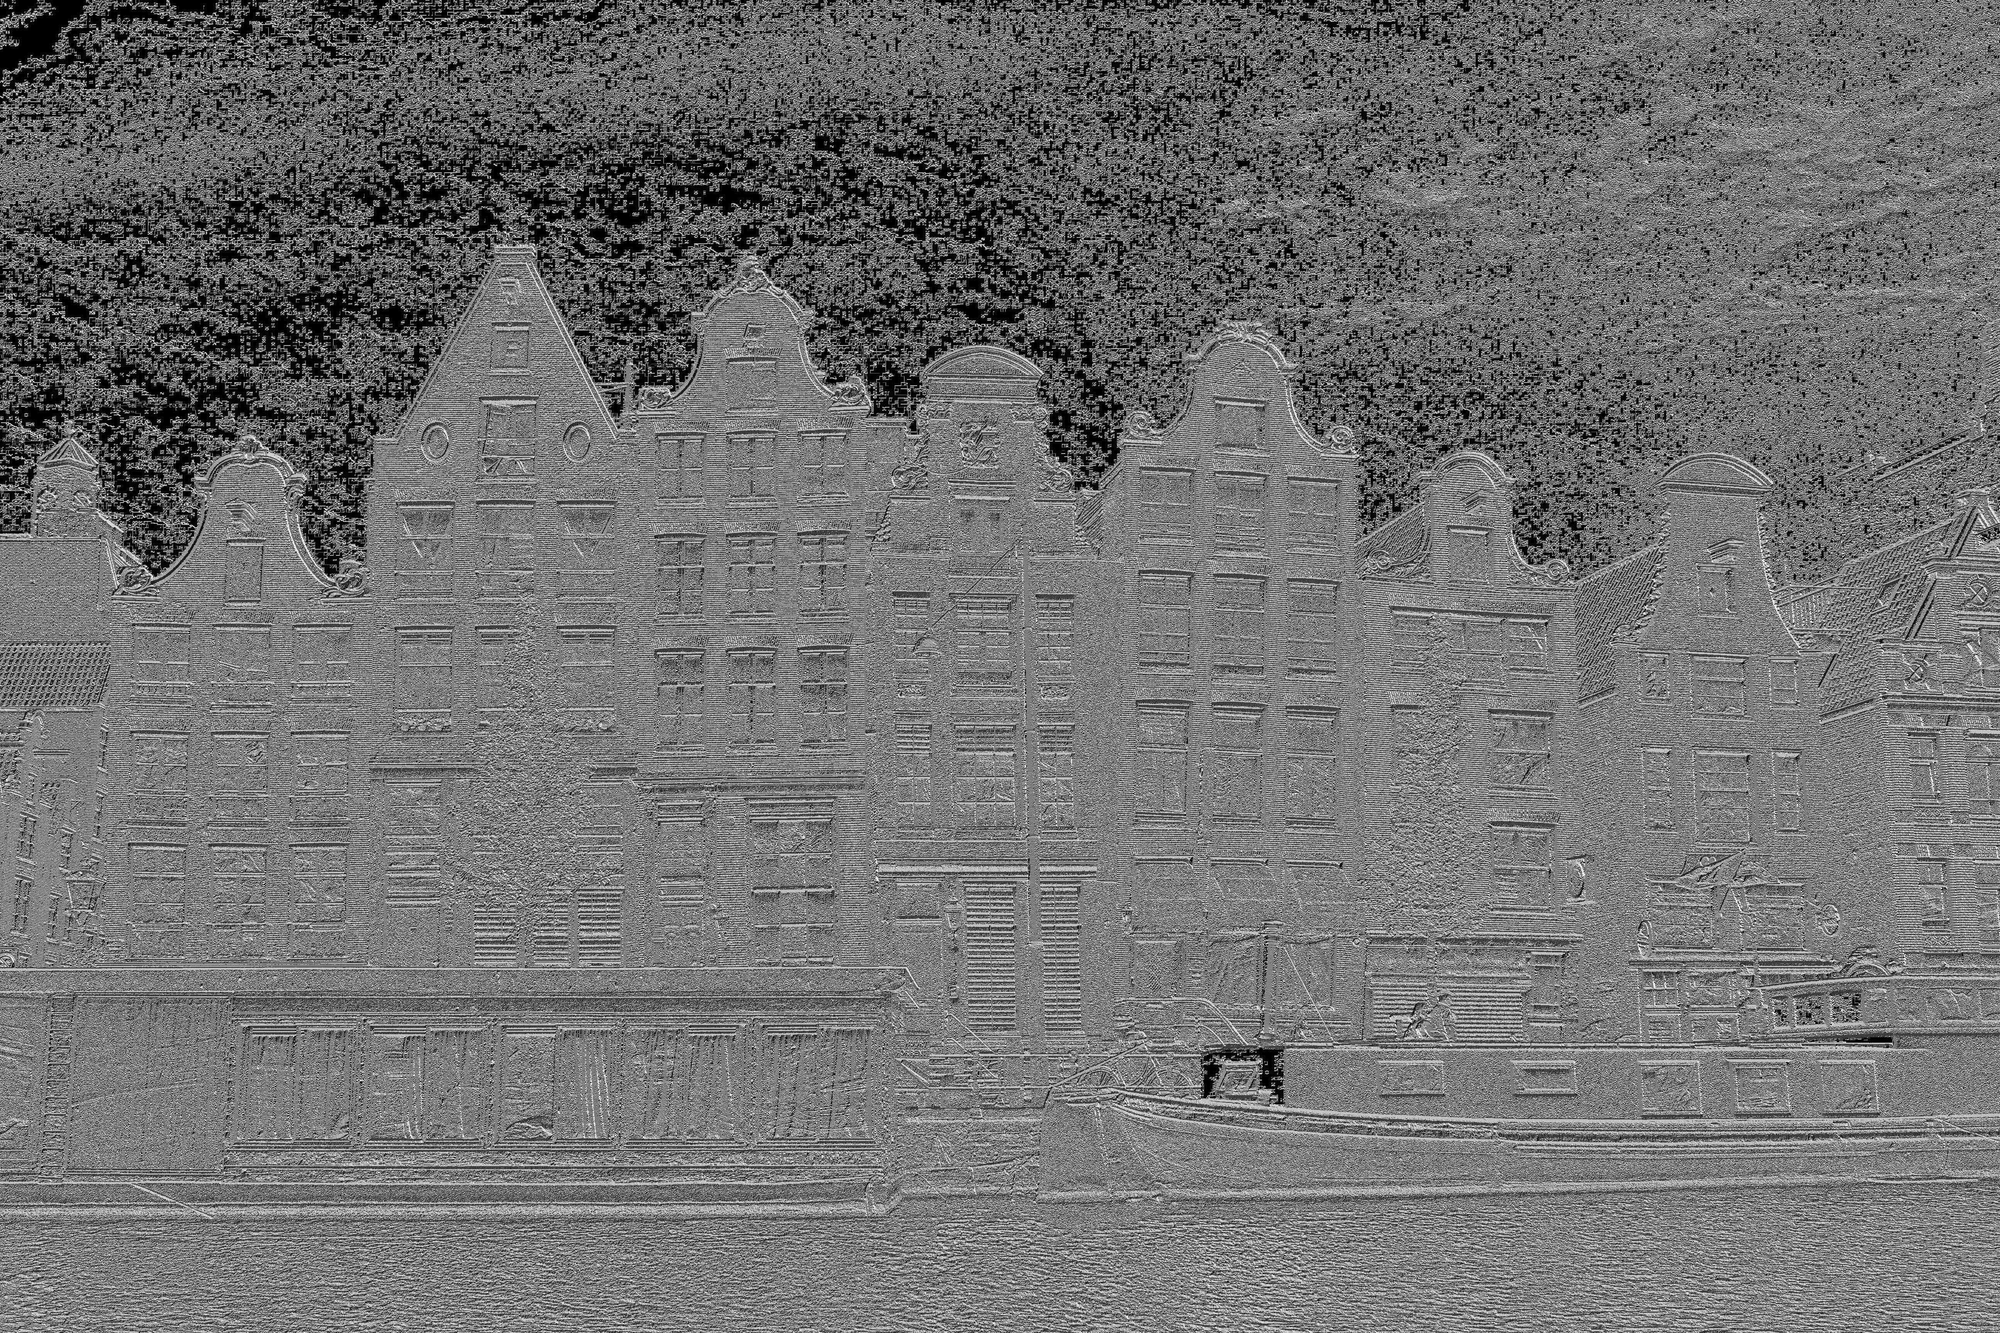
The example below shows the gradient direction calculated from Gx and Gy represented as an image.
Step 5: Generate the Edge Image
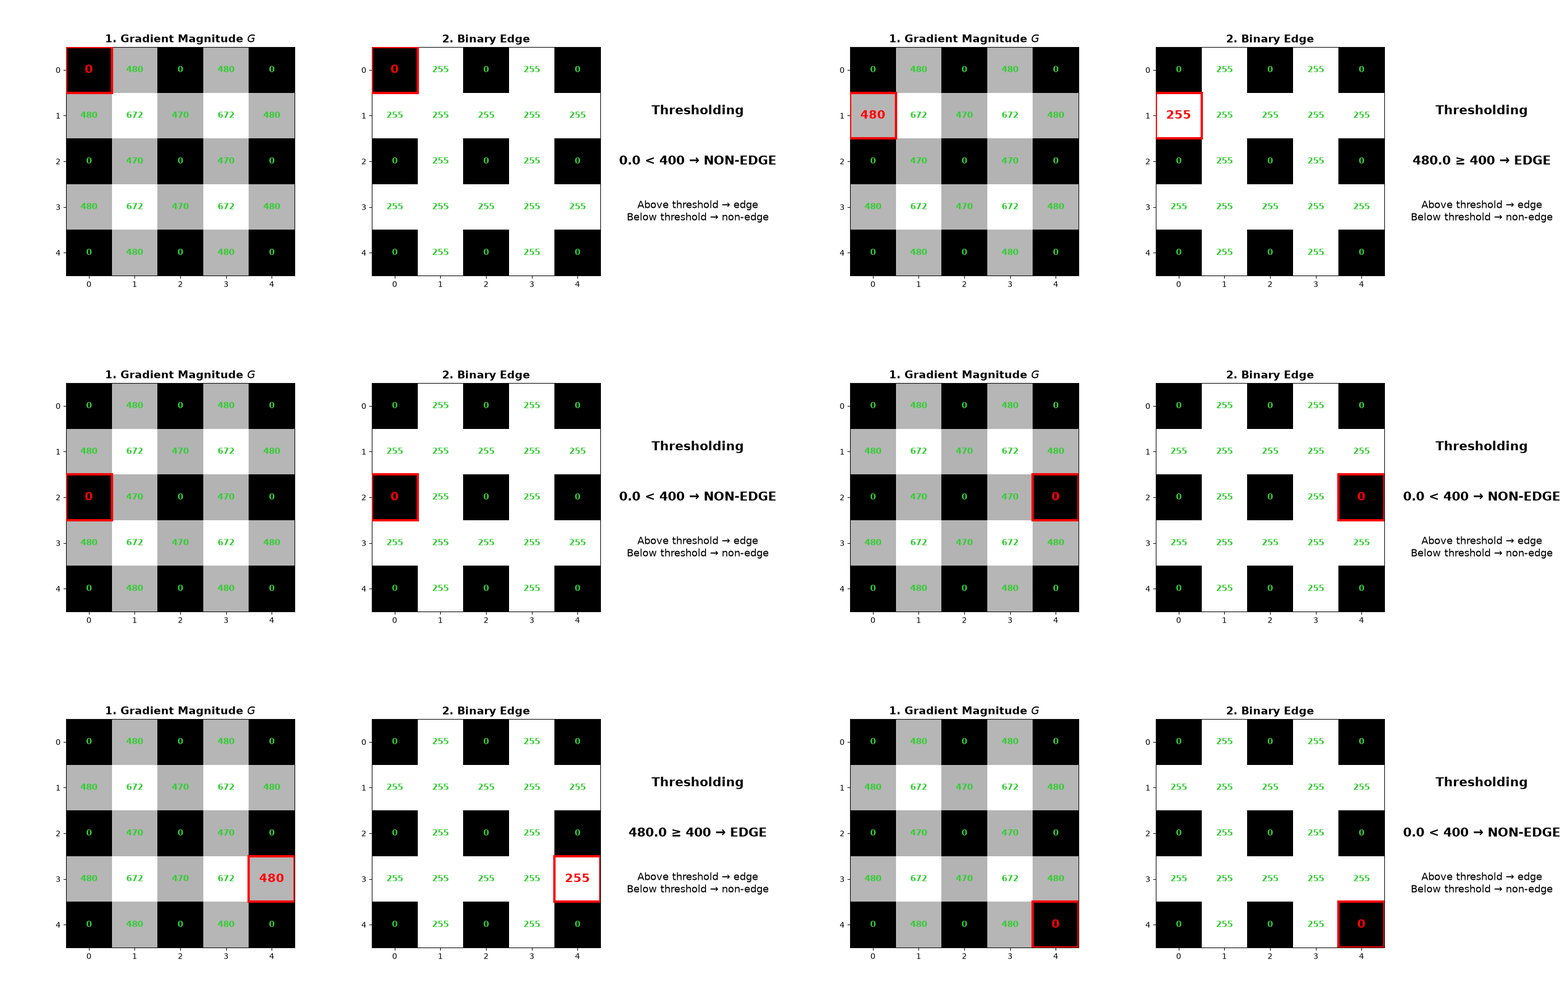
The calculated gradient magnitude itself acts as a grayscale edge image. However, if a binary edge image is required, a threshold can be applied to the gradient magnitude. Pixels with gradient magnitude values above the threshold are classified as edges, while those below the threshold are classified as non-edges. This produces a binary edge map that clearly separates detected edges from non-edge regions.
This visualization below demonstrates how a binary edge map is created by thresholding the gradient magnitude G, classifying pixel values above the threshold (e.g., 400) as edges (255) and those below as non-edges (0).
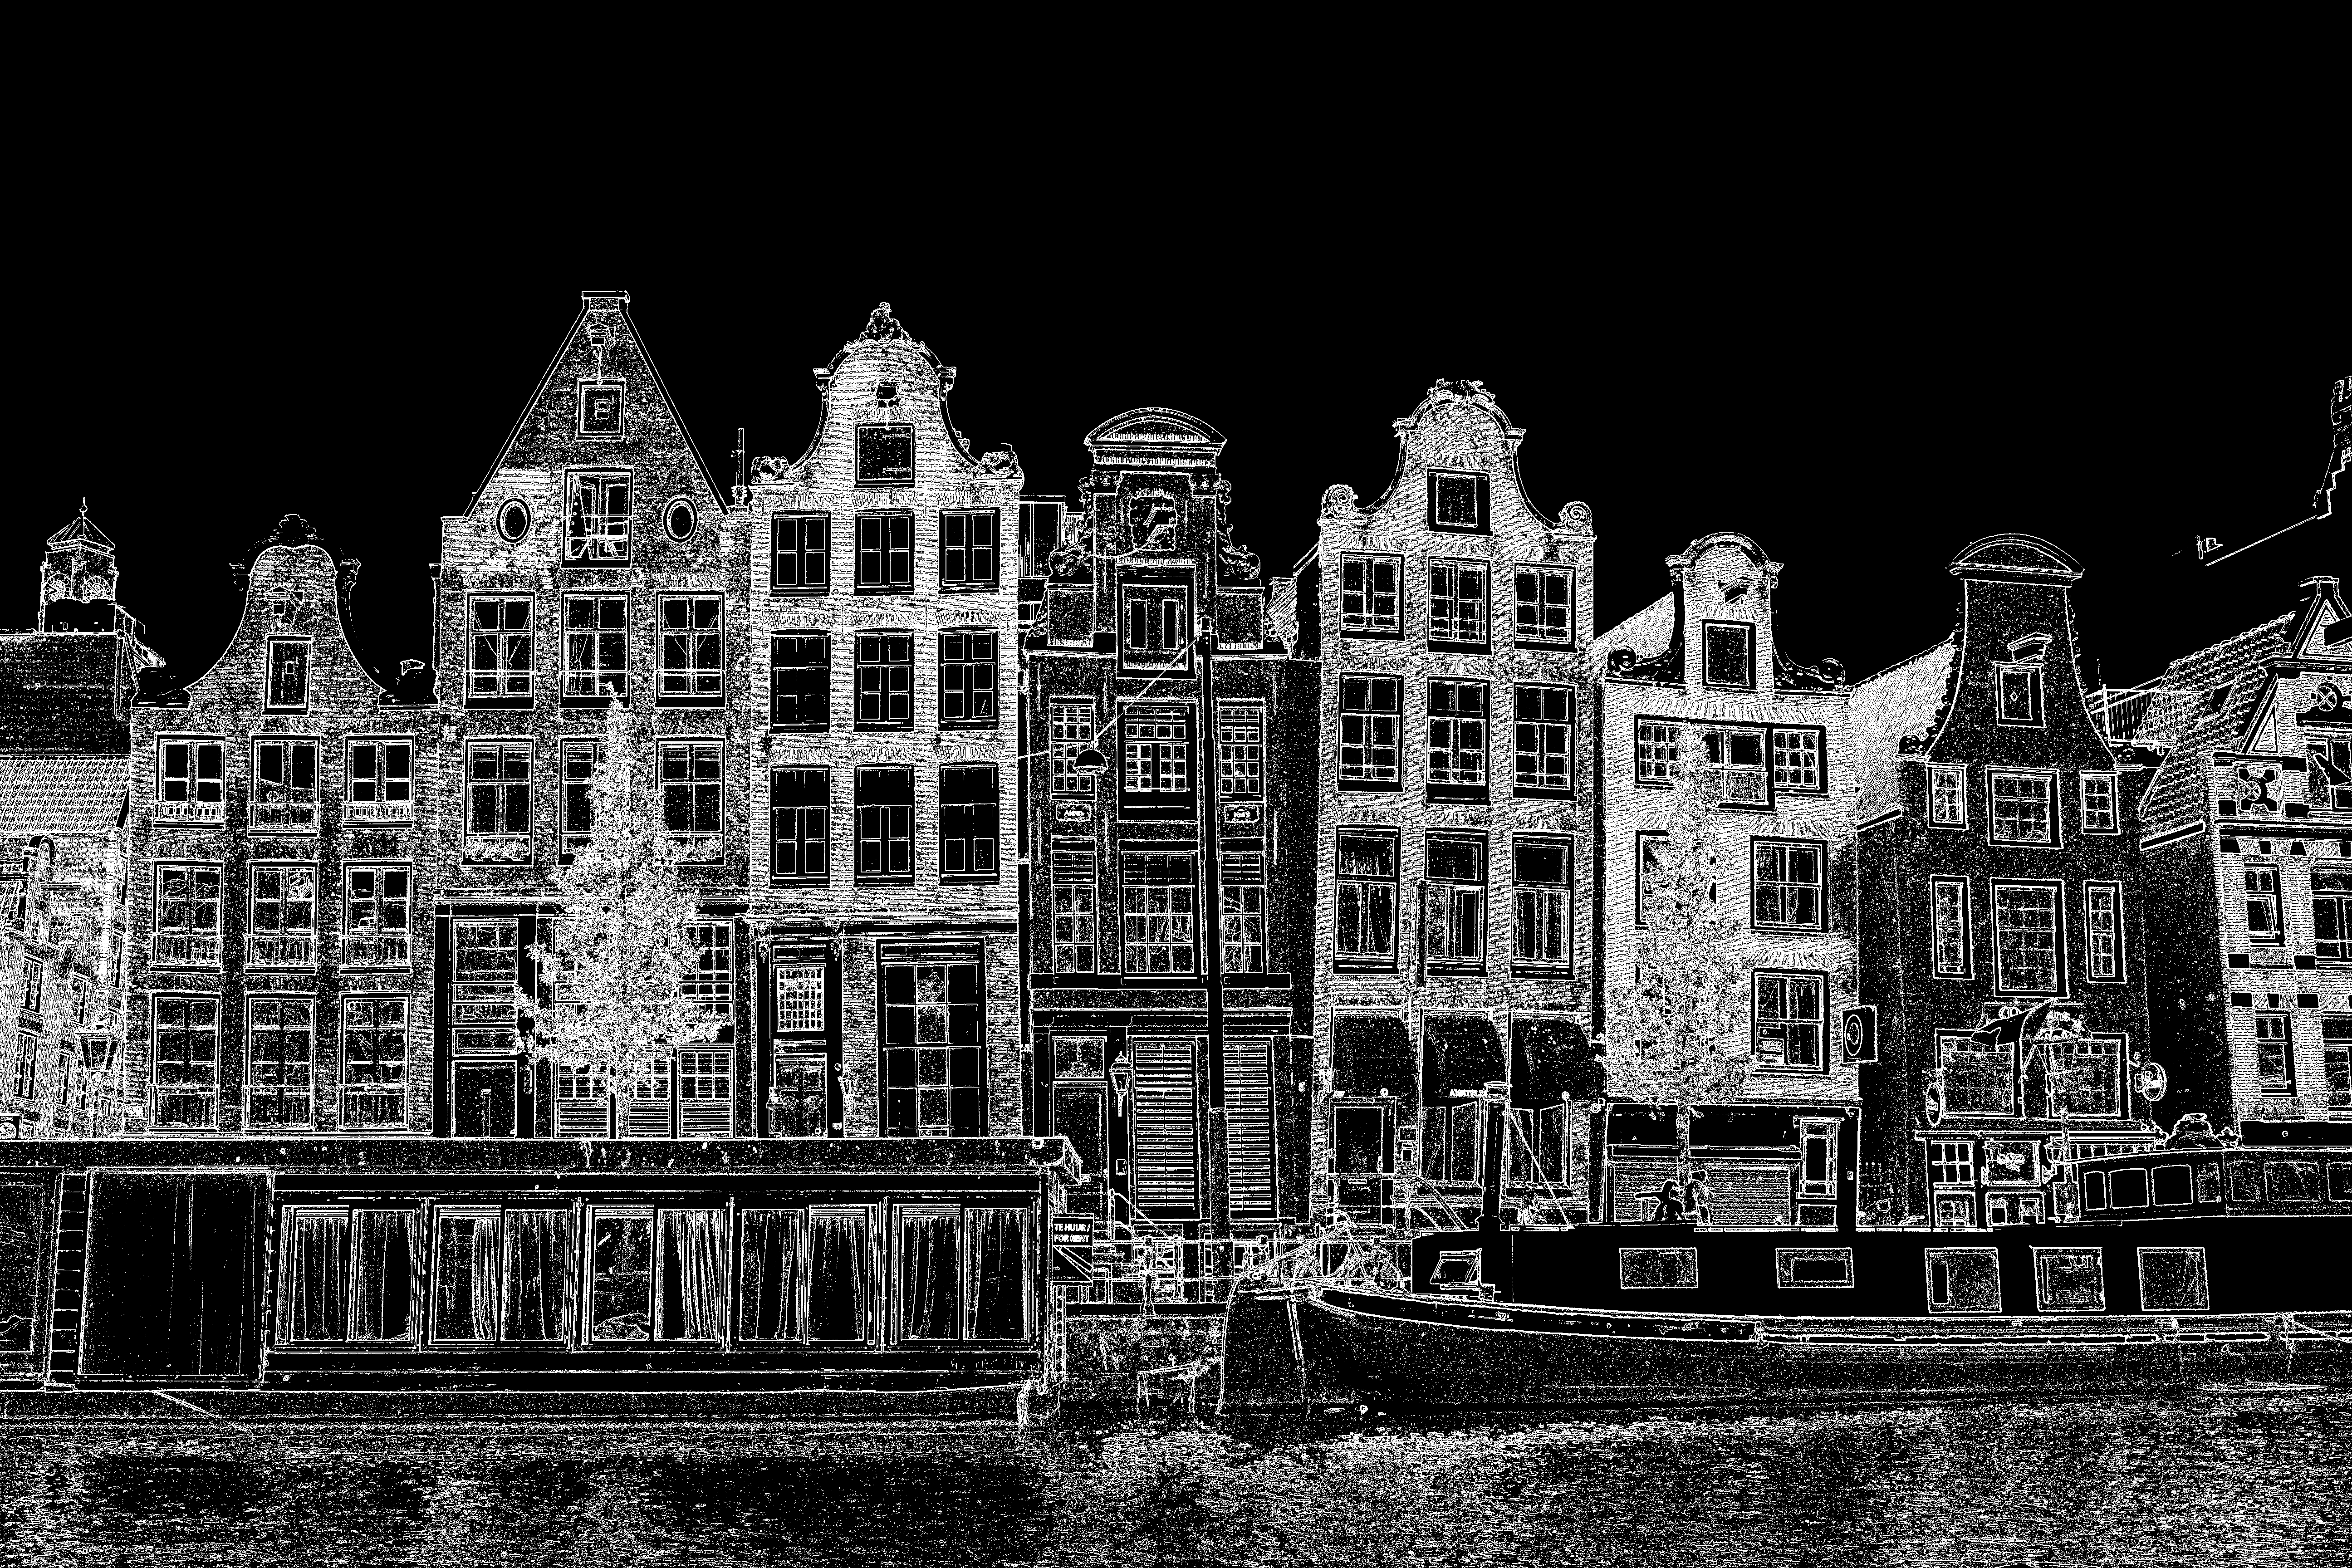
The example below shows a generated binary edge map from the gradient magnitude of a real image using a threshold.
Sobel vs. Canny Edge Detection
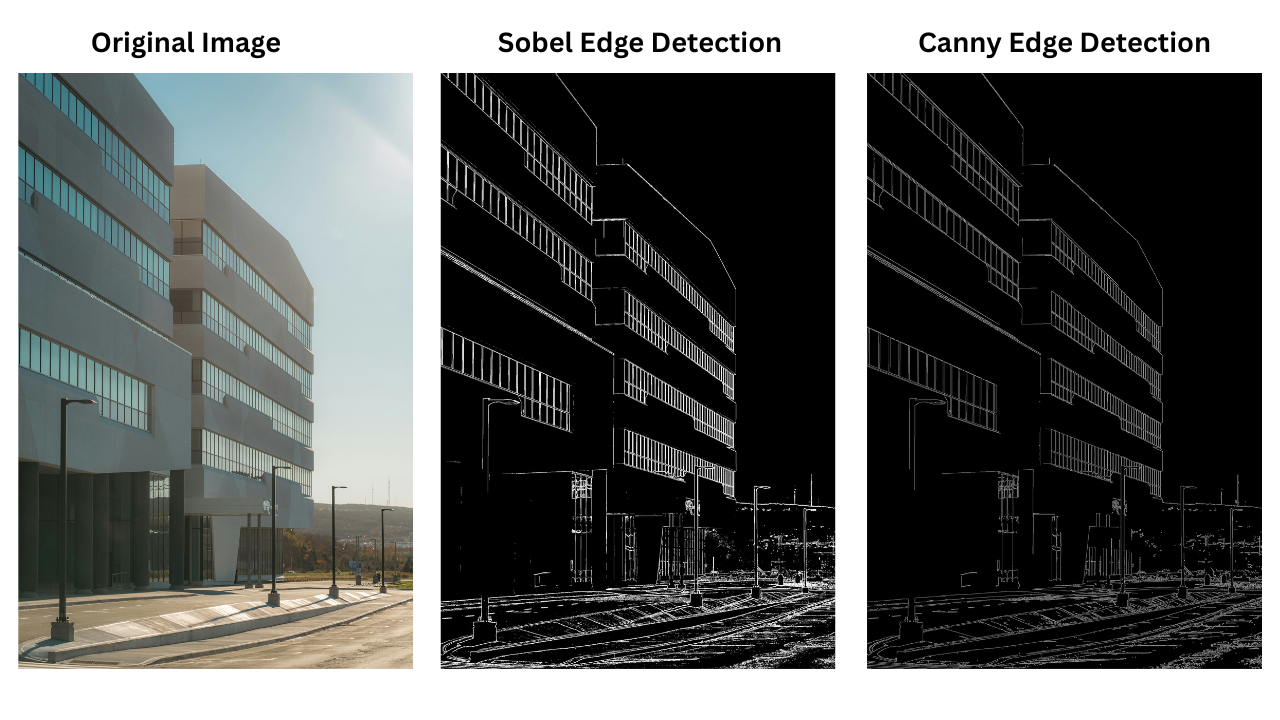
Sobel and Canny are both widely used edge detection techniques, but they differ in how they process and refine detected edges. The table below compares the two methods across several key characteristics.
In the comparison below, Sobel produces thicker edges and captures more noise, especially around edge boundaries, while Canny produces thinner, more well-defined edges with significantly less noise around the edges.
Where Is Sobel Edge Detection Used?
Although Sobel Edge Detection can be used for edge detection, similar to Canny, its usefulness extends beyond producing an edge map. The gradient information produced by Sobel can also be used in applications such as:
- Gradient-based feature extraction: Calculating horizontal and vertical intensity changes to create features for subsequent image-processing algorithms.
- Texture analysis: Analyzing local intensity changes to characterize textures and surface patterns.
- Shape and orientation analysis: Using gradient direction to identify the orientation of boundaries and structures in an image.
- Image enhancement: Emphasizing fine details and boundaries before applying other image-processing operations.
- Preprocessing for machine learning: Generating gradient-based representations that can be provided as input features for traditional computer vision or machine learning algorithms.
Integrate Sobel Edge Detection into Your Computer Vision Pipeline with Roboflow Workflows
You can integrate Sobel Edge Detection into your computer vision pipeline using Roboflow Workflows. Workflows provides a range of pre-built blocks, including detection and segmentation models, image preprocessing, and visualization blocks. These blocks make it easy to build computer vision pipelines without having to implement every component from scratch.
To build a Sobel Edge Detection workflow, you can either create one manually in Roboflow or use Roboflow Agent. To create a workflow manually, log in to Roboflow, navigate to Workflows in the left sidebar, and select Create Workflow. This opens the Workflow Editor, where you can add and connect the blocks needed to build your pipeline.

With Roboflow Agent (available after you log in), you can simply describe the workflow you want to create, and the Agent will build it for you. As shown below, I asked the Agent to build a Sobel Edge Detection workflow.

Roboflow Agent then generated a workflow that performed Sobel Edge Detection on both images and video streams. It also provided an interface for testing the workflow by dragging and dropping images or videos into the workflow.
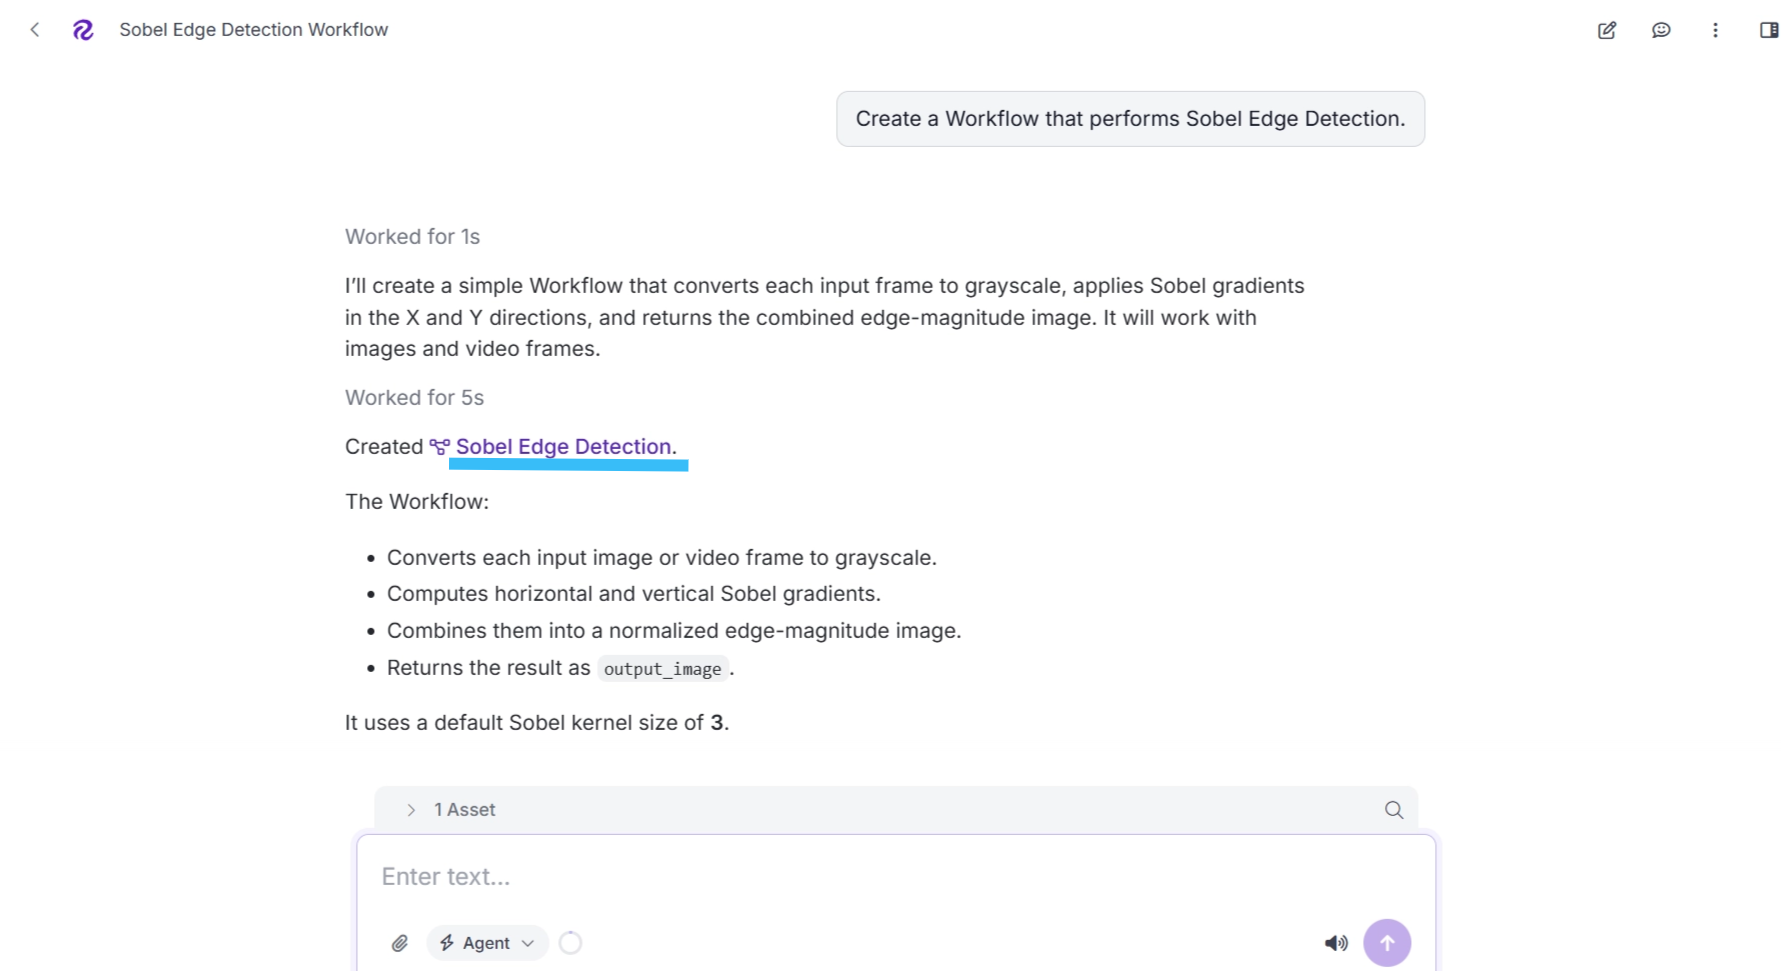
The interface shown below is accessible when you click the created workflow. You can also access the generated workflow from this interface.

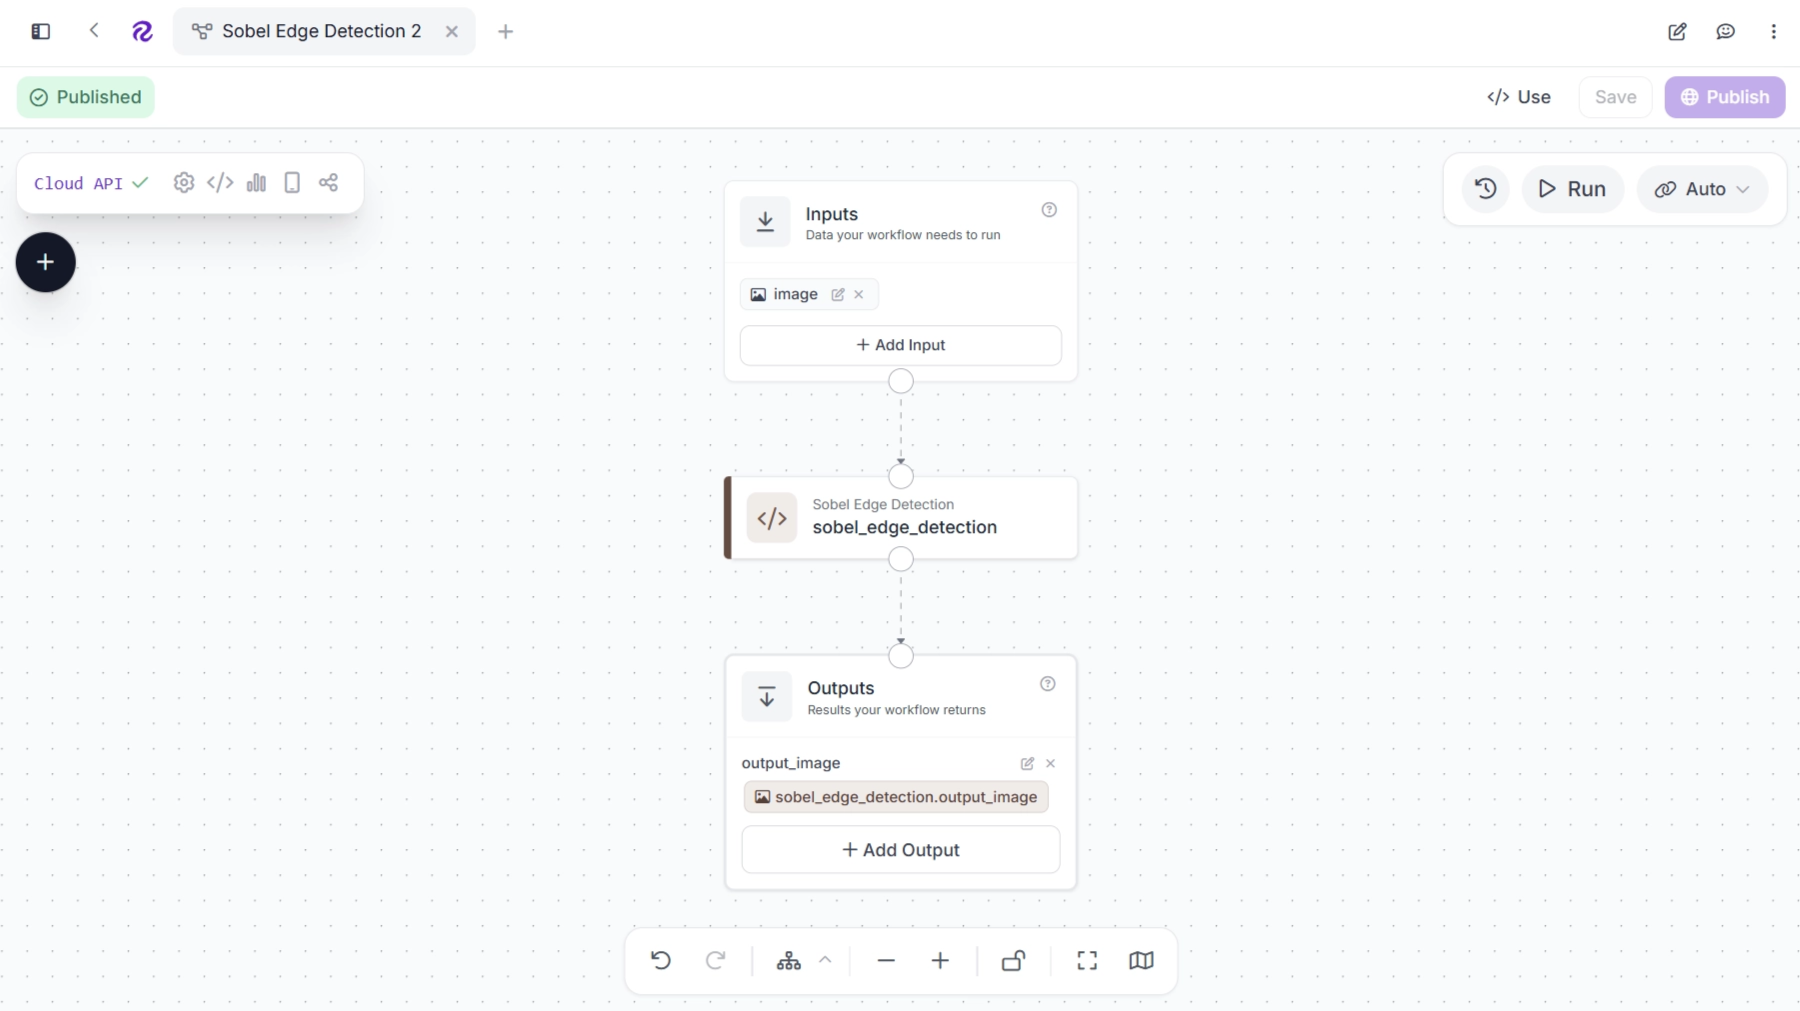
The generated workflow is shown below. It uses a Custom Python Block in Roboflow Workflows to implement Sobel Edge Detection. Try the workflow.
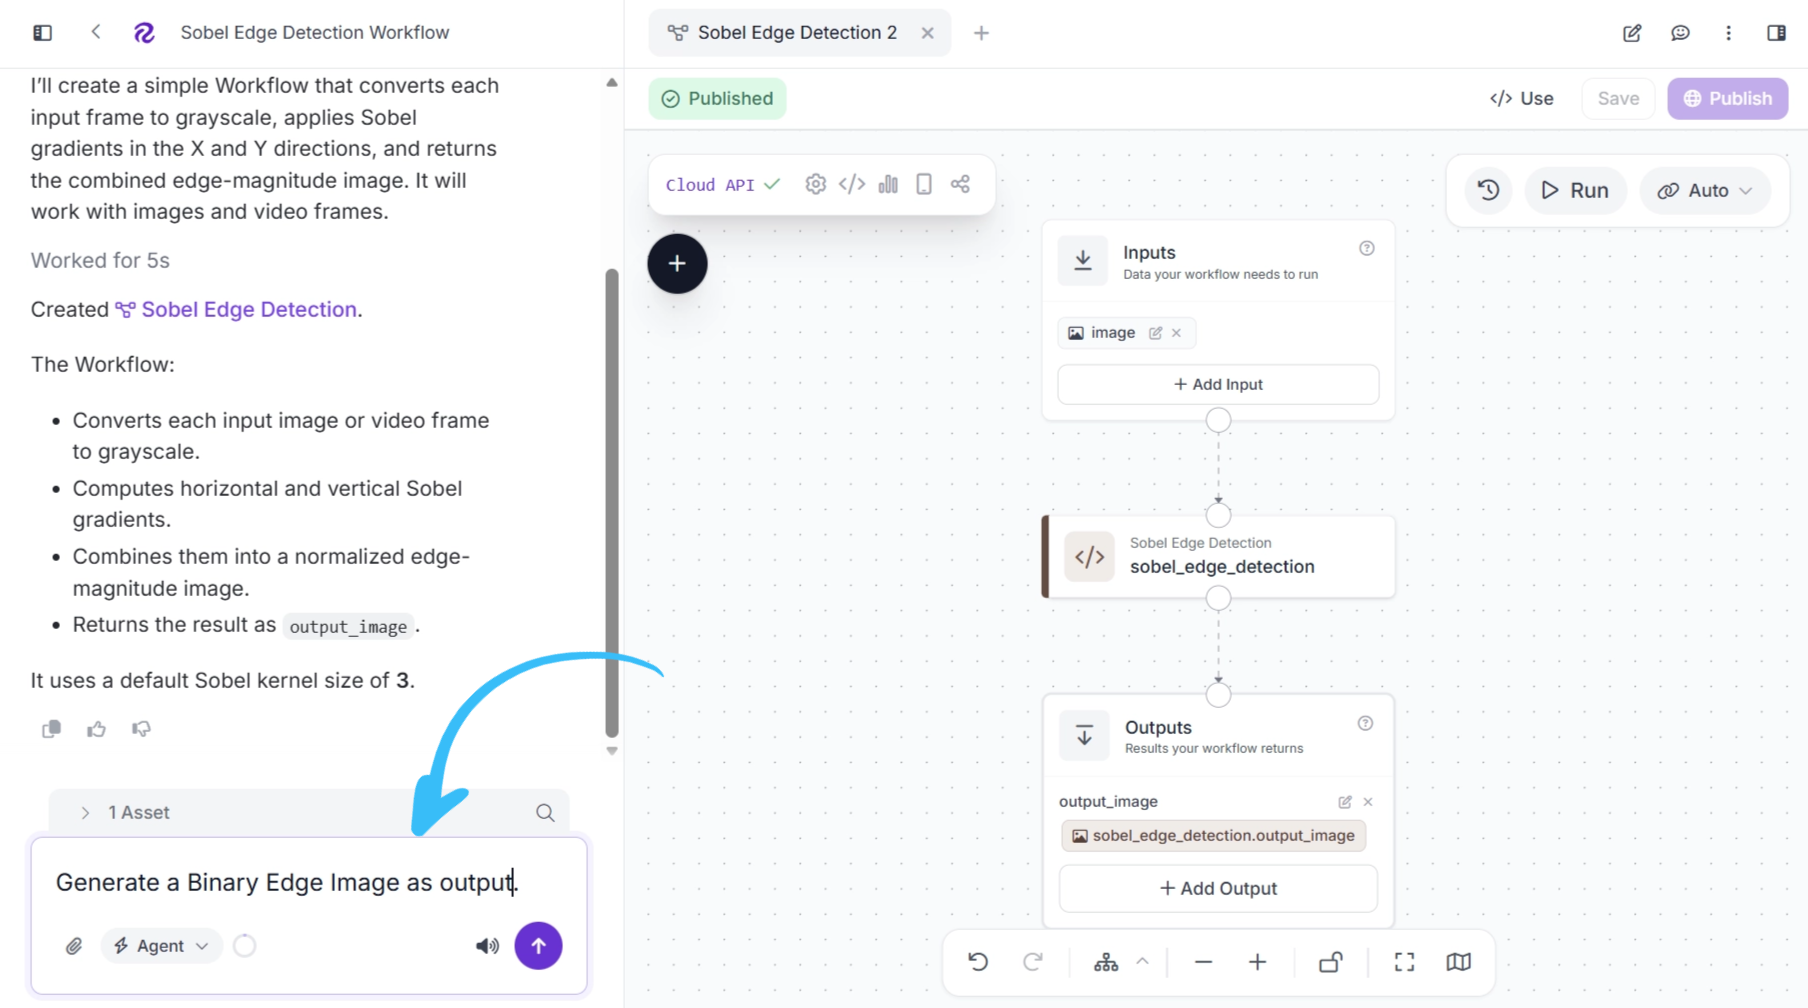
You can also use Roboflow Agent to add additional computer vision operations to the workflow. This allows you to build a complete computer vision workflow by describing the operations you want in a prompt.
If you prefer to build the workflow manually, click the + button in the upper-left corner of the Workflow Editor, search for the Custom Python Block, and select it to add it to the workflow. Custom Python Blocks allow you to add your own Python code to a Workflow and use it alongside other workflow blocks.

Once you add the block, connect it to the rest of the workflow as shown below.

Next, select the Custom Python block and click Edit Code. This opens the code editor, where you can configure the block and add your Python code.
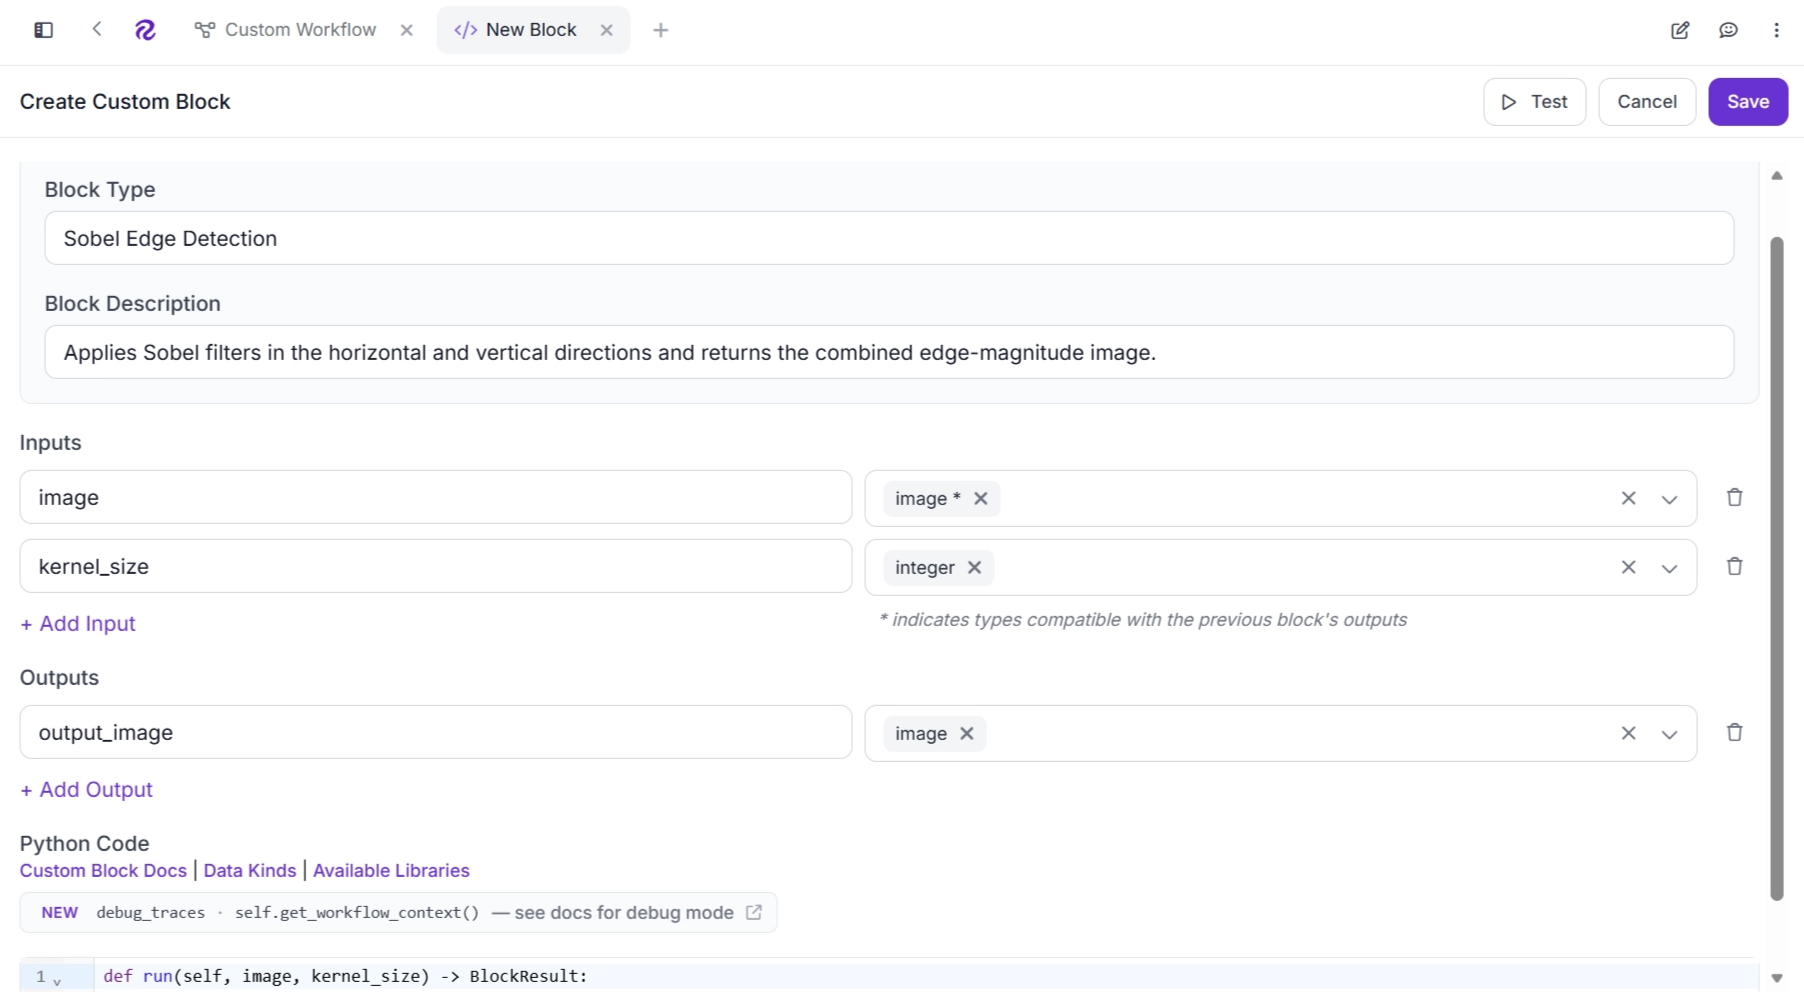
In the Python Code section, add the following code. When you use Roboflow Agent, the code for this block is automatically generated.
def run(self, image, kernel_size=3, threshold=100):
    # Get the image as a NumPy array
    arr = image.numpy_image

    # Convert the input image to grayscale
    if arr.ndim == 2:
        # Image is already grayscale
        gray = arr
    elif arr.shape[2] == 4:
        # Convert BGRA image to grayscale
        gray = cv2.cvtColor(arr, cv2.COLOR_BGRA2GRAY)
    else:
        # Convert BGR image to grayscale
        gray = cv2.cvtColor(arr, cv2.COLOR_BGR2GRAY)

    # Convert kernel size to an integer
    ksize = int(kernel_size)

    # Use a supported Sobel kernel size
    if ksize not in (1, 3, 5, 7):
        ksize = 3

    # Calculate the horizontal gradient
    grad_x = cv2.Sobel(gray, cv2.CV_32F, 1, 0, ksize=ksize)

    # Calculate the vertical gradient
    grad_y = cv2.Sobel(gray, cv2.CV_32F, 0, 1, ksize=ksize)

    # Calculate the gradient magnitude
    magnitude = cv2.magnitude(grad_x, grad_y)

    # Apply a threshold to the gradient magnitude
    # Pixels above the threshold become 255 (edge)
    # Pixels below the threshold become 0 (non-edge)
    _, edges = cv2.threshold(magnitude, float(threshold), 255, cv2.THRESH_BINARY)

    # Convert the result to an 8-bit unsigned integer image
    edges = np.ascontiguousarray(edges.astype(np.uint8))

    # Convert the binary grayscale image to BGR format
    edges_bgr = cv2.cvtColor(edges, cv2.COLOR_GRAY2BGR)

    # Create a new Workflow image using the binary edge image
    output = WorkflowImageData.copy_and_replace(
        origin_image_data=image,
        numpy_image=edges_bgr
    )

    # Return the binary edge image
    return {'output_image': output}
This code converts the input image to grayscale, applies the Sobel operator in the horizontal and vertical directions, and combines the resulting gradients to calculate the gradient magnitude. It then applies a threshold to the gradient magnitude and returns a binary edge image.
Since the code uses OpenCV, and OpenCV's Sobel implementation supports different odd-sized kernels, including 3×3, 5×5, and 7×7, you can use this capability in your workflow.
To make the kernel size configurable in your workflow, add an input parameter to the Inputs block. Select the block and click + Add Input, as shown below.

Next, configure the kernel_size parameter of the Custom Python Block to use the kernel_size input from the Inputs block, as shown below, alongside the image input from the Inputs block.

Next, add an output parameter to the Outputs block. This output represents the edge map generated by the Custom Python block operations. Select the Outputs block and click + Add Output, as shown below.

Your workflow should now look like the one shown below. You can then run the workflow directly from the Workflow Editor. Provide an input image and select a kernel size, and the workflow will apply Sobel Edge Detection and return the resulting edge map.
Deploy Sobel Edge Detection Workflows with Roboflow Deploy
Firstly, rename the workflow and make sure it is published. Giving the workflow an appropriate name makes it easier to identify and deploy, while publishing makes the workflow live and available through the API.

Once your edge detection workflow is published, click </> Use in the Workflows editor to open the deployment panel. From here, you can choose a deployment option and access everything you need to run your workflow in production.

Roboflow Deploy automatically generates production-ready code snippets that you can copy directly into your application. These snippets can also be used with AI coding assistants such as Codex, Claude, Cursor, and ChatGPT to accelerate workflow integration and application development.

Roboflow Deploy also supports cloud-based deployment through the Serverless Cloud API, where your workflow runs in the cloud and you are charged credits for each inference.

You can also deploy your workflow locally and run it on your own hardware, including devices such as NVIDIA Jetson and Raspberry Pi.

The Deployment panel provides ready-to-use code for running your workflow with different input sources, including images, video files, live webcam streams, and RTSP camera streams.
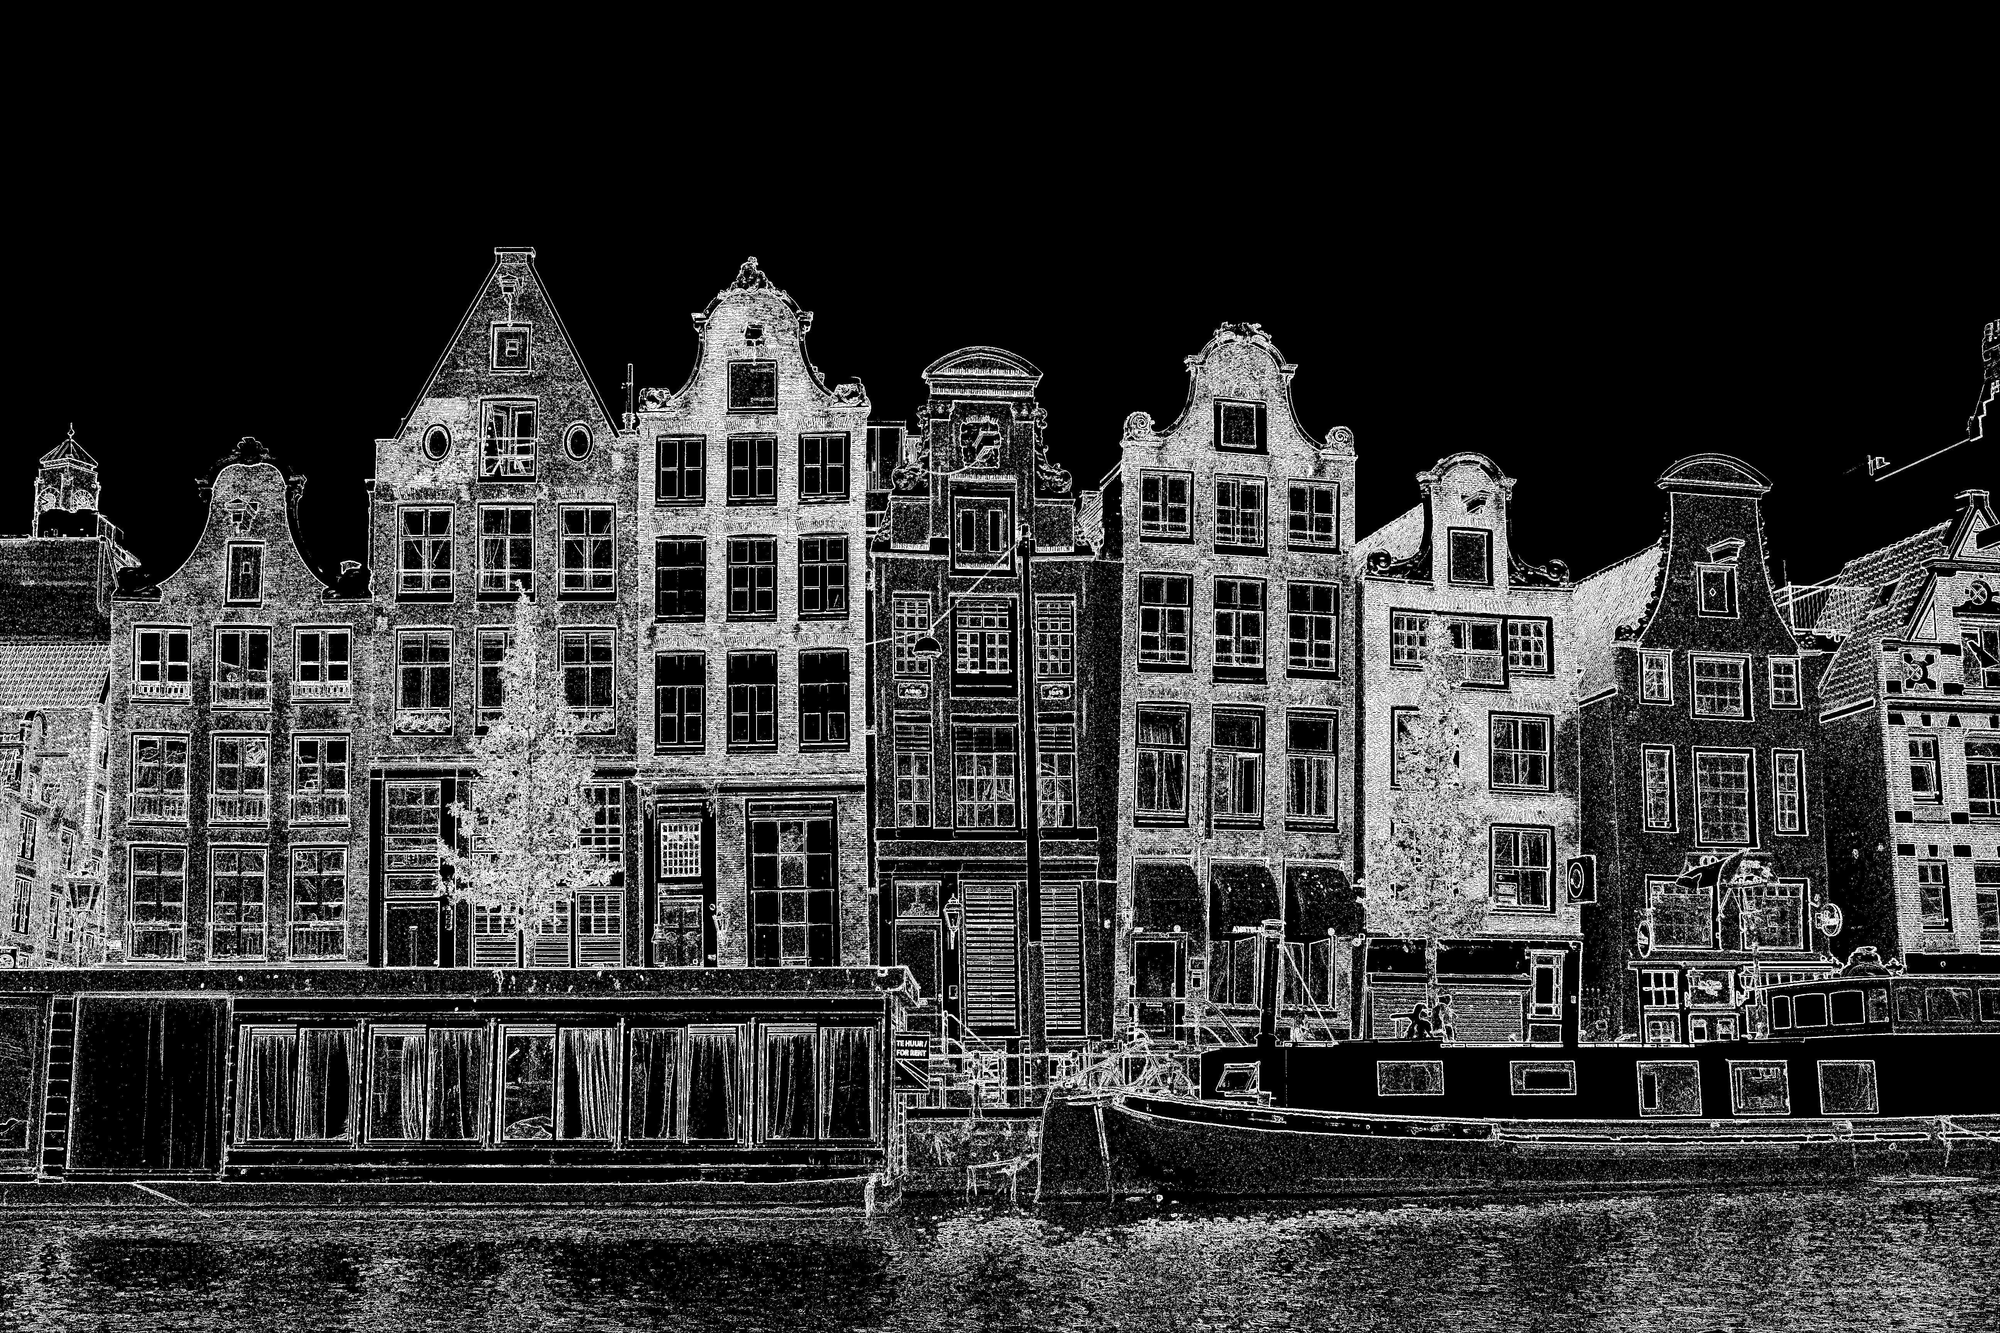
For example, the script below, provided by Roboflow Deploy, calls the Sobel edge detection workflow with an input image and kernel size parameter, then saves the output image locally:
import base64
from io import BytesIO
from PIL import Image
from inference_sdk import InferenceHTTPClient, InferenceConfiguration

# 2. Connect to your workflow
client = InferenceHTTPClient(
    api_url="https://serverless.roboflow.com",
    api_key="YOUR_ROBOFLOW_API_KEY"  # Replace with your actual API key
).configure(InferenceConfiguration(
    api_key_transport="header"  # header-based auth (inference v1.5.0+)
))

# 2. Run your workflow
result = client.run_workflow(
    workspace_name="your-workspace", # Replace with your actual workspace name
    workflow_id="your-sobel-edge-detection-workflow-id",  # Replace with your actual workflow ID
    images={
        "image": "input.jpg" # Path to your image file
    },
    parameters={
        "kernel_size": 3
    },
    use_cache=True # Speeds up repeated requests
)

# 3. Get the Base64 image from the first result
output_image = result[0]["edge_detected_image"]

# 4. Decode the Base64 string
image_bytes = base64.b64decode(output_image)

# 5. Open the decoded image
image = Image.open(BytesIO(image_bytes))

# 6. Convert to RGB and save as JPEG
image.convert("RGB").save("sobel_output.jpg", "JPEG")

print("Saved output image as sobel_output.jpg")
Make sure you have installed the inference-sdk package before running the script above.
pip install -U inference-sdk
The image below shows the output image saved when you run the script:
Conclusion
Sobel Edge Detection provides a computationally efficient and straightforward way to extract meaningful boundaries and information about intensity changes in images. With the Roboflow Platform, Sobel Edge Detection can become part of a larger computer vision pipeline without requiring you to build the surrounding infrastructure from scratch. Start building your own computer vision pipeline with Roboflow today.


Cite this Post
Use the following entry to cite this post in your research:
Dikshant Shah. (Sep 22, 2026). Sobel Edge Detection in Computer Vision. Roboflow Blog: https://blog.roboflow.com/sobel-edge-detection-in-computer-vision/