
A trained inspector examining hot-rolled coils on a finishing line typically detects 60 to 70 percent of surface defects. This leaves 30 to 40 percent undetected, including scratches hidden by scale, subtle inclusion, and edge cracks masked by strip curvature.
These missed defects do not disappear. They move downstream into stamping, coating, or fabrication processes, where they later appear as press shop cracks, coating failures, and customer returns.
Steel strip is used in automotive panels, shipbuilding parts, and precision machinery. Surface quality is not just cosmetic. A scratch that reduces fatigue resistance or an inclusion that grows under load is a structural risk, not a visual issue.
When a labeled dataset already exists for the defect types you care about, the fastest path to automated inspection is to train a model on it. This tutorial does exactly that: it takes a public dataset of steel strip images annotated for six defect classes, trains an object detection model with Roboflow, and builds a Workflow that goes beyond binary pass/fail by flagging uncertain detections for human review.
By the end, you will have a trained model and a working Workflow that takes a single strip image and returns one of three outcomes: pass, review, or fail, along with the annotated image showing exactly what it found.
Steel Strip Defect Inspection
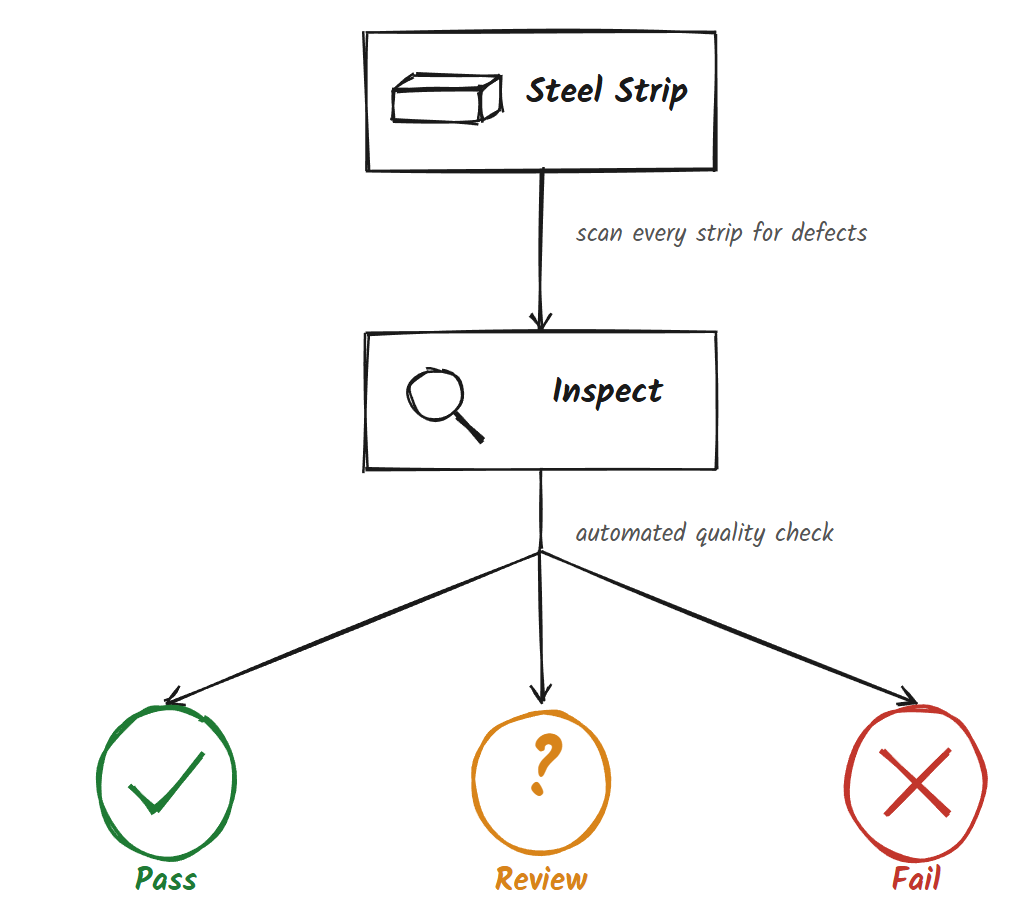
Train an RF-DETR model on steel strip defects and build a workflow that sorts every inspection into pass, review, or fail. Here's the workflow we'll build.
Dataset
Go to Roboflow Universe and search for the steel surface defects dataset. With more than 250,000 open source datasets available on Universe, there is a good chance a dataset similar to your use case already exists.
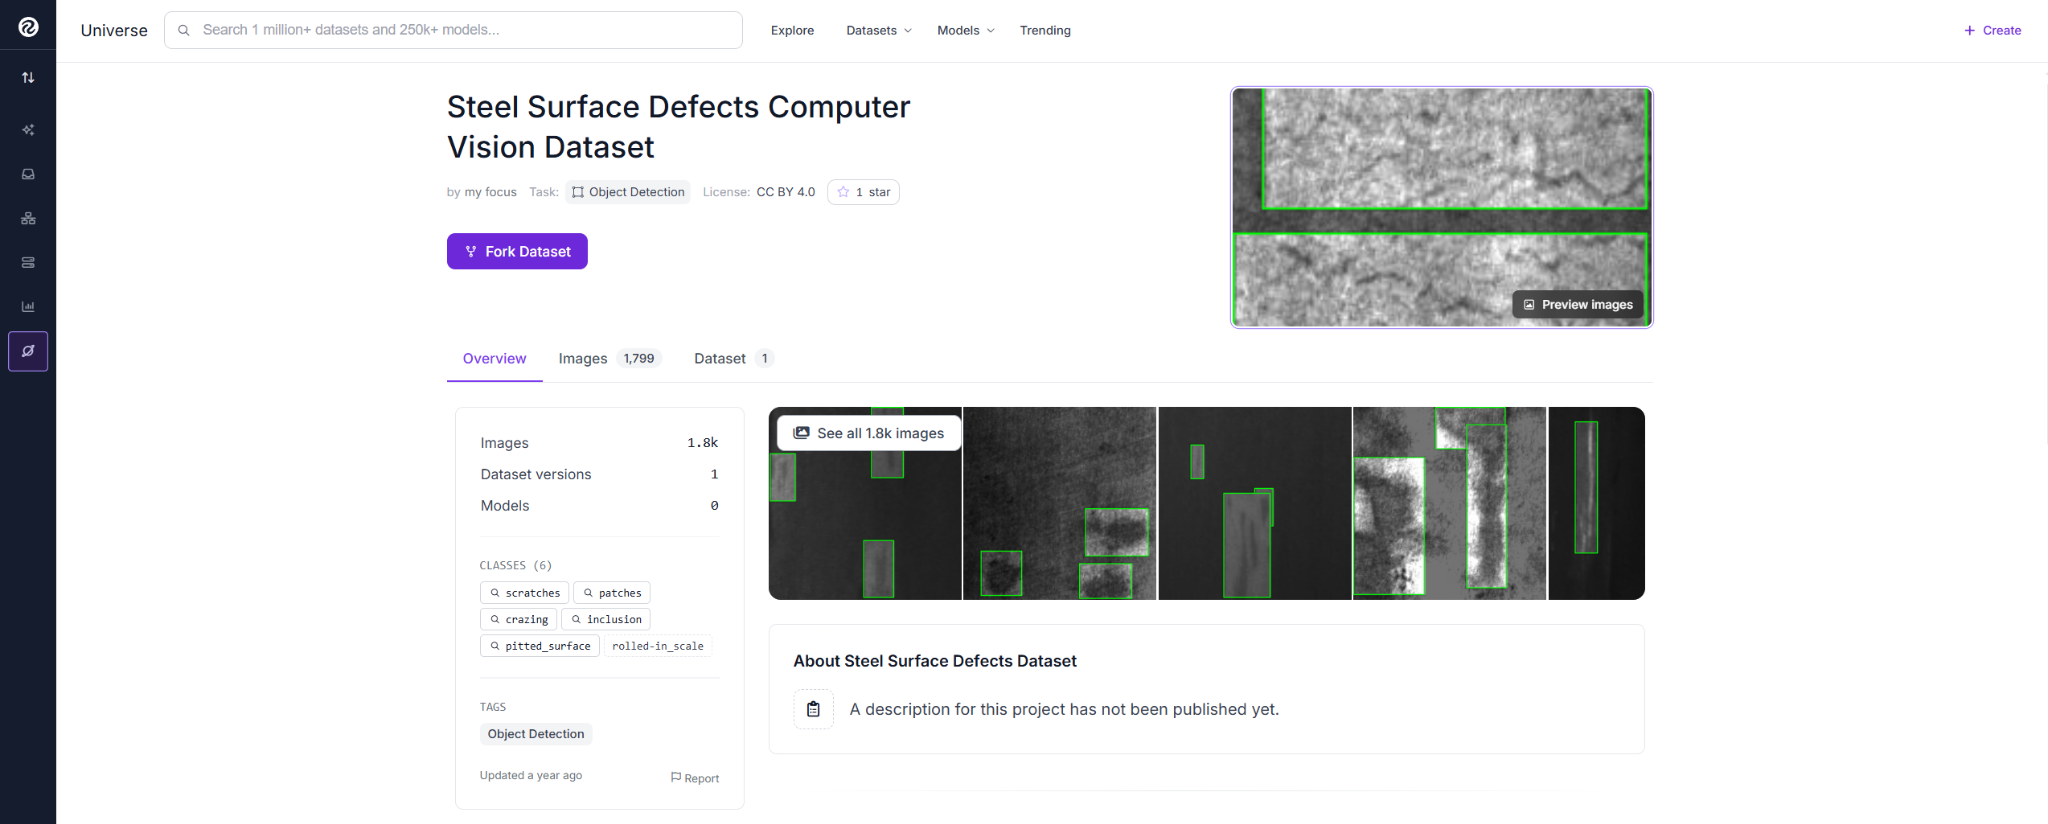
This dataset contains steel strip images captured under grayscale industrial imaging conditions, annotated for six defect classes: scratches, inclusion, patches, pitted surface, crazing, and rolled-in scale. These are the most common surface defects that appear during hot-rolled strip production, caused by factors ranging from raw material quality to rolling process conditions.
Lighting intensity, defect size, and position across the strip surface all vary across the set, exactly the kind of spread a model needs to see before it encounters real production images.
From here, fork the dataset into your own workspace, annotations included, so you have your own copy to build on.
Train the Model
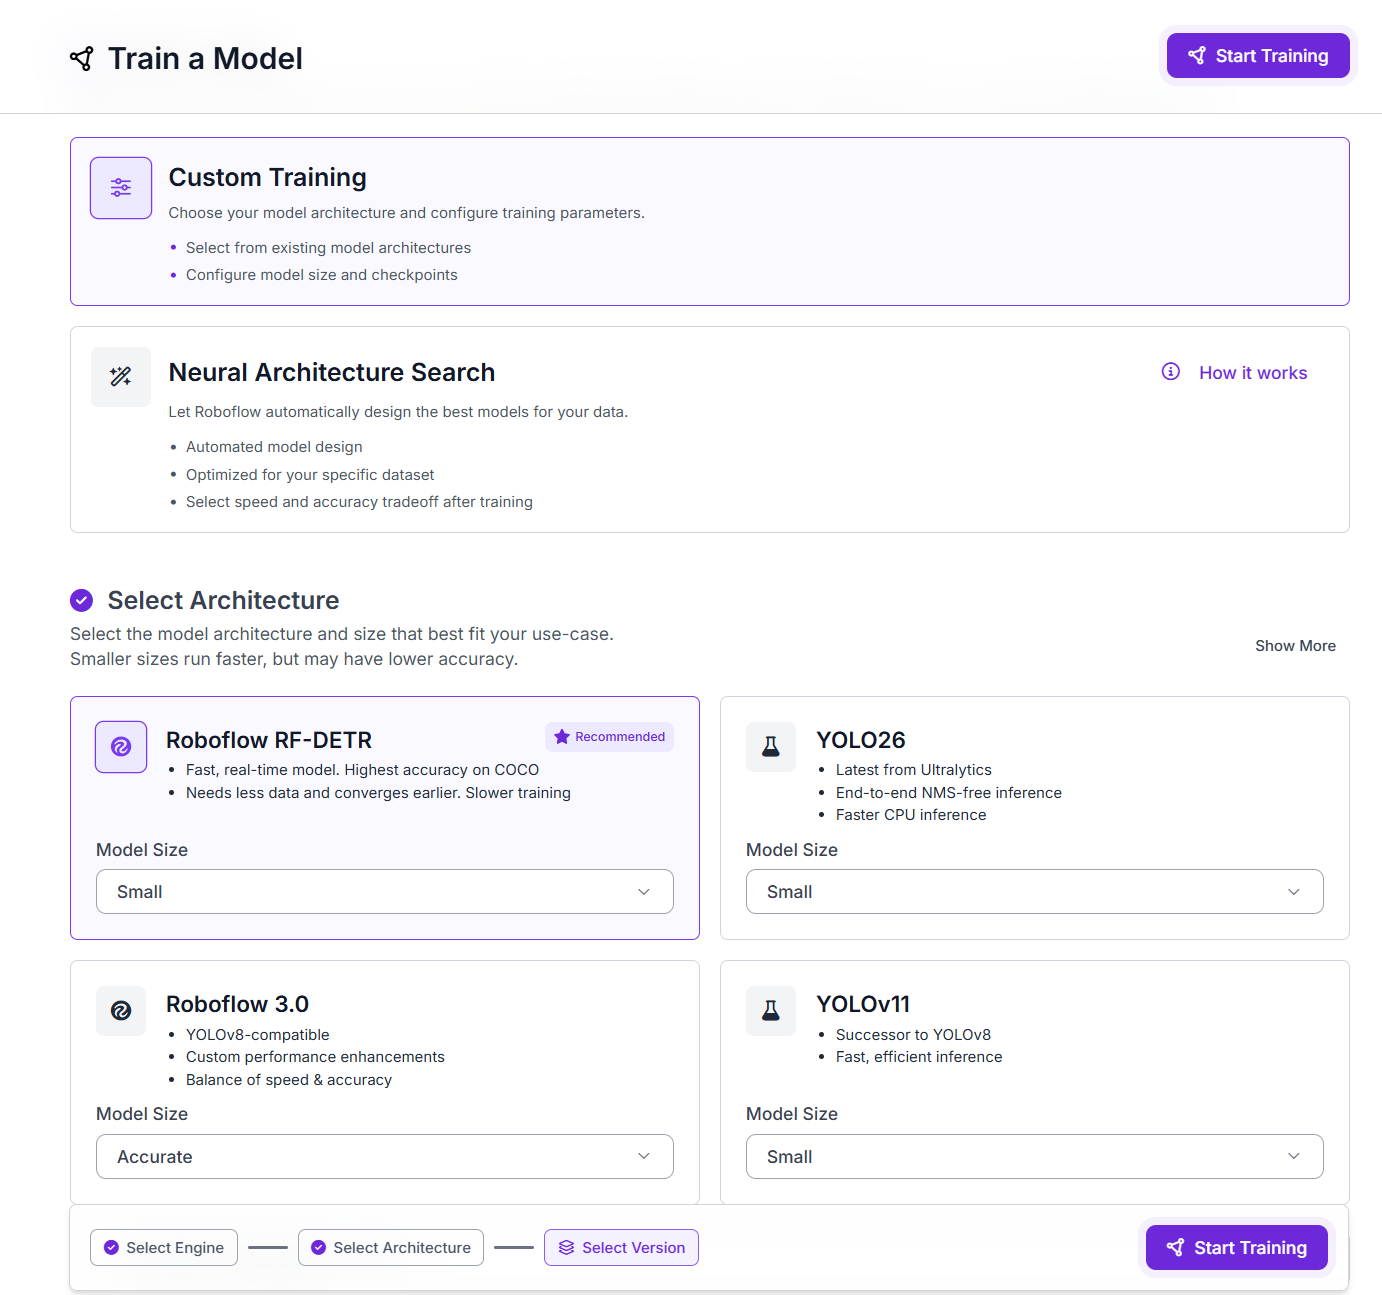
After forking the dataset into your workspace, go to the Versions tab and click Generate New Version. Select Custom Train and choose RF-DETR (Small). RF-DETR is Roboflow's real-time object detection model built for production deployment.
Click Start Training and wait for the run to finish.

When training completes, review the metrics on the test set: mAP, precision, recall, and F1. These reflect how the model performs on images it never saw during training. This model reached 76.4% mAP@50, 74.7% precision, and 72.1% recall on a 180-image test set across six defect classes.
Build the Workflow
Here is what each block does in this Workflow.
- Object Detection Model: runs the trained RF-DETR model, returns bounding boxes and confidence scores.
- Bounding Box Visualization: draws boxes on the image.
- Label Visualization: adds class name to each box.
- Custom Python Block: sorts results into pass, review, or fail.
- Text Display: writes the verdict onto the image.
- Roboflow Vision Events: logs every inspection run.
- Outputs: returns the labeled image and JSON report.
Step 1: Add the trained model as an Object Detection block
Open the Workflows tab and create a new Workflow. Roboflow adds an Image Input and Outputs block automatically.
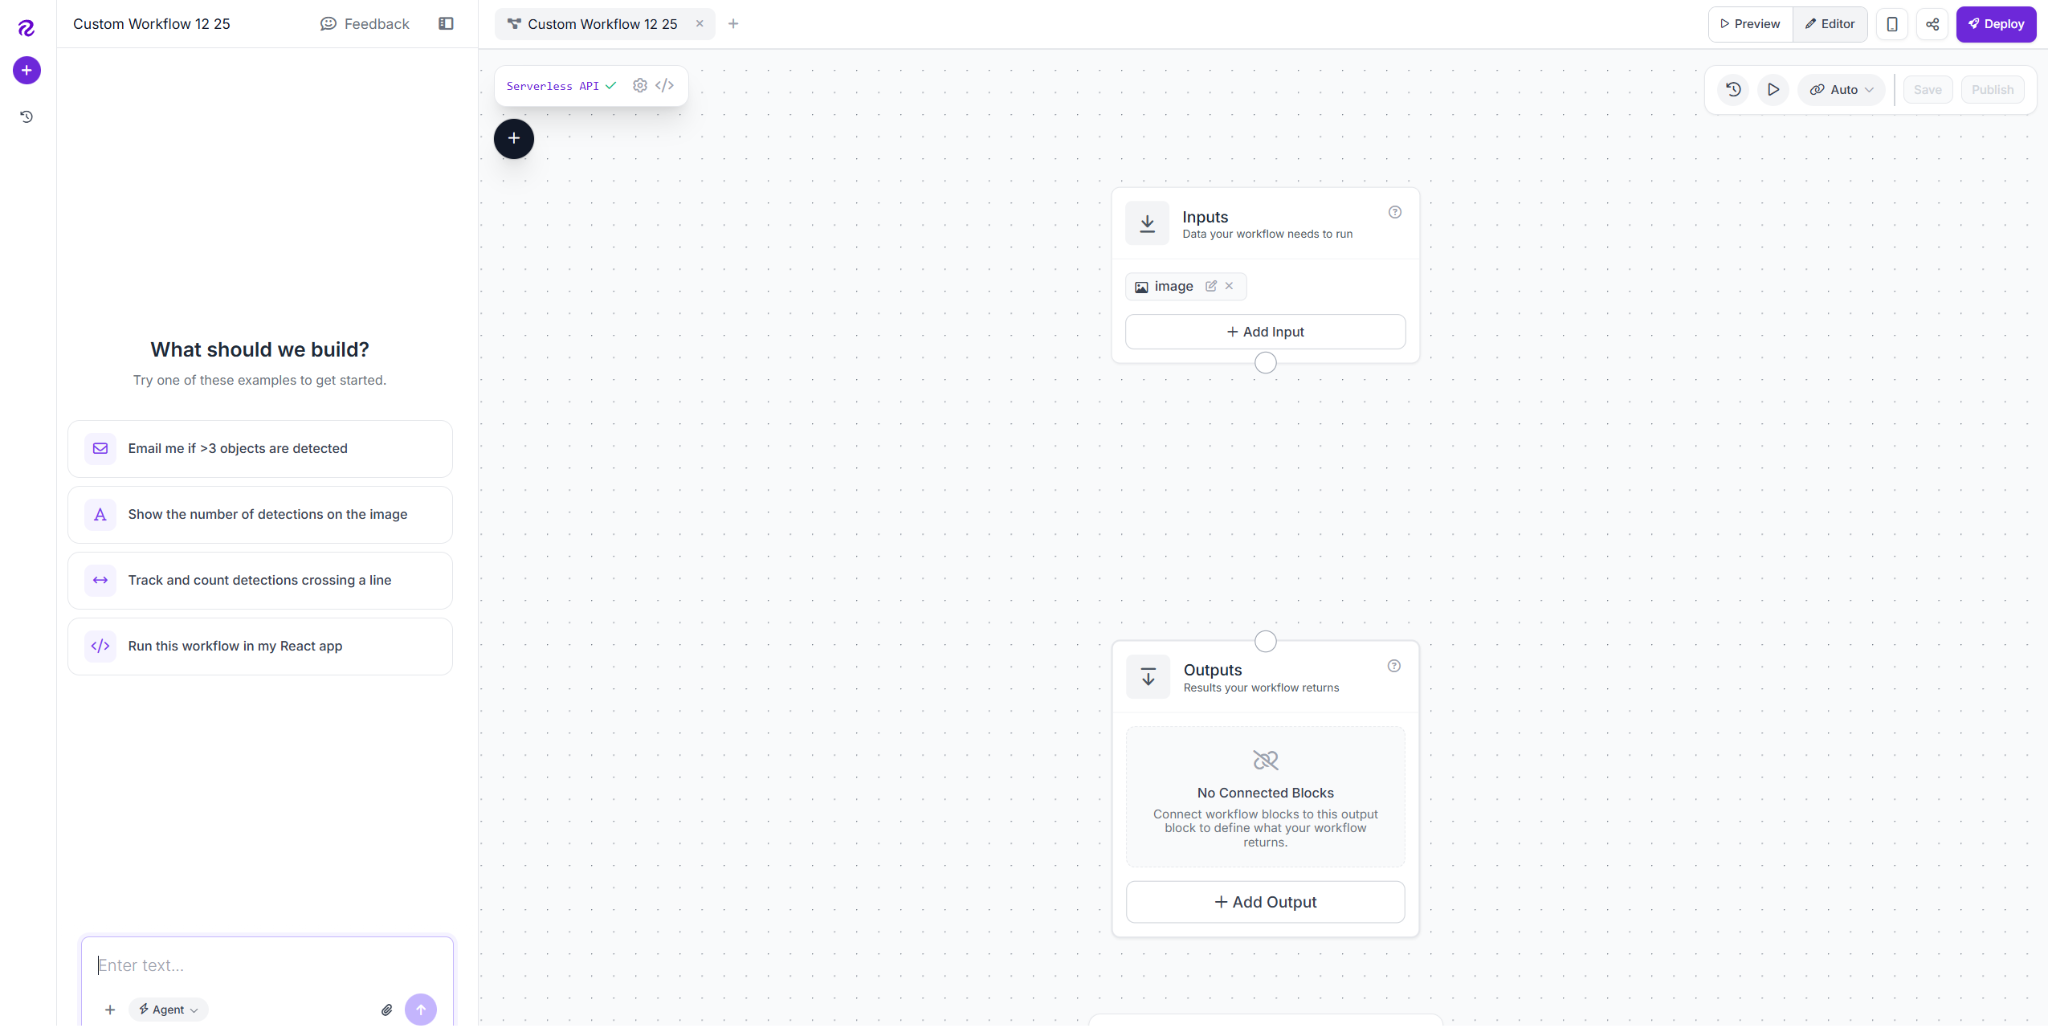
Click the plus icon, search for Object Detection Model, and add it as defect_detector. Connect the image to inputs.image, then copy the model URL from your trained model's card and paste it into the Model field.

Set the confidence threshold to 0.4, lower than the 0.6 cutoff used later to decide pass, review, or fail. Anything the model detects with at least 40% confidence gets passed downstream, including borderline detections in the 40-60% range, which the next block routes to review instead of discarding.
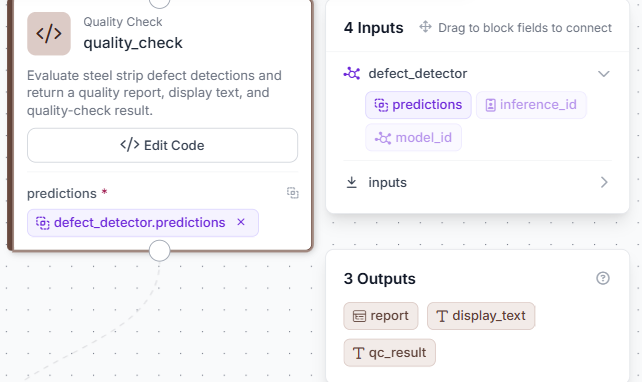
Step 2: Add the Custom Python Block (triage logic)
Add a Custom Python Block named quality_check. Connect one input, predictions, to defect_detector.predictions, kind object_detection_prediction. Add three outputs: report (dictionary), display_text (string), and qc_result (string).
Click Edit Code and write the triage logic:
import re
def run(self, predictions):
    # 1. Collect detections that match our defect classes, with confidence
    defect_classes = {"scratches", "inclusion", "patches", "pitted_surface", "crazing", "rolled_in_scale"}
    found = []
    if predictions is not None:
        try:
            class_names = predictions.data.get("class_name", [])
            confidences = predictions.confidence
            for name, conf in zip(class_names, confidences):
                clean_name = re.sub(r'^\d+_', '', str(name))
                if clean_name.lower() in defect_classes or str(name).lower() in defect_classes:
                    found.append({"defect": clean_name, "confidence": float(conf)})
        except Exception:
            pass
    # 2. Decide pass / review / fail based on highest confidence found
    if not found:
        status = "PASS"
    else:
        max_conf = max(d["confidence"] for d in found)
        if max_conf >= 0.6:
            status = "FAIL"
        else:
            status = "REVIEW"
    # 3. Build the human-readable summary
    if found:
        defect_names = sorted(set(d["defect"] for d in found))
        defect_list = ", ".join(defect_names)
    else:
        defect_list = "None"
    display_text = f"Status: {status}\nDefects: {defect_list}"
    # 4. Package everything for the rest of the Workflow
    report = {
        "qc_result": status,
        "defects": list(set(d["defect"] for d in found)),
        "defect_count": len(found),
        "highest_confidence": round(max((d["confidence"] for d in found), default=0), 4),
    }
    return {
        "report": report,
        "display_text": display_text,
        "qc_result": status
    }
Click Save to apply the code. The block is now ready to receive predictions from the detector and return a verdict for every image that passes through.
No detection above 0.4 means PASS, a detection below 0.6 confidence means REVIEW, and 0.6 or higher means FAIL. display_text carries the version shown on the image, while report keeps the full detail.
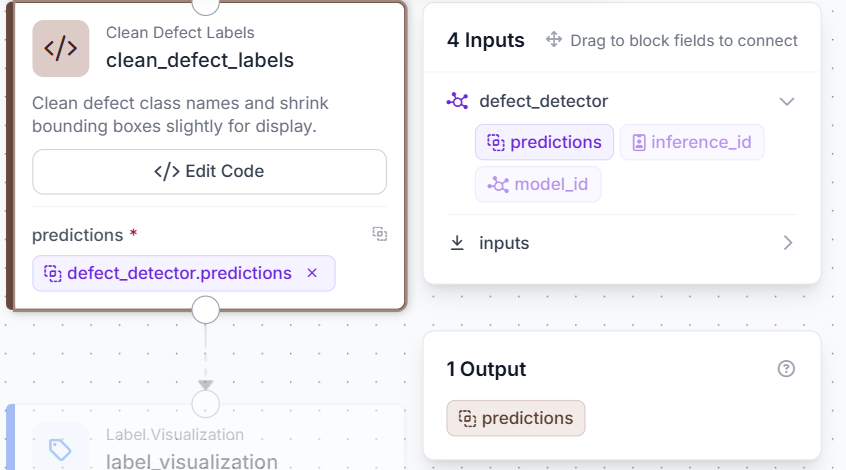
Step 3: Add the Clean Defect Labels block
Add a Custom Python Block named clean_defect_labels. Connect one input, predictions, to defect_detector.predictions, kind object_detection_prediction. Add one output: predictions (object_detection_prediction).
Click Edit Code and write the following:
def run(self, predictions):
    def clean_class_name(name):
        try:
            if isinstance(name, (list, tuple)) and len(name) > 0:
                name = name[0]
            elif hasattr(name, 'tolist'):
                name = name.tolist()
                if isinstance(name, (list, tuple)) and len(name) > 0:
                    name = name[0]
        except Exception:
            pass
        cleaned = str(name).strip()
        cleaned = cleaned.strip('[]')
        cleaned = cleaned.strip('"\'')
        while cleaned and (cleaned[0].isdigit() or cleaned[0] == '_'):
            cleaned = cleaned[1:]
        return cleaned.strip()
    try:
        cleaned_predictions = predictions.copy()
    except Exception:
        try:
            import copy
            cleaned_predictions = copy.deepcopy(predictions)
        except Exception:
            cleaned_predictions = predictions
    try:
        data = getattr(cleaned_predictions, 'data', None)
        if data is not None and 'class_name' in data:
            data['class_name'] = [clean_class_name(name) for name in data.get('class_name', [])]
    except Exception:
        pass
    return {'predictions': cleaned_predictions}
This block strips numeric prefixes and cleans formatting artifacts from class names, so 3_scratches displays as scratches and ['patches'] displays as patches on the bounding boxes. Connect its output predictions to the Bounding Box Visualization block in the next step.
Step 4: Add Bounding Box and Label Visualization
Add a Bounding Box Visualization block. Connect Image to inputs.image and Predictions to clean_defect_labels.predictions. This draws a box around each detected defect.
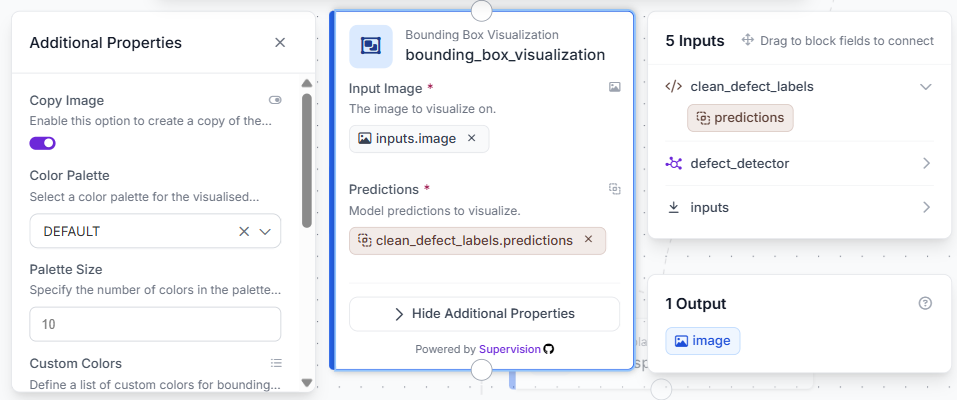
Add a Label Visualization block right after it. Connect Image to the Bounding Box block's output and Predictions to clean_defect_labels.predictions. Set Text to Class Name. This adds the cleaned defect class name next to each box.
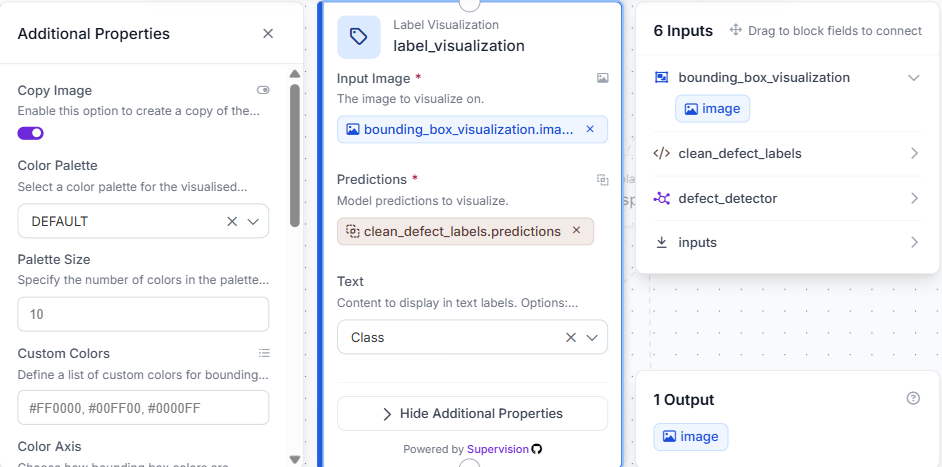
At this point, the image shows exactly what the model found and where. The next steps decide what that means for the result.
Step 5: Add Text Display
Add a Text Display block. Connect Image to label_visualization.image and Text to quality_check.display_text. Set the style to white text on a black background, anchored to the bottom-left corner.
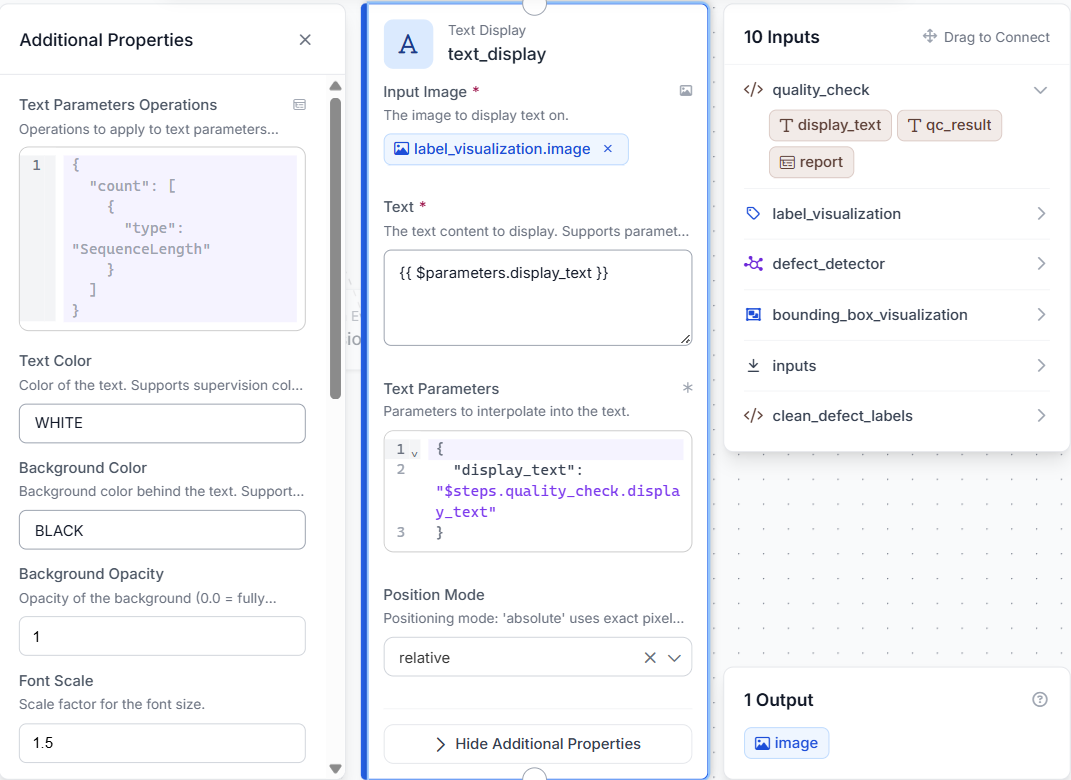
The image now shows both the detected boxes from Step 3 and the pass, review, or fail verdict from Step 2, all in one frame.
Step 6: Add Vision Events and configure Outputs
Add a Roboflow Vision Events block. Connect its input image to the inputs.image, output image to text_display.image, predictions to defect_detector.predictions, and result to quality_check.qc_result. Set Event Type to Quality Check and Use Case to Steel Strip Defect Inspection.
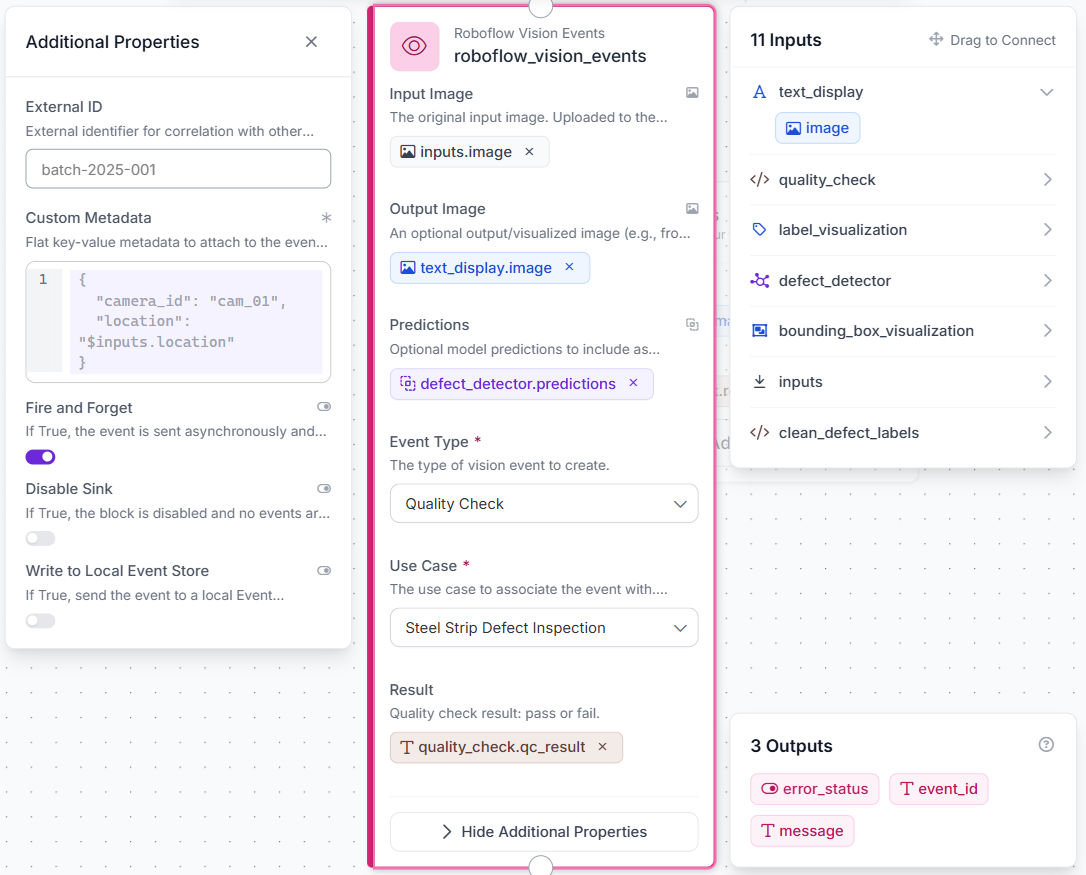
This logs every inspection, the original image, the labeled result, what was detected, and the final status, without changing what the Workflow returns.
Step 7: Configure Outputs
Set two outputs: output_image from text_display.image and quality_report from quality_check.report.

With everything connected, the full Workflow looks like this:
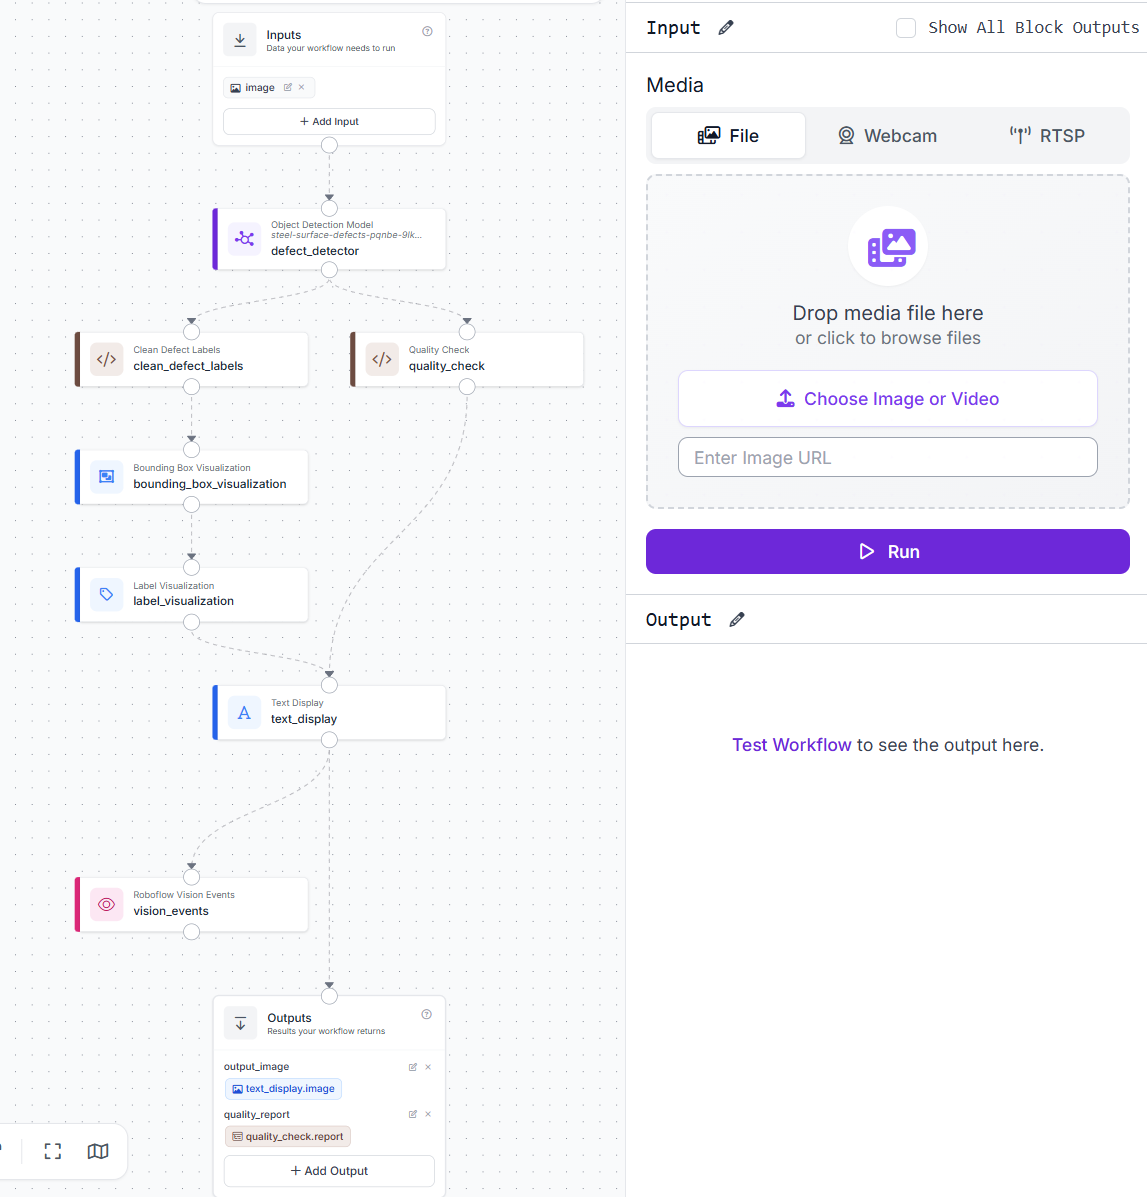
From here, every image that comes in gets a labeled result, a structured report, and a logged record, no extra steps needed.
Results
Test case 1: Clean strip, status PASS
A strip with no visible defects returns an empty defects list and a PASS status.
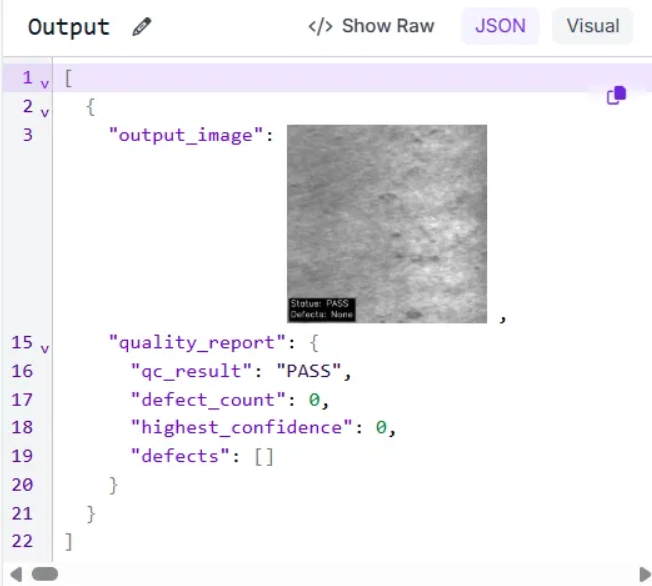
This is the ideal case on the production line: a standard pass with no defects detected.
Test case 2: Low-confidence detection, status REVIEW
A rolled-in scale defect is identified but falls below the 0.6 confidence cutoff at 45.6%. The case is sent for review rather than being automatically accepted or rejected.
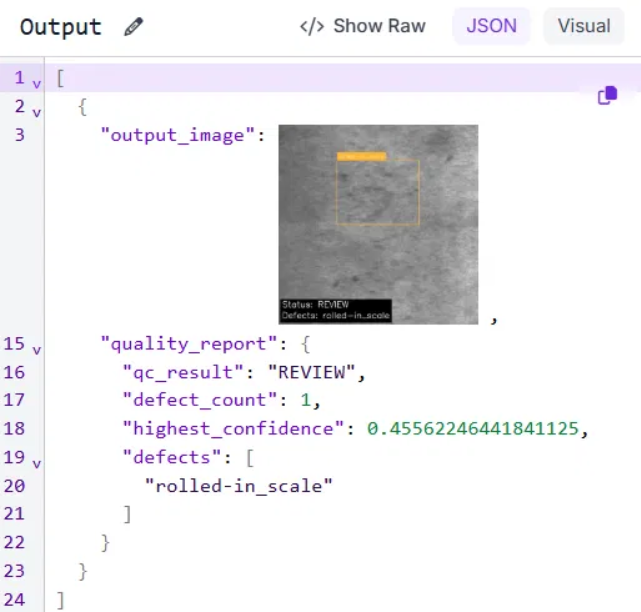
The detection is a legitimate finding, but with insufficient confidence for an automatic verdict. The review tier preserves that uncertainty instead of forcing a result the model is not sure about.
Test case 3: High-confidence defect, status FAIL
Two scratch defects are detected with the highest confidence at 93.3%, well above the 0.6 cutoff. The strip is automatically classified as a fail.
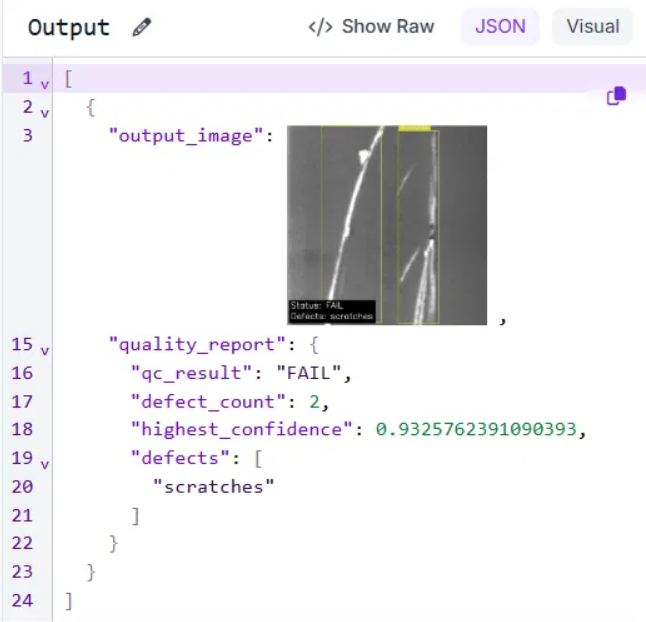
Both detections are of the same class, so the defects list shows a single unique entry. The defect count reflects the total number of detections on the image.
Production Deployment for Steel Strip Defect Inspection
The 0.6 cutoff was chosen from a small set of test images and is not permanent. Every strip sent to REVIEW is a case where the model is uncertain. An operator checks the result, corrects it if needed, and adds it back to the dataset. After retraining, the model has learned from that example. Over time, the REVIEW queue shrinks because the model becomes better at handling cases that once caused uncertainty.
Strip lines run continuously, with a single camera capturing hundreds of images per shift. Vision Events records each image, detected defects, confidence score, and final verdict, creating a complete quality record for every batch. If a customer reports an issue weeks later, the inspection history is already available. If rolled-in scale defects start increasing on a particular shift, the trend can be detected in the data before it becomes a customer complaint.
Roboflow Inference runs the same Workflow on an edge device next to the line. The output format is identical whether the Workflow runs on-device or through the hosted API, so adding a second inspection station means connecting another camera, not rebuilding the pipeline.
Steel Strip Defect Inspection with Roboflow Agent
If you'd rather not add each block by hand, use Roboflow Agent. Instead of configuring blocks one at a time, you describe the pipeline you want in plain text and the Agent builds it for you. Here's an example:
Automated Steel Strip Defect Inspection Conclusion
This Workflow takes a single steel strip image, runs it through a custom-trained RF-DETR model, and returns pass, review, or fail with an annotated output showing detected defects. No manual rules, no separate inspection step, and no forced tradeoff between automation and human oversight.
What makes it durable is that nothing is fixed. Confidence thresholds, defect classes, and datasets evolve as production images accumulate. Each REVIEW case feeds the next training cycle. The Workflow itself does not need rebuilding; only the model needs improvement.
The same structure extends beyond steel strips. A new surface defect dataset can be forked, a model trained, and plugged into the same Workflow. Detection changes, while triage logic, visualization, and logging stay consistent.
At 72.1 percent recall, the model still misses about 28 percent of defects. It supports inspectors rather than replacing them, and active learning closes that gap over time.
Further reading:
Cite this Post
Use the following entry to cite this post in your research:
Mostafa Ibrahim. (Jun 24, 2026). Steel Strip Defect Inspection. Roboflow Blog: https://blog.roboflow.com/steel-strip-defect-inspection/