
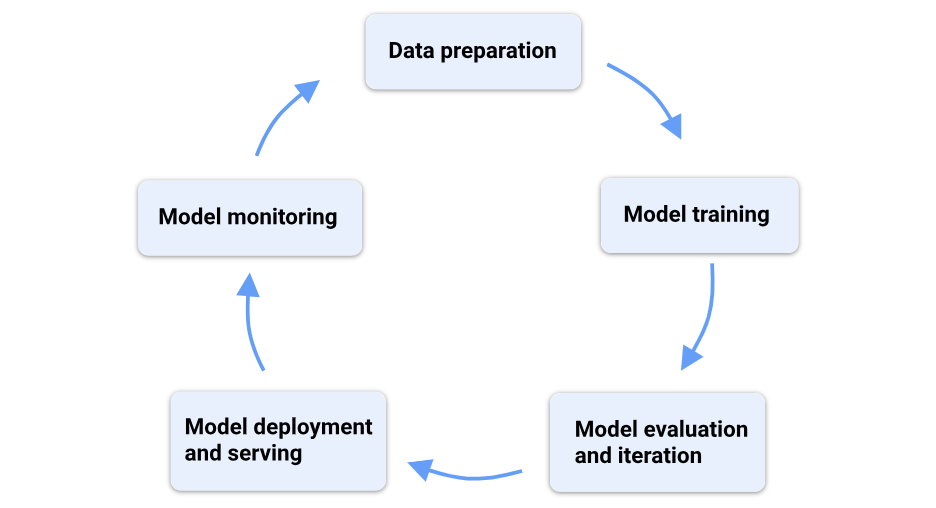
Vertex AI is Google Cloud’s unified platform for building and managing artificial intelligence (AI) solutions. Vertex AI provides tools for each step of machine learning (ML) workflow such as data preparation, labeling, training, evaluation, deployment, and monitoring into a single environment. This makes it easier for both beginners and experienced developers to move from raw data to a working AI system without worrying about managing servers or scaling infrastructure.
Vertex AI has built in support for computer vision applications. Users can upload and label images, train models for tasks like image classification, object detection, segmentation, and then deploy these models either in the cloud for large-scale use or at the edge for real-time, on-device inference. The platform also offers AutoML, which lets you train models with minimal coding, as well as options for custom training if you want more control over the model architecture and parameters.
Vertex AI bring together automation, scalability, and flexibility and allows researchers, businesses, and organizations to apply computer vision and other AI techniques to solve real-world problems such as detecting defects in manufacturing, monitoring crops in agriculture, or analyzing medical images all while reducing the complexity of building production-ready AI systems.
Vertex AI Use Cases
Vertex AI supports multiple computer vision workflows including image classification, object detection, and image segmentation - each designed to provide different levels of detail, from simple labels to precise pixel-level insights.
Image Classification
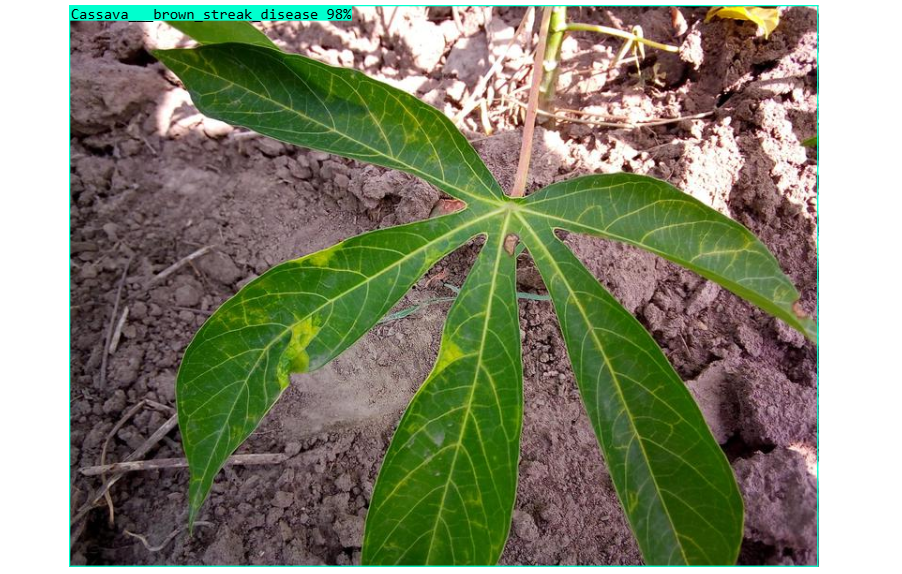
Vertex AI can train models that classify an entire image. This is useful when the main goal is to understand the overall content of an image rather than locate specific objects. Vertex AI supports following two methods of classification:
Single-Label Classification: Single label classification is used when categories are mutually exclusive. Examples:
- Plant leaf image is either healthy or diseased, but not both.
- A manufacturing product could be labeled as defective or non-defective.
Multi-Label Classification: Multi label classification is used when categories are not mutually exclusive, images can express multiple attributes (i.e. categories can overlap/coexist). Examples:
- A road scene image might simultaneously be labeled as daytime, rainy, and heavy traffic in infrastructure.
- A plant image might be tagged with both early blight and nutrient deficiency in agriculture.
Object Detection
Vertex AI enables users to train detection models that output bounding boxes around objects. Examples:
- Detect screws or missing parts on a conveyor belt in manufacturing.
- Count how many soda bottles are on a shelf in retail.
- Detect fruits on a tree for yield estimation in agriculture.
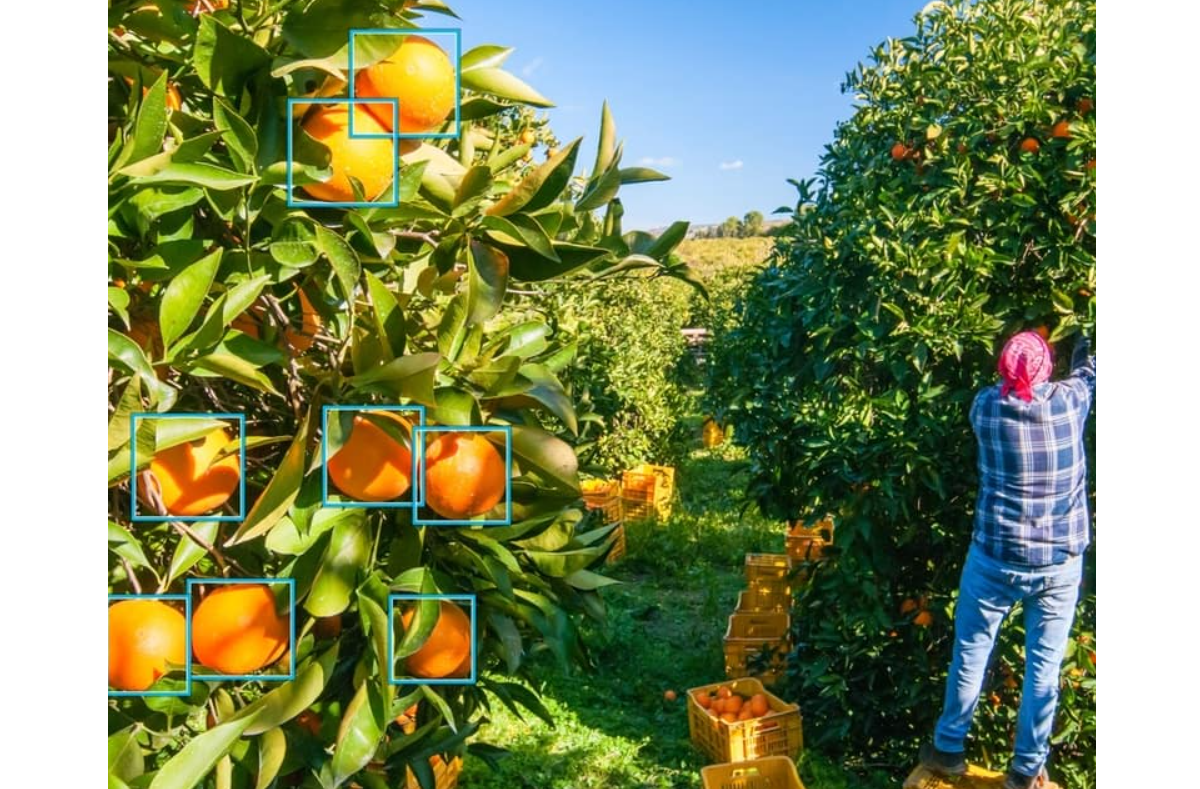
Image Segmentation
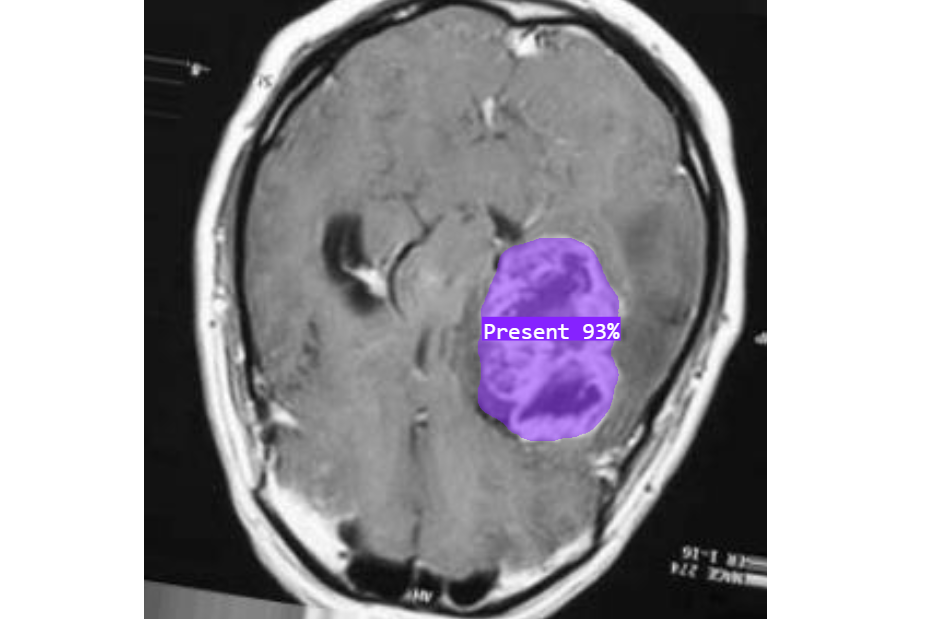
Vertex AI helps in training segmentation model that helps in highly detailed analysis of shapes, boundaries, and regions of interest. Examples:
- Outlining tumors in MRI scans in healthcare.
- Measuring diseased leaf areas or segmenting weeds in crop fields in agriculture.
- Highlighting cracks in pavement or corrosion on metal surfaces in infrastructure.
How to Use Vertex AI for Building a Computer Vision Model
In this walkthrough, we will explore how to build a computer vision model using Vertex AI. We will create an object detection model for screw detection in a manufacturing environment. This end-to-end process will show you how to upload data, annotate images, train a model with AutoML, and prepare it for deployment. Use the following steps to build and train a model using Vertex AI:
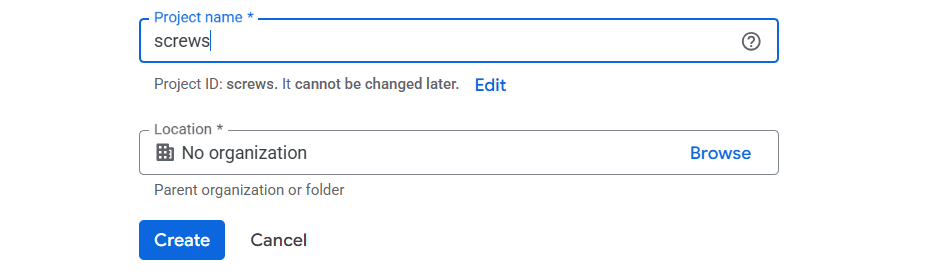
Step #1: Create a Project in Google Cloud
The first step is to create a project in the Google Cloud Console. A project serves as the workspace where your datasets, models, endpoints, and billing settings live. To do this, log into the Google Cloud Console, click the project dropdown at the top of the page, and select New Project. Give the project a name (e.g., “screw-detection”), choose an organization (if applicable), and click Create. Once created, link the project to a billing account and enable the Vertex AI API. With the project set up, you now have a dedicated environment for building and managing your machine learning workflows.
Step #2: Create the Dataset
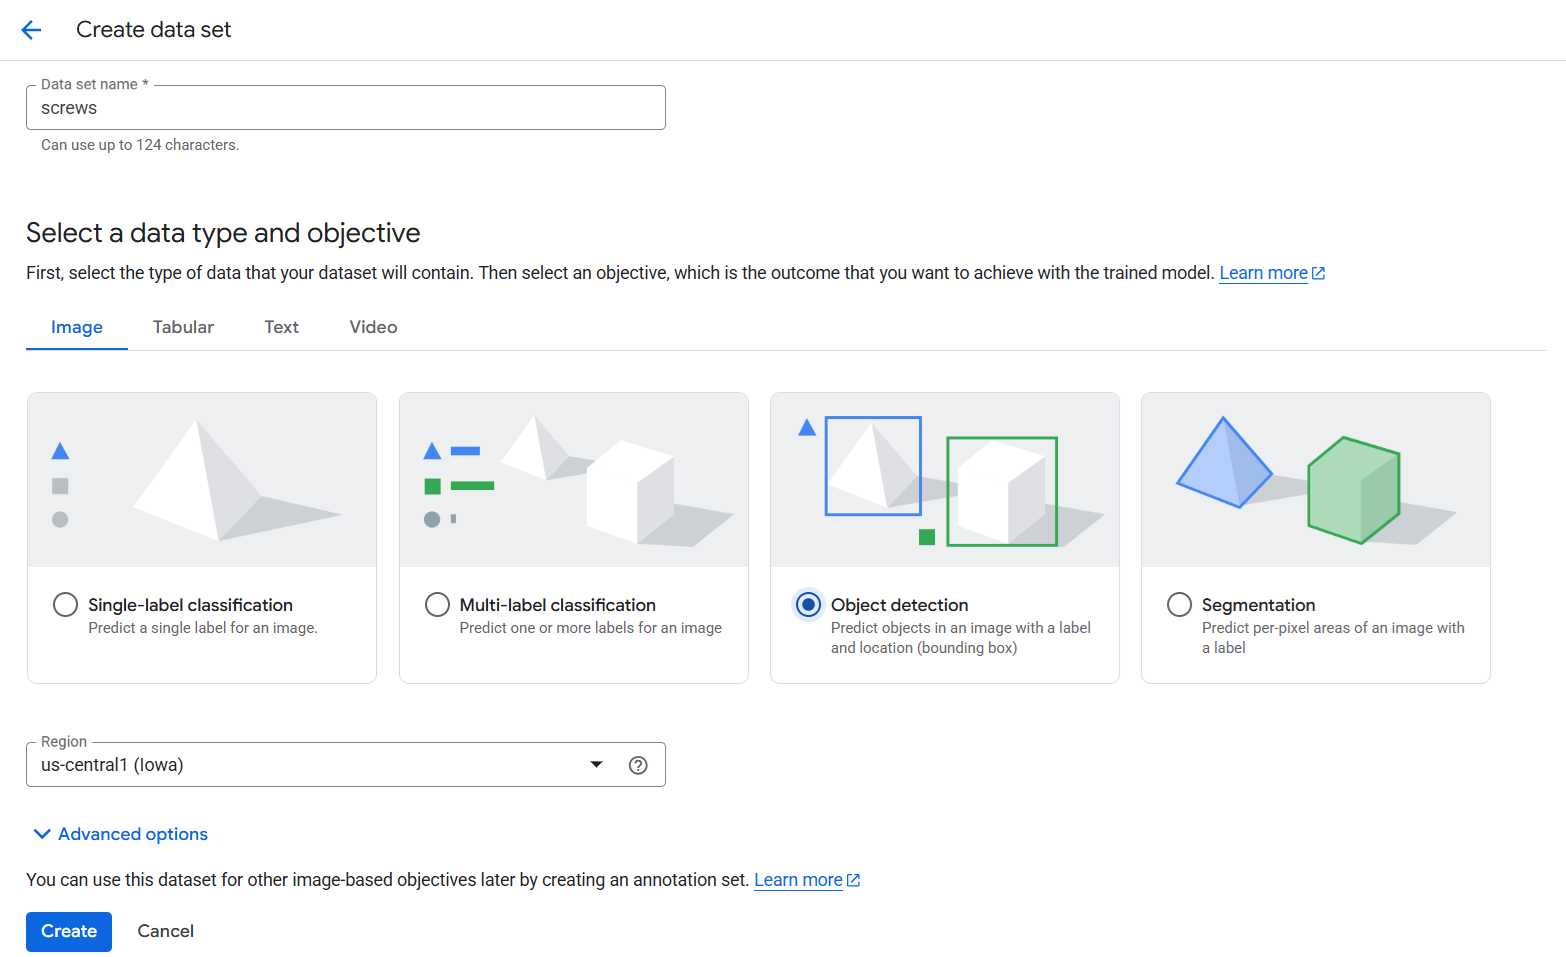
The next step in Vertex AI is to create a dataset. In the Datasets section of the Vertex AI Console, you begin by giving your dataset a name (in our case, “screws”) and selecting the task type.
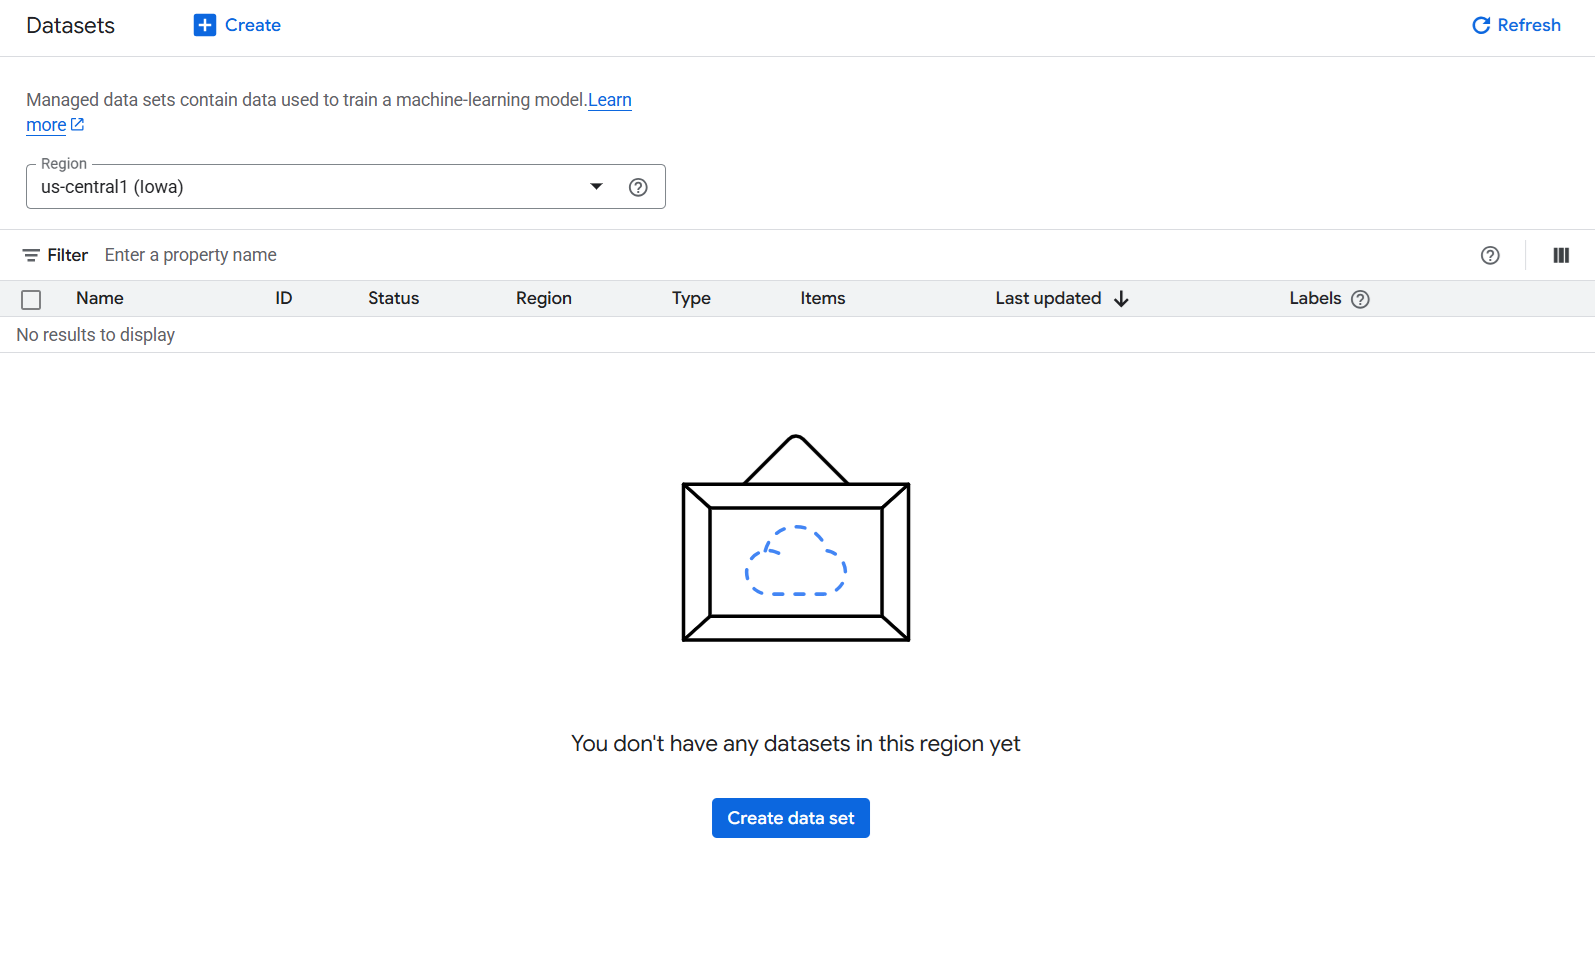
For this project, we choose Image -> Object Detection, since we need the model not just to classify an image, but also to locate each screw within it.
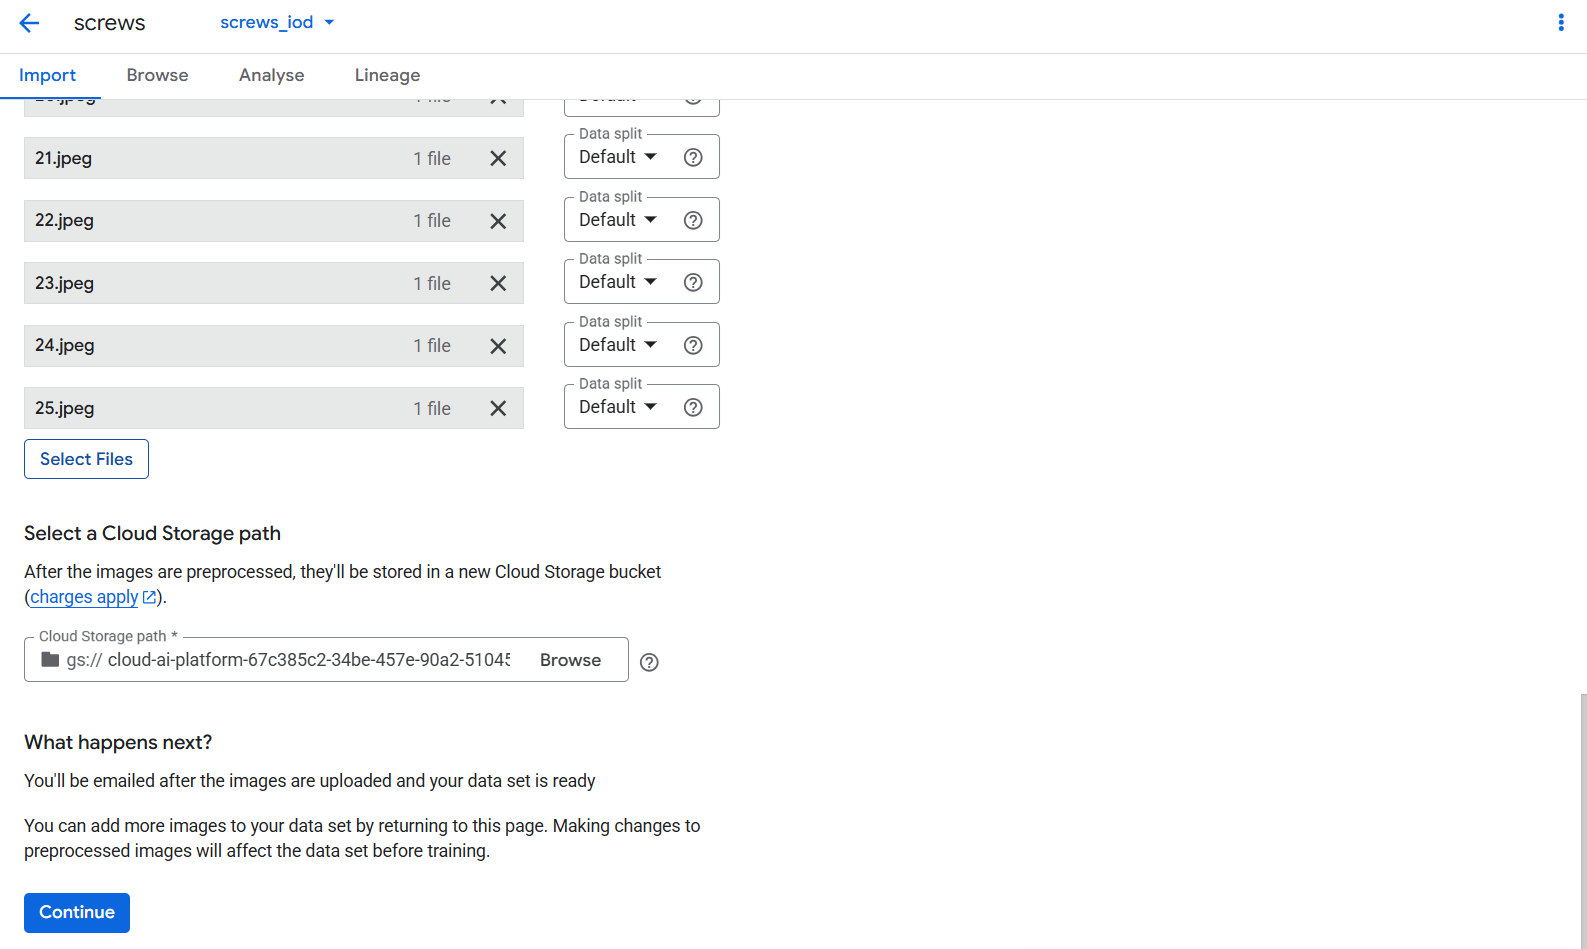
At this point, you can import images directly from your computer or from a Google Cloud Storage bucket. For demonstration, I uploaded a set of screw images into the platform.
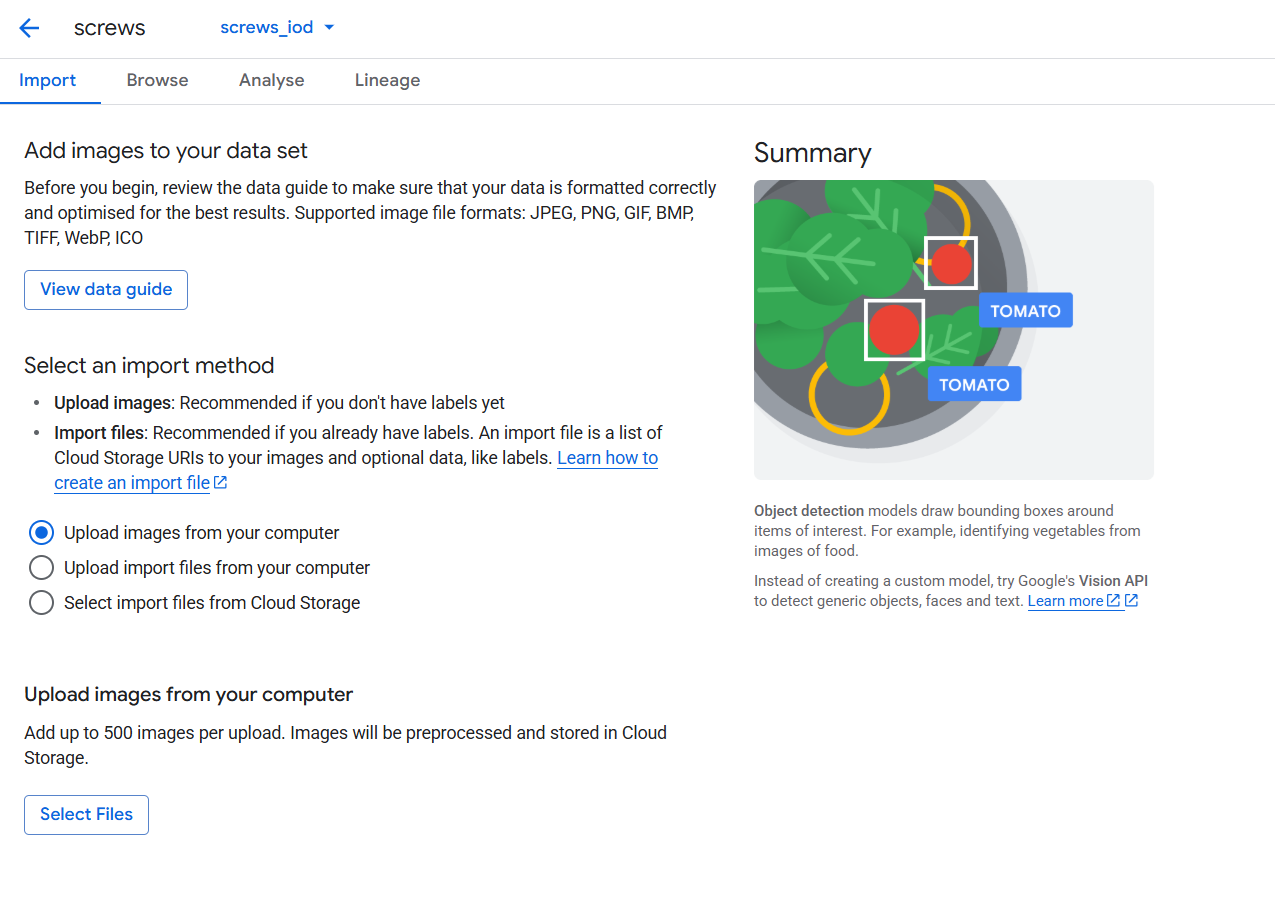
Step #3: Upload and Manage Images
After importing, Vertex AI preprocesses the images and stores them in a secure Cloud Storage path which is selected by you.
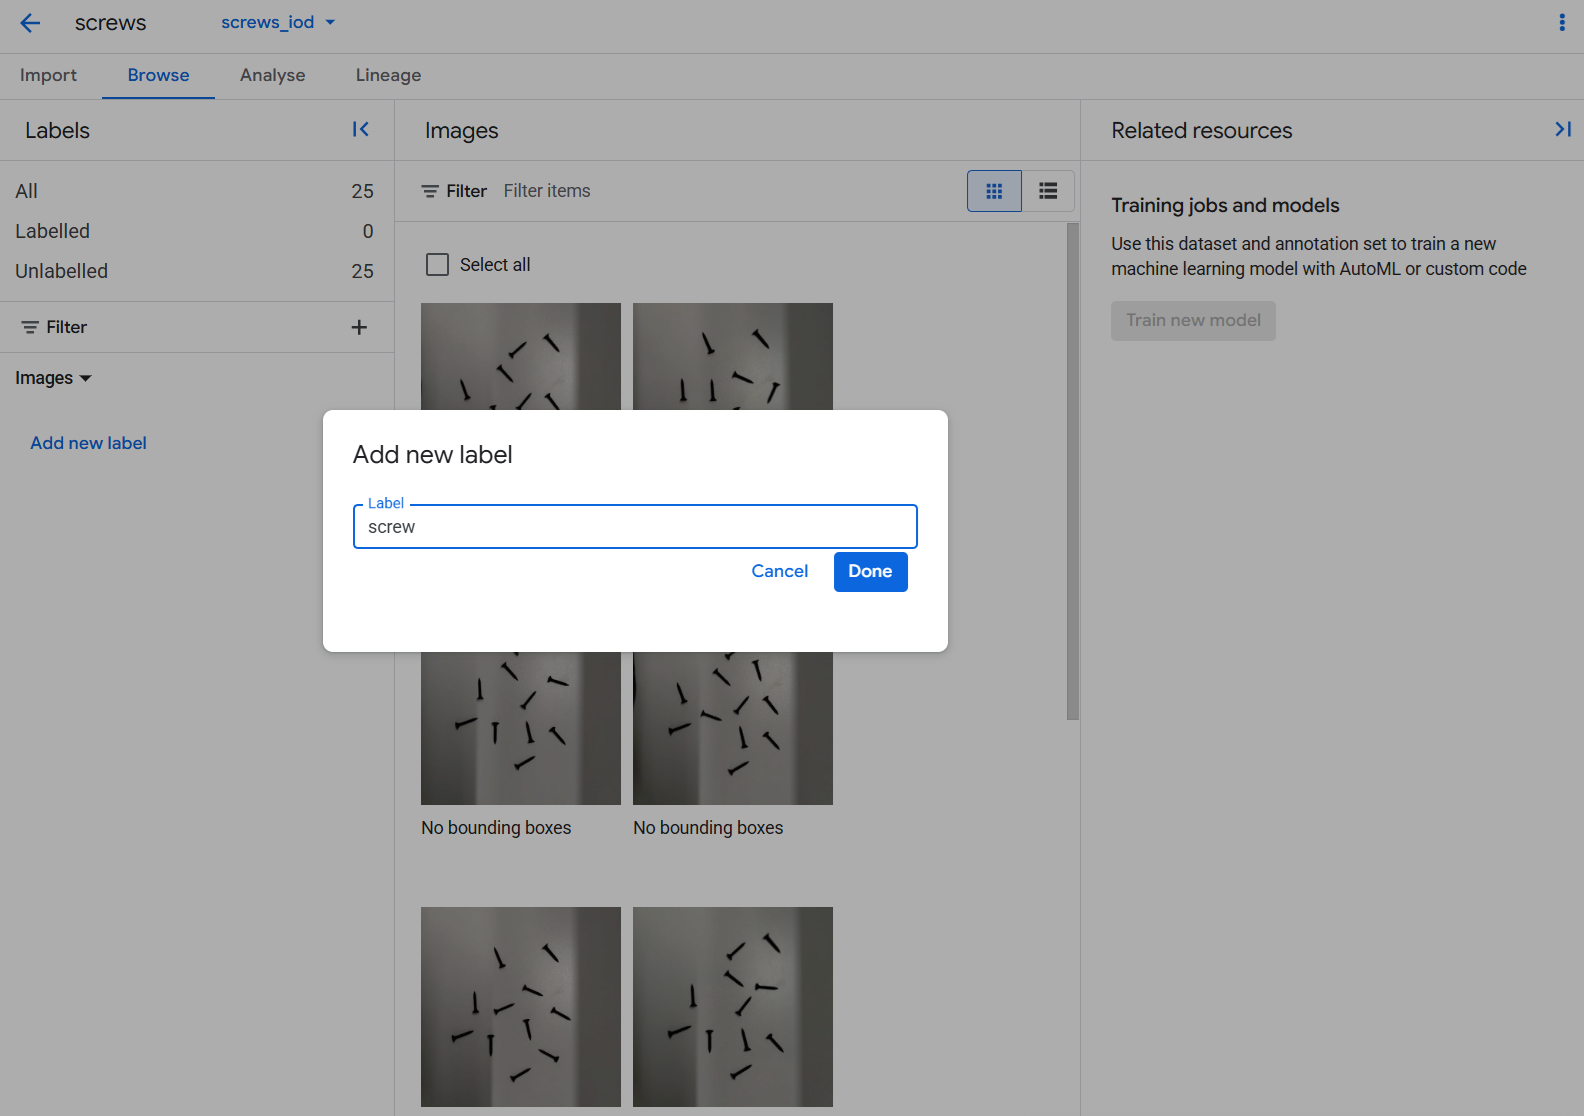
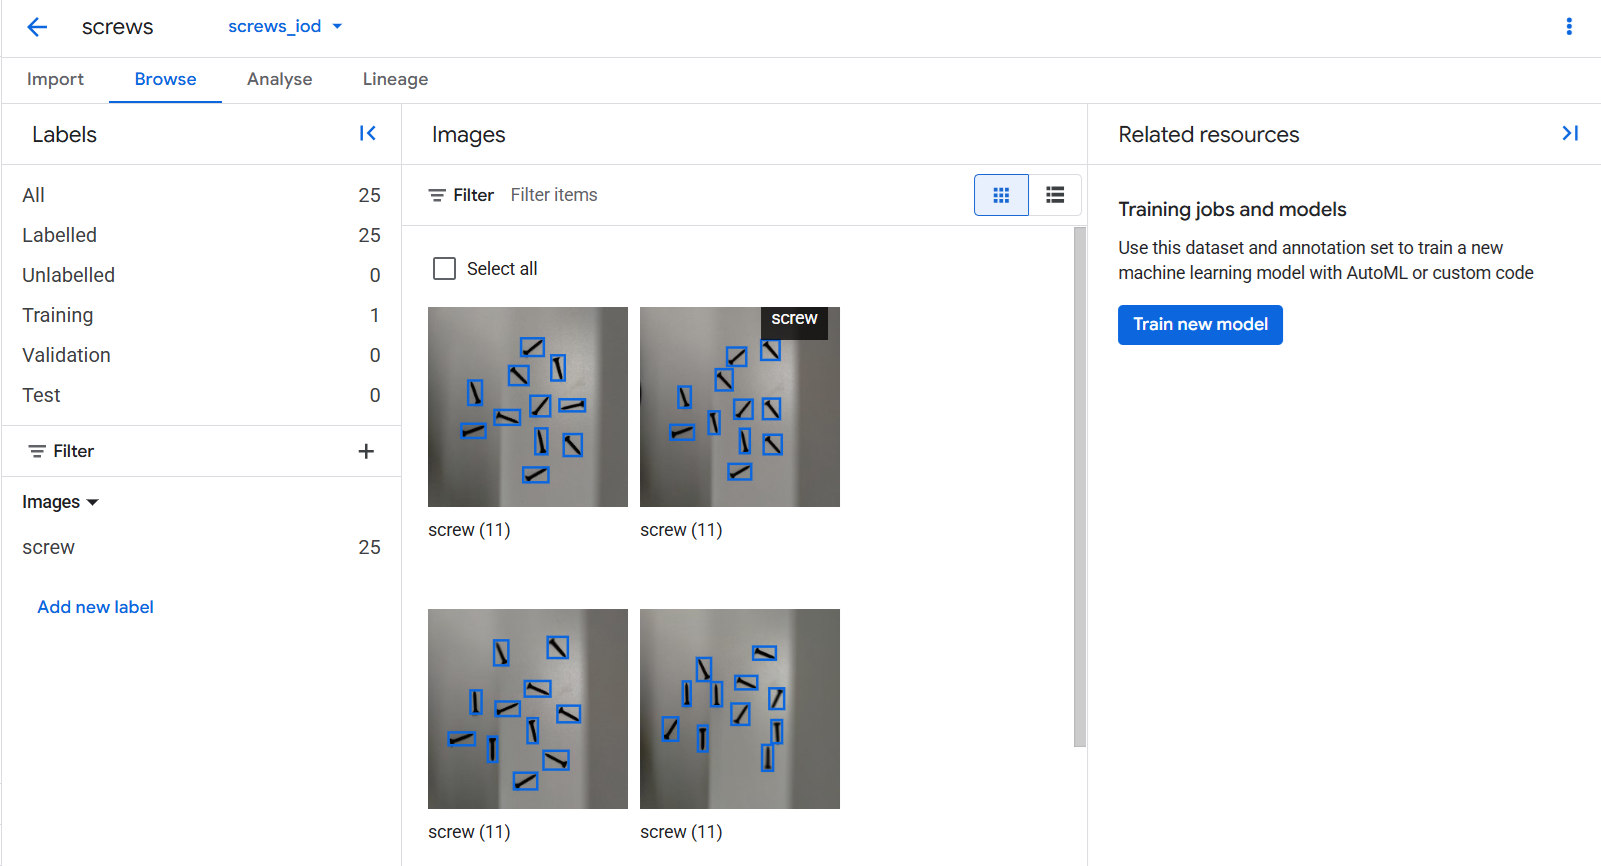
You can view your dataset in the Browse tab, where all the uploaded images appear. Initially, these images show “No bounding boxes,” meaning they still need annotation. This is normal while the dataset is now created, the system does not yet know what objects are in the images.

Step #4: Annotate the Images
Annotation is the most important stage because it teaches the model what to recognize. In the labeling interface, you can create a new label for example, “screw” and then draw bounding boxes around each screw in the image. To do this click on “Add new label” and specify your label as “screw”.
Once the label is specified, you can click on the image and start annotating it by drawing the bounding boxes around objects.
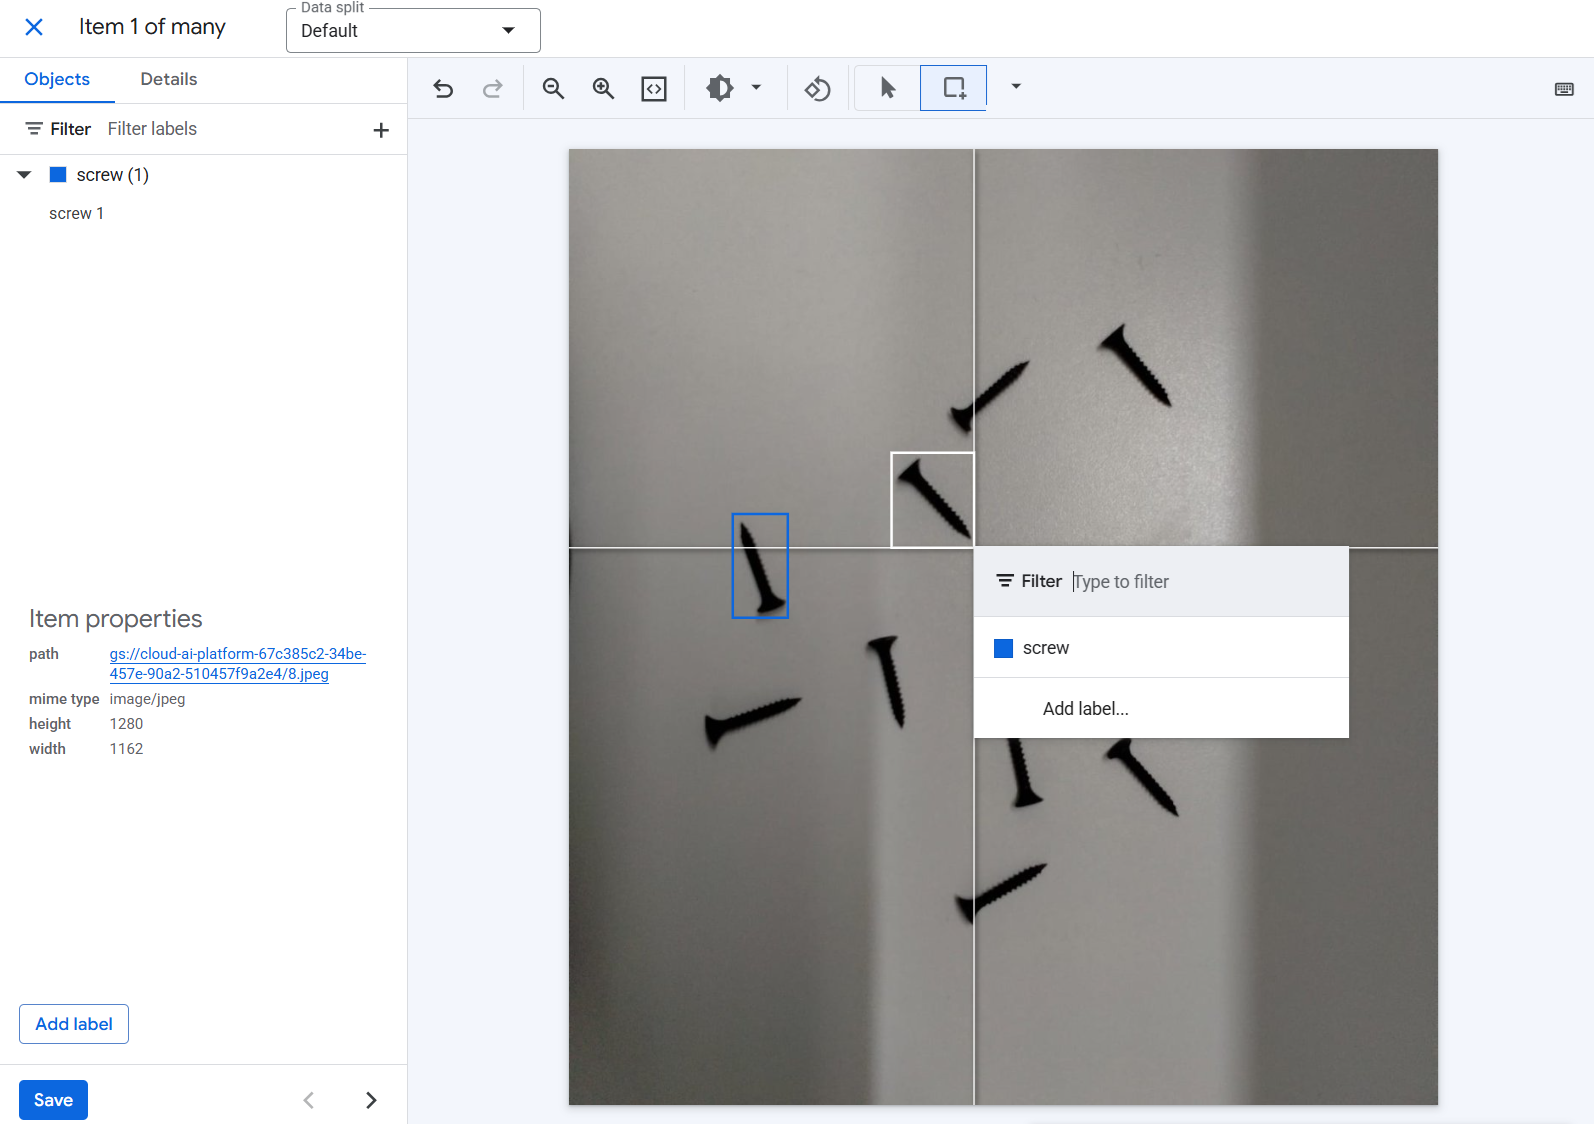
After annotating each instance of objects in the image, save the annotations. This builds an annotation set that pairs image data with labels. For industrial use, consistency is vital for every screw: no matter how small, each screw should be boxed tightly and accurately. The quality of annotations directly impacts the quality of the trained model.
Step #5: Train the Model
Once annotation is complete, the dataset is ready for training. In the training workflow, you first select the method.
Vertex AI offers AutoML, which automatically handles architecture selection and hyperparameter tuning, making it ideal for users who want strong results without writing code. You then choose where the model will run i.e. in the cloud for online predictions, on edge devices for local inference, or in Vertex AI Vision for streaming video. For manufacturing screw detection, cloud deployment is a good starting point.
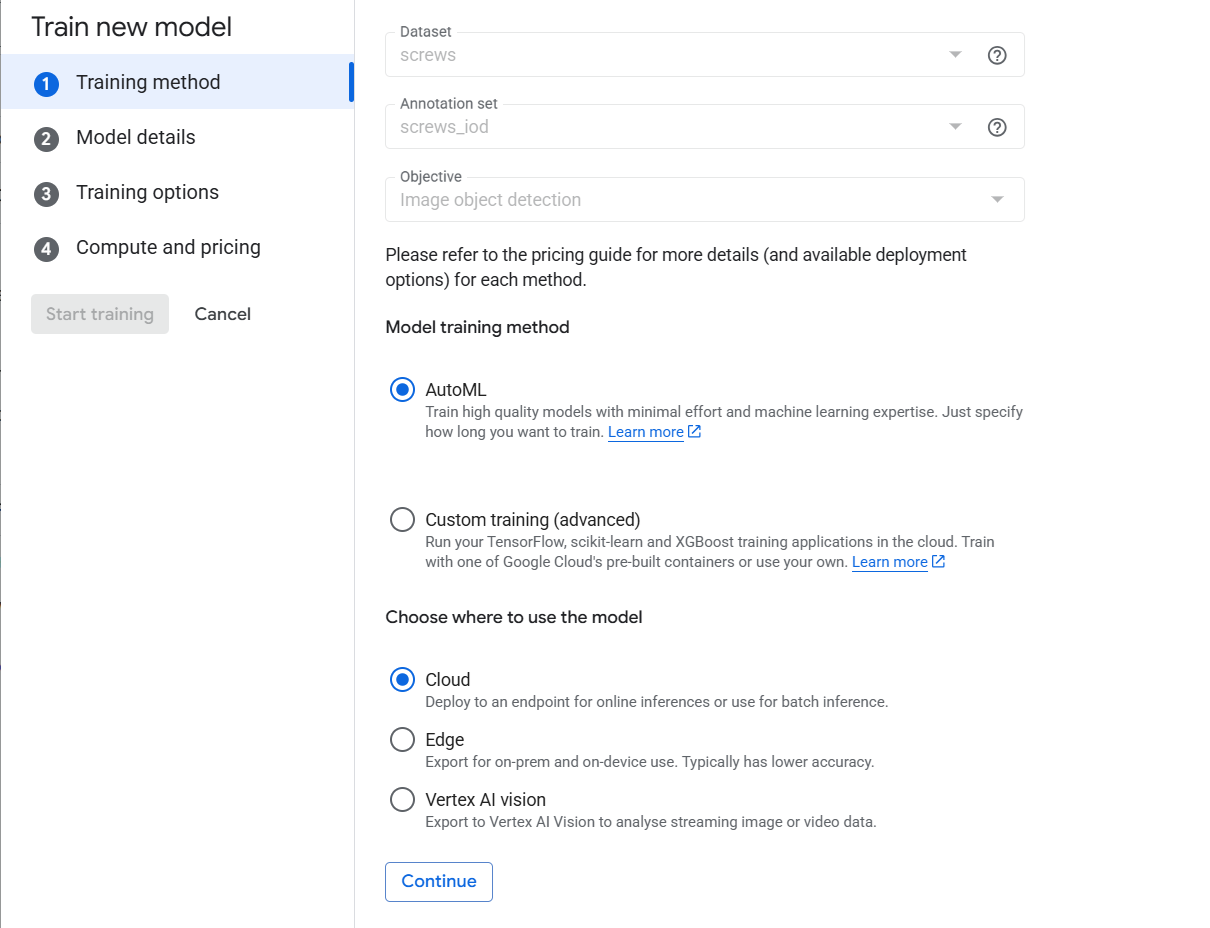
Next, you provide model details such as a name and how the dataset should be split into training, validation, and test sets (commonly 80/10/10). Vertex AI can handle this split automatically.

You then decide on training objectives such as higher accuracy, faster predictions, or a balance.
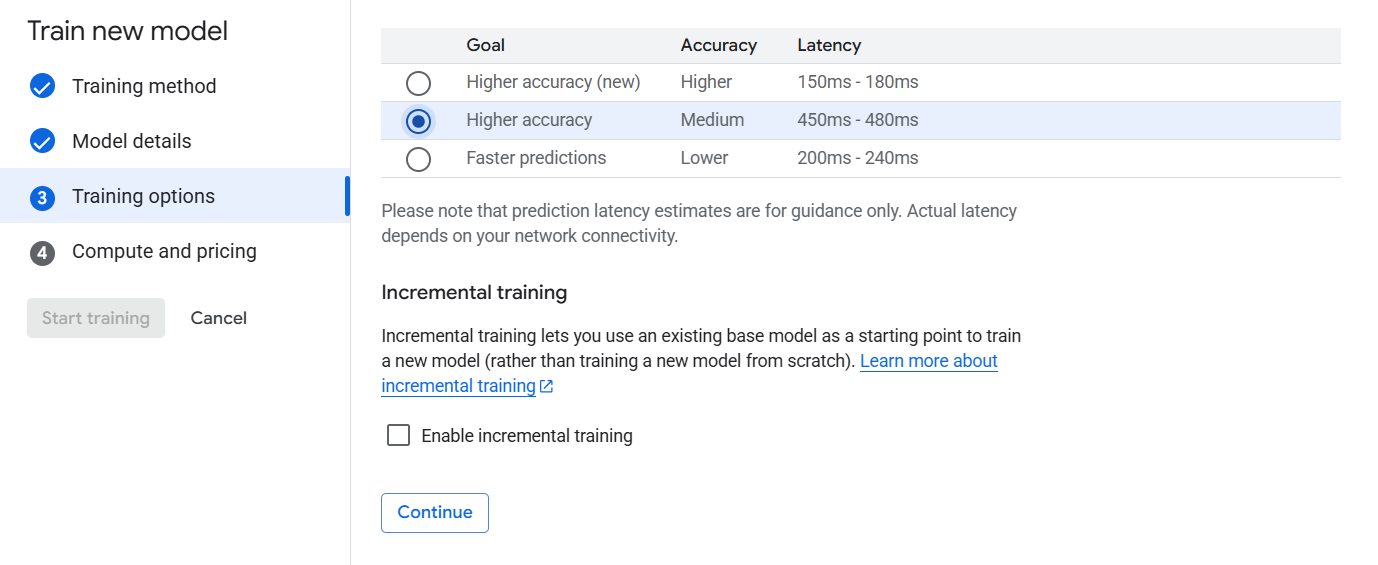
After confirming compute and pricing options, you start the training job. The system runs for the allocated budget, processes the dataset, and outputs a trained object detection model.
You can also label the dataset in Roboflow, and train a computer vision model in Vertex AI utilizing the powerful annotation, preprocessing, automated augmentation and versioning features of Roboflow.
Step #6: Evaluate the Results
After training finishes, Vertex AI provides evaluation metrics, including precision, recall, and mean average precision (mAP). These metrics help you understand how well the model detects screws across the validation and test sets. For small demonstration datasets, results may be modest. But with more annotated images covering different conditions such as varying lighting, angles, and screw types the model improves significantly. You can see the evaluation details through the “Model Registry” option on the left pane.
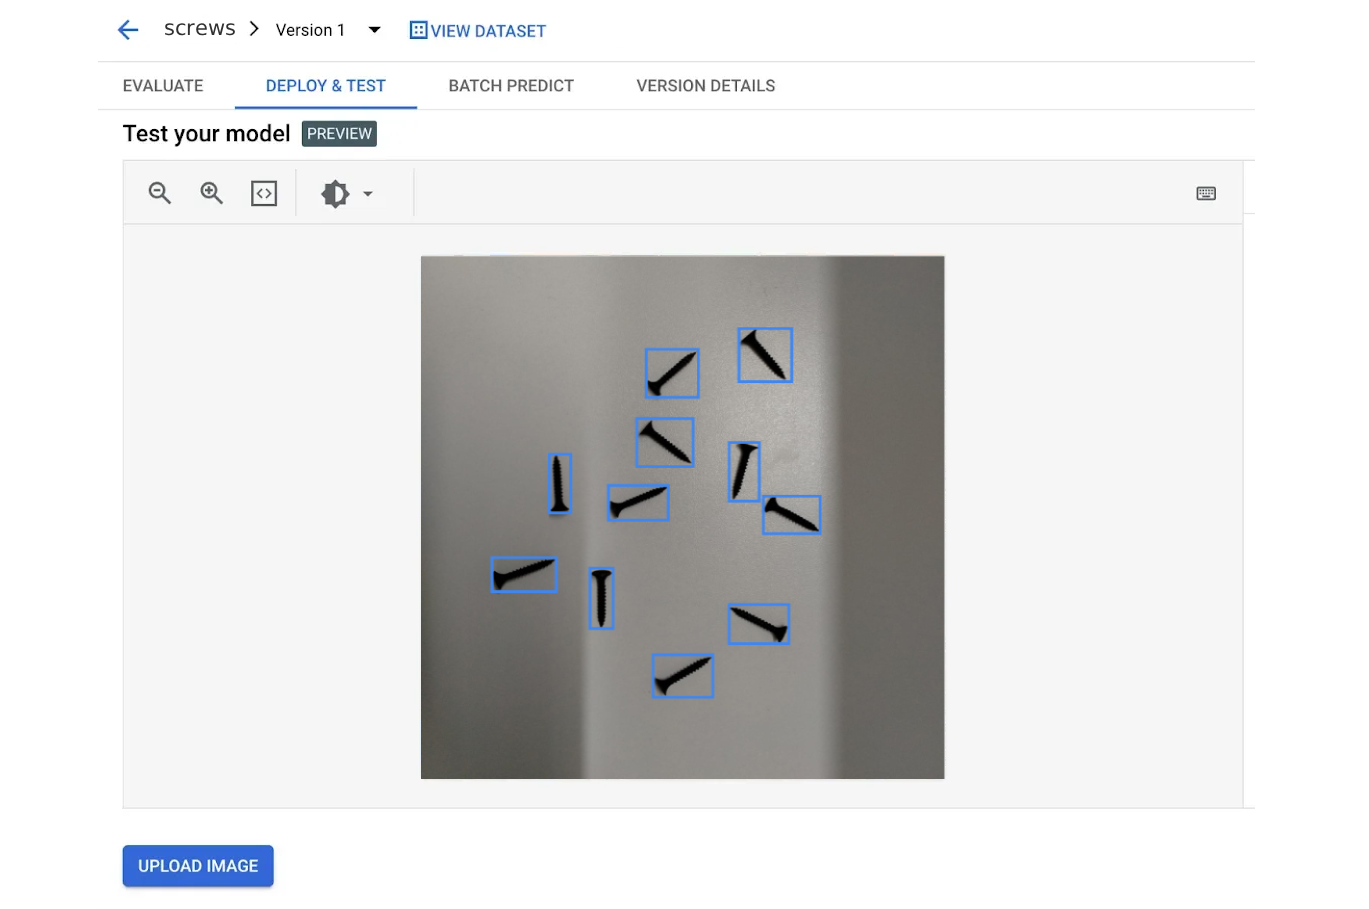
Step #7: Deployment and Inference
The final stage is deployment. In Vertex AI, you can deploy your trained model to an endpoint for real-time inference. This allows you to test images directly in the console or integrate the endpoint into a production pipeline. For a manufacturing scenario, the model could be connected to cameras on the assembly line, automatically scanning every product and flagging anomalies like missing screws.
To test the model go to the "Deploy & Test" page of your deployed model where you can upload individual images or batches of images and test your model.
This project demonstrates how Vertex AI simplifies the entire machine learning lifecycle for computer vision applications. By creating a project, uploading and labeling images, training a model through AutoML, and deploying it to the cloud, we have built a working screw detection system tailored for quality control in manufacturing. While this demonstration used a small dataset, scaling up with more diverse training data will make the model robust enough for industrial deployment.
How to Use Roboflow with Vertex AI
Roboflow brings several capabilities that can enhance or fill in gaps when used alongside Vertex AI.
- Refine your dataset: Easily import labeled data from Google Vision AI into Roboflow.
- Train anywhere, deploy anywhere: Bring your Google Vision AI-trained models into Roboflow for more flexibility.
- Improve performance: Close the loop by sending data from your running models back to Roboflow.
Here are some practical workflows to combine Roboflow with Vertex AI (or Google Vision APIs) to build custom computer-vision solutions.
Start by collecting images or video frames that match your use case. Then, use Roboflow to label and organize the data. You can also clean it, balance class distributions, and add augmentations.
Once your dataset is ready, export it in a format Vertex AI understands (like Google Cloud AutoML), which Roboflow makes easy with built-in format conversion. Next, train a custom model in Vertex AI using AutoML Vision or your own training job, taking advantage of Google Cloud’s scalable infrastructure. Finally, evaluate the model and deploy it through Vertex AI endpoints so it can start making predictions.
You can use Roboflow alongside Google Vision API in a hybrid setup. Start by using the Vision API for common tasks like object detection. When the API struggles such as with uncommon objects or new classes, collect those images and send them to Roboflow for labeling.
Then, train a custom model in Roboflow or Vertex AI to handle those specific cases. In your application, you can add logic so that regular tasks go to Vision API, while the tricky or custom cases are handled by your custom model.
Together, Roboflow and Vertex AI give you a flexible ML pipeline, making it easier to build computer vision systems that are both accurate and production-ready.
Vertex AI Conclusion
When combined with Roboflow’s strengths in data annotation, dataset management, and flexible deployment, Vertex AI can be used to create robust AI pipelines that continuously improve over time. Together, Vertex AI and Roboflow lower the barriers to entry while offering enterprise-grade flexibility that help researchers and businesses deploy powerful vision models that solve real-world problems efficiently and at scale.
Cite this Post
Use the following entry to cite this post in your research:
Timothy M. (Sep 22, 2025). What Is Vertex AI?. Roboflow Blog: https://blog.roboflow.com/vertex-ai/