
In computer vision, few model families have made as big an impact as YOLO. Originally designed for fast and accurate object detection, the YOLO architecture has evolved rapidly, now supporting both complex detection and segmentation tasks.
With the rise of YOLOE and other enhanced variants, it's now easier than ever to build models that can perform zero shot detection and segmentation.
In this guide, we’ll show you how to use YOLOE for zero shot object detection and segmentation. Let's dive in!
YOLOE Environment Setup
To access YOLOE, we'll need a Hugging Face API key. Hugging Face is a platform that hosts a variety of models, including YOLOE weights. The notebook provides a helpful link to the settings page (once you've signed up/logged in). From here, click on access tokens and create a new access token.
The colab notebook has a quick snippet and instruction that allows you to easily store these keys in an environment variables, and import it for future use.
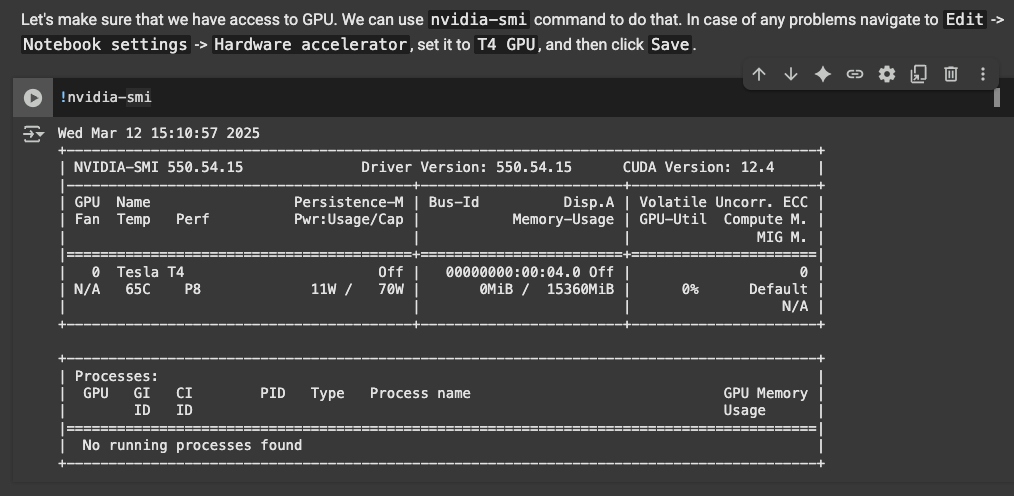
The next step is to use the T4 GPU in colab, because running the model requires accelerated hardware. Following these instructions should allow you to include the T4 GPU:
The next snippet installs other dependencies for YOLOE, as well as Supervision, Roboflow's library for reusable computer vision tools. We'll need this library later on for visualizing predictions from YOLOE.
The next step is to pull the weights for YOLOE from HuggingFace. The next two snippets do this, and it also installs sample images from Roboflow. However, you can change what images you chose to detect on by uploading your own data to colab.
Now we're ready to run YOLOE!
YOLOE Execution
From here, it's simple to run the weights. the first snippet after importing the assets walks through how to run the model weights:
import supervision as sv
from ultralytics import YOLOE
from PIL import Image
IMAGE_PATH = "dog.jpeg"
NAMES = ["dog", "eye", "tongue", "nose", "ear"]
model = YOLOE("yoloe-v8l-seg.pt").cuda()
model.set_classes(NAMES, model.get_text_pe(NAMES))
image = Image.open(IMAGE_PATH)
results = model.predict(image, conf=0.1, verbose=False)
detections = sv.Detections.from_ultralytics(results[0])
annotated_image = image.copy()
annotated_image = sv.BoxAnnotator().annotate(scene=annotated_image, detections=detections)
annotated_image = sv.LabelAnnotator().annotate(scene=annotated_image, detections=detections)
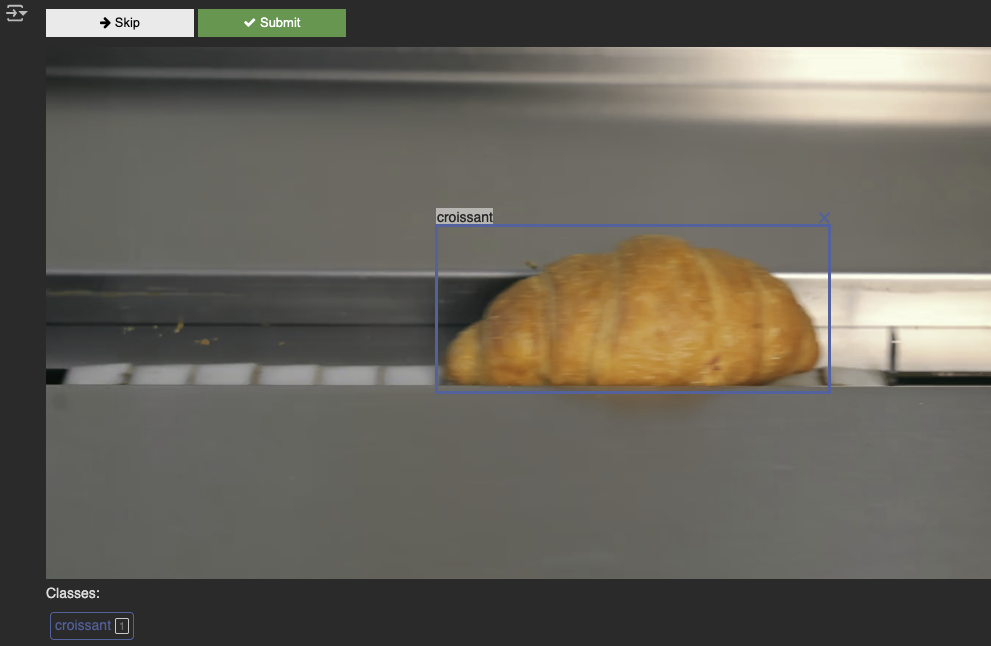
annotated_imageThe NAMES variable holds all of the classes we would like to detect. Running the snippet:

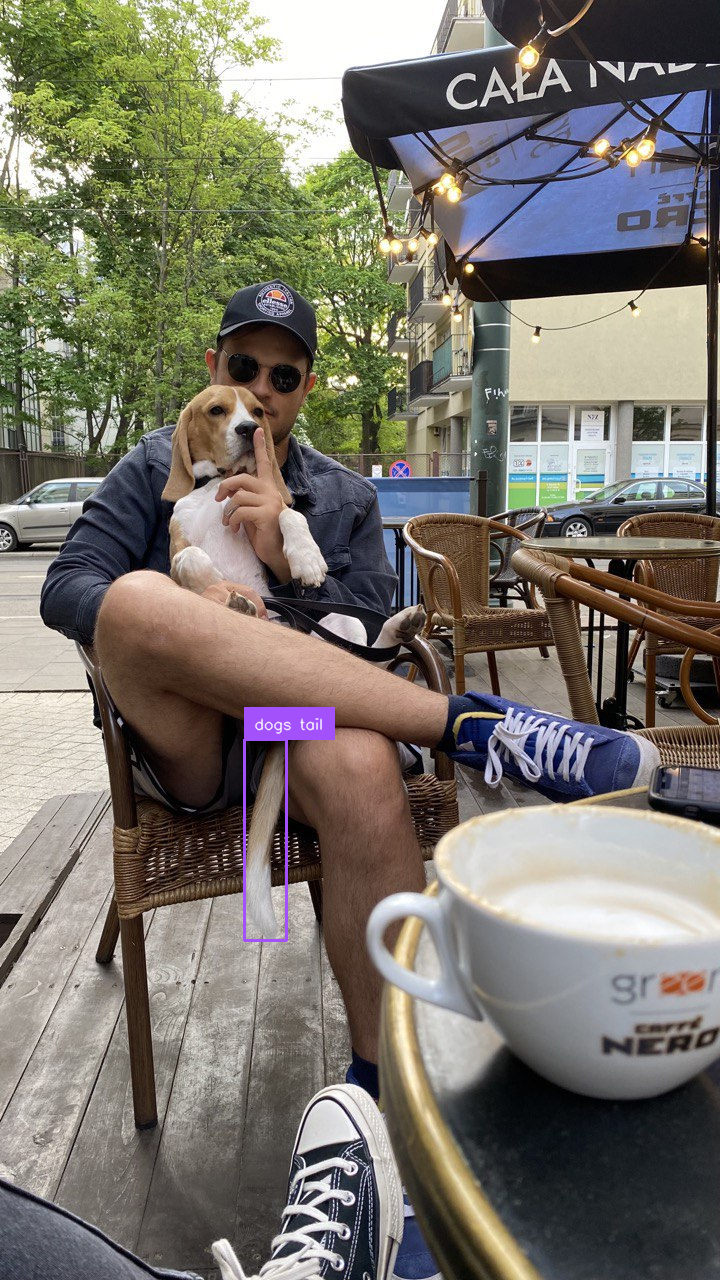
The next snippet is YOLOE detecting the class "dogs tail".
The next section in the notebook highlights another way we can run YOLOE, visual prompting. Instead of telling it what to look for on its own, we provide an image with annotations that we make ourselves of different classes, so that YOLOE knows what, for example, a "dog" looks like, and it can then later detect dogs in a new image.
The next two snippets allow you to actually draw bounding boxes yourself on an image, and they will later be used as inputs to YOLOE.
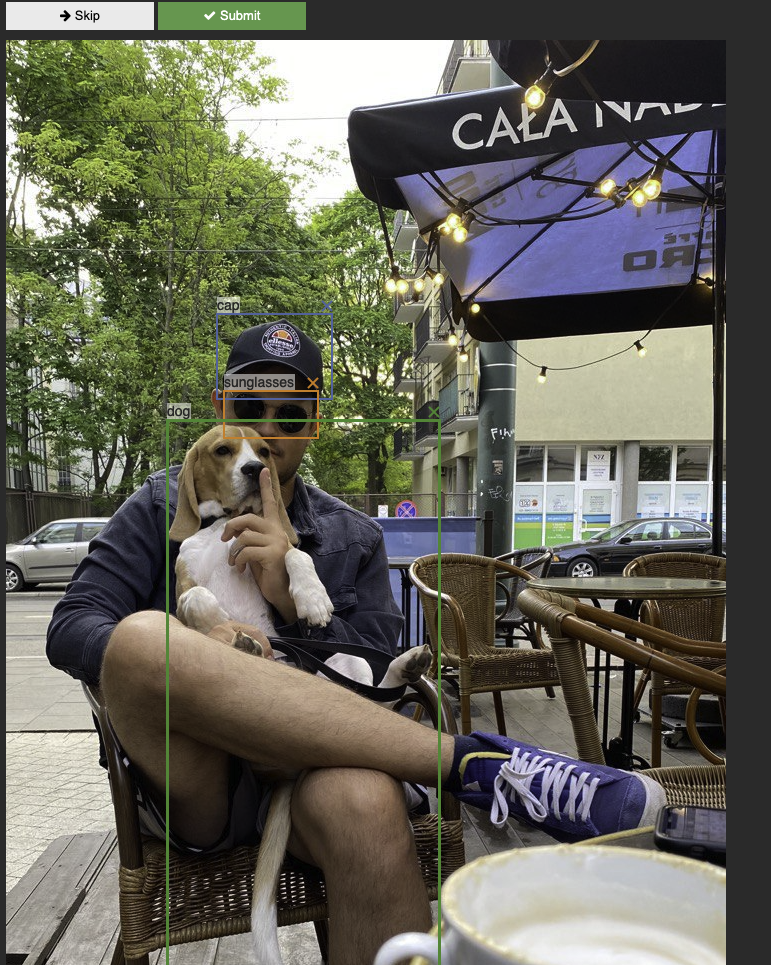
The next two snippets allow convert the bounding boxes to a np.ndarray, the necessary format.
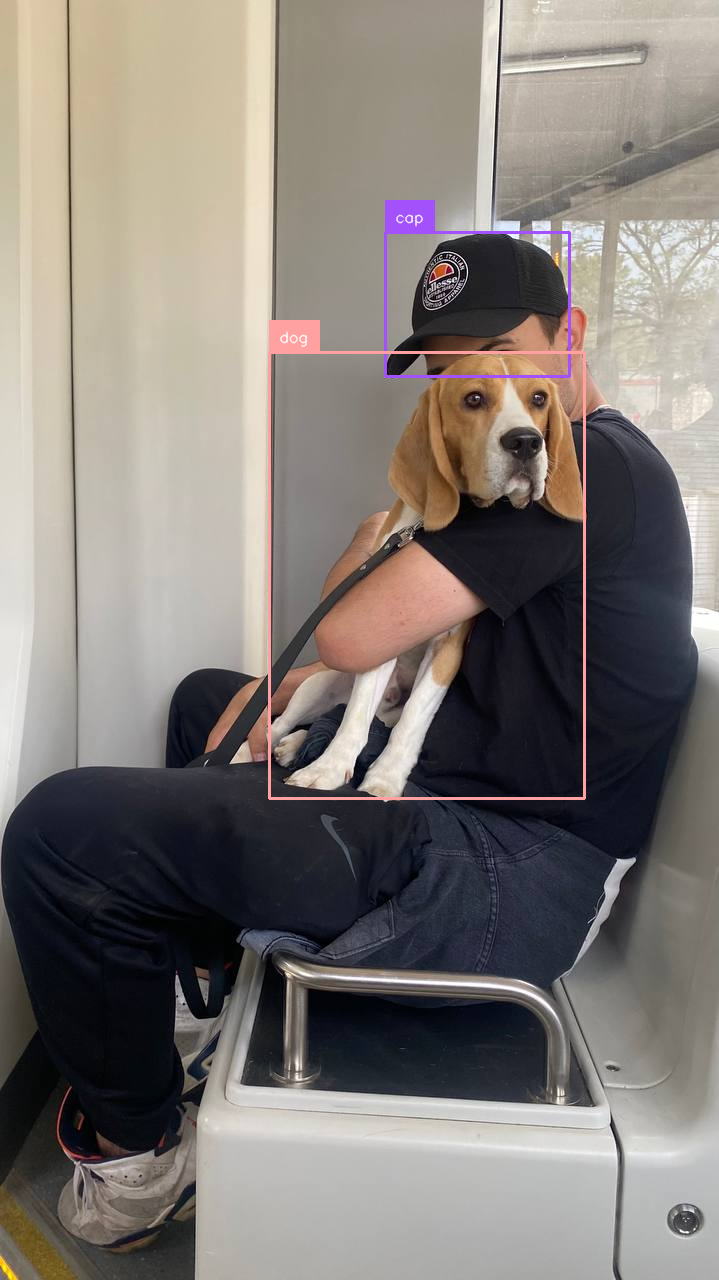
Running the next snippet (using the bounding boxes as a "prompt"), its able to detect, with high accuracy, the bounding boxes for caps and dogs.
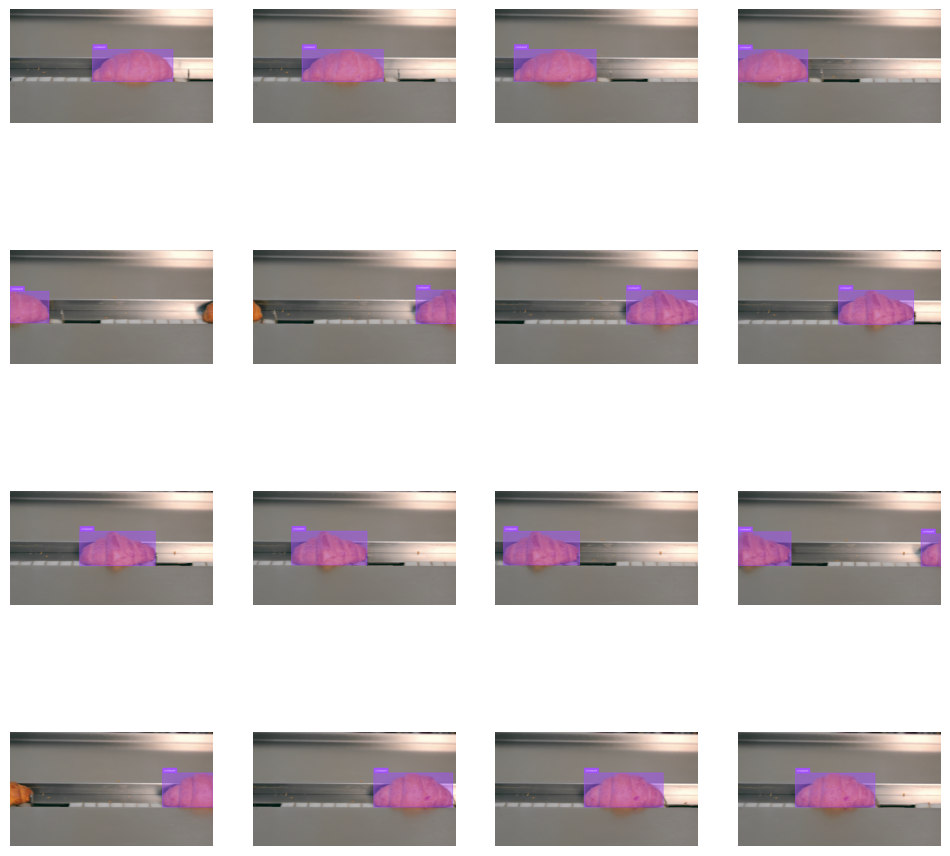
YOLOE is also capable of running on video. The following snippet runs YOLOE weights for each frame in a video, detecting suitcases:
import supervision as sv
from ultralytics import YOLOE
from PIL import Image
from tqdm import tqdm

SOURCE_VIDEO_PATH = "suitcases-1280x720.mp4"
TARGET_VIDEO_PATH = "suitcases-1280x720-result.mp4"
NAMES = ["suitcase"]

model = YOLOE("yoloe-v8l-seg.pt").cuda()
model.set_classes(NAMES, model.get_text_pe(NAMES))

frame_generator = sv.get_video_frames_generator(SOURCE_VIDEO_PATH)
video_info = sv.VideoInfo.from_video_path(SOURCE_VIDEO_PATH)

# visualize video frames sample in notebook
frames = []
frame_interval = 10

with sv.VideoSink(TARGET_VIDEO_PATH, video_info) as sink:
    for index, frame in enumerate(tqdm(frame_generator)):
        results = model.predict(frame, conf=0.1, verbose=False)
        detections = sv.Detections.from_ultralytics(results[0])

        annotated_image = frame.copy()
        annotated_image = sv.ColorAnnotator().annotate(scene=annotated_image, detections=detections)
        annotated_image = sv.BoxAnnotator().annotate(scene=annotated_image, detections=detections)
        annotated_image = sv.LabelAnnotator().annotate(scene=annotated_image, detections=detections)

        sink.write_frame(annotated_image)

        # visualize video frames sample in notebook
        if index % frame_interval == 0:
            frames.append(annotated_image)
Running it and plotting it with Supervision:
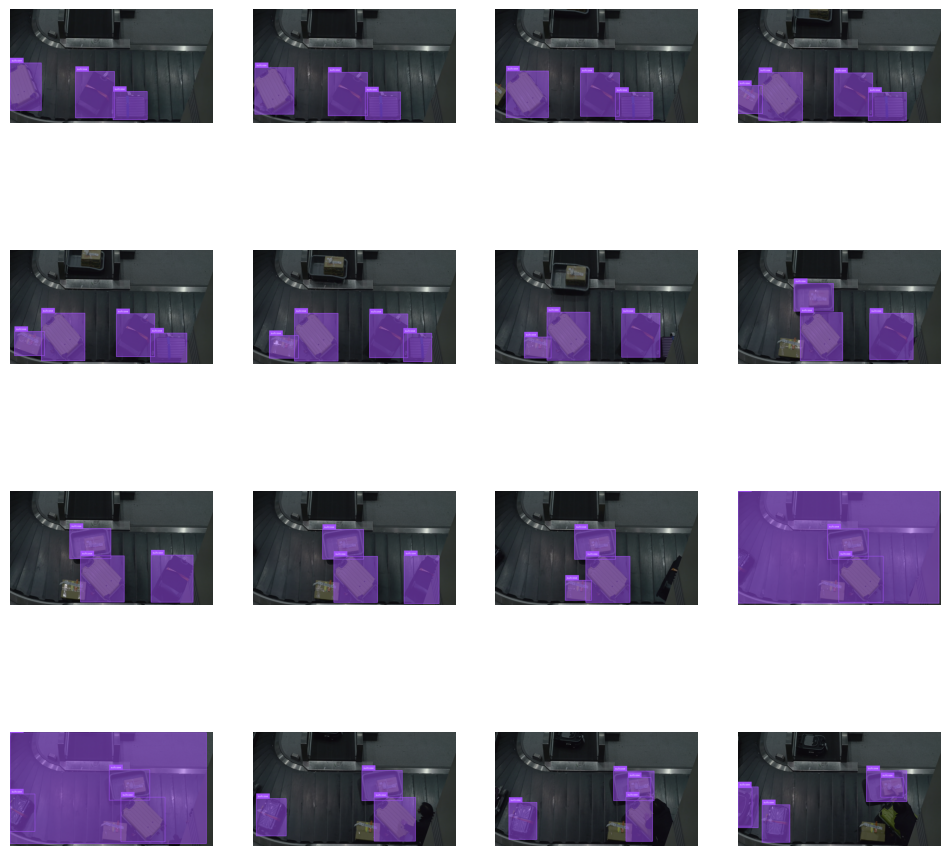
A similar technique that we applied earlier, visual prompting, can also be done with videos. The next snippets walk through annotating a frame of video, which will undergo a similar process to before for using it as a prompt.
Running it on the full video:
And with that, we've successfully performed zero shot detection and segmentation with YOLO!
Conclusion
Congratulations! You have successfully used YOLOE and Supervision to perform zero-shot object detection and segmentation.
Because its so easy to simply change the classes, and even potentially using visual prompting, this approach is quite versatile. Good luck!
Cite this Post
Use the following entry to cite this post in your research:
Aryan Vasudevan. (Aug 8, 2025). How to use YOLOE for Zero-Shot Object Detection & Segmentation. Roboflow Blog: https://blog.roboflow.com/yoloe-zero-shot-object-detection-segmentation/