
Autodistill is an open-source library that uses large foundation models, such as Grounded SAM, as base models to automatically generate training labels, then distills that knowledge into smaller, faster target models suited for real-time or edge deployment. You define your target classes in plain text, the base model annotates your images, and the resulting labeled dataset trains a compact model you can deploy via Roboflow. The worked example detects milk bottles without writing a single annotation by hand.
Use Foundation Models to Train Any Vision Model Without Labeling
Today we are announcing Autodistill, a new library for creating computer vision models without labeling any training data. Autodistill allows you to use the knowledge of large foundation models and transfer it to smaller models for building enterprise AI applications running in real-time or at the edge.
Advancements in AI research – particularly large, multipurpose, multimodal foundation models – represent a fundamental shift in capabilities of machine learning. AI models are capable of handling an unprecedented, wide array of tasks.
Meta AI’s Segment Anything Model can segment the edges of a mechanical part or item on a shelf, OpenAI’s GPT-4 can write your dinner recipe and write your code (or, soon, even tell you why a meme is funny), and BLIP2 by Salesforce can caption a scene of Olympians celebrating a gold medal or describe a photo of your favorite shoe.
Large, foundation models represent a stepwise change in capabilities.
Foundation models aren’t perfect for every use case. They can be GPU compute-intensive, too slow for real time use, proprietary, and/or only available via API. These limitations can restrict developers from using models in low compute environments (especially edge deployment), creating their own intellectual property, and/or deploying cost effectively.
If you’re deploying a model to segment tennis players during a live broadcast to run real-time on an edge device, Meta’s SAM won’t produce high enough throughput — even though it knows how to segment where tennis players are zero-shot. If you’re creating your own code completion model, you could use GPT-4, though you’re only leveraging a fraction of its knowledge.
Foundation models know a lot about a lot, and many real-world AI applications need to know a lot about a little.
Fortunately, there is a way to benefit from the knowledge of large models without deploying them explicitly: distillation. There have been recent breakthroughs in both knowledge distillation and dataset distillation to help make distillation the best path for transferring the power of large models to small models for real-world applications.
Introducing Autodistill
The Autodistill Python package labels images automatically using a foundation model, which themselves are trained on millions of images and millions of dollars in compute consumption by the world’s largest companies (Meta, Google, Amazon, etc.), then trains a state-of-the-art model on the resulting dataset.
Distilling a large model gives you:
- A smaller, faster model with which to work;
- Visibility into the training data used to create your model, and;
- Full control over the output.
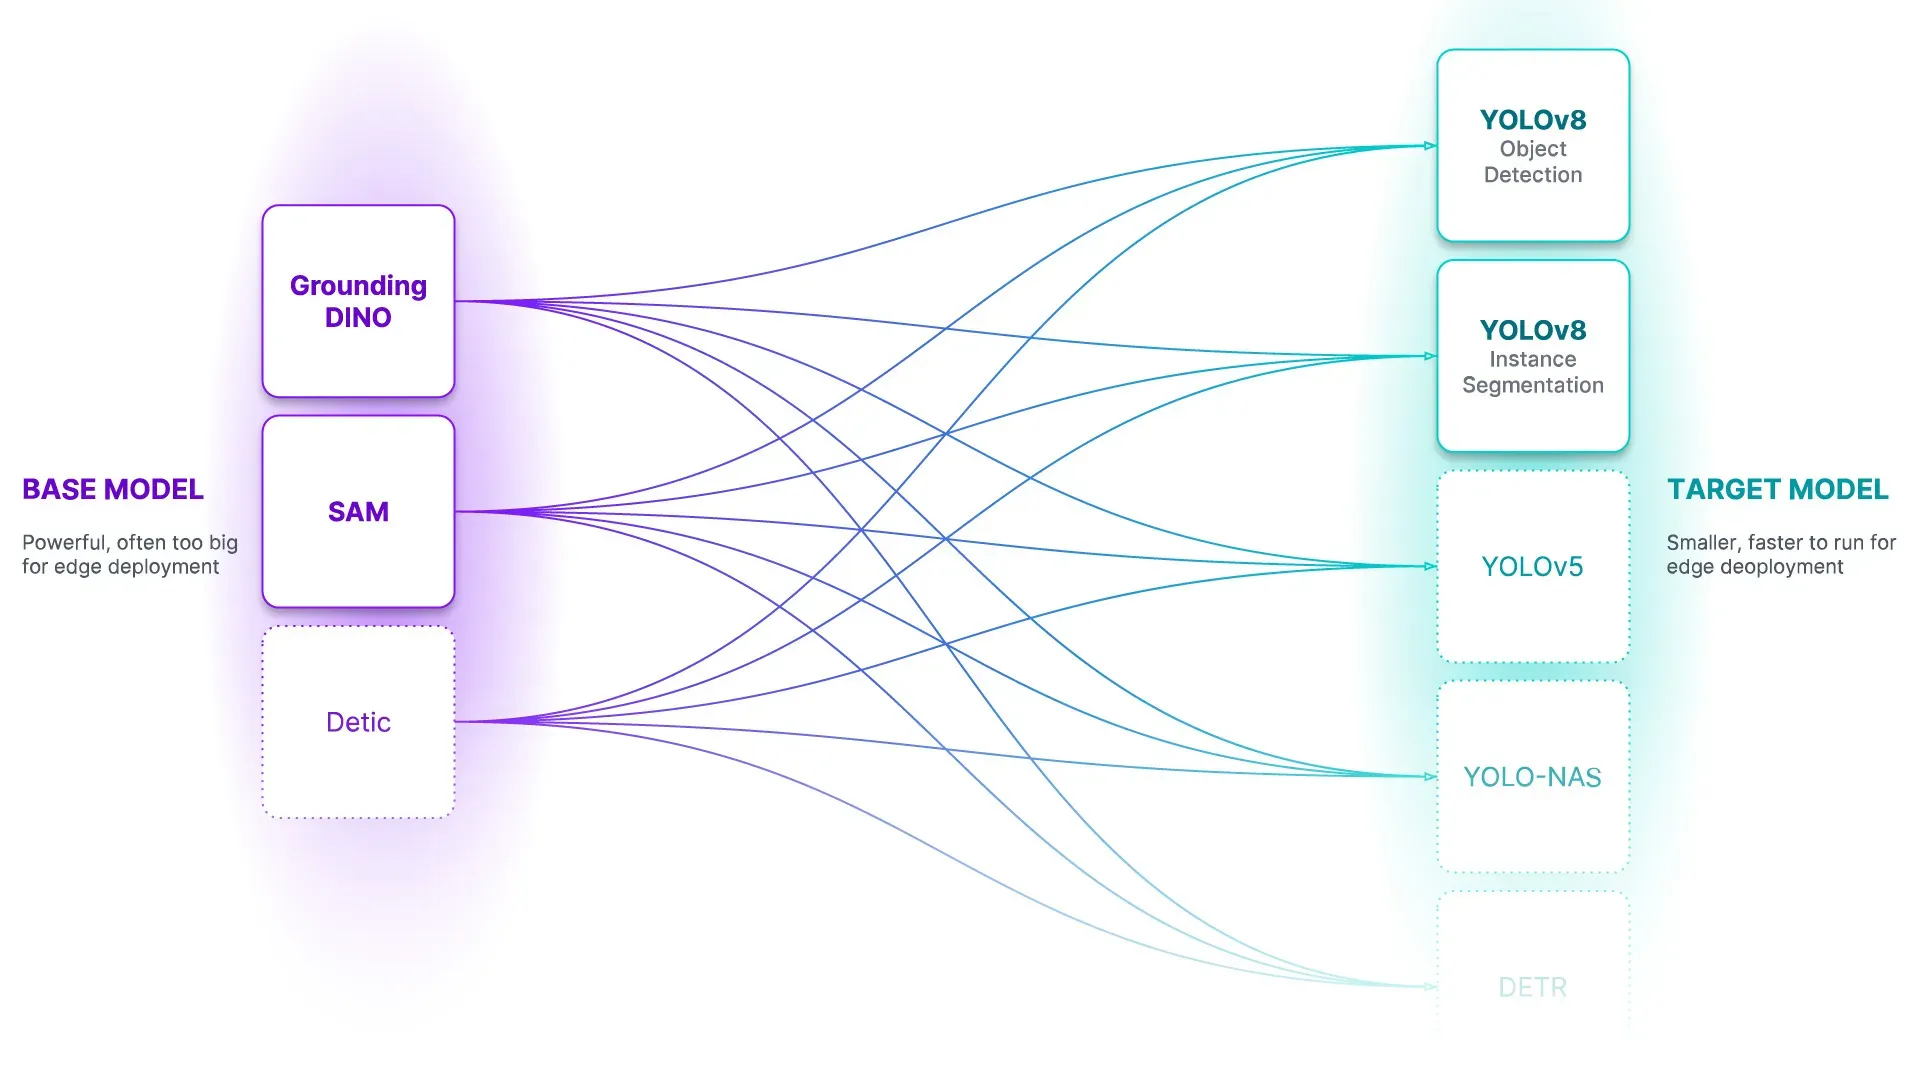
In this guide, we’re going to showcase how to use the new Autodistill Python package with Grounded SAM and YOLOv8.
Autodistill is launching with support for using:
To train:
In the coming weeks, we will also announce support for CLIP and ViT for classification tasks.
With Autodistill, you get a new model that will be significantly smaller and more efficient for running on the edge and in production, but at a fraction of the cost and training time as the foundation models. You own your model and have insight into all of the data used to train it. And you will be able to use your model as the starting point for an automated active learning pipeline to discover and fix new edge cases it encounters in the wild.
This package is inspired by the “distillation” process in computer vision in which one takes the knowledge from a larger model then “distills” the information into a smaller model.
Processes modeled on distillation have been used in natural language processing to create smaller models that learn their knowledge from larger models. One notable example of this is the Stanford Alpaca model, released in March 2023. This model used OpenAI’s text-davinci-003 model to generate 52,000 instructions using a seed set of data.
These examples were then used to fine-tune the LLaMA model by Meta Research to generate a new model: Alpaca. Knowledge from a large model – text-davinci-003 – was distilled into Alpaca.
How Autodistill Works
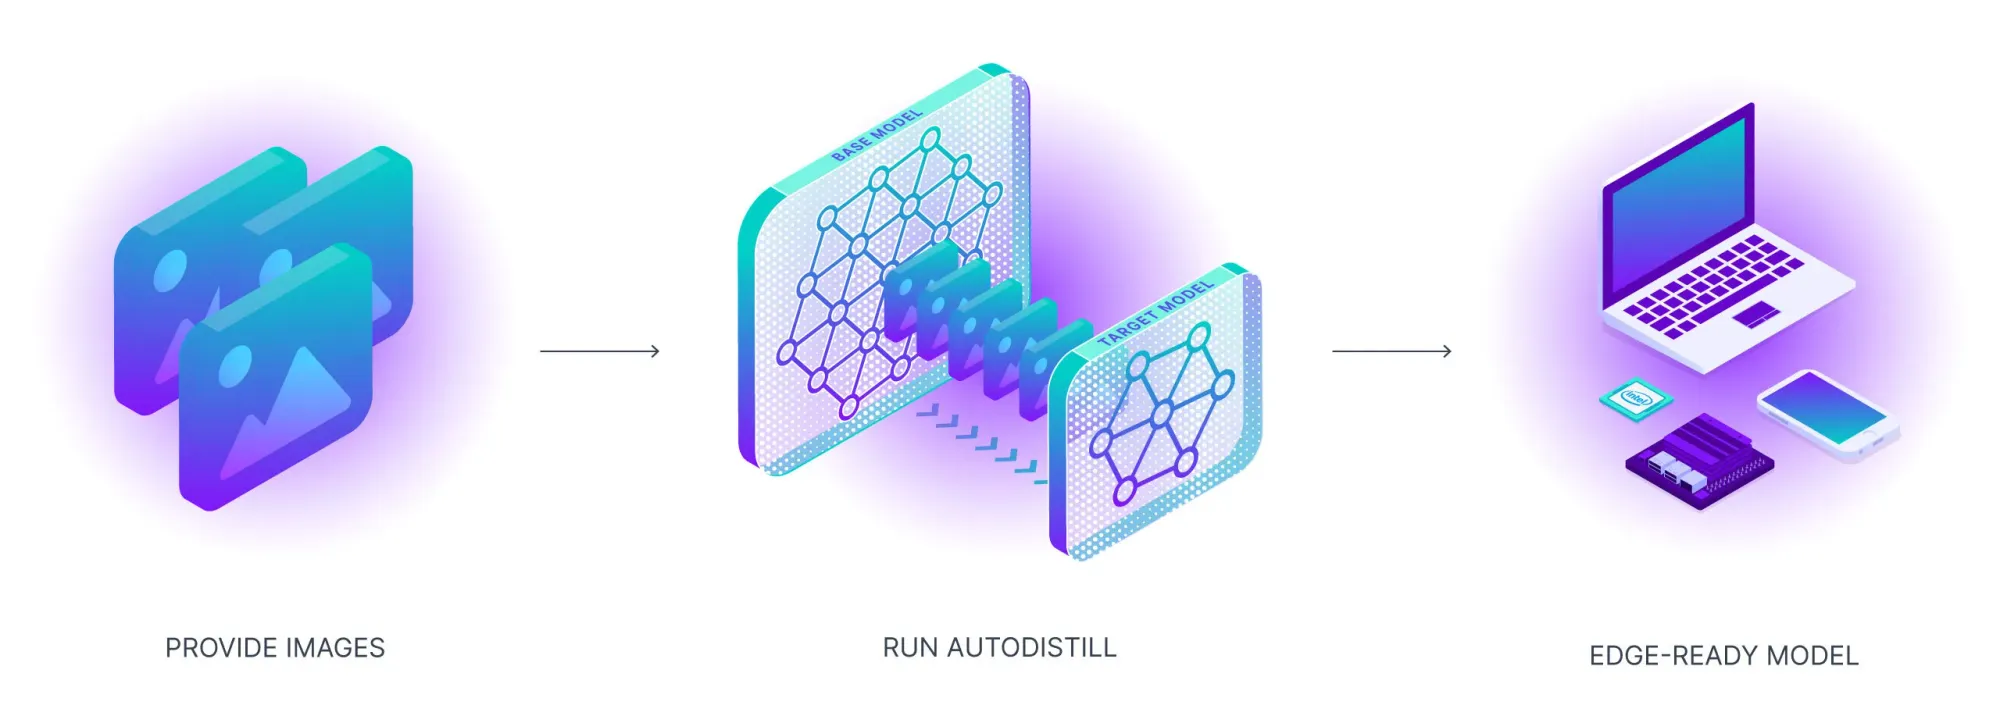
To get a model into production using Autodistill, all you need to do is collect images, describe what you want to detect, configure Autodistill inputs, and then train and deploy.
Consider a scenario where you want to build a model that detects vehicles. Using Autodistill, you could send images to a foundation model (i.e. Grounding DINO) with a prompt like “milk bottle” or “box” or “truck” to identify the vehicles you want to locate in an image. We call models like Grounding DINO that can annotate images “Base Models” in autodistill.
With the right prompt, you can run the foundation model across your dataset, providing you with a set of auto-labeled images. Autodistill provides a Python method for declaring prompts (“Ontologies”); you can modify your ontology to experiment with different prompts and find the right one to extract the correct knowledge from your foundation model.
In this setup, you don’t have to do any labeling, thus saving time on getting to the first version of your computer vision model.
Next, you can use the images to train a new vehicle model, using an architecture such as YOLOv8. We refer to these supervised models as “Target Models” in autodistill. This new model will learn from the vehicle annotations made by Grounding DINO. At the end, you will have a smaller model that identifies milk containers and can run at high FPS on a variety of devices.
Autodistill Use Cases and Best Practices
You can use Autodistill to create the first version of your model without having to label any data (although there are limitations, which will be discussed at the end of this section). This allows you to get to a model with which you can experiment faster than ever.
Since Autodistill labels images you have specified, you have full visibility into the data used to train your model. This is not present in most large models, where training datasets are private. By having insight into training data used, you can debug model performance more efficiently and understand the data changes you need to make to improve the accuracy of model predictions.
Automated labeling with Autodistill could enable you to label thousands of images, and then add humans in the loop for classes where your foundation model is less performant. You can reduce labeling costs by whatever percentage of your data Autodistill can label.
With that said, there are limitations to the base models supported at the time of writing. First, base models may not be able to identify every class that you want to identify. For more obscure or nuanced objects, base models may not yet be able to identify the objects you need to annotate (or may take extensive experimentation to find the ideal prompts).
Second, we have found that many zero-shot models that you can use for automatic labeling struggle to correctly annotate classes whose labels are used in similar contexts in natural language (i.e. distinguishing “paper cup” vs “plastic cup”).
We expect performance to improve as new foundation models are created and released and have built Autodistill as a framework where future models can easily be slotted in. We’ve seen excellent results within common domains and encourage you to see if your use case is the right match for Autodistill. The open source CVevals project is a useful tool for evaluating base models and prompts
Train a Computer Vision Model with No Labeling (Milk Detection Example)
In this guide, we’re going to create a milk container detection model using Autodistill. The best part? We're going to train a model with no labeling process. We will use Autodistill and a base model, Grounded SAM, to label images automatically according to a prompt.
Our milk container detection model could be used by a food manufacturer to count liquid bottles going through an assembly line, identify bottles without caps, and count bottles that enter the packing line.
To build our model, we will:
- Install and configure Autodistill;
- Annotate milk containers in images using a base model (Grounded SAM);
- Train a new target model (in this example, YOLOv8) using the annotated images, and;
- Test the new model.
We have prepared an accompanying notebook that you can use to follow along with this section. We recommend writing the code in this guide in a notebook environment (i.e. Google Colab).
Step 1: Install Autodistill
First, we need to install Autodistill and the required dependencies. Autodistill packages each model separately, so we also need to install the Autodistill packages that correspond with the models we plan to use. In this guide, we’ll be using Grounded SAM – a base model that combines Grounding DINO and the Segment Anything Model – and YOLOv8.
Let’s install the dependencies we need:
pip install -q autodistill autodistill-grounded-sam autodistill-yolov8 supervisionIn this example, we’re going to annotate a dataset of milk bottles for use in training a model. To download the dataset, use the following commands:
!wget --load-cookies /tmp/cookies.txt "https://docs.google.com/uc?export=download&confirm=$(wget --quiet --save-cookies /tmp/cookies.txt --keep-session-cookies --no-check-certificate 'https://docs.google.com/uc?export=download&id=1wnW7v6UTJZTAcOQj0416ZbQF8b7yO6Pt' -O- | sed -rn 's/.*confirm=([0-9A-Za-z_]+).*/\1\n/p')&id=1wnW7v6UTJZTAcOQj0416ZbQF8b7yO6Pt" -O milk.zip && rm -rf /tmp/cookies.txt
!unzip milk.zip
You can use any dataset you have with autodistill!
Step 2: Annotate Milk Bottles in Images with Grounded SAM
We are going to use Grounded SAM to annotate milk bottles in our images. Grounded SAM uses SAM to generate segmentation masks for parts in an image and Grounding DINO to label the contents of a mask. Given a text prompt (i.e. “milk bottle”) the model will return bounding boxes around the instances of each identified object.
Our dataset contains videos of milk bottles on a production line. We can divide the videos into frames using supervision, a Python package that provides helpful utilities for use in building computer vision applications.
If you already have a folder of images, you can skip this step. But, you'll still need to set a variable that records where the images are that you want to use to train your model:
IMAGE_DIR_PATH = f"{HOME}/images"To create a list of video frames for use with training our model, we can use the following code:
import supervision as sv
from tqdm.notebook import tqdm

VIDEO_DIR_PATH = f"{HOME}/videos"
IMAGE_DIR_PATH = f"{HOME}/images"

video_paths = sv.list_files_with_extensions(
    directory=VIDEO_DIR_PATH,
    extensions=["mov", "mp4"])

TEST_VIDEO_PATHS, TRAIN_VIDEO_PATHS = video_paths[:2], video_paths[2:]

for video_path in tqdm(TRAIN_VIDEO_PATHS):
    video_name = video_path.stem
    image_name_pattern = video_name + "-{:05d}.png"
    with sv.ImageSink(target_dir_path=IMAGE_DIR_PATH, image_name_pattern=image_name_pattern) as sink:
        for image in sv.get_video_frames_generator(source_path=str(video_path), stride=FRAME_STRIDE):
            sink.save_image(image=image)
Here is an example frame from a video:
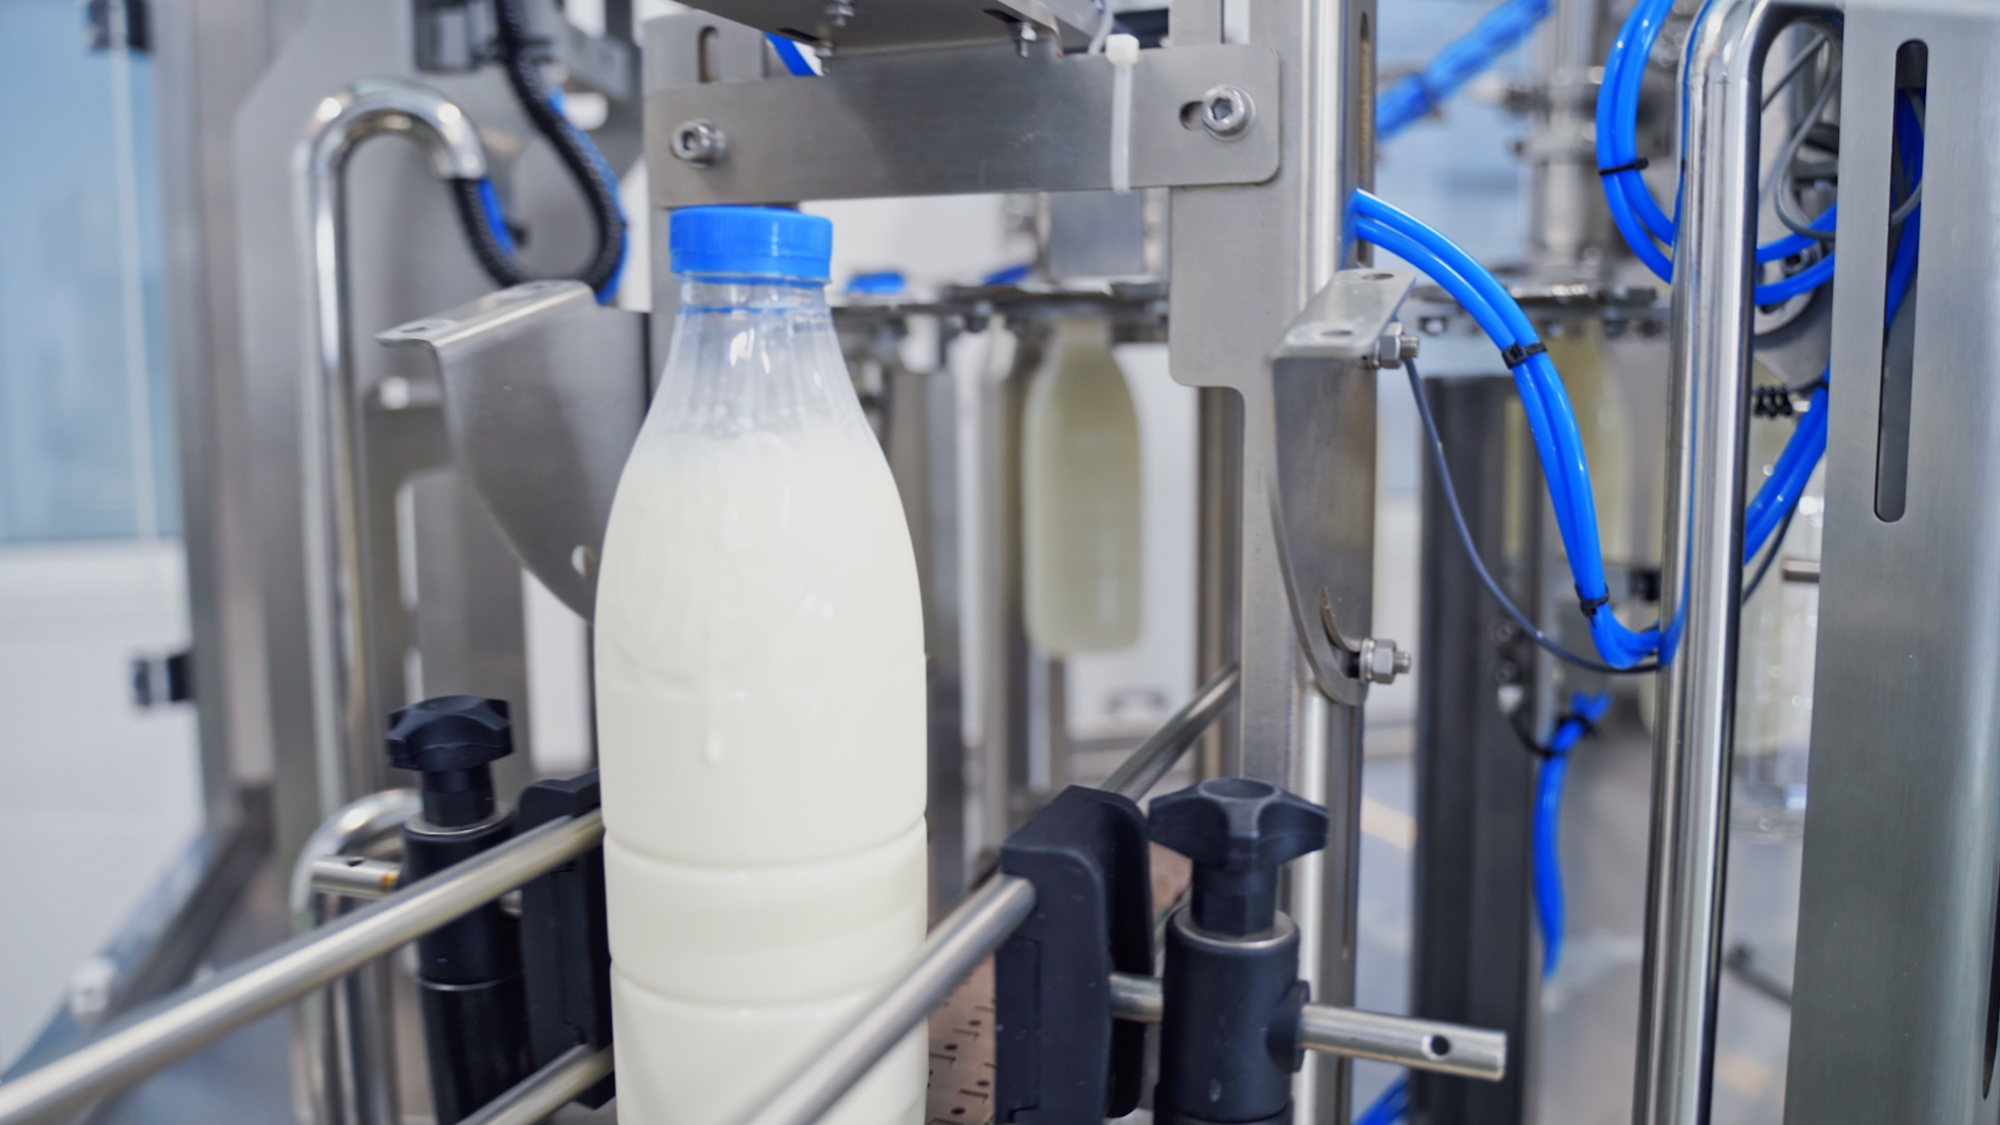
To tell Grounded SAM we want to annotate milk containers, we need to create an ontology. This ontology is a structured representation that maps our prompts to the class names we want to use:
ontology = CaptionOntology({
    "milk bottle": "bottle",
    "blue cap": "cap"
})

base_model = GroundedSAM(ontology=ontology)
When we first run this code, Grounding DINO and SAM will be installed and configured on our system.
In the code above, we create an ontology that maps class names to prompt. The Grounded SAM base model will be given the prompts “milk bottle” and "blue cap". Our code will return any instance of “milk bottle" as "bottle" and "blue cap" as "cap".
We now have a base model through which we can annotate images.
We can try a prompt on a single image using the predict() method:
detections = base_model.predict("image.png")This method returns an object with information on the bounding box coordinates returned by the model. We can plot the bounding boxes on the image using the following code:
import supervision as sv

image = cv2.imread(test_image)

classes = ["milk bottle", "blue cap"]

detections = base_model.predict(test_image)

box_annotator = sv.BoxAnnotator()

labels = [f"{classes[class_id]} {confidence:0.2f}" for _, _, confidence, class_id, _ in detections]

annotated_frame = box_annotator.annotate(scene=image.copy(), detections=detections, labels=labels)

sv.plot_image(annotated_frame)
If the returned bounding boxes are not accurate, you can experiment with different prompts to see which one returns results closer to your desired outcome.
To annotate a folder of images, we can use this code:
DATASET_DIR_PATH = f"{HOME}/dataset"

dataset = base_model.label(
    input_folder=IMAGE_DIR_PATH,
    extension=".png",
    output_folder=DATASET_DIR_PATH)
This line of code will run our base model on every image with the extension .png in our image folder and save the prediction results into a folder called dataset.
Step 3: Train a New Model Using the Annotated Images
Now that we have labeled our images, we can train a new model fine-tuned to our use case. In this example, we’ll train a YOLOv8 model.
In the following code, we will:
- Import the YOLOv8 Autodistill loader;
- Load the pre-trained YOLOv8 weights;
- Train a model using our labeled context images for 200 epochs, and;
- Export our weights for future reference.
from autodistill_yolov8 import YOLOv8

target_model = YOLOv8("yolov8n.pt")
target_model.train(DATA_YAML_PATH, epochs=50)
To evaluate our model, we can use the following code (YOLOv8 only; other models will likely have different ways of accessing model evaluation metrics):
from IPython.display import Image

Image(filename=f'{HOME}/runs/detect/train/confusion_matrix.png', width=600)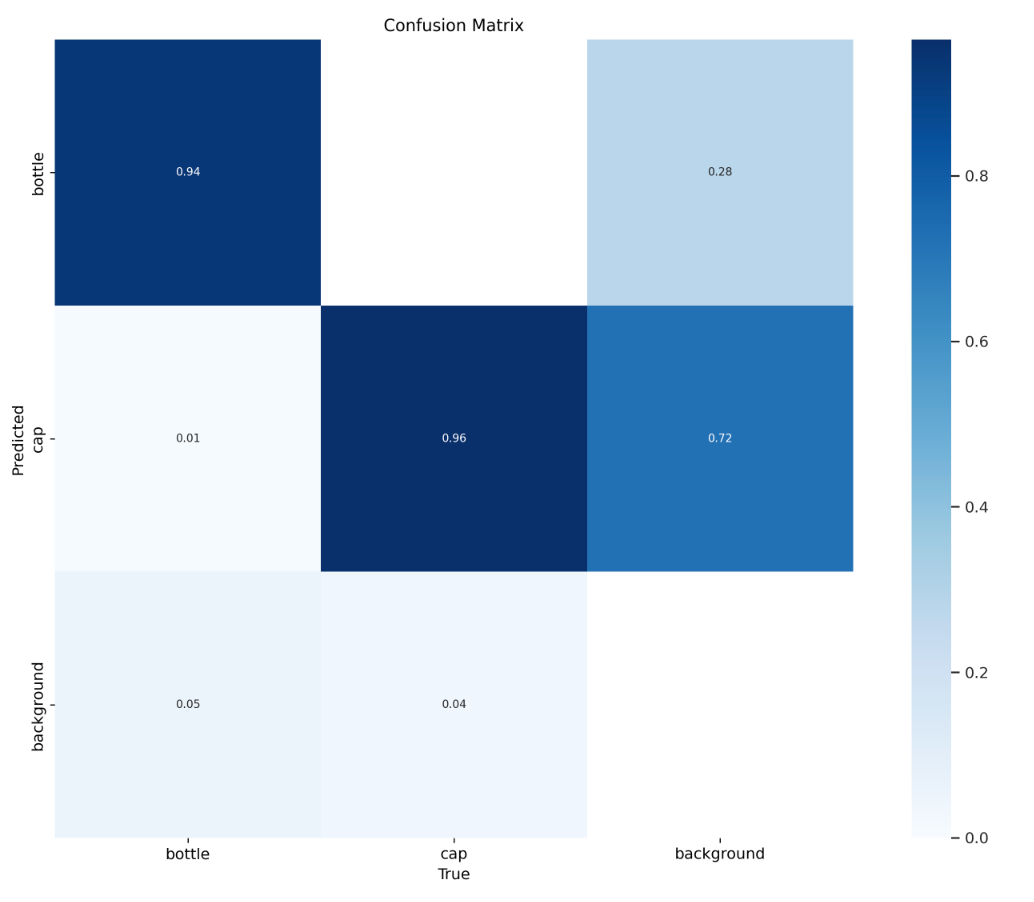
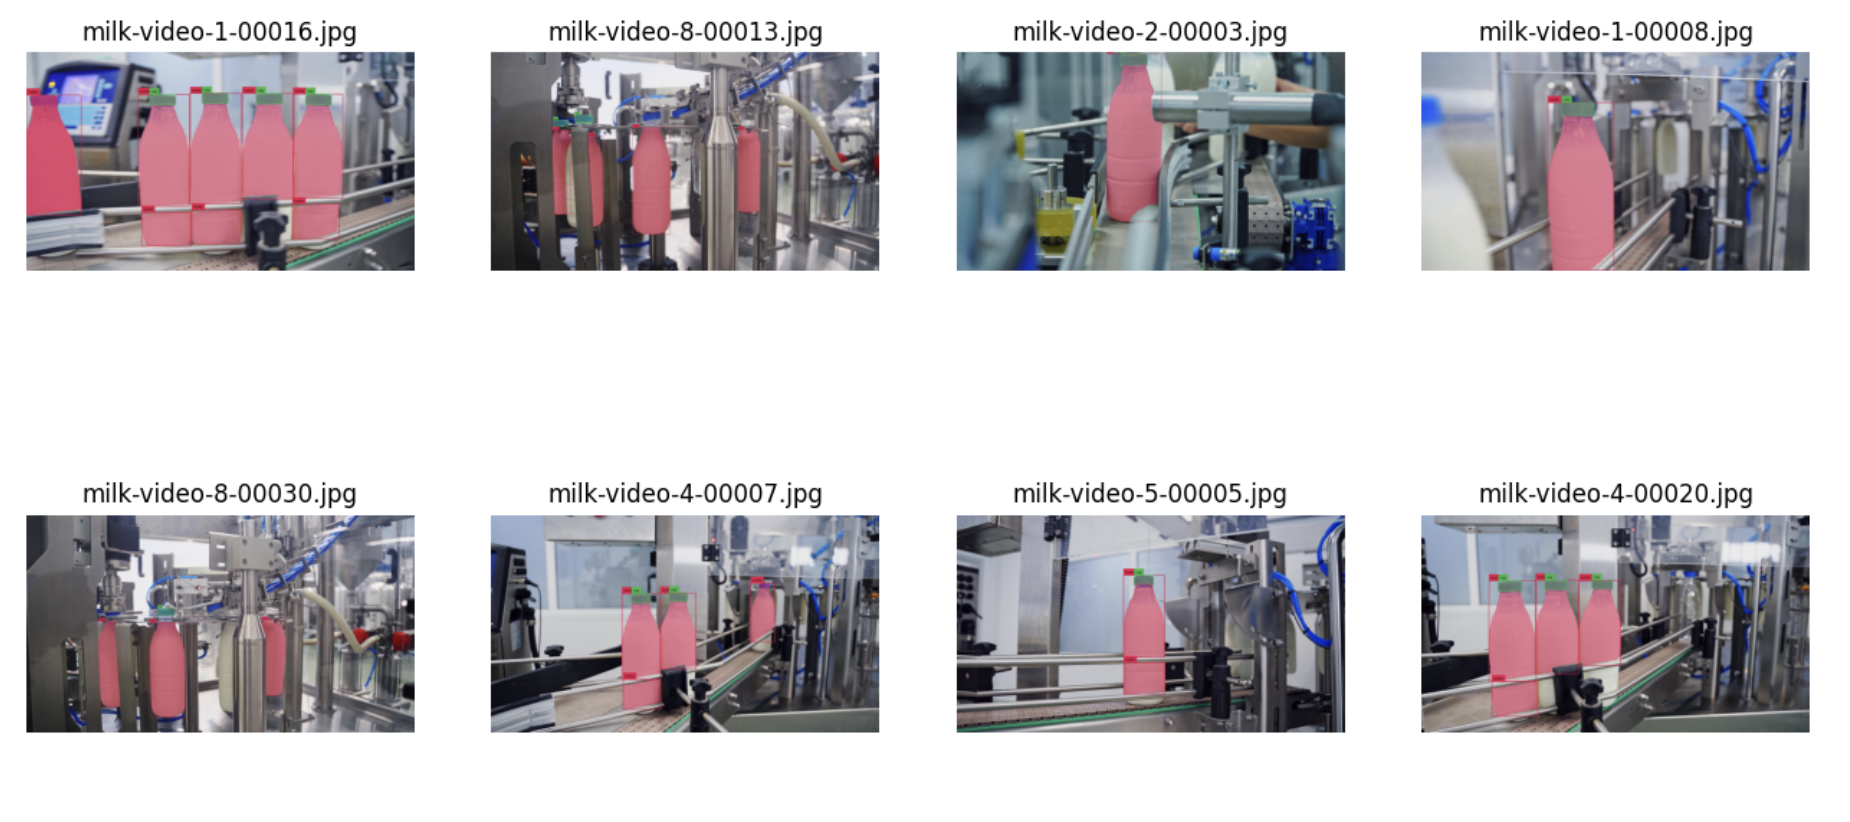
To see example predictions for images in the validation dataset, run this code (YOLOv8 only; other models will likely have different ways of accessing model evaluation metrics):
Image(filename=f'{HOME}/runs/detect/train/val_batch0_pred.jpg', width=600)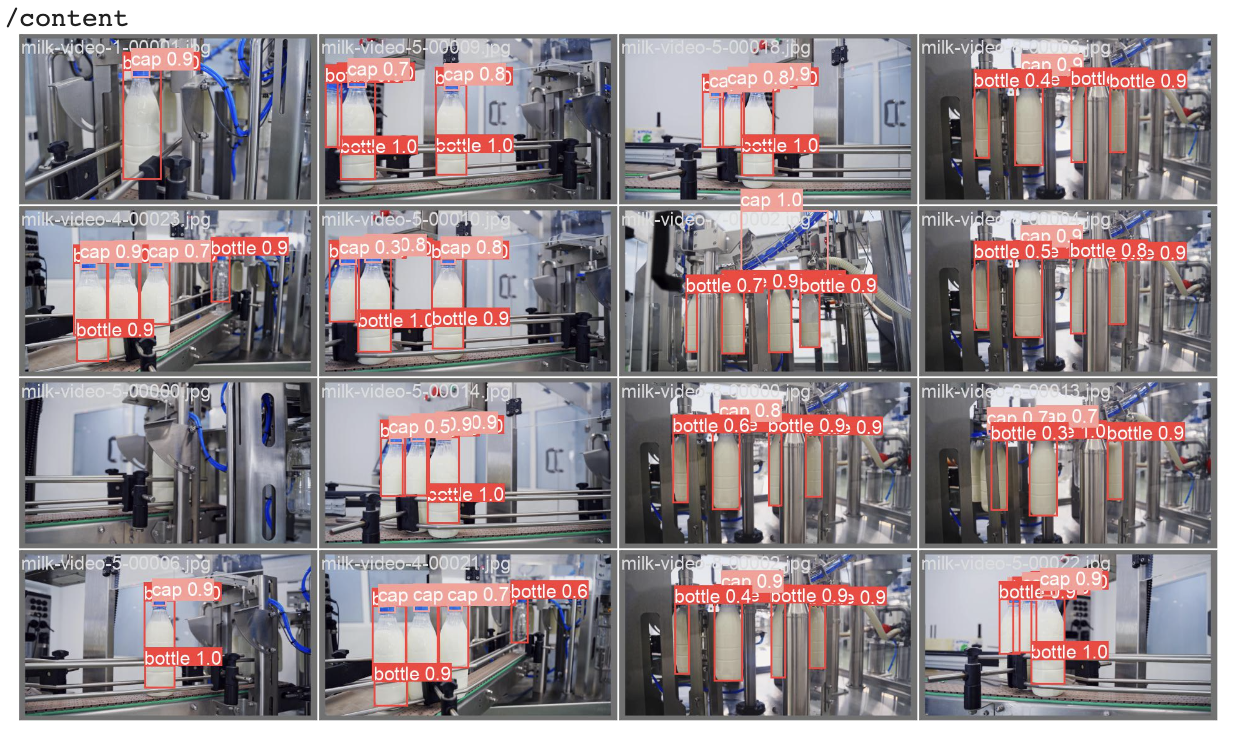
Step 4: Test the Model
We now have a trained model that we can test. Let’s test the model on images in our dataset:
SAMPLE_SIZE = 8

image_names = list(dataset.images.keys())[:SAMPLE_SIZE]

mask_annotator = sv.MaskAnnotator()
box_annotator = sv.BoxAnnotator()

images = []
for image_name in image_names:
    image = dataset.images[image_name]
    annotations = dataset.annotations[image_name]
    labels = [
        dataset.classes[class_id]
        for class_id
        in annotations.class_id]
    annotates_image = mask_annotator.annotate(
        scene=image.copy(),
        detections=annotations)
    annotates_image = box_annotator.annotate(
        scene=annotates_image,
        detections=annotations,
        labels=labels)
    images.append(annotates_image)

sv.plot_images_grid(
    images=images,
    titles=image_names,
    grid_size=SAMPLE_GRID_SIZE,
    size=SAMPLE_PLOT_SIZE)
In this code, we use supervision to process predictions for eight images in our dataset, and plot all of the predictions onto each image in a grid style:
Our model is able to successfully identify various bottles and bottle caps.
Here is an example of our new model running on a video:
0:00/1×
We now have a small computer vision model that we can deploy to the edge, built with full visibility into the data on which the model is trained.
From here, we can:
- Run our model on a Luxonis OAK, NVIDIA Jetson, webcam, in a Python script, or using another supported Roboflow deployment target;
- Analyze our evaluation metrics to plan what we can do to improve our model, and;
- Start gathering more data to use in the next version of the model.
Deploy the Model to Roboflow
You can upload your trained model directly to Roboflow for deployment on the edge. We currently support uploading weights for the following Target Models:
- YOLOv5 Object Detection
- YOLOv5 Instance Segmentation
- YOLOv8 Object Detection
- YOLOv8 Image Segmentation
- YOLOv8 Classification
- YOLOv7 Instance Segmentation
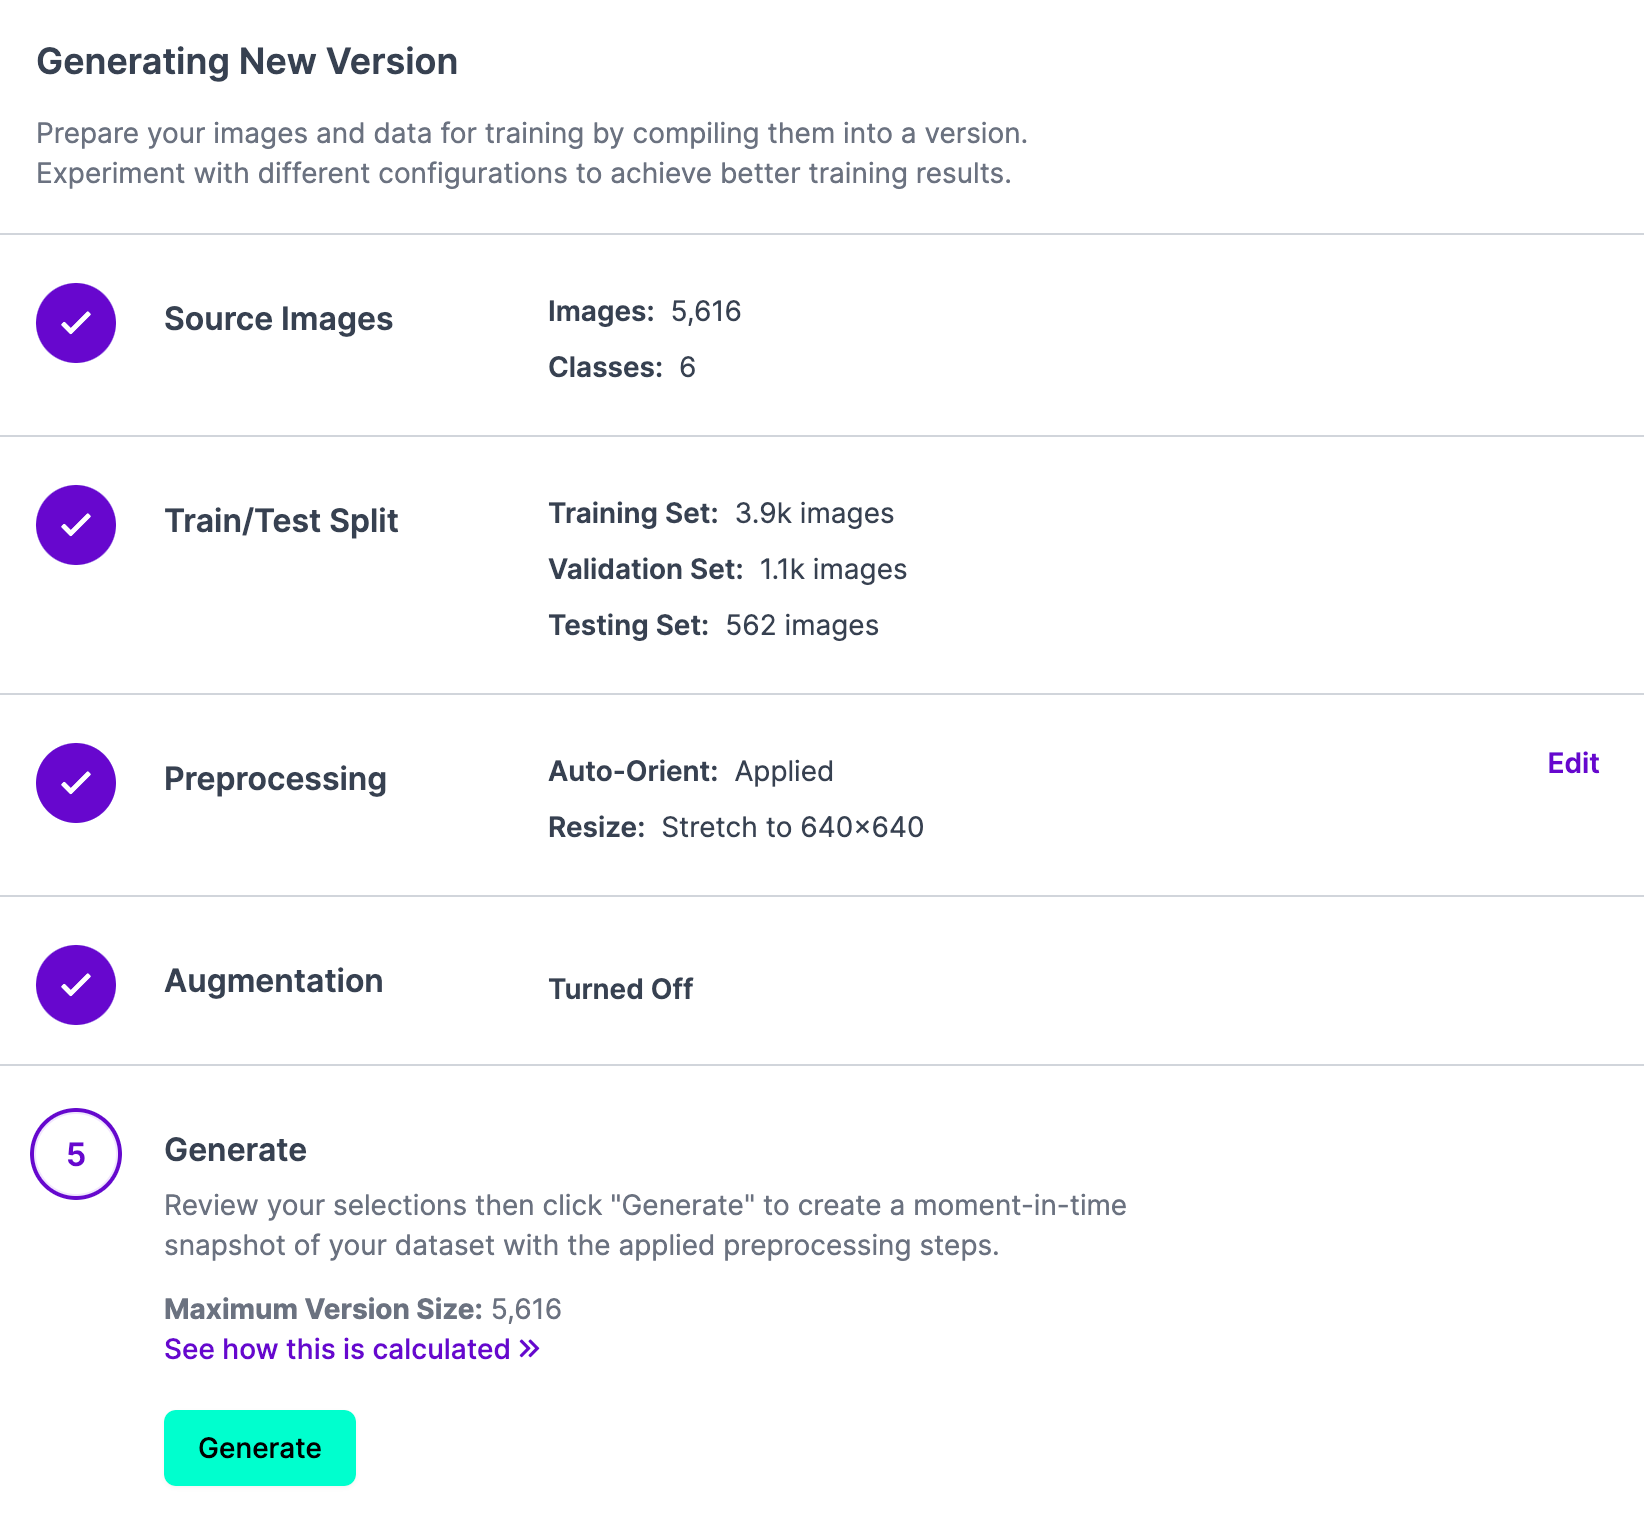
To do so, first create a new project in Roboflow and upload the data on which your model was trained. Then, click "Generate" in the Roboflow dashboard to create a new project version with which you will attach your weights:
Next, run the following commands to deploy your model to Roboflow:
from roboflow import Roboflow

rf = Roboflow(api_key="API_KEY")

project = rf.workspace().project("PROJECT_ID")

project.version(DATASET_VERSION).deploy(model_type=”yolov8”, model_path=f”{HOME}/runs/detect/train/”)
Subtitute the API key, project ID, and dataset version with the versions associated with your project. We have a guide on how to find these values in our documentation.
After you upload your weights, Roboflow will create a hosted model you can query, available for use via our API, Python package, and other SDKs.
Autodistill has enabled us to build the first version of a model that detects containers that we can use as a strong foundation toward building a model precisely tuned for our use case.
Conclusion
Autodistill allows you to use a large vision model to train a smaller model fine-tuned for your use case. This new model will be smaller and faster, which is ideal for deployment.
You will have full visibility into the training data used for the model. This means that you have the information you need to investigate model performance and understand why your model performs in the way that it does and add new data to improve model performance.
As more foundational models are released, we will add new base and target models so that you can use the best available open source technology with Autodistill. We welcome contributions to add new base and target models, too!
If you would like to help us add new models to Autodistill, leave an Issue on the project GitHub repository. We’ll advise if there is already work going on to add a model. If no work has started, you can add a new model from scratch; if a contributor is already adding a model, we can point you to where you can help. Check out the project contribution guidelines for more information.
Cite this Post
Use the following entry to cite this post in your research:
James Gallagher. (Jun 8, 2023). Distill Large Vision Models into Smaller, Efficient Models with Autodistill. Roboflow Blog: https://blog.roboflow.com/autodistill/