
According to a 2024 DS Smith and Harris Poll survey, 60% of Americans received at least one damaged item from online retailers that year. This contributes to an estimated $48.5 billion in annual losses from damaged deliveries. The expensive part isn’t the product itself. It’s a chargeback, the return, the insurance claim, and the customer who never comes back, 73% of consumers say they’re unlikely to repurchase after receiving a damaged package.
The good news is that most package damage is visible: crushed corners, torn wrapping, punctures, and water stains. These are clear visual signals that appear well before a package leaves the facility. That makes them ideal targets for computer vision.
In this tutorial, you’ll build a complete damage detection pipeline with Roboflow. You’ll start with a public dataset, train a detection model, and wire it into a Roboflow Workflow that sends a Slack alert whenever a damaged package is detected.
How to Build an Automated Package Damage Detection System
A detection system is only as reliable as the data behind it. Instead of photographing and labeling hundreds of damaged packages before proving the concept, we’ll start with a public baseline and focus on the workflow that matters: training, deploying, and automating actions.
Building a Damage Detection Dataset from Roboflow Universe
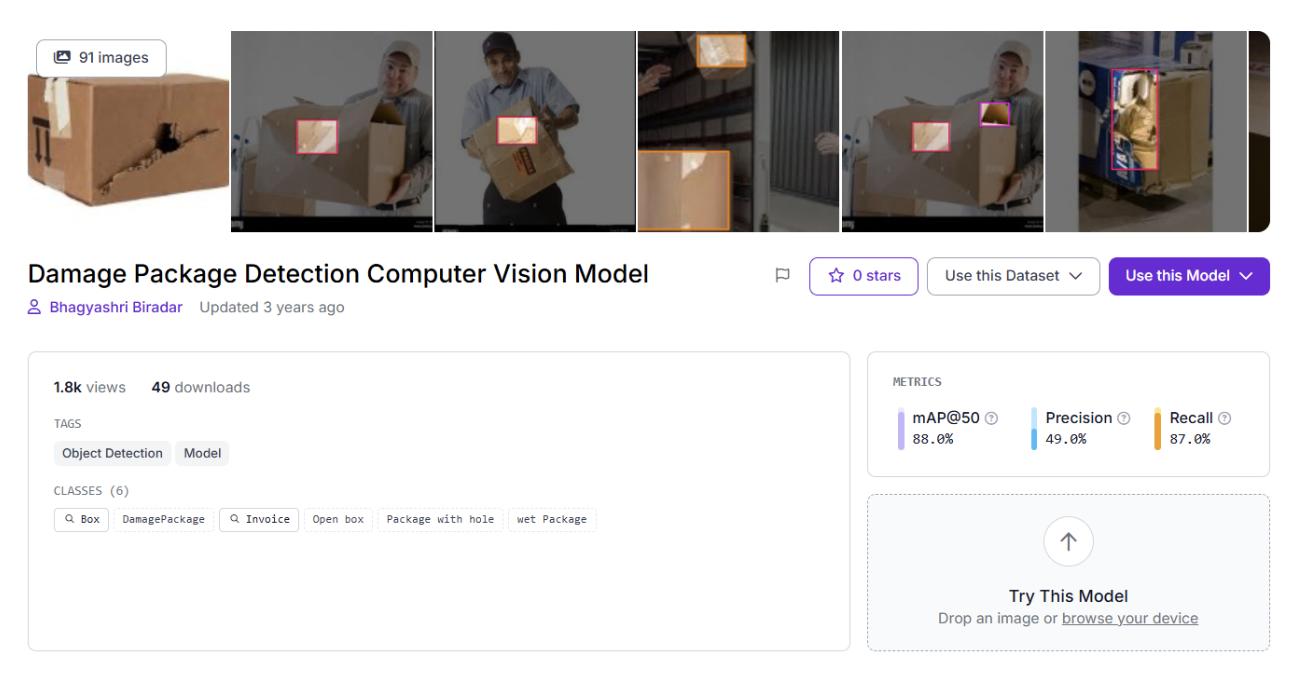
For this tutorial, we’ll use Damage Package Detection, an object detection dataset on the Roboflow Universe with 91 images across 6 classes: Box, Damaged Package Invoice, Open box, Package with hole, and wet Package. It covers the kinds of real-world variation that matter for a first model: different damage types, mixed lighting, and varying package conditions.
Start by forking the Damage Package Detection dataset from Roboflow Universe into your workspace.
Train a Package Damage Detection Model in Roboflow
This is where the dataset becomes something you can actually deploy: an object detection model that reliably detects package damage to trigger downstream automation.
For this tutorial, we’ll train a single baseline model to keep the pipeline focused and reproducible. In real deployments, teams typically iterate over multiple dataset versions, but you only need a strong starting point to build the workflow and automation loop.
Training configuration:
- Task: Object detection
- Architecture: RF-DETR
- Model size: nano
- Initialization: Train from pretrained weights
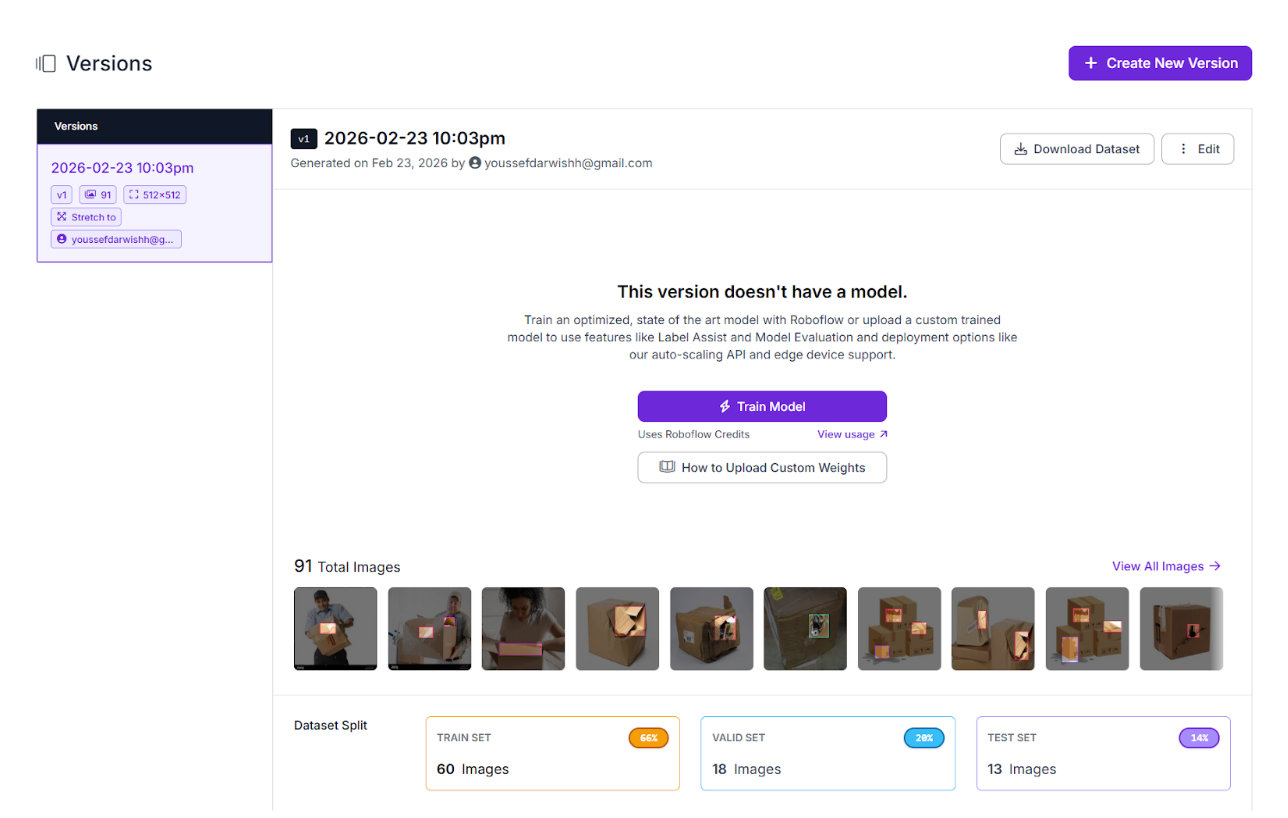
To start training, go to your dataset version and click Custom Train. Select the configuration above and launch the job. Training time depends on data size, but for 91 images, you can expect it to complete within a few minutes.

At this stage, don’t chase perfect numbers. What matters more is high recall, catching real damage, even if it means some false positives. A damaged package that ships out is far more costly than a false alert that a human can quickly dismiss.
Once training completes, you’ll have a reliable damage-detection model ready to drop into Roboflow Workflows, where predictions can trigger Slack alerts automatically.
Build a Workflow That Routes Damage Detections to Slack Alerts
This is the point where the project stops being "a model that detects boxes" and becomes an actual system someone can use. Roboflow Workflows is the glue that connects inference to action, so detections don't just sit in a dashboard. They trigger something real.
At a high level, the workflow is simple: assembly line image → run inference → if damage detected → notify Slack. The difference is in the small pieces of logic that make it reliable and readable.
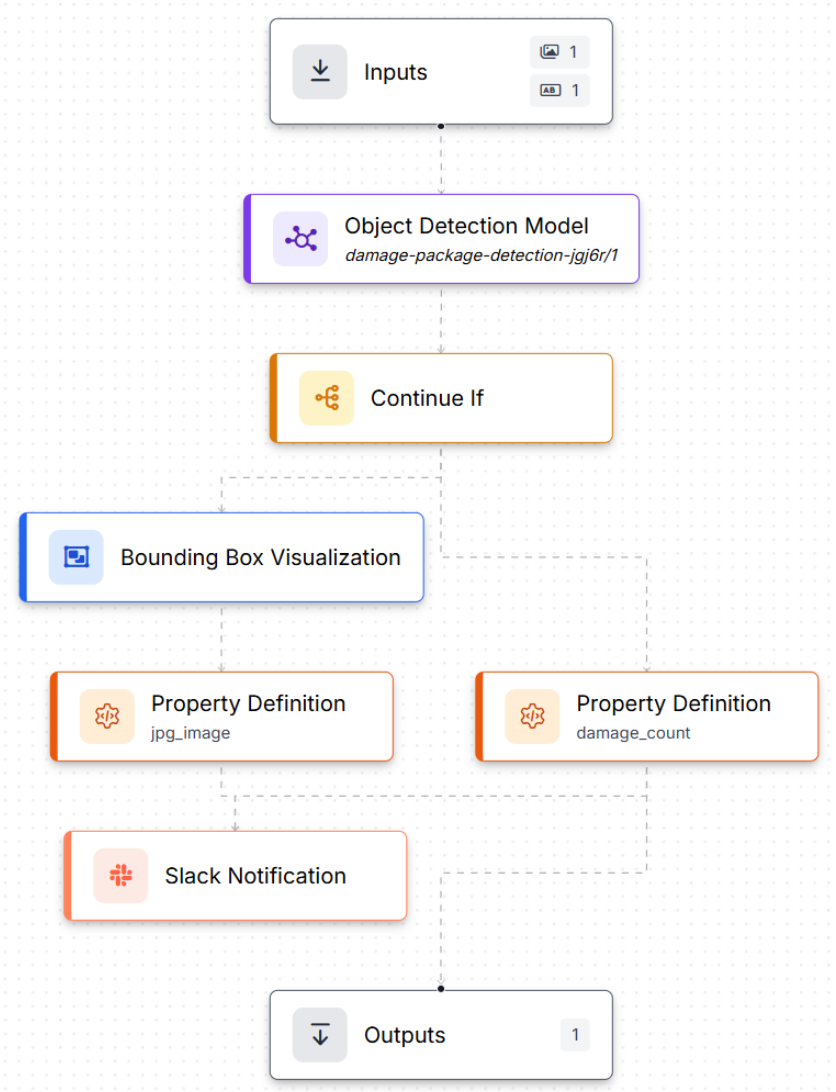
Here's the final workflow we'll build, and here is a preview of what it will look like:
Step 1: Generate the Workflow Scaffold
To build the workflow, go to your trained model and click Try Workflows → Build My Own. Roboflow automatically creates a basic workflow for you: an Inputs block feeding an Object Detection Model block, ending in Outputs. From there, you extend it into an automation pipeline.
Step 2: Inputs (Image + Station Context)
In the Inputs block, set up two inputs:
- A test package image
- A station_id parameter (so the alert is actionable, not just "damage detected somewhere")

The station_id follows a naming convention that maps directly to your facility layout. When an alert fires, the QC team knows exactly which station flagged the issue — no guessing, no wasted time.
Step 3: Only Continue If Damage Was Detected
To avoid pointless downstream steps, we add a Continue If block. This checks the number of bounding boxes returned by the model and only continues when it's ≥ 1.

Step 4: Prepare Two Outputs for Slack (Image + Damage Count)
From there, we create two useful artifacts:
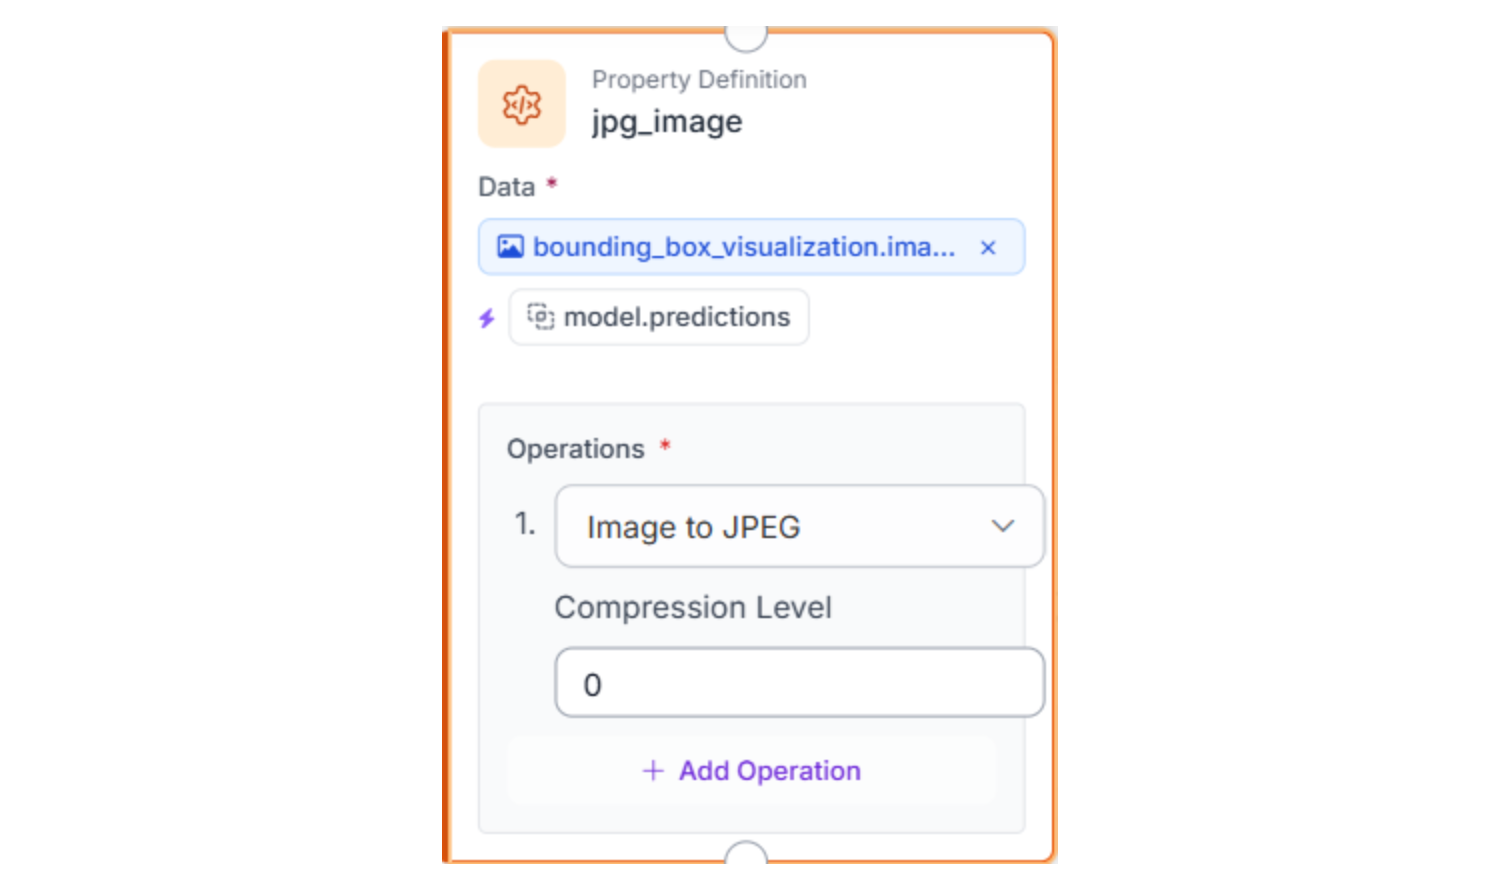
- A visualized image (bounding boxes drawn on top of the package image), then convert it to JPEG so it can be attached to Slack.
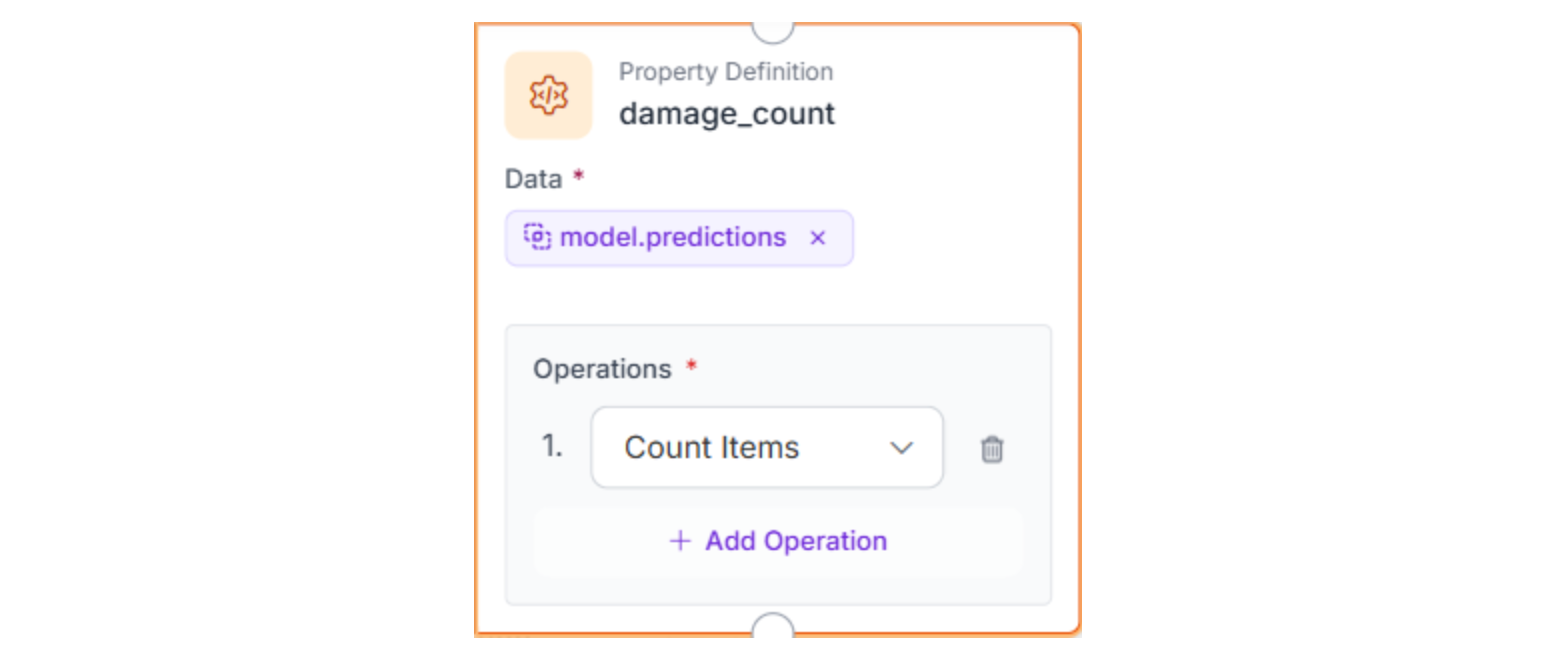
- A numeric damage_count, calculated by counting the model's prediction items.
Step 5: Send the Slack Alert
Finally, the Slack Notification block sends a message using two parameters: station_id and damage_count, and attaches the annotated image. (For the Slack token + channel setup, reference Roboflow's Slack Notification guide.)
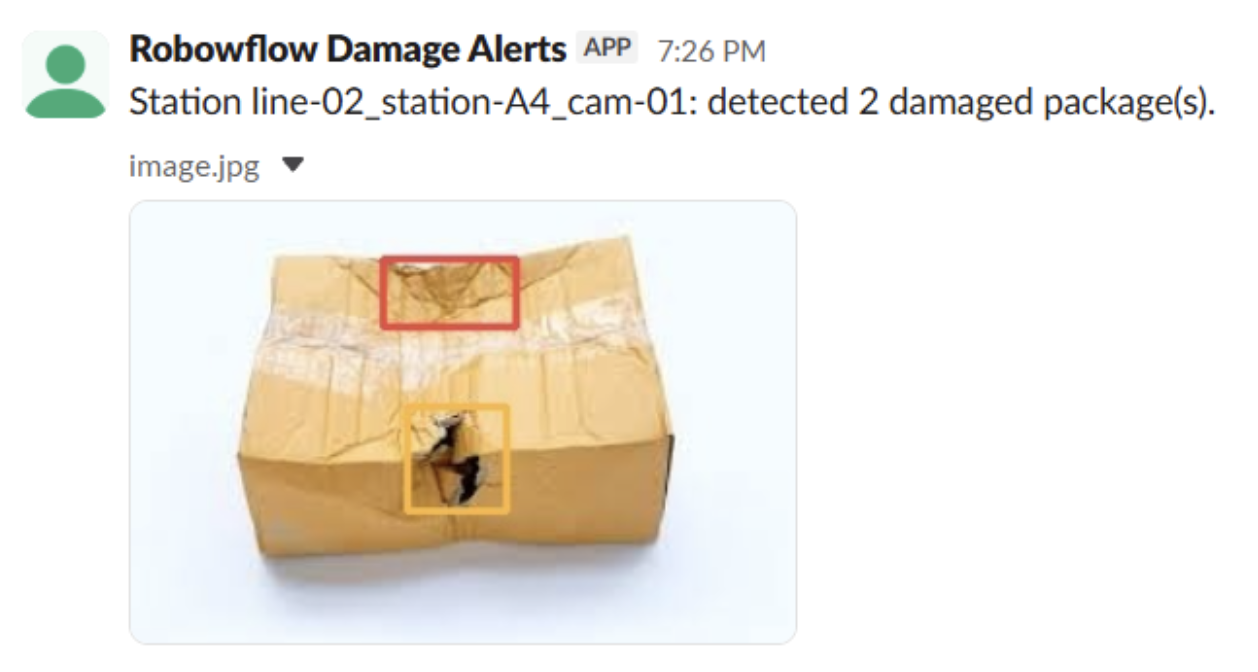
Message:
Station {{ $parameters.station_id }}: detected {{ $parameters.damage_count }} damaged package(s).Attachment field:
{
  "image.jpg": "$steps.jpg_image.output"
}
Step 6: Test the Workflow
Run a quick sanity check to verify that the workflow works end-to-end and that the alert contains the right information.
- Test the workflow with a sample package image + station_id
- Confirm you get one Slack message with an annotated image + damage_count + station_id
With this workflow in place, every assembly line image becomes an operational trigger: detect damage, package the evidence, and automatically notify the appropriate channel.
From Prototype to Production: Making Alerts Reliable at Scale
The workflow you built is the core loop: detect package damage and notify the right channel. In production, the model is rarely the first thing to break. The alerting system breaks first, usually because it's too noisy, too repetitive, or too hard to route to the right owner. This is where teams harden Workflows so the system stays useful as volume and complexity grow.
Reduce noise without losing real signals.
Most teams add a few lightweight guardrails before expanding rollout. Confidence thresholds let you filter out low-quality detections, only alert when the model is reasonably sure it found real damage, not shadows or label glare. Cooldowns prevent repeated alerts for the same station within a time window; a common production starting range is 10-15 minutes, long enough to avoid spam from persistent issues but short enough to resurface unresolved ones. Grouping detections into a single alert (rather than one per frame) further reduces noise without hiding real problems.
Scale from one station to many lines.
Once you move beyond a single test station, you need structure. Use station_id (and optionally line/facility identifiers) so alerts can be routed to the right channel or team. Different cameras, lighting conditions, and package types will surface edge cases quickly at scale. The practical response is data iteration: capture failures, label them, retrain, repeat.
Go beyond Slack when accountability matters.
Slack is great for speed, but it's not a system of record. Once teams want traceability, the next step is to route the same workflow outputs into a task system (Jira, Trello, Asana), where the workflow can create a "Review damaged package" ticket that includes the station ID, damage count, and the annotated image. Beyond that, teams route detections to Manufacturing Execution Systems (MES), build automatic package diversion logic, or generate proof-of-condition reports for insurance claims.
The point is simple: Workflows lets you keep the same detection pipeline and progressively harden the operational layer, rather than rebuilding everything once the first "it spams too much" complaint comes in.
Conclusion: Build an Automated "Proof of Condition" System
Package damage detection is a high-value computer vision use case because the cost of missed damage is measurable: chargebacks, returns, and broken customer trust. But the real win isn't drawing boxes on an image. It's closing the loop between detection and action.
In this tutorial, you built the full loop in Roboflow: you started with a public damage detection dataset, trained a detection model for damaged packages, and then deployed it in Roboflow Workflows to automate the last mile. With a simple workflow, each assembly line image becomes an operational signal, and Slack receives an alert containing the annotated image, the station ID, and the damage count. That's what makes the system useful, not just impressive.
From here, production hardening is straightforward: reduce noise with thresholds and cooldowns, expand to more lines and facilities, and route alerts into task systems when you need accountability. The core pattern stays the same. Train, deploy, automate, and iterate until the alerts are trustworthy enough to run the operation.
Further Reading
Below are a few related topics you might be interested in:
Cite this Post
Use the following entry to cite this post in your research:
Contributing Writer. (Feb 26, 2026). Automate Package Damage Detection. Roboflow Blog: https://blog.roboflow.com/automate-package-damage-detection/