
Data augmentation artificially expands training sets by applying flips, crops, rotations, noise, and occlusion techniques, and it has a measurable impact on object detection accuracy even when collecting more labeled images is not practical. RF-DETR relies heavily on augmentation to achieve its COCO benchmark results, and the same principles apply to custom datasets at any scale. This post walks through a hands-on example using augmented data exported from Roboflow, trained for 30 epochs, and evaluated with mAP to show the concrete performance gain over a baseline.
Data augmentation in computer vision is not new, but recently data augmentation has emerged on the forefront of state of the art modeling. RF-DETR, Roboflow's real-time transformer-based object detection model, uses a variety of data augmentation techniques to boost the model's performance on COCO, a popular image detection benchmark that contains a wide range of images and object classes. We wrote a great post specifically about data augmentation and RF-DETR.
In this post, we discuss why you should use data augmentation on your own dataset and how to get started. We provide a hands-on example of how we used data augmentation to boost our models performance. The reality is that data augmentation is extremely important for sparse computer vision data sets, and we believe that augmentation is currently under utilized.
The What the Why of Data Augmentation in Vision
A few months ago, we put together a great post explaining what preprocessing and data augmentation is in computer vision and why you should consider using them on your own data set. I will briefly revisit that ground here.
Preprocessing in Vision - Image preprocessing involves reformatting images before they are used in training and inference. You do this on all of the data set splits - training, validation, and testing. This include resizing, orienting, color corrections, etc.
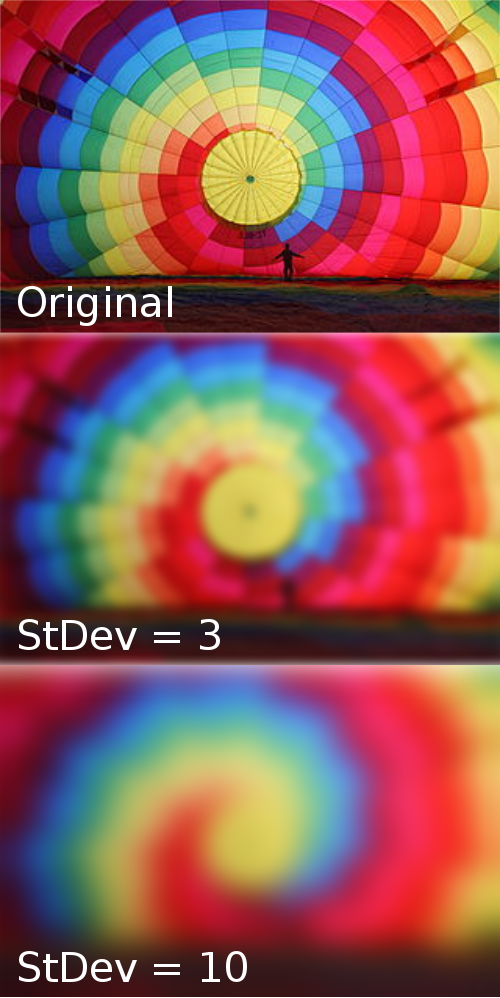
What is Data Augmentation in Vision - Image augmentation involves altering the training images to generate a synthetic dataset that is larger than your original dataset and will hopefully improve the downstream performance of your model. Data augmentations include flipping, rotating, cropping, adding noise, occluding portions of the image, and more. In the past, we have written blog posts on a number of these including how to create a synthetic dataset for computer vision, how and why to use flip augmentation, the importance of blur augmentation, and why and how to use random crop augmentation. In our post on data augmentation strategies in RF-DETR, we introduce a number of occlusion techniques that are designed to improve training through regularization.
Why Use Data Augmentation in Vision - augmenting your images creates a larger dataset that will better generalize to the situations that the model may encounter in production. Different augmentation techniques are more or less useful in different settings. For example, in a self driving car dataset, adding random noise may make the model more resilient to camera artifacts, but flipping vertically might not be useful since the road is never inverted.
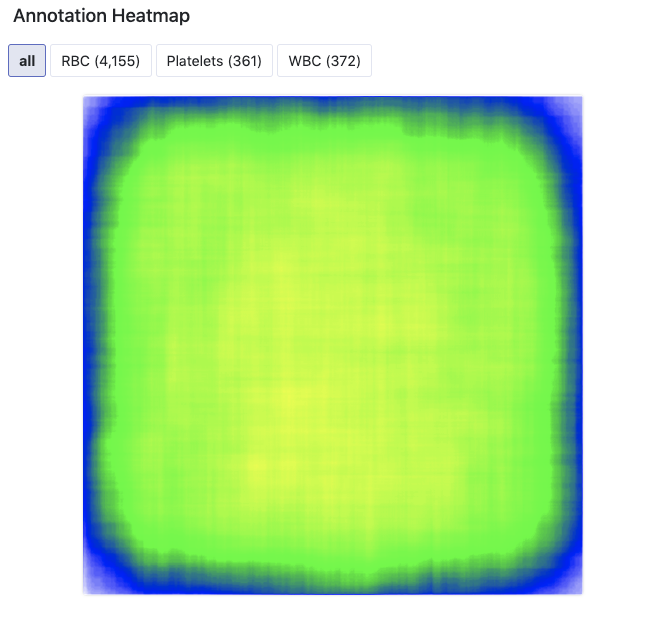
Simple augmentation strategies can help fill in the gaps for a model. For example, models often localize object classes to guess that they only appear in the locations that appear in the training set. For example, in our tutorial example, we have one under represented class (platelets) that appears with the following heat map.

With a few flip and rotate augmentations, we should be able to make that picture look a lot better and more distributed.
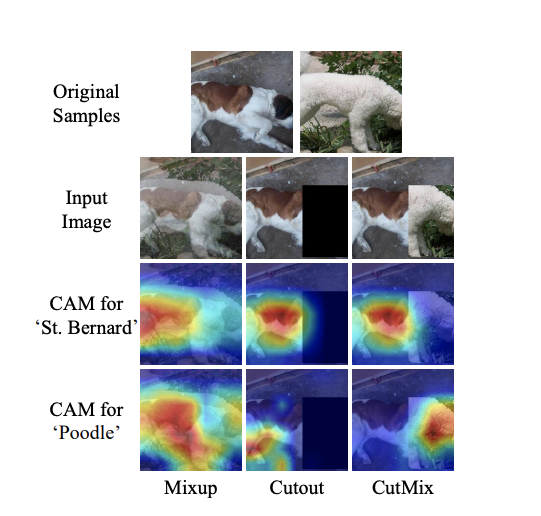
More complicated augmentations like occlusion strategies are implemented to force the model to learn more about the whole object that is being detected and not just the low hanging fruit. For example, in detecting a dog, the model may converge on recognizing the dogs head as a useful characteristic. This convergence can be demonstrated with Class Activation Mapping (CAM). But what happens if that dog is in a picture with its head behind a bush? Below you can see in "Cutout", how the dog is now recognized by its back portion as well.
Training and Evaluating an Object Detection Model
***Skip this section if you already have a training/evaluation pipeline
In order to get our hands dirty with image augmentation, we will need to train an object detection model. Then we will evaluate our model on our test set to determine if the augmentations we have made improved our models performance.
For this tutorial, we will use EfficientDet, a state of the art object detector published by Google Brain. For an in depth guide on training, see my post on how to train EfficientDet for object detection.
Now, I will provide a high level view of the training process. If you are eager to get right into the code, here is a Colab Notebook for using data augmentation in computer vision.
First, we will set up our training environment in Google Colab.
! git clone https://github.com/roboflow-ai/Monk_Object_Detection.git
! cd Monk_Object_Detection/3_mxrcnn/installation && cat requirements_colab.txt | xargs -n 1 -L 1 pip install
Then, we will downloaded data that we have augmented via an easy to use user interface. The download link will be generated below in the tutorial.
#THIS CELL NEEDS CHANGED

!curl -L [Your Data Link HERE] > roboflow.zip; unzip roboflow.zip; rm roboflow.zip
We will do some folder restructuring in the notebook and then we will kick off training.
#some free compute from Colab, nice
gtf = Detector();

gtf.Train_Dataset(root_dir, coco_dir, img_dir, set_dir, batch_size=8, image_size=512, use_gpu=True)

gtf.Model();

gtf.Set_Hyperparams(lr=0.0001, val_interval=1, es_min_delta=0.0, es_patience=0)

gtf.Train(num_epochs=30, model_output_dir="trained/");
Then you will see a training output like so:
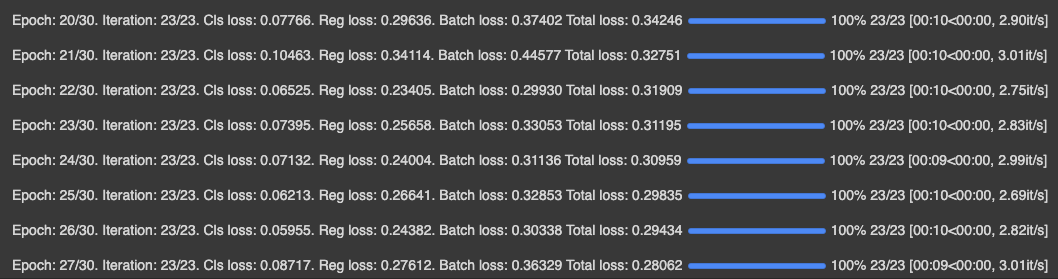
For evaluation, we will make inferences with our model and take the mAP of our model's predictions on the test set. See my post here for a deep dive on what is mAP. Here is the output!
52.62% = Platelets AP
77.24% = RBC AP
92.00% = WBC AP
mAP = 73.96%
Not too bad for state of the art detection!
If you are like me, you can set up multiple Colab notebooks to run multiple experiments at once :D
How to Generate Data Augmentations for Vision
For our data augmentations, we will head over to Roboflow where we will find an easy user interface for uploading images, making augmentations, and then downloading our augmented images in any annotation format.
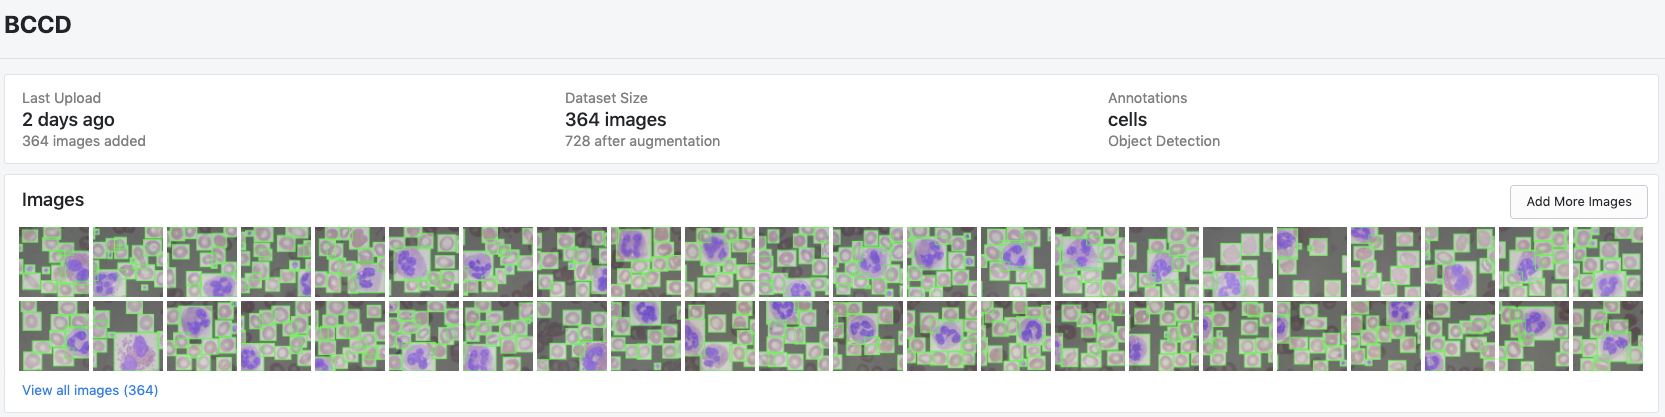
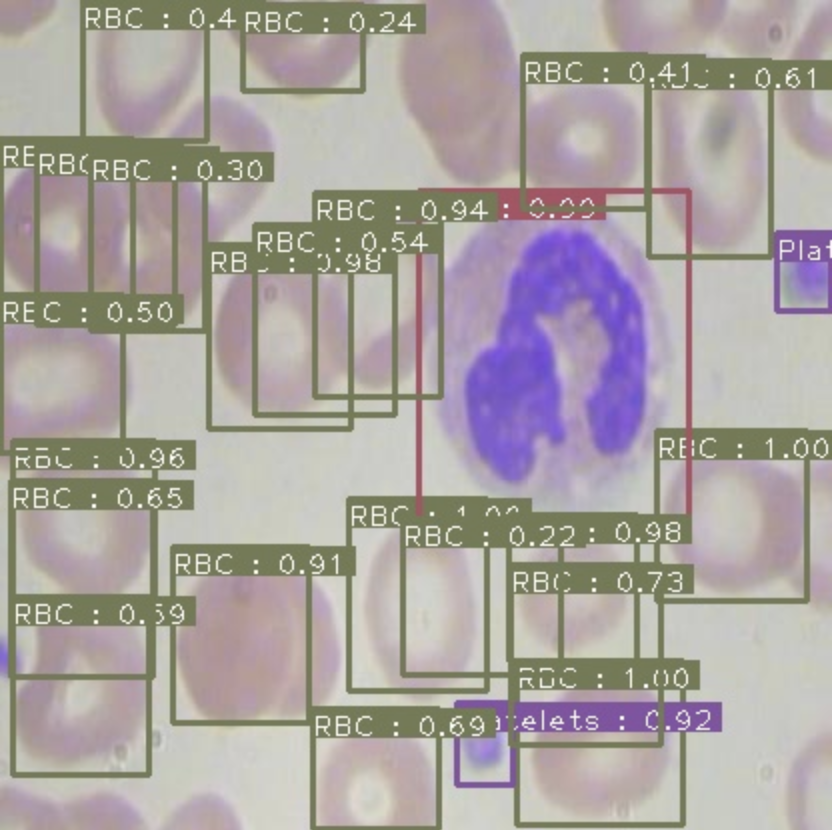
To get started, you can upload your dataset or you can fork one of the public datasets. Once your images and annotations are uploaded, the dataset view will show you the images along with bounding boxes like so.
Then you will find a number of options that we can use to create an augmented dataset.
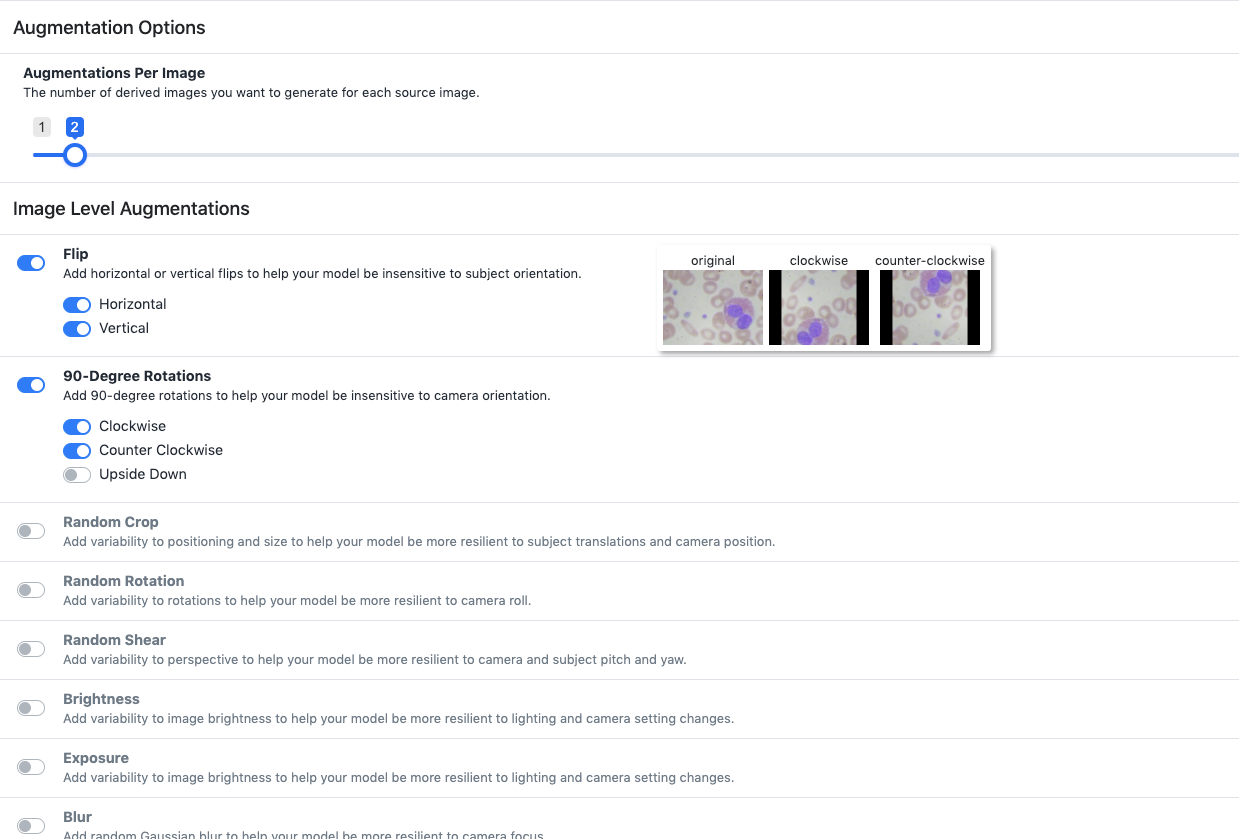
For my experiment with blood cell detection - I can rule a few augmentations out by reasoning about the dataset and production environment that my model will find itself in. I don't need to vary "Exposure" because these images will be taken under consistent settings in the bloodstream. I also probably don't need to introduce blur because the images will not be taken with a camera that has focus issues. But some useful augmentations will definitely be flipping and rotating, since a cell could manifest itself in the image in any given direction.
Through a process of running experiments and thinking about my dataset, I came up with the following experiments to run.
1) vanilla - The original 364 images without augmentation
2) flip-rotate - flip vertically and horizontally and rotate 90 degrees. 3 augmentations per image.
3) flip-random-rotate - flip vertically and horizontally and randomly rotate up to 30 degrees. 3 augmentations
4) flip-sheer - flip the image and sheer it a little bit. 3 augmentations
5) flip-rotate-sheer - flip, rotate and sheer according to the above. 6 augmentations
6) flip-rotate-big - just flip and rotate. 6 augmentations
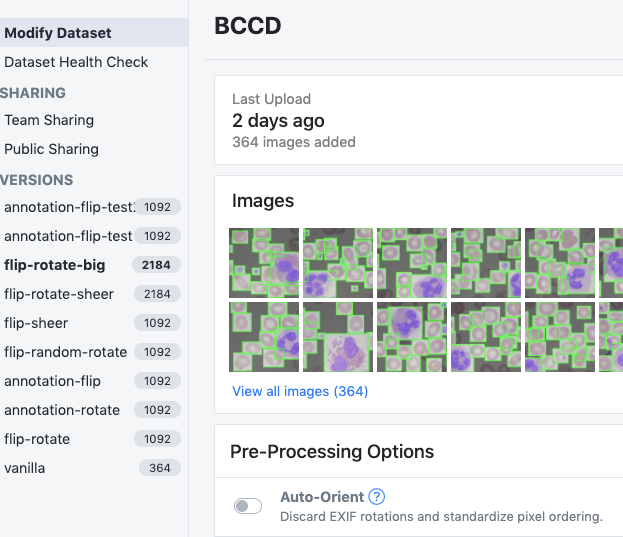
Ultimately I ended up with the following dataset versions.
Results of Data Augmentations
Now on to experimentation!
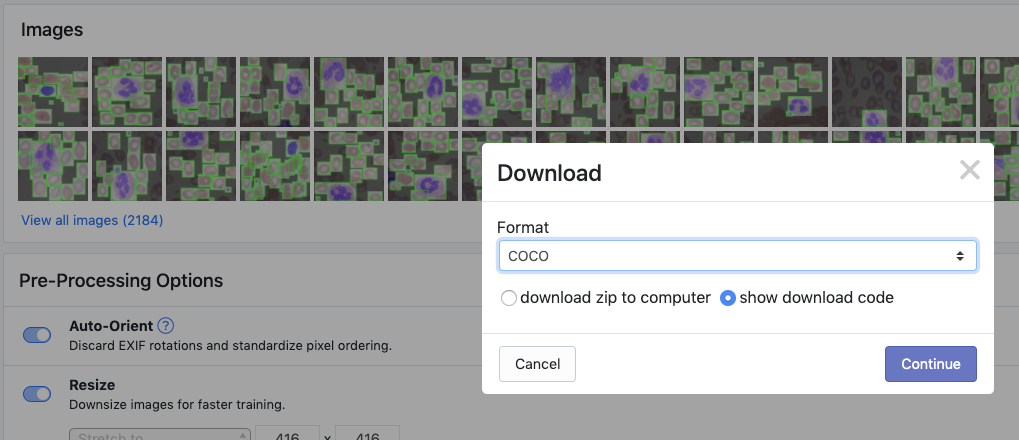
In order to experiment with the model training process we have set up in this Colab notebook to test augmentations, we need to export our data in COCO json format.
***If your model requires another format, never fear, all formats are available to export.
Then you paste that link into the notebook where the dataset link is missing and hit run all cells!
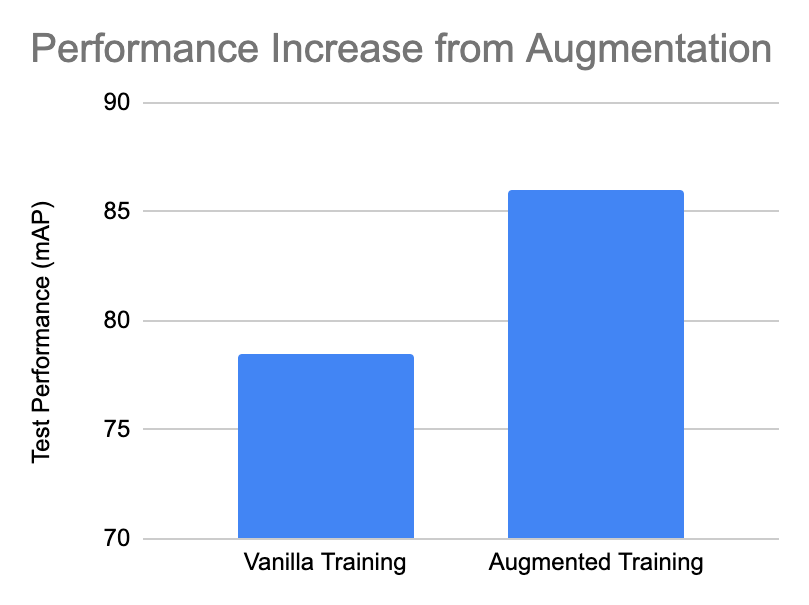
The notebooks train for 30 epochs (about 10 minutes) and then infer (30 ms) on the augmented data. The inferences are passed into an evaluation script and I found the resulting mAP performances after augmentation.
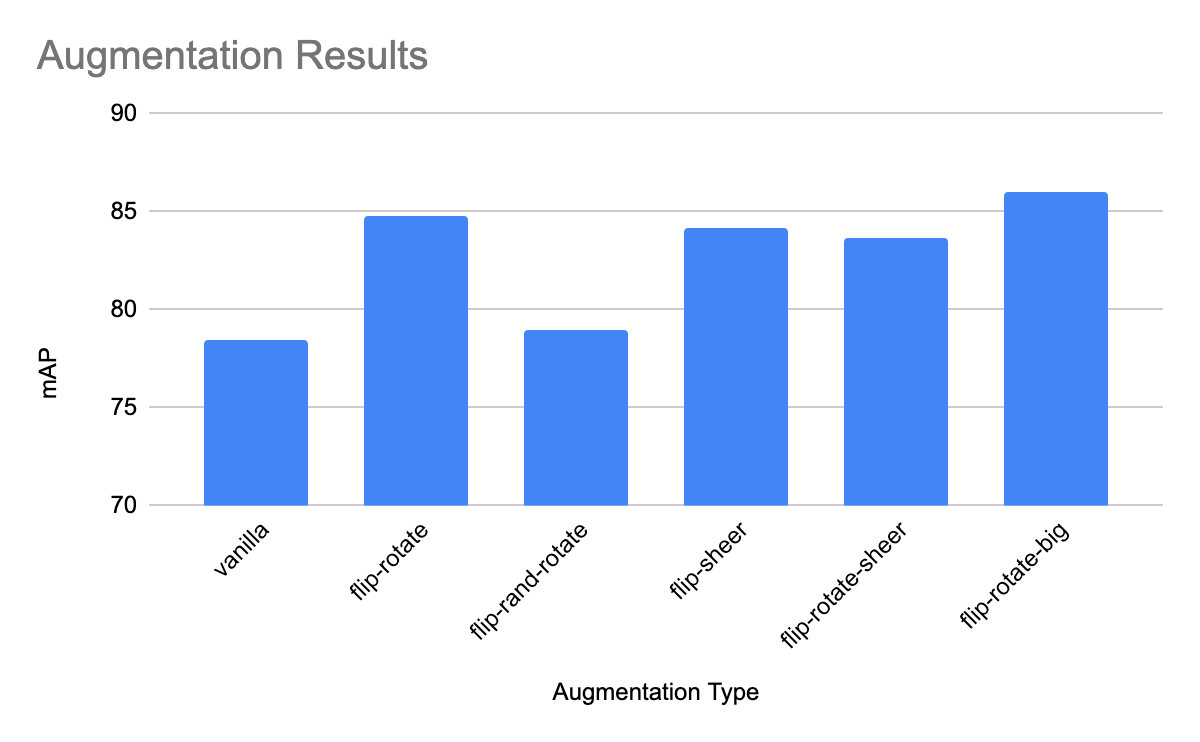
Now that is a big improvement from our baseline dataset! And we didn't have to collect more data or wait for the new state of the art image detection model to be released.
Conclusion
Data augmentation is extremely powerful for computer vision tasks, especially if you have a sparse dataset that needs to be scaled without collecting new data.
In this post, we have provided a tutorial on how to use data augmentation on your own computer vision task.
Happy augmenting! 🙌
Drop us a line!
If you are attempting to use augmentation in your computer vision project and found this tutorial useful, we would love to hear what you are working on and help you get to the finish line.
Cite this Post
Use the following entry to cite this post in your research:
Jacob Solawetz. (Jun 2, 2020). Getting Started with Data Augmentation in Computer Vision. Roboflow Blog: https://blog.roboflow.com/boosting-image-detection-performance-with-data-augmentation/