

Synthetic images are often used early in a model's development to expand datasets or fill gaps where real-world data is limited. They provide a fast, cost-effective way to increase dataset diversity and can be replaced over time as more production images become available.
Synthetic images are especially useful when the objects you want to detect are rare, making them difficult or expensive to capture in real-world conditions.
In this guide, you'll learn how to build a synthetic image generation workflow in Roboflow Workflows using the Stability AI Image Generation block.
When Should You Use Synthetic Images?
You should use synthetic images when they help solve data challenges that real-world images cannot easily or affordably address. These scenarios include:
- Insufficient training data: When you don't have enough images to train a robust model.
- Class imbalance: When one class has far fewer examples than others. Synthetic images can help balance the dataset.
- Rare edge cases: To generate examples of unusual lighting, weather, occlusions, viewpoints, or backgrounds that are difficult to capture.
- Rapid prototyping: To quickly create an initial dataset before collecting production data.
- Testing model robustness: To expose the model to a wider variety of conditions than those available in real-world data.
Synthetic images are most effective when they are visually realistic, accurately represent the real-world environment in which the model will be deployed, and are used to complement real images rather than replace them.
How to Generate Synthetic Images Using Stability AI in Roboflow Workflows
Roboflow Workflows let you visually build computer vision pipelines by connecting modular blocks for tasks such as image generation, object detection, visualization, and more. This visual approach simplifies complex workflows, reduces the amount of code required, and enables you to quickly create scalable, production-ready computer vision applications.
The video below demonstrates the workflow we will build. The workflow automatically generates synthetic images from text prompts and uploads them directly to a Roboflow project, where they can be annotated, organized into a dataset, and used to train computer vision models.
Try it yourself by forking the workflow and using your own Stability AI Developer API key. To build this workflow follow the steps discussed below.
Alternatively, you can use Roboflow Agent, available in your workspace after you log in, to automatically generate the workflow.
Roboflow Agent acts as a conversational interface for Roboflow tools such as Workflows. Simply describe the workflow you want in natural language, and the Agent will generate it for you. The generated workflow provides a strong starting point while remaining fully customizable.
For example, you can use the following prompt:
“Generate an image generation workflow that creates synthetic images, tags them with 'synthetic-image', and uploads them to the Roboflow project with ID 'construction-site-7yu42'.
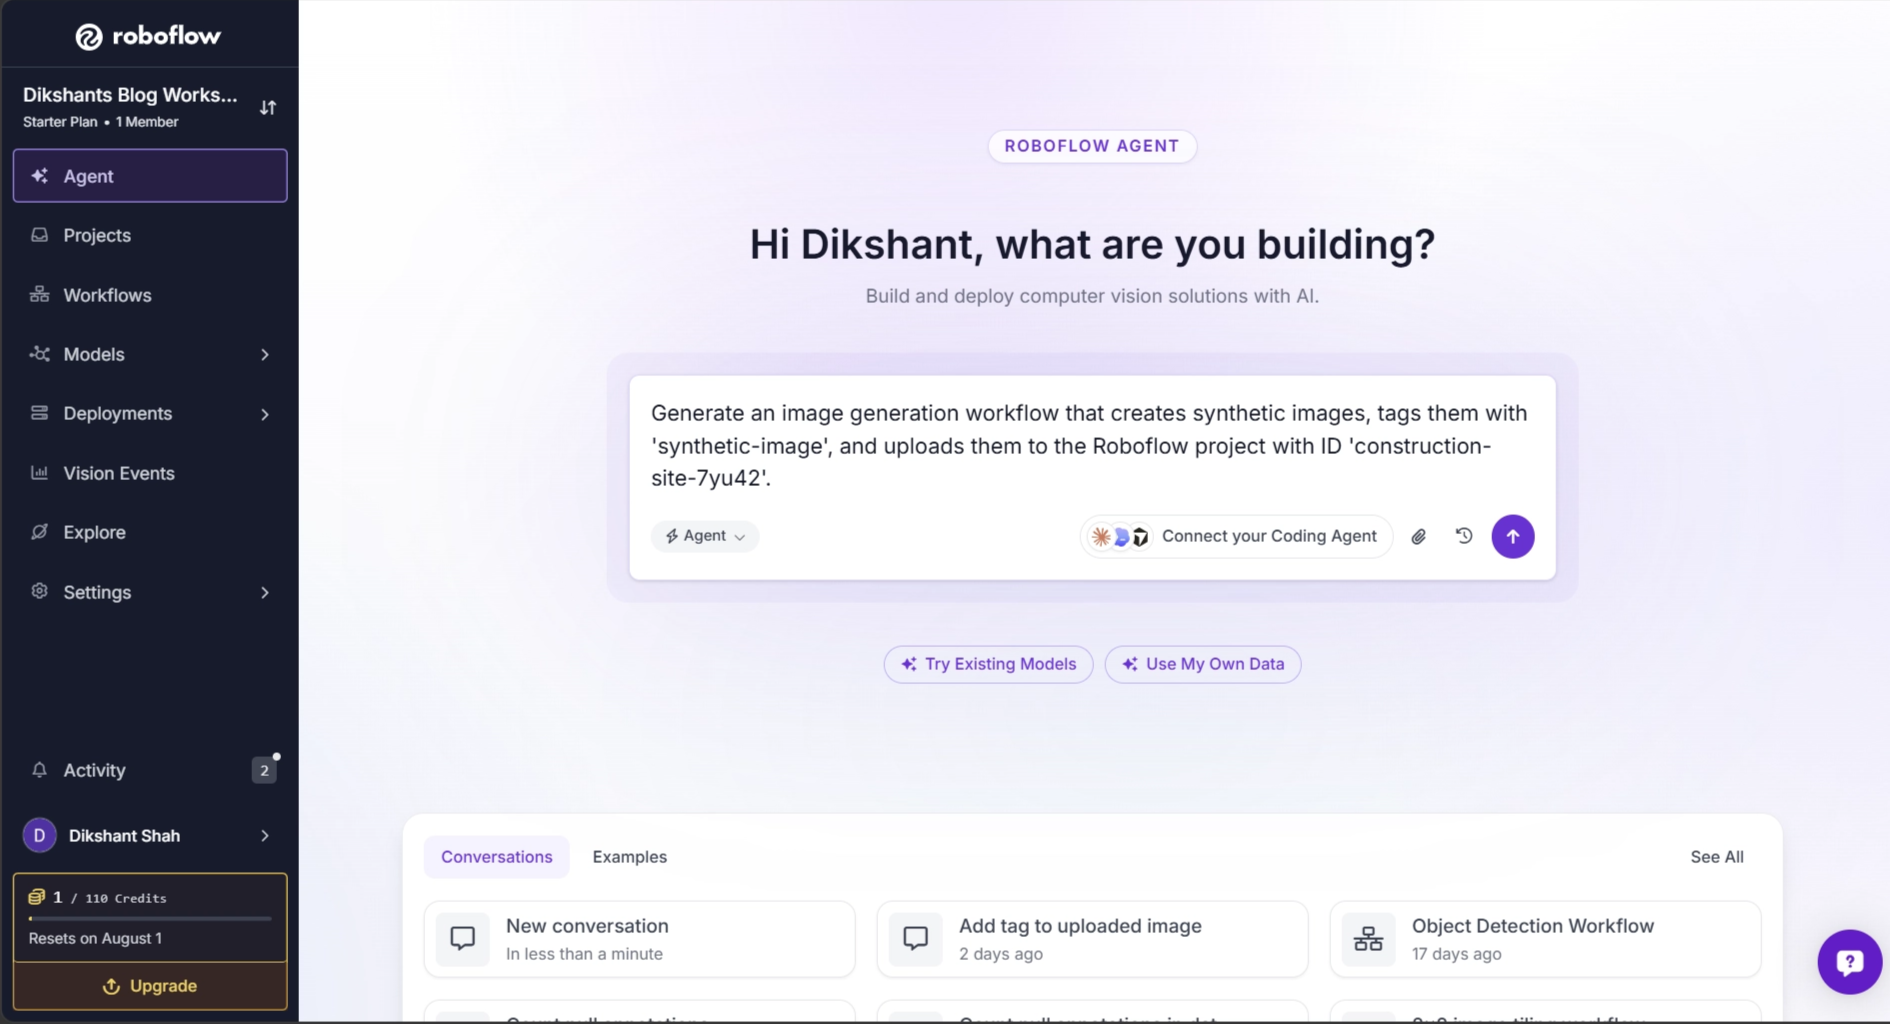
In this guide, however, we'll build the workflow step by step using individual blocks so you can understand what each component does and how they work together.
Step 1: Set Up Your Roboflow Workflow
To get started, create a free Roboflow account and sign in. Next, create a workspace, navigate to Workflows from the left sidebar, and click Create Workflow.
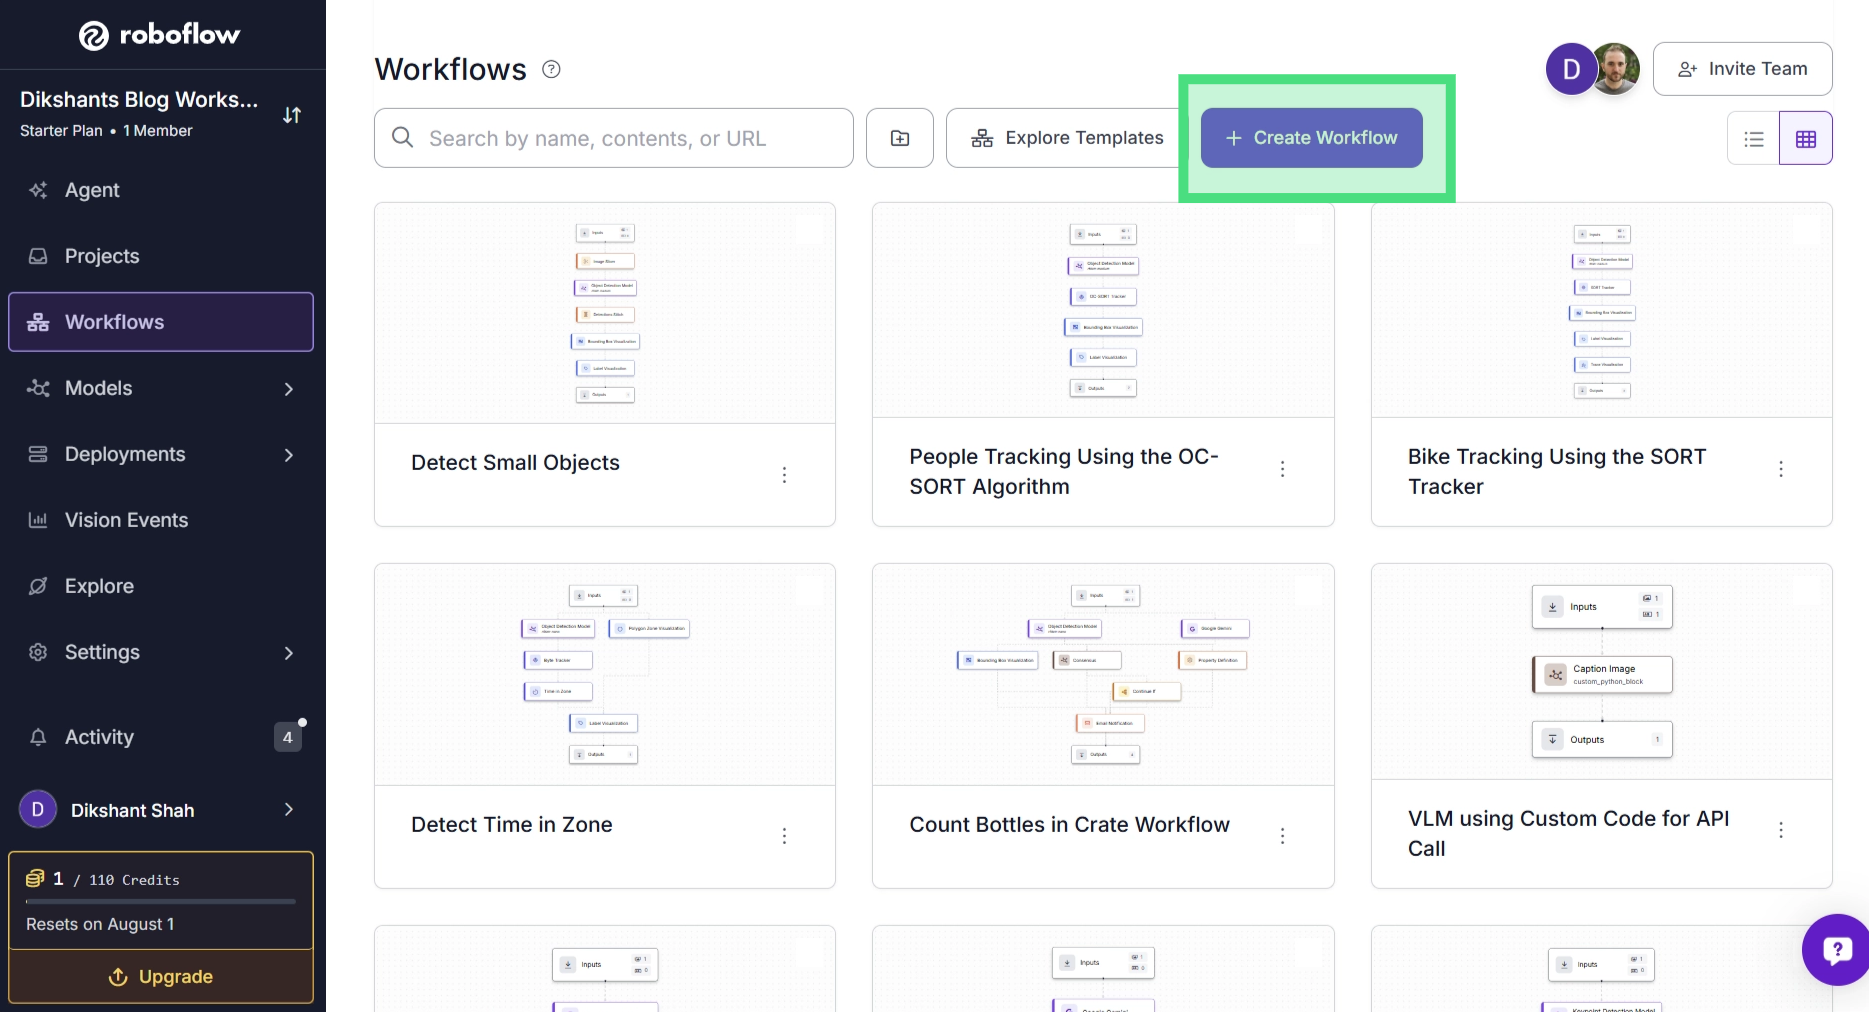
You will be taken to the Workflows editor, where you can build and configure your workflow.
By default, the editor contains two blocks, Inputs and Outputs, along with Roboflow Agent chat panel, which can generate workflows or modify existing ones based on your prompts.
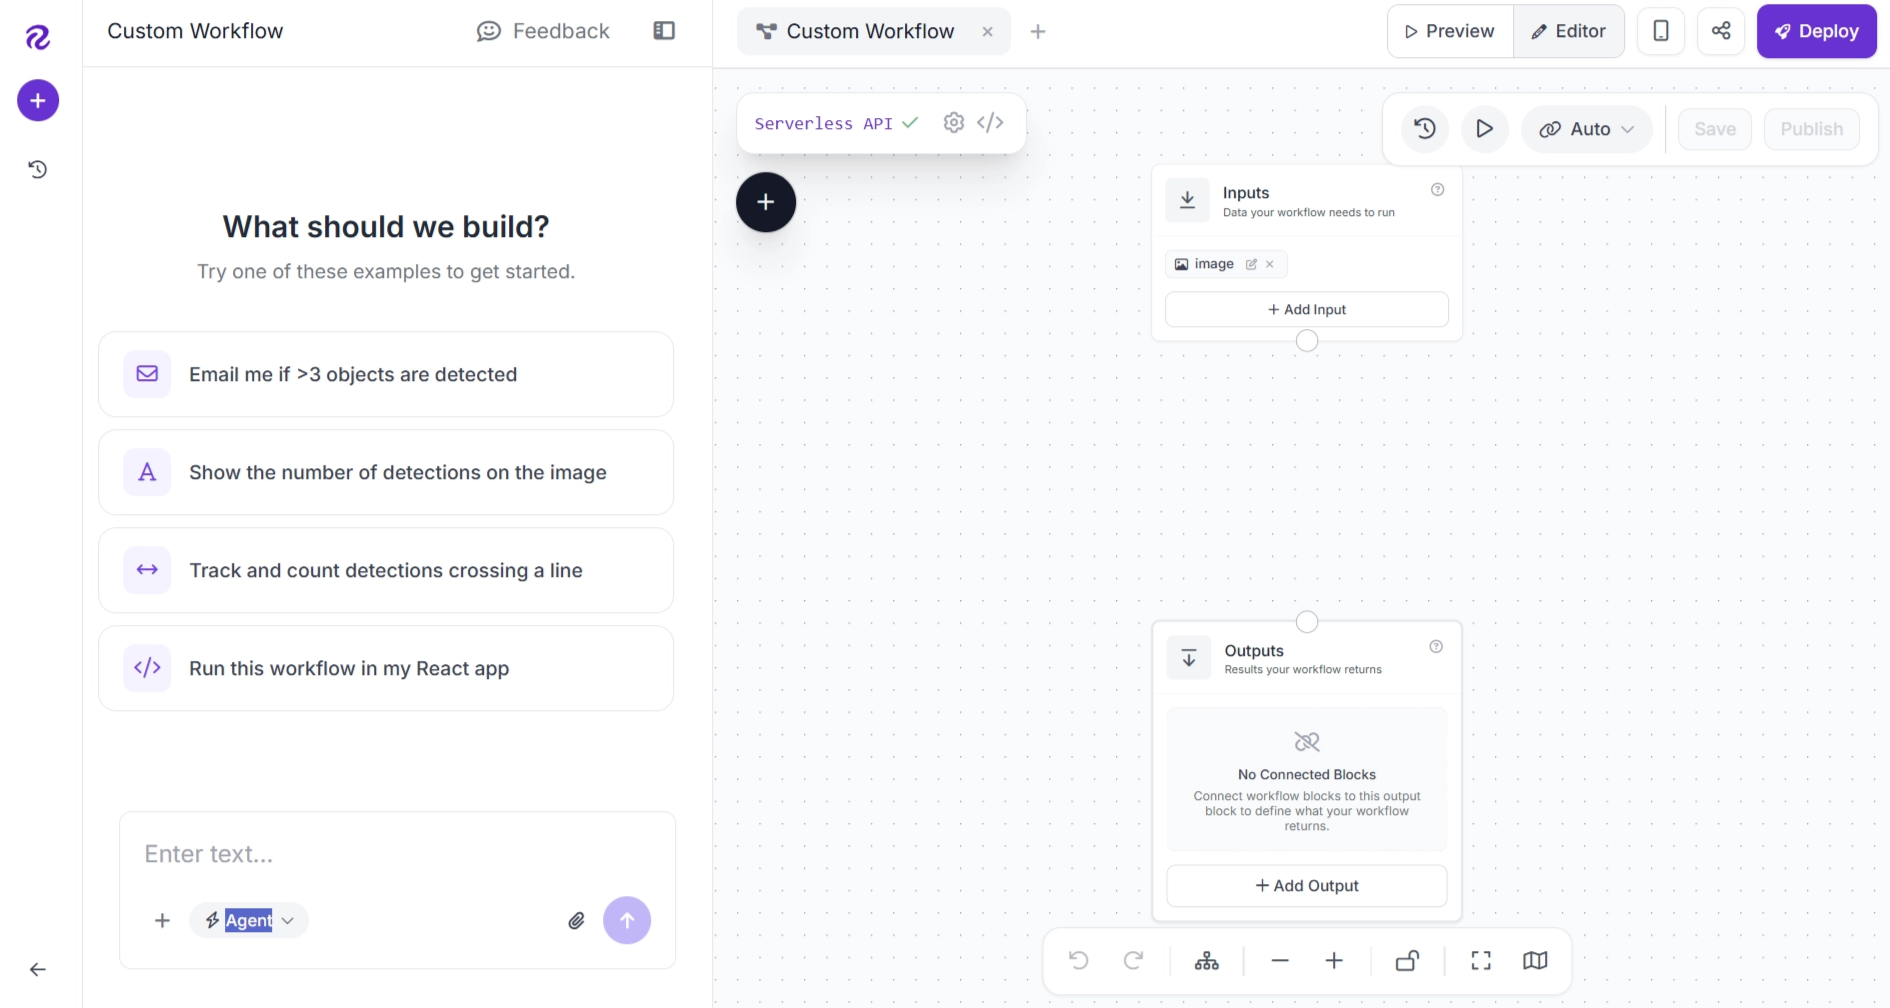
For this tutorial, you can hide the chat panel since we'll be building the workflow step by step. You can also rename your workflow by clicking the ⚙️ icon.
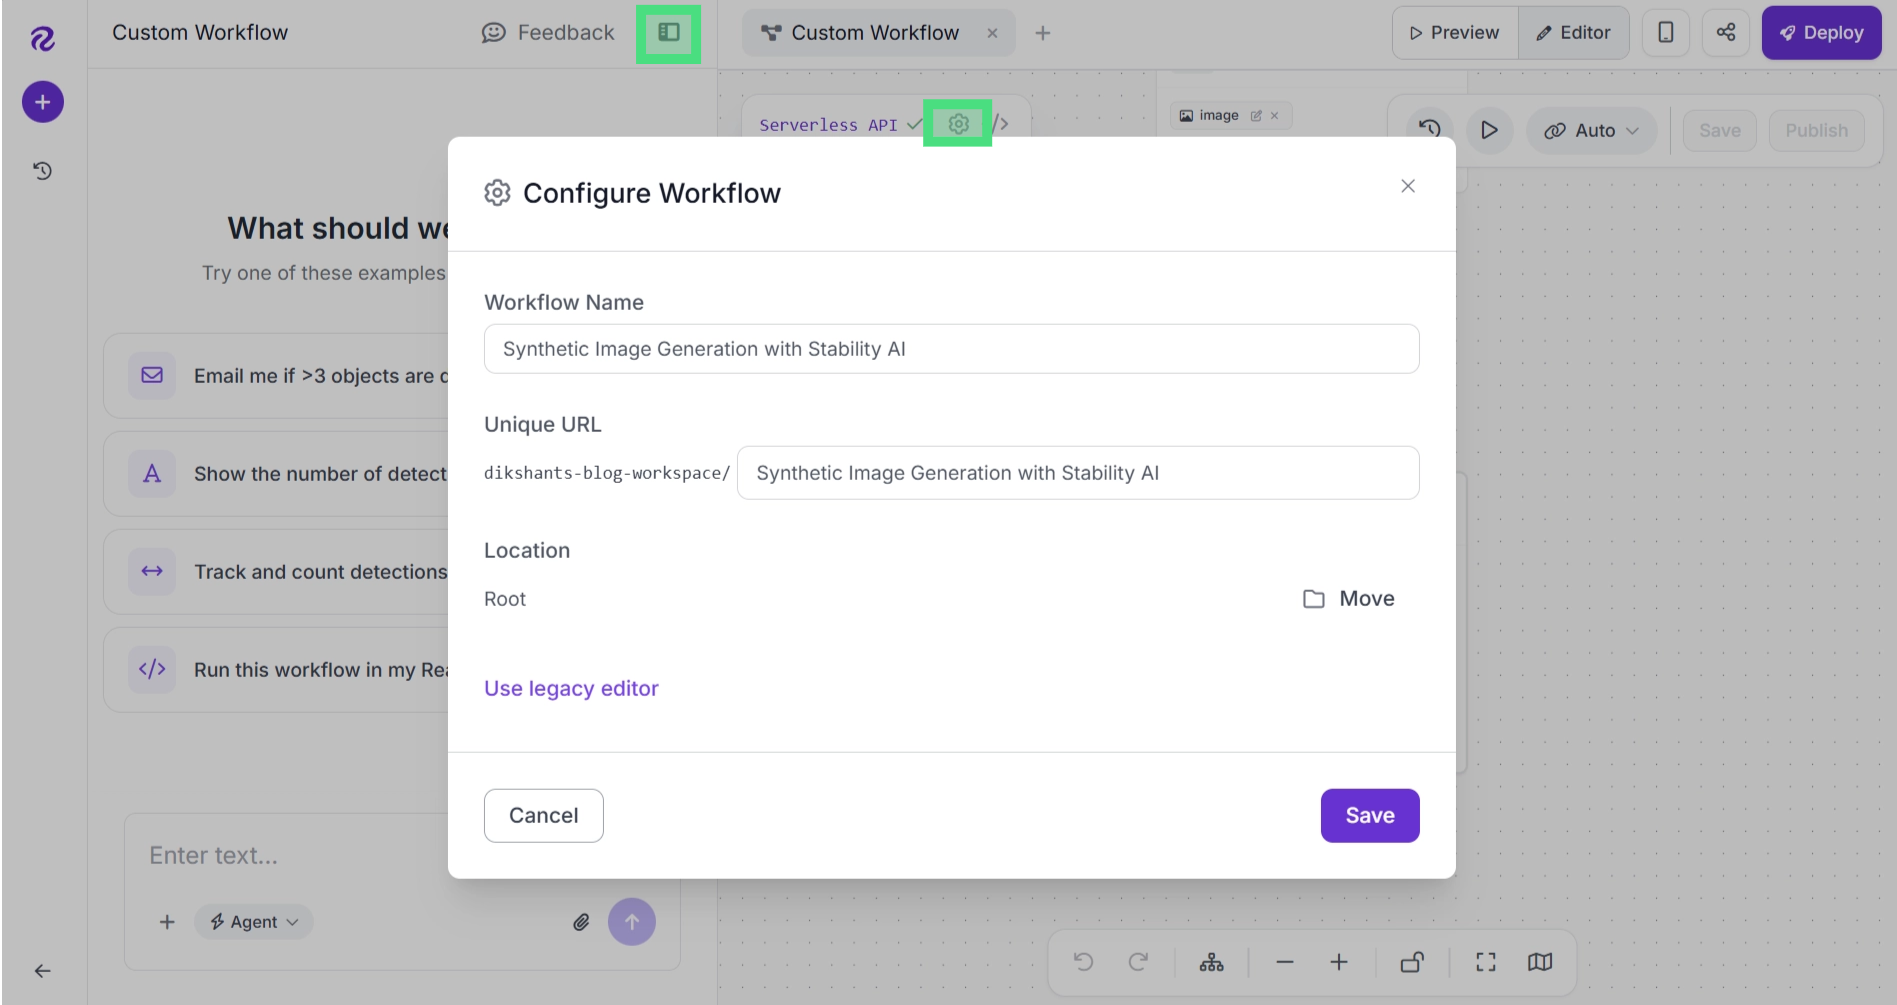
Step 2: Add and Configure the Stability AI Image Generation Block
Next, add image generation capabilities to your workflow using the Stability AI Image Generation block. This block wraps the Stability AI Image Generation API, allowing you to generate images from text prompts or create variations of existing images.
To add the block, click the + button in the top-left corner of the canvas. Search for Stability AI Image Generation and insert it into your workflow.
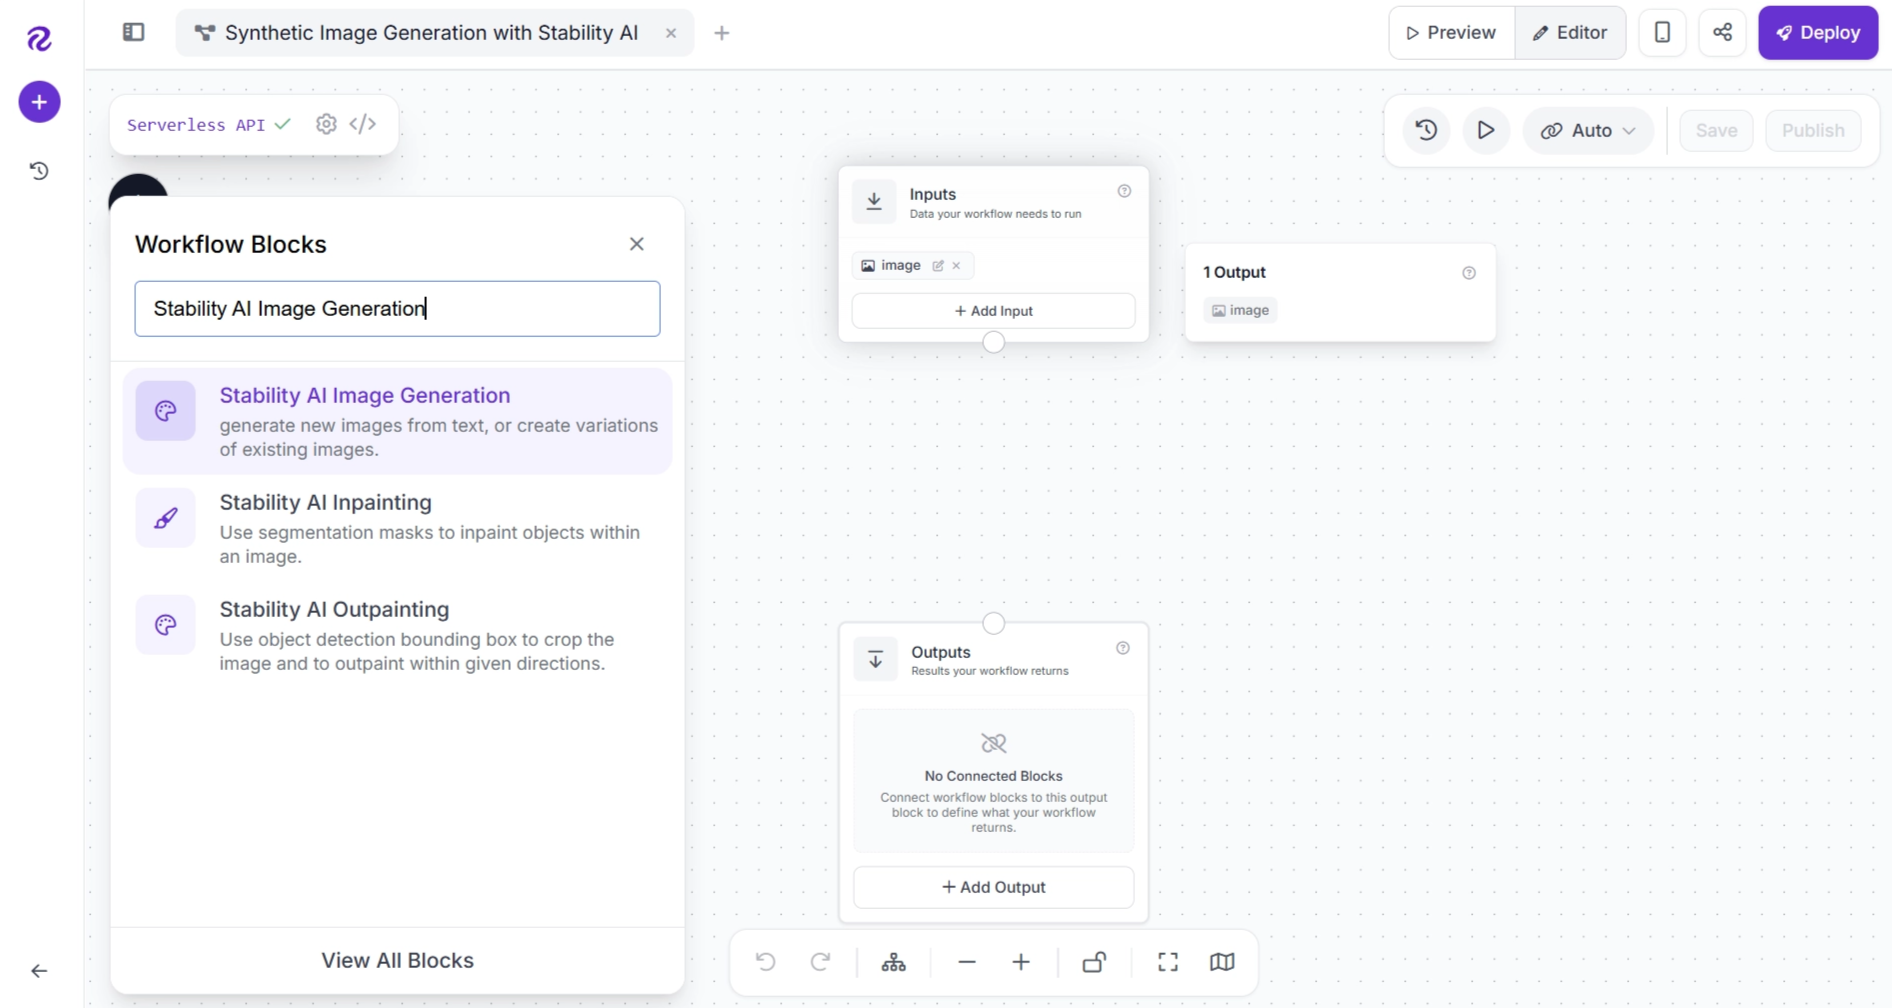
After adding the block, the Inputs block should automatically connect to the Stability AI Image Generation block. If it does not, create the connection manually as shown below.
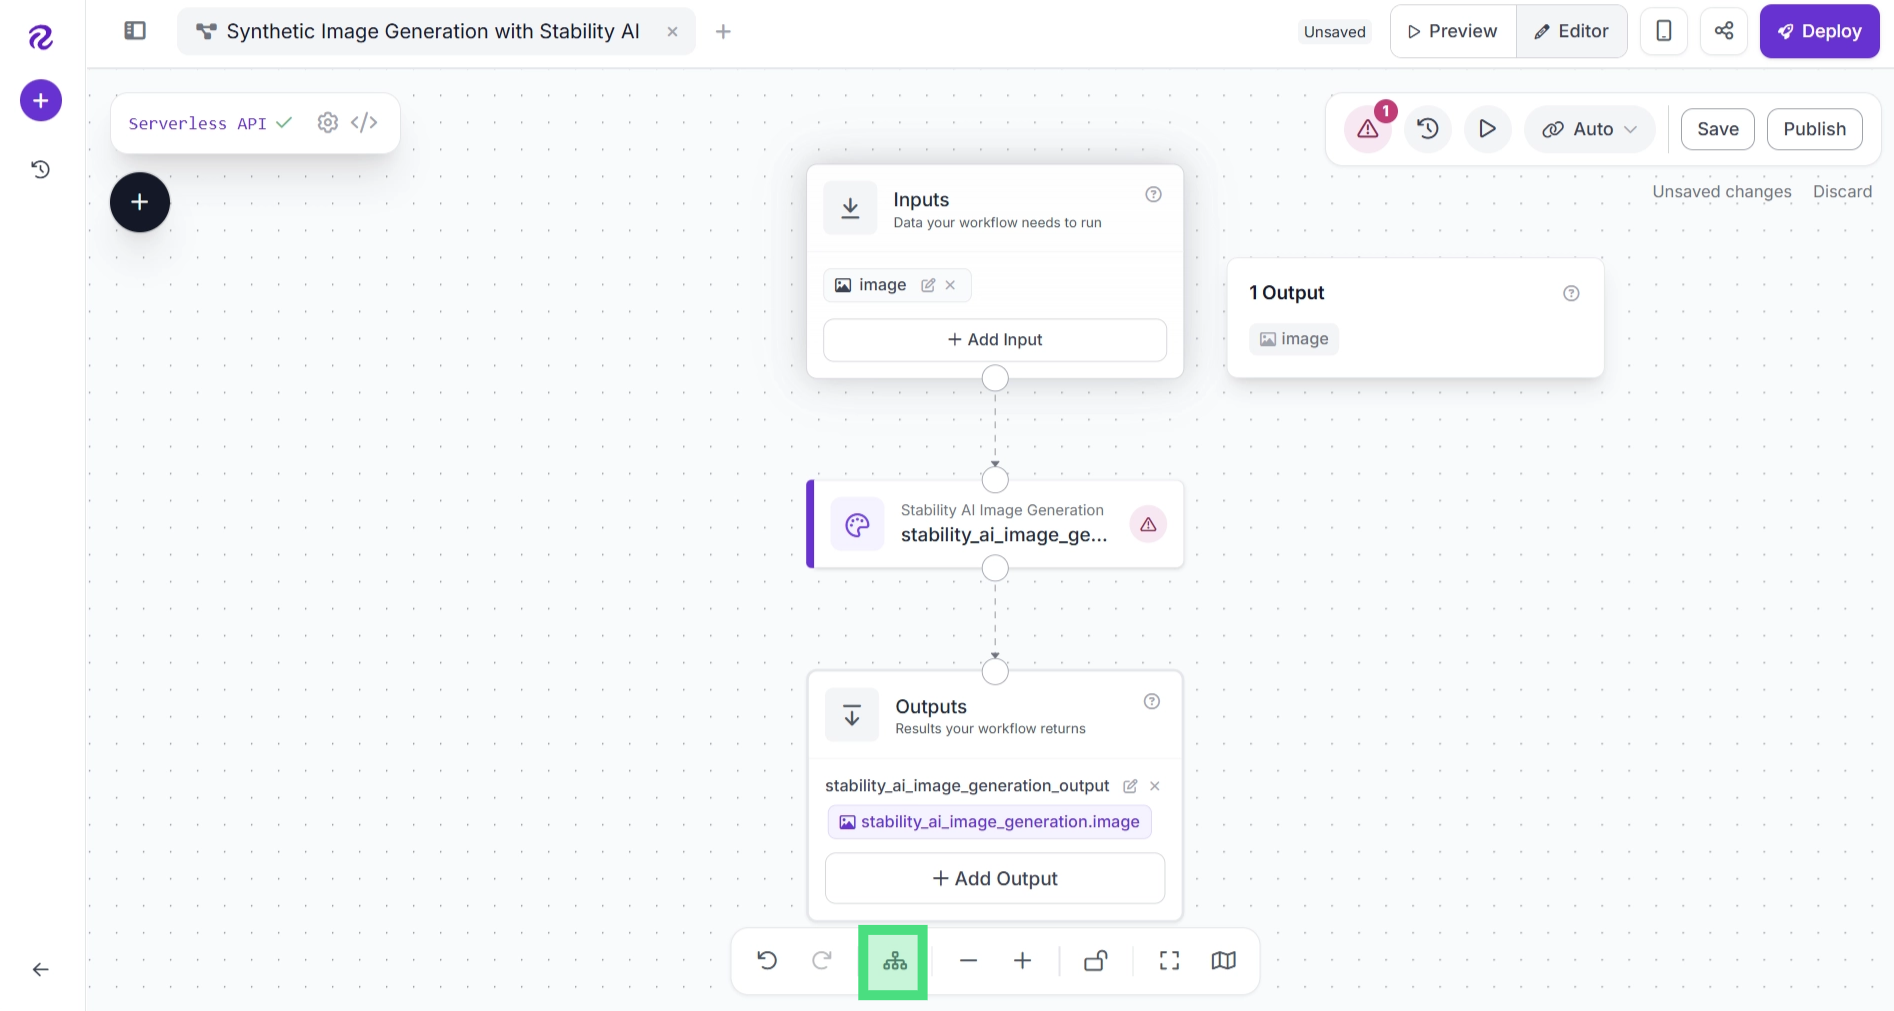
This connection passes the output from upstream blocks to downstream blocks, allowing them to use that data as input.
You can also click Auto Layout (located to the left of the zoom controls at the bottom of the editor) to automatically organize the workflow.
Next, configure the Stability AI Image Generation block. Select the block to open its parameters, then update the settings as shown below.
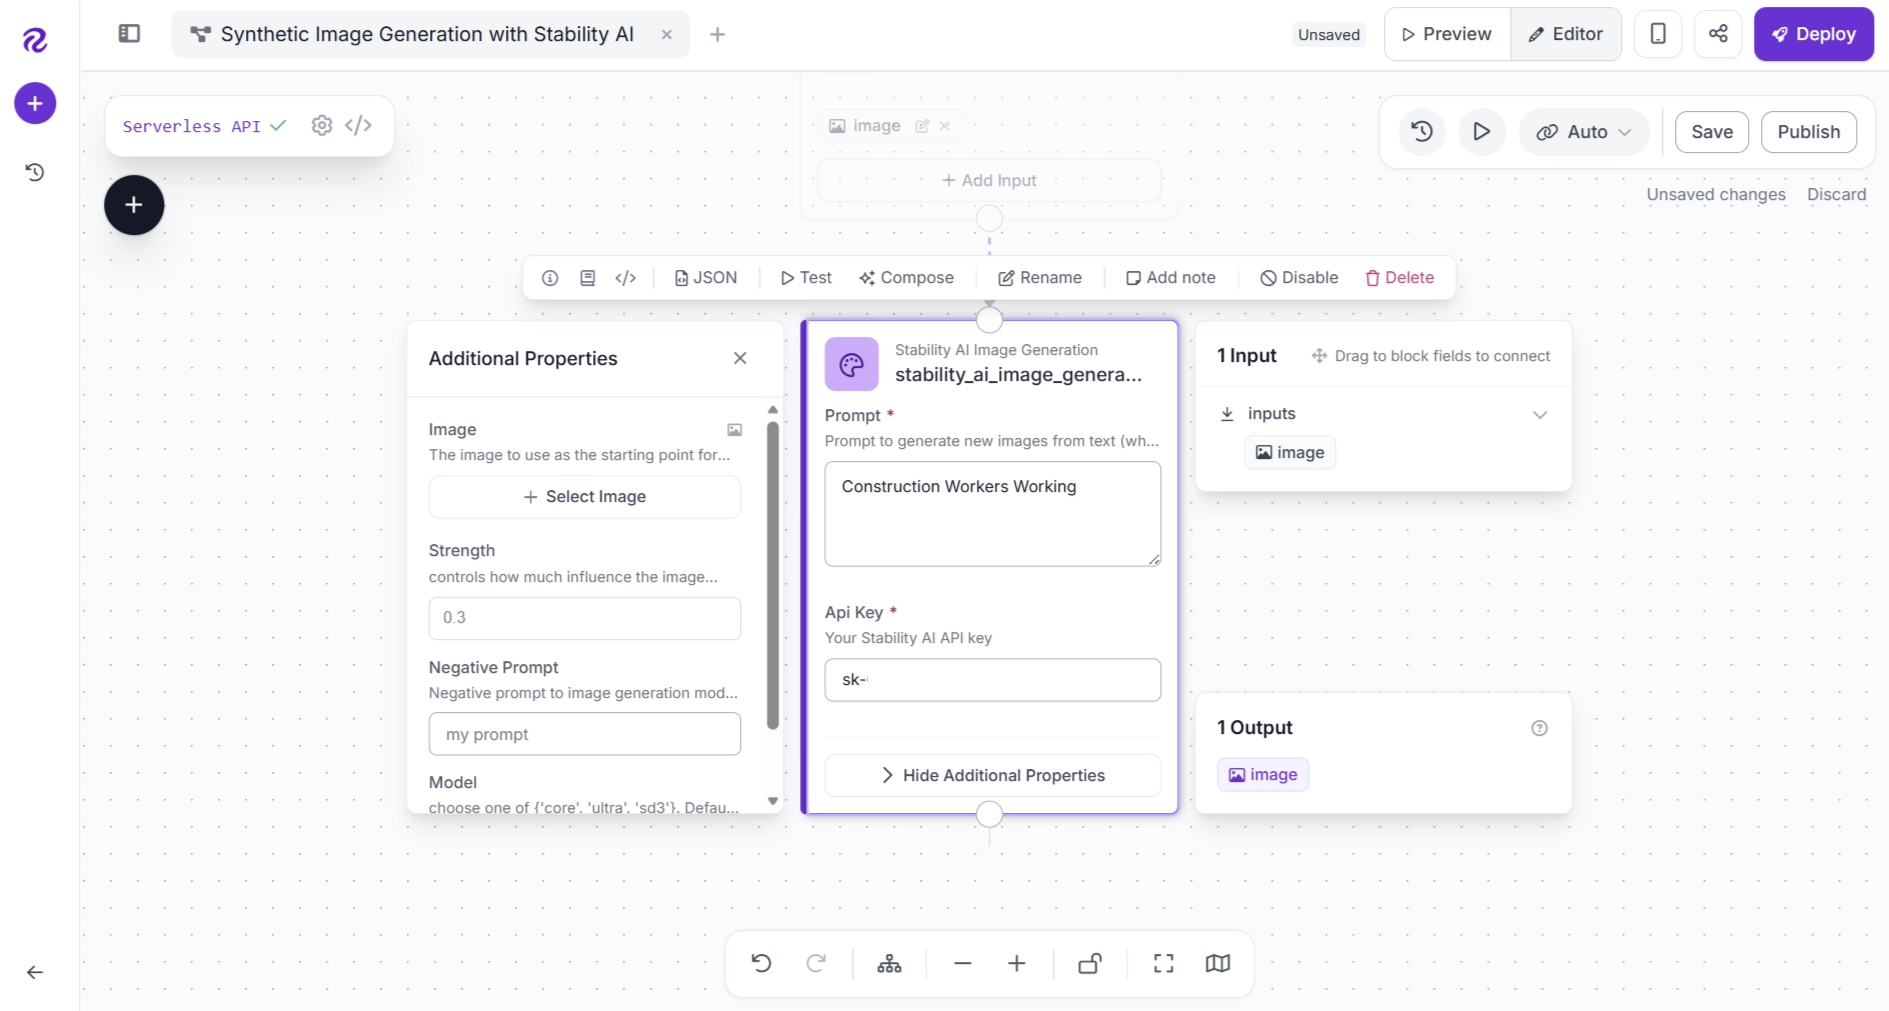
You can also pass an input image to the workflow and use it as a starting point for image generation. To do this, drag the image input from the Inputs panel (on the right) to the Image parameter under Additional Properties of Stability AI Image Generation block.
In this guide, we'll generate synthetic images using only a text prompt, so we won't provide an input image as a starting point. This encourages the model to generate more diverse images rather than creating variations that closely resemble a single source image, resulting in a more diverse dataset.
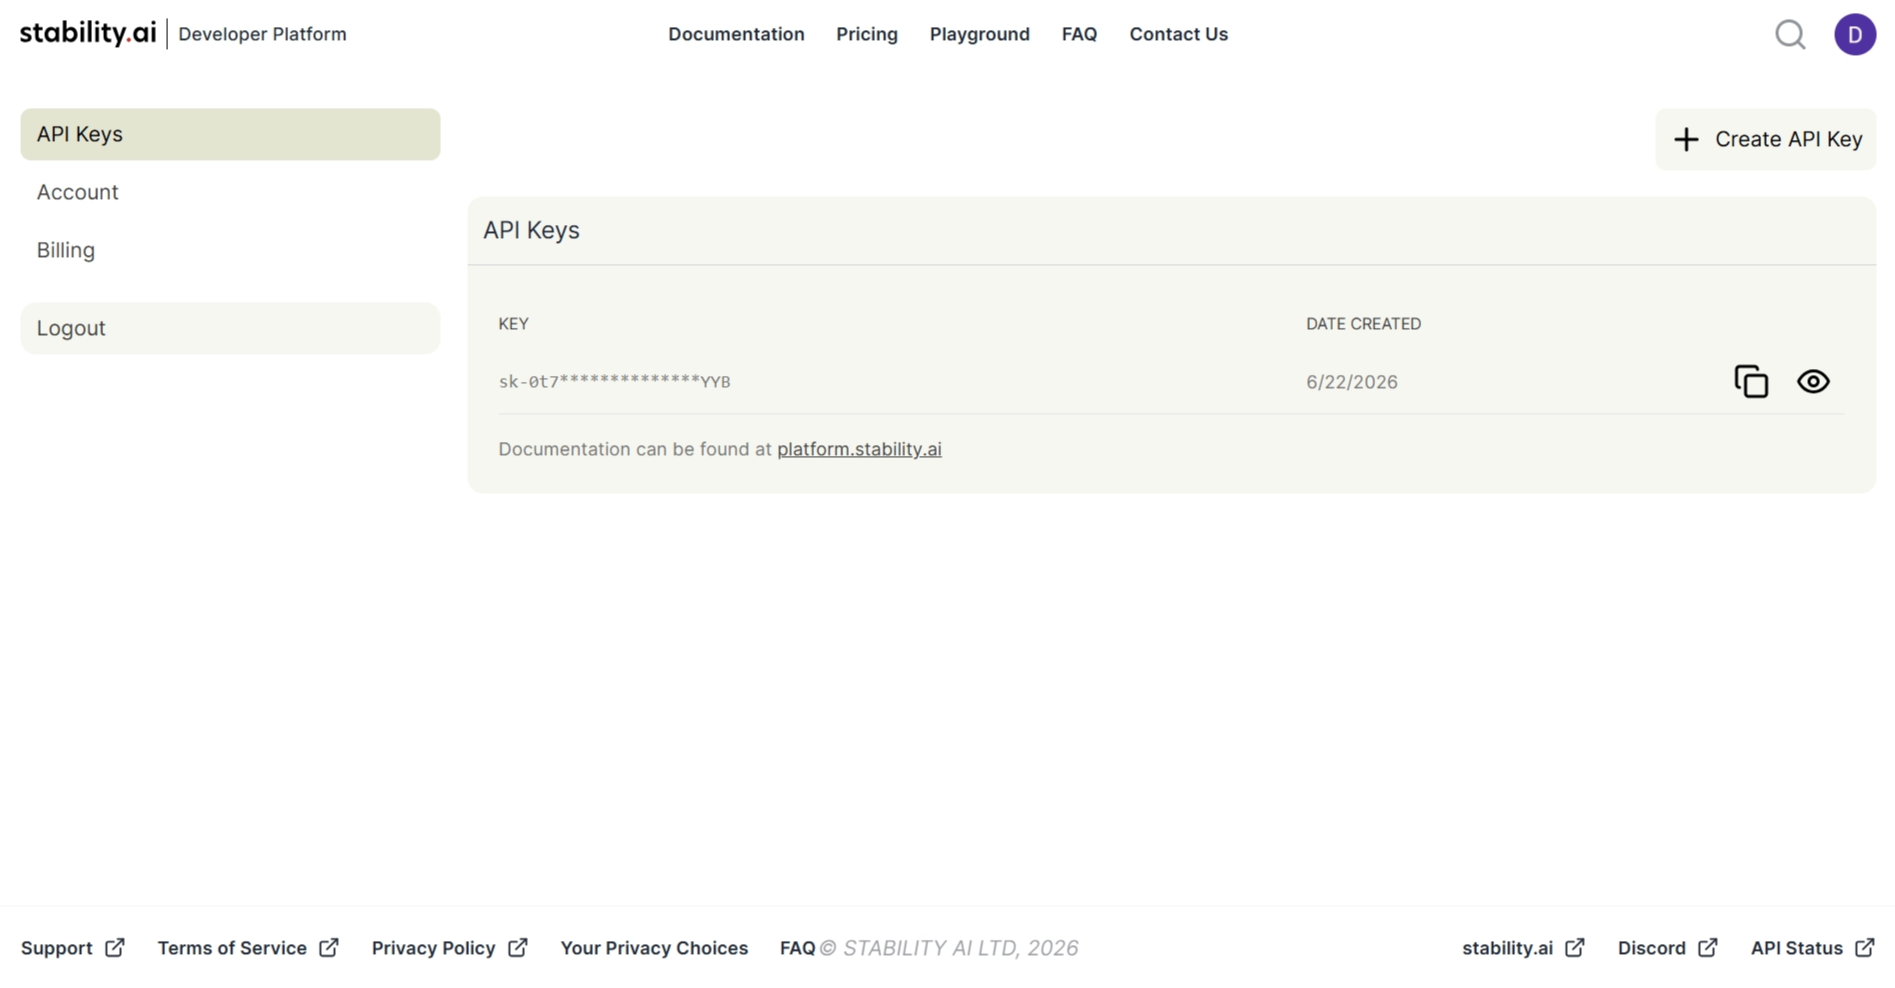
You can obtain your Stability AI API key from the Stability AI Developer Platform.
Once you have finished configuring the block, click Save. Be sure to save your workflow regularly throughout the creation process so you don't lose your changes.
Step 3: Create a Roboflow Dataset
Next, create a Roboflow project where the generated images will be uploaded. To do this, save the workflow and return to your Roboflow workspace. Then, select Projects from the left sidebar.
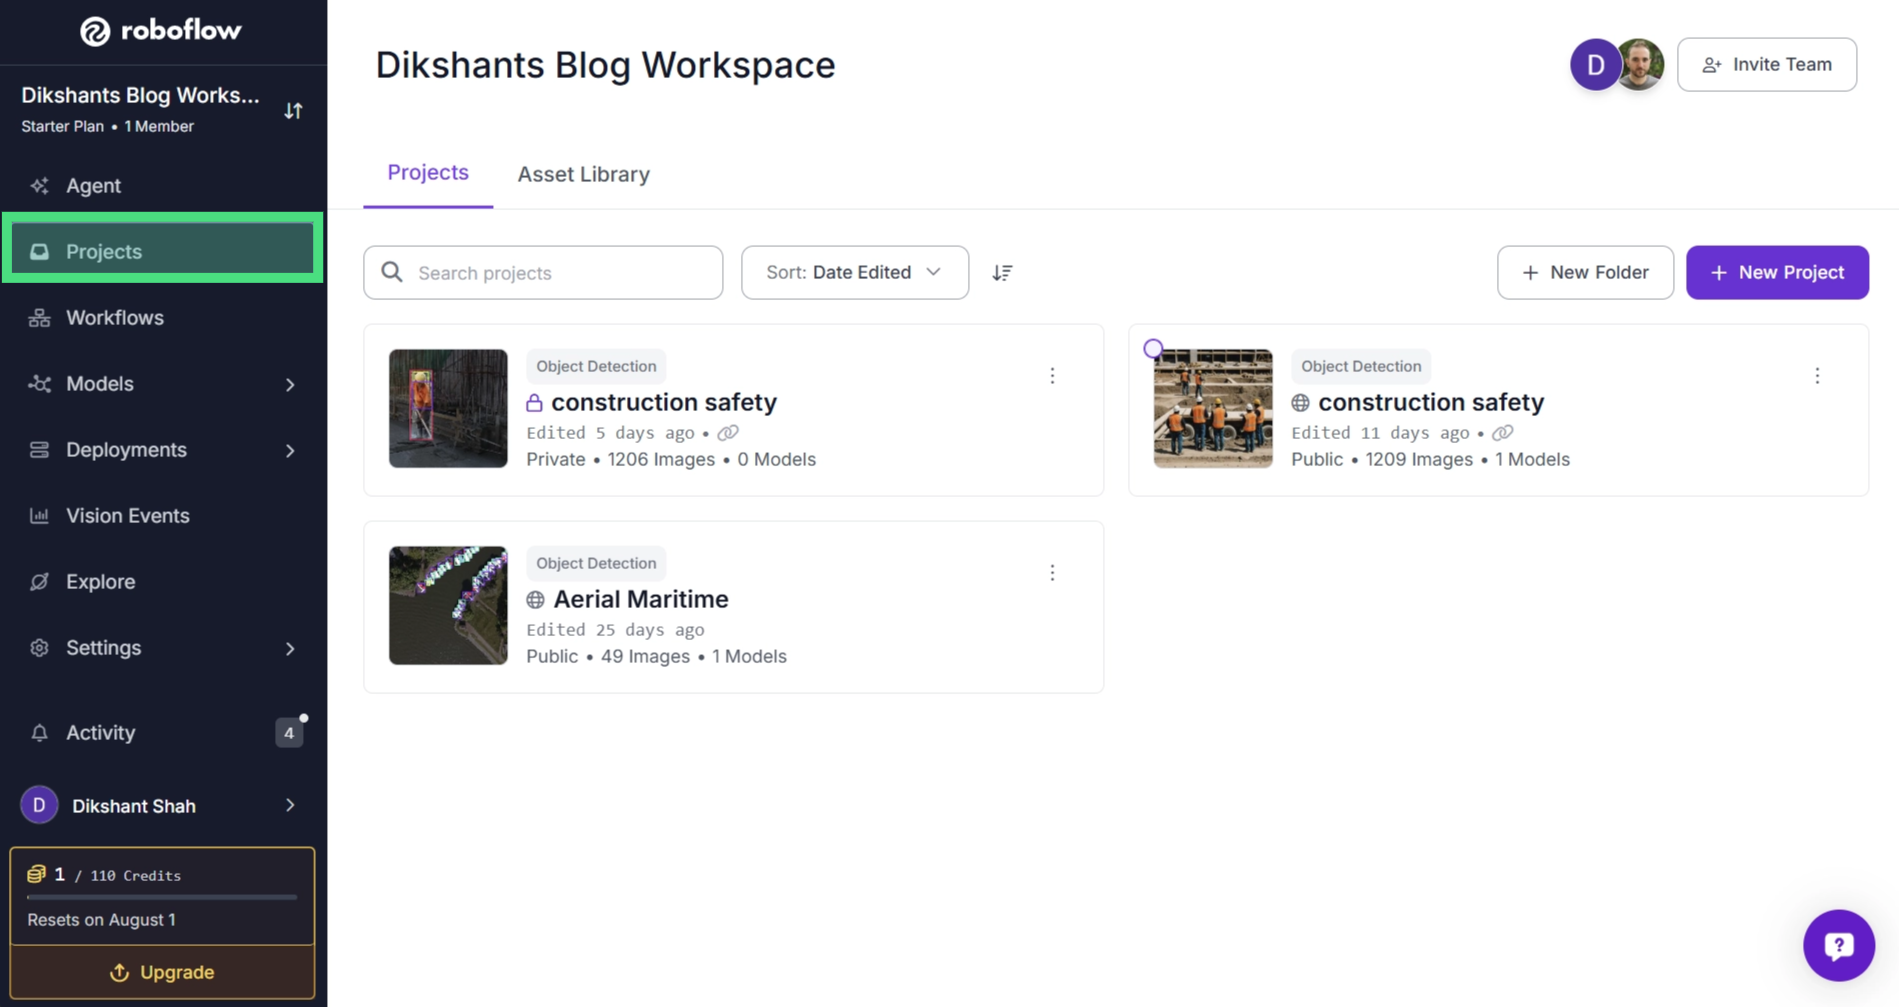
Click the New Project button, then choose the project type based on the computer vision task you intend to train. Roboflow supports object detection, instance segmentation, image classification, pose estimation, semantic segmentation, and multimodal applications.
For this guide, we'll create an Object Detection project.
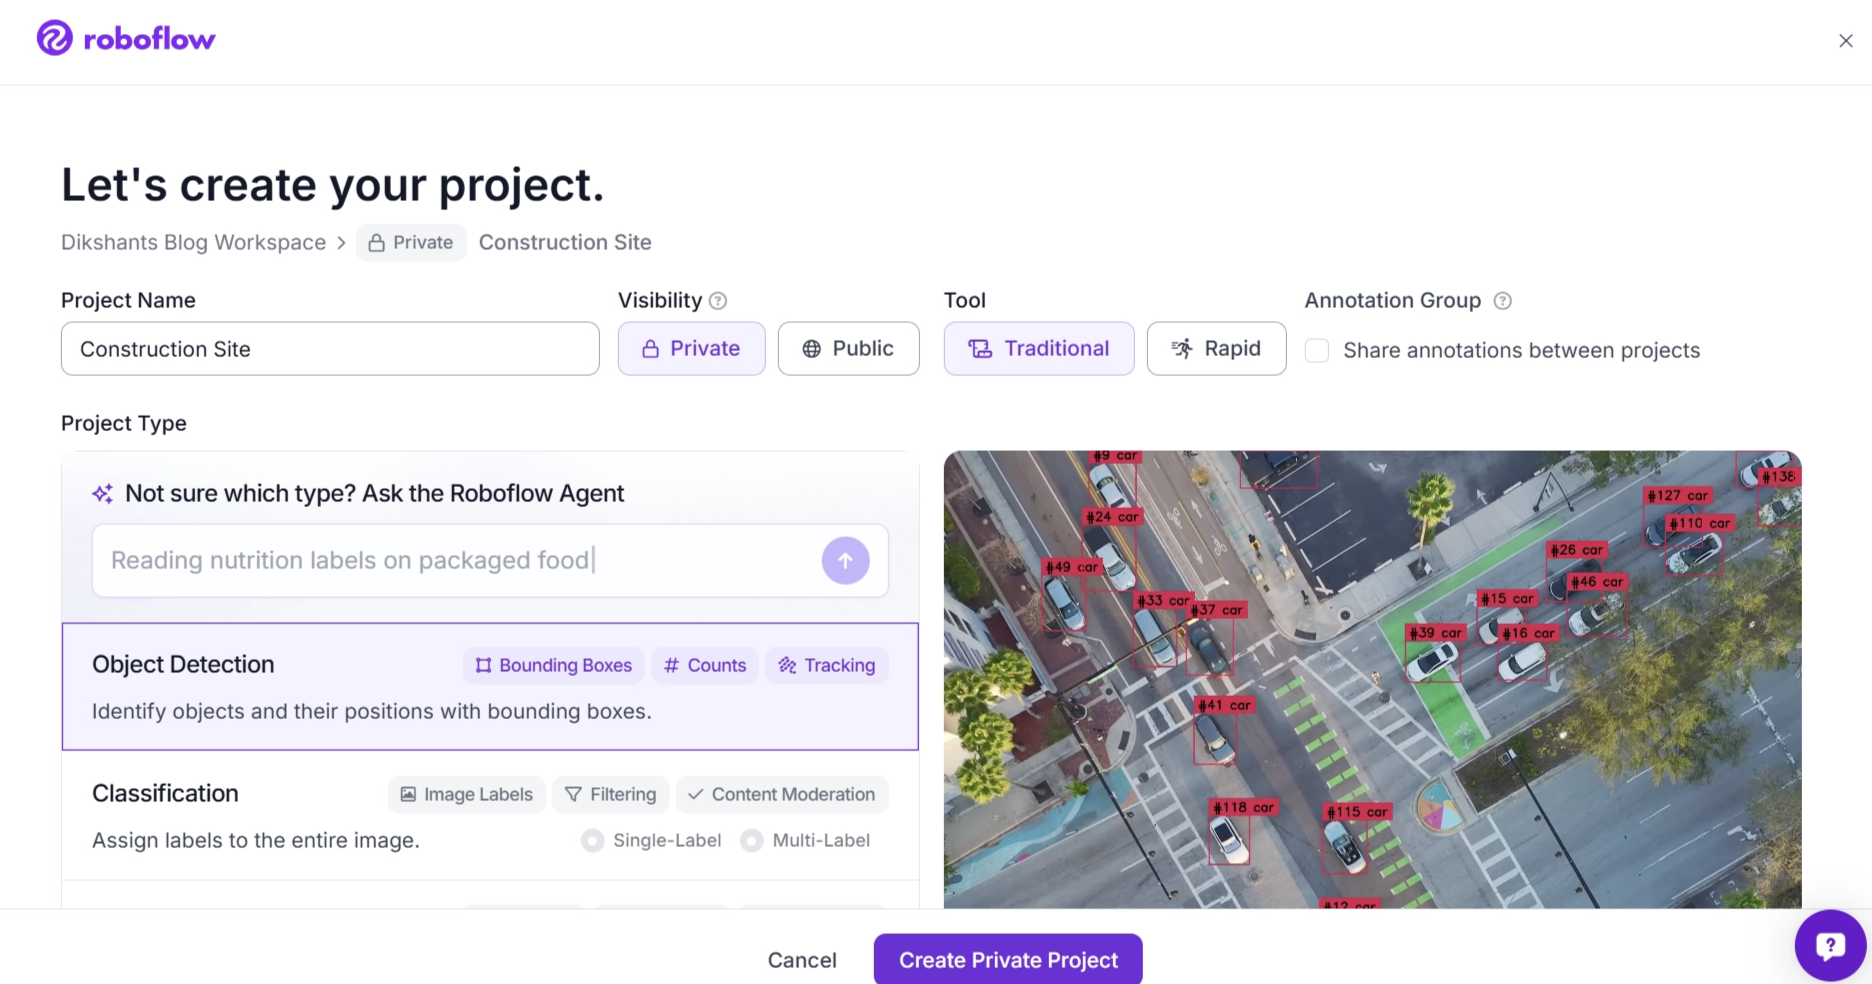
After creating the project, you'll be taken to the upload page, where you can add images by dragging and dropping them for annotation and use them to build datasets for training models.
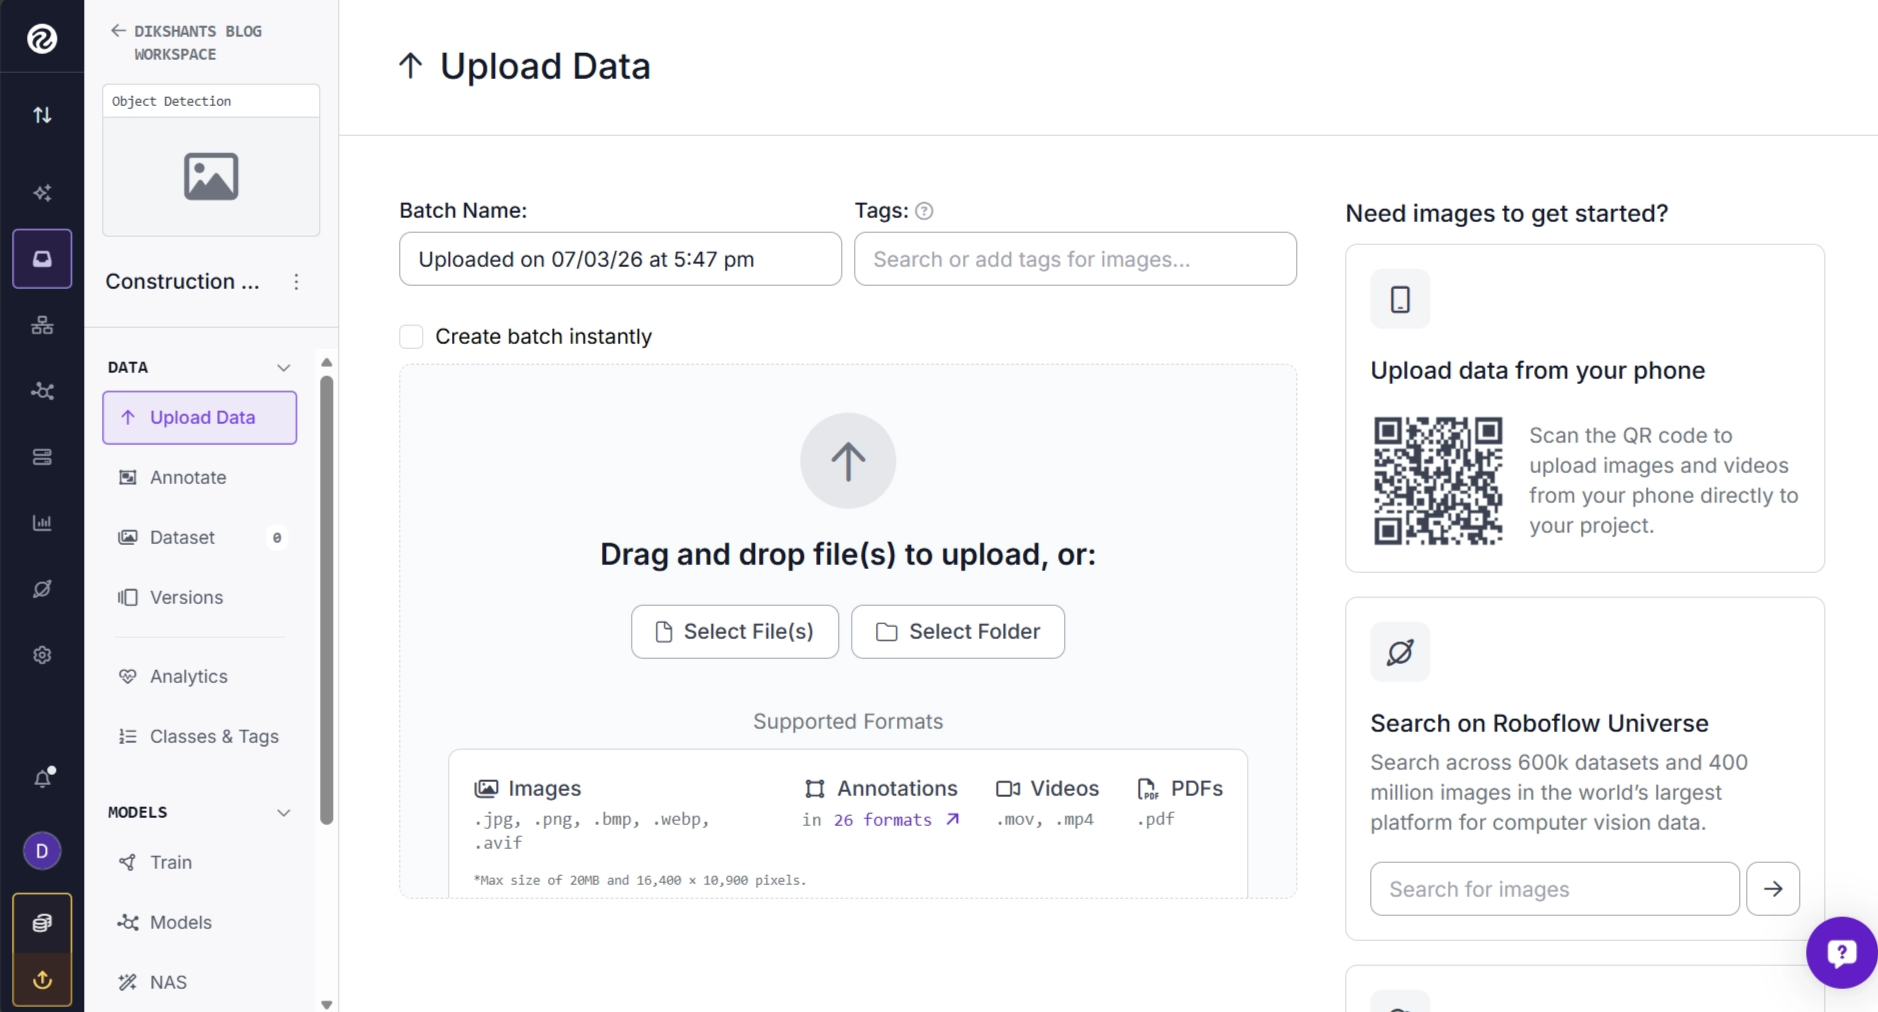
Instead of uploading images manually this way, by dragging and dropping them, we'll configure the workflow to automatically upload each generated image to this project.
Step 4: Add a Roboflow Dataset Upload Block
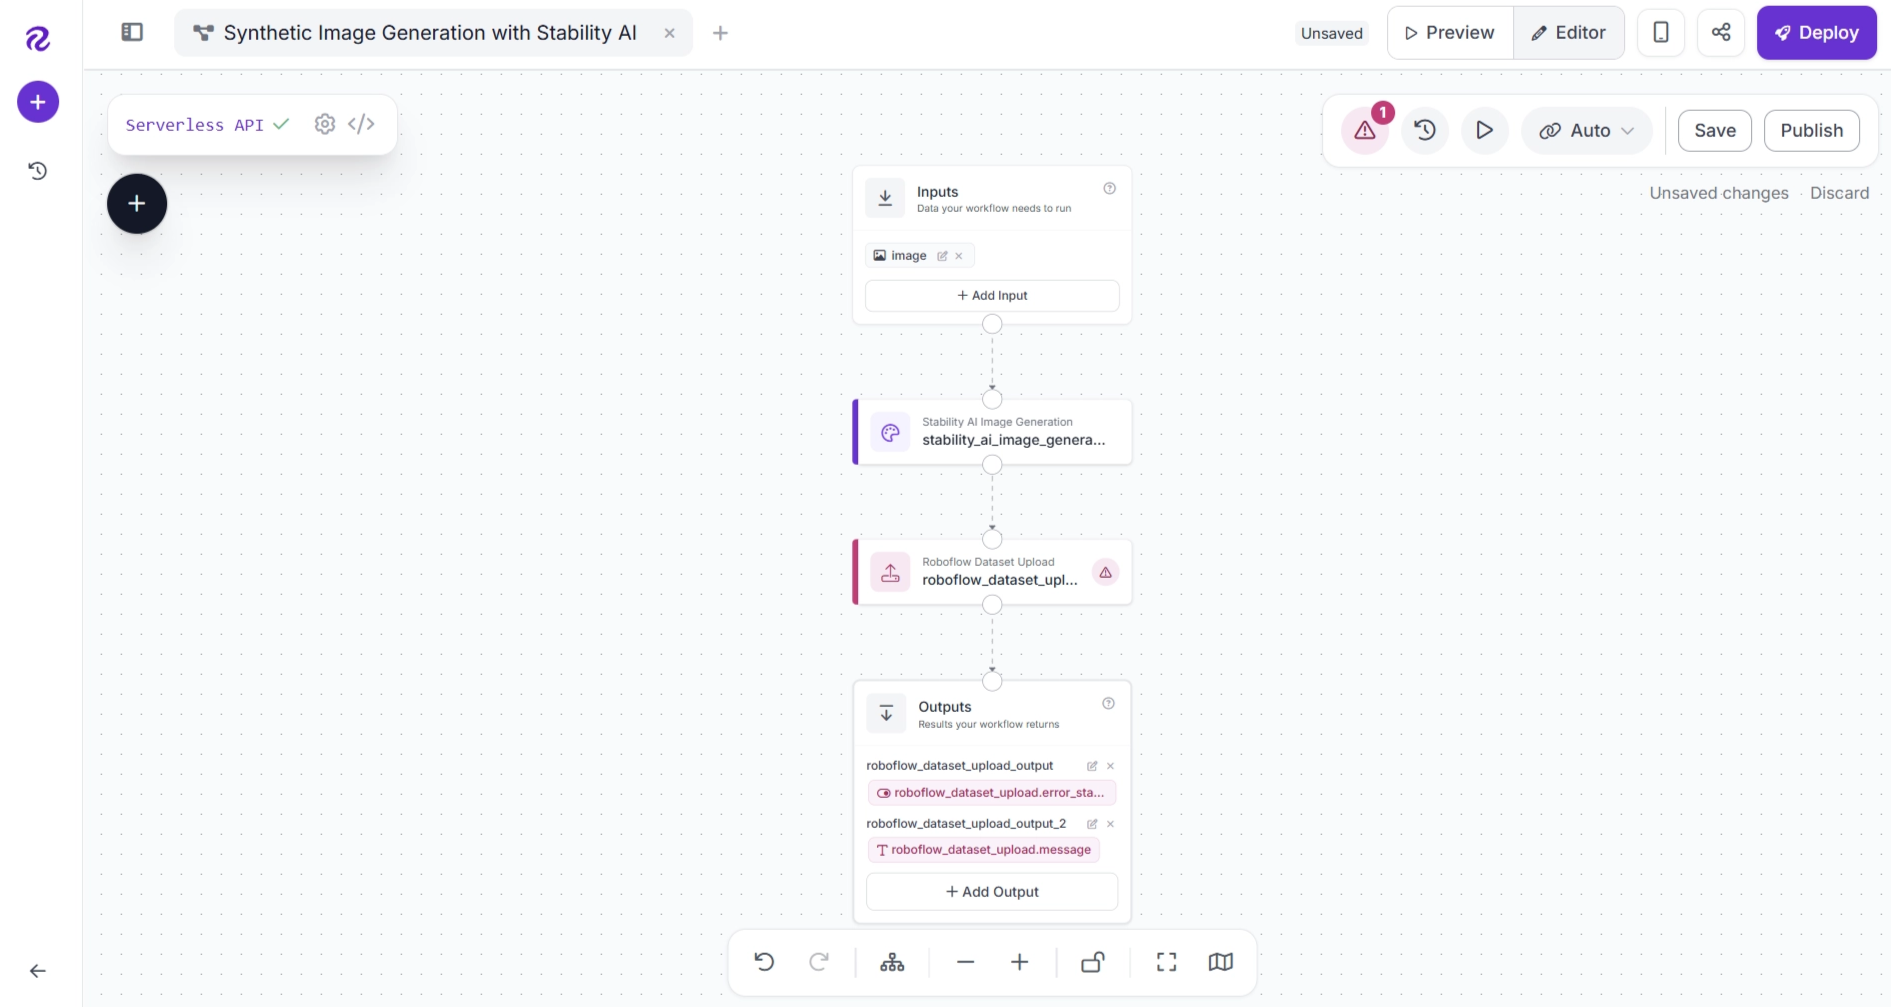
Now that the project has been created, add a Roboflow Dataset Upload block to automatically upload generated images to your dataset.
Click the + button in the workflow editor, search for Roboflow Dataset Upload, and insert the block into your workflow.
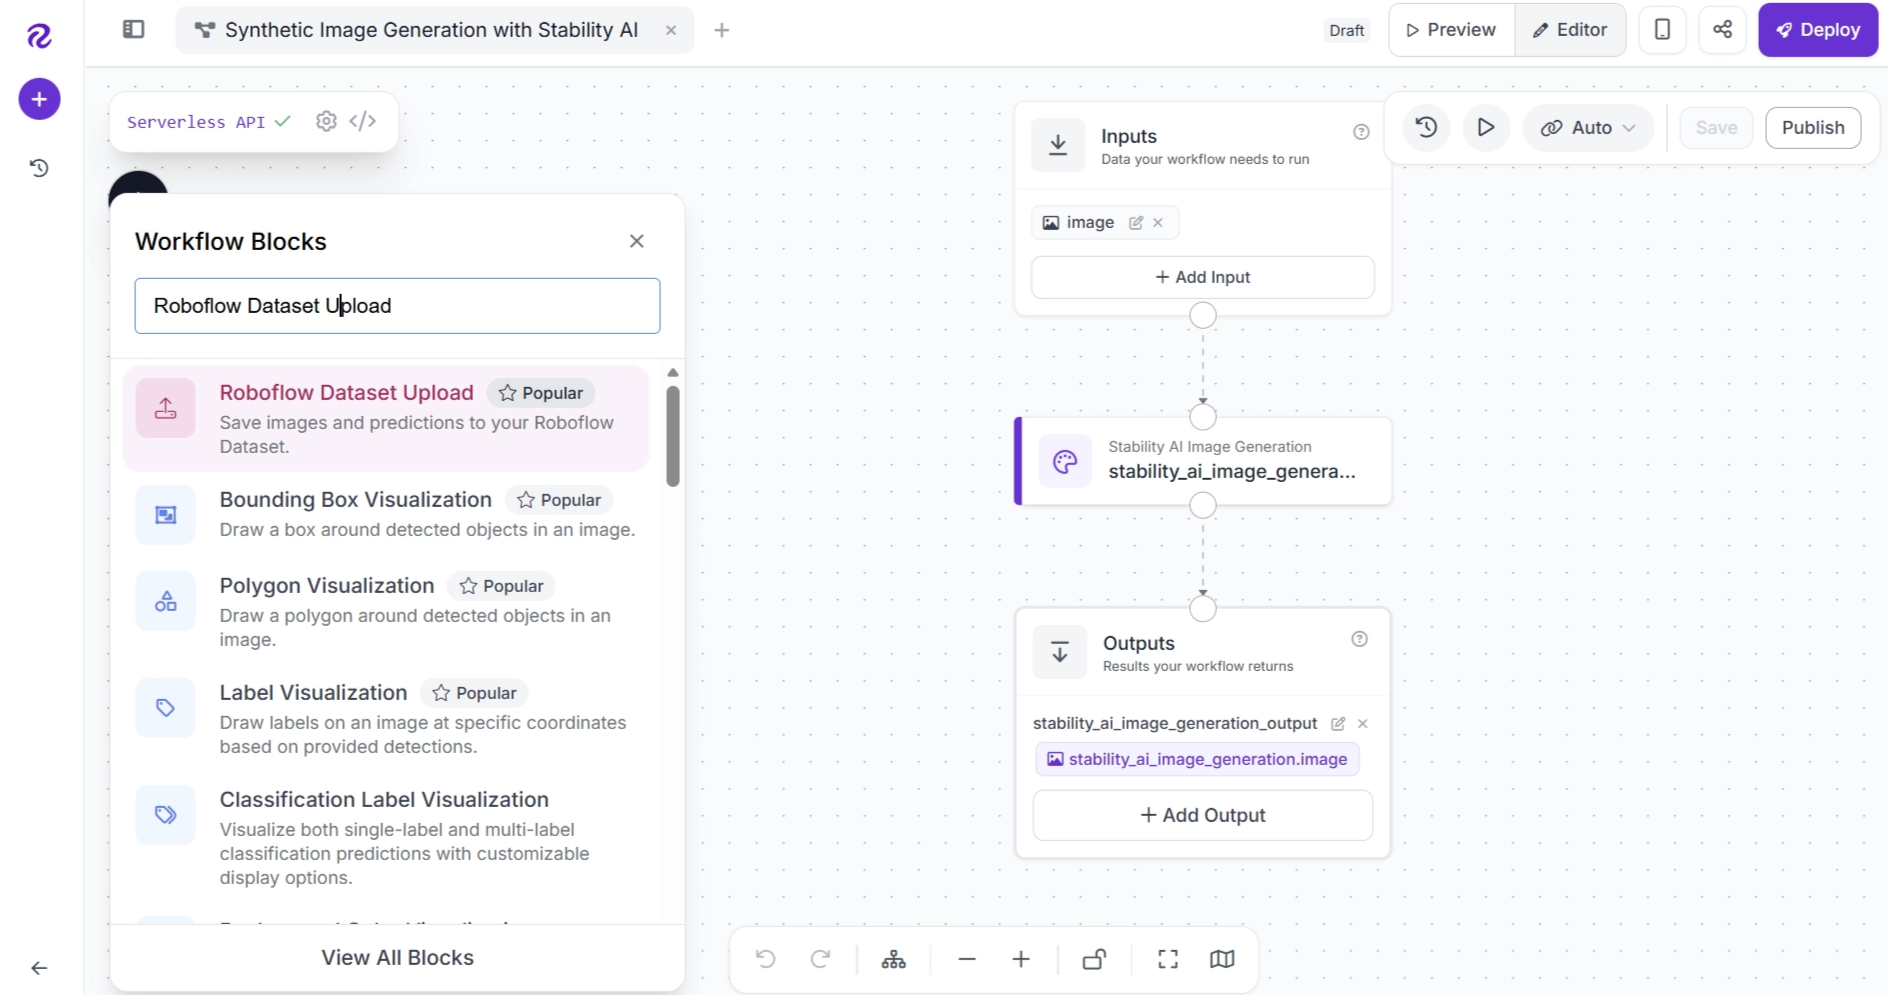
Connect the blocks as shown below and remove any unnecessary connections.
Step 5: Configure the Dataset Upload Block
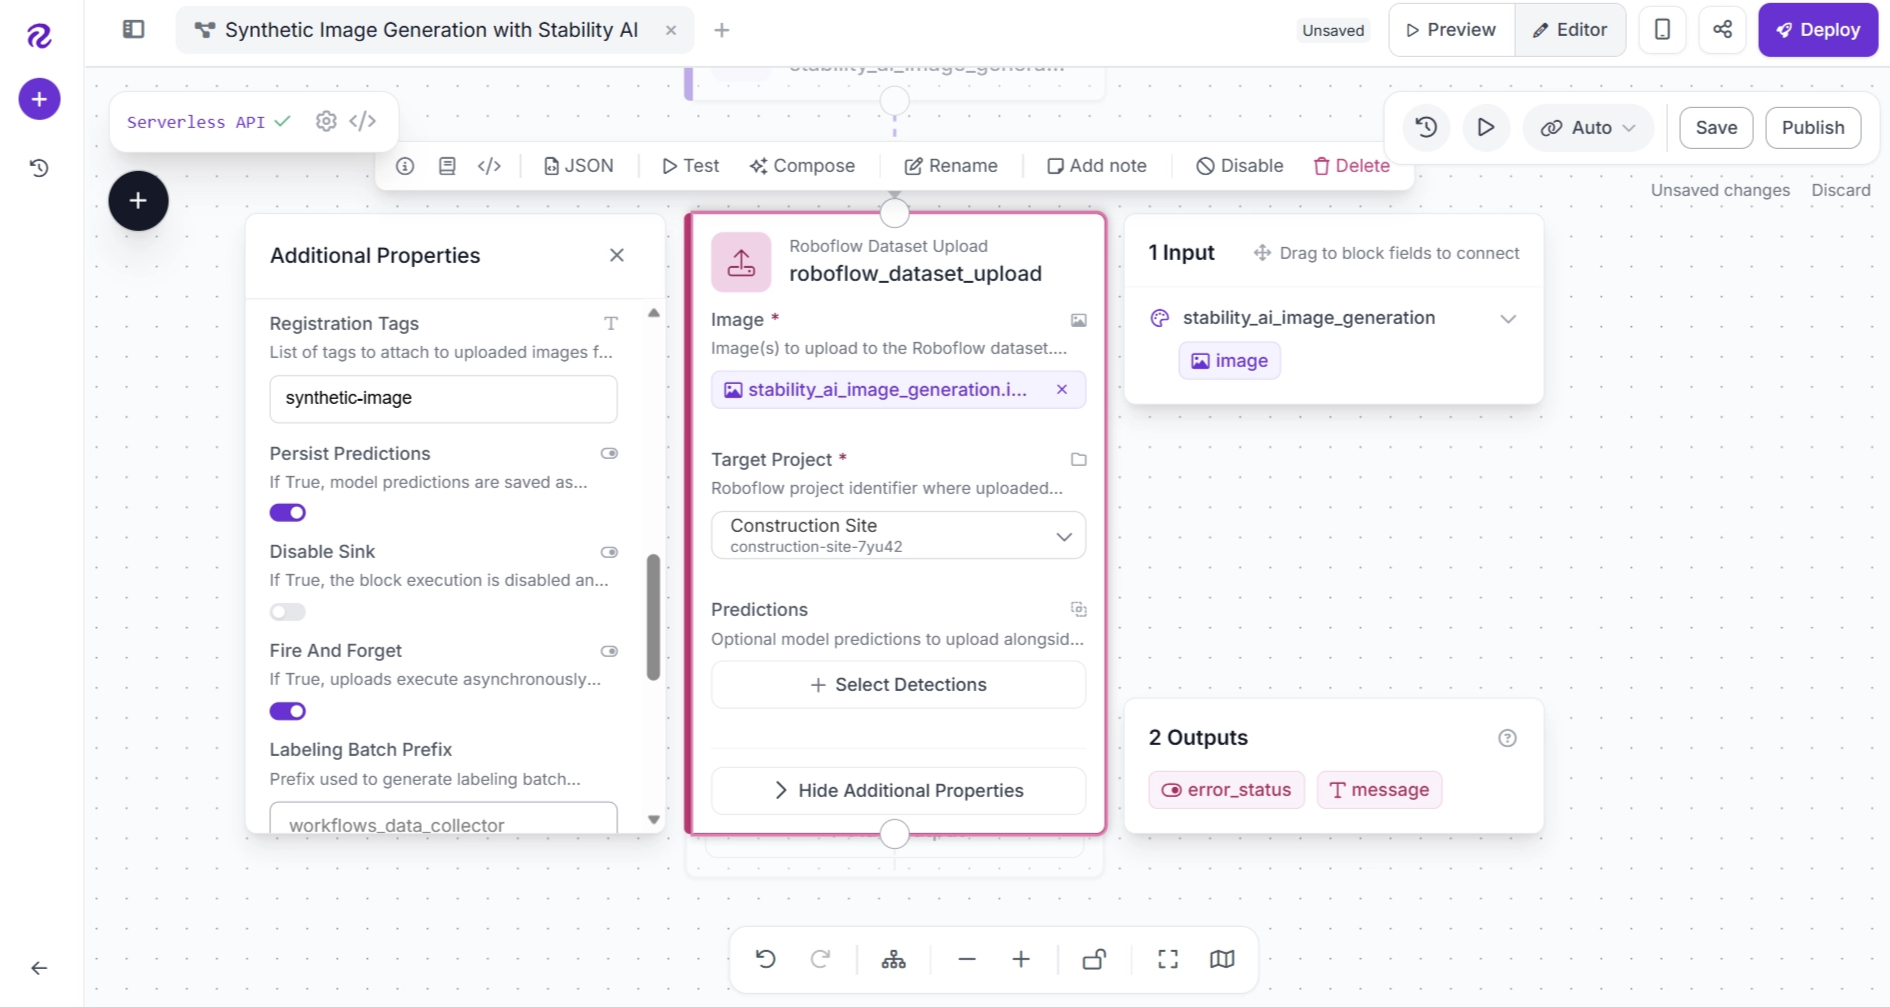
Next, configure the Roboflow Dataset Upload block. Drag the Image output from the stability_ai_generation block in the Inputs panel (on the right) to the Image parameter of the Roboflow Dataset Upload block.
Then, select your newly created Roboflow project from the Target Project dropdown.
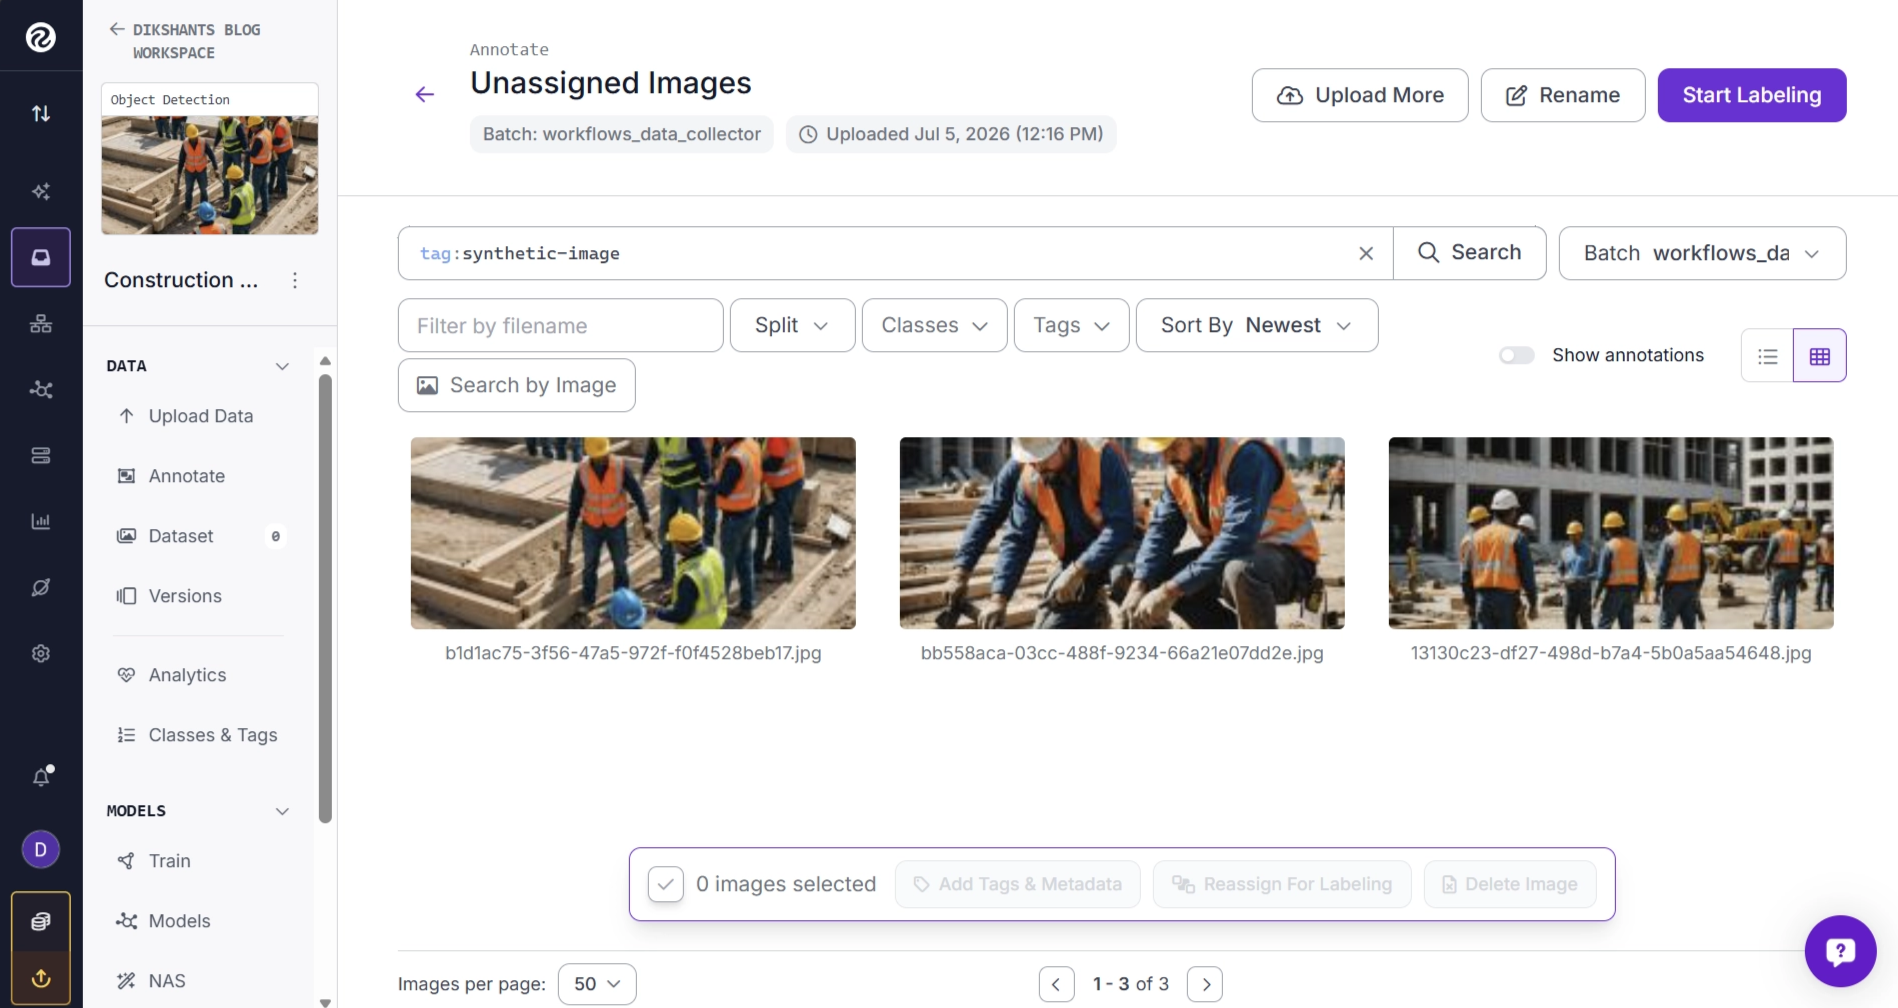
Optionally, add a Registration Tag, such as synthetic-image, to every uploaded image. This makes it easy to search for, organize, or remove synthetic images later if needed.
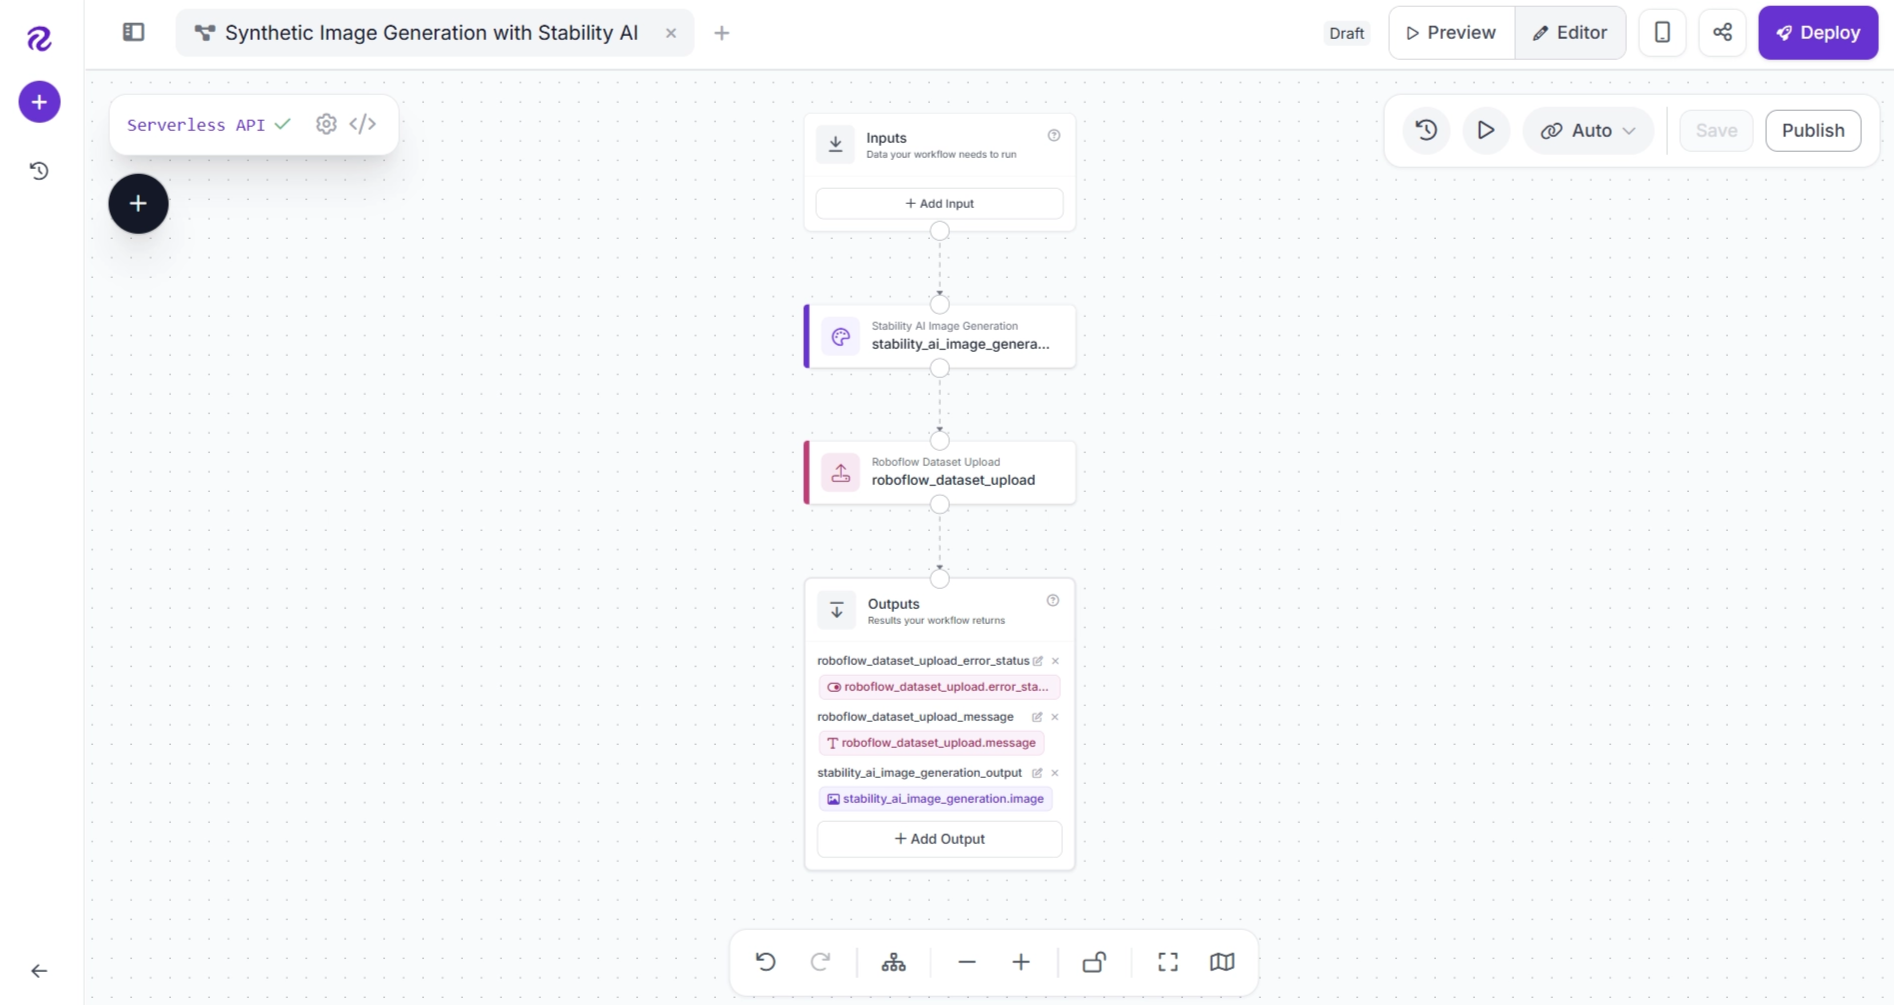
The completed configuration is shown below.
Step 6: Configure the Workflow Inputs and Outputs
Now, configure the workflow outputs so they return the upload status from the Roboflow Dataset Upload block. This lets you verify whether each generated image was uploaded successfully.
You can also expose the generated image itself as a workflow output if you want to preview it or use it elsewhere.
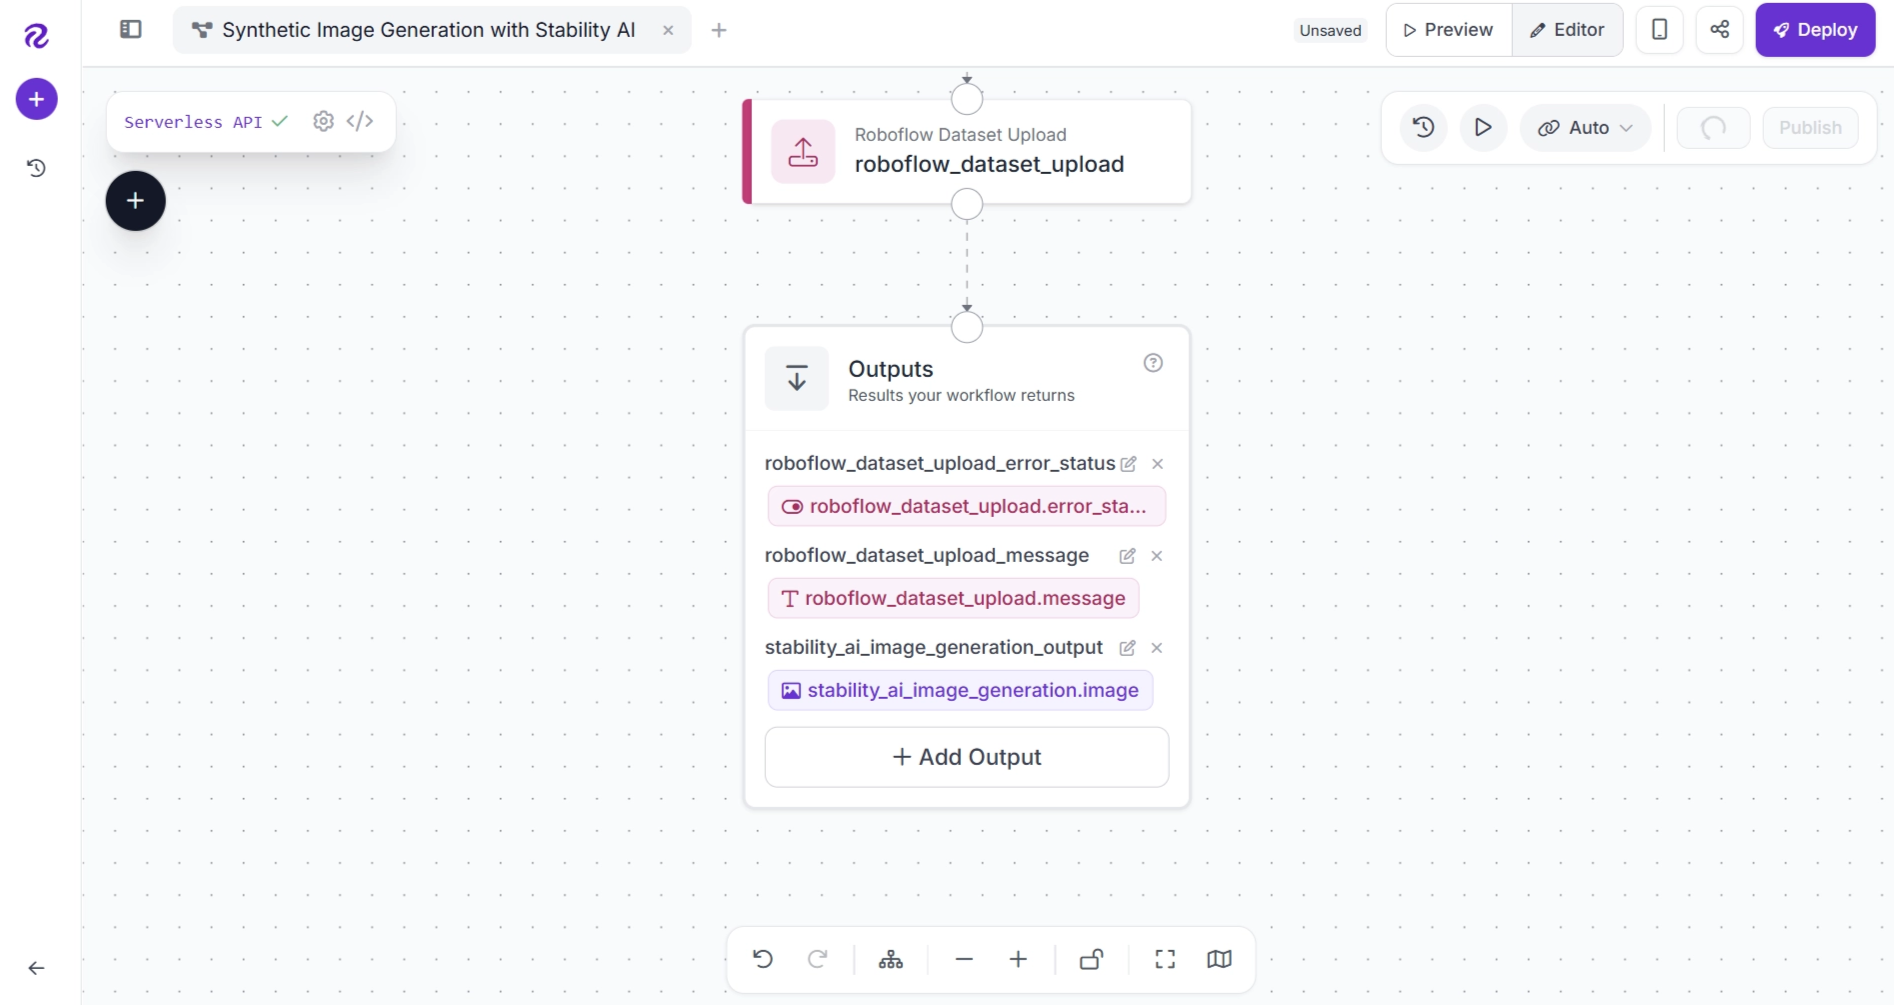
Since this workflow generates images entirely from text prompts, the image parameter in the Inputs block is not required and can be removed.
If you later want to use an image as the starting point for image generation instead of generating images solely from a text prompt, simply add the image parameter back and connect it to the Image input parameter of the Stability AI Image Generation block.
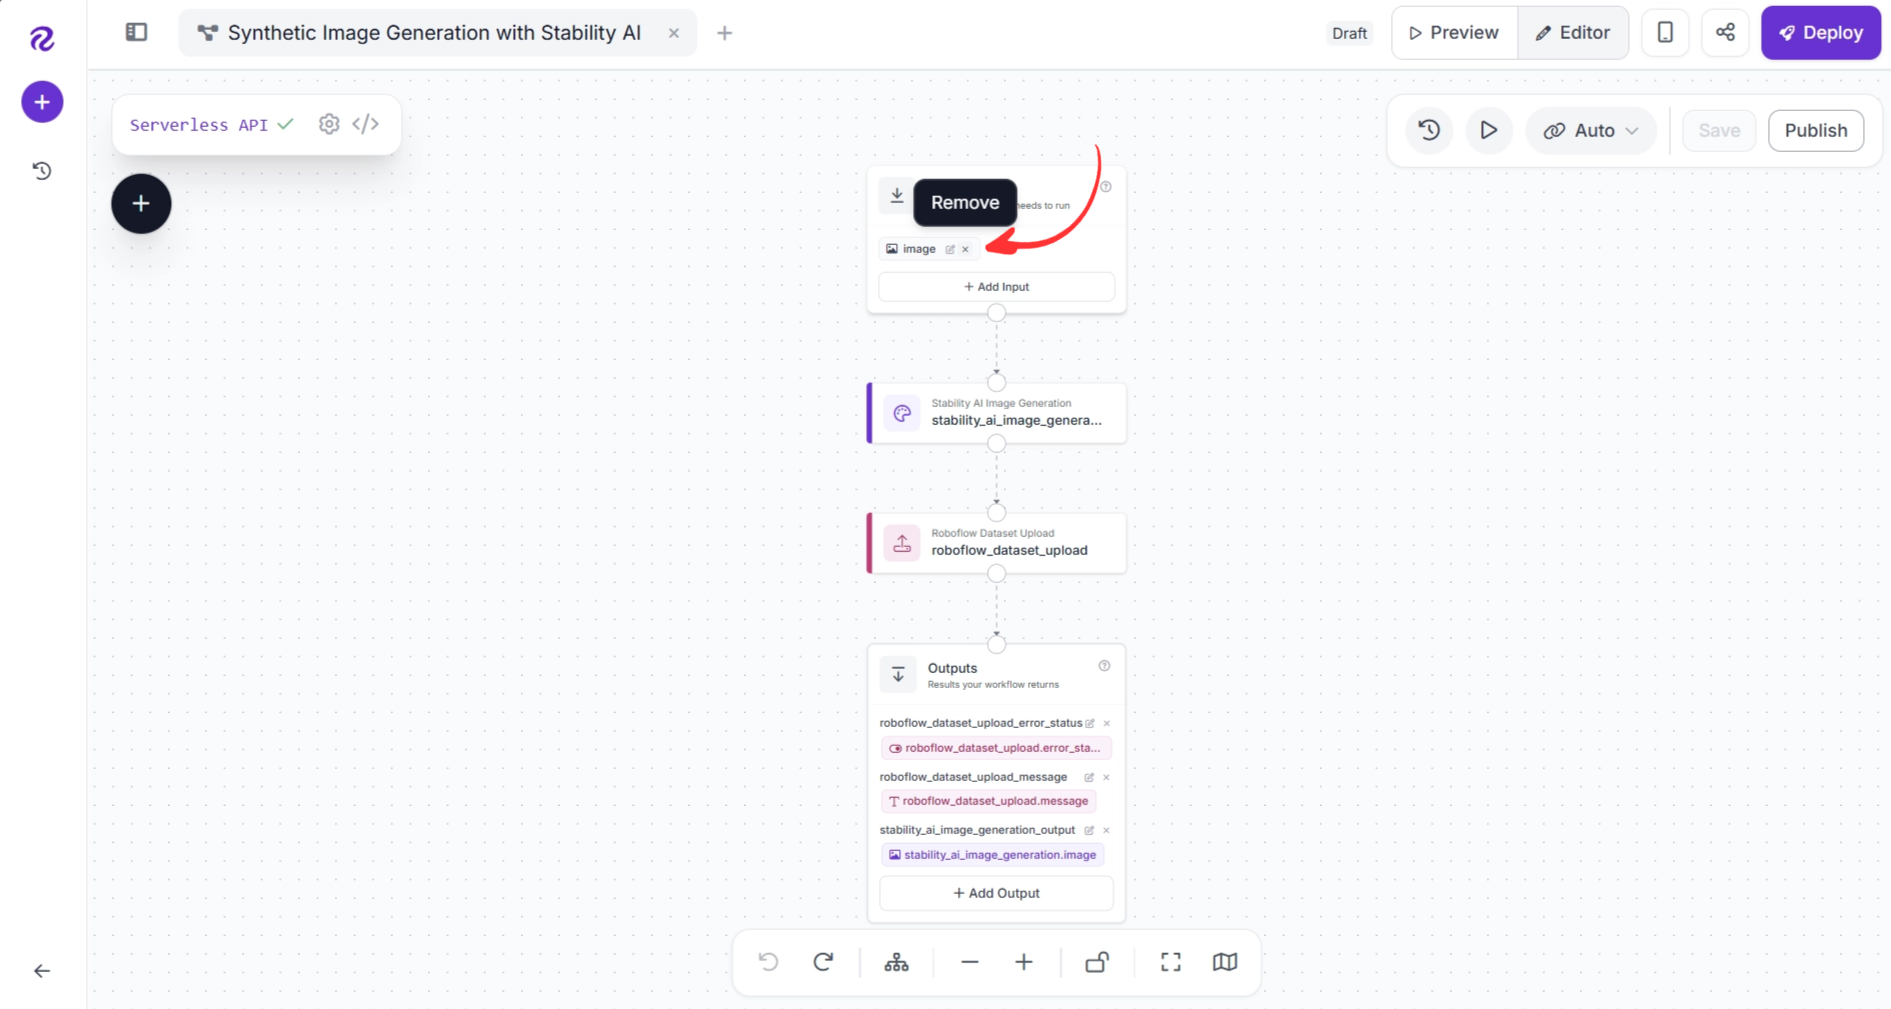
Your completed workflow should look similar to the one below. Try the workflow here.
Step 7: Run the workflow
You can now run the workflow directly from the Workflows editor.
Each execution generates a synthetic image and uploads it to your Roboflow project, where it can be annotated and used to train a computer vision model.
The Output tab displays the upload status, indicating whether the image was successfully added to the dataset, along with the generated image.
After the workflow finishes, you can find the generated images in your project by searching for the registration tag you assigned, such as synthetic-image.
You can also run the workflow from Python. Click the Deploy button in the Workflows editor to generate the Python code.
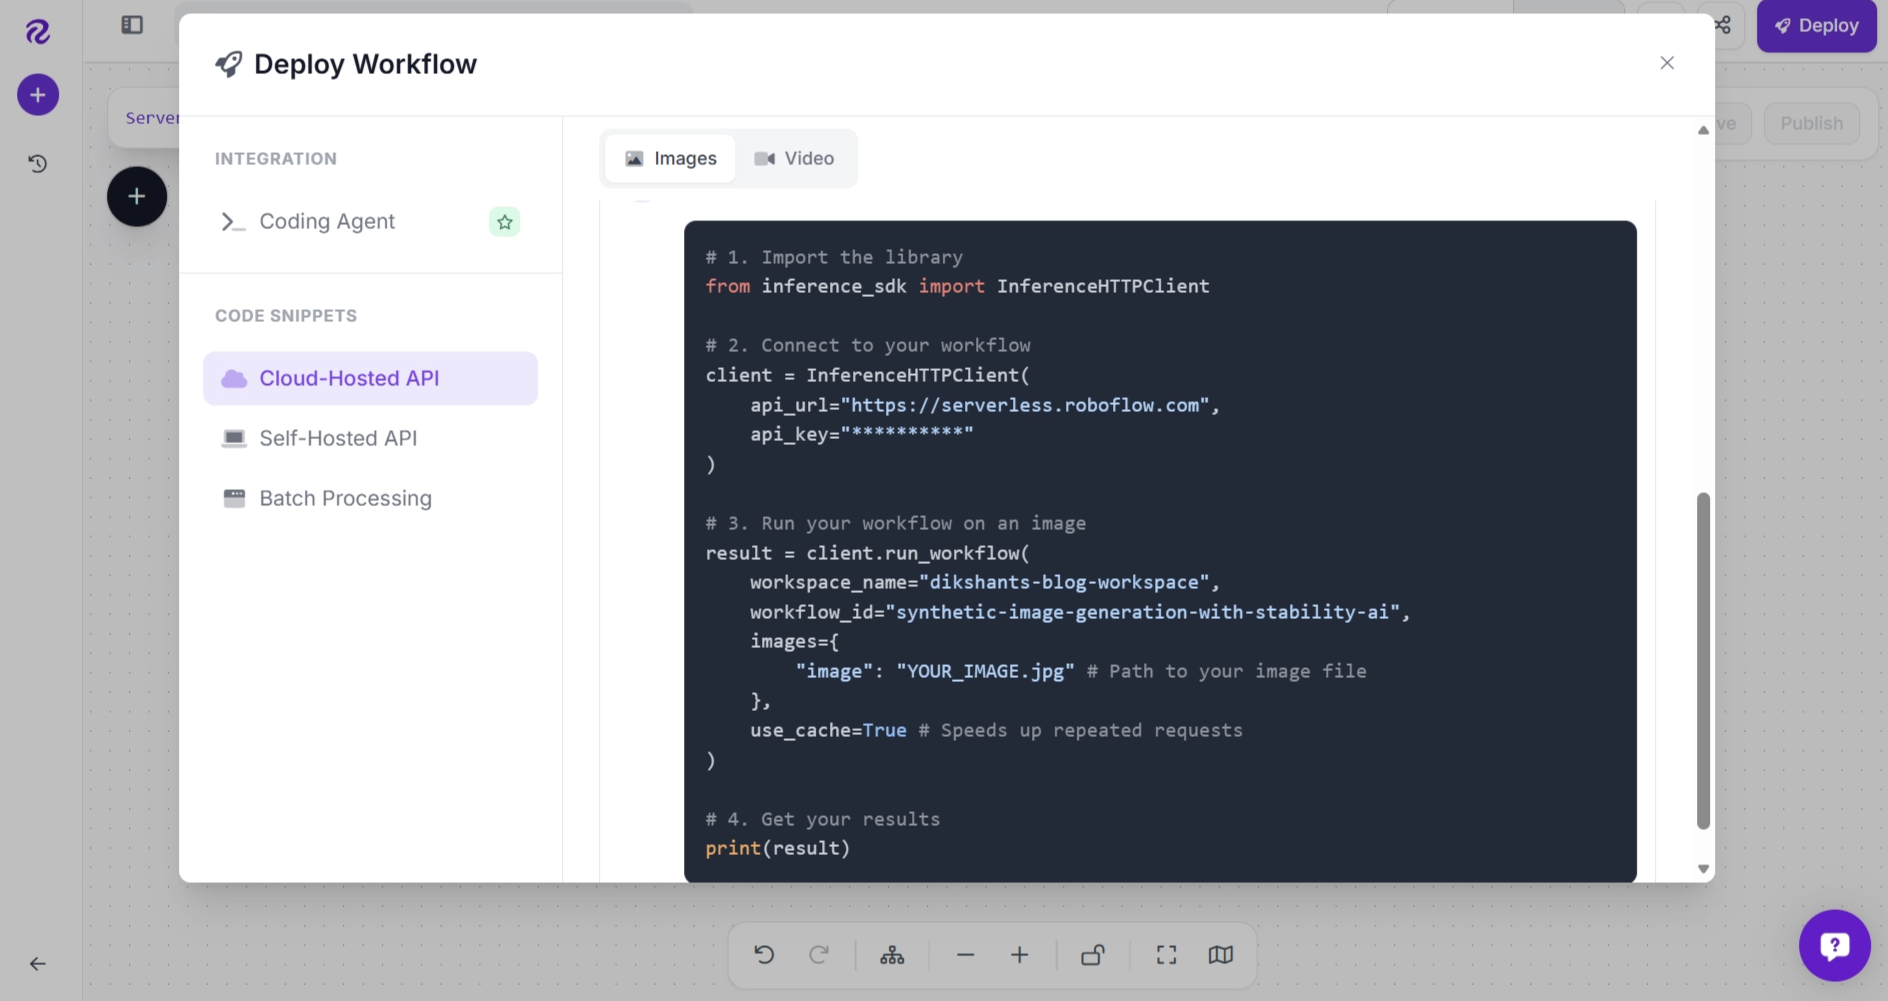
To run it, first install the Inference SDK:
pip install -U inference-sdk
You can then copy and paste the generated script into a Python file and run it.
The example below is a modified version of the generated script. In this example, the workflow is executed five times, generating five synthetic images and automatically uploading them to the dataset.
from inference_sdk import InferenceHTTPClient

client = InferenceHTTPClient(
    api_url="https://serverless.roboflow.com",
    api_key="YOUR ROBOFLOW_API_KEY"
)

for i in range(5):
    result = client.run_workflow(
        workspace_name="your-workspace",
        workflow_id="synthetic-image-generation-with-stability-ai",
        images={
        },
        use_cache=True
    )
    print(result[0]['roboflow_dataset_upload_message'])
After the script completes, your dataset will contain five newly generated synthetic images, each ready for annotation and model training.
Managing Synthetic Images in Your Dataset
As you collect more real-world images, you may want to reduce or remove synthetic images from your training dataset.
Because every image generated by this workflow is assigned the synthetic-image registration tag, you can easily filter your dataset to find all synthetic images.
In your dataset, select the tagged images and click Delete Images. After deleting them, generate a new dataset version so that future model training uses only the remaining images.
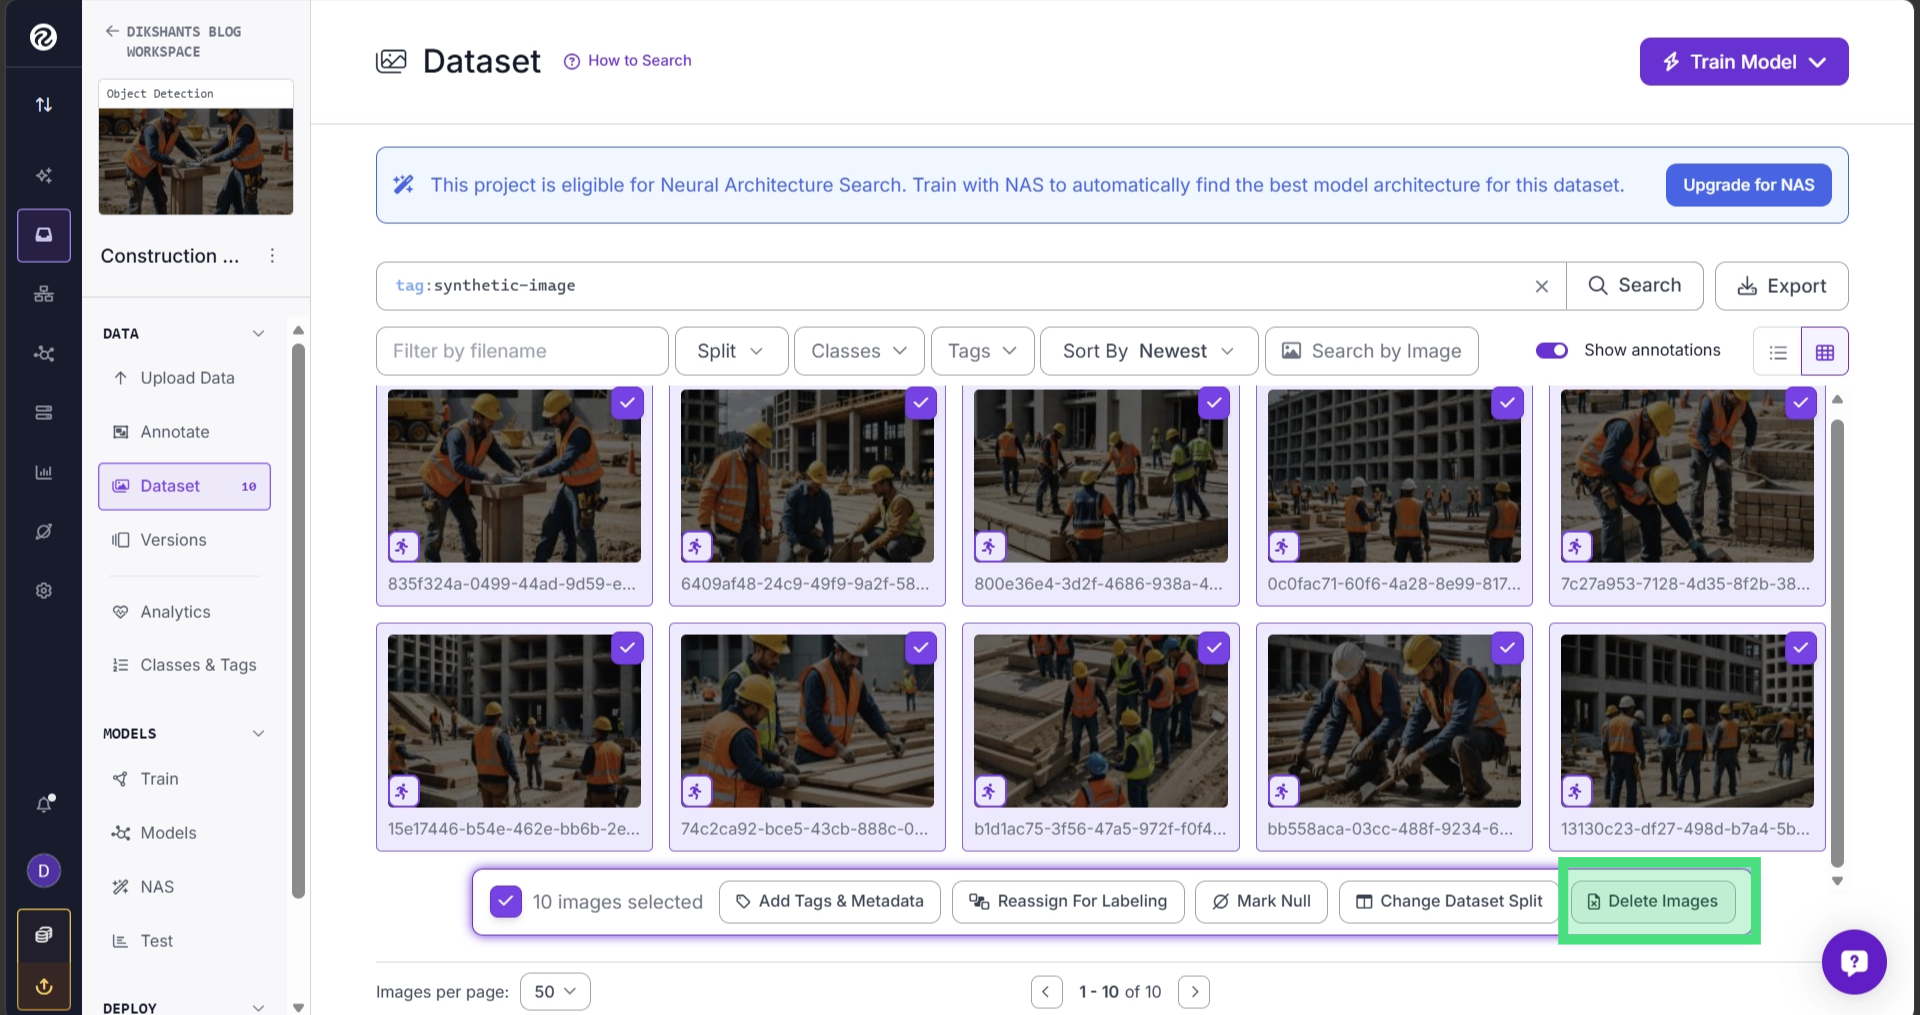
This tagging approach makes it easy to experiment with synthetic data early in development while maintaining the flexibility to remove synthetic data once you have collected enough production images.
Conclusion: Synthetic Image Generation in Roboflow Workflows with Stability AI
Synthetic images can help accelerate the development of computer vision models by quickly expanding datasets, balancing classes, and generating examples of scenarios that are difficult to capture in the real world.
While they should complement rather than replace real world data, they are an effective way to bootstrap a project and improve model robustness during the early stages of development.
Using Roboflow Workflows and the Stability AI Image Generation block, you can automate the entire process of generating synthetic images and uploading them directly to a Roboflow project, where they can be organized into a dataset for annotation and model training.
As you collect more real-world data, you can easily identify and remove synthetic images using registration tags, allowing your dataset to evolve alongside your application.
Try Roboflow Workflows for free to build synthetic image generation pipelines.
Further reading: Roboflow Advances Defect Detection Pipeline for Manufacturers with Synthetic Data Powered by NVIDIA Physical AI
Cite this Post
Use the following entry to cite this post in your research:
Dikshant Shah. (Jun 1, 2026). How to Create a Synthetic Dataset for Computer Vision. Roboflow Blog: https://blog.roboflow.com/how-to-create-a-synthetic-dataset-for-computer-vision/