
Build a no-code object detection model with Apple CreateML by labeling your images in Roboflow, exporting to CreateML JSON, and training on your Mac; the resulting CoreML file runs on-device in an iOS app. Around 50 to 100 images per class works with the Transfer Learning algorithm, and when a project needs more accuracy, the same dataset trains RF-DETR in one click.
What Is CreateML?
CreateML (styled Create ML by Apple) is a machine learning tool developed by Apple for building models that work with images, sound, text, activity data, and more. It ships free with Xcode on macOS as a standalone app, providing a no-code interface for training models that integrate with the rest of the Apple ecosystem: the output is a CoreML file that runs on-device on iPhone and iPad using the neural engine.
For computer vision, CreateML supports image classification (which of a set of labels best represents the contents of an image) and object detection (where are the different instances of an object in an image), along with related templates like hand pose and action classification.
While Apple's platform is no-code, you still need labeled data to build a model, and CreateML expects it in its own CreateML JSON format, which most labeling tools do not write natively. That is the gap Roboflow closes: label or upload data in any format, then export directly to CreateML JSON. Combining Roboflow with CreateML makes the no-code training path fully no-code end to end.
To build a computer vision model using Apple's CreateML, we will:
- Collect data
- Configure an object detection project in CreateML
- Start training
- Evaluate model performance
Setup to Use Apple's CreateML for Computer Vision
You will need a Mac running a current version of macOS with Xcode installed (free in the Mac App Store). CreateML opens from Xcode under Xcode > Open Developer Tool > Create ML. Training runs locally, and it is dramatically faster on Apple silicon than the Intel-era Macs the tool grew up on, though your machine is still doing real work during a training run.
Collect Data to Use With CreateML
You can collect data by taking pictures with your iPhone. Capture your subject from different angles, with different backgrounds, and in different lighting; the more variation, the better the model generalizes.
Once you have a hundred or so images, label them in Roboflow Annotate. Two AI-assisted features do most of the work: Auto Label drafts bounding boxes across the whole dataset from a text description of each class, and Label Assist suggests boxes as you review image by image. CVAT is a solid open source alternative if you prefer to label elsewhere and import; Roboflow reads 26+ annotation formats either way.
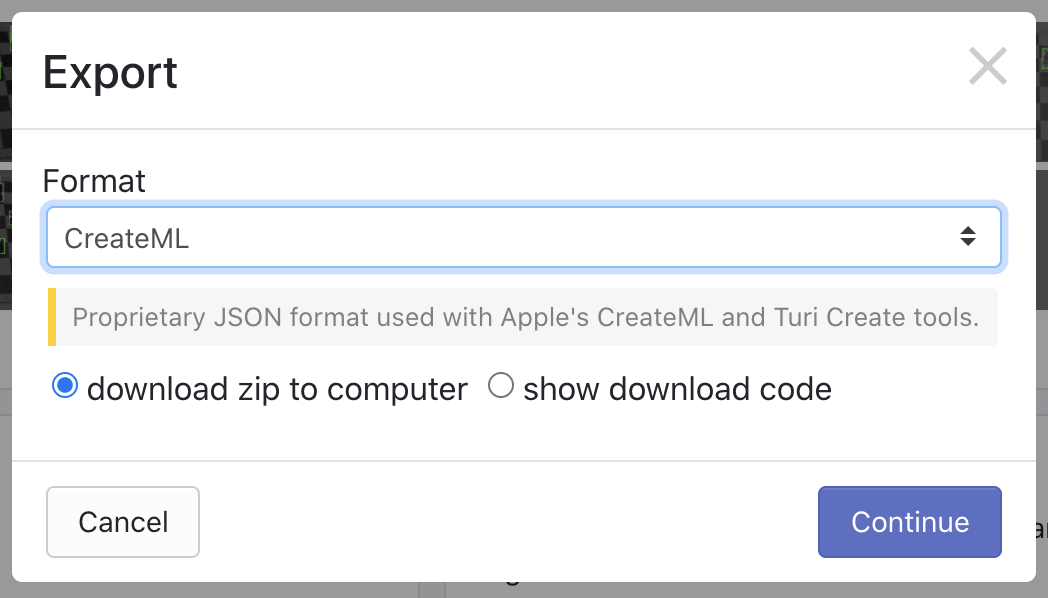
When your dataset is labeled, generate a version (optionally adding augmentations like brightness shifts and flips to increase its size) and export in CreateML format. The export gives you a zip with train, valid, and test folders, exactly the structure CreateML expects, with the split handled for you.
If you would rather not collect and label your own images, choose an open source dataset from Roboflow Universe, which hosts 200,000+ datasets, and fork and download it directly in CreateML JSON format. This tutorial uses a public mask wearing dataset with two classes, mask and no-mask.
Train a Computer Vision Model with CreateML
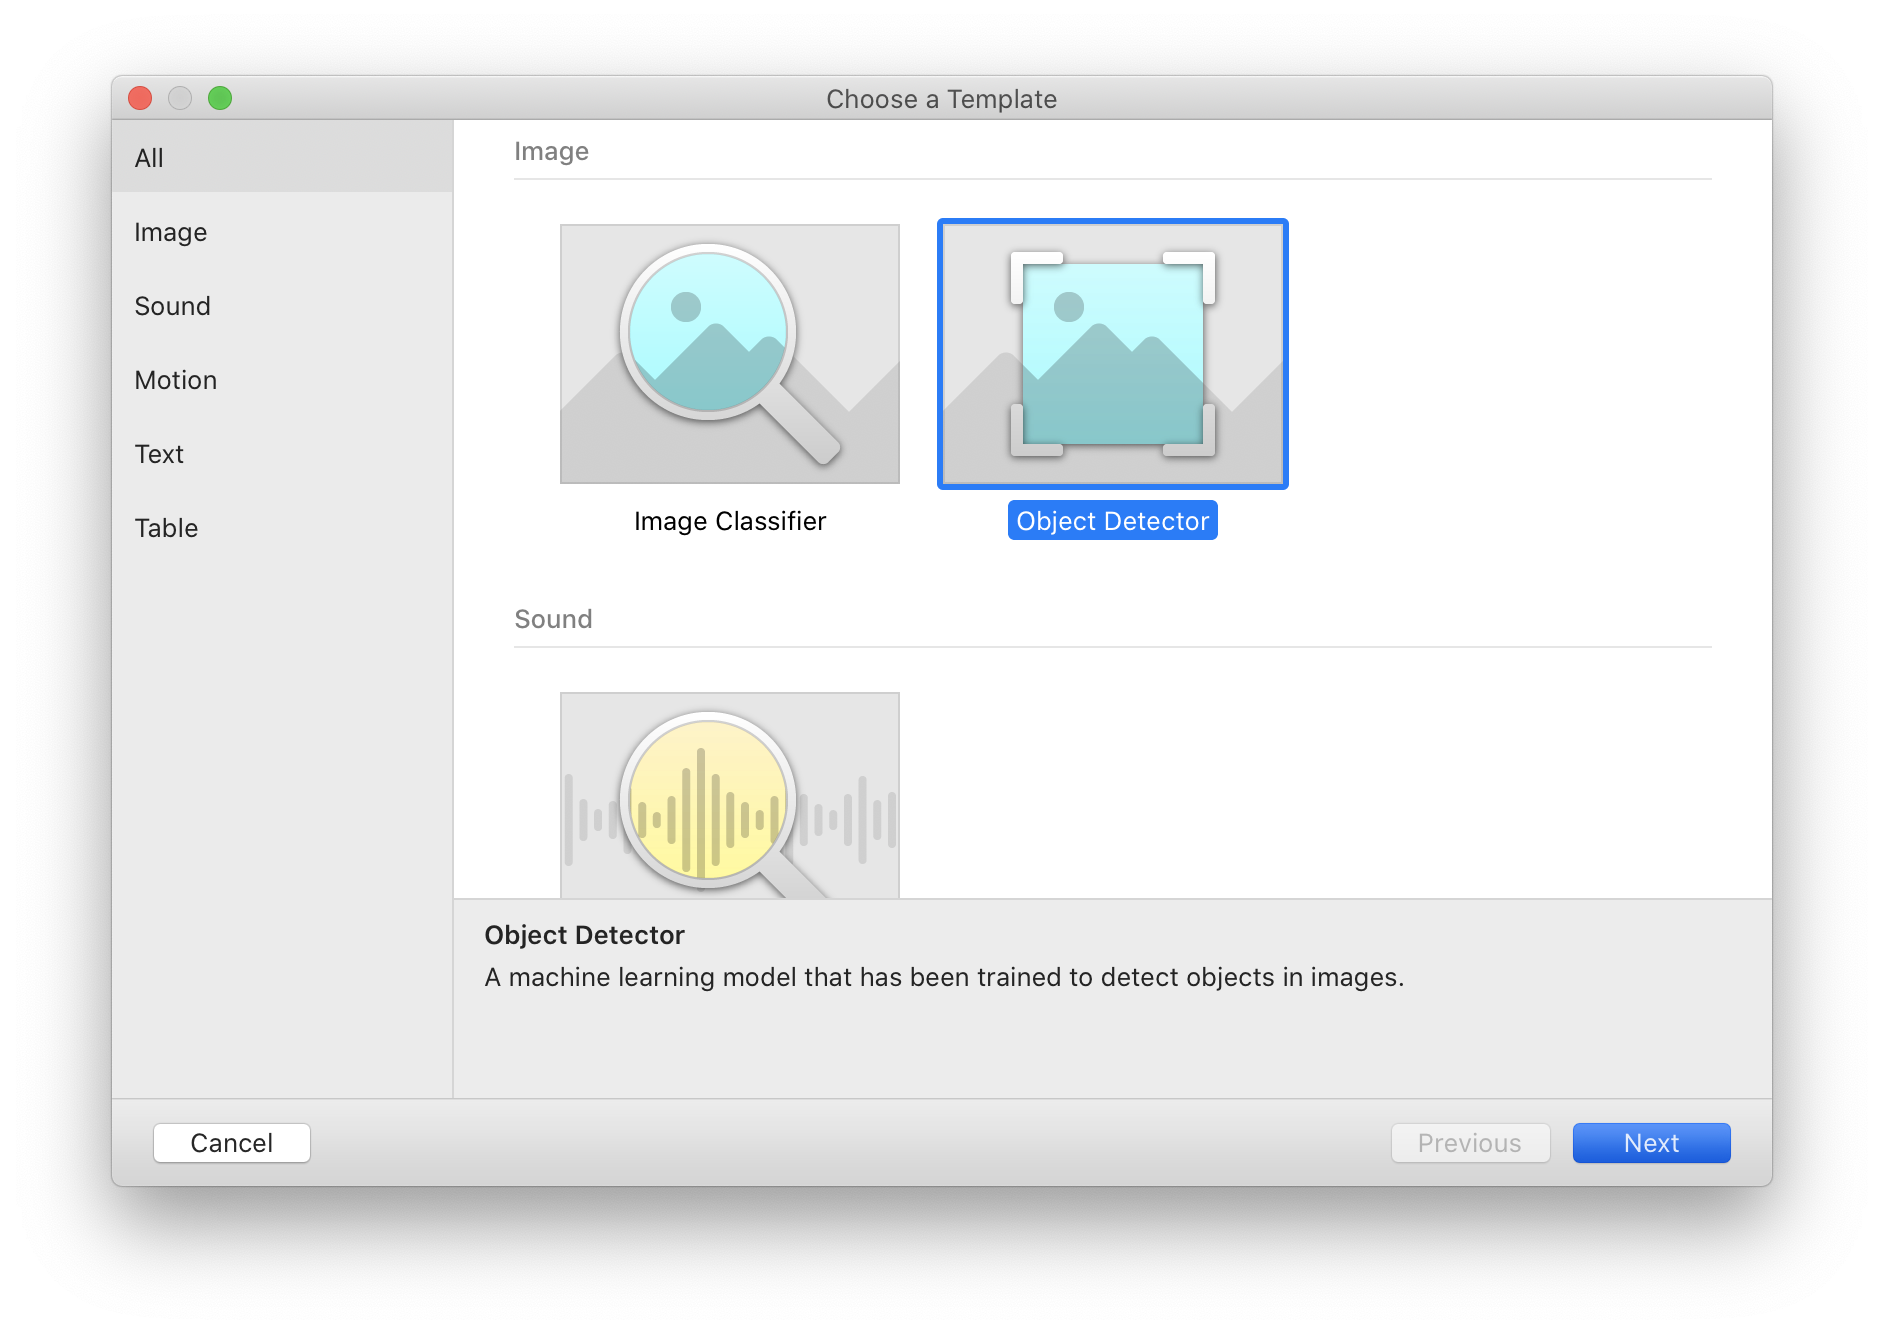
Now comes the fun part. We're ready to train a model! Fire up CreateML and create a new Object Detector project.
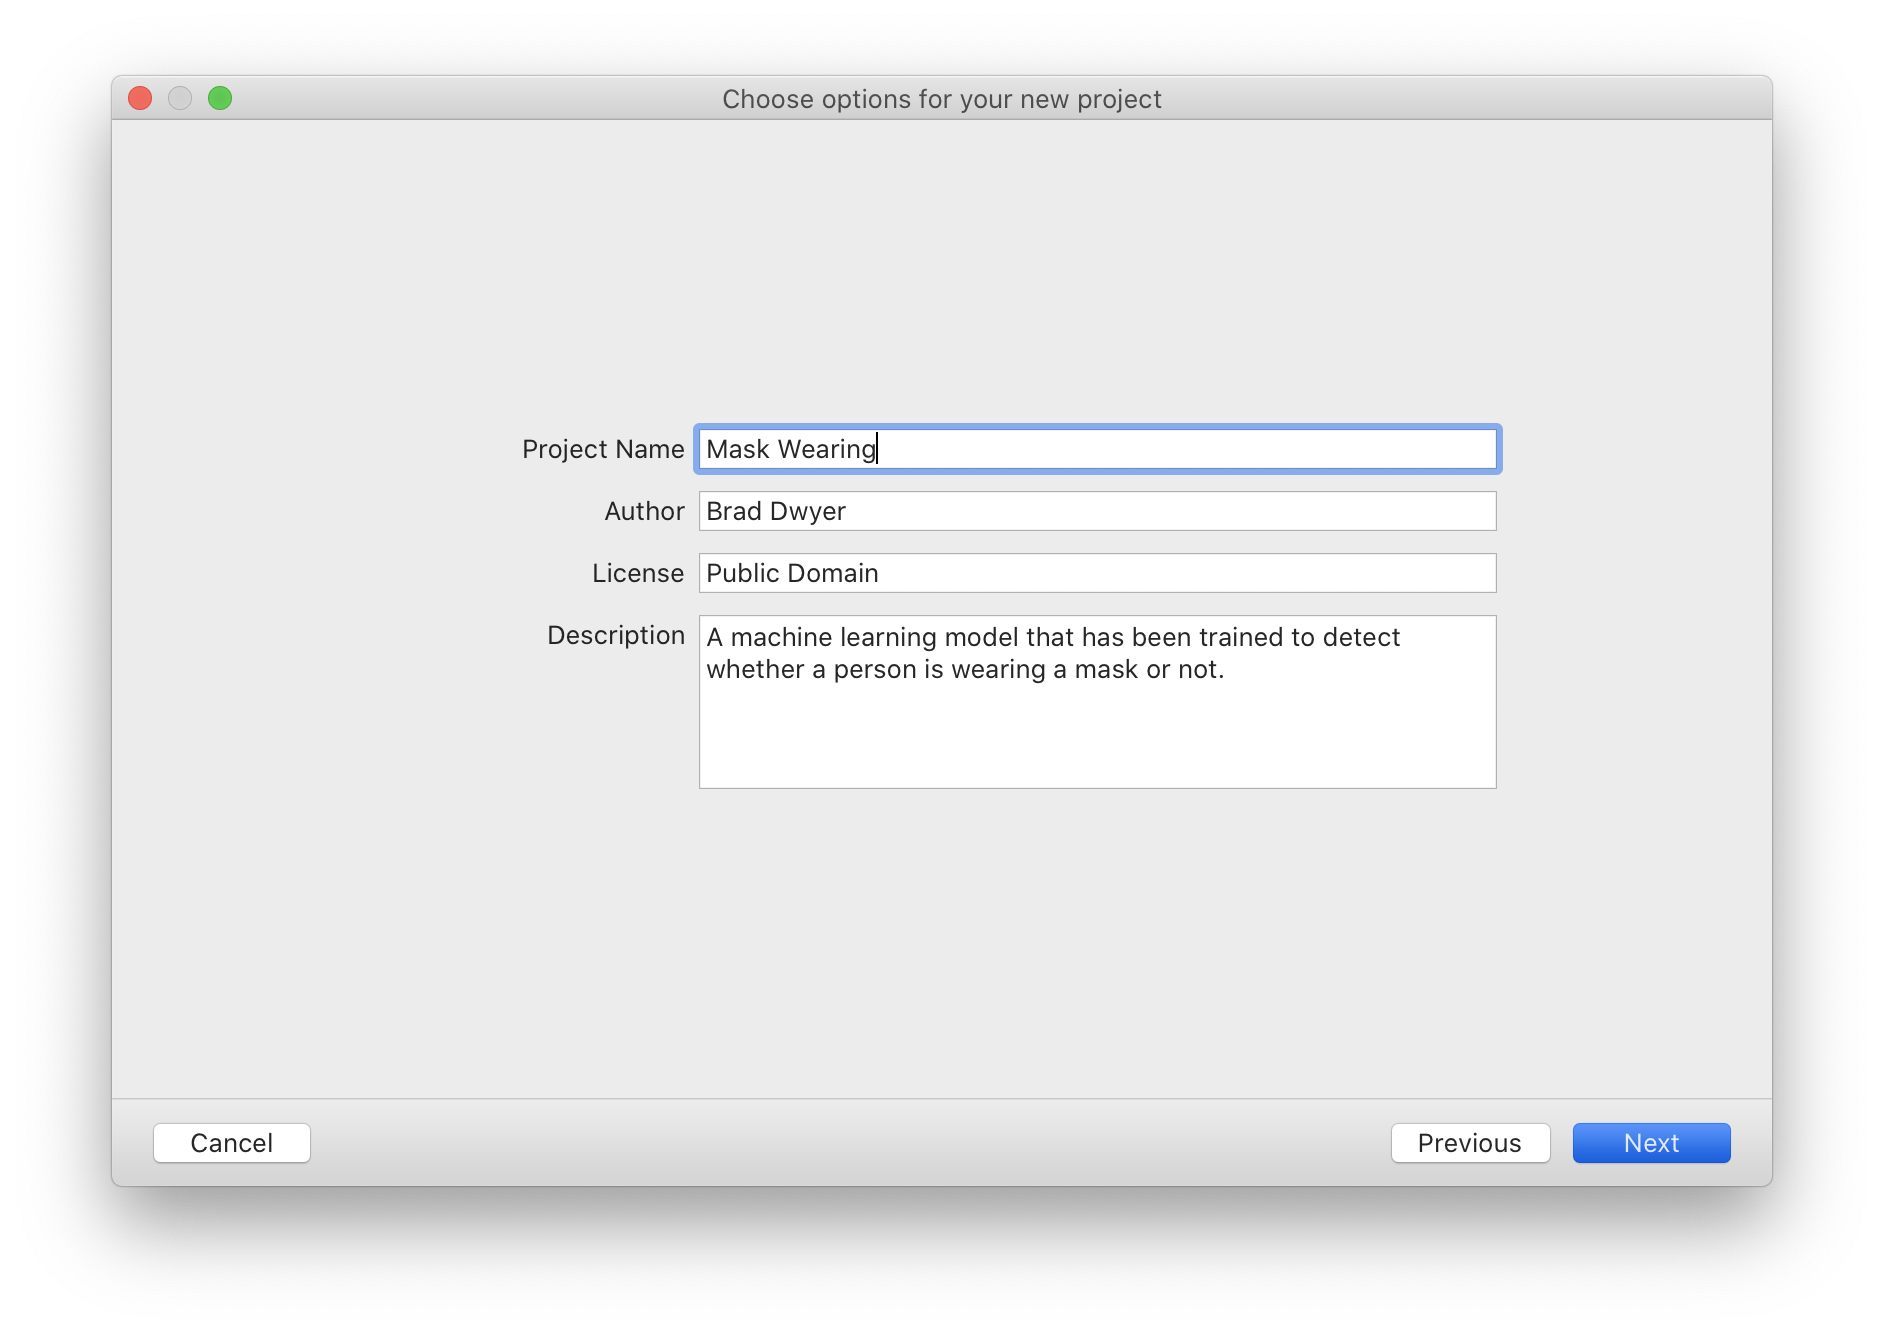
Next, give your project a name and description. I'll be training a model to detect whether a person is wearing a mask or not (based on this public mask wearing dataset).
CreateML offers two training algorithms for object detection. Full Network trains the complete detection network and generally wants more images and more training time. Transfer Learning starts from a pretrained feature extractor, needs fewer images, and trains faster, making it the better default for datasets in the hundreds of images.
Then we'll unzip the download from Roboflow and point CreateML at the training, validation, and testing data we downloaded:
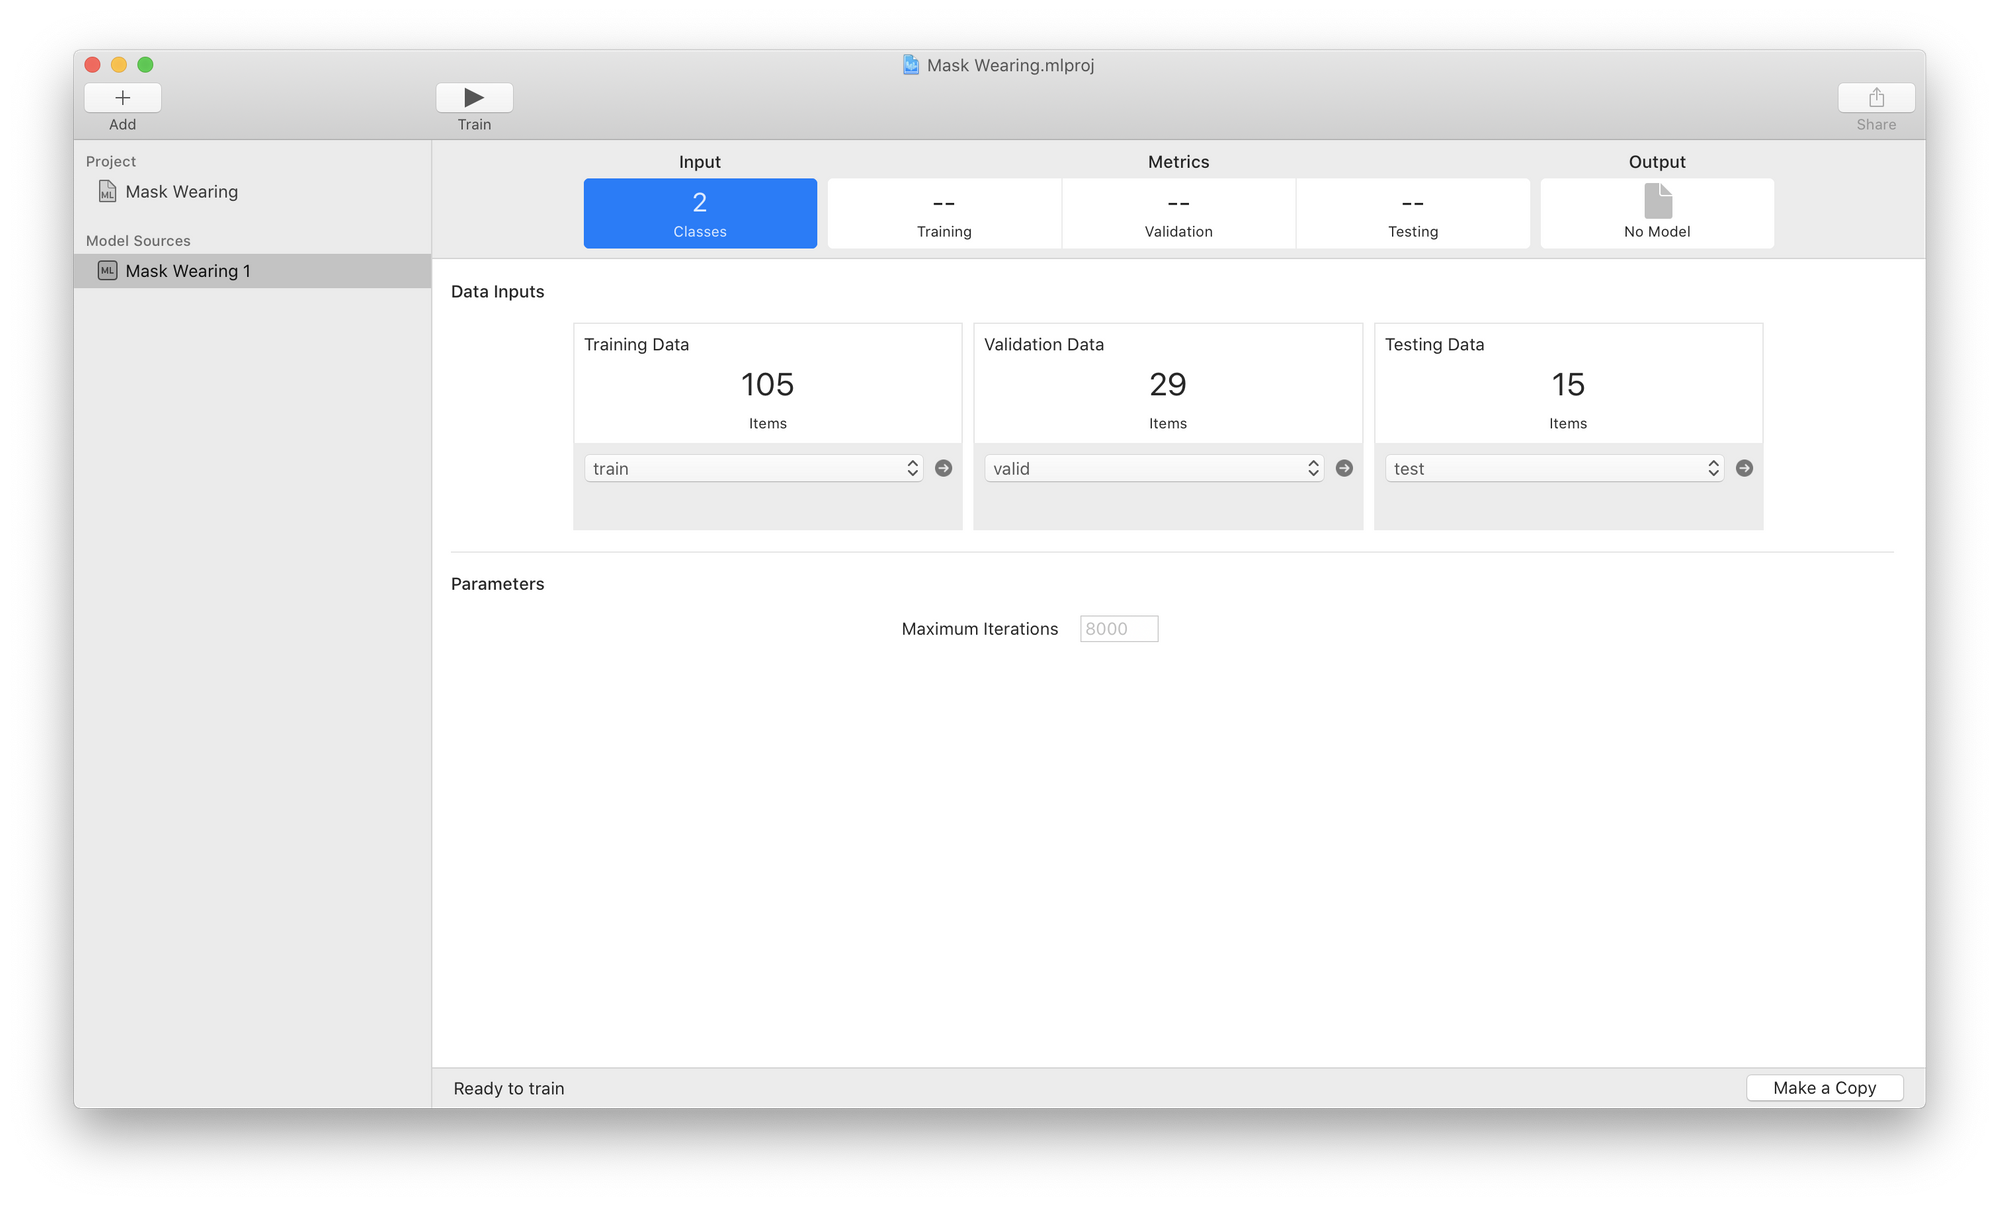
Just hit the "Train" button at the top and we're on our way. Depending on dataset size, iteration count, and whether you are on Apple silicon, training takes anywhere from a coffee break to several hours, and your Mac will be busy for the duration.
Evaluate Model Performance in CreateML
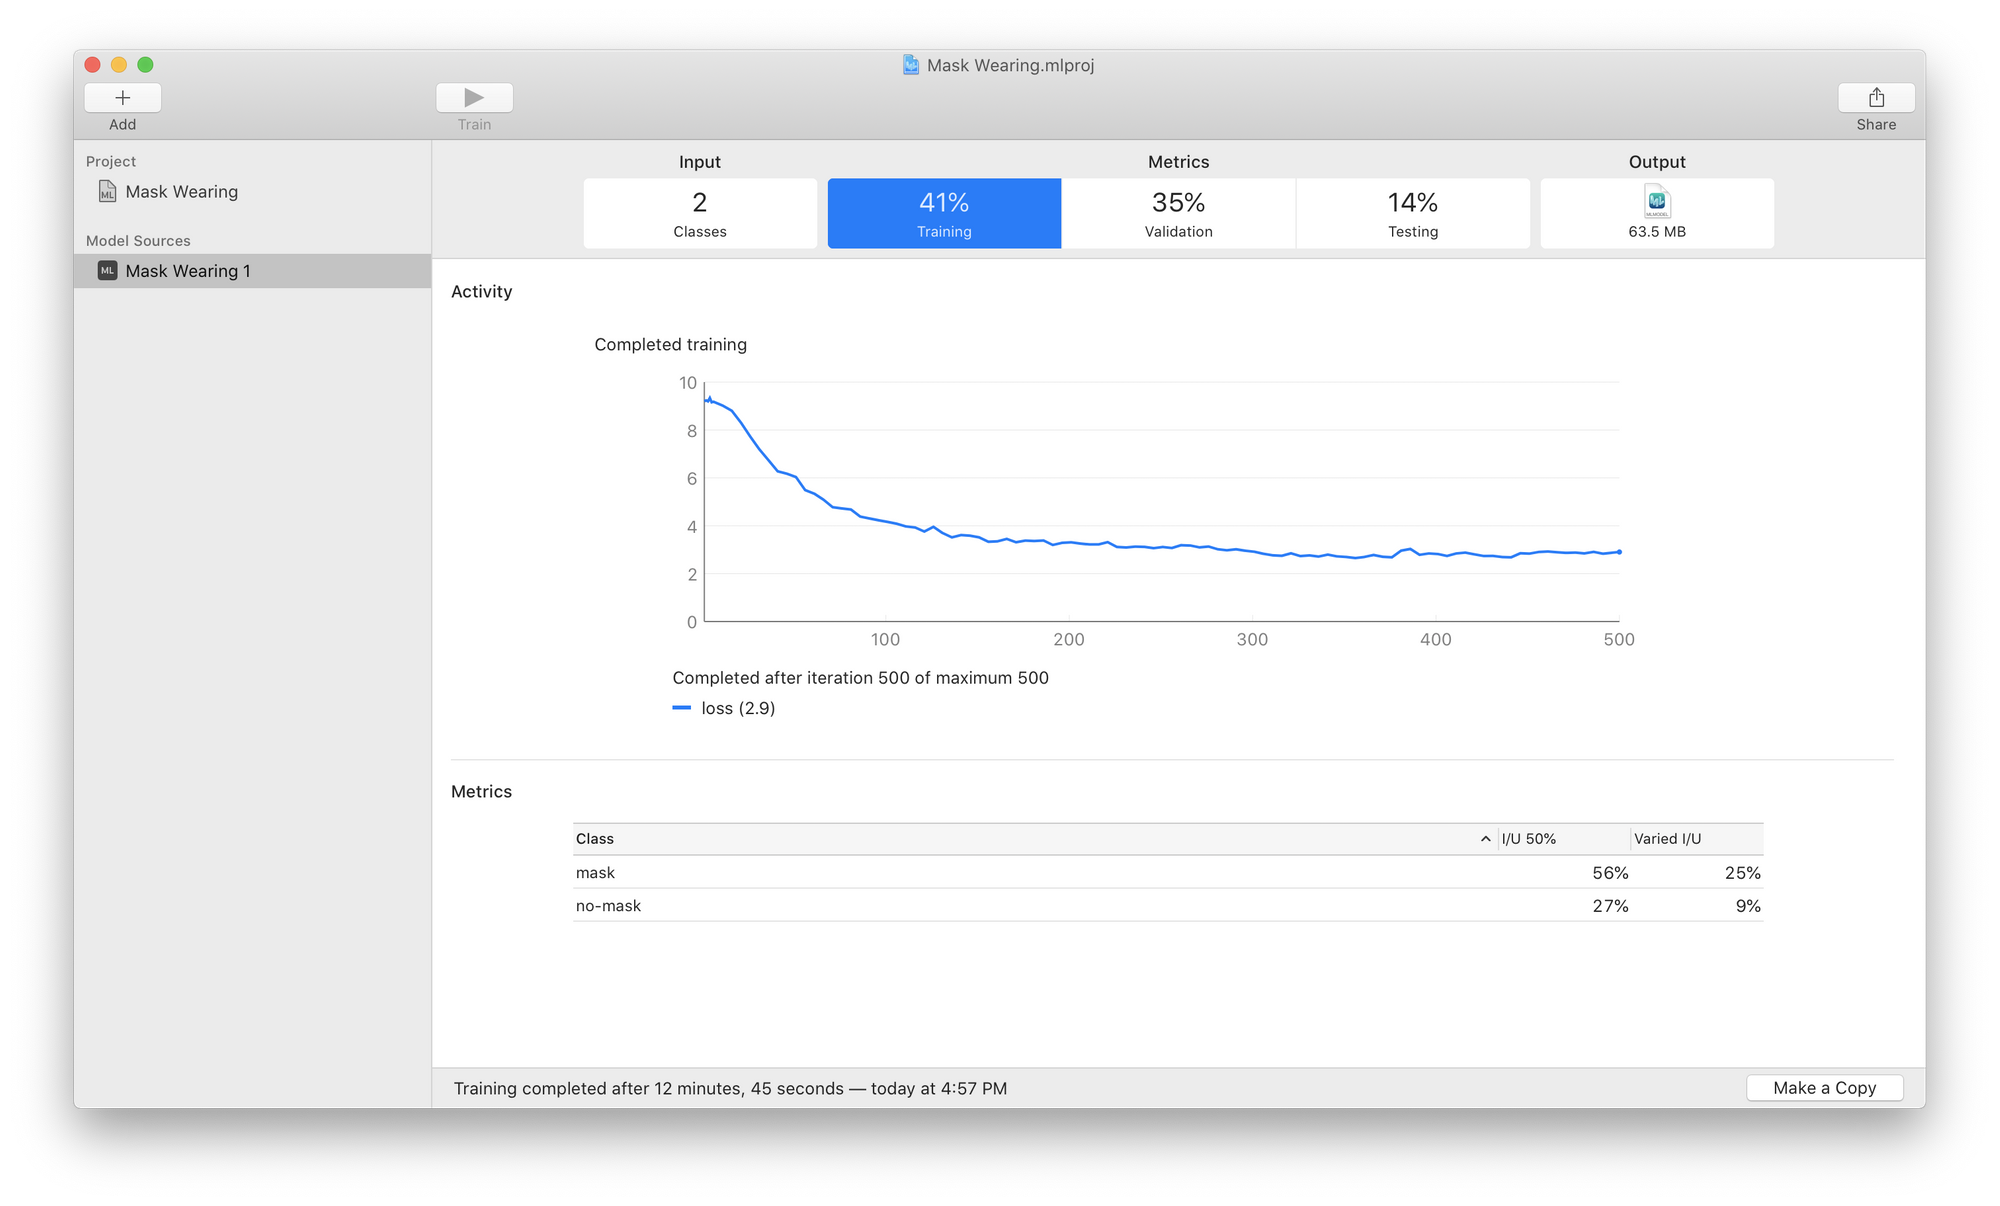
As your model trains, you'll watch the blue line tick to the right (and hopefully down). This line measures your validation loss which is one measure of how well your model is fitting your dataset. Lower numbers are better.
At the end of training you will see a percentage for Intersection Over Union (I/U) for each class and a Mean Average Precision for your Training, Validation, and Testing sets at the top. Higher values are better here.
From my screenshot above we can see that the model is better at detecting faces with masks than faces without masks. And that it does much better on the training and validation data than the testing data. This means the model did not generalize very well to data it hadn't seen before.
To address this issue I should collect or generate more training data (particularly of people not wearing masks) or add augmentations and re-export a new version from Roboflow.
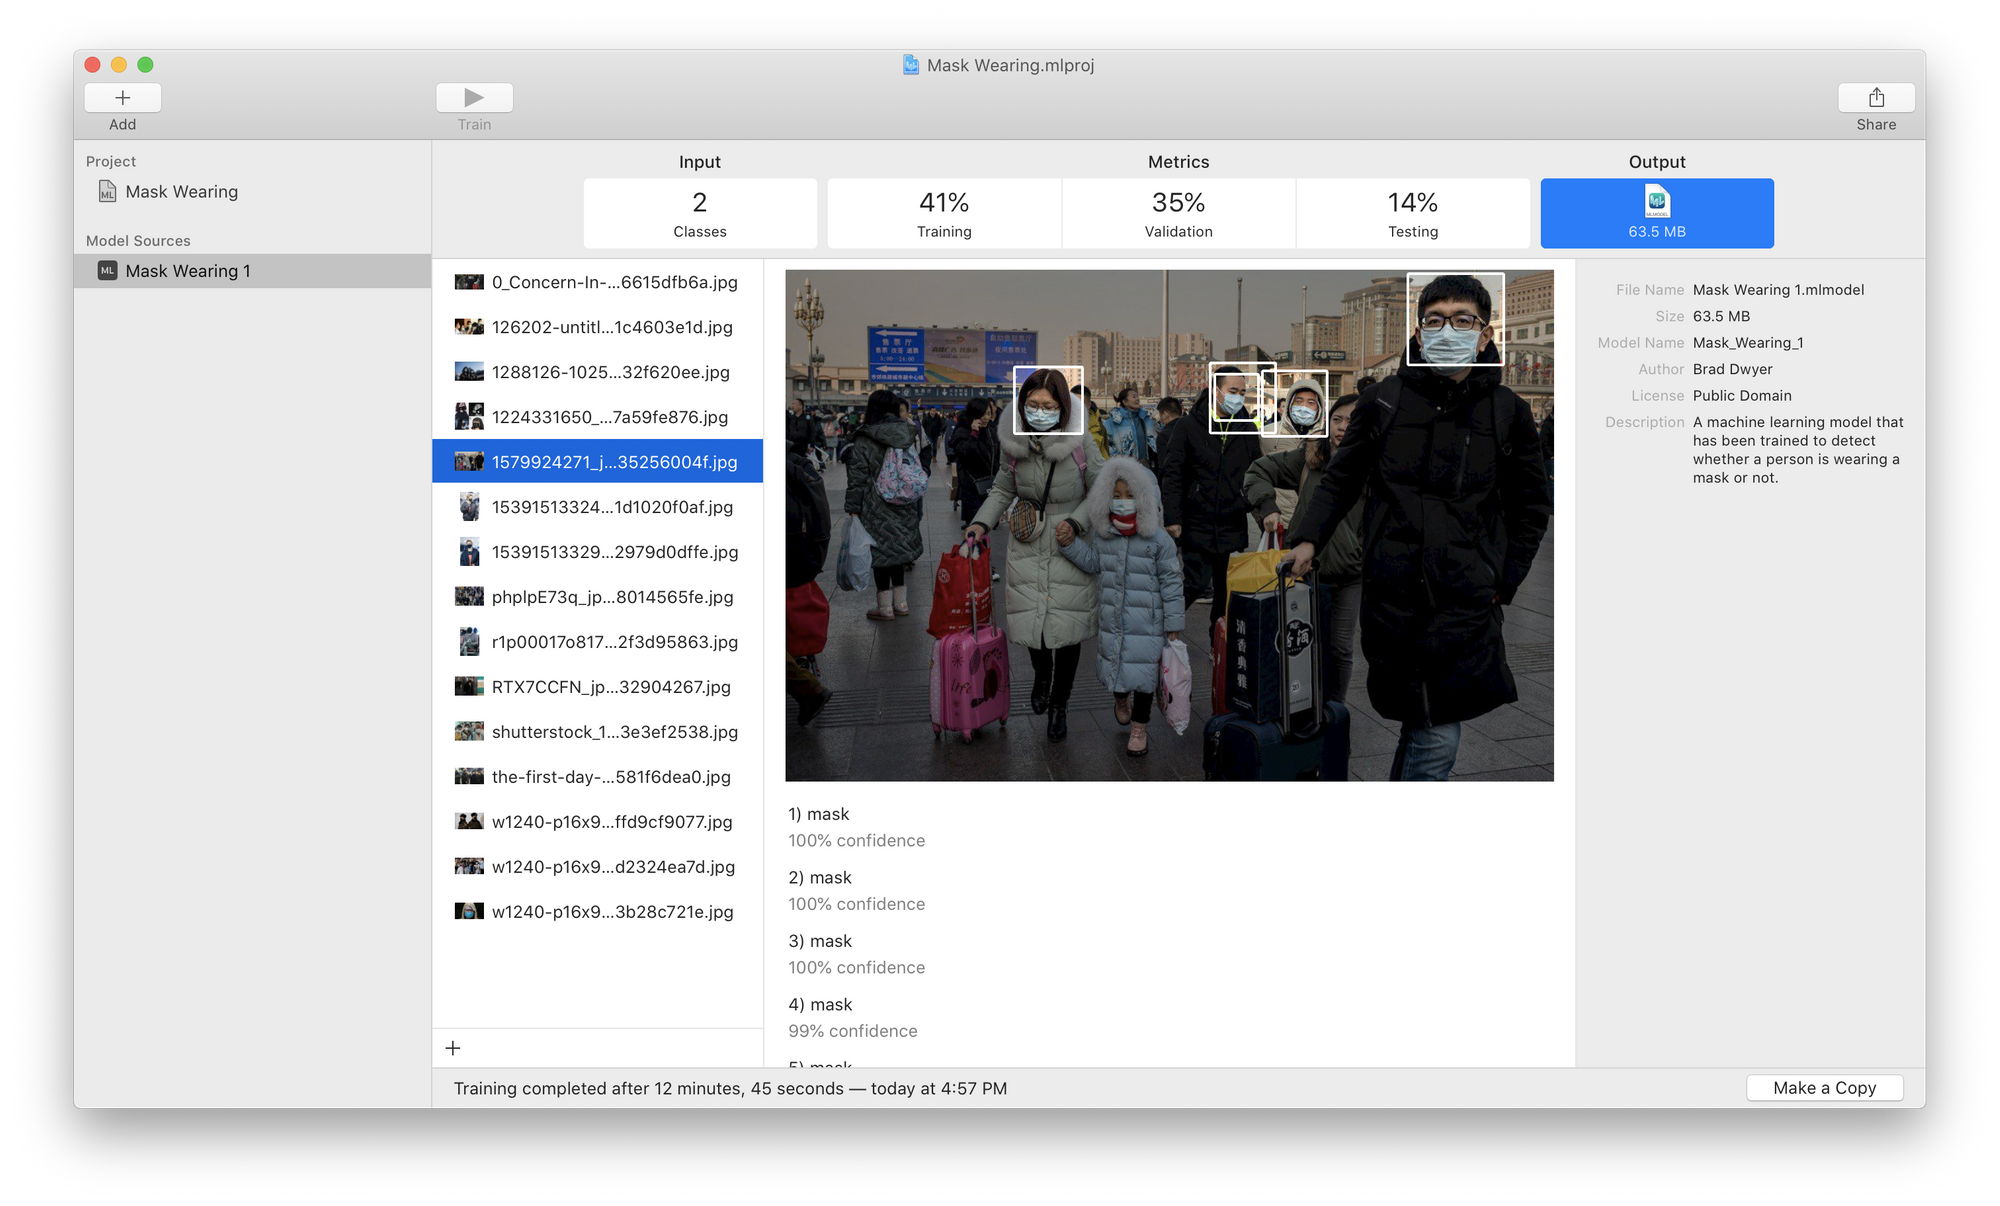
But numbers can be hard to grok. To truly see how your model performs, click on the "Output" tab and drop your test images in to see a visualization of your model prediction.
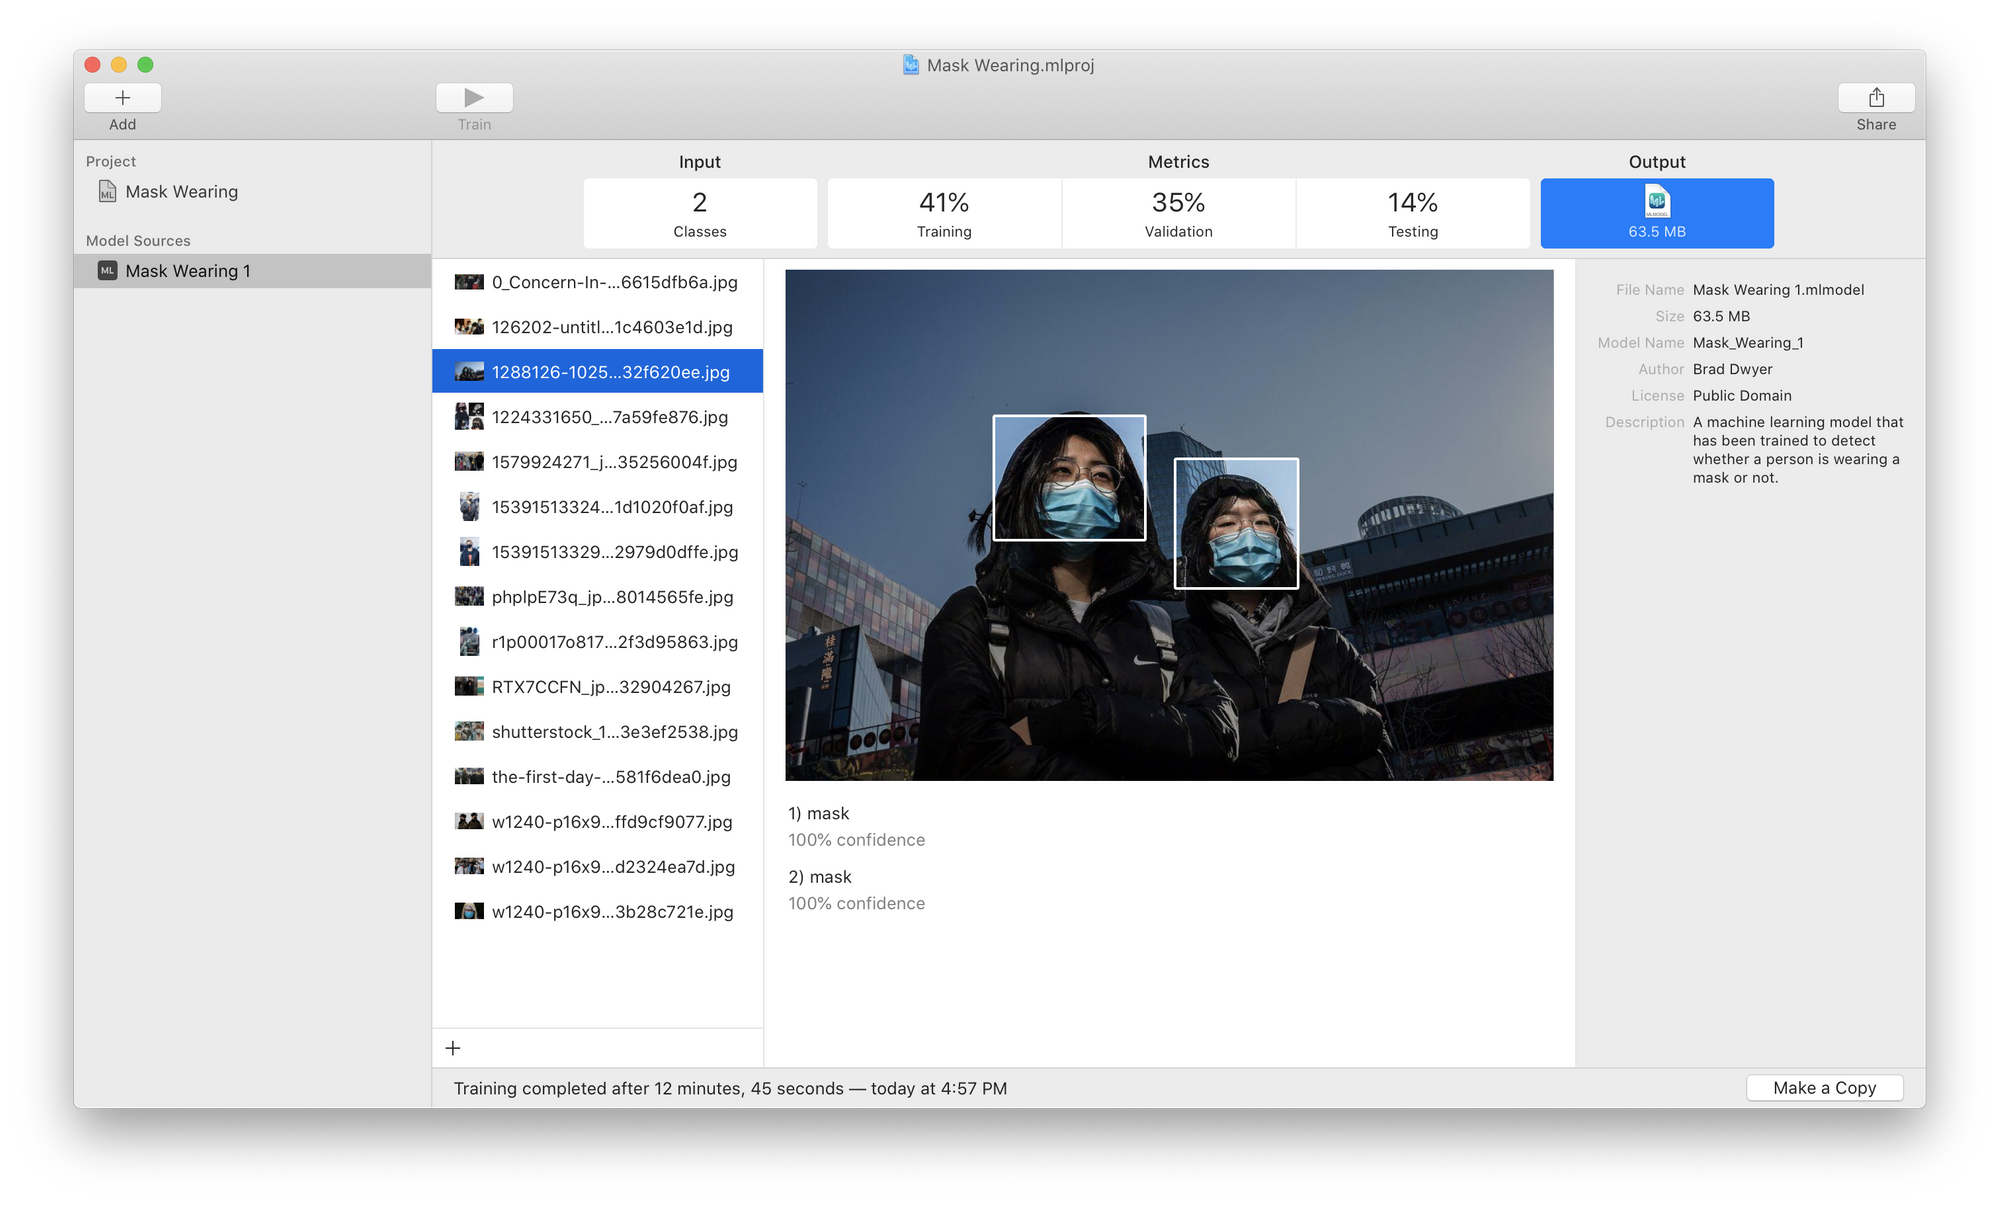
Here we can see that our model actually did quite well! It's detected two people with masks. Unfortunately, in some other images, it did worse; for example it missed the child with the mask and the lady whose face was partially obscured by the man's arm in this example:
Use CreateML in a Sample App
This is a pretty good start! I can actually drop this CoreML file directly into the Apple sample app and run it on my iPhone's live camera feed.
But getting a model that is good enough to use in production requires experimentation and iteration. To improve this model I would go out and collect more varied training examples, add them to my dataset, and train another version of my model.
Then repeat the process of identifying where it's least accurate, adding more data, and training again until it's ready for prime time.
Where CreateML Fits
CreateML is a strong choice when the whole project lives in the Apple ecosystem: training on your Mac, deploying only to iOS, and running fully on-device. Its boundaries are the flip side of that focus. Training capacity is your Mac's hardware, architectures are fixed and Apple-defined, and the CoreML output serves Apple platforms only.
When a project outgrows those boundaries, Roboflow's RF-DETR is the better-suited trainer. It is a real-time detection transformer with higher accuracy per parameter than the CNN architectures inside CreateML's templates, it comes in sizes from Nano (for latency-sensitive devices) to Large, and its commercial-friendly license means the trained model ships in your product without restrictions.
Hosted training runs on cloud GPUs instead of your Mac, evaluation includes per-class breakdowns and a visual tester, and the same trained model serves iOS, Android, web, and edge hardware like a Jetson from one API that any client, including an iOS app, can call. The same dataset you exported for CreateML trains RF-DETR with one click, so trying both and comparing accuracy costs nothing but a training run.
Is CreateML free?
Yes. CreateML is included with Xcode, which is a free download from the Mac App Store. Training runs on your own Mac, so there are no compute charges.
What data format does CreateML use for object detection?
CreateML uses its own JSON annotation format with images organized into train, valid, and test folders. Roboflow exports any labeled dataset to CreateML JSON, so data labeled in any tool or downloaded from Universe converts without custom scripts.
How many images do I need to train a CreateML object detection model?
A useful floor is around 50 to 100 labeled images per class with the Transfer Learning algorithm, and a few hundred for dependable results. Augmentation stretches a small dataset further; export the augmented version from Roboflow before training.
Can I use a CreateML model outside of iOS?
Not directly. CreateML produces CoreML models, which run on Apple platforms. For a model that serves iOS and Android and web from one place, train in a platform that deploys behind a hosted API or exports to portable formats.
Get Started
Create a free Roboflow account, label your images or fork a dataset from Universe, export in CreateML JSON, and you can have a custom CoreML model running on your iPhone today.
Cite this Post
Use the following entry to cite this post in your research:
Brad Dwyer. (Apr 14, 2026). How to Build Computer Vision Models with Apple CreateML. Roboflow Blog: https://blog.roboflow.com/createml/