
LabelImg is no longer actively developed. Use Roboflow Annotate which runs in the browser, supports teams, adds AI-assisted labeling, converts formats, and connects directly to training and deployment.
Accurately labeled data is the foundation of any working computer vision model. LabelImg is a free, open source tool for drawing bounding boxes on images, and it is a common starting point for small object detection projects.
This guide covers what LabelImg is, how to install and use it, labeling best practices that apply no matter which tool you use, and a faster path from labels to a trained model.
One thing to know up front: LabelImg is no longer actively developed. It is now part of the Label Studio community, and while you can still install and run it, that maintenance status is worth weighing if you are choosing a tool for a project you will keep working on.
What is LabelImg?
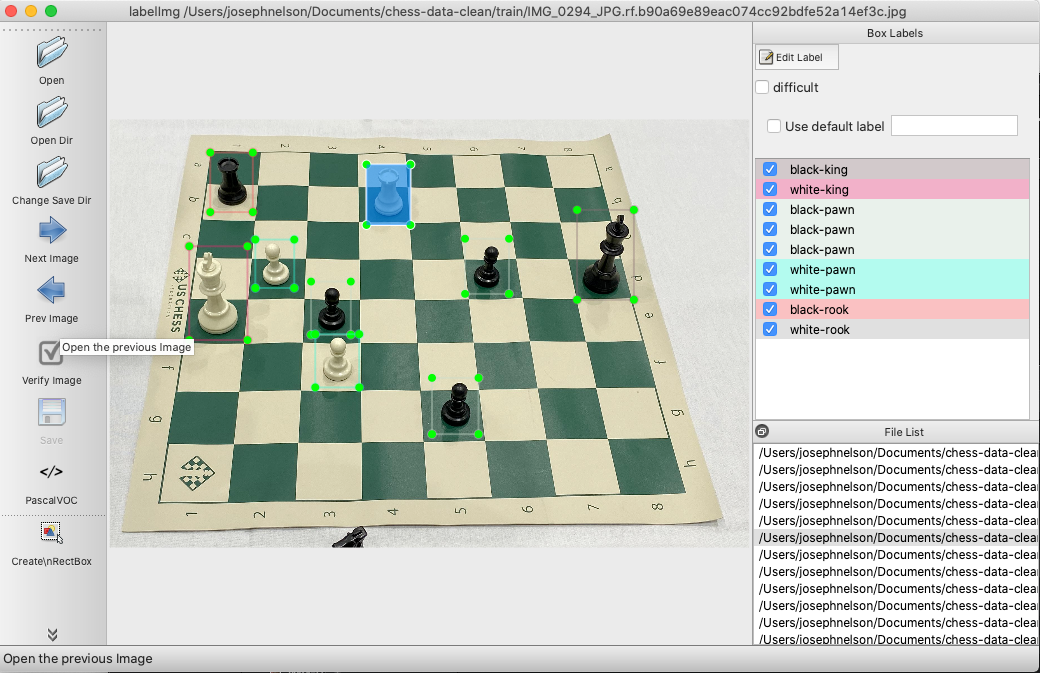
LabelImg is a free, open source desktop tool for graphically labeling images. It is written in Python and uses Qt for its interface, and it exports annotations in Pascal VOC XML or YOLO text format. It is a straightforward way to label a few hundred images when you are getting an object detection project off the ground.
How to Install and Use LabelImg
LabelImg runs from the command line, so a little terminal comfort helps.
Install it with pip, assuming Python 3:
pip3 install labelImgThen launch it by running:
labelImgIf it does not start cleanly, that is common on newer Python and Qt versions given the tool is no longer maintained. The LabelImg repository has platform-specific notes, and if you hit a wall, the labeling-in-the-browser option below avoids local setup entirely.
To label:
- Select Open Dir on the left and choose your folder of images.
- Choose your save format, Pascal VOC XML or YOLO text. VOC XML is a good default because it is a widely supported standard, and you can convert it to any other format later with Roboflow's format tools.
- Press w to start a box, draw it around the object, and assign a class.
- Press Ctrl or Cmd plus S to save, d to move to the next image, and a to go back.
Labeling Best Practices
These tips hold whether you label in LabelImg, in the browser, or anywhere else. For the full version, see our guide to labeling best practices.
- Box the entire object. Keep boxes tight, but include a small buffer rather than cutting off any part of the object. A model learns edges better from complete boxes.
- Label occluded objects in full. If something is partly hidden behind another object, label it as if you could see the whole thing, so the model learns the true bounds of objects.
- Label objects that run off the frame. A partial object at the edge is usually still worth labeling, though this depends on your problem.
- Give clear instructions to anyone else labeling. If you bring on help, be explicit, especially about boxing the whole object rather than clipping it. Consistency across labelers matters more than any single rule.
A Faster Path: Label in the Browser with Roboflow
For anything beyond a few hundred images, a hosted tool removes the setup, the maintenance risk, and most of the manual work. Roboflow Annotate runs in the browser, so there is nothing to install, and it adds the things a desktop tool cannot:
- Auto Label and Label Assist use foundation models to draw the first set of boxes for you, so you review and correct rather than draw every box by hand.
- Your whole team can label in the same project, with consistent classes.
- Export to 30+ formats, so you are never locked to one framework.
- A built-in Dataset Health Check flags class imbalance and missing labels before you train.
From Labels to a Trained Model with Roboflow
Whichever tool you label in, the next step is training. You can take it all the way in Roboflow without a local GPU:
- Bring your labels in. Upload your LabelImg VOC XML or YOLO text annotations alongside your images, or label directly in Roboflow Annotate. You can also start from a labeled dataset on Roboflow Universe.
- Generate a dataset version with preprocessing and augmentation. Roboflow splits train, validation, and test for you.
- Train RF-DETR with Custom Training from the public COCO checkpoint. RF-DETR is a strong default for object detection: fast to fine-tune, accurate, and commercial-safe. See the training docs.
- Evaluate with mean average precision, precision, and recall, then deploy. If a class scores poorly, label more examples of it and retrain.
What annotation format should I use?
Pascal VOC XML is a safe default because it is widely supported, and you can convert it to COCO JSON or other formats later. Roboflow handles format conversion across 30+ formats.
What is the difference between LabelImg and Roboflow Annotate?
LabelImg is a single-user desktop tool for drawing boxes. Roboflow Annotate runs in the browser, supports teams, adds AI-assisted labeling, converts formats, and connects directly to training and deployment.
How do I train a model on LabelImg labels?
Upload your images and VOC XML or YOLO text labels to Roboflow, generate a dataset version, and train RF-DETR with Custom Training. No local GPU or environment setup is required.
Get Started
Label your data, then take it straight to a model. Create a free Roboflow account to label in the browser, convert formats, and train RF-DETR in one place.
Cite this Post
Use the following entry to cite this post in your research:
Contributing Writer. (Mar 16, 2026). LabelImg for Labeling Object Detection Data. Roboflow Blog: https://blog.roboflow.com/labelimg/