
Vision-Language Models (VLMs) are multimodal AI models capable of jointly understanding and processing images and text. They power a wide range of computer vision applications, including object detection, visual question answering, image captioning, and many others.
In this blog, we will leverage the capabilities of VLMs in image understanding to build a production-ready web application using Next.js called Street Sign Interpreter, which can recognize and interpret street signs from any country, regardless of language or design, as demonstrated in the demo below:
The Street Sign Interpreter will have two components: an AI workflow built using Roboflow Workflows that interprets street signs and provides their interpretation as output, and a deployed Next.js web application that packages this workflow with a proper UI and backend logic. The steps below outline how to build these two components and integrate them.
Building Component One: An AI Workflow to Interpret Street Signs
We’ll use Roboflow Workflows to create a workflow that takes an image of a street sign as input and outputs the interpretation. Roboflow Workflows is a low-code, open-source, web-based platform that enables seamless chaining of multiple computer vision tasks, including visual grounding, image captioning, visual question answering, and more.
The video below demonstrates this workflow in action:
You can fork the workflow above, but be sure to update the Google Gemini block’s API Key parameter with your own Gemini API key, which you can generate through Google AI Studio.
Setup Your Roboflow Workflow
To get started, create a free Roboflow account and log in. Next, create a workspace, then click on “Workflows” in the left sidebar and click on Create Workflow.
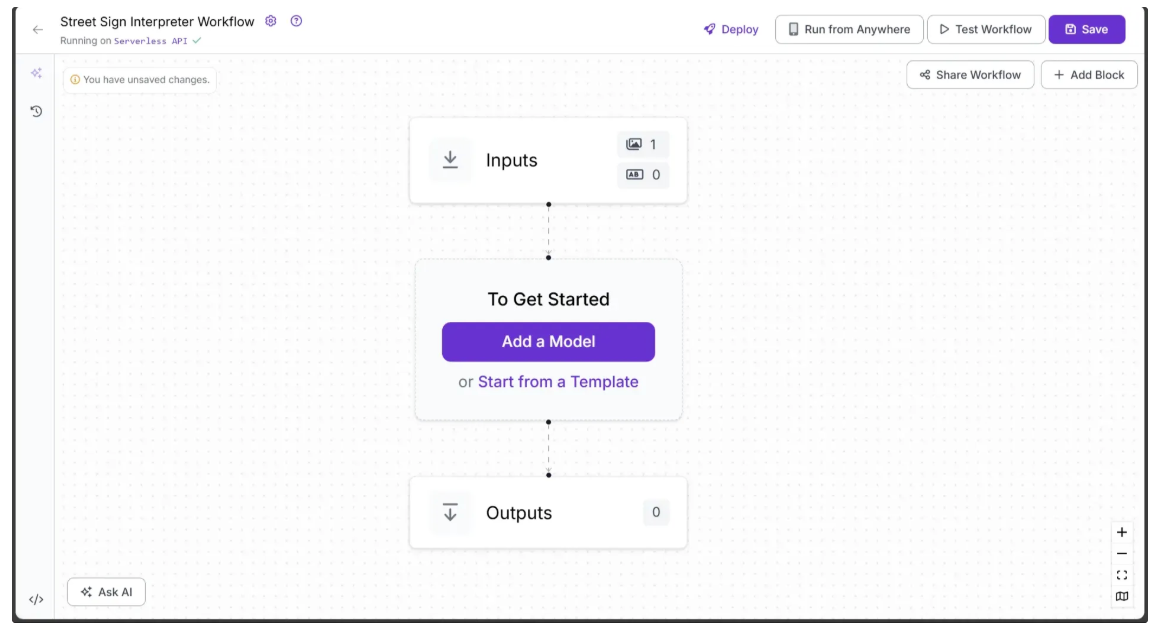
You’ll be taken to a blank workflow editor, ready for you to build your AI-powered workflow. Here, you’ll see two workflow blocks: Inputs and Outputs, as shown below:
Step 1: Select An Vision Language Model
Roboflow offers a variety of Vision-Language Model (VLM) blocks, including GPT-5, Qwen2.5-VL, Google Gemini, and more. You can customize parameters for each model without deployment or coding to generate the outputs you need, and seamlessly add or switch out models based on your preferred results.
For our Street Sign Interpreter use case, we’ll be leveraging Google Gemini, a family of Large Multimodal Models (LMMs) developed by Google DeepMind and purpose-built for multimodality. The Gemini suite includes variants such as Gemini 2.5 Pro, Gemini 2.5 Flash, and Gemini 2.5 Flash-Lite, each optimized for different performance needs and application scenarios.
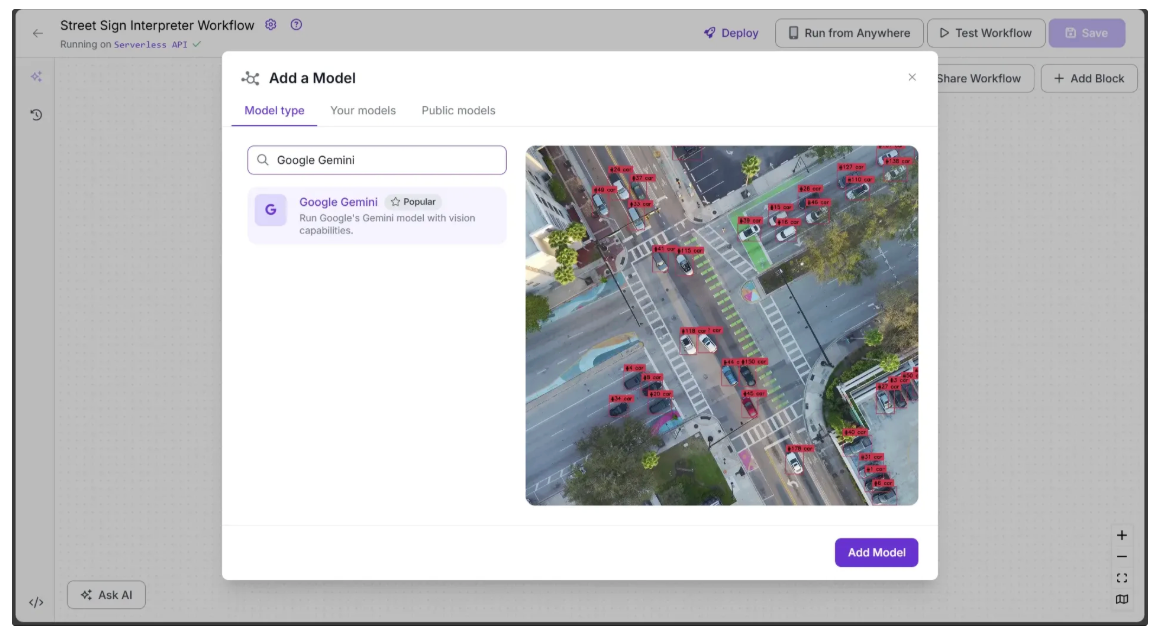
To add it to your workflow, click on Add a Model and search for “Google Gemini” select it and click Add Model as shown below:
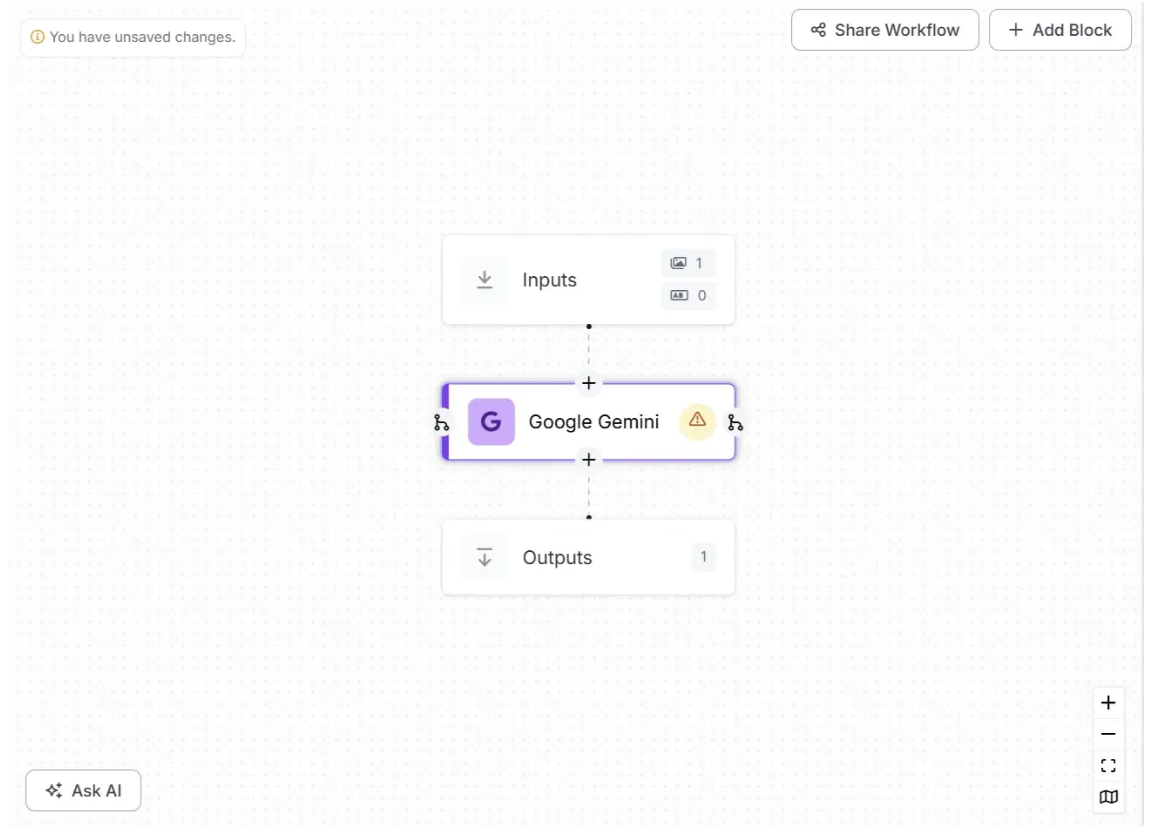
Now the Google Gemini model should be added to your workflow. Your workflow should now look like the one shown below:
Step 2: Configure the Vision Language Model
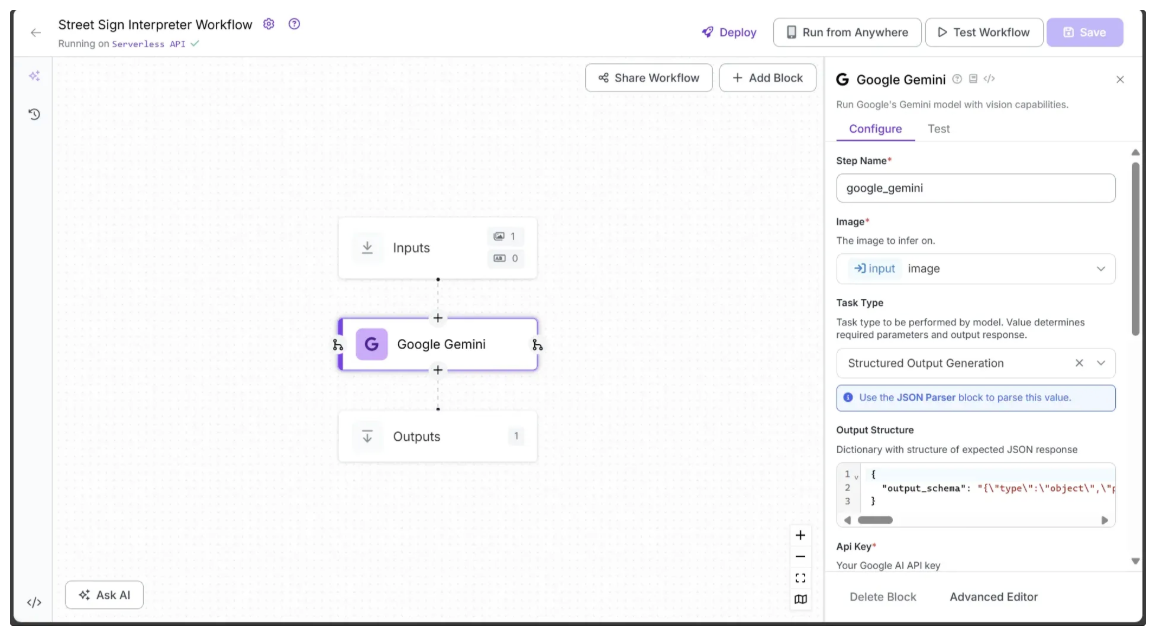
Next, we’ll use the Vision-Language Model to interpret a street sign image. The Google Gemini block provides built-in prompt for different task types such as Open Prompt, Visual Question Answering, and Structured Output Generation. For our use case, we’ll use Structured Output Generation, which produces a structured JSON response with customizable key–value pairs. This ensures consistent output while allowing flexibility to add additional fields as needed.
To use Structured Output Generation, set the 'Task Type' parameter to 'Structured Output Generation' in the Configure tab, accessible by clicking the Gemini Model block in your workflow. Then, provide the following JSON as the 'Output Structure':
{
  "output_schema": "{\"type\":\"object\",\"properties\":{\"interpretation\":{\"type\":\"string\",\"description\":\"Meaning of the sign in English, limited to 1 sentence, with added context if needed. Original language or symbols should be explained.\"}},\"propertyOrdering\":[\"interpretation\"],\"required\":[\"interpretation\"]}"
}
The output_schema above consists of a raw JSON string that specifies the structure of the response required from the Vision-Language Model when given a street sign image as input. It directs the model to include a key called 'interpretation', whose value is a string describing the sign in the provided image.
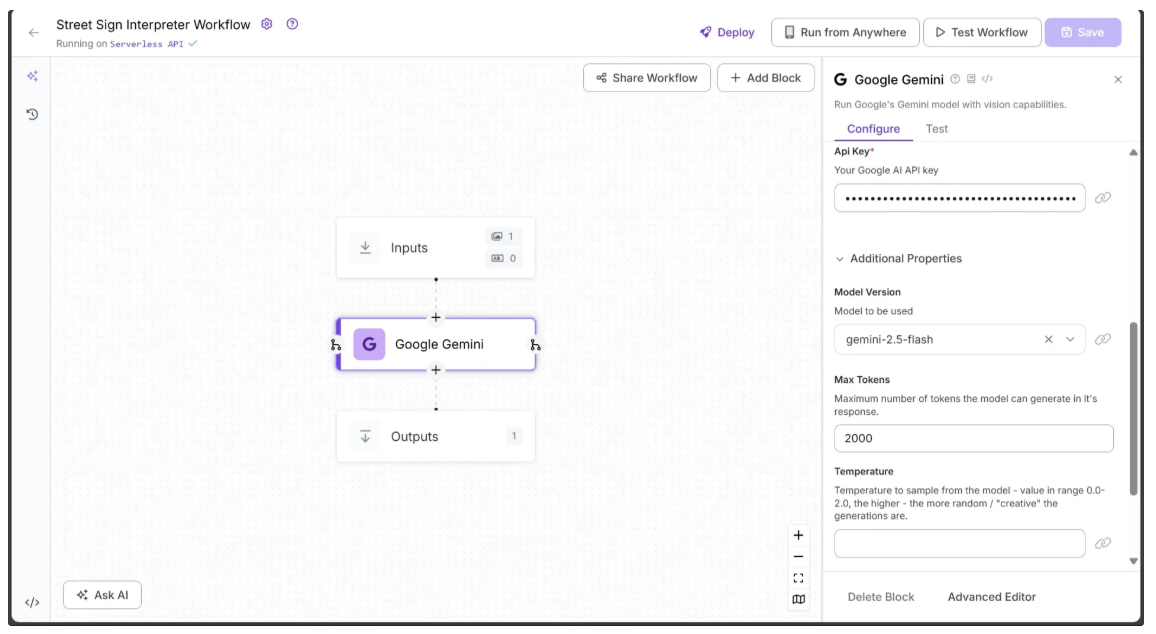
In addition to defining the 'Output Structure', you need to provide a Google Gemini API key for this block. You can easily generate a free api key through Google AI Studio. Once generated, enter the api key in the parameter labeled 'Api Key'.
The Gemini block supports multiple vision variants. For our use case, we use Gemini 2.5 Flash, which provides sufficient accuracy with less strict Rate Per Day limits on a free tier account. To select it, choose 'gemini-2.5-flash' from the 'Model Version' dropdown.
We also set Max Tokens to 2000 to ensure the generated output is complete and not truncated due to a low token limit.
You can also configure additional parameters, such as Temperature and Max Concurrent Requests, to fine-tune the model and achieve the desired output.
Now, the first half of the Configure tab for the Google Gemini block should appear as shown below:
And the second half of the Configure tab for the Google Gemini block should appear as shown below:
Step 3: Parse the Raw String Output from Vision Language Model
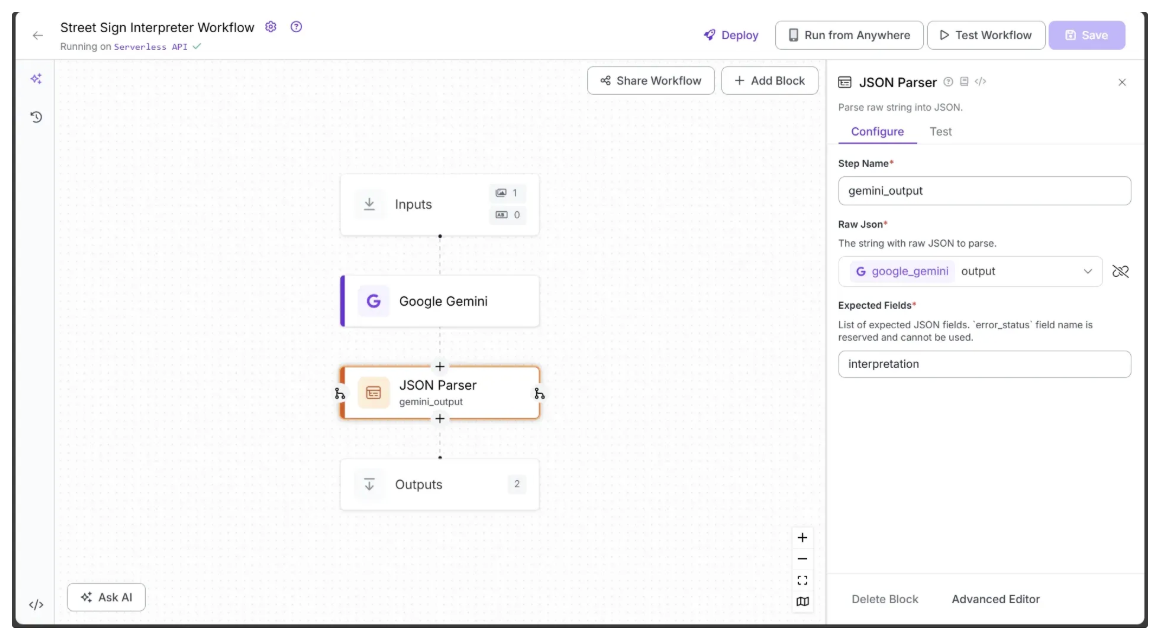
The output from the Google Gemini block is returned as a raw string, so it needs to be parsed into JSON. Roboflow provides a JSON Parser block specifically for this purpose.
To add it, hover over the Google Gemini block, click the + icon, and search for “JSON Parser” to insert it into your workflow.
Finally, configure the JSON Parser’s ‘Expected Fields’ to interpretation and change the ‘Step Name' to gemini_output, as shown below:
Step 4: Setup Outputs
Begin by selecting the Outputs block. In the Configure tab, click the + Add Output button to add an output from the workflow. Remove any unnecessary outputs by clicking the 🗑️ icon, as shown below:
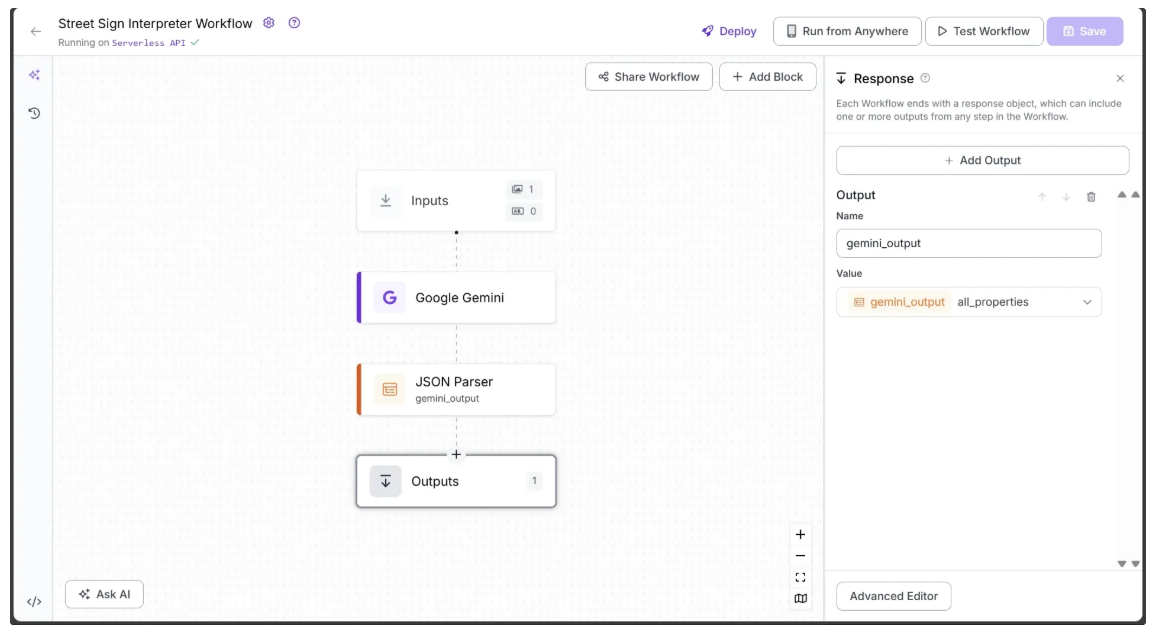
Ensure that gemini_output is added as an output of the workflow. With this output included, the final workflow is complete. It takes a street sign image as input and returns a JSON containing the interpreted results of the sign.
Step 5: Run the Workflow
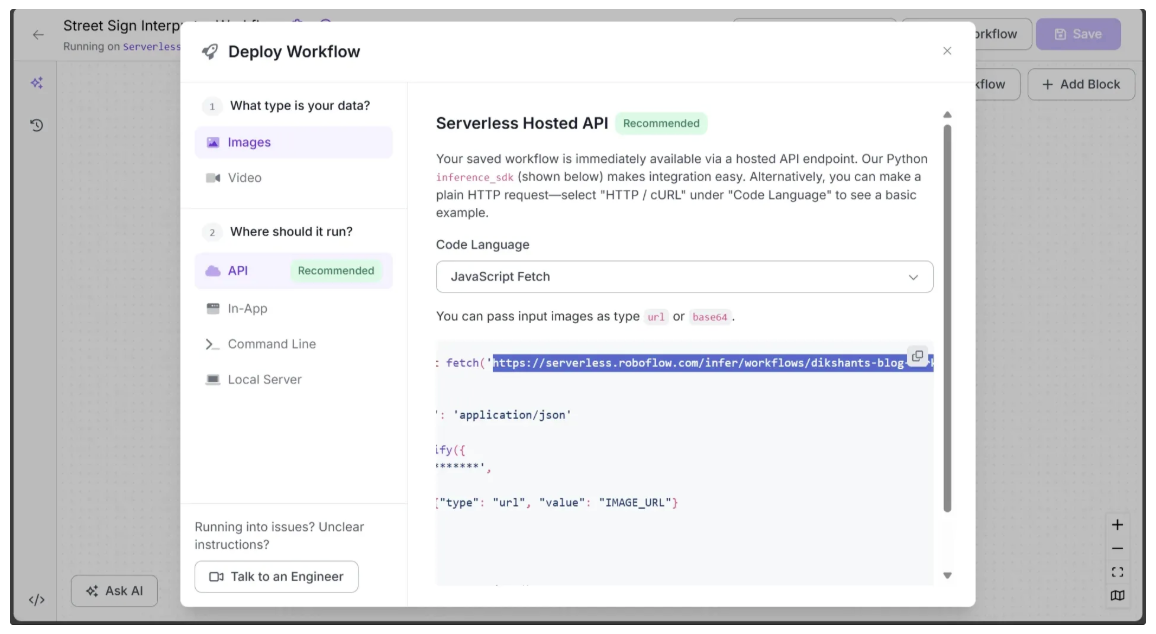
You can run the workflow directly through the UI or also via the API, command line, or other supported methods. To view the code for these execution options, click the Deploy button in the top-right corner of the workflow as shown below:
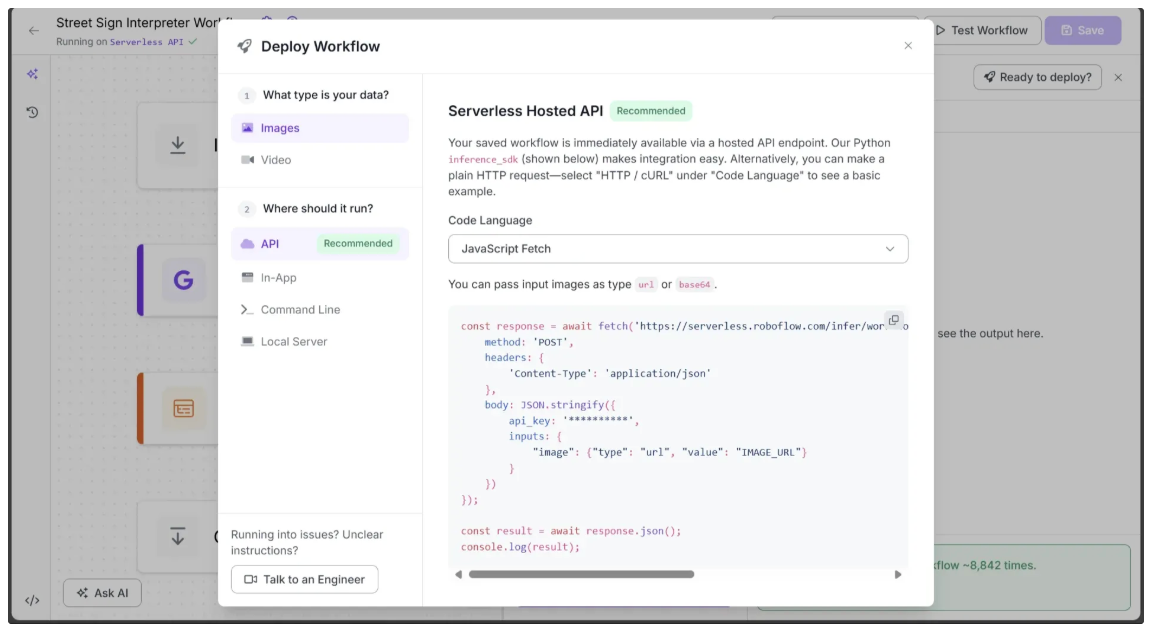
We’ll use the same code shown above to run the workflow with JavaScript in the backend of our Next.js web application, but with one key difference: instead of passing an image URL, we’ll pass the image as base64.
Build Component Two: A Next.js App that integrates the Street Sign Interpreter Workflow
Next.js is an open-source web development framework built on React, developed and maintained by Vercel. It enables developers to create full-stack web applications by seamlessly integrating frontend and backend capabilities within a single project structure. This dual functionality allows for building dynamic user interfaces and handling server-side logic, such as API routes and data fetching, all within the same framework.
Capabilities of Next.js
- Server-side rendering for improved performance
- Static site generation for faster page loads
- API routes for building backend endpoints within the app
- Support for React components and hooks
- Easy integration with third-party libraries and services
- Incremental static regeneration for dynamic content updates
- Strong developer experience with hot-reloading and fast refresh
Step 1: Create a Next.js Project
To build a Next.js project, you first need to install Node.js. You can download it from the official Node.js website.
Once installed (with “Add to PATH/Environment Variables” enabled during setup), open your terminal and run the following command to create a new Next.js project:
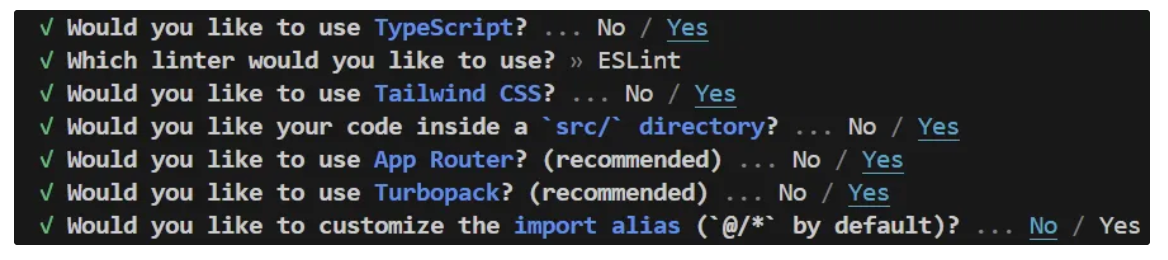
npx create-next-app@latest street-sign-interpreterWhen you run the command above, Next.js will prompt you with a series of setup questions. Select the default options as shown below.
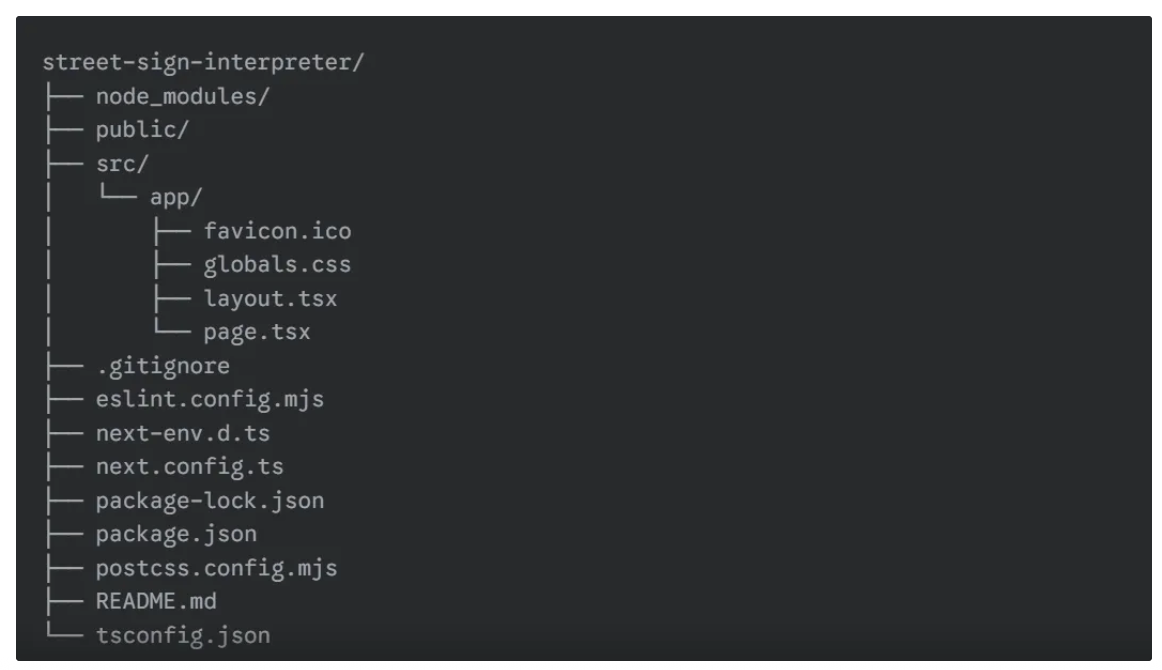
After the npx command finishes, your new project structure will look like this:
Next, navigate into the newly created Next.js project using the following command to run it on localhost:
cd .\street-sign-interpreter\
npm run dev
Note: The above command is for PowerShell; use the appropriate cd command for your system to navigate into the new Next.js project.
Now, when you visit http://localhost:3000, you should see your newly created Next.js project as shown below:

Step 2: Create a Backend API
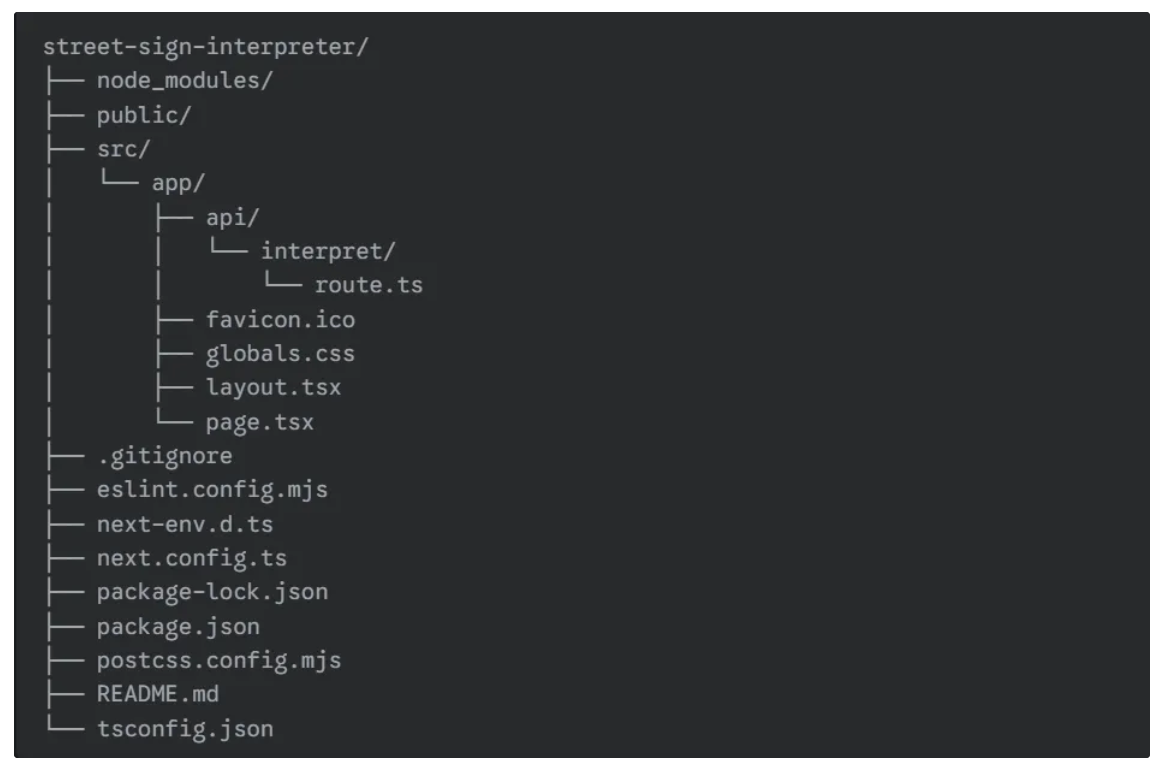
Next, we’ll create a backend API in the Next.js project that can be accessed only via POST requests. In Next.js, each API is defined by a folder containing a 'route.tsx' file.
To create an API named 'interpret', first create an 'api' folder inside the 'app' folder of 'src'. Then, inside 'api', create a folder called 'interpret' and add a 'route.tsx' file within it. Your directory should now look like this:
Next, add the following code to the ‘route.tsx’ file:
import { NextResponse } from "next/server";

export async function POST(req: Request) {

  const workspaceName = "<your-workspace-name>"
  const workflowName = "<your-workflow-name>"
  // URL of the Roboflow workflow that interprets street signs
  const workflowUrl = `https://serverless.roboflow.com/infer/workflows/${workspaceName}/${workflowName}`;

  const formData = await req.formData();
  const image = formData.get("image") as File | null;

  if (!image) {
    return NextResponse.json({ interpretation: "No image uploaded." });
  }

  try {
    // Convert the uploaded file to Base64
    const arrayBuffer = await image.arrayBuffer();
    const buffer = Buffer.from(arrayBuffer);
    const base64Image = buffer.toString("base64");

    // Send the base64 image to Roboflow Workflow
    const response = await fetch(workflowUrl, {
      method: "POST",
      headers: { "Content-Type": "application/json" },
      body: JSON.stringify({
        api_key: process.env.ROBOFLOW_KEY,
        inputs: {
          image: { type: "base64", value: base64Image },
        },
      }),
    });

    const result = await response.json();

    // Debugging: log full response
    console.log("Roboflow Workflow Result:", JSON.stringify(result, null, 2));

    // Extract interpretation
    const interpretation =
      result?.outputs?.[0]?.gemini_output?.interpretation ||
      "No interpretation returned from Roboflow workflow.";

    return NextResponse.json({ interpretation });
  } catch (error) {
    console.error("Error calling Roboflow Workflow:", error);
    return NextResponse.json({
      interpretation: "Failed to interpret the sign.",
    });
  }
}
In the code above, make sure to update the values of workspaceName and workflowName with your own workspace and workflow names from the Roboflow workflow you created earlier to interpret street signs.
Alternatively, you can remove these two variables entirely and directly set workflowUrl to the full workflow URL, which can be found in the Deploy tab, as highlighted below:
You also need to create an environment variable called ROBOFLOW_KEY on your computer and set it to your Roboflow API key for the code to run locally. You can find your Roboflow API key in your account’s Settings under the API Keys section.
The code inside ‘route.tsx’ file defines a Next.js POST API that receives an uploaded image from a request, converts it to Base64, and sends it to the Roboflow Workflow we created earlier to interpret street signs. It extracts the interpretation from the API response from Roboflow Workflow and returns it as JSON as a response.
You can also extend and modify the code to store uploaded images along with their outputs, any denied images and associated errors, for future reference, and add many more features to make the web app even more robust.
Step 3: Update Frontend UI
Next, we’ll create a frontend that interacts with the backend API by updating the code inside ‘page.tsx’ as follows:
"use client";

import { useState, ChangeEvent } from "react";

export default function Home() {
  const [imageFile, setImageFile] = useState<File | null>(null);
  const [imagePreview, setImagePreview] = useState<string>("");
  const [interpretation, setInterpretation] = useState<string>("");
  const [loading, setLoading] = useState<boolean>(false);

  const handleFileChange = (e: ChangeEvent<HTMLInputElement>) => {
    if (e.target.files && e.target.files[0]) {
      const file = e.target.files[0];
      setImageFile(file);
      setImagePreview(URL.createObjectURL(file));
      setInterpretation(""); // reset previous interpretation
    }
  };

  const handleInterpret = async () => {
    if (!imageFile) {
      alert("Please select a file first.");
      return;
    }

    setLoading(true);
    setInterpretation(""); // clear previous interpretation

    try {
      const formData = new FormData();
      formData.append("image", imageFile);

      const res = await fetch("/api/interpret", {
        method: "POST",
        body: formData,
      });

      const data = await res.json();
      setInterpretation(data.interpretation);
    } catch (error) {
      console.error("Error interpreting sign:", error);
      setInterpretation("Failed to interpret the sign.");
    } finally {
      setLoading(false);
    }
  };

  return (
    <div className="font-sans min-h-screen p-8 flex flex-col items-center gap-8 bg-gray-50 dark:bg-gray-900 text-gray-900 dark:text-white">
      <h1 className="text-3xl font-bold">🚦 Street Sign Interpreter</h1>

      {/* Custom file input */}
      <label className="flex items-center gap-4 cursor-pointer border border-gray-300 dark:border-gray-700 px-4 py-2 rounded hover:bg-gray-100 dark:hover:bg-gray-800">
        <span className="font-medium">Choose file</span>
        <span className="text-gray-500 dark:text-gray-400">
          | {imageFile ? imageFile.name : "No file chosen"}
        </span>
        <input
          type="file"
          accept="image/*"
          onChange={handleFileChange}
          className="hidden"
        />
      </label>

      {/* Preview uploaded image */}
      {imagePreview && (
        <div className="flex flex-col items-center gap-4">
          <p className="font-medium">Preview:</p>
          <img
            src={imagePreview}
            alt="Uploaded street sign"
            className="max-w-xs rounded shadow-md"
          />
        </div>
      )}

      {/* Interpret button */}
      <button
        onClick={handleInterpret}
        className="px-6 py-2 bg-blue-500 text-white rounded-md hover:bg-blue-600 transition flex items-center gap-2 cursor-pointer"
        disabled={loading}
      >
        {loading && (
          <svg
            className="animate-spin h-5 w-5 text-white"
            xmlns="http://www.w3.org/2000/svg"
            fill="none"
            viewBox="0 0 24 24"
          >
            <circle
              className="opacity-25"
              cx="12"
              cy="12"
              r="10"
              stroke="currentColor"
              strokeWidth="4"
            ></circle>
            <path
              className="opacity-75"
              fill="currentColor"
              d="M4 12a8 8 0 018-8v4a4 4 0 00-4 4H4z"
            ></path>
          </svg>
        )}
        {loading ? "Interpreting..." : "Interpret"}
      </button>

      {/* Display interpretation */}
      {interpretation && (
        <p className="mt-4 p-4 bg-gray-200 dark:bg-gray-800 rounded-md w-full max-w-2xl text-center">
          {interpretation}
        </p>
      )}
    </div>
  );
}
The above code is a React component for a Street Sign Interpreter web page. It allows users to upload an image of a street sign, displays a preview of the uploaded image, and sends it to the backend API we created earlier as a POST request when the Interpret button is clicked.
Now, open the ‘layout.tsx’ file and replace its content with the following code:
import type { Metadata } from "next";
import { Geist, Geist_Mono } from "next/font/google";
import "./globals.css";

const geistSans = Geist({
  variable: "--font-geist-sans",
  subsets: ["latin"],
});

const geistMono = Geist_Mono({
  variable: "--font-geist-mono",
  subsets: ["latin"],
});

export const metadata: Metadata = {
  title: "Street Sign Interpreter",
  description: "Recognizes and interprets street signs worldwide.",
};

export default function RootLayout({
  children,
}: Readonly<{
  children: React.ReactNode;
}>) {
  return (
    <html lang="en">
      <body
        className={`${geistSans.variable} ${geistMono.variable} antialiased`}
      >
        {children}
      </body>
    </html>
  );
}
The above code defines the root layout for a Next.js application. It imports fonts and assigns them to CSS variables for use throughout the app. The metadata object sets the page’s title and description, which helps with SEO and browser tab labeling.
Now when you run the Next.js project locally again using the following command:
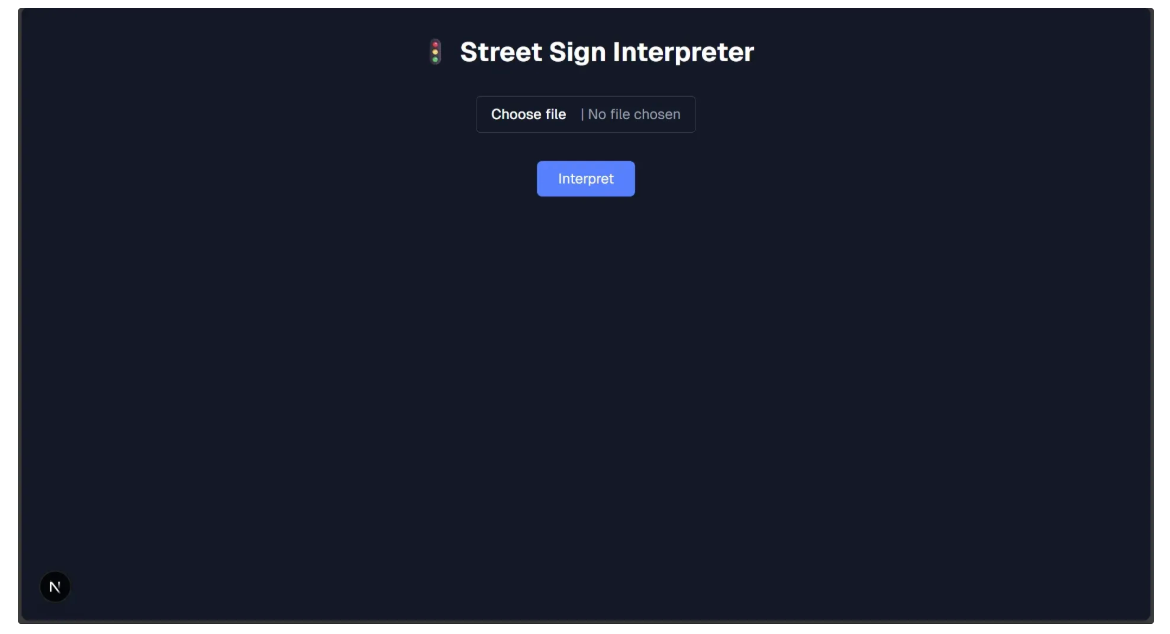
npm run devAnd navigate to http://localhost:3000, you should see an functional Street Sign Interpreter application for you to try out:
Step 4: Push it to GitHub Repo
To make the web app accessible to everyone, we need to deploy it. There are several services available for deployment, but we’ll use Vercel because it’s free and simple to set up. Before deploying to Vercel, we first need to push the project to a GitHub repository.
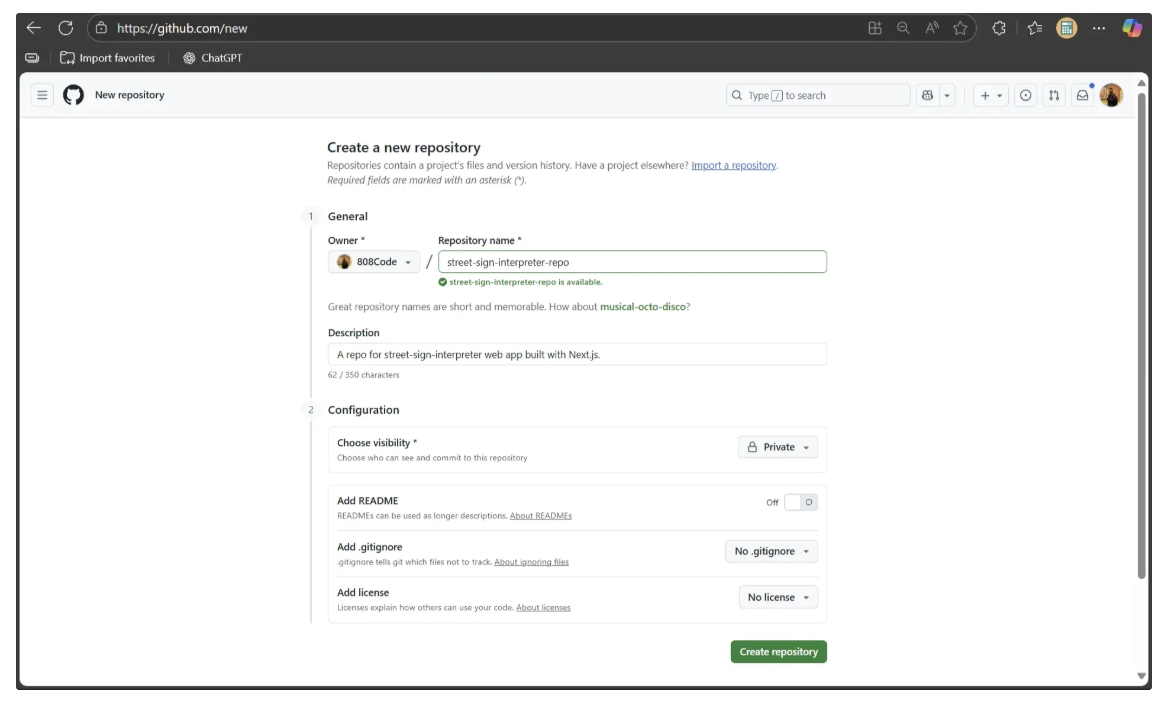
Start by going to github.com and logging in. Then, visit github.com/new to create a new repository, filling in the details as shown below.
Next, we initialize a GitHub repository for our Next.js project. Inside the street-sign-interpreter directory we created earlier, we add and commit our local changes, then push them to the street-sign-interpreter-repo repository on GitHub using the following commands:
git init
git add .
git commit -m "first commit"
git branch -M main
git remote add origin https://github.com/<YOUR-GITHUB-USER-NAME>/street-sign-interpreter-repo.git
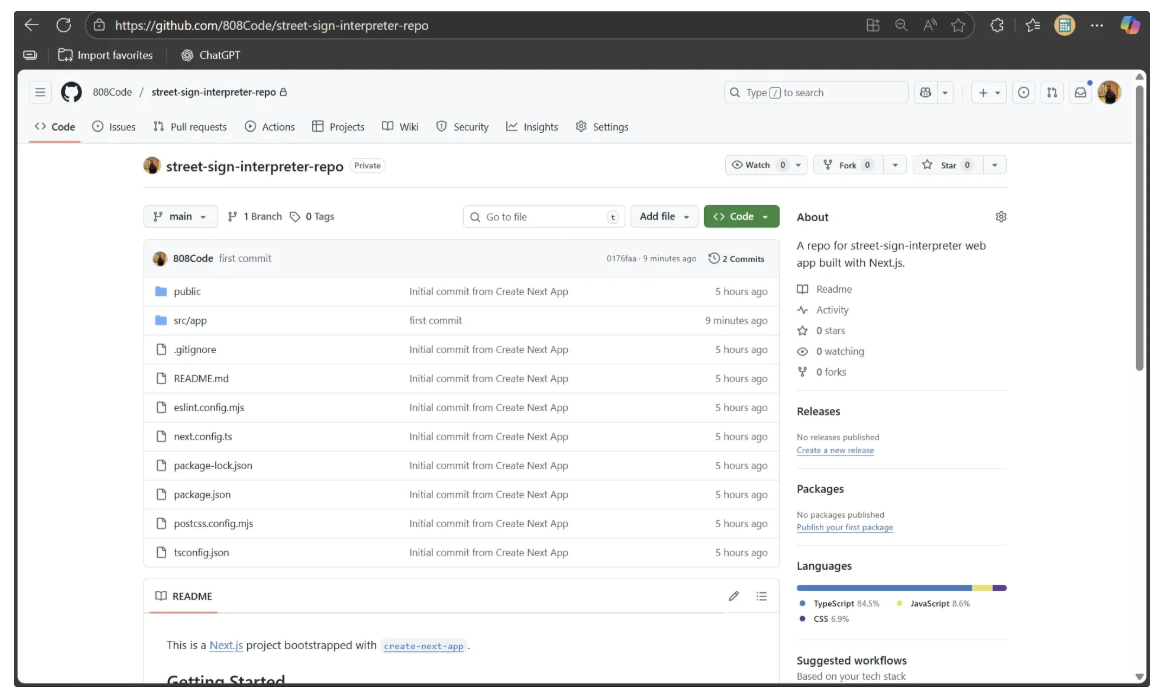
git push -u origin mainOnce the push is complete, your code will be visible in the GitHub repository.
Step 5: Deploy using Vercel
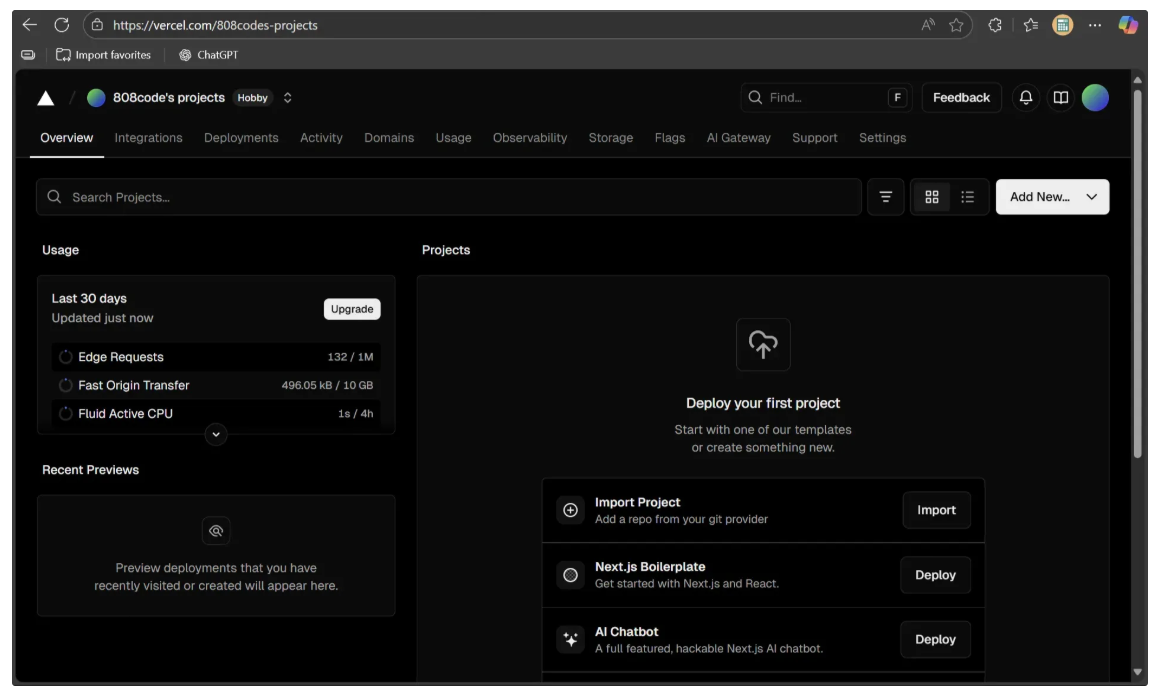
Now, sign up for Vercel. You can also log in directly using your GitHub account. After logging in, click your profile and then go to the Dashboard. You should see a screen like the one below:
Next, click on "Import Project." A dropdown menu will appear, where you should select your GitHub account as shown below:
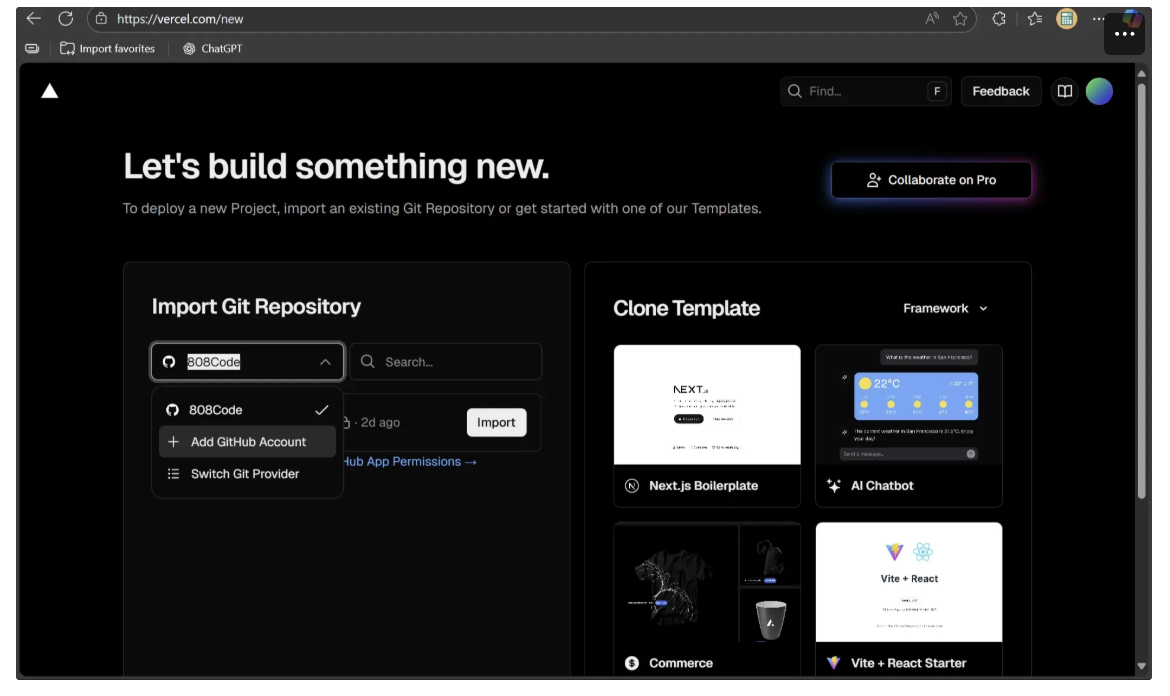
If your GitHub account isn’t connected, click on “Add GitHub Account” to link it. Otherwise, simply select your GitHub account.
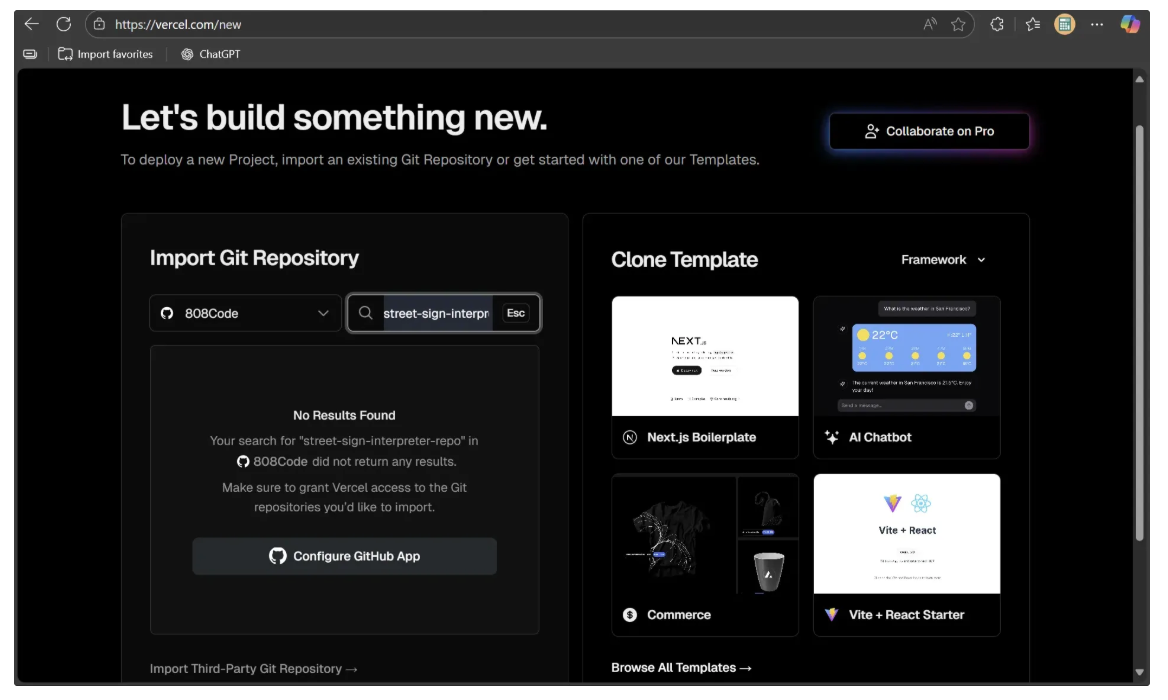
Now, search for the street-sign-interpreter-repo repository you just created. If it doesn’t appear, you’ll need to add it manually. To do this, select the “Configure GitHub App” option as shown below:
Next, follow the instructions in the popup window that asks you to install Vercel on repositories in your GitHub account. Continue until you reach a screen like the one below:
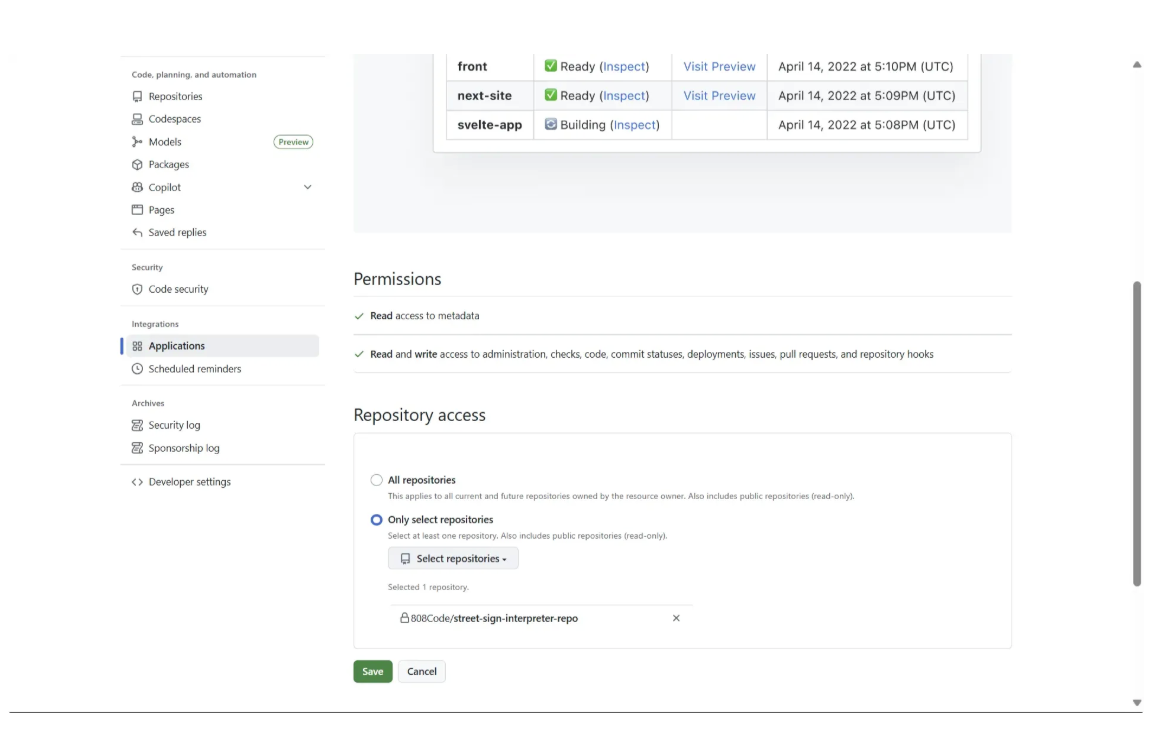
Here, grant repository access to the recently created street-sign-interpreter-repo, as shown above. Once access is granted, the repository will be available for import. Then click on ‘Import’ to import your repository to Vercel for deployment.

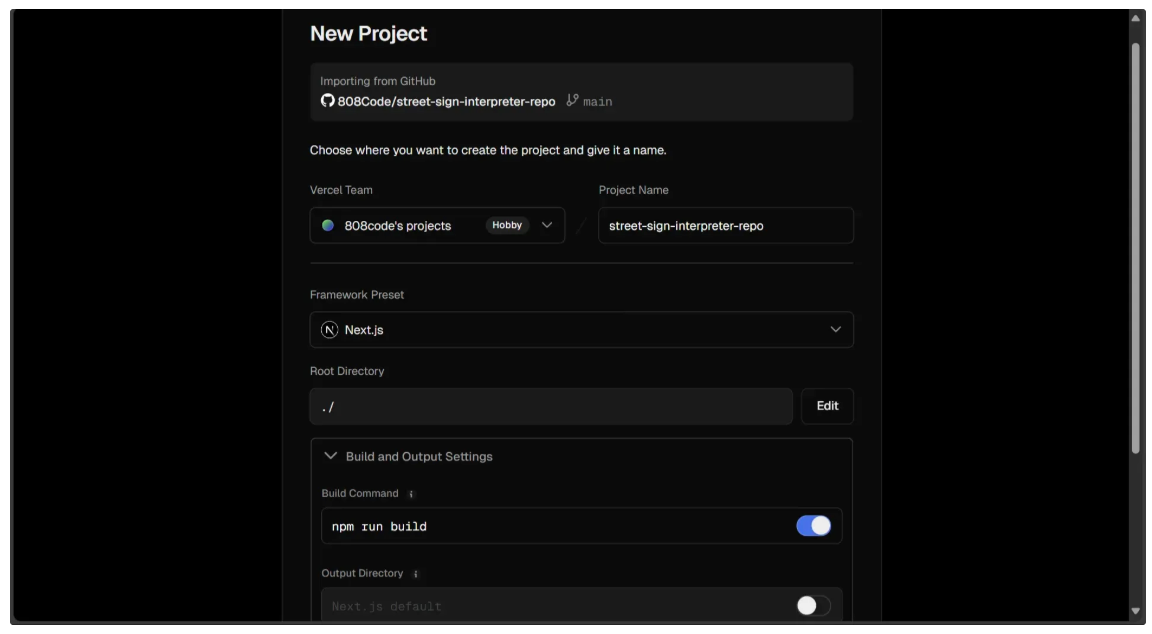
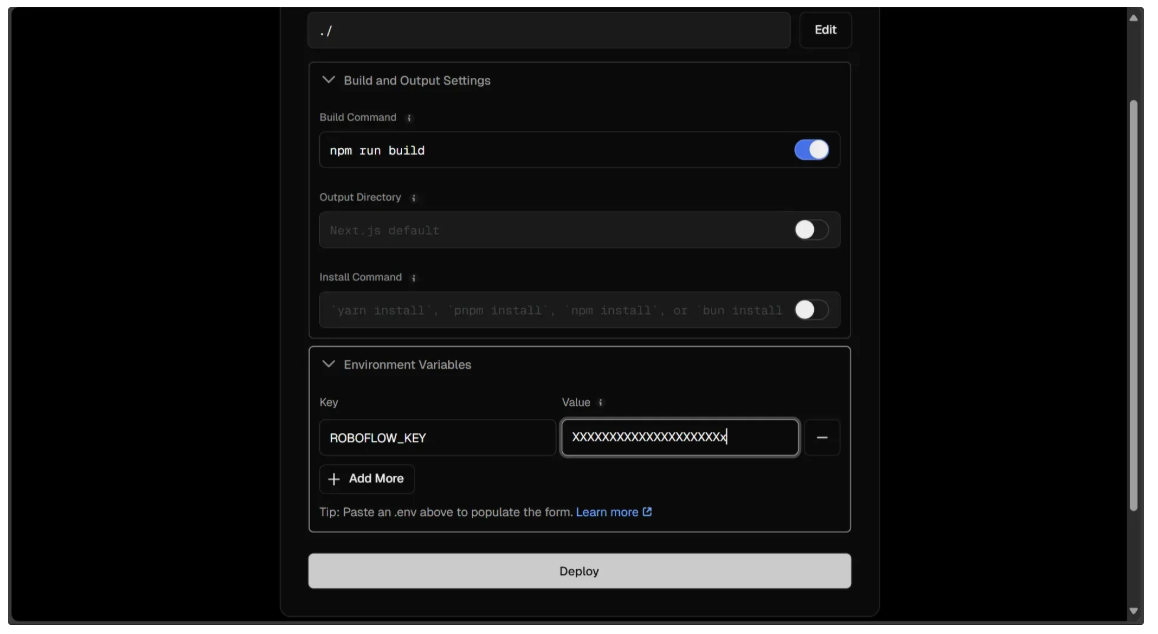
When you import the repository, a form like the one below will appear to set up your deployment. Complete the first half of the form as shown, where the root directory is set to ./ and the build command ‘npm run build’ is specified:
For the second half, fill it out as shown below. You’ll need to add a ROBOFLOW_KEY to the environment variables of the deployment machine, with the corresponding Roboflow API key as its value.
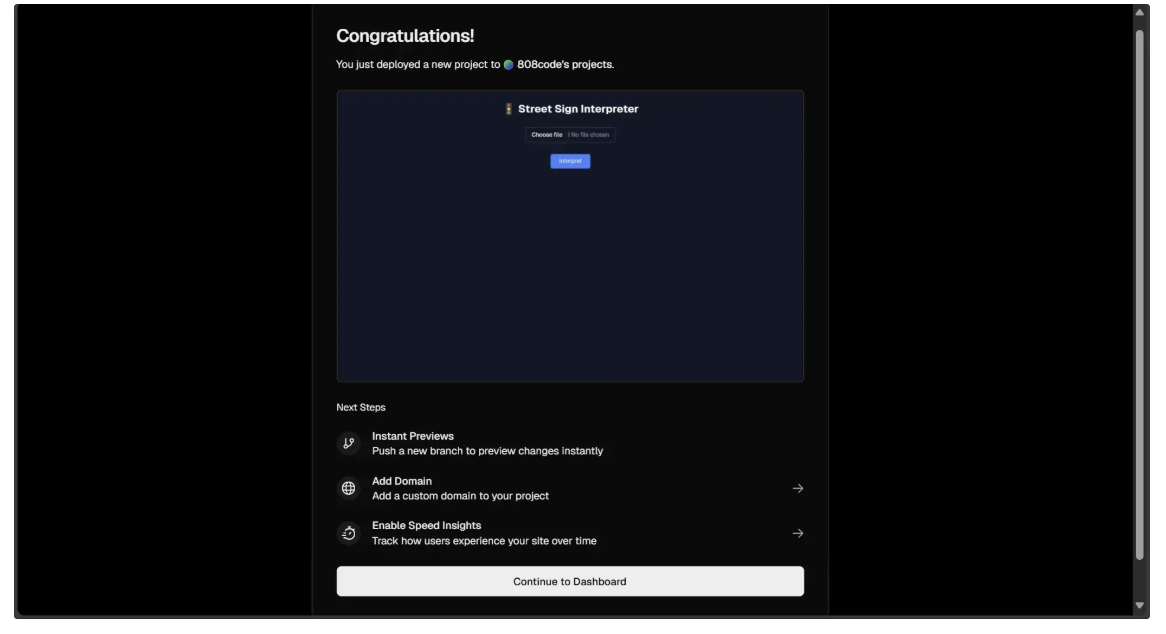
After filling out the form, click Deploy to deploy the web application on Vercel. Once the deployment is complete, a window will open, as shown below, with a preview of the web app. Click on the preview, and it will open the fully functional deployed site, which you can then share with others.
Building a Vision-Language Model Application with Next.js Conclusion
By leveraging Roboflow Workflows and Next.js, we built a production-ready Street Sign Interpreter that recognizes street signs worldwide. While this blog focused on traffic signs, the pipeline can be adapted to many applications, from business process automation to retail optimization, showcasing the versatility of vision language models.
Additionally, Roboflow Workflows offers a no-code interface for building AI workflows with a variety of Vision Language Model blocks, such as Google Gemini, GPT-4, and QwenVL, while also being easily integrable with Next.js applications, enabling rapid development of computer vision applications.
To learn more about building with Roboflow Workflows, check out the Workflows launch guide.
Written by Dikshant Shah
Cite this Post
Use the following entry to cite this post in your research:
Contributing Writer. (Sep 16, 2025). How to Build a Vision-Language Model Application with Next.js. Roboflow Blog: https://blog.roboflow.com/build-vision-applications-next-js-roboflow/