
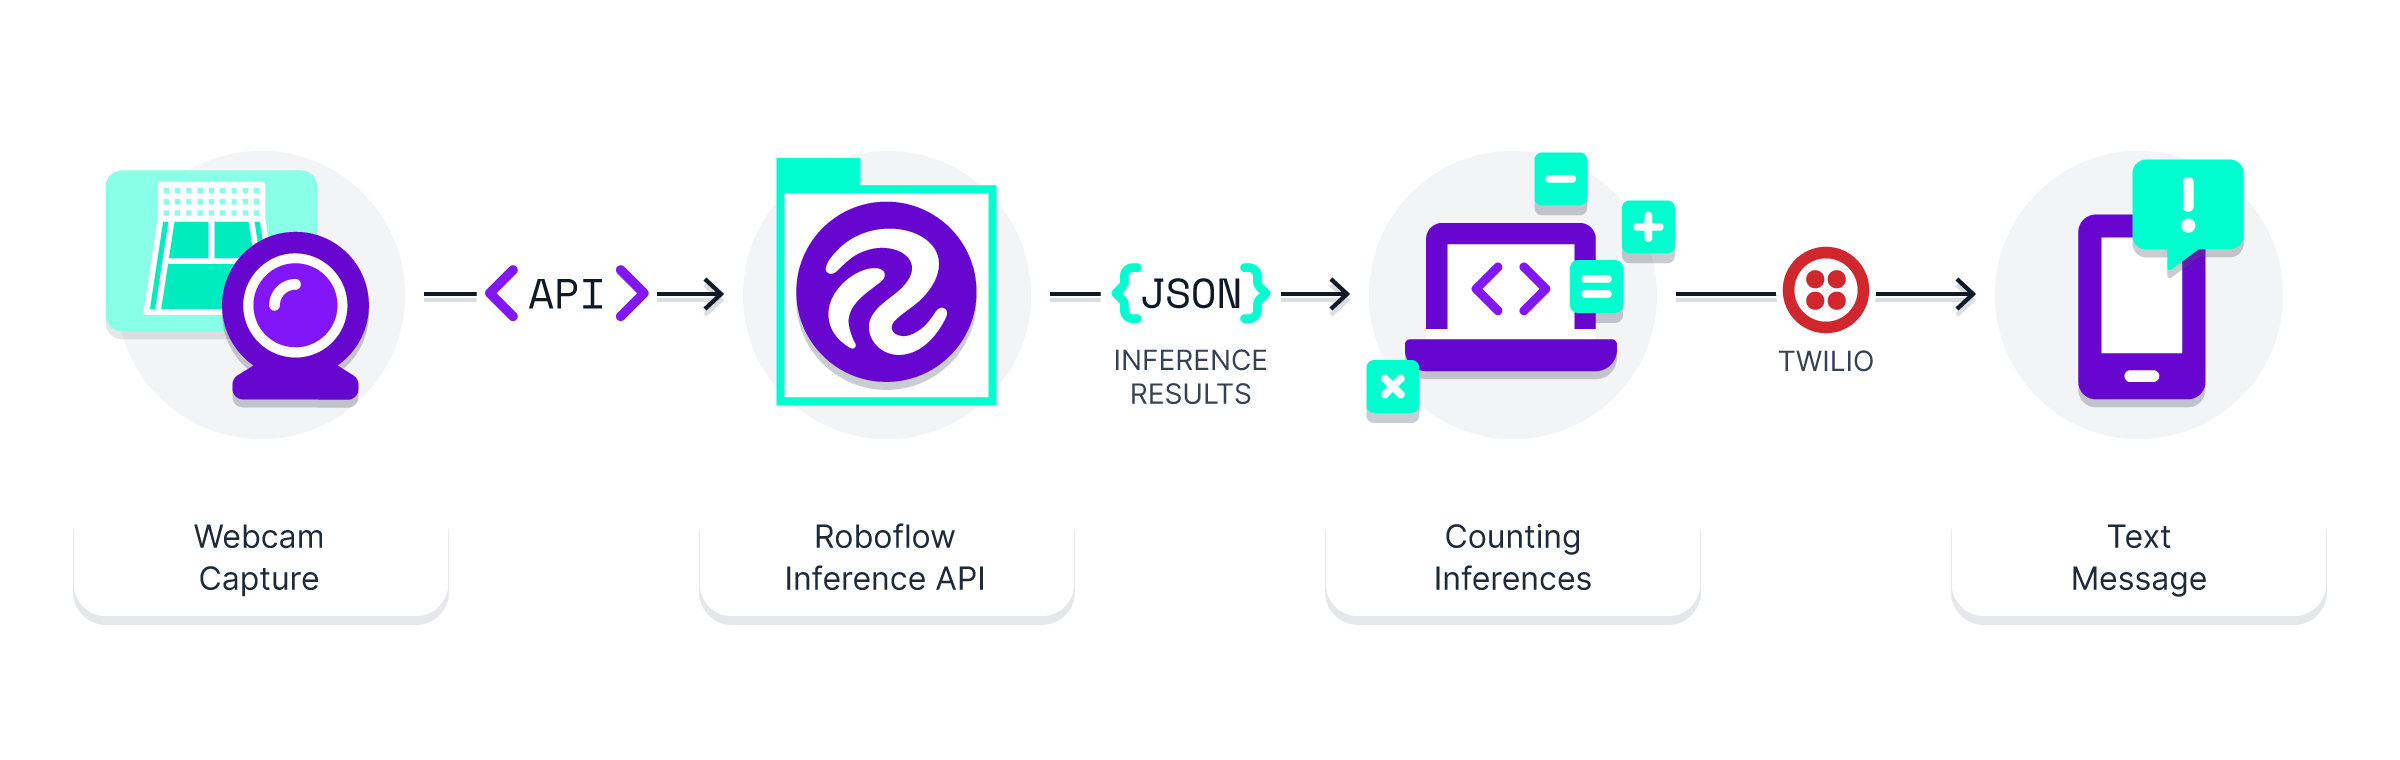
A non-ML practitioner built a working computer vision application that monitors a local tennis court via webcam, detects whether players are on the court using a model trained in Roboflow, and sends an SMS notification through Twilio when a court opens up. The post covers the full pipeline: collecting and uploading footage, labeling three classes (tennis-player, court, and person) in Roboflow Annotate, training, deploying via Python, and wiring in Twilio's API to trigger a text message.
Some people don’t follow the rules at public tennis courts.
Most city courts are first-come-first-serve, and you’re meant to limit play to a set amount of time if people are waiting. However, people often try to get away with a tiebreak set after using the court for over their allotted time. And it feels like the courts are always full.
So what's the best way to make sure you get an open court? The quick answer is to pick a time when the court is empty, but that’s an art form.
If you’re like me and want to turn this art form into science, you need computer vision. However, if you’re really like me, you might not have a ton of machine learning (or even coding) experience. I work in Operations, and while I can make some pretty mean Excel formulas, creating a mini program to hack when public tennis courts seemed like a fun introductory challenge.
I'll walk you through how a Python noob (me) put together a simple computer vision application that detects whether people are playing on a local tennis court and send a text notification.
Step 1: Get the Data
To get your data, all you need is a webcam and a place to put it. Fortunately, we have access to a view that overlooks local tennis courts, so that was straightforward. Make sure to check relevant laws before placing a camera in a public place!
The dataset uses film from 13 hours over the course of two days, ensuring to capture different light conditions and a range of people in the frame. The video files can be uploaded to Roboflow via the drag-and-drop web UI and generated one frame for every 30 seconds of film, which resulted in ~1,600 images.
Step 2: Label the Data
The images can then be labeled directly in Roboflow. In this example, I opted for three classes: tennis-player, court, and person (which refers to non-tennis players). Structuring the data this way allows us to locate tennis players in relation to the courts, while also ensuring we do not accidentally detect a pedestrian walking by as a tennis player.
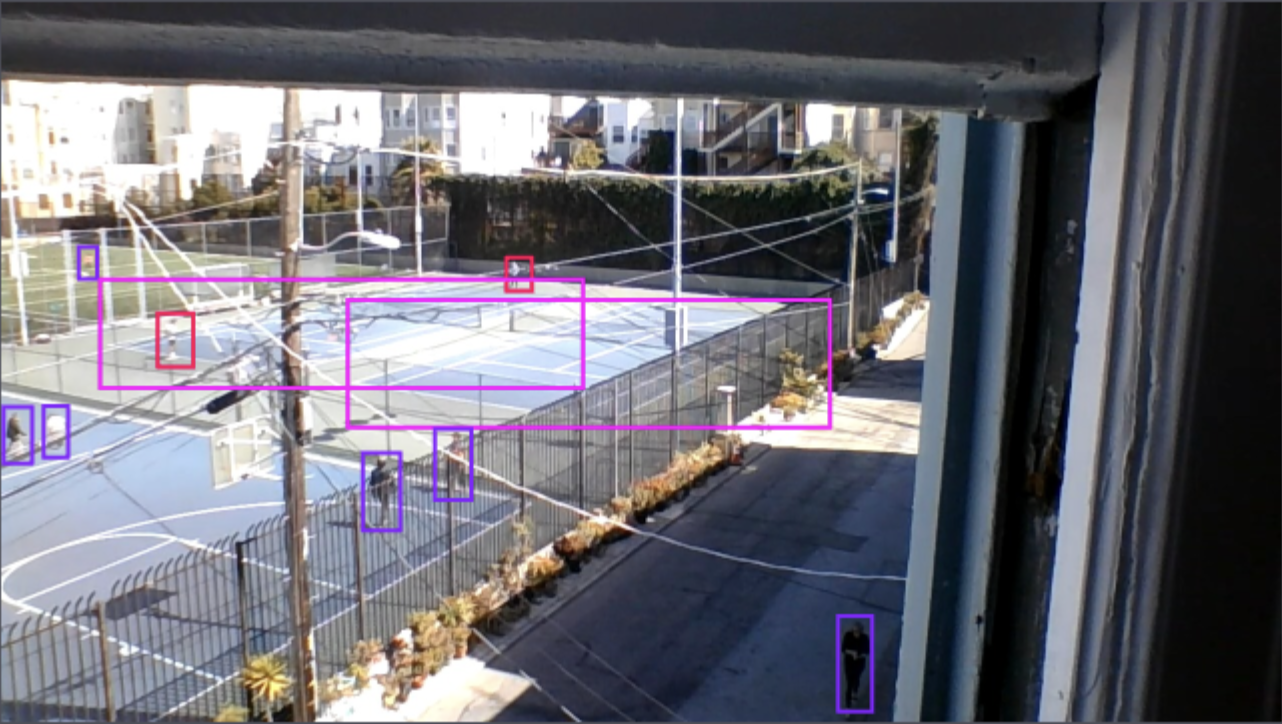
Even though the labels for the court area don't perfectly encapsulate the court itself, they cover enough of the area for me to confidently determine if my tennis-player class is within the court class. I could have used a more precise labeling strategy (like polygons for instance segmentation), but, frankly, that'd take a bit longer and be overkill for the goal of simply looking for overlapping boxes!
I had 1,600 images to label. After labeling the first ~60 images, I made use of Label Assist (sort of like a labeling copilot) to speed through the rest. My workflow became:
- Label images with Label Assist
- Re-train the model every ~200 images
- Continue labeling with improved Label Assist
Ultimately, ~1,000 of the 1,600 images were labeled. Label Assist likely saved me ~5-10 seconds per image, which corresponds to 75-150 minutes for the 900 images where manual labels were applied! Woo. Onto the next.
Step 3: Train the Model
To train the model, I could grab an open source architecture or make use of an autoML for a quick prototype. For speed of setup, I opted for the latter. Roboflow's one-click training meant I only needed to make...one click...to start training my model after labeling.
0:00/1×Roboflow Train is a quick way to train a model with one-click
(Before Training, I did also add some pre-processing steps and augmentations to create variations of the images.)
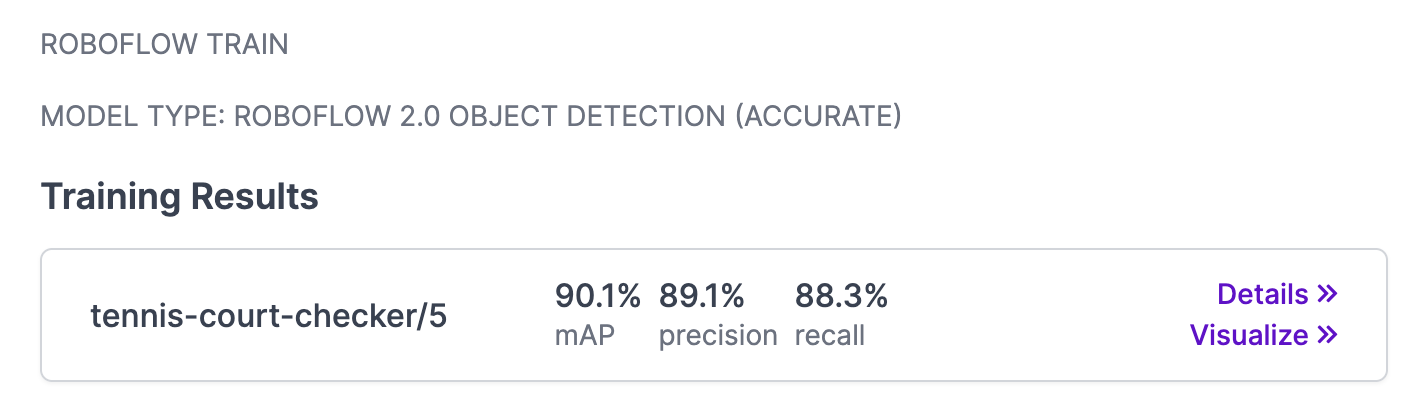
When the model finished training less than an hour later, the results looked accurate enough for my use case! Woo, onto the next.
Step 4: Webcam Deployment
I planned to use the webcam I have perched over top of the tennis courts to be the source of data at inference. I'd pass the webcam images to the model we trained to determine if the courts were empty or not.
To deploy on a USB webcam, I wrote a Python script to take images and then send them to the inference API that is ready to use from the model that finished above. (Note to fellow rookies – these two tutorials are great to help me get set up.) Here's a look at the code I pieced together to get this part working:
import cv2
import time
import io
import cv2
import requests
from PIL import Image, ImageOps
from requests_toolbelt.multipart.encoder import MultipartEncoder
import math
from twilio.rest import Clientphotos_to_take = 5
# take the photos
for x in range(photos_to_take):
cap = cv2.VideoCapture(1)
ret, frame = cap.read()
photo_path = ''.join(['RF_project/webcamphoto',str(x+1),'.jpg'])
cv2.imwrite(photo_path, frame)
cap.release
time.sleep(3)OpenCV can be used to take and save five photos at 3-second increments. One note here - cv2.VideoCapture() takes the path of your webcam. Depending on your setup, this value might be 0, 1, or a different number.
I recommend playing around to ensure the webcam is actually taking photos - there were a few times where I thought I was capturing images and was not.
# mirror the images
for x in range(photos_to_take):
    im = Image.open(''.join(['RF_project/webcamphoto',str(x+1),'.jpg']))
    mirror_image = ImageOps.mirror(im)
mirror_image.save(''.join(['RF_project/webcamphoto',str(x+1),'.jpg']))# Load Image with PIL
response = [None] * photos_to_take
for x in range (photos_to_take):
photo_path = ''.join(['RF_project/webcamphoto',str(x+1),'.jpg'])
img = cv2.imread(photo_path)
image = cv2.cvtColor(img, cv2.COLOR_BGR2RGB)
pilImage = Image.fromarray(image)
# Convert to JPEG Buffer
buffered = io.BytesIO()
pilImage.save(buffered, quality=100, format="JPEG")
# Build multipart form and post request
m = MultipartEncoder(fields={'file': ("imageToUpload", buffered.getvalue(), "image/jpeg")})
response[x] = requests.post("https://detect.roboflow.com/YOUR_MODEL/YOUR_MODEL_ID?api_key=YOUR_API_KEY&confidence=.40", data=m, headers={'Content-Type': m.content_type}).json()
# See inference results
print(response)Next, the images are sent to the Roboflow inference API for our model, which returned JSON inference results. I more or less copy/pasted the Python example inference script from the docs – all I did was added my own API key, model name, and model ID to the script.
(You can find the API key and model name by clicking the gear on the Workspace page and going to “Roboflow API”. Model ID is in the URL of your version after the name of the workspace. My example was https://app.roboflow.com/mixed-sports-area/tennis-court-checker/5)
# Post processing - looking at average count of objects in the images, rounding up.
response_str = str(response)
player_count = math.ceil(response_str.count("tennis")/photos_to_take)
court_count = math.ceil(response_str.count("court")/photos_to_take)Finally, create ‘count’ values for players and courts to understand how many were detected by the model. This example divides total detections by the number of photos taken, and rounding up (in case the player was out-of-frame or not detected by the model).
(An added bonus I could do here but did not yet: check if the player class is wholly within the court class. For now, counting players worked for me!)
Step 5: Set Up Notifications
Now we have a Python script that will take photos and infer them from our model. However, I needed a way to get notified of results. I want to know when I can play!
This is where Twilio is super simple as a delivery method. It enables us to easily send SMS text messages with the results. Their documentation is here.
from twilio.rest import Client

# Your Account SID from twilio.com/console
account_sid = "XXXXXXXXXXXXXXXXXXXXXXXXXXXXXXXXX"
# Your Auth Token from twilio.com/console
auth_token  = "XXXXXXXXXXXXXXXXXXXXXXXXXXXXXXXXX"
court_phrase = "courts."
if court_count == 1:
   court_phrase=" court."

player_phrase = " tennis players detected on "
if player_count == 1:
   player_phrase=" tennis player detected on "

message_body = str("There are " + str(player_count) + player_phrase + str(court_count) + court_phrase)
print(message_body)
client = Client(account_sid, auth_token)

message = client.messages.create(to="+XXXXXXXXXX", from_="+XXXXXXXXXX",body=message_body)
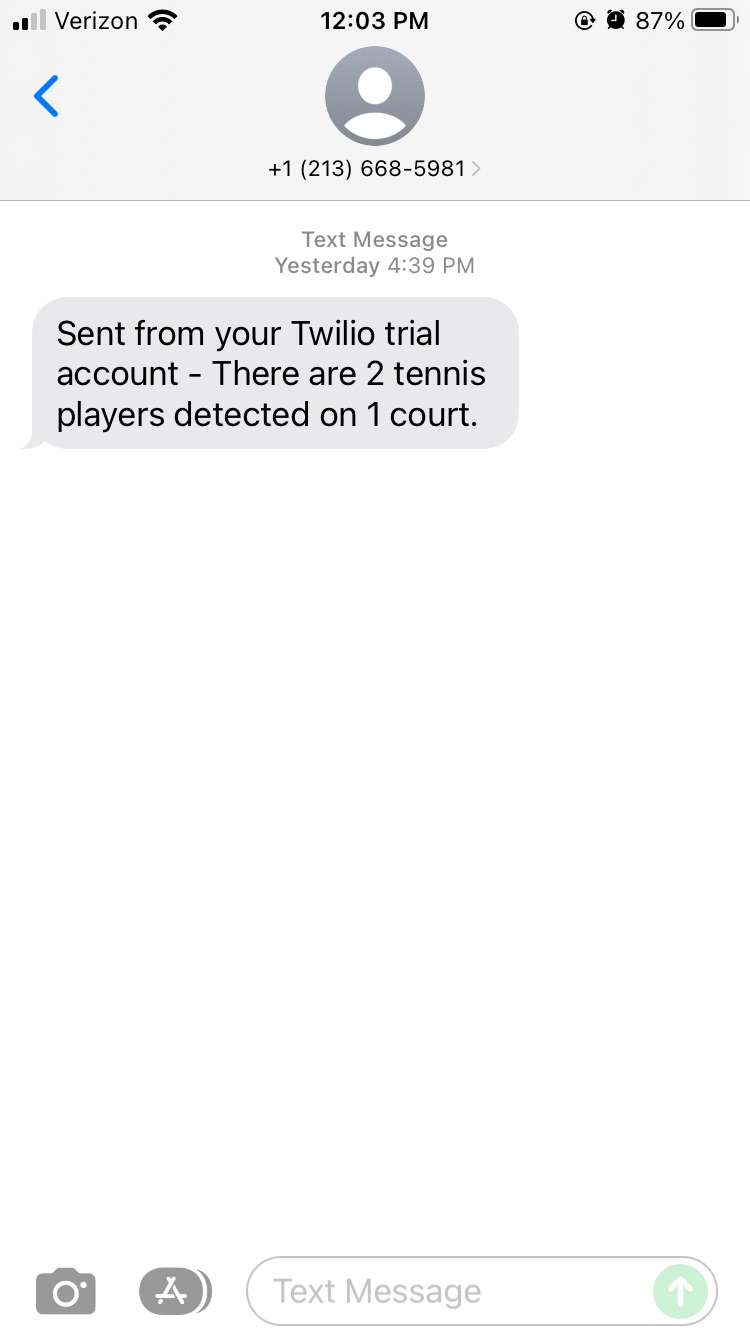
print(message.sid)When we run the full script, it sends a text! Here’s what Twilio sent:
Overall, Roboflow + Twilio made it easy for me to put together an end-to-end computer vision app. More than that, it's exciting to not wait for tennis anymore :)
This is a pretty basic MVP, but there are a ton of ways you could use this script. Some suggestions for people who want to take it a step further:
- Have the script fire on a regular basis (say, every 30 minutes)
- Trigger the script after receiving a text message
- Build a full web app to cover multiple courts or parks in a city
Hopefully you can use parts of this application to build your own project. If you end up building something, please share in our forum!
NB: Troubleshooting Notes
If you’re having trouble with the code, check the following things:
- Make sure you’re using the right webcam path for
cv2.VideoCapture()and that you are actually saving images on your computer. - Double-check that you’ve added your API key, model name, and model ID to requests.post().
- Sometimes it helps to unplug your webcam or reset your Python instance when repeatedly running the script.
Cite this Post
Use the following entry to cite this post in your research:
Jacob Witt. (Sep 7, 2022). How I use Computer Vision and Twilio to Guarantee Availability at Busy Public Tennis Courts. Roboflow Blog: https://blog.roboflow.com/computer-vision-twilio-notifications/