
Keypoint detection offers a compact way to determine object orientation: train a model to locate two reference points on an object, then compute the angle of the line between them with basic trigonometry. This tutorial trains a keypoint detection model in Roboflow to identify the top and bottom of a water bottle, then uses the resulting x,y coordinates to calculate tilt angle and classify whether the bottle is correctly positioned, with direct applications in robotic grasping, packaging lines, and warehouse sorting.
Keypoint detection in computer vision is a technique used to identify distinctive points or locations in an image that can be used as references for further analysis such as object recognition, pose estimation, or motion tracking etc.
In this blog post we will walk through how to use key point labeling to train a computer vision model to identify water bottle points of interest.
We will then use this information to estimate the orientation of the water bottle. The orientation of a water bottle refers to its rotational alignment or positioning relative to a reference frame or axis. In simpler terms, it's the angle at which the water bottle is tilted or turned with respect to a certain direction.
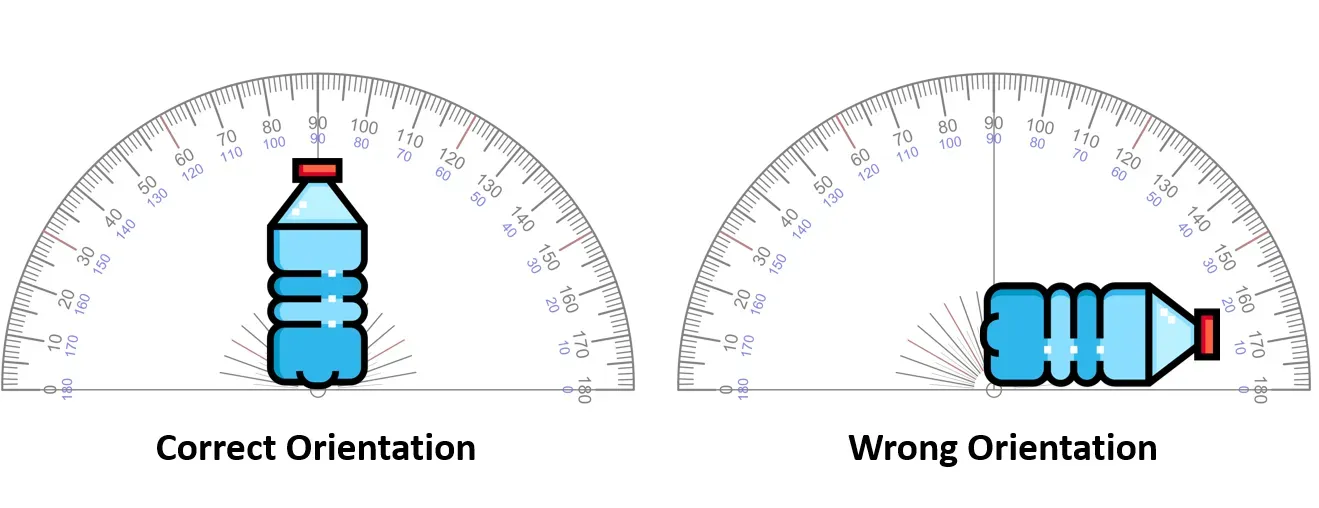
For example, if you place a water bottle on a table and it's perfectly upright with its base parallel to the table surface, its orientation would be considered 90 degrees. If you then tilt the bottle slightly to the left or right, its orientation would change accordingly.
In computer vision or robotics contexts, determining the orientation of a water bottle might involve measuring the angle at which it's tilted or rotated from a predefined reference direction. This information can be useful for various applications such as object detection, manipulation, or tracking in automated systems.
Determining the orientation of objects, such as a water bottle or any other object, has numerous real-world applications across various domains such as:
- In robotics, the industrial robots need to grasp objects with precision to perform tasks such as assembly, sorting, packaging, or placing objects in designated locations.
- In shipment and logistics, when loading items into shipping containers, trucks, or cargo planes, knowing the orientation of packages can help maximize space utilization.
Methodology to Estimate Bottle Orientation with Computer Vision
First, we need to train a keypoint detection model to recognize the top and bottom keypoints of a water bottle. We will walk through how to train the model in the next step. This model will give us the x and y coordinates for these keypoints. Then, using trigonometry, calculated the angle of the line segment formed by two points (x1, y1) and (x2, y2) to estimate the orientation of the water bottle as given below:
First, find the difference in the x-coordinates (Δx) and the difference in the y-coordinates (Δy):
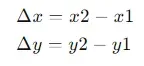
Then, use the arctangent function to find the angle:

This information is used to estimate the orientation of object, a water bottle with top and bottom keypoints in our example. If the bottle is upright with its base, registering an angle of 90 degrees, it indicates correct orientation; otherwise, it's deemed incorrect.
This concept may be used to estimate orientation of any physical object given that the keypoints of objects are correctly identified.
Steps for building the automatic bottle orienter project
For building the project, following steps are used.
- Collect and label a water bottle dataset
- Train a keypoint detection model
- Build application to detect keypoints and estimate orientation of water bottle
Step #1: Collect and label a water bottle dataset
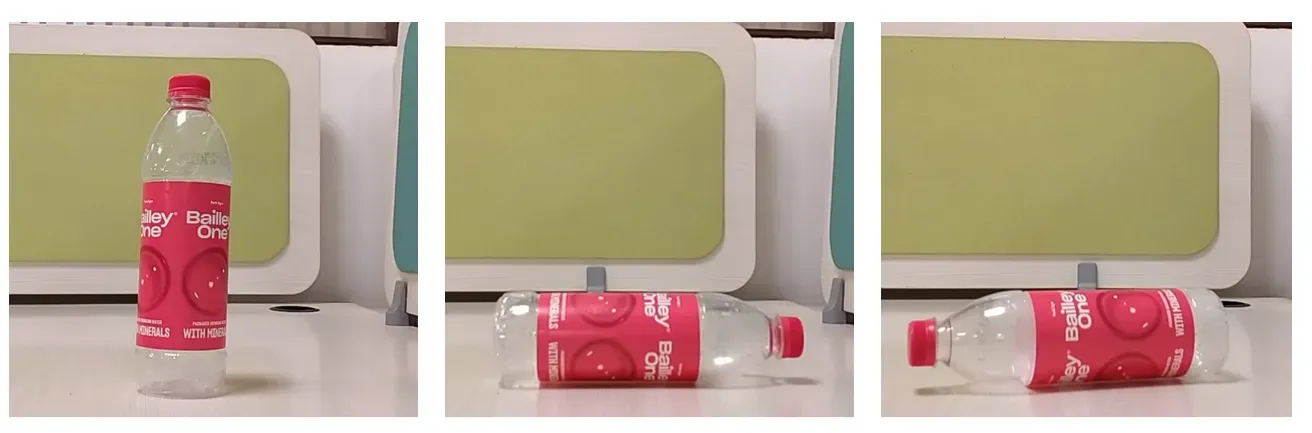
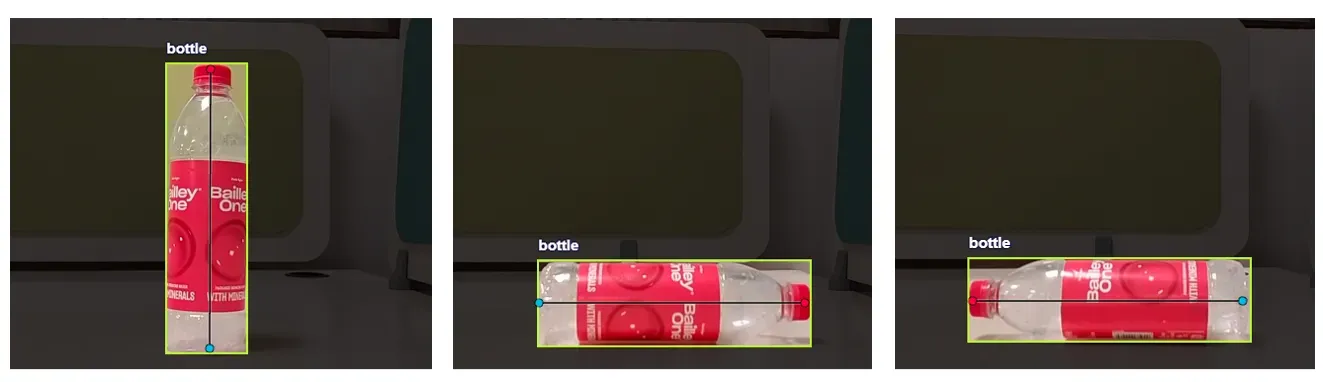
The dataset of water bottle is manually collected. The dataset contains water bottles placed in three different orientations as shown in image below
After collecting the dataset, it is uploaded to Roboflow project for labelling and training. To label the dataset, first a keypoint skeleton needs to be created. You may refer to this article for more details on how to create and label keypoint project using Roboflow.
For this project, I have defined a keypoint skeleton describing the top and bottom points as shown in following image.
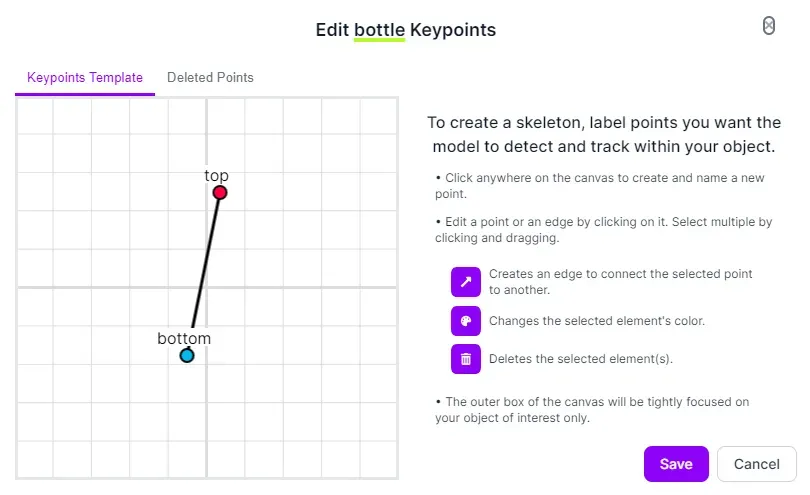
Once the keypoint skeleton class is defined, it is used to label each image by dragging the bounding box and positioning “top” and “bottom” keypoints to its desired position as shown in following image.
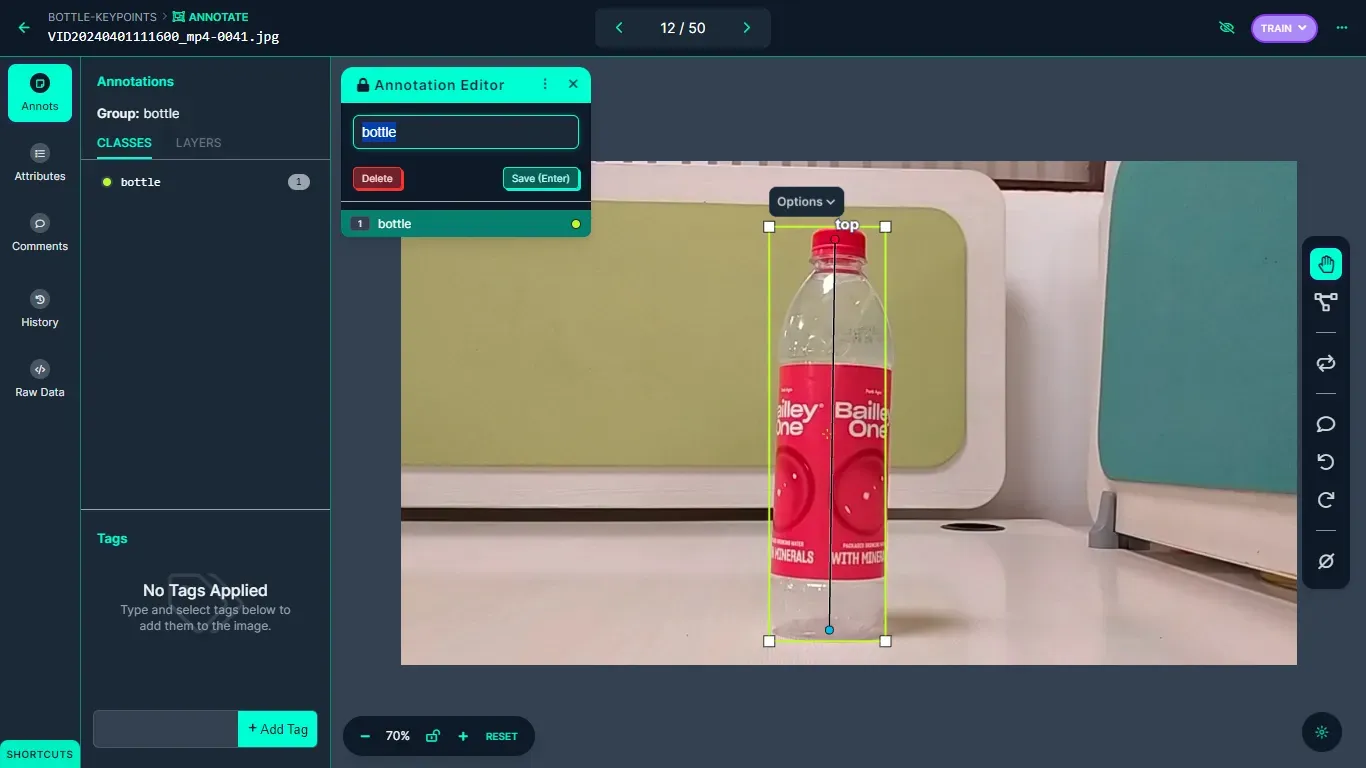
All the images are labeled using keypoint class and the dataset was generated.
Step #2: Train a keypoint detection model
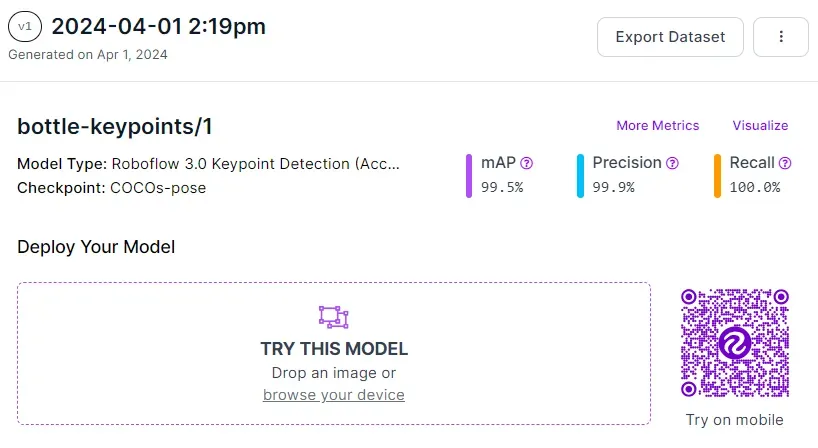
Upon finishing the labeling process, a dataset version is generated, and the model undergoes training using the Roboflow auto-training feature. The achieved training accuracy is 99.5%.
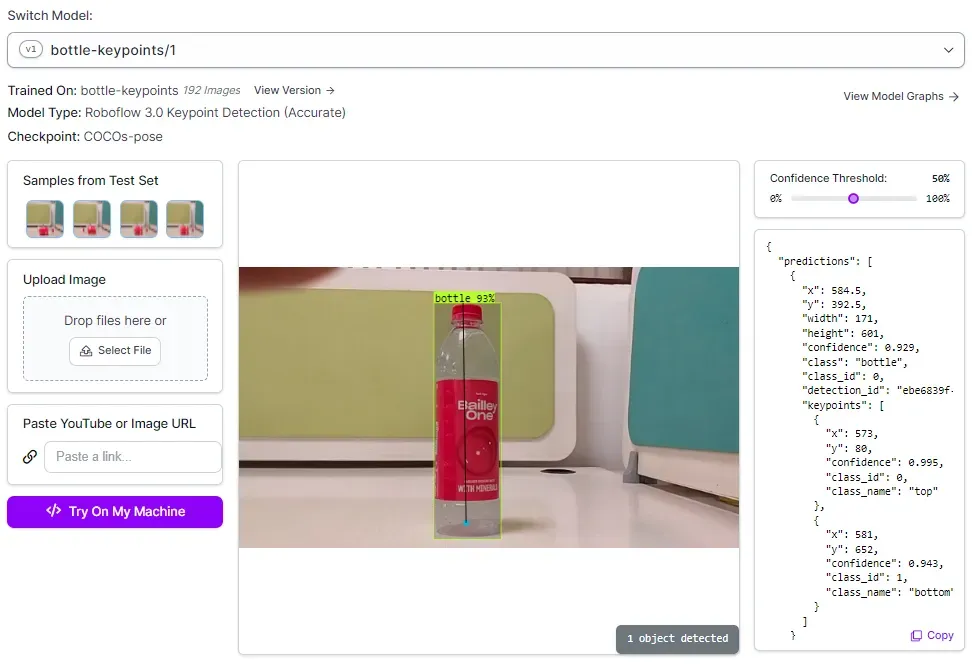
The model is automatically deployed to a cloud API. Roboflow offers a range of options for testing and deploying the model, such as live testing in a web browser and deployment to edge devices. The accompanying image illustrates the model undergoing testing through Roboflow's web interface.
Step #3: Build application to detect keypoints and estimate orientation of water bottle
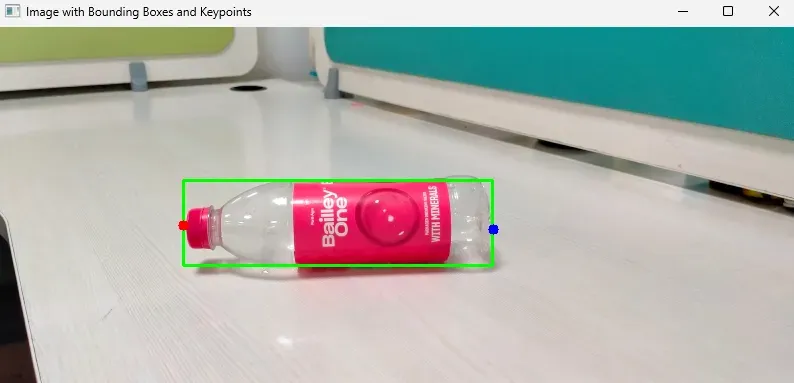
This step involves constructing the application to detect the keypoints of a water bottle in a live camera feed. Initially, we'll develop a basic Python script capable of detecting the keypoints of a water bottle and displaying them with bounding boxes on an image. We'll use the provided test image for this purpose.

Fist, install the Roboflow Python package and the Inference SDK package, with which we will run inference on our model:
pip install roboflow inference-sdk inferenceWe can then write a script to run inference. Create a new file and add the following code:
from inference_sdk import InferenceHTTPClient
import cv2
import json
CLIENT = InferenceHTTPClient(
    api_url="https://detect.roboflow.com",
    api_key="YOUR_API_KEY"
)
# infer on a local image
json_data = CLIENT.infer("bottle.jpg", model_id="bottle-keypoints/1")
print(json_data)
The above code gives output in JSON format as following. This prediction result is stored in json_data variable.
{'time': 0.09515731000010419, 'image': {'width': 800, 'height': 360}, 'predictions': [{'x': 341.5, 'y': 196.5, 'width': 309.0, 'height': 85.0, 'confidence': 0.9074831008911133, 'class': 'bottle', 'class_id': 0, 'detection_id': 'bff695c1-df86-4576-83ad-8c802e08774e', 'keypoints': [{'x': 186.0, 'y': 198.0, 'confidence': 0.9994387626647949, 'class_id': 0, 'class_name': 'top'}, {'x': 496.0, 'y': 202.0, 'confidence': 0.9994300007820129, 'class_id': 1, 'class_name': 'bottom'}]}]}We will convert this to a JSON string (in following code) and then use the string to draw bounding boxes and keypoints on our test image output.
To display the image with the bounding box and key points returned by our keypoint detection model, we need to load the image. Then, we need to iterate through prediction results stored in JSON string and draw bounding boxes and keypoints as shown in the following code.
json_string = json.dumps(json_data)
data = json.loads(json_string )
image = cv2.imread("bottle.jpg")
for prediction in data['predictions']:
    x = int(prediction['x'])
    y = int(prediction['y'])
    width = int(prediction['width'])
    height = int(prediction['height'])

    x1 = int(x - (width / 2))
    y1 = int(y - (height / 2))
    x2 = int(x + (width / 2))
    y2 = int(y + (height / 2))

    # Draw bounding box
    cv2.rectangle(image, (x1, y1), (x2, y2), (0, 255, 0), 2)

    # Draw keypoints
    for keypoint in prediction['keypoints']:
        keypoint_x = int(keypoint['x'])
        keypoint_y = int(keypoint['y'])
        class_name = keypoint['class_name']
        if class_name == 'top':
            color = (0, 0, 255)  # Red color for top keypoints
        elif class_name == 'bottom':
            color = (255, 0, 0)  # Blue color for bottom keypoints
        else:
            color = (0, 255, 0)  # Green color for other keypoints
        cv2.circle(image, (keypoint_x, keypoint_y), 5, color, -1)
cv2.imshow("Image with Bounding Boxes and Keypoints", image)
cv2.waitKey(0)
cv2.destroyAllWindows()
Here is the output from our code:
Next, we'll update this code to perform inference on a video stream. We'll utilize a webcam to capture the video and execute inference for each frame of the video.
Create a new file and add the following code:
from inference_sdk import InferenceHTTPClient
import cv2
import json
CLIENT = InferenceHTTPClient(
    api_url="https://detect.roboflow.com",
    api_key="YOUR_API_KEY"
)

def calculate_angle(x1, y1, x2, y2):
    # Calculate the differences in coordinates
    delta_x = x1 - x2
    delta_y = y1 - y2

    # Calculate the angle using arctan2 and convert it to degrees
    angle_rad = math.atan2(delta_y, delta_x)
    angle_deg = math.degrees(angle_rad)

    # Ensure the angle is between 0 and 360 degrees
    mapped_angle = angle_deg % 360
    if mapped_angle < 0:
        mapped_angle += 360  # Ensure angle is positive

    return mapped_angle

cap = cv2.VideoCapture(0)
 ret, frame = cap.read()

    if not ret:
        break

    # Perform inference on the current frame
    json_data = CLIENT.infer(frame, model_id="bottle-keypoints/1")

    # Convert JSON data to dictionary
    data = json.loads(json.dumps(json_data))
# Variables to store bottom and top keypoint coordinates
    bottom_x, bottom_y = None, None
    top_x, top_y = None, None

    # Iterate through predictions
    for prediction in data['predictions']:
        x = int(prediction['x'])
        y = int(prediction['y'])
        width = int(prediction['width'])
        height = int(prediction['height'])

        x1 = int(x - (width / 2))
        y1 = int(y - (height / 2))
        x2 = int(x + (width / 2))
        y2 = int(y + (height / 2))

        # Draw bounding box
        cv2.rectangle(frame, (x1, y1), (x2, y2), (0, 255, 0), 2)

        # Draw keypoints
        for keypoint in prediction['keypoints']:
            keypoint_x = int(keypoint['x'])
            keypoint_y = int(keypoint['y'])
            class_name = keypoint['class_name']
            if class_name == 'top':
                color = (0, 0, 255)  # Red color for top keypoints
                top_x, top_y = keypoint_x, keypoint_y
            elif class_name == 'bottom':
                color = (255, 0, 0)  # Blue color for bottom keypoints
                bottom_x, bottom_y = keypoint_x, keypoint_y
            else:
                color = (0, 255, 0)  # Green color for other keypoints
            cv2.circle(frame, (keypoint_x, keypoint_y), 5, color, -1)
 if bottom_x is not None and bottom_y is not None and top_x is not None and top_y is not None:
        angle = calculate_angle(bottom_x, bottom_y, top_x, top_y)

        # Display the angle on the frame
        cv2.putText(frame, "Angle: {:.2f} degrees".format(angle), (50, 50), cv2.FONT_HERSHEY_SIMPLEX, 1, ( 251, 241, 25), 2)
# Check for orientation
        if 0 <= angle <= 85 or 95 <= angle <= 185:  # Angle close to 0 or 180 degrees
            cv2.putText(frame, "Wrong orientation", (50, 100), cv2.FONT_HERSHEY_SIMPLEX, 1, (0, 0, 255), 2)
        elif 85 <= angle <= 95 or 265 <= angle <= 275:  # Angle close to 90 degrees
            cv2.putText(frame, "Correct orientation", (50, 100), cv2.FONT_HERSHEY_SIMPLEX, 1, (0, 255, 0), 2)
    # Display the frame with predictions and angle
    cv2.imshow('Webcam', frame)

    # Check for 'q' key press to exit
    if cv2.waitKey(1) & 0xFF == ord('q'):
        break

# Release the webcam and close OpenCV windows
cap.release()
cv2.destroyAllWindows()
Within our code, we use a function to calculate the angle between the key points of our model. Using this angle, we'll determine the correct orientation of the water bottle.
We can open our video stream and capture frames from our webcam, perform inference on each frame, and save the prediction results. We then draw bounding box and keypoints on each frame of the captured video.
After this, we will compute the angle and display it onto the video frame.
Then, we can assess the orientation, whereby if the bottle is angled at 90 degrees, it's deemed correctly positioned; however, if it's tilted close to 0 or 180 degrees, it's considered incorrectly positioned.
Here is the final output of our system:
Build an Automatic Bottle Orienter
This blog post has provided a comprehensive guide on constructing a keypoint detection project to determine the orientation of objects, with a focus on a water bottle in our example, using Roboflow. Ensuring accurate orientation detection of an object is crucial, particularly in robot vision applications.
In tasks such as grasping, manipulation, and assembly, knowing the orientation of objects allows robots to handle them correctly. For example, in a manufacturing setting, a robot arm needs to pick up objects with the correct orientation to place them accurately in assembly processes.
Moreover, in scenarios where objects need to be sorted or inspected based on their orientation, reliable orientation detection is indispensable. For instance, in warehouse automation, robots need to orient packages correctly for scanning or stacking purposes.
The dataset and computer vision model for this project is available at Roboflow Universe and all the code is available here.
Cite this Post
Use the following entry to cite this post in your research:
Timothy M. (Apr 10, 2024). Automatic Bottle Orienter with Computer Vision. Roboflow Blog: https://blog.roboflow.com/estimate-bottle-orientation/