
Object detection is a computer vision task that identifies and locates objects in images or videos. It not only classifies the objects, but also determines their precise positions using bounding box coordinates. Typically, this is achieved with a machine learning model that predicts both the labels and the bounding boxes.
One such model is RF-DETR, an open-source, real-time object detection model. It is the first model to surpass 60 Average Precision (AP) on the Microsoft COCO benchmark, demonstrating its ability to accurately detect objects while generating precise bounding boxes. RF-DETR also achieves state-of-the-art performance on RF100-VL, a benchmark designed to evaluate real-world adaptability, and consistently outperforms other models across a variety of benchmarks.
RF-DETR is designed for high-speed, accurate detection, even on limited compute or in low-latency environments, making it ideal for practical object detection workflows. In this blog, we’ll demonstrate how to detect object in videos by building a workflow using RF-DETR, as shown in the output video below.
How to Detect Objects in Videos Using RF-DETR
We’ll be using Roboflow Workflows, a web-based tool for building visual AI applications, to create our object detection workflow utilizing RF-DETR.
Roboflow Workflows allows us to seamlessly chain multiple computer vision tasks, such as object detection, bounding box visualization, and label visualization, among many others. Each task is represented as a built-in modular block, enabling us to visually design and customize workflows.
The video below demonstrates the object detection workflow we will create:
You can run this workflow on both images and videos. Try it out or fork it here.
Setup Your Roboflow Workflow
To get started, create a free Roboflow account and log in. Next, create a workspace, then click on “Workflows” in the left sidebar and click on ”Create Workflow”.
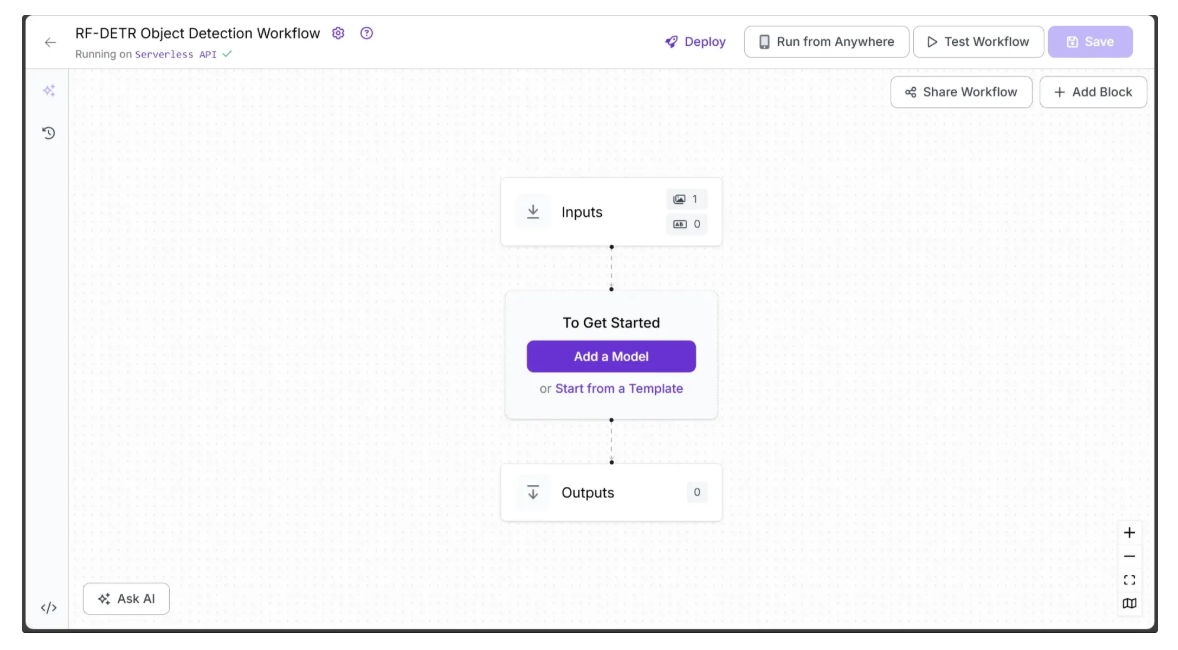
You’ll be taken to a blank workflow editor, ready for you to build your AI-powered workflow. Here, you’ll see two workflow blocks: Inputs and Outputs.
Step 1: Define Workflow Inputs
We want the object detection performed by the workflow to be configurable. To achieve this, we define input parameters that control how the workflow generates its output. The workflow then dynamically adapts based on the values provided for these parameters.
This workflow includes the following input parameters:
- image – The input image for object detection. If a video is passed to the workflow, this parameter represents individual video frames. It is included by default in all Roboflow workflows.
- class_filter – Specifies which objects to detect, provided as a list. This can range from a single COCO class to multiple classes, or all COCO classes if the list is left empty.
- confidence – Sets the minimum confidence threshold required for detections.
- text_scale – Adjusts the size of the label text.
- text_thickness – Controls the boldness of the label text.
- bounding_box_thickness – Adjusts the thickness of bounding box outlines.
To add these parameters, select the Inputs block and click “Add Parameter.” Each parameter requires a type and can also have a default value.
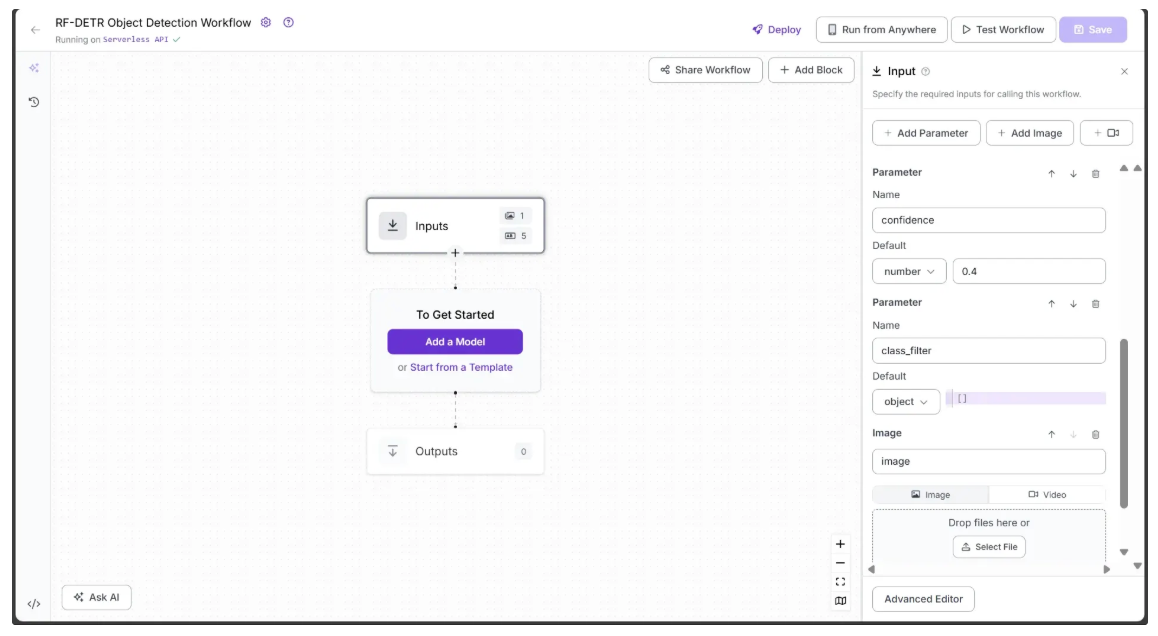
The image below illustrates three workflow inputs: the image parameter (included by default), the confidence parameter (numeric type) with a default value of 0.4, and the class_filter parameter (object type) with a default value of an empty list.
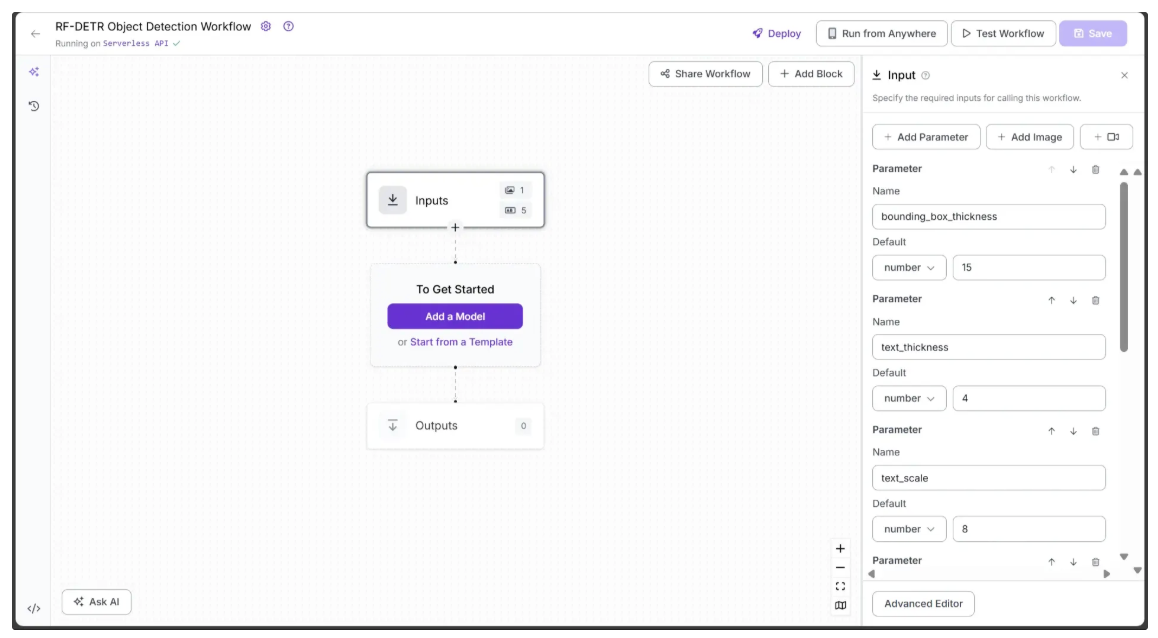
The following image shows the remaining workflow inputs, all of numeric type: text_scale with a default value of 8, text_thickness with a default value of 4, and bounding_box_thickness with a default value of 15.
All the parameters added above serve as inputs for various blocks throughout the workflow, controlling the object detection output.
Step 2: Add an Object Detection Model Block
Next, we’ll add object detection capabilities to our workflow using the Object Detection Model block. This Roboflow workflow block allows us to utilize RF-DETR for object detection.
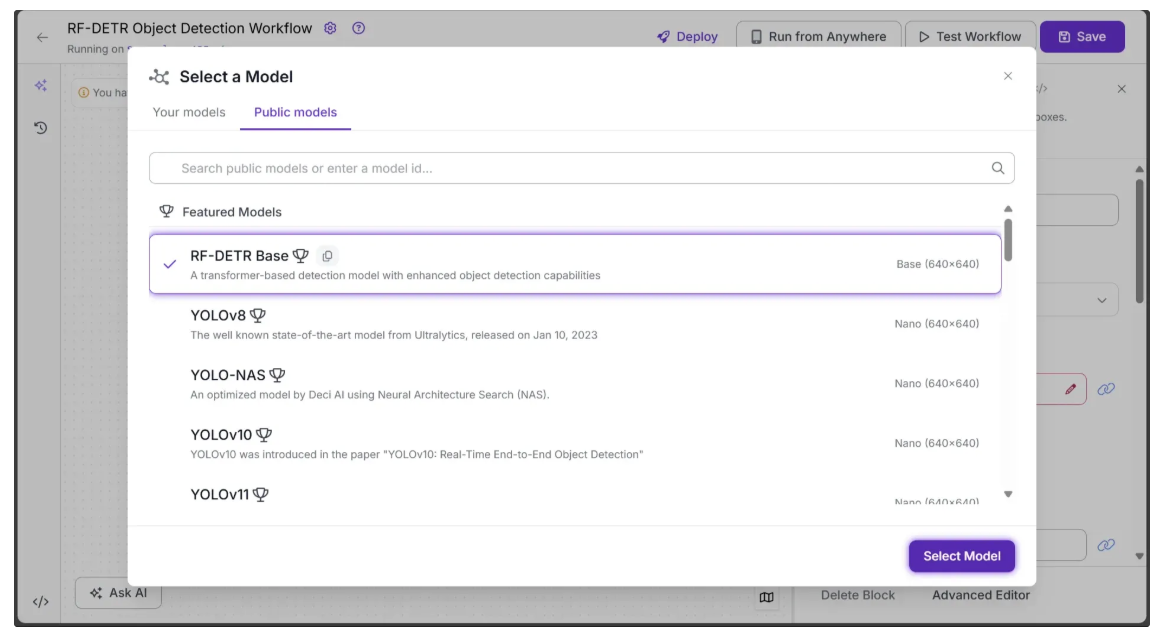
To add the block, click “Add a Model”, then select the “Public Models” option. This will display all the available object detection models on Roboflow; among them, click RF-DETR:
Next, configure the Object Detection Model block to use certain parameters from the Inputs block, such as image, confidence, and class_filter.
To do this, open the Configure tab of the Object Detection Model block, click the link 🔗 icon next to each parameter, and select the corresponding input value.
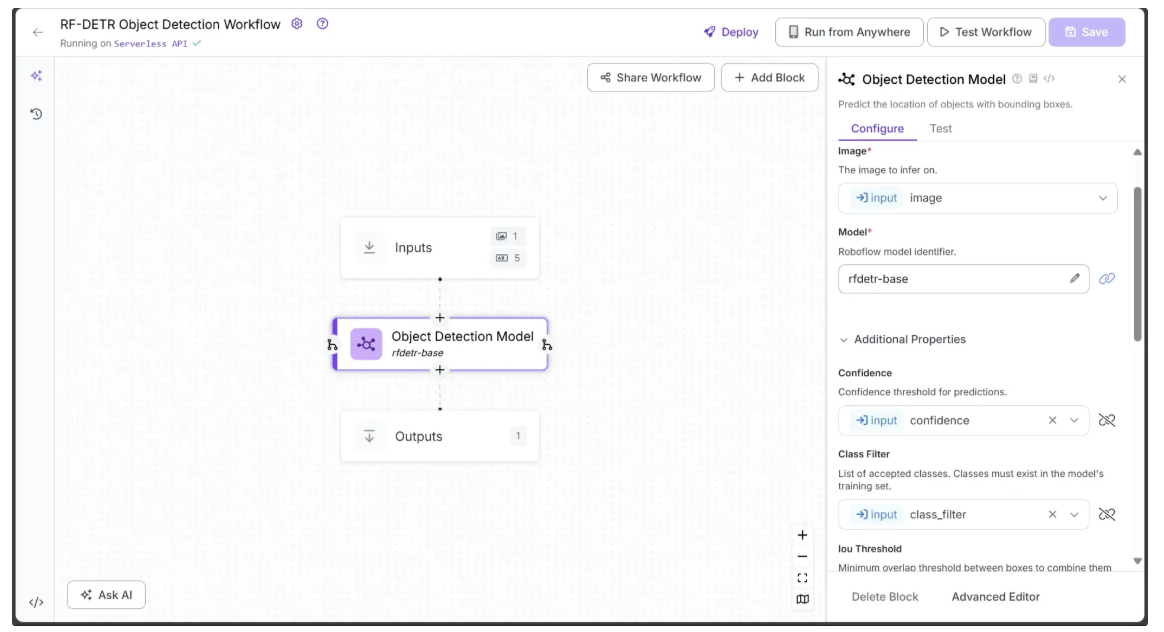
Specifically, in the Configure tab, Image, Confidence, and Class Filter should be linked to the corresponding image, confidence, and class_filter parameters from the Inputs block. You can leave all other parameters at their default values.
Step 3: Enable Object Tracking Across Video Frames
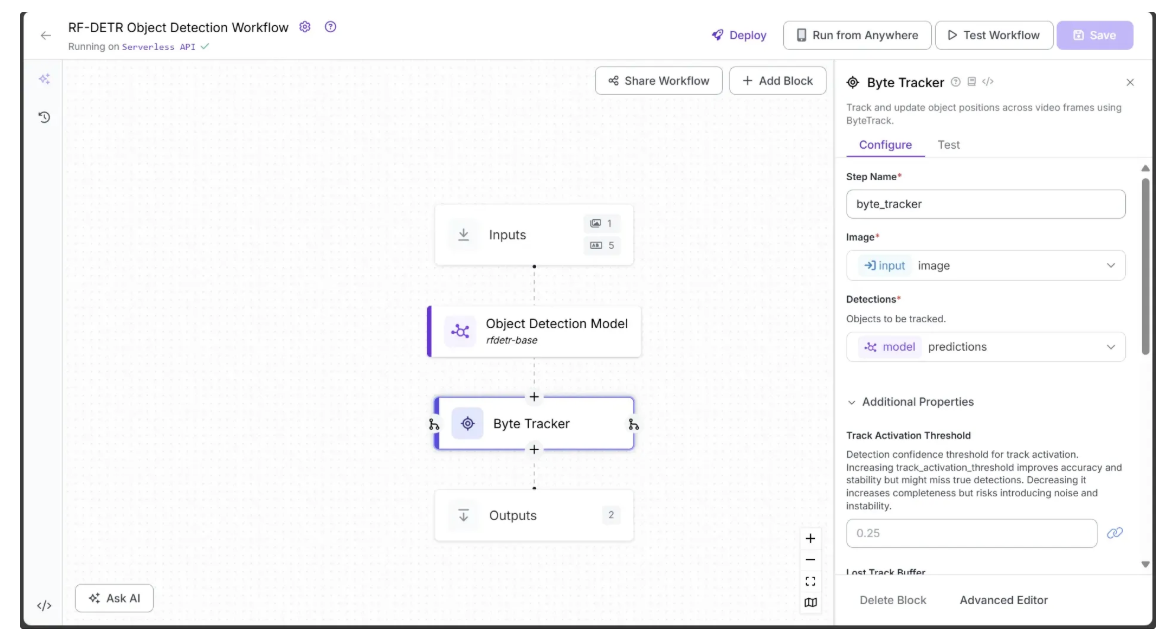
To enable tracking of objects across video frames using the predictions from the Object Detection Model, we add a Byte Tracker block to the workflow.
This block takes detections and their corresponding video frames as input and initializes trackers for each detection. You can configure parameters such as track activation threshold, lost track buffer, minimum matching threshold, and frame rate to control the tracking behavior.
To add the Byte Tracker, hover over the Object Detection Model block, click the + icon that appears below it, and search for “Byte Tracker” to insert it into your workflow. Once added, the workflow should look like this:
Step 4: Visualize Predictions with Bounding Boxes
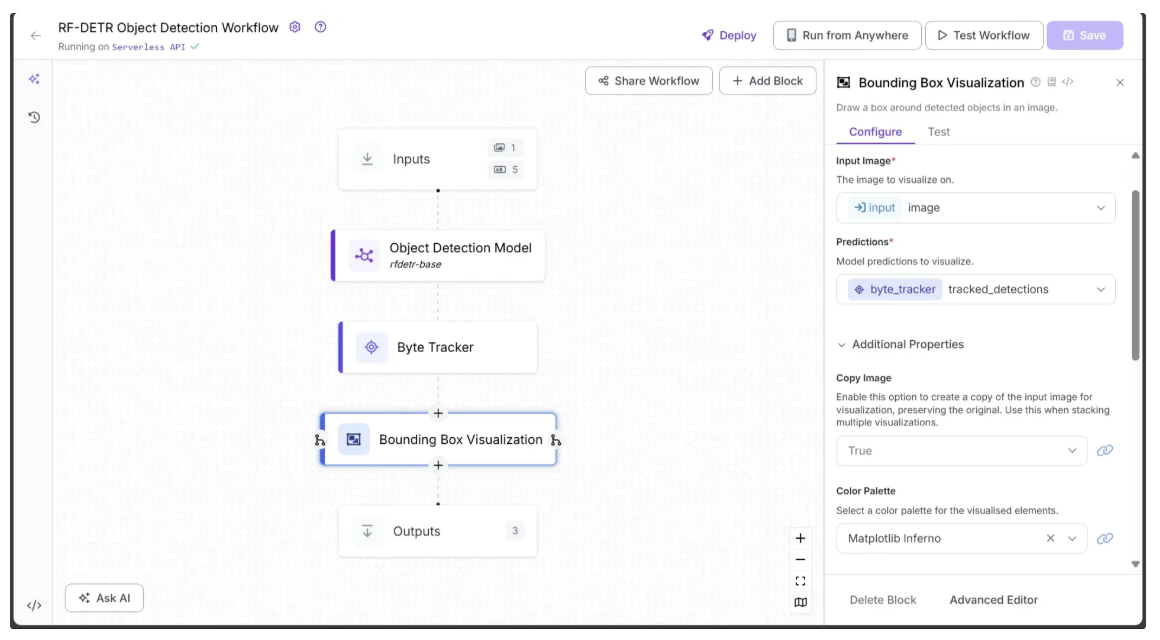
The Object Detection Model block outputs prediction objects, which can be visualized as bounding boxes on the image using the Bounding Box Visualization block.
To add this block, hover over the Object Detection Model block, click the + icon, search for “Bounding Box Visualization”, and insert it into your workflow.
In the Configure tab, link Image to the image parameter from the Inputs block and Predictions to the tracked_detections output from the Byte Tracker block. Select a Color Palette for the bounding boxes; in this workflow, we used ‘Matplotlib Inferno’, as shown below:
Finally, link the Thickness parameter to the bounding_box_thickness input from the Inputs block, as shown below:
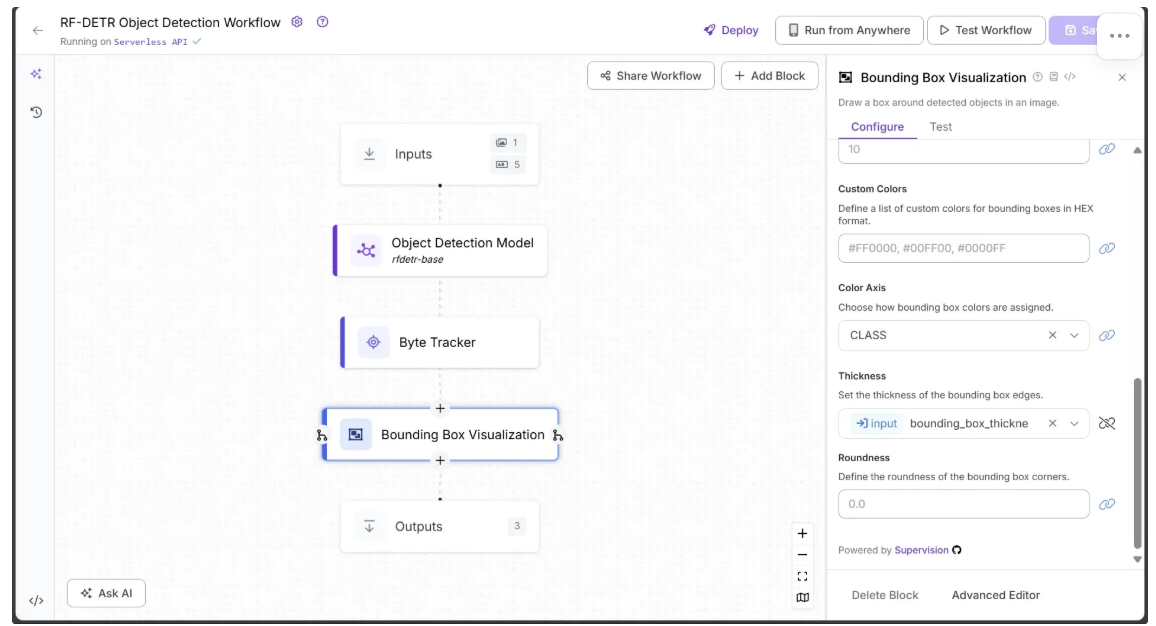
You can leave all other parameters at their default values.
Step 5: Add Labels to Bounding Boxes
Each bounding box represents an object, so labels are needed to indicate their classes. The Label Visualization block handles this and allows you to configure its style through various parameters.
To add the block, hover over the Bounding Box Visualization block, click the + icon, search for “Label Visualization”, and insert it into your workflow.
In the Configure tab, link Image to the image output from the Bounding Box Visualization block and Predictions to the tracked_detections output from the Byte Tracker block. Select a color palette for the labels; in this workflow, we used ‘Matplotlib Pastel2’.
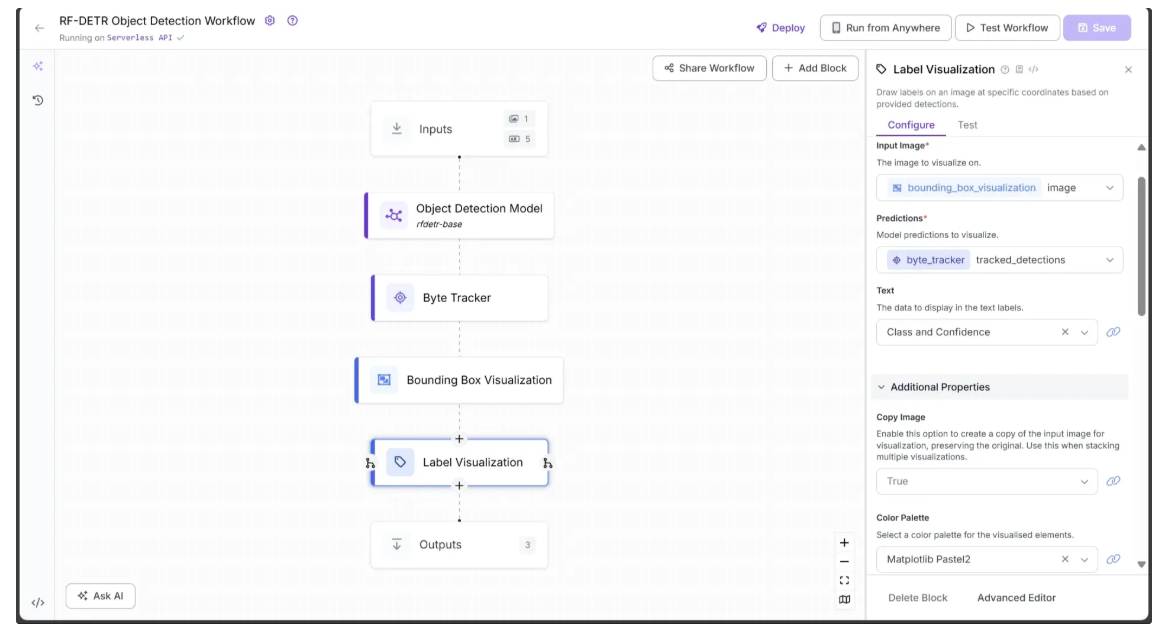
Finally, link the Text Scale to the text_scale input from the Inputs block and Text Thickness to the text_thickness input. You can also specify a Text Color and choose a Text Position, as shown below:

You can leave all other parameters at their default values.
Step 6: Define Workflow Outputs
With all the blocks added, the workflow is now complete, and we can define the desired outputs. To do this, select the Outputs block, open the Configure tab, and click “Add Output”. Remove any unwanted outputs using the 🗑️ icon.
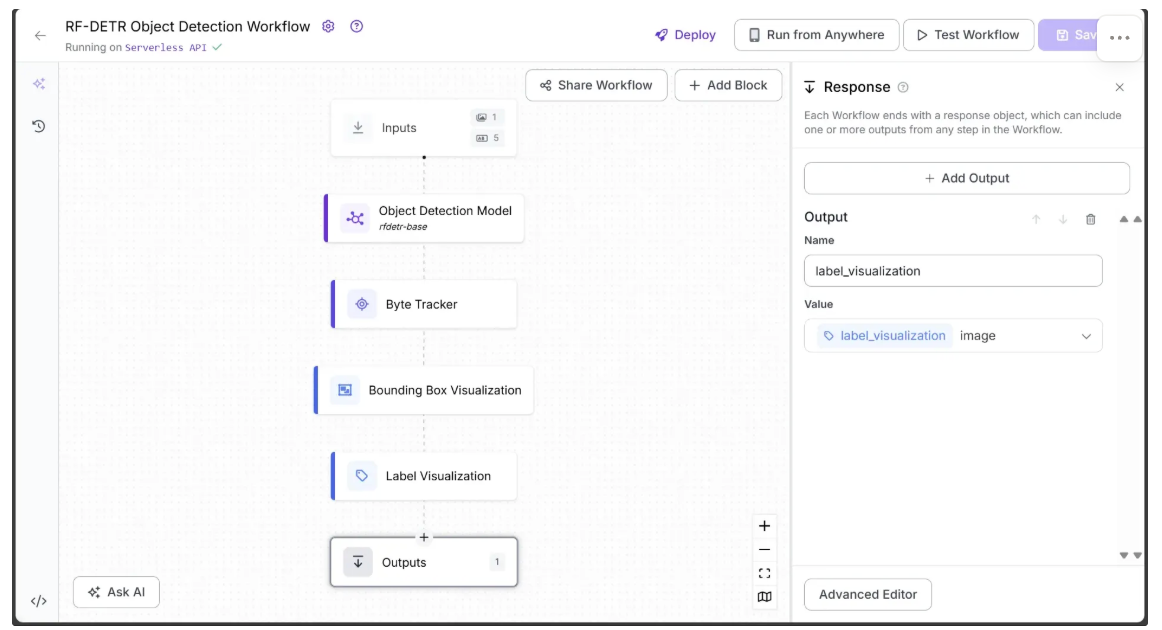
Ensure label_visualization is set as a workflow output and linked to the Label Visualization block’s image, which represents the final object detection result.
Step 7: Run the Workflow
You can run the workflow directly through its user interface, via the API, the command line, or other supported methods. To view the code for these execution options, click the “Deploy” button in the top-right corner of the workflow.
In this example, we’ll run the workflow using Python. First, install the required package in your Python environment:
pip install inferenceThe script below is a modified version of the Python deployment script available under “Deploy” and then “Video”. The modification allows the script to dynamically adjust text scale and bounding box thickness based on video resolution for the workflow input parameters, while also performing object detection on a test video:
from inference import InferencePipeline
from supervision.draw.utils import calculate_optimal_line_thickness, calculate_optimal_text_scale
import cv2

def my_sink(result, video_frame):
    if result.get("label_visualization"):  # Display an frame from the workflow response
        cv2.imshow("Workflow frame", result["label_visualization"].numpy_image)
        cv2.waitKey(1)
    print(result)  # do something with the predictions of each frame

# Function to dynamically get video resolution
def get_video_resolution(video_path):
    cap = cv2.VideoCapture(video_path)
    ret, frame = cap.read()
    cap.release()
    height, width = frame.shape[:2]
    return (width, height)

video_path = "video.mp4"
resolution = get_video_resolution(video_path)

# Initialize a pipeline object
pipeline = InferencePipeline.init_with_workflow(
    api_key="YOUR_ROBOFLOW_KEY",
    workspace_name="YOUR_ROBOFLOW_WORKSPACE",
    workflow_id="YOUR_ROBOFLOW_OBJECT_DETECTION_WORKFLOW",
    video_reference=video_path, # Path to video, device id (int, usually 0 for built in webcams), or RTSP stream url
    max_fps=30,
    on_prediction=my_sink,
    workflows_parameters={
        "bounding_box_thickness": calculate_optimal_line_thickness(resolution),
        "text_thickness": 1,
        "text_scale": 1.1 * calculate_optimal_text_scale(resolution),
        "confidence": 0.1,
        "class_filter": ["car"]
    }
)

pipeline.start()  # start the pipeline
pipeline.join()   # wait for the pipeline thread to finish
In the script above, replace YOUR_ROBOFLOW_KEY, YOUR_ROBOFLOW_WORKSPACE, and YOUR_ROBOFLOW_OBJECT_DETECTION_WORKFLOW with the values from the Python deployment script available under “Deploy”. The hidden Roboflow API key in the deployment script becomes visible when you paste the script into a local file.
The following video demonstrates the expected outcome when you run the script:
Step 8: Combine Visualization Frames to Video
You can now compile the frames generated by the workflow to create a final video that clearly highlights the detected objects.
The following script accomplishes this by saving each frame with visualized object detections to a temporary folder and then stitching the frames together at the original video’s frame rate. The result is a smooth, object-detected video ready for review or further analysis.
from inference import InferencePipeline
from supervision.draw.utils import calculate_optimal_line_thickness, calculate_optimal_text_scale
import cv2
import os
import shutil

# Frame counter
frame_count = 0

def my_sink(result, video_frame):
    global frame_count
    if result.get("label_visualization"):  # Save an frame from the workflow response
        frame = result["label_visualization"].numpy_image
        frame_path = os.path.join(temp_dir, f"frame_{frame_count:06d}.jpg")
        cv2.imwrite(frame_path, frame)
        frame_count += 1
    print(result)  # do something with the predictions of each frame

# Function to dynamically get video resolution
def get_video_resolution(video_path):
    cap = cv2.VideoCapture(video_path)
    ret, frame = cap.read()
    cap.release()
    height, width = frame.shape[:2]
    return (width, height)

# Function to dynamically get video fps
def get_video_fps(video_path):
    cap = cv2.VideoCapture(video_path)
    fps = cap.get(cv2.CAP_PROP_FPS)
    cap.release()
    return fps

video_path = "video.mp4"
resolution = get_video_resolution(video_path)
fps = get_video_fps(video_path)

temp_dir = "temp_frames"
output_path = "object_detected_video.mp4"

# Ensure temp folder exists
os.makedirs(temp_dir, exist_ok=True)

# Initialize a pipeline object
pipeline = InferencePipeline.init_with_workflow(
    api_key="YOUR_ROBOFLOW_KEY",
    workspace_name="YOUR_ROBOFLOW_WORKSPACE",
    workflow_id="YOUR_ROBOFLOW_OBJECT_DETECTION_WORKFLOW",
    video_reference=video_path, # Path to video, device id (int, usually 0 for built in webcams), or RTSP stream url
    max_fps=30,
    on_prediction=my_sink,
    workflows_parameters={
        "bounding_box_thickness": calculate_optimal_line_thickness(resolution),
        "text_thickness": 1,
        "text_scale": 1.1 * calculate_optimal_text_scale(resolution),
        "confidence": 0.1,
        "class_filter": ["car"]
    }
)

pipeline.start()  # start the pipeline
pipeline.join()   # wait for the pipeline thread to finish

# Prepare the final video writer to compile all frames
fourcc = cv2.VideoWriter_fourcc(*'mp4v')
writer = cv2.VideoWriter(output_path, fourcc, fps, resolution)

# Loop through all saved frames and write them to the video
for i in range(frame_count):
    frame_path = os.path.join(temp_dir, f"frame_{i:06d}.jpg")
    frame = cv2.imread(frame_path)
    writer.write(frame)

# Release the video writer
writer.release()

# Clean up temporary frames
shutil.rmtree(temp_dir)

print(f"Final video saved at {output_path}")
Running the script on this video at SD quality, we observe that all the cars in the video have been detected, and the object detection workflow successfully ignores a motorbike that appears briefly at 0:36. The output is show below:
In the video, the model consistently detects each car, achieving higher accuracy when the car is closer to the camera and lower accuracy when it is farther away.
Real-World Use Cases of Video Object Detection
- Detecting pedestrians, vehicles, and obstacles in autonomous driving
- Monitoring public spaces for security and surveillance
- Detecting defects or anomalies in manufacturing and quality control
- Tracking objects and players in sports analytics
- Wildlife conservation and environmental monitoring
Enhancing Object Detection Precision with Segmentation using RF-DETR Seg
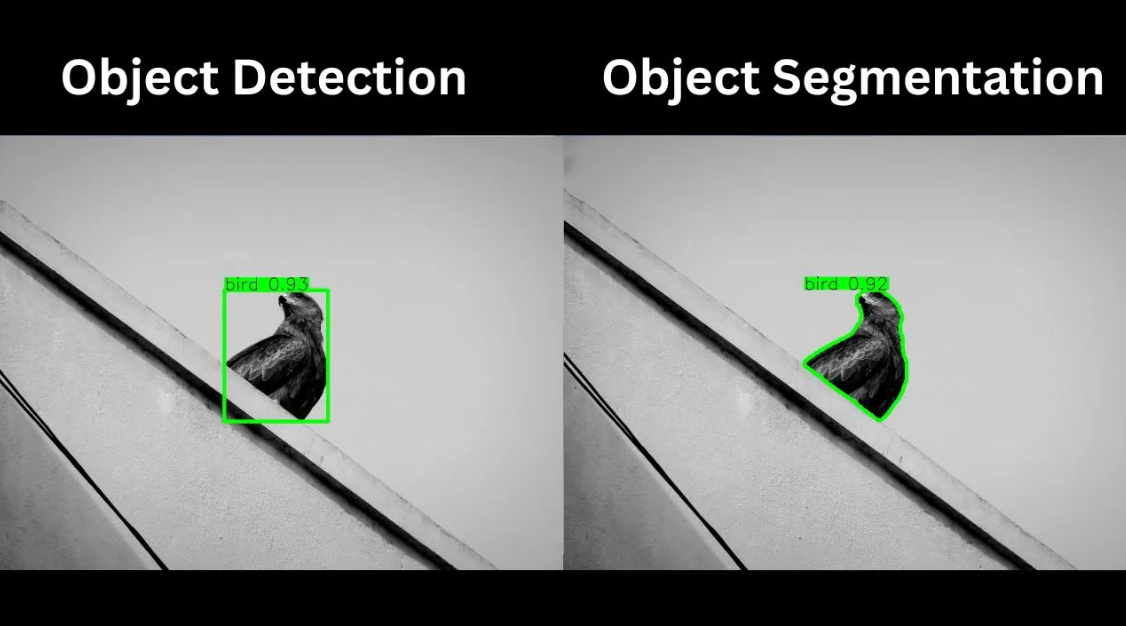
Object detection identifies objects in an image or video frame and provides bounding boxes around them. However, certain applications, such as medical imaging, satellite imagery, or fine-grained image editing, require much higher precision at the pixel level. This is where object segmentation becomes essential.
Object segmentation allows a computer to precisely outline the shape and boundaries of each object within an image, capturing detailed contours rather than just simple bounding boxes.
Like object detection, segmentation is achieved using machine learning models that predict both the labels and the precise boundaries of each object.
One such object segmentation model is RF-DETR Seg. RF-DETR Seg (Preview) is three times faster and more accurate than the largest segmentation model, YOLO11, when evaluated on the Microsoft COCO Segmentation benchmark, setting a new real-time state-of-the-art (SOTA) for this industry-standard evaluation.
RF-DETR Seg allows us to create image masks, enabling precise object segmentation for tasks such as image editing, medical analysis, AR/VR, object tracking, and training machine learning models.
Conclusion on Detecting Objects in Videos
In this blog, we demonstrated how RF-DETR enables highly accurate object detection in videos, delivering precise bounding boxes for each object. When combined with Roboflow Workflows, you can easily design, configure, and deploy workflows that detect, label, and track objects seamlessly.
For applications that demand even greater precision, RF-DETR Seg provides pixel-level object segmentation, unlocking advanced possibilities in image editing, medical imaging, and AR/VR projects.
With Roboflow’s modular building blocks and flexible workflow system, creating AI-powered computer vision solutions has never been easier.
To learn more about building with Roboflow Workflows, check out the Workflows launch guide.
Written by Dikshant Shah
Cite this Post
Use the following entry to cite this post in your research:
Contributing Writer. (Oct 6, 2025). Video Object Detection. Roboflow Blog: https://blog.roboflow.com/how-to-detect-objects-in-videos/