

Google Colab is Google's hosted Jupyter Notebook product that provides a free compute environment, including GPU and TPU.
Colab comes "batteries included" with many popular Python packages installed, making it a choice tool for easy model experimentation. For this reason, Roboflow Playground includes many free, open source computer vision models available on Google Colab.
Colab does come with limitations. The compute resources allocated are limited to a 12-hour span. If the browser session senses inactivity (e.g. the user is not active in that tab) for an hour, the kernel disconnects.
Because of this, it's important to save a model's weights and reload them in a future session. Saving a model's weights means saving the fit of a model after training. Reloading the model weights means using those saved weights in a future experiment, even if that is a new session in Colab.
In this post, we walkthrough how to save and reload model weights from YOLOv5, but the steps we follow are applicable to any Colab session (with file path modification).
Saving Model Weights
To save model weights, we must first have weights we want to save and a destination where we seek to save those weights.
Identify the Weights File Path
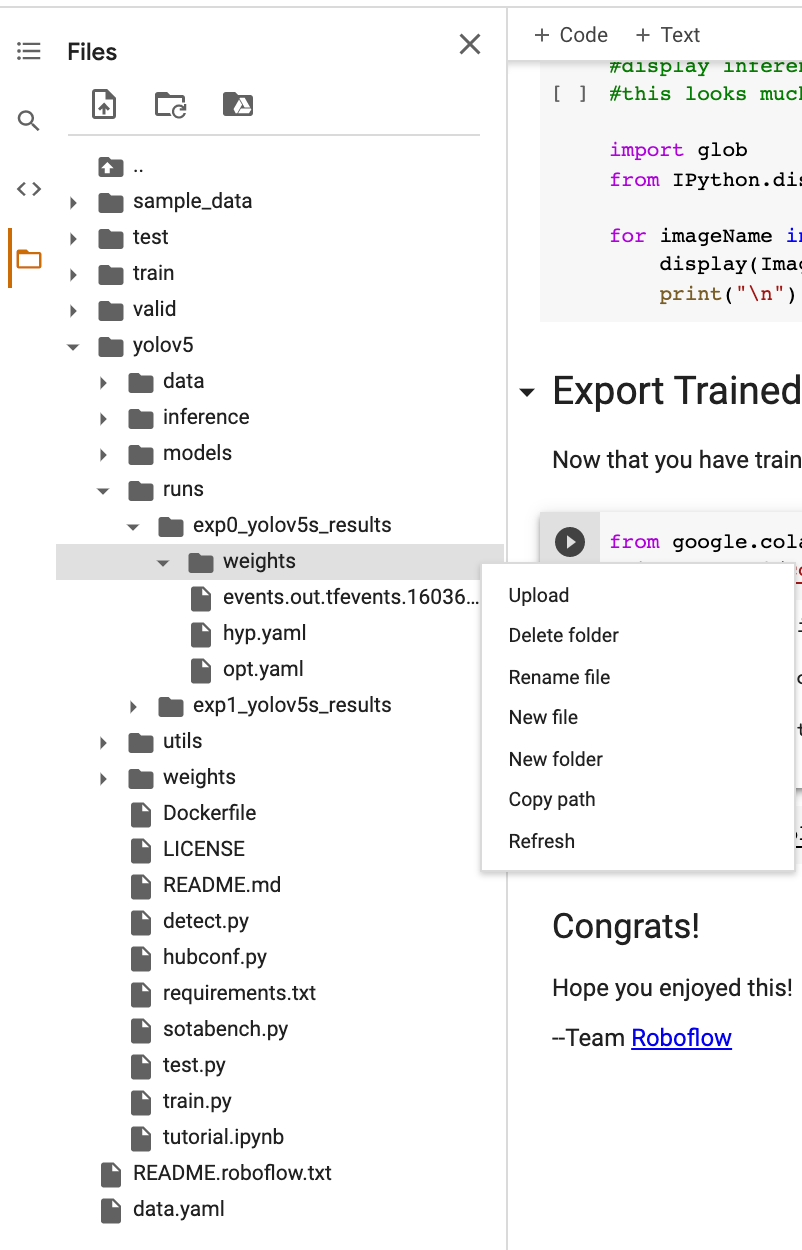
After training a model, the weights of that model are stored as a file in the Colab session. In our example YOLOv5 notebook, these weights are saved in the runs folder. Specifically, the file path is:
/content/yolov5/runs/exp0_yolov5s_results/weights/best.pt
where the weights are called best.pt.
(PRO TIP: To identify the file path of any file in Colab, you can use the navigation pane on the left, right click a given file, and select, "Copy file path.")
Download the Weights from Colab (Locally or to Google Drive)
Once we have the file path of our weights file, we can save this file locally or to our Google Drive. We recommend saving weights to your Google Drive.
How do you download a file from Google Colab? It's this simple:
from google.colab import files
files.download('example.txt')
How to download files from Google Colab to your computer.
where example.txt should be the file we want to download – in our case, we need to replace this with the path to our weights file.
We can also download and save files to our Google Drive, which may be a little more convenient as we may want to have our weights file available with our Google account.
How do you download a file from Google Colab to Google Drive? There's two steps.
First, connect your Google Drive to your Google Colab session by running the below. This will prompt you to visit a separate page and copy/paste an authorization code.
from google.colab import drive
drive.mount('/content/gdrive')
How to link your Google Drive in your Google Colab notebook.
Second, copy the file from your Google Colab notebook to your Google Drive. This requires us to specify (1) the path of the file we want to copy (our weights, in this case) and (2) the location of where we're saving the weights in our Google Drive.
In the snippet below, we're presuming we're using the YOLOv5 notebook model weights location and that we're saving them to the root directory of our Google Drive.
%cp /content/yolov5/runs/exp0_yolov5s_results/weights/best.pt /content/gdrive/My\ DriveCopy weights from the YOLOv5 notebook to Google Drive.
After running this cell, the weights will be available in our Google Drive as a file called best.pt.
Loading Model Weights in Colab
Once we have our weights saved, we may want to reload them in a later Google Colab session. Loading model weights requires that we have already built our model architecture and environment.
But, instead of using that architecture to train a new model, we will use that architecture to run inference on a new set of data.
In our case, we will again be basing our example on the YOLOv5 notebook for image recognition and object detection. (In the YOLOv5 notebook, we call inference when we call the detect.py script.)
Uploading Model Weights into a Colab Session
To add weights to our Colab session, we can either load weights from our local computer or from our Google Drive. We need to know the existing location of our model weights and, critically, where in our Colab notebook we are adding them. We'll walkthrough loading files from your local machine and loading files from Google Drive.
How do you upload files to Google Colab?
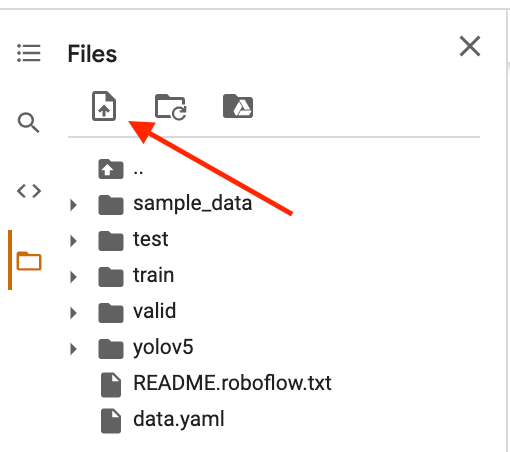
For files on your local machine, we'll use the user interface in Google Colab. In the upper left hand corner, select the folder icon to see the list of available folders in a given directory.
Here, there is an icon for uploading a file. Select this icon, and then select wherever the weights are on your local machine. (Note that this upload icon loads the file from your local directory to wherever you selected the upload icon.)
How do you upload a file to Google Colab from Google Drive?
Here, we need to first link our Google Drive and our Google Colab notebook using this code snippet in a cell (which will require an authorization code):
from google.colab import drive
drive.mount('/content/gdrive')
How to link your Google Drive in your Google Colab notebook.
Now, we can load our weights from our Google Drive into our Colab notebook. This requires knowing the file path of the weights in our Google Drive and where we want to copy the weights into our Colab session.
We'll assume the weights are at the base directory of our Google Drive (which is where we saved them in our prior example in this blog post). We will also assume we're loading the model weights into a directory in the YOLOv5 folder structure called weights.
To copy our weights (called best.pt) from Google Drive to our Colab notebook weights directory, we'll run this in a cell:
%cp /content/gdrive/My\ Drive/best.pt /content/yolov5/weightsCopy weights from our Google Drive to a folder called "weights" in our YOLO5 directory.
Using Our Uploaded Model Weights
Now that we have our model weights in our Colab Session, we can use them with our model. This requires running all cells to set up the model (in the YOLOv5 notebook, this is everything before running the train.py cell.)
We need to know the file path of our weights file, and pass that file path to our model running inference. In our YOLOv5 example above where we linked our Google Drive, we loaded our weights called best.pt into the content/yolov5/weights directory. Thus, the script where we use our model weights to call inference should reference this weights file path. It'd look like this:
!python detect.py --weights weights/best.pt --img 416 --conf 0.4 --source ../test/images
Voila! We now can save and load model weights from Google Colab to our Google Drive for faster experimentation.
Train in Colab with Roboflow's RF-DETR
You could also train RF-DETR, Roboflow's transformer-based detection architecture, using the open source rfdetr Python package. RF-DETR fine-tunes quickly from COCO-pretrained checkpoints, leads real-time models on the RF100-VL benchmark, and ships under a commercially permissive license. The save and load pattern shown here applies to any file in a Colab session.
Know Which Weights File to Save
Before saving anything, it helps to know what RF-DETR writes during training. The rfdetr package saves several checkpoints to your chosen output directory:
checkpoint.pth: the most recent epoch, including optimizer and scheduler state. Use this to resume training.checkpoint_best_ema.pth: the best validation score using EMA (exponential moving average) weights, a smoothed version of the parameters that often generalizes better.checkpoint_best_regular.pth: the best validation score using the raw weights.checkpoint_best_total.pth: the final stripped checkpoint, the better of EMA and regular, containing only model weights. Use this for inference and deployment.
The short version: save checkpoint.pth if you might continue training, and checkpoint_best_total.pth for everything else. Best-checkpoint selection uses validation box mAP; if that metric is new to you, see our mean average precision explainer.
Step 1: Train a Model in Colab
Create a notebook with a GPU runtime (Runtime, then Change runtime type, then T4 GPU) and install the packages:
pip install rfdetr roboflowYou need a dataset in COCO or YOLO format; the package detects the format automatically. The fastest path is exporting one from Roboflow, or forking one of the 200,000+ open datasets on Roboflow Universe:
import os
from roboflow import Roboflow

rf = Roboflow(api_key=os.getenv("ROBOFLOW_API_KEY"))
project = rf.workspace("your-workspace").project("your-project")
dataset = project.version(1).download("coco")
Store your API key in Colab's Secrets panel (the key icon in the left sidebar) rather than pasting it into a cell.
Step 2: Mount Google Drive Before Training, Not After
The classic mistake is training first and exporting afterward, which leaves a window where a disconnect destroys the run. Mount Google Drive first, then point the training output directory at it, so every checkpoint lands in Drive the moment it is written:
from google.colab import drive
drive.mount("/content/drive")
Colab prompts you to authorize access. Once mounted, your Drive appears at /content/drive/MyDrive.
Now train, with output_dir on Drive:
from rfdetr import RFDETRMedium

model = RFDETRMedium()

model.train(
    dataset_dir=dataset.location,
    epochs=50,
    batch_size=4,
    grad_accum_steps=4,
    lr=1e-4,
    output_dir="/content/drive/MyDrive/rfdetr-run",
    early_stopping=True,
)
On a Colab T4, batch_size=4 with grad_accum_steps=4 keeps the effective batch size at 16 while fitting in memory. Early stopping halts the run once validation mAP stops improving, which matters in an environment with a session clock. If the session dies mid-run anyway, nothing is lost: the checkpoints written so far are already sitting in Drive.
To find any file's path in Colab, open the file browser in the left sidebar, right click the file, and select Copy path.
Step 3: Download Weights to Your Computer
For a local copy, download any checkpoint directly from the notebook:
from google.colab import files
files.download("/content/drive/MyDrive/rfdetr-run/checkpoint_best_total.pth")
If you trained to a session-local directory instead of Drive, the same call works with that path; copy the file to Drive with a shell command if you want both:
cp /content/output/checkpoint_best_total.pth /content/drive/MyDrive/Step 4: Load Saved Weights in a New Session
In a fresh Colab session, install rfdetr, mount Drive again, and pass the checkpoint path as pretrain_weights:
from rfdetr import RFDETRMedium

model = RFDETRMedium(
    pretrain_weights="/content/drive/MyDrive/rfdetr-run/checkpoint_best_total.pth"
)

detections = model.predict("image.jpg")
The model loads with your fine-tuned parameters and is ready for inference immediately. No training cells need to re-run.
Step 5: Resume an Interrupted Training Run
Loading weights for inference and resuming training are different operations. To pick up a run where it stopped, pass the full training checkpoint to the resume argument, which restores the model weights, optimizer state, scheduler state, and epoch counter:
from rfdetr import RFDETRMedium

model = RFDETRMedium()

model.train(
    dataset_dir=dataset.location,
    epochs=50,
    batch_size=4,
    grad_accum_steps=4,
    lr=1e-4,
    output_dir="/content/drive/MyDrive/rfdetr-run",
    resume="/content/drive/MyDrive/rfdetr-run/checkpoint.pth",
)
Use resume with checkpoint.pth to continue an interrupted run. Use pretrain_weights with checkpoint_best_total.pth to start a fresh run initialized from your trained weights.
Step 6: Upload Your Weights to Roboflow
Google Drive keeps weights safe; it does not make them useful. Uploading the trained model to Roboflow turns the checkpoint into a hosted, versioned model you can call from an API, run on an edge device, or drop into a larger application:
import os
from rfdetr import RFDETRMedium

model = RFDETRMedium(
    pretrain_weights="/content/drive/MyDrive/rfdetr-run/checkpoint_best_total.pth"
)

model.deploy_to_roboflow(
    workspace="your-workspace",
    project_id="your-project",
    version=1,
    api_key=os.getenv("ROBOFLOW_API_KEY"),
)
Once uploaded, the model runs through the Serverless Hosted API with no infrastructure to manage, on your own hardware with open source Roboflow Inference (including Jetson and Raspberry Pi), or inside Roboflow Workflows, the low-code builder for chaining models and logic into a full application. Your weights stop being a file in a folder and become an endpoint.
Train in the Cloud Instead
Everything above manages a constraint that Roboflow training removes entirely. With Custom Training, you pick RF-DETR, click Start Training, and the run executes on hosted GPUs with no session clock. Weights are stored, versioned, and deployable the moment training finishes, with no mounting, copying, or downloading anywhere in the loop. Colab remains a good fit for custom training loops and experimentation; for the train-evaluate-deploy path, the platform does the bookkeeping for you. Get started free.
Happy training!
Cite this Post
Use the following entry to cite this post in your research:
Erik Kokalj. (Feb 3, 2026). How to Save and Load Model Weights in Google Colab. Roboflow Blog: https://blog.roboflow.com/how-to-save-and-load-weights-in-google-colab/