

If you set out to train YOLOv5 on a custom dataset, what you actually want is an object detector that works on your own images, without cloning a repo, editing a model config, or babysitting a Colab GPU. This guide gets you there in the browser: label your images, generate a dataset version, and train a model in the cloud.
The model you train is Roboflow's RF-DETR, a real-time detection transformer that fine-tunes fast, reaches state-of-the-art accuracy, and ships under a permissive Apache 2.0 license, so it goes to production without licensing friction.
We use a blood cell detection dataset (BCCD) as the running example, since finding and classifying red blood cells, white blood cells, and platelets is a clean stand-in for any task where you locate many objects in one frame. Swap in your own images at any step, the process is the same. If you'd still like to use YOLOv5, find the complete tutorial for that at the bottom of this post.
What Is YOLOv5?
YOLOv5 is a single-stage object detection model released in 2020, built in the PyTorch framework. It became popular because it trained quickly, ran fast, and was straightforward to use compared with the Darknet-based detectors before it.
How YOLOv5 Is Structured
YOLOv5 detects objects in a single forward pass with a CSP-based convolutional backbone, a feature-pyramid neck, and an anchor-based detection head. It ships in a range of sizes, YOLOv5s, m, l, and x, that trade speed for accuracy, and trains at input resolutions like 640x640 or 1280x1280. Training it the traditional way means cloning the repository, editing a YAML model config to set your class count and anchors, and running a training script on a GPU you provision yourself.
Where YOLOv5 Fits Today
YOLOv5 is a useful reference for how modern single-stage detectors are put together, and it is still fast. For a detector you plan to build on and deploy, transformer-based architectures now match or exceed it on accuracy while being simpler to train and ship.
That is why this guide trains RF-DETR. RF-DETR fine-tunes on a custom dataset in a fraction of the time a from-scratch training loop takes, runs in real time, and comes with a clean commercial license and a direct deployment path. You keep the real-time detection goal YOLOv5 was built for, without the repo, the config file, or the GPU setup that make the original hard to reproduce.
Training an object detector on your own images
The goal is a model that puts a labeled box around every object you care about. BCCD is 364 images with roughly 4,900 labels, which is small by deep learning standards. With transfer learning from a COCO-pretrained checkpoint, that is plenty: a few hundred well-labeled images gets you a working detector, no million-image dataset required. Follow the complete steps to train a custom RF-DETR model here. Here's a quick overview:
What you need
A free Roboflow account, some images (yours, or a public dataset), and a browser. To call the model from a script afterward, you also need Python locally. There is no repository to clone, no CUDA to match, and no GPU to rent.
Step 1: Create a project
Sign in, create a new project, set the type to Object Detection, and name your classes. The project is the home for your images, annotations, dataset versions, and trained models.
Step 2: Upload your images
Drag your images in. To skip collection and labeling, you can fork the BCCD dataset, or any of the 200,000-plus datasets on Roboflow Universe, into your workspace already labeled. If you upload your own images, Roboflow reads existing annotations in YOLOv5 PyTorch TXT, COCO, Pascal VOC, and other formats, or leaves them unlabeled for the next step.
Step 3: Annotate your images
Label any unlabeled images in Roboflow Annotate. Auto Label drafts annotations with a foundation model for you to review, and Label Assist pre-draws boxes as you go so you confirm rather than draw each one. Tight, consistent boxes move final accuracy more than any training setting.
Step 4: Generate a dataset version
A version freezes your labeled images together with preprocessing and augmentation, and Roboflow auto-splits them into train, validation, and test sets. Auto-orient and resize are worth applying to almost any dataset. Augmentations such as flips and small rotations expand a small dataset and reduce overfitting, and Roboflow updates every bounding box for you when it transforms an image.
Step 5: Train your model
Open Roboflow Custom Training, choose RF-DETR, and train from the COCO-pretrained checkpoint so the model starts with broad object knowledge and only learns your classes. This is transfer learning, and it is why a few hundred images is enough. Training runs on Roboflow's cloud, so there is nothing to configure, and a small dataset like BCCD usually finishes in under an hour.
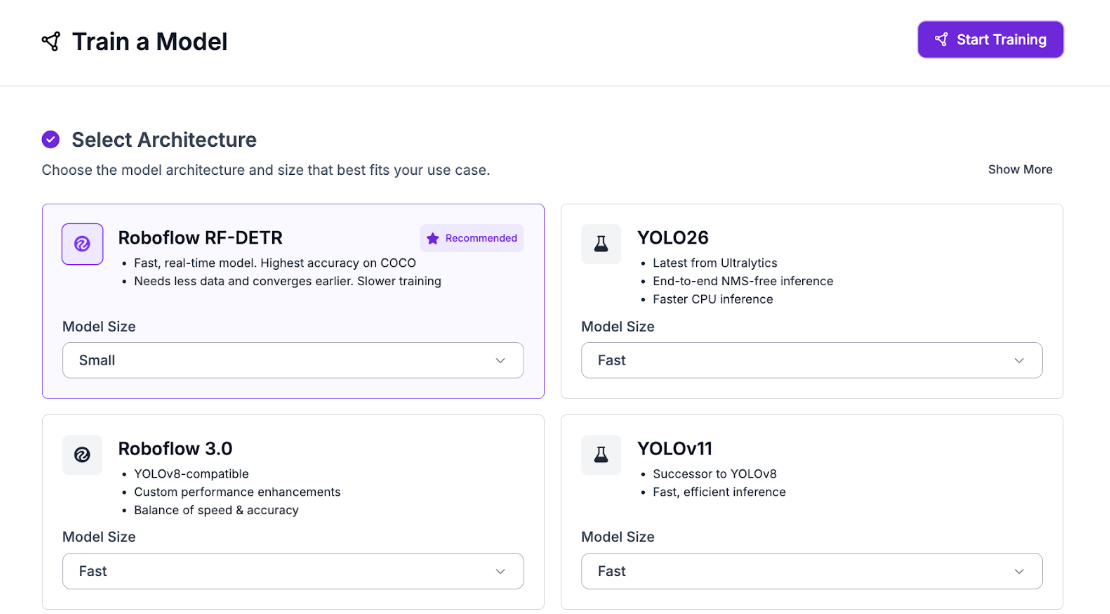
Try out RF-DETR in the interactive workflow below.
Step 6: Evaluate your model
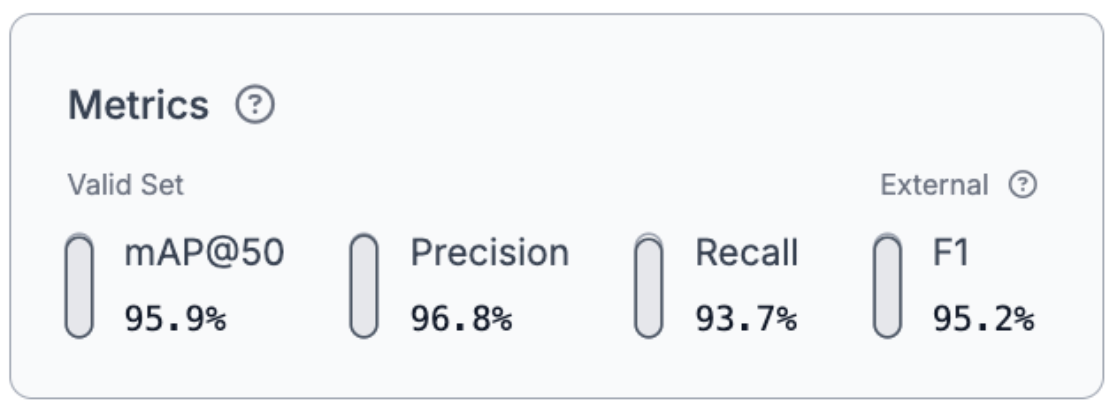
When training finishes, Roboflow reports mean average precision (mAP) on the held-out test set, with precision and recall. Read the per-class numbers, not just the overall figure: BCCD skews heavily toward red blood cells, so a model can post a healthy average while missing the rarer platelets. When a class lags, add or relabel examples of it and retrain. Two or three of these passes is what turns a promising model into a production-ready one.
Step 7: Run inference
Serve the trained model through the Serverless Hosted API and call it from a few lines of Python. Install the SDK:
pip install inference-sdk supervision
Then run the model on an image, with your API key supplied through an environment variable:
import os
import cv2
import supervision as sv
from inference_sdk import InferenceHTTPClient

client = InferenceHTTPClient(
    api_url="https://serverless.roboflow.com",
    api_key=os.getenv("ROBOFLOW_API_KEY"),
)

# model_id is "project-name/version", e.g. "your-project/1"
result = client.infer("image.jpg", model_id="your-project/1")

image = cv2.imread("image.jpg")
detections = sv.Detections.from_inference(result)

box_annotator = sv.BoxAnnotator()
label_annotator = sv.LabelAnnotator()
annotated = box_annotator.annotate(scene=image.copy(), detections=detections)
annotated = label_annotator.annotate(scene=annotated, detections=detections)
cv2.imwrite("annotated.png", annotated)
The supervision library handles drawing and post-processing so you are not writing box math by hand.
Step 8: Deploy to production
To run the model where your images are, Roboflow Inference is the open source engine that serves it on the cloud, on-prem, or at the edge on devices like NVIDIA Jetson, using the same model ID. To add application logic without building a service, Roboflow Workflows is a low-code builder for chaining the model with steps like filtering by class, counting, and triggering actions. And if you work with a coding agent, the Roboflow MCP server connects your workspace to tools like Claude Code, Codex, and Cursor over the Model Context Protocol.
Why RF-DETR for Custom Object Detection?
YOLOv5 was built for real-time detection that trains quickly, and it delivered for its era. RF-DETR reaches that goal with an architecture and workflow suited to production today. It fine-tunes fast, so the evaluate-and-retrain loop is quick. It runs in real time, so the model you train for analysis drops straight into a live pipeline. It ships under an Apache 2.0 license, so commercial deployment is unambiguous. And it lives in one platform from labeling to training to deployment, so there is no repo, config file, or separate serving stack to maintain.
Can I still train YOLOv5 in Roboflow?
Training YOLOv5 in Roboflow is deprecated for new projects. YOLOv5 inference is still supported: you can upload your own trained YOLOv5 weights to a Roboflow project and run them through the Serverless Hosted API for object detection or instance segmentation, or self-host with Roboflow Inference. Note that commercial use of YOLOv5 requires a license from its maintainers. Learn more in the YOLOv5 docs.
Train a YOLOv5 Model on a Custom Dataset
You can train a custom object detection model on your own images today, entirely in the browser, and have a deployable model in an afternoon. Create a free Roboflow account and start with your dataset or one from Universe.
YOLOv5 Custom Dataset Training
The YOLO family of object detection models grows ever stronger with the introduction of YOLOv5. In this post, we will walk through how you can train YOLOv5 to recognize your custom objects for your use case.
We use a public blood cell detection dataset, which you can export yourself. You can also use this tutorial on your own custom data.
To train our object detection model, we will:
- Install YOLOv5 dependencies
- Download Custom YOLOv5 Object Detection Data
- Define YOLOv5 Model Configuration and Architecture
- Train a custom YOLOv5 Detector
- Evaluate YOLOv5 performance
- Visualize YOLOv5 training data
- Run YOLOv5 Inference on test images
- Export Saved YOLOv5 Weights for Future Inference
On to training... We recommend following along concurrently in this YOLOv5 Colab Notebook.
You can train YOLOv5 models in a few lines of code and without labeling data using Autodistill, an open-source ecosystem for distilling large foundation models into smaller models trained on your data.
Check out our Autodistill guide for more information, and our Autodistill YOLOv5 documentation.
Installing the YOLOv5 Environment
To start off we first clone the YOLOv5 repository and install dependencies. This will set up our programming environment to be ready to running object detection training and inference commands.
!git clone https://github.com/ultralytics/yolov5  # clone repo
!pip install -U -r yolov5/requirements.txt  # install dependencies

%cd /content/yolov5
Then, we can take a look at our training environment provided to us for free from Google Colab.
import torch
from IPython.display import Image  # for displaying images
from utils.google_utils import gdrive_download  # for downloading models/datasets

print('torch %s %s' % (torch.__version__, torch.cuda.get_device_properties(0) if torch.cuda.is_available() else 'CPU'))
It is likely that you will receive a Tesla P100 GPU from Google Colab. Here is what we received:
torch 1.5.0+cu101 _CudaDeviceProperties(name='Tesla P100-PCIE-16GB', major=6, minor=0, total_memory=16280MB, multi_processor_count=56)The GPU will allow us to accelerate training time. Colab comes preinstalled with torch and cuda. If you are attempting this tutorial on local, there may be additional steps to take to set up YOLOv5.
Download Custom YOLOv5 Object Detection Data
In this tutorial we will download object detection data in YOLOv5 format from Roboflow. In the tutorial, we train YOLOv5 to detect cells in the blood stream with a public blood cell detection dataset. You can follow along with the public blood cell dataset or upload your own dataset.
Using Your Own Data
To export your own data for this tutorial, sign up for Roboflow and make a public workspace, or make a new public workspace in your existing account. If your data is private, you can upgrade to a paid plan for export to use external training routines like this one or experiment with using Roboflow's internal training solution.
To get started, label any unlabeled images. For free open source labeling tools, we recommend Roboflow Annotate or the following guides on getting started with LabelImg or getting started with CVAT annotation tools.
Try labeling ~50 images to proceed in this tutorial. You will want to label more images to improve your model's performance later.
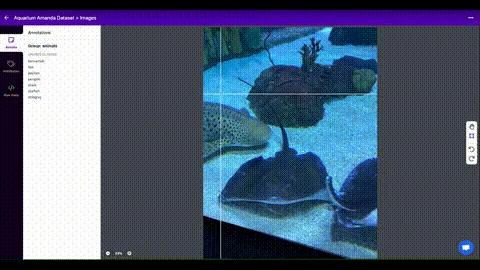
Once you have labeled data, to move your data into Roboflow, you can drag your dataset into the app in any format: (VOC XML, COCO JSON, TensorFlow Object Detection CSV, etc).
Roboflow also offers Auto Label, an automated labeling solution. With Auto Label, you can use foundation models like Grounding DINO and Segment Anything to automatically label images in your dataset. Refer to our Auto Label launch post for more information about how Auto Label works, and how you can use it with your project.
Once uploaded you can choose preprocessing and augmentation steps:
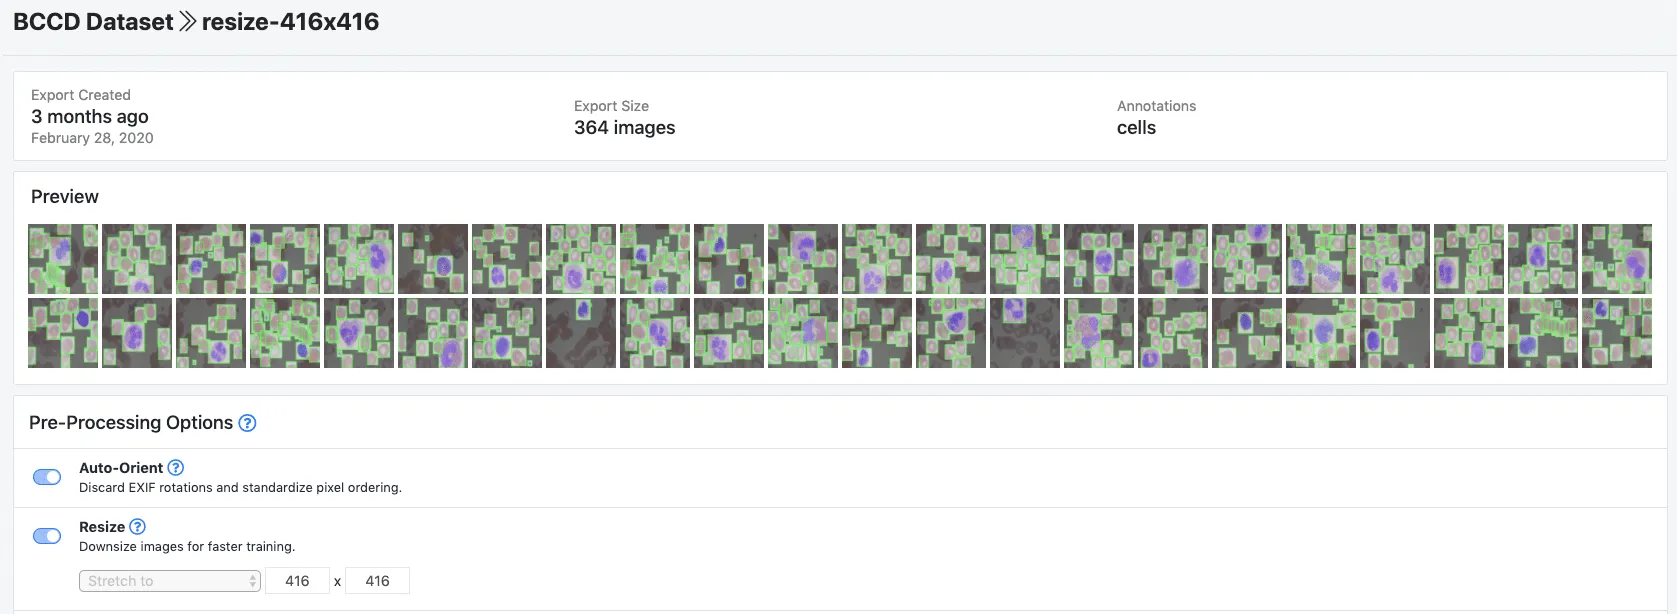
Then, click Generate and Download and you will be able to choose YOLOv5 PyTorch format.
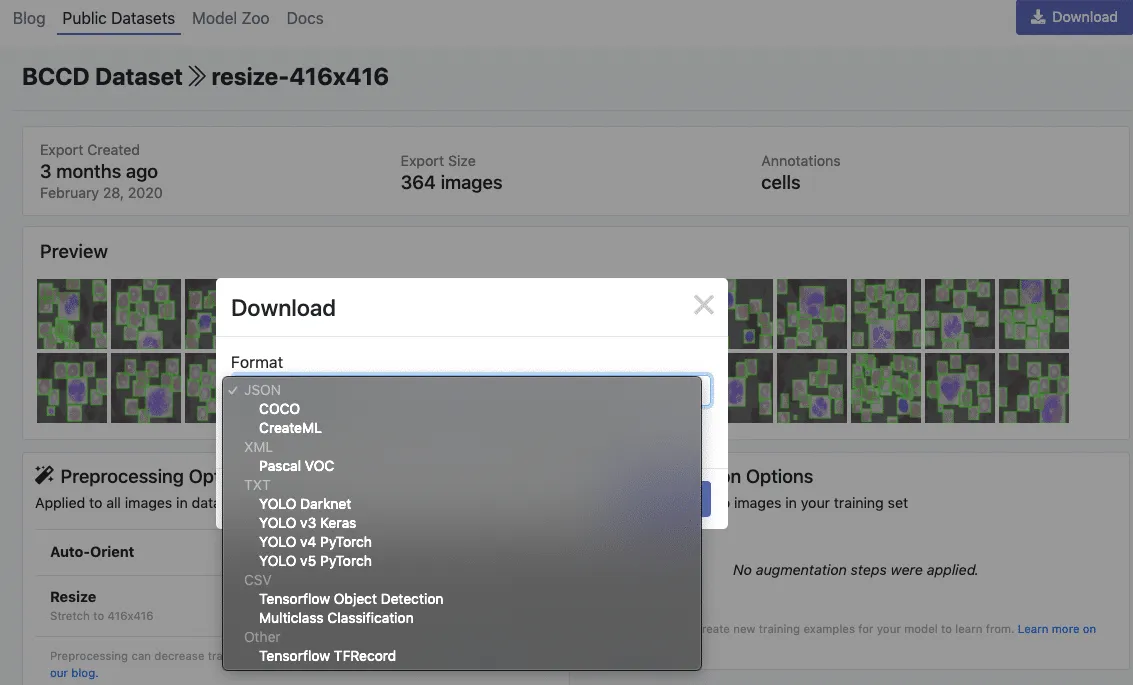
When prompted, select "Show Code Snippet." This will output a download curl script so you can easily port your data into Colab in the proper format.
curl -L "https://public.roboflow.com/ds/YOUR-LINK-HERE" > roboflow.zip; unzip roboflow.zip; rm roboflow.zip
****Note you can now also download your data with the Roboflow PIP Package
#from roboflow import Roboflow
#rf = Roboflow(api_key="YOUR API KEY HERE")
#project = rf.workspace().project("YOUR PROJECT")
#dataset = project.version("YOUR VERSION").download("yolov5")
Downloading in Colab...
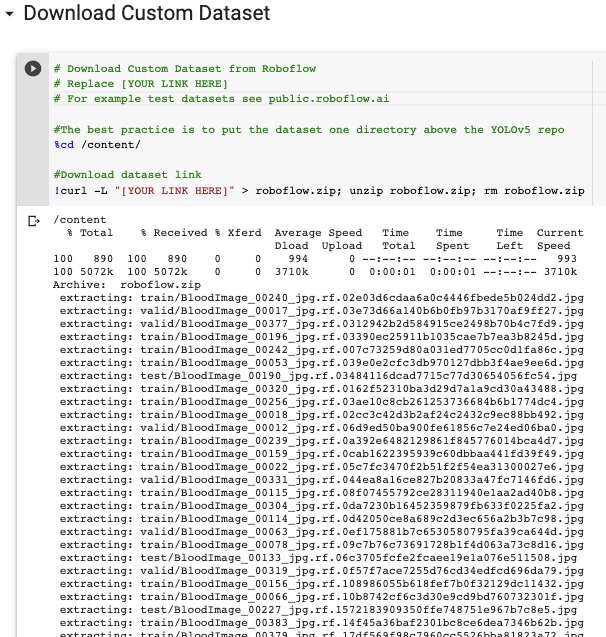
The export creates a YOLOv5 .yaml file called data.yaml specifying the location of a YOLOv5 images folder, a YOLOv5 labels folder, and information on our custom classes.
Define YOLOv5 Model Configuration and Architecture
Next we write a model configuration file for our custom object detector. For this tutorial, we chose the smallest, fastest base model of YOLOv5. You have the option to pick from other YOLOv5 models including:
- YOLOv5s
- YOLOv5m
- YOLOv5l
- YOLOv5x
You can also edit the structure of the network in this step, though rarely will you need to do this. Here is the YOLOv5 model configuration file, which we term custom_yolov5s.yaml:
nc: 3
depth_multiple: 0.33
width_multiple: 0.50

anchors:
  - [10,13, 16,30, 33,23]
  - [30,61, 62,45, 59,119]
  - [116,90, 156,198, 373,326]

backbone:
  [[-1, 1, Focus, [64, 3]],
   [-1, 1, Conv, [128, 3, 2]],
   [-1, 3, Bottleneck, [128]],
   [-1, 1, Conv, [256, 3, 2]],
   [-1, 9, BottleneckCSP, [256]],
   [-1, 1, Conv, [512, 3, 2]],
   [-1, 9, BottleneckCSP, [512]],
   [-1, 1, Conv, [1024, 3, 2]],
   [-1, 1, SPP, [1024, [5, 9, 13]]],
   [-1, 6, BottleneckCSP, [1024]],
  ]

head:
  [[-1, 3, BottleneckCSP, [1024, False]],
   [-1, 1, nn.Conv2d, [na * (nc + 5), 1, 1, 0]],
   [-2, 1, nn.Upsample, [None, 2, "nearest"]],
   [[-1, 6], 1, Concat, [1]],
   [-1, 1, Conv, [512, 1, 1]],
   [-1, 3, BottleneckCSP, [512, False]],
   [-1, 1, nn.Conv2d, [na * (nc + 5), 1, 1, 0]],
   [-2, 1, nn.Upsample, [None, 2, "nearest"]],
   [[-1, 4], 1, Concat, [1]],
   [-1, 1, Conv, [256, 1, 1]],
   [-1, 3, BottleneckCSP, [256, False]],
   [-1, 1, nn.Conv2d, [na * (nc + 5), 1, 1, 0]],

   [[], 1, Detect, [nc, anchors]],
  ]
Training Custom YOLOv5 Detector
With our data.yaml and custom_yolov5s.yaml files ready, we can get started with training.
To kick off training we running the training command with the following options:
- img: define input image size
- batch: determine batch size
- epochs: define the number of training epochs.
- data: set the path to our yaml file
- cfg: specify our model configuration
- weights: specify a custom path to weights. (Note: you can download weights from the Ultralytics Google Drive folder)
- name: result names
- nosave: only save the final checkpoint
- cache: cache images for faster training
And run the training command:
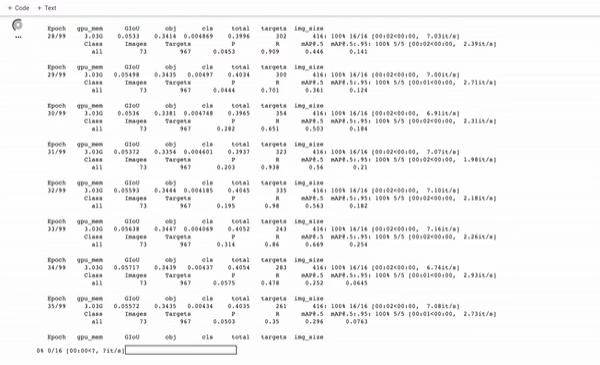
During training, you want to be watching the mAP@0.5 to see how your detector is performing - see this post on breaking down mAP.
Evaluate Custom YOLOv5 Detector Performance
Now that we have completed training, we can evaluate how well the training procedure performed by looking at the validation metrics. The training script will drop tensorboard logs in runs. We visualize those here:
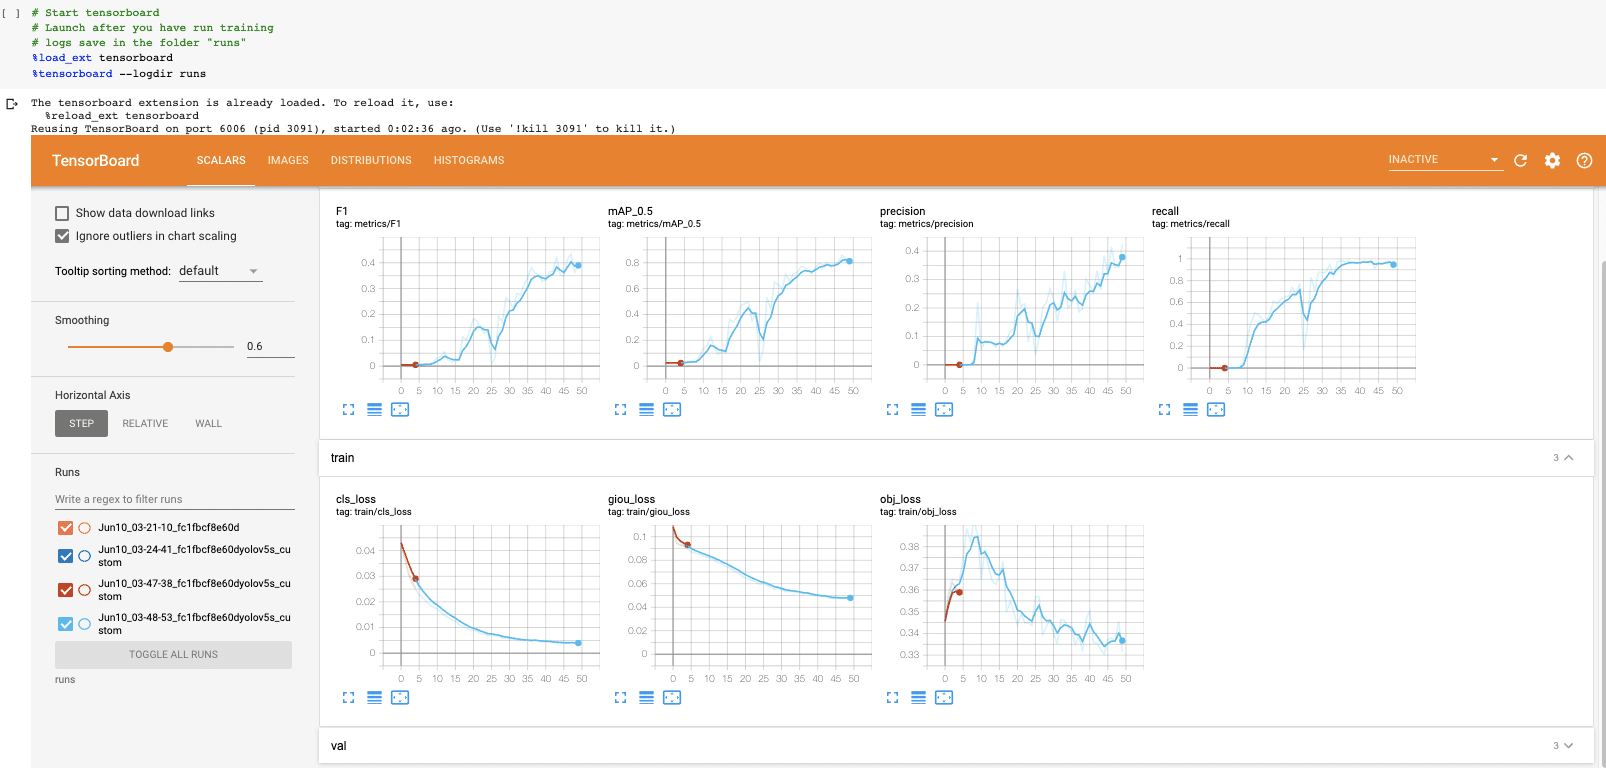
And if you can't visualize Tensorboard for whatever reason the results can also be plotted with utils.plot_results and saving a result.png.
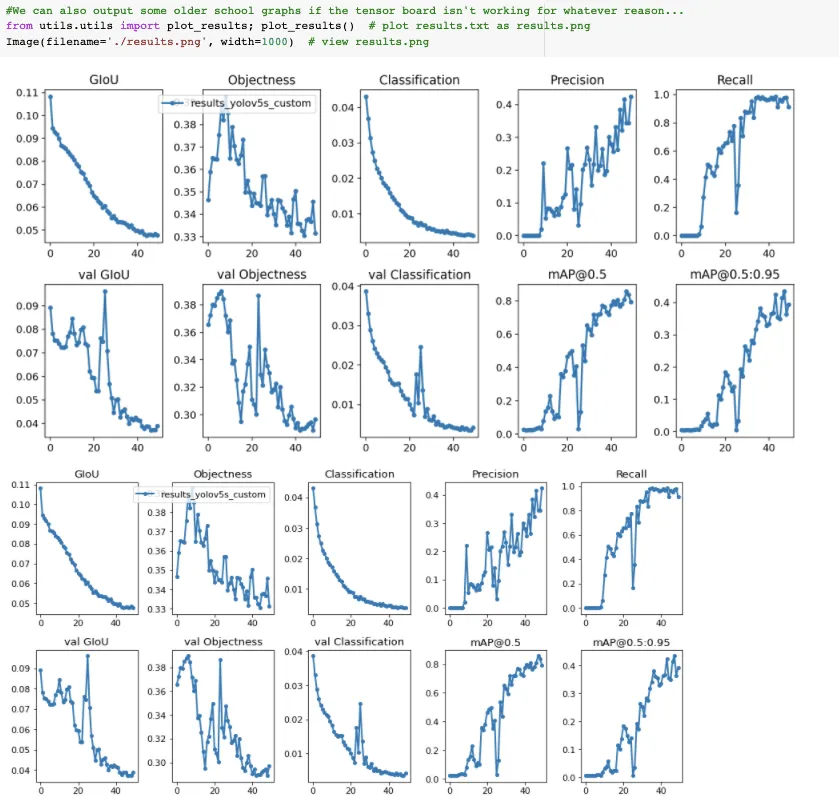
We stopped training a little early here. You want to take the trained model weights at the point where the validation mAP reaches its highest.
Visualize YOLOv5 training data
During training, the YOLOv5 training pipeline creates batches of training data with augmentations. We can visualize the training data ground truth as well as the augmented training data.
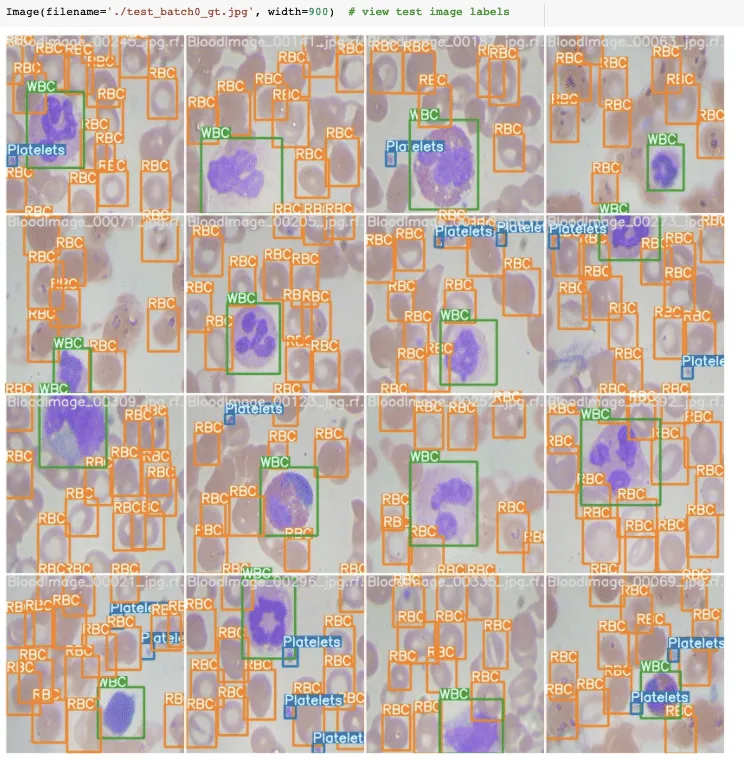
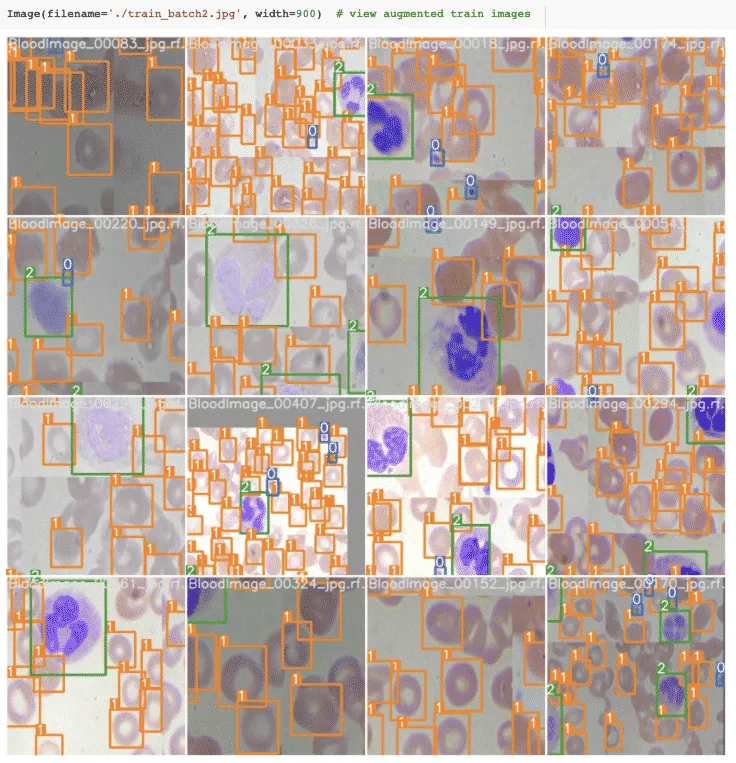
Run YOLOv5 Inference on Test Images
Now we take our trained model and make inference on test images. After training has completed model weights will save in weights/.
For inference we invoke those weights along with a conf specifying model confidence (higher confidence required makes less predictions), and a inference source. source can accept a directory of images, individual images, video files, and also a device's webcam port. For source, I have moved our test/*jpg to test_infer/.
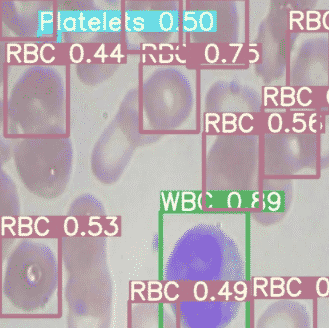
!python detect.py --weights weights/last_yolov5s_custom.pt --img 416 --conf 0.4 --source ../test_inferThe inference time is extremely fast. On our Tesla P100, the YOLOv5 is reaching 142 FPS.
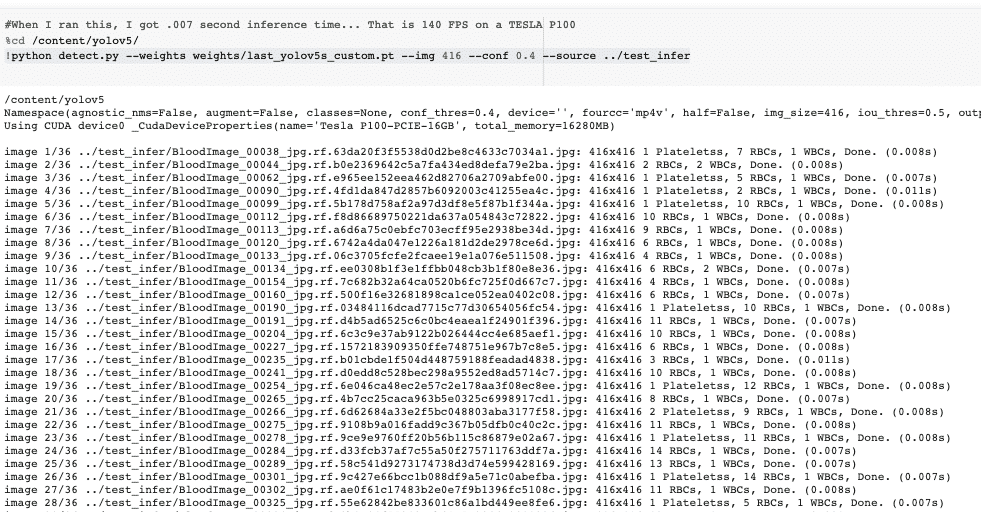
Finally, we visualize our detectors inferences on test images.
Export Saved YOLOv5 Weights for Future Inference
Now that our custom YOLOv5 object detector has been verified, we might want to take the weights out of Colab for use on a live computer vision task. To do so we import a Google Drive module and send them out.
from google.colab import drive
drive.mount('/content/gdrive')

%cp /content/yolov5/weights/last_yolov5s_custom.pt /content/gdrive/My\ Drive
Deploy to Roboflow
Once you have finished training your YOLOv5 model, you’ll have a set of trained weights ready for use with a hosted API endpoint. These weights will be in the “/runs/detect/train/weights/best.pt” folder of your project. You can upload your model weights to Roboflow Deploy with the deploy() function in the Roboflow pip package to use your trained weights.
To upload model weights, first create a new project on Roboflow, upload your dataset, and create a project version. Check out our complete guide on how to create and set up a project in Roboflow. Then, write a Python script with the following code:
import roboflow

roboflow.login()

rf = roboflow.Roboflow()

project = rf.workspace().project(PROJECT_ID)

project.version(DATASET_VERSION).deploy(model_type=”yolov5”, model_path=f”{HOME}/runs/detect/train/”)
Replace PROJECT_ID with the ID of your project and DATASET_VERSION with the version number associated with your project. Learn how to find your project ID and dataset version number.
Shortly after running the above code, your model will be available for use in the Deploy page on your Roboflow project dashboard.
Deploy Your Model to the Edge
In addition to using the Roboflow hosted API for deployment, you can use Roboflow Inference, an open source inference solution that has powered millions of API calls in production environments. Inference works with CPU and GPU, giving you immediate access to a range of devices, from the NVIDIA Jetson to TRT-compatible devices to ARM CPU devices.
With Roboflow Inference you can self-host and deploy your model on-device. You can deploy applications using the Inference Docker containers or the pip package. In this guide, we are going to use the Inference Docker deployment solution. First, install Docker on your device. Then, review the Inference documentation to find the Docker container for your device.
For this guide, we'll use the GPU Docker container:
docker pull roboflow/roboflow-inference-server-gpuThis command will download the Docker container and start the inference server. This server is available at http://localhost:9001. To run inference, we can use the following Python code:
import requests

workspace_id = ""
model_id = ""
image_url = ""
confidence = 0.75
api_key = ""

infer_payload = {
    "image": {
        "type": "url",
        "value": image_url,
    },
    "confidence": confidence,
    "iou_threshold": iou_thresh,
    "api_key": api_key,
}
res = requests.post(
    f"http://localhost:9001/{workspace_id}/{model_id}",
    json=infer_object_detection_payload,
)

predictions = res.json()
Above, set your Roboflow workspace ID, model ID, and API key.
Also, set the URL of an image on which you want to run inference. This can be a local file.
To use your YOLOv5 model commercially with Inference, you will need a Roboflow Enterprise license, through which you gain a pass-through license for using YOLOv5. An enterprise license also grants you access to features like advanced device management, multi-model containers, auto-batch inference, and more.
To learn more about deploying commercial applications with Roboflow Inference, contact the Roboflow sales team.


Cite this Post
Use the following entry to cite this post in your research:
Erik Kokalj. (Jan 10, 2026). How to Train a YOLOv5 Model On a Custom Dataset. Roboflow Blog: https://blog.roboflow.com/how-to-train-yolov5-on-a-custom-dataset/