
EfficientNet is a convolutional neural network architecture from Google Brain that scales width, depth, and input resolution together to maximize classification accuracy per parameter count. This tutorial trains an EfficientNet model in Keras on Google Colab using a public rock-paper-scissors dataset sourced from Roboflow, covering dataset import, training configuration, results inspection, and running inference on new images. The same notebook structure applies directly to any custom classification dataset by changing a single import line.
In this tutorial, we will train state of the art EfficientNet convolutional neural network, to classify images, using a custom dataset and custom classifications. To run this tutorial on your own custom dataset, you need to only change one line of code for your dataset import.
Today, we will train EfficientNet using a Keras framework in Google Colab. We train our classifier to recognize rock, paper, scissors hand gestures - but the tutorial is written generally so you can use this approach to classify your images into any classification type, given the right supervision in your dataset.
What is EfficientNet?
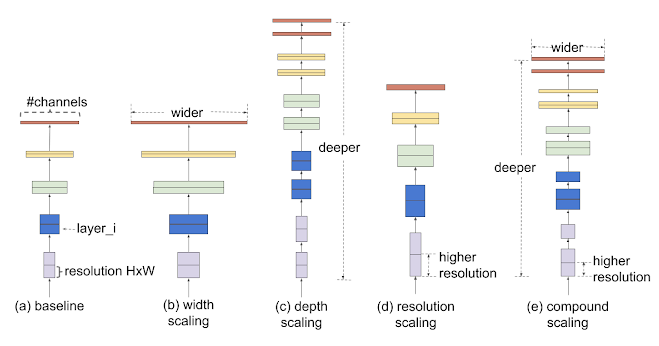
EfficientNet is a convolutional neural network from the Google Brain team, introduced in the 2019 paper EfficientNet: Rethinking Model Scaling for Convolutional Neural Networks. Its central idea is compound scaling: rather than growing a network along one axis, you scale width, depth, and input resolution together with a fixed ratio, which produces a family of models, B0 through B7, that stay near the accuracy-per-compute frontier at every size.
EfficientNet became a default classification backbone because it hit top ImageNet accuracy with far fewer parameters than earlier networks, and it is the backbone the EfficientDet object detector builds on. Pretrained on ImageNet, an EfficientNet model already understands general visual features, which is what makes it a strong starting point for a custom classifier.
Where EfficientNet fits today
EfficientNet is still a strong, efficient classification backbone and a clear reference for how model scaling works. For a new classification project, it now sits alongside Vision Transformers, ConvNeXt, and zero-shot options like CLIP that classify from text prompts with no training.
You do not need to hand-configure any of these in a framework to get a working classifier: Roboflow trains an image classification model for you from an ImageNet-pretrained checkpoint, so you get the transfer-learning benefit EfficientNet popularized without managing the training code.
Training a Custom Image Classification Model in Roboflow
Image classification assigns one label (or a set of labels) to a whole image, answering what is this a picture of. That is different from object detection, which draws a box around each object and is the right tool when you need to locate or count things. Our rock, paper, scissors example is pure single-label classification: each image is exactly one gesture, and the model outputs a probability for each class, with the highest one taken as the prediction.
What You Need
A free Roboflow account, a set of images sorted by the classes you care about, and a browser. There is no TensorFlow, Keras, notebook, or GPU to set up.
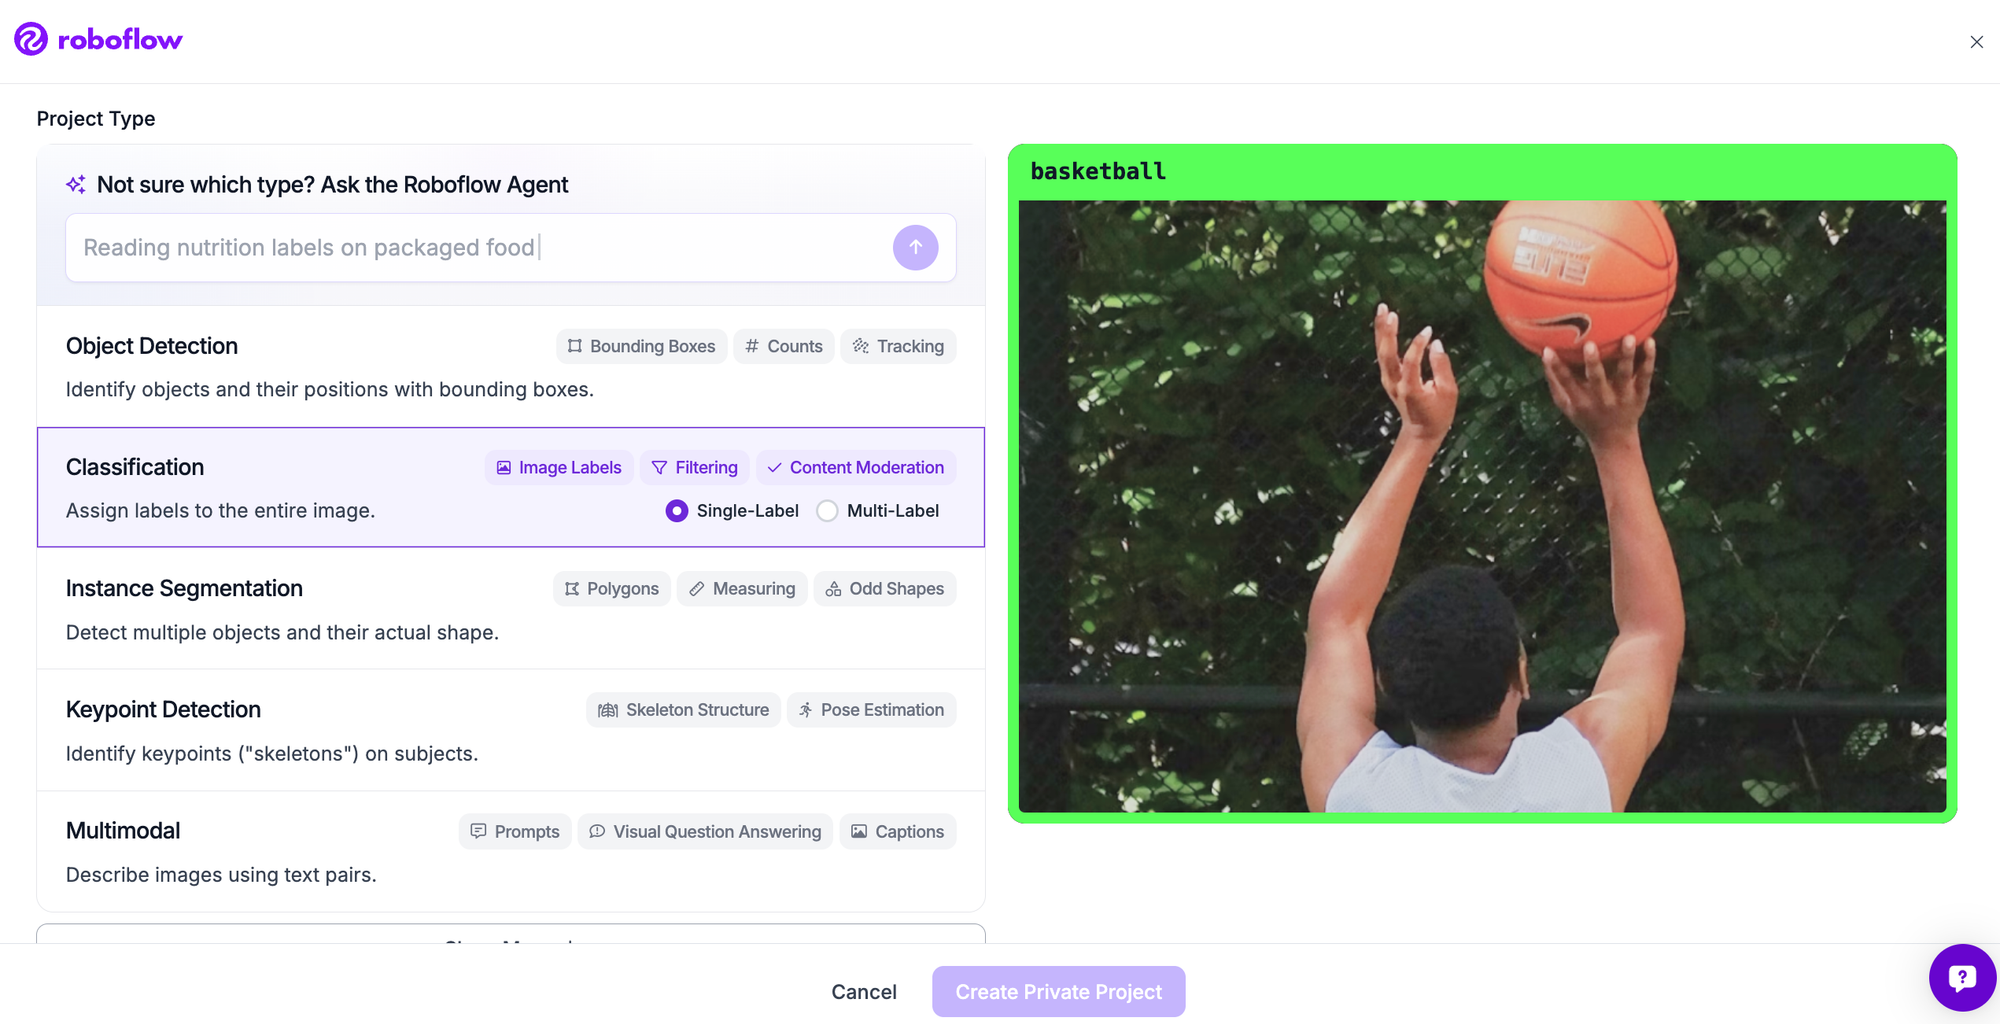
Step 1: Create a Classification Project
Sign in to Roboflow, create a new project, and set the project type to Classification. Choose single-label if each image belongs to exactly one class (rock, paper, or scissors), or multi-label if an image can carry more than one tag. Name your classes.
Step 2: Add Your Images
Upload your images, grouped by class. For a running start, Roboflow Universe hosts a large library of open datasets you can fork. If your images are not yet sorted into classes, you can label them in the next step.
Step 3: Label Your Images
For classification, a label is the class assigned to the whole image rather than a box. You can assign classes in the Roboflow interface, or automate the first pass: Autodistill uses a foundation model like CLIP to label an unlabeled image folder from a short list of text prompts, so you review and correct instead of sorting every image by hand. Consistent labels are the biggest lever on final accuracy.
Step 4: Generate a Dataset Version
A version freezes your labeled images together with preprocessing and augmentation, and Roboflow auto-splits them into train, validation, and test sets. Resize standardizes input dimensions. Augmentation is especially effective for classification: brightness, contrast, rotation, and noise all expand a small dataset and reduce overfitting, and you apply them with a click rather than a script. Keep your validation and test sets clean so your accuracy numbers reflect real images.
Step 5: Train Your Model
Open Roboflow Training and start a classification training job. Classification models train from an ImageNet-pretrained checkpoint, so the network begins with broad visual knowledge and only has to learn your classes. Training runs in the cloud, so there is nothing to install and no GPU to rent, and you get an email when it finishes.
Step 6: Evaluate Your Model
When training completes, Roboflow reports accuracy on the held-out test set along with a confusion matrix that shows which classes get mixed up. Read the per-class results, not just the overall number: for rock, paper, scissors, the model may confuse two visually similar gestures more than the third. If a class underperforms or a pair keeps getting confused, add or relabel examples for it and retrain. Two or three of these passes is what moves a model from promising to production-ready.
Step 7: Deploy Your Model
Once a version performs, run it without standing up any infrastructure. The Serverless Hosted API serves your classifier behind an endpoint you can call from any language, returning the predicted class and confidence for each image. To run where your images are, Roboflow Inference is the open source engine that serves the model on the cloud, on-prem, or on edge devices like NVIDIA Jetson, which suits the smaller, faster classifiers that real-time and on-device use call for.
Why Train a Classifier in Roboflow?
EfficientNet made the case that a well-scaled network pretrained on ImageNet transfers well to new classification tasks. Roboflow gives you that benefit without the parts that make the original hard to reproduce.
There is no framework to pin to an old version, no notebook that expires, and no GPU environment to match. You label, generate a version, and train from an ImageNet checkpoint in the browser, then deploy to the cloud or the edge from the same place, so the whole path from images to a running classifier lives in one platform.
Custom Classification with an EfficientNet Model
In our tutorial we will be training a model to classify rock, paper, scissors hand gestures in the popular game.

Import EfficientNet Dependencies
As you are working through this tutorial, I recommend opening this Colab Notebook Training EfficientNet in tandem. This notebook is based on the original tutorial by DLogogy and has been updated to fix software versioning and the dataset import and creation now easily flows through with Roboflow.
First, make a copy of the notebook so you can edit, and make sure you select your Runtime Type --> GPU to utilize free GPU resources.
The first step we take in the notebook is to select the correct tensorflow environment, the codebase is still running on tensorflow 1.x. We also check our keras version, in this pass we are using keras 2.3.1. Then we import some packages and clone the EfficientNet keras repository.
Import EfficientNet and Choose EfficientNet Model
The biggest contribution of EfficientNet was to study how ConvNets can be efficiently scaled up. In this notebook, you can take advantage of that fact!
In the line from efficientnet import EfficientNetB0 as Net you can choose between the size of model you would like to use. Choose from among EfficientNetB0, EfficientNetB1, EfficientNetB2, EfficientNetB3. The larger the better performance, but watch out training time will slow down with larger models and you may run out of GPU memory with the free Colab GPUs.
Next, before loading the model, we choose the input resolution. We start with 150 x 150 here for GPU memory and to get a feel for the classification script, but it may be useful to scale this up on your task later.
Creating a Custom EfficientNet Training Dataset
To follow along with this tutorial, we recommend using this public rock, paper, scissors dataset. For the purposes of our tutorial, we are only going to train on a small subset of 25 images, so we filter accordingly. We pass our data through a training generator to prepare the data for train time.
Importantly, during the creation of our training generator we set the batch_size that our model will be using during training. The higher batch size the more images you pass through at a time and training will run faster, but you may max out the memory that the Colab GPU can handle.
1. Creating a Custom EfficientNet Training Job
Next we set up the infrastructure to run a training job on our dataset. We choose the number of epochs to train for. The more epochs, the better your model is likely to fit your data but training will run for longer.
Next, we set up the network to build the correct number of layers for the number of classes we have in our dataset.
Here is a summary of our model's architecture:
Model: "sequential_1"
_________________________________________________________________
Layer (type)                 Output Shape              Param #
=================================================================
efficientnet-b0 (Model)      (None, 5, 5, 1280)        4049564
_________________________________________________________________
gap (GlobalMaxPooling2D)     (None, 1280)              0
_________________________________________________________________
dropout_out (Dropout)        (None, 1280)              0
_________________________________________________________________
fc_out (Dense)               (None, 3)                 3843
=================================================================
Total params: 4,053,407
Trainable params: 3,843
Non-trainable params: 4,049,564
EfficientNet model architecture built in this tutorial
2. Run Custom EfficientNet Training
Now that we have imported our dataset and set up the training job, we are ready to train our custom classification model!
We reference the train_generator and the number of epochs and kick off training.
Epoch 1/50
22/25 [=========================>....] - ETA: 1s - loss: 3.6326 - acc: 0.2632Epoch 1/50
25/25 [==============================] - 3s 101ms/step - loss: 4.7799 - acc: 0.1978
25/25 [==============================] - 12s 470ms/step - loss: 3.5314 - acc: 0.2727 - val_loss: 4.7799 - val_acc: 0.1978
Epoch 2/50
21/25 [========================>.....] - ETA: 0s - loss: 3.2819 - acc: 0.3205Epoch 1/50
25/25 [==============================] - 1s 51ms/step - loss: 4.8272 - acc: 0.2308
25/25 [==============================] - 3s 114ms/step - loss: 3.0902 - acc: 0.3407 - val_loss: 4.8272 - val_acc: 0.2308
Epoch 3/50
24/25 [===========================>..] - ETA: 0s - loss: 2.4715 - acc: 0.3214Epoch 1/50
25/25 [==============================] - 1s 55ms/step - loss: 4.4176 - acc: 0.2418
25/25 [==============================] - 3s 109ms/step - loss: 2.4724 - acc: 0.3068 - val_loss: 4.4176 - val_acc: 0.2418
Epoch 4/50
24/25 [===========================>..] - ETA: 0s - loss: 2.0287 - acc: 0.4253Epoch 1/50
25/25 [==============================] - 1s 56ms/step - loss: 4.1211 - acc: 0.2527
25/25 [==============================] - 3s 120ms/step - loss: 2.0432 - acc: 0.4066 - val_loss: 4.1211 - val_acc: 0.2527
Epoch 5/50
23/25 [==========================>...] - ETA: 0s - loss: 2.2813 - acc: 0.3625Epoch 1/50
25/25 [==============================] - 1s 54ms/step - loss: 4.1572 - acc: 0.2527
25/25 [==============================] - 3s 103ms/step - loss: 2.2516 - acc: 0.3750 - val_loss: 4.1572 - val_acc: 0.2527
Epoch 6/50
23/25 [==========================>...] - ETA: 0s - loss: 2.6184 - acc: 0.3976Epoch 1/50
25/25 [==============================] - 1s 54ms/step - loss: 4.0033 - acc: 0.2527
25/25 [==============================] - 3s 118ms/step - loss: 2.6760 - acc: 0.3736 - val_loss: 4.0033 - val_acc: 0.2527
Running classification training
If you see your training hanging for more that 10 minutes on Epoch 1/50, then you may have run out of GPU memory, though the error is not exposed. You may need to reduce the size of the training set, reduce the batch size, etc.
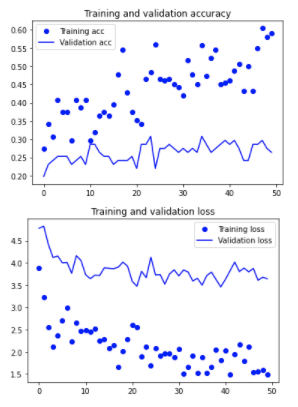
As training is running, you want to watch your train loss moving downwards and the validation accuracy increasing. Validation accuracy is measured on a portion of your dataset that the model has never seen.
3. Examine EfficientNet Training Results
After training your custom EfficientNet classification model, you will be able to view the graph of your training job
4. Fine Tuning Custom EfficientDet Model
Lastly, we can fine tune the last few layers of our network, hopefully to squeeze out some additional performance. This means that most of the network doesn't change but the last few parameters that are contributing the most to the class prediction.
5. Use Custom EfficientNet Model for Inference
And now the best part! We can run a test image through our custom EfficientNet model for test inference. When we pass the image through the classifier it will return a series of probabilities associated with each of the possible classifications. We can assume the maximum probability is the models prediction for that class.
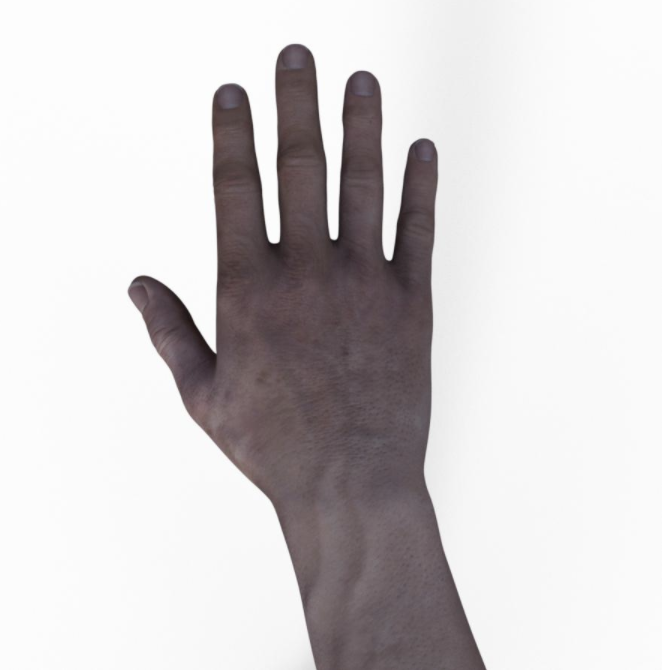
Our test image yields through inference:
('paper', 0.9996512, array([[9.9965119e-01, 1.3654739e-04, 2.1229258e-04]], dtype=float32))Our classifier identifies the above image as paper with 99.9% probability!
6. Save Custom EfficientNet Model Weights for Posterity
Lastly, we save our classification model's weights and export for future use in an application.
We also provide an example in the notebook of how to load the model back in for future inference.
How to Train EfficientNet Conclusion
Congratulations, now you now how to train an image classification model on your own images today, entirely in the browser, and have a deployable model in an afternoon. Create a free Roboflow account and start with your own images or a dataset from Universe.
Happy classifying 🧐
Related reading:
Cite this Post
Use the following entry to cite this post in your research:
Erik Kokalj. (Feb 3, 2026). How to Train an EfficientNet Model with a Custom Dataset. Roboflow Blog: https://blog.roboflow.com/how-to-train-efficientnet/