
FastViT is an image classification model released by Apple in August 2023 that uses a Vision Transformer architecture optimized for latency, running 3.5x faster than CMT and 4.9x faster than EfficientNet on mobile hardware at comparable ImageNet accuracy. This guide covers running FastViT inference via the autodistill-fastvit wrapper, which also enables automatic dataset labeling: FastViT classifies images in a folder and writes out labeled data that can be uploaded to Roboflow for further curation or use in training a downstream model.
Image classification is one of the main tasks in the field of computer vision. In image classification, a model aims to say how relevant given labels are to an image. An image can be assigned zero, one, or multiple labels depending on how similar the model thinks the labels on which it was trained are to a given image.
Apple released FastViT earlier this year, a fast model with which you can classify images. This model can be run both in Python using PyTorch and using CoreML, Apple’s on-device machine learning framework.
In this guide, we are going to show you how to use FastViT to classify images. We are going to use the autodistill-fastvit package, which sets up everything you need to use FastVit. autodistill-fastvit also includes the tools you need to train a model using images labeled with FastViT in a few lines of code. Training FastViT models is out of scope. But, you can find commands to train FastViT models in the Apple FastViT README.
Without further ado, let’s get started!
What is FastViT?
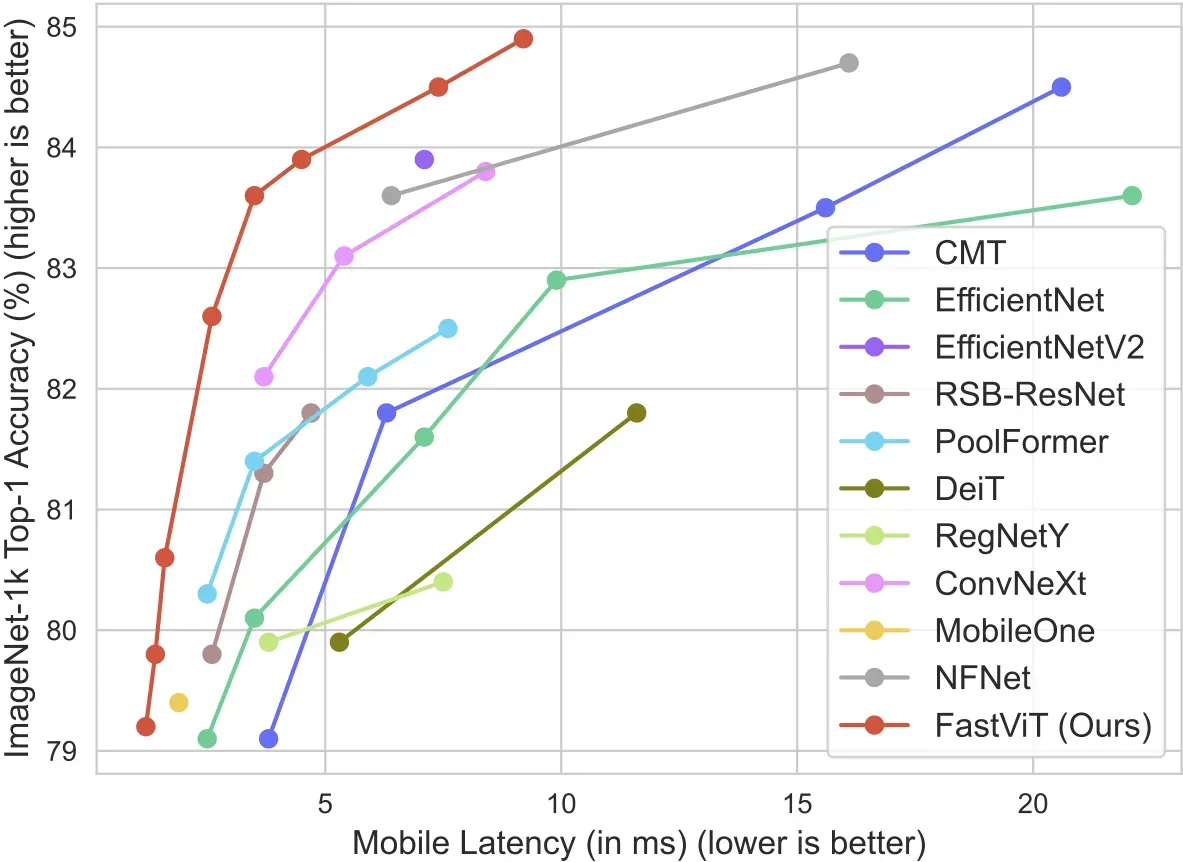
In August 2023, Apple released FastViT, a new Vision Transformer for use in classifying images. FastViT was trained on the ImageNet-1k dataset, and is thus capable of identifying the 1,000 unique classes in that dataset. The model gets its name from “state-of-the-art latency-accuracy trade-off” reported in the abstract of the FastViT paper.
According to the paper, FastVit is “3.5x faster than CMT, a recent state-of-the-art hybrid transformer architecture, 4.9x faster than EfficientNet, and 1.9x faster than ConvNeXt on a mobile device for the same accuracy on the ImageNet dataset”, making the model an excellent candidate for use in image classification.
How to Use FastViT
The original FastViT repository contains some limited code with which you can load FastViT, but the usage example does not include inference code.
Since the paper and associated code was released, timm, a Python package that implements several vision functions like layers, optimizers, and data loaders, made an implementation available on Hugging Face Hub.
Roboflow then integrated the model into Autodistill, a framework that enables you to run inference on and label data with state of the art foundation models in a few lines of code.
In this guide, we will show you how to use FastViT with autodistill-fastvit. If you want to use the project from source, check out the Apple FastViT repository.
Step #1: Install FastViT
To install the Autodistill FastViT wrapper, run the following command:
pip install autodistill-fastvitNow that we have FastViT installed on our system, we can start experimenting with the model.
What can FastViT Identify?
FastViT is capable of identifying all of the classes in the ImageNet-1k dataset. The class list covers everything from vultures to car mirrors to screws. You can retrieve a list of these classes with the following Python code:
from autodistill_fastvit import FASTVIT_IMAGENET_1K_CLASSES
print(FASTVIT_IMAGENET_1K_CLASSES)
Alternatively, you can refer to a public list of the ImageNet-1k classes.
Step #2: Run Inference
Let’s classify the following image of a dog:

Create a new Python file and add the following code:
from autodistill_fastvit import FastViT, FASTVIT_IMAGENET_1K_CLASSES
from autodistill.detection import CaptionOntology

# zero shot with prompts from FASTVIT_IMAGENET_1K_CLASSES
base_model = FastViT(
    ontology=CaptionOntology(
        {
            "Beagle": "beagle",
            "Border Collie": "collie"
        }
    )
)

# zero shot without prompts
# base_model = FastViT(None)

predictions = base_model.predict("./example.png")

labels = [FASTVIT_IMAGENET_1K_CLASSES[i] for i in predictions.class_id.tolist()]

print(labels)
Above, we have specified two options for classification: Beagle or Border Collie. If none of these prompts are relevant, none of them will be returned.
Our code returns the following:
['Beagle']Great! Our code was able to successfully classify that the image contains a Beagle.
There is a lot going on in this code, so let’s walk through the code step by step.
First, we import the required autodistill dependencies. Then, we create an ontology. This ontology maps a prompt “Beagle” (a class in the ImageNet-1k dataset) to a class name “beagle” and "Border Collie" to "collie". The class name is only relevant if you choose to train a model using autodistill-fastvit. We’ll cover how to do that later in the guide.
Next, there is a commented out line which has the comment “zero shot without prompts”. This is here because there are two ways you can use autodistill-fastvit: with or without providing classes. If you want to classify an image using specific classes in ImageNet, you can specify those classes in the CaptionOntology. If you want to classify an image using all classes, you can specify None.
Next, we use the predict() function to retrieve predictions from FastVit. The predict() function returns a list of class IDs, numbers that map to the position of class names in a list of classes in the ImageNet dataset. We turn these numbers into the class names in the next line of code. Finally, we print the results of classification to the console.
We encourage you to experiment with multiple images and prompts to try out FastViT.
Label a Dataset with Autodistill FastViT
Now that we have Autodistill set up with FastViT, we can label a dataset using FastViT. This may be useful if you are training a classification model that uses some classes in ImageNet-1k but includes your own classes, too. To label a dataset, add the following line of Python to the code we wrote earlier:
base_model.label(
  input_folder="./images",
  output_folder="./dataset"
)
Replace "./images'' with the name of the folder that contains images you want to label. Note: You must have a CaptionOntology specified when you load FastViT.
When you run the script with this line of code, Autodistill will label all images in the folder using FastViT and save the labeled data in a folder called "./dataset".
You can combine this dataset with others by uploading the labeled data into the Roboflow platform and then adding more images that you want to label by hand or inspect. To learn more about using Roboflow, check out the Roboflow Getting Started guide.
Conclusion
FastViT is a classification model developed by Apple. FastViT uses the Vision Transformer architecture with novel changes that enable fast performance. Apple’s benchmarks have demonstrated that FastViT achieves lower latency and higher accuracy than many popular classification architectures such as EfficientNet and CMT.
In this guide, we showed how to use FastViT with autodistill-fastvit, a convenient wrapper that makes it easy to set up and get started with FastViT. autodistill-fastvit is part of the Autodistill framework. This framework enables you to use foundation models like FastViT to automatically label images for use in training a vision model.
To learn more about Autodistill, check out our complete guide to using Autodistill.
Cite this Post
Use the following entry to cite this post in your research:
James Gallagher. (Oct 20, 2023). How to Use FastViT. Roboflow Blog: https://blog.roboflow.com/how-to-use-fastvit/