
Imagine a car factory where hundreds of vehicles roll off the line every hour. High-speed cameras capture every angle, and computer vision models analyze each frame in real time, detecting even a hairline dent. Today, vision AI has become an essential part of modern quality control, empowering machines to see, understand, and ensure perfection at industrial scale.
These intelligent industrial inspection systems don’t just detect defects - they act on them. Integrated directly into automated production workflows, they can trigger instant responses such as pausing a conveyor, rejecting a flawed component, or alerting an operator for review. Built to operate around the clock in demanding environments, industrial inspection systems keep production lines running smoothly.
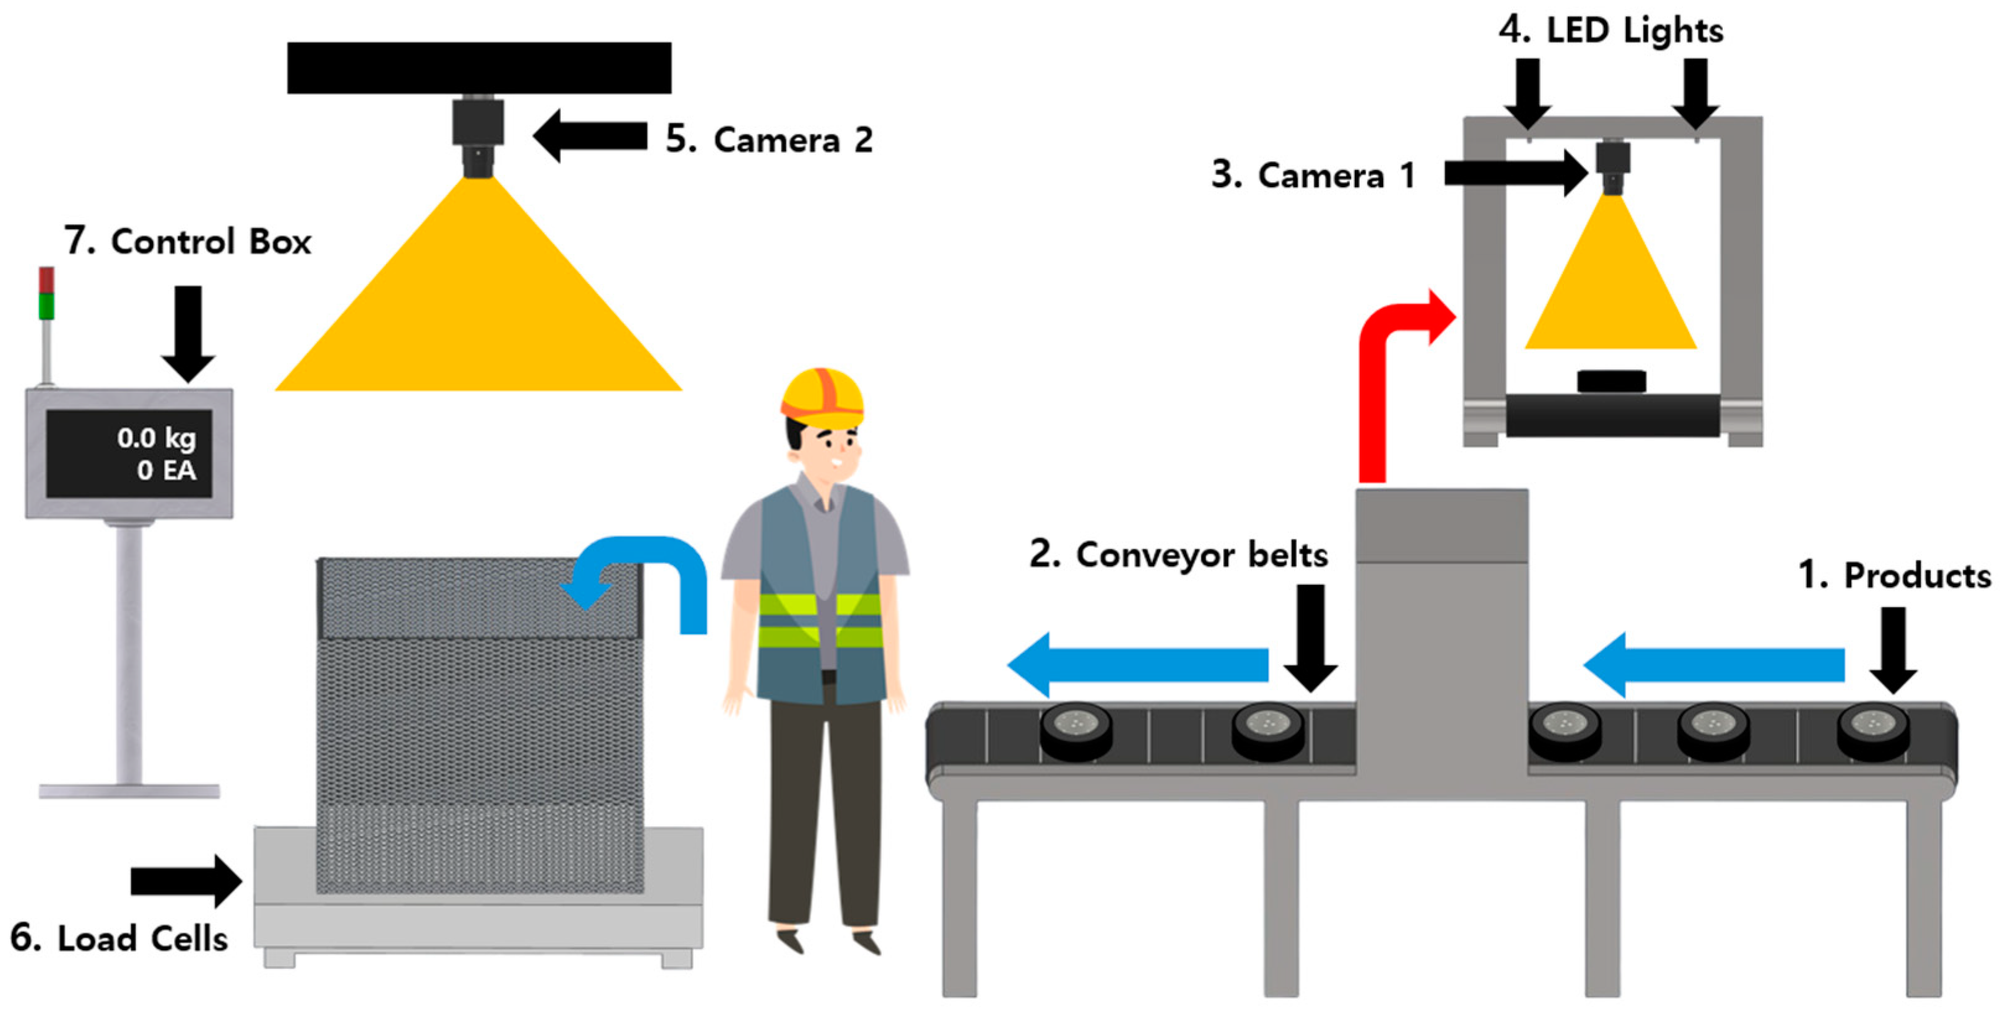
So today we will explore how industrial inspection solutions are changing manufacturing, and learn the best way to build an industrial inspection system.
Industrial Inspection System Applications
Industrial inspection is a crucial part of modern manufacturing, ensuring that every product meets strict quality and safety standards. Computer vision has transformed this process by enabling automated, real-time visual analysis of products, parts, and assemblies. Here's how:
Defect Detection
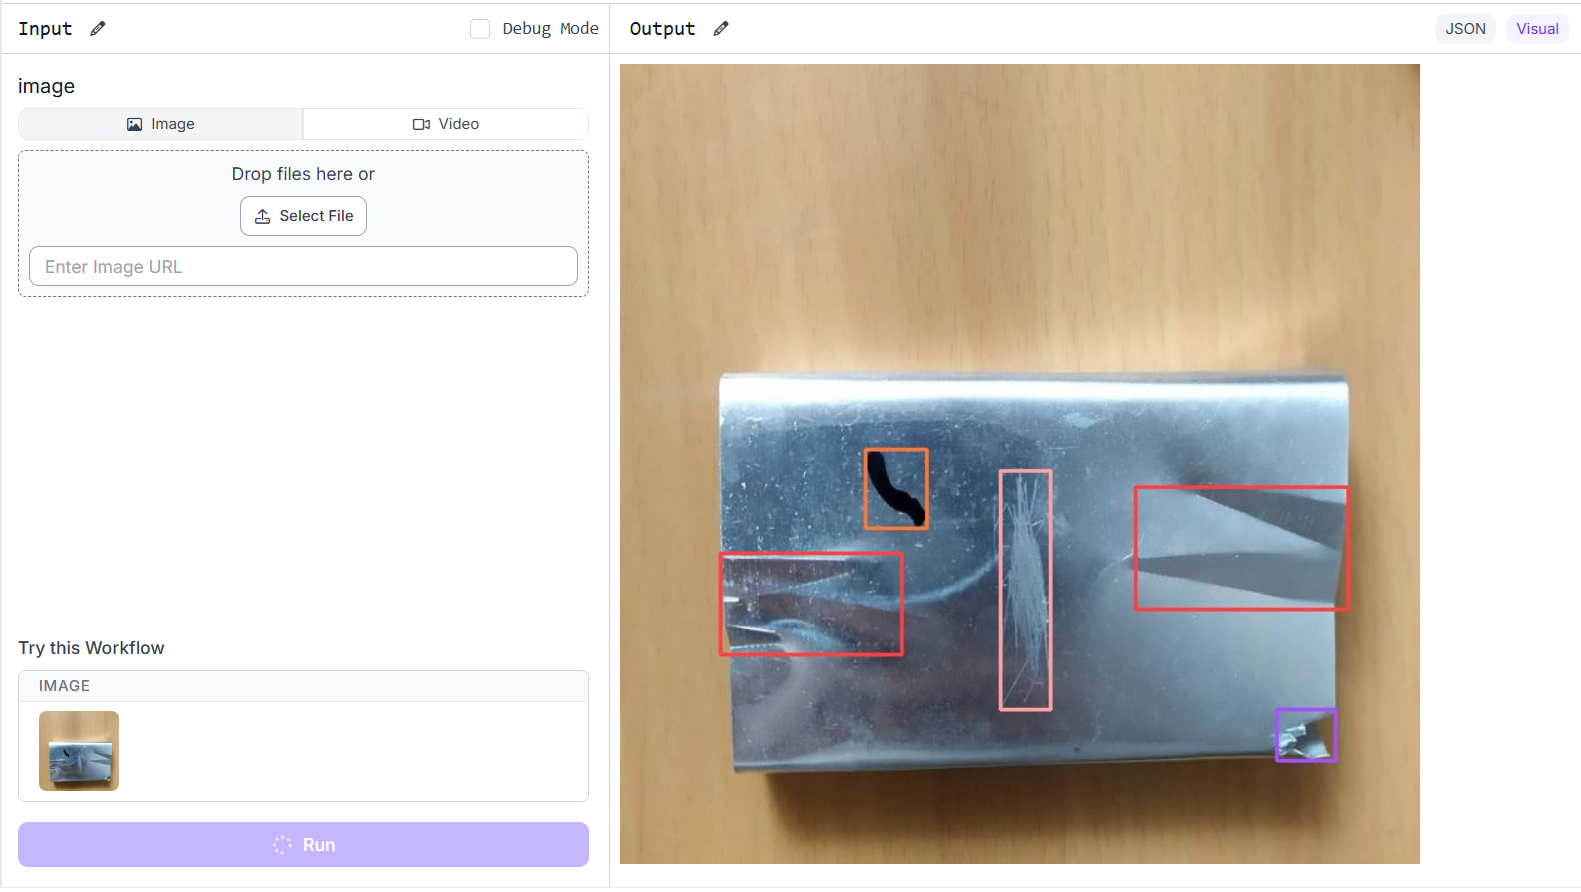
Computer vision is used to detect defects, automatically identifying flaws such as cracks, scratches, and dents. For example, PCB defect detection systems detect, classify, and flag defects in real time, automatically rejecting critical faults and marking minor ones for human inspection.
PCB defect detection system
Metal defect inspection systems detect and classify scratches, dents, and discolorations on metal parts.
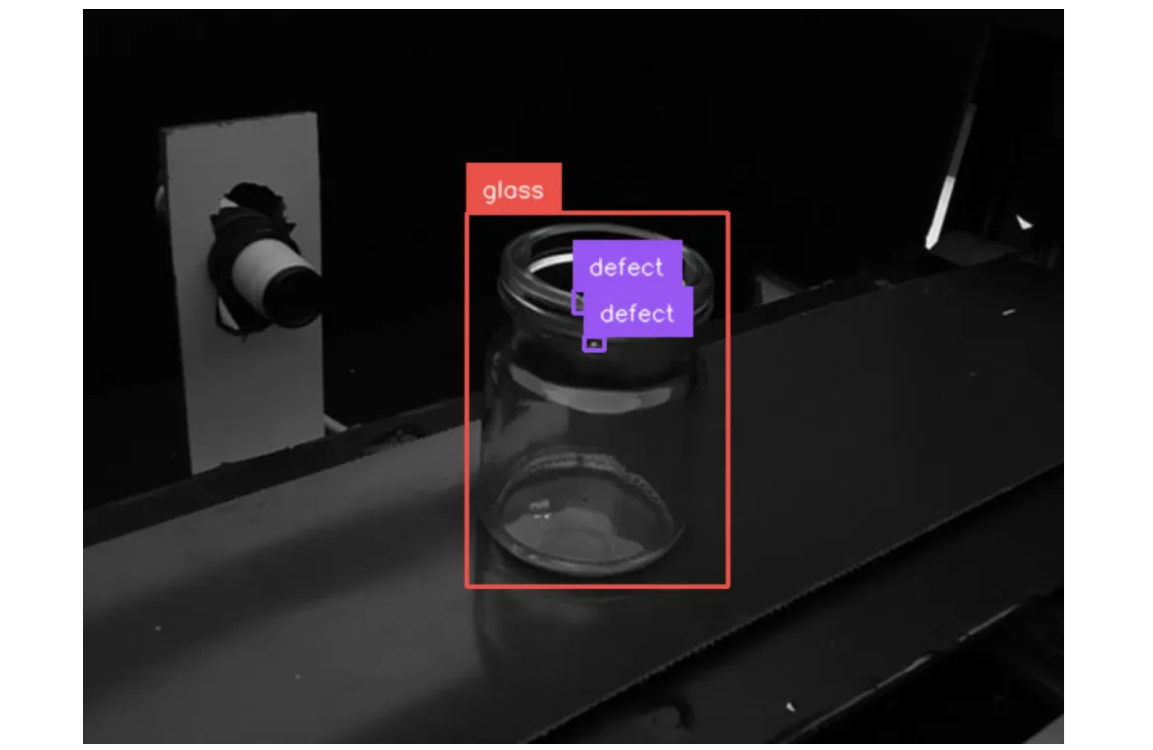
Glass inspection systems use computer vision models to detect scratches, chips, and blemishes on bottles, windshields, solar panels, and more, and flag anomalies for review.
And computer vision helps detect issues such as edge chipping, holes, or unwanted lines on ceramic tiles during manufacturing.
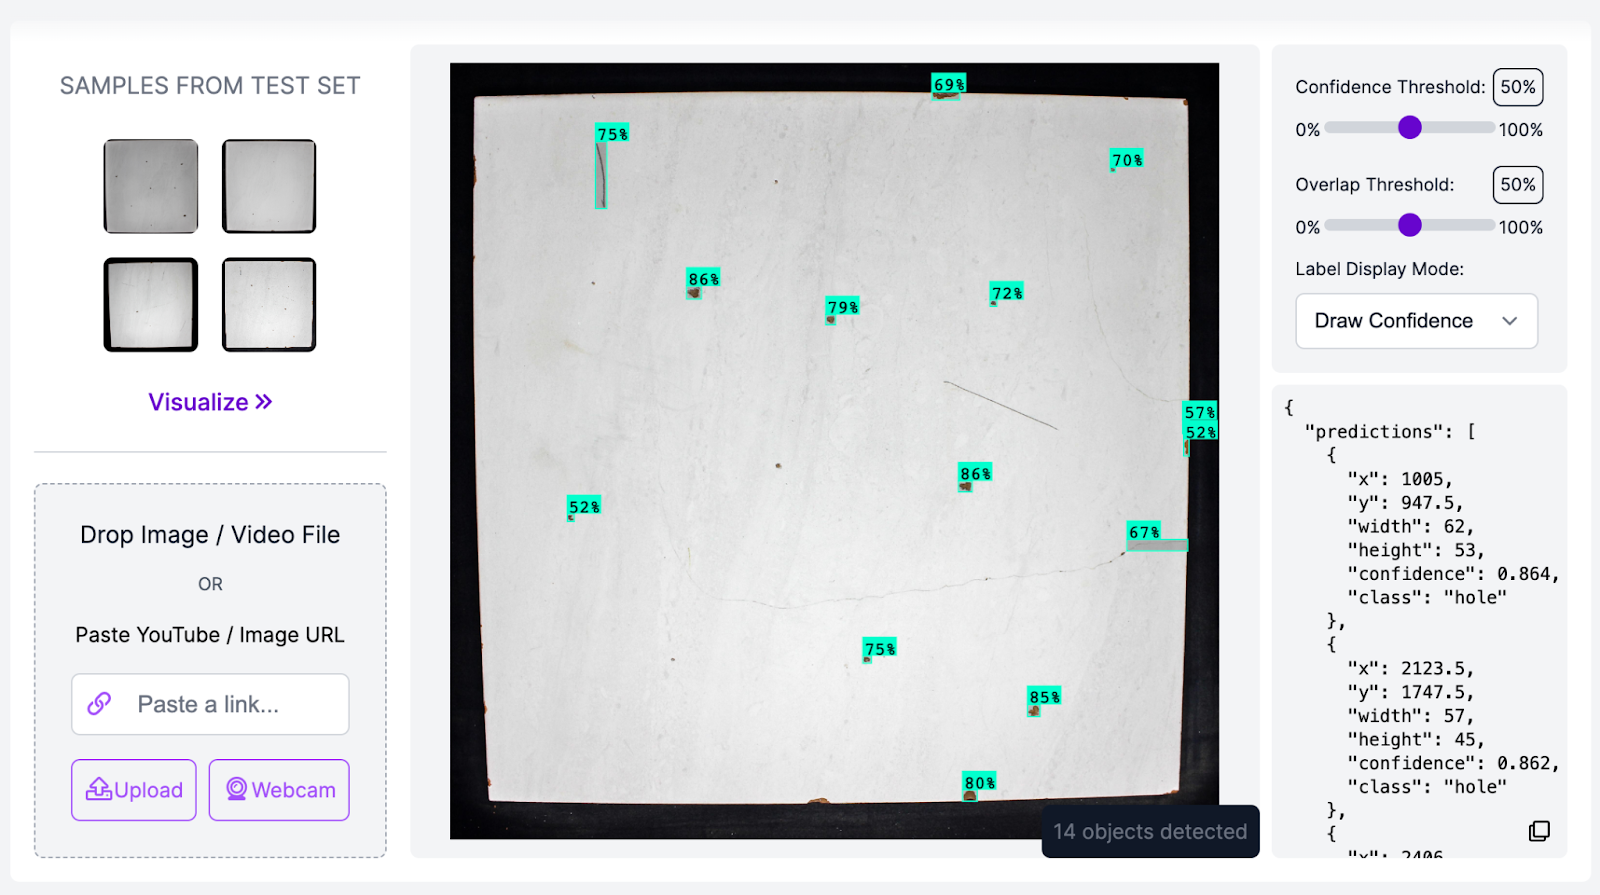
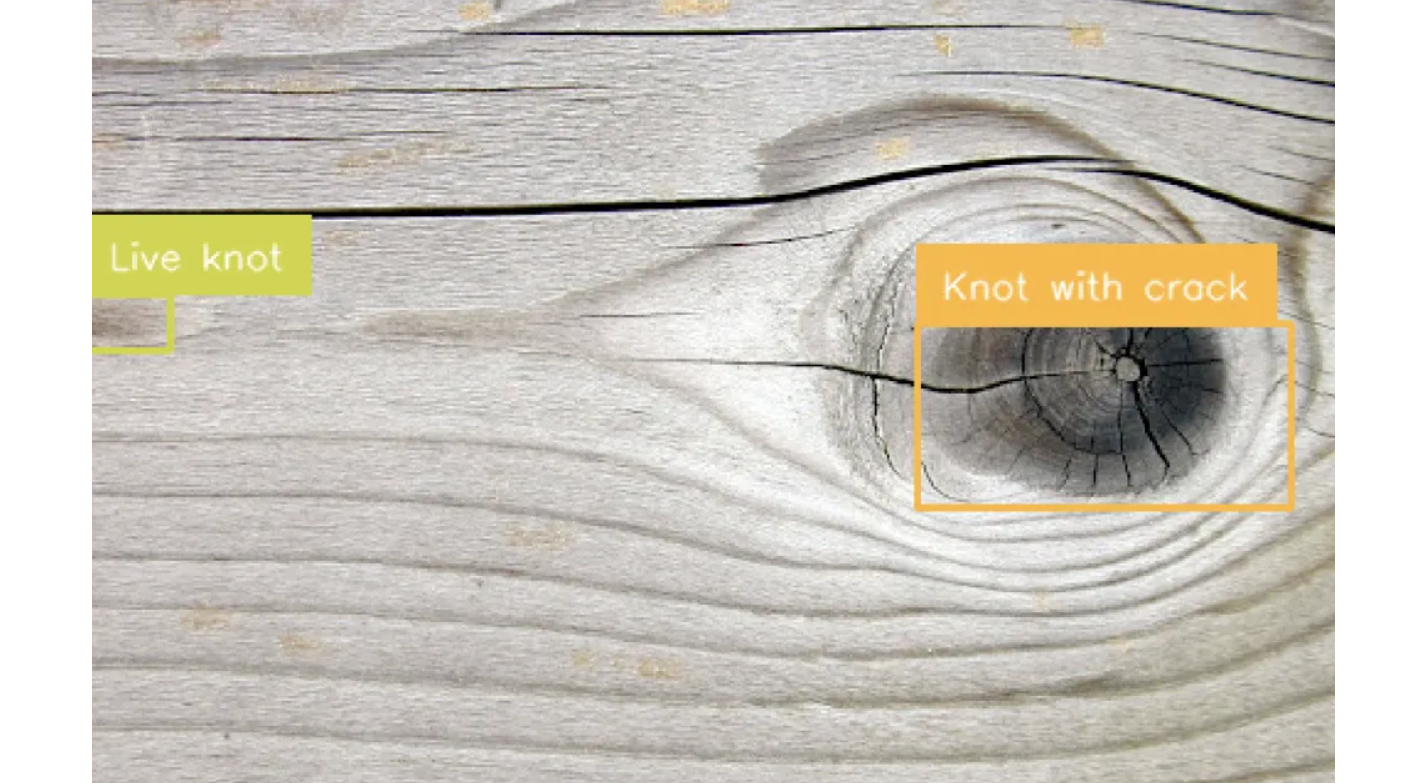
In the timber industry, wood surface defect detection systems use computer vision to find knots, cracks, dead knots, or resin.
Assembly Verification
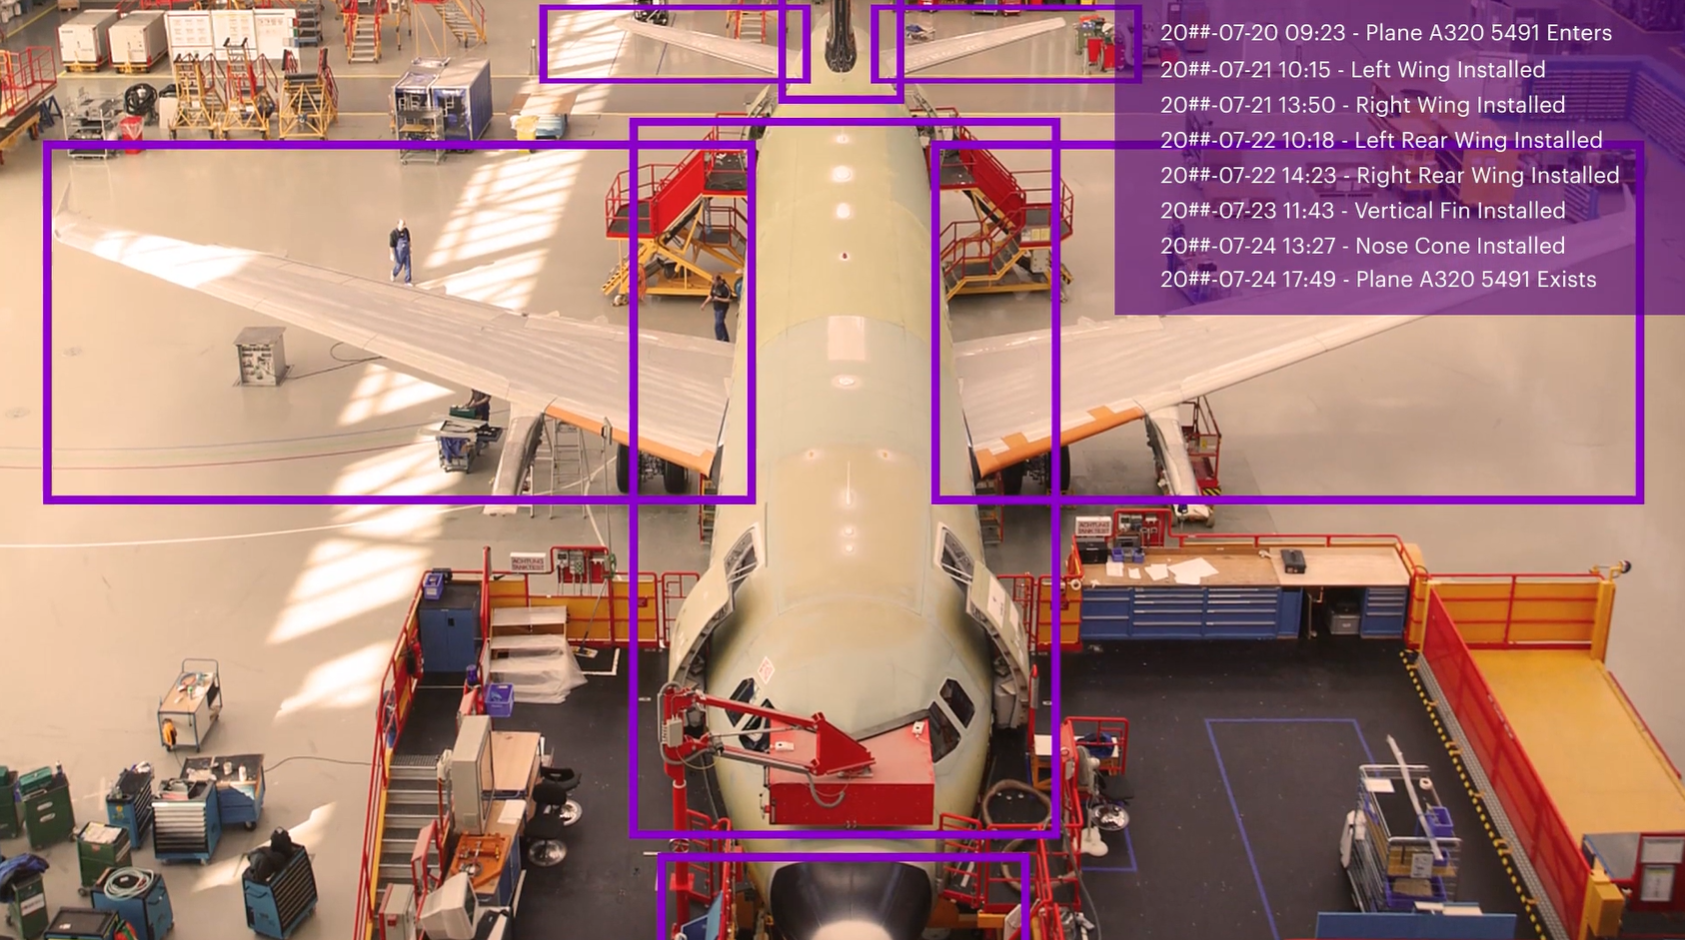
Assembly verification uses computer vision to confirm that all parts or components are correctly assembled in the right order, position, and orientation.
For example, Airbus and Accenture developed a vision AI based inspection system that detects when key assembly stages, such as wing attachment or fuselage fitting, are completed.
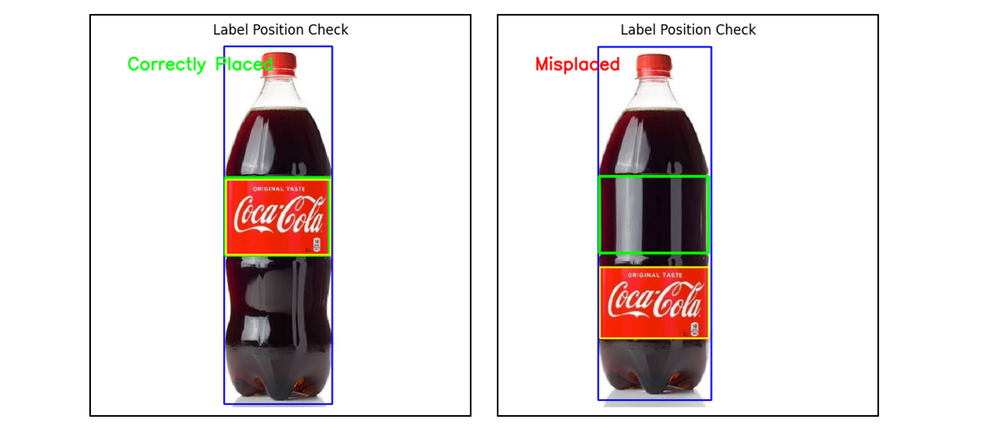
Label Inspection
Label inspection systems use computer vision to verify that product labels are correctly printed, positioned, and readable.
Color Inspection
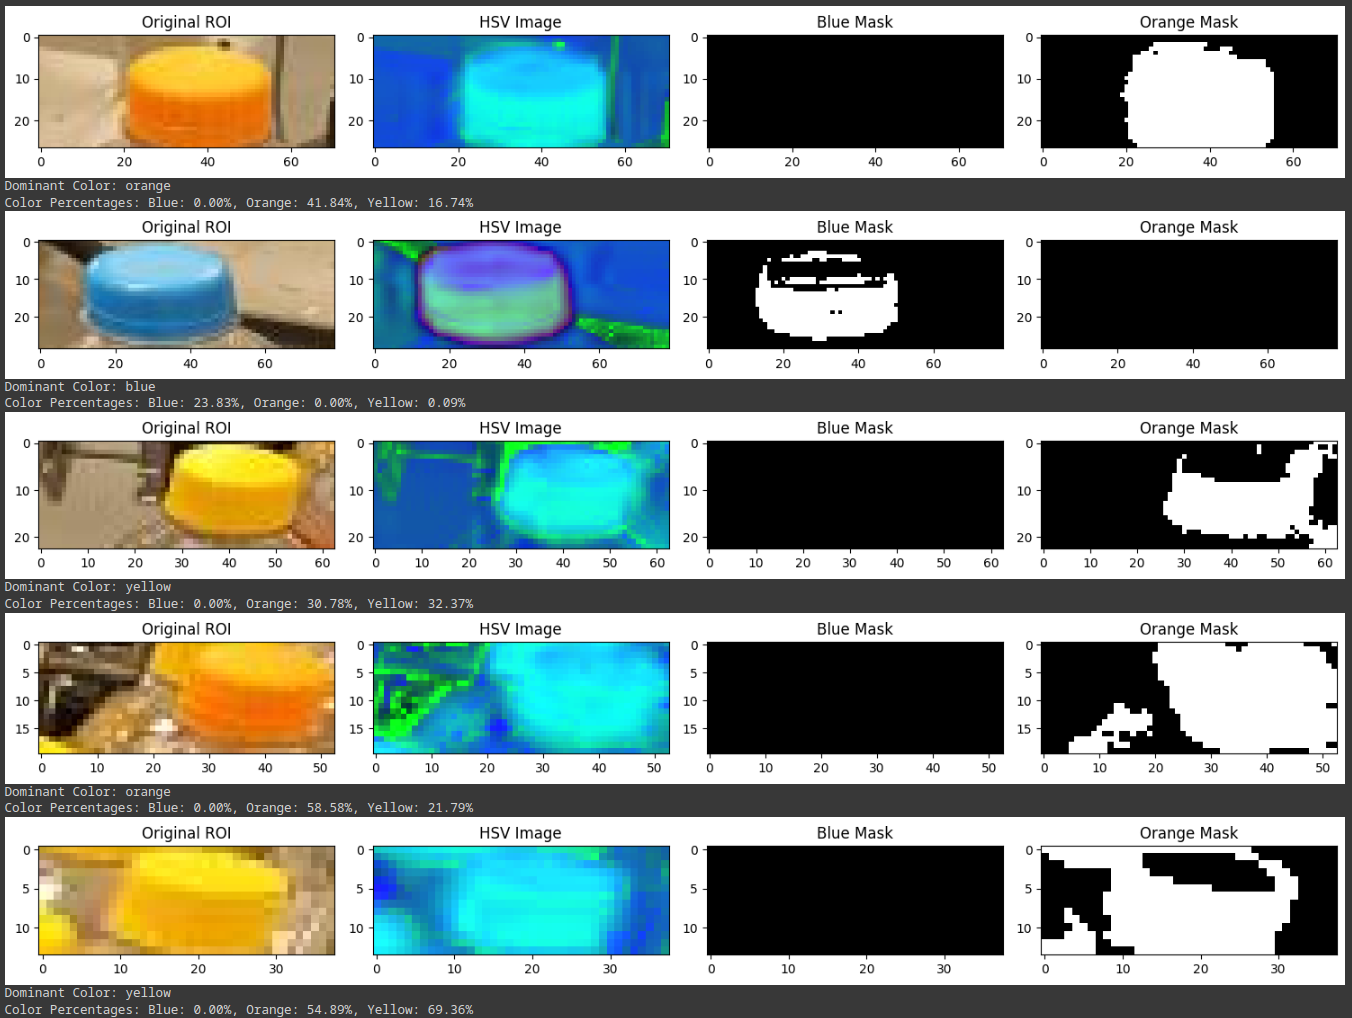
Computer vision is also used in industrial inspection to analyze and verify the color consistency of products, materials, or packaging. For example, this product color analyzer system uses a segmentation model to isolate the product region (so background colors don’t interfere), before applying clustering (e.g. k-means) to the segmented pixels to determine the dominant color(s).
As another example, bottle cap color sensing systems detect and verify cap colors by combining segmentation with HSV color analysis.
Presence/Absence Detection
Presence/Absence detection systems play an important role in verifying whether specific components, parts, or features are present or missing in an assembly or product.
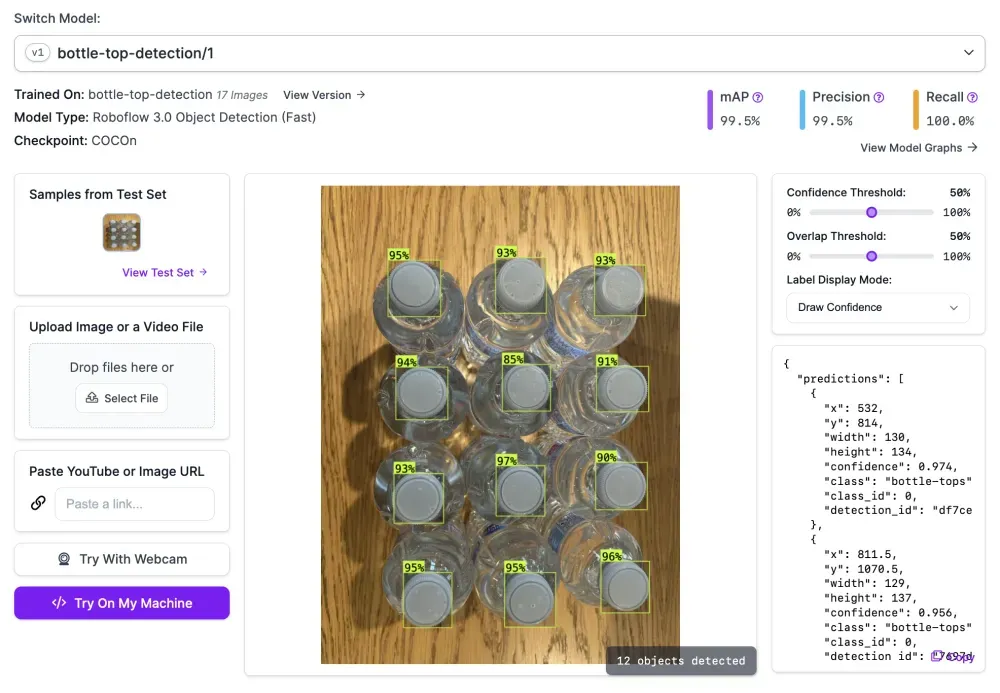
For example, in the consumer goods packaging industry, industrial inspection systems detect missing bottles to ensure each box has the full count. If the count is lower than expected, the system flags the package for further inspection.
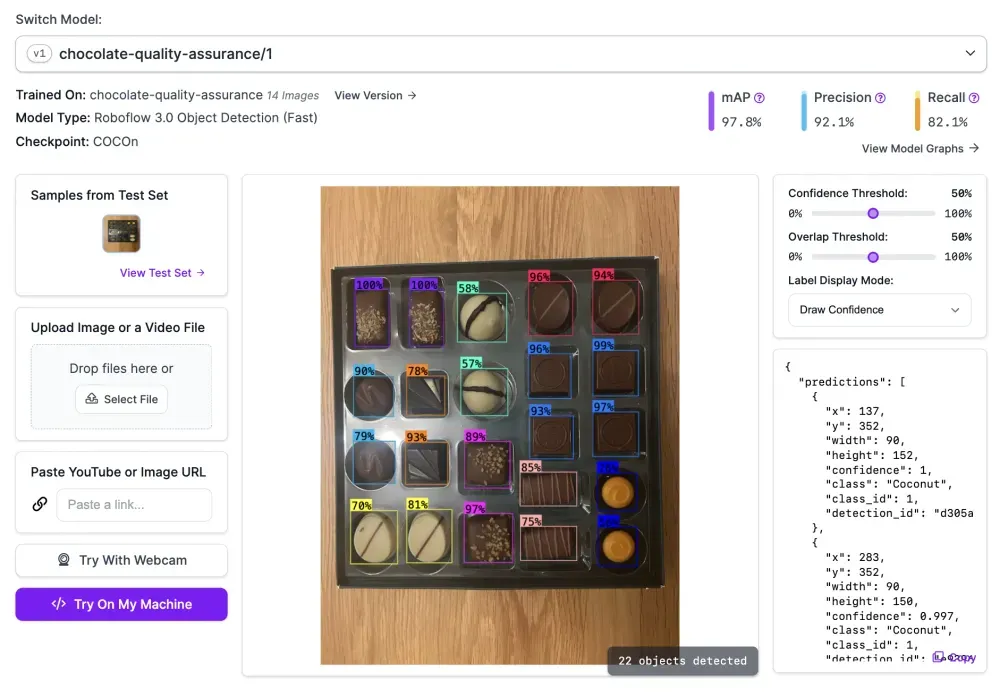
Similarly chocolate box inspection systems inspect packaging to ensure each box has the correct number of chocolates, verify each chocolate is the right type and in the correct position, and reject boxes where chocolates are missing, mis-ordered, or defective.
The applications of computer vision in industrial inspection are endless, from weld analysis and dimensional measurement to surface finish evaluation. Learn how to build your own industrial inspection system next.
Industrial Inspection System: How to Build a Welding Defect Detection Solution
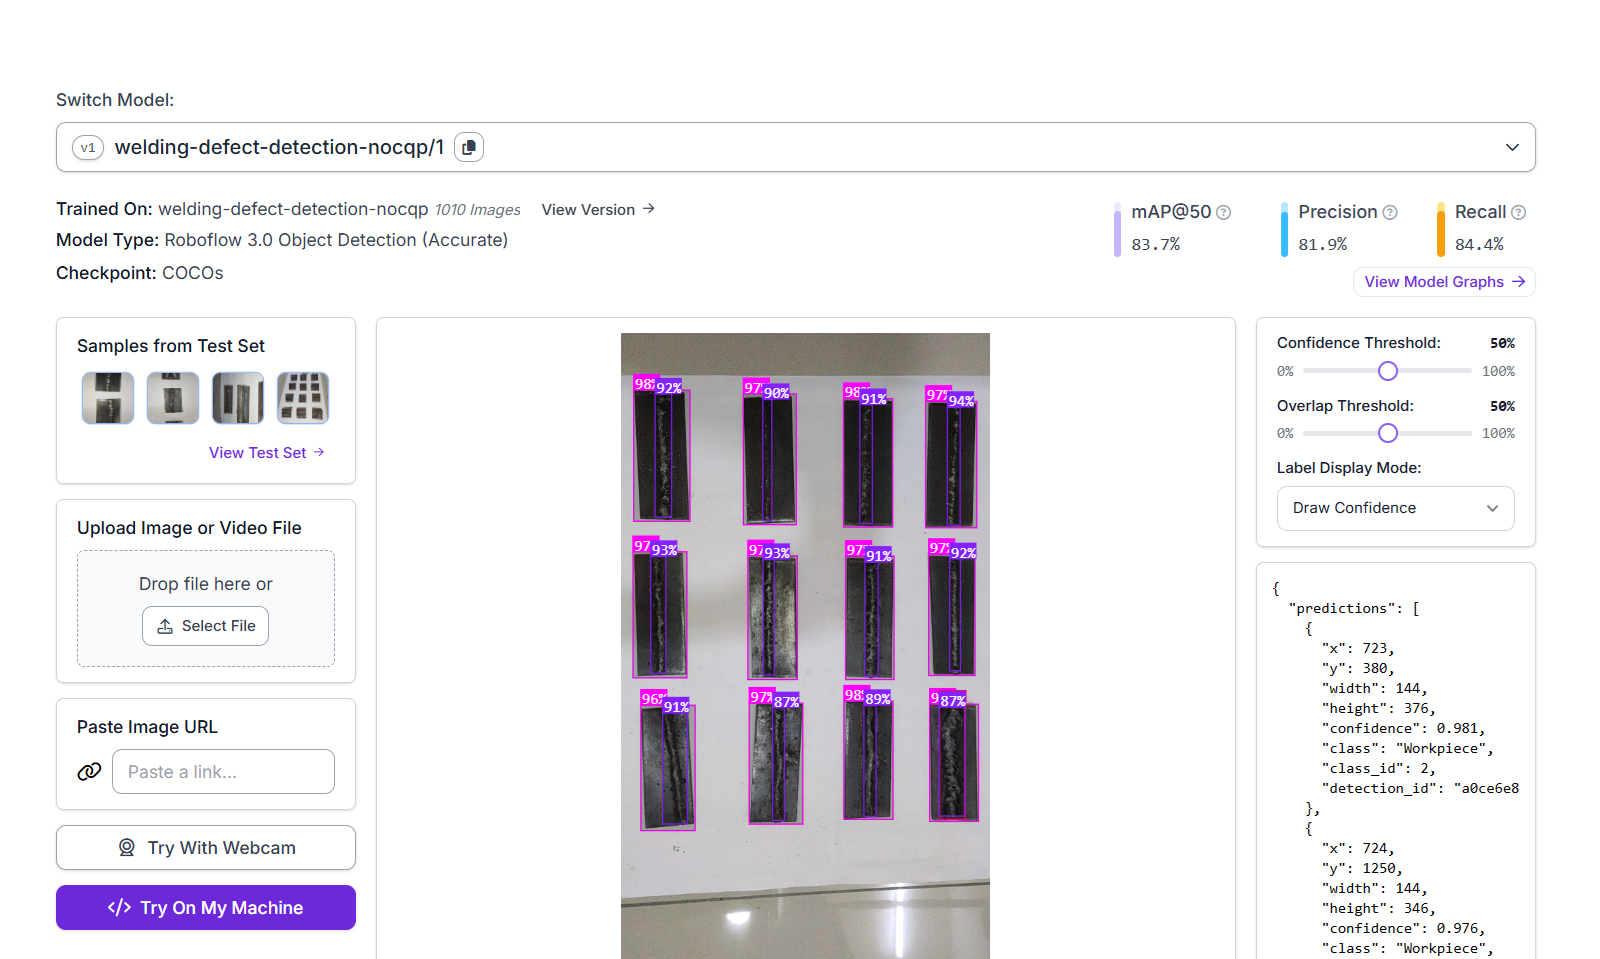
We're going to build an AI-powered welding defect inspection system using a pre-trained model: welding-defect-detection-nocqp/1 from Roboflow Universe. Our goal is to automatically detect welding defects in images of weld joints.
Step #1: Prepare dataset for welding defect detection
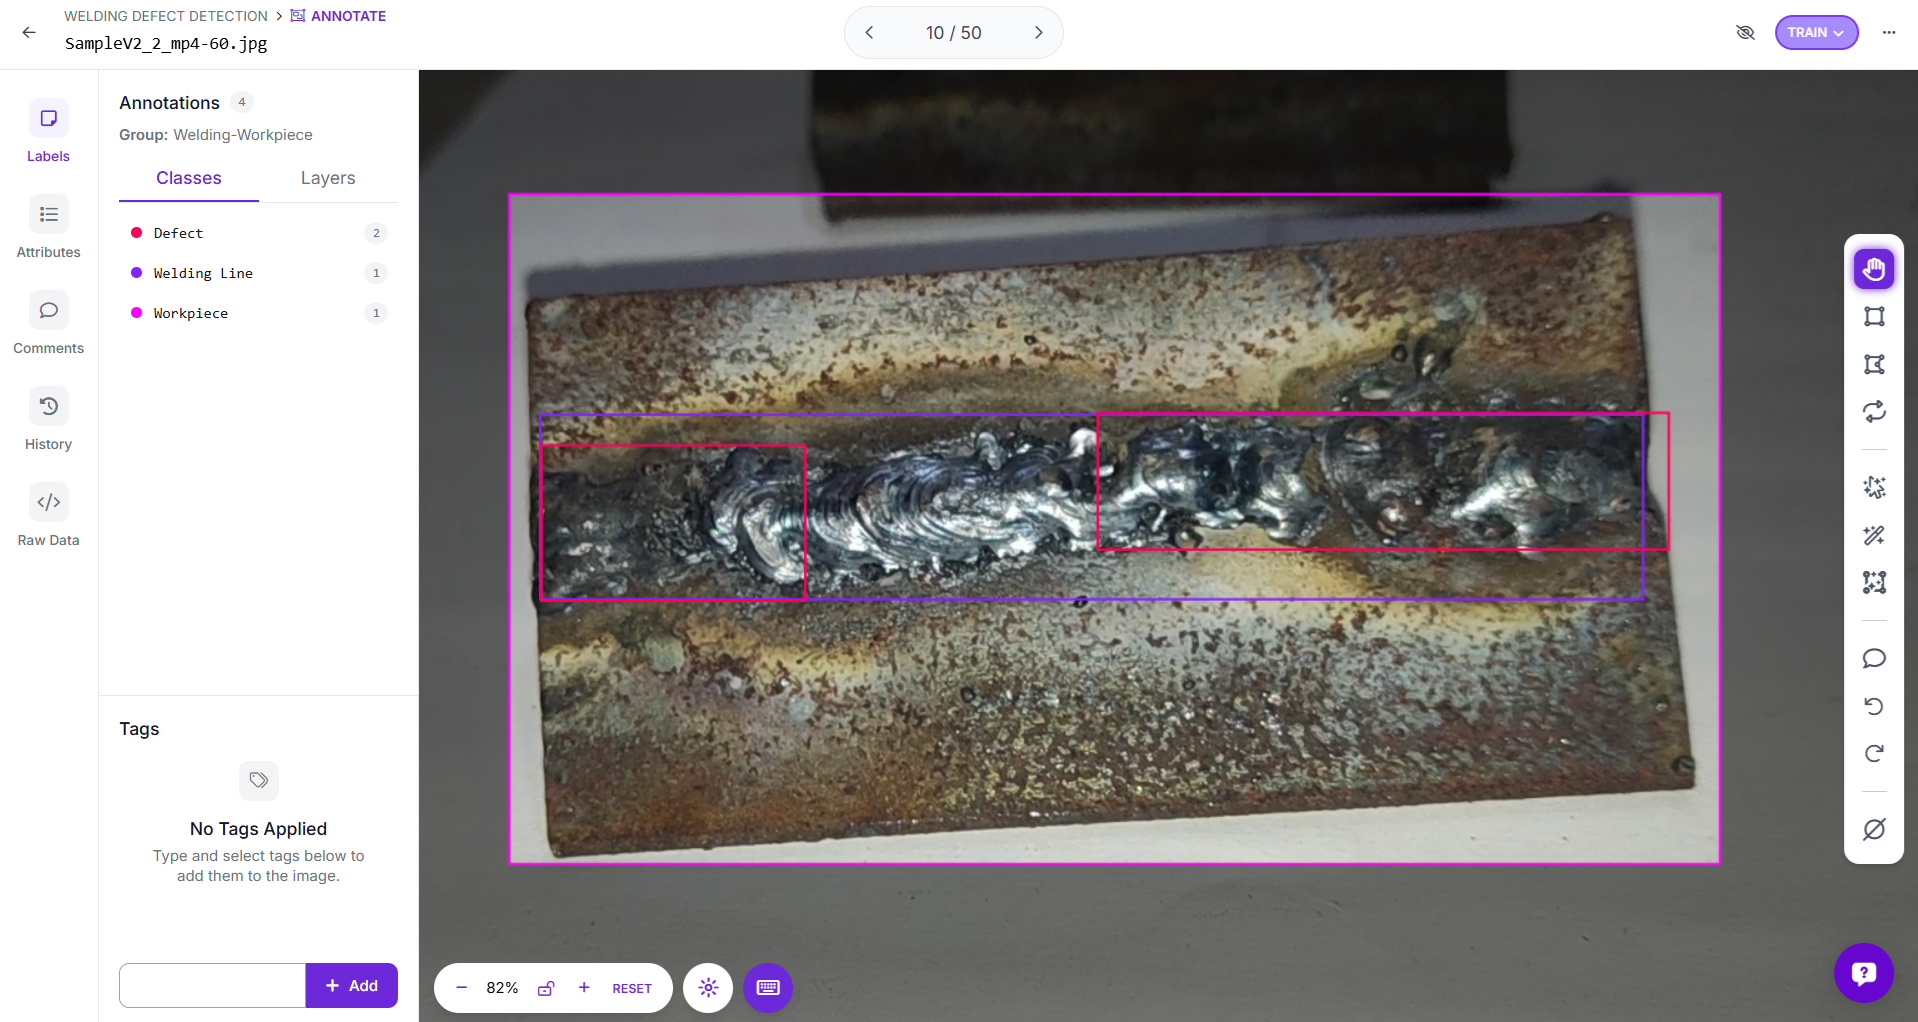
First, create a new object detection project in Roboflow. Then, upload images of workpieces with welding lines that include visible welding defects as well as some with no defects. Using the annotation tools, carefully draw bounding boxes around each "workpiece," "welding line" and "defects." These will be our class labels.
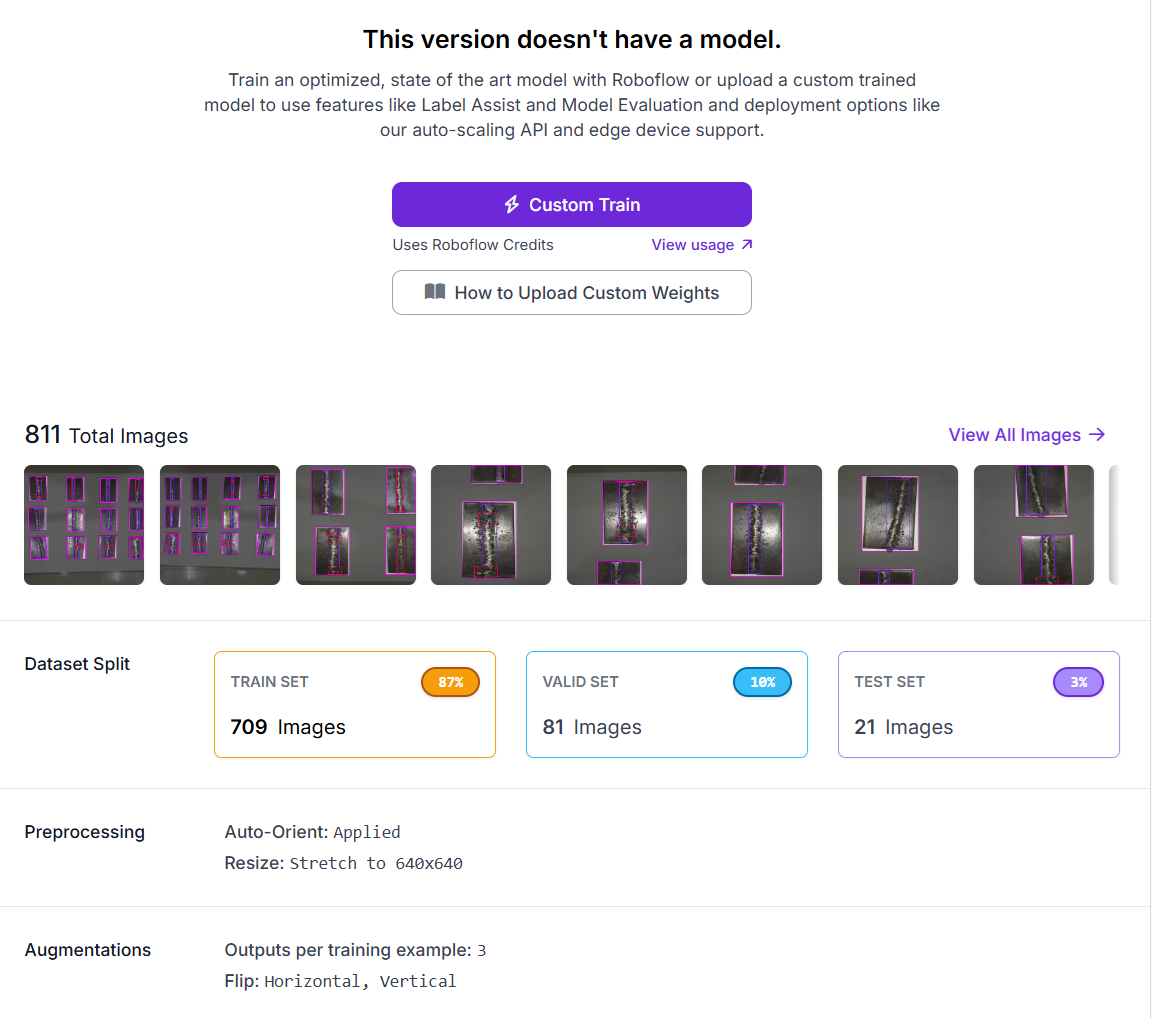
Once annotated, preprocess and augment the dataset, and create a version of the dataset.
Step #2: Train the welding defect inspection model
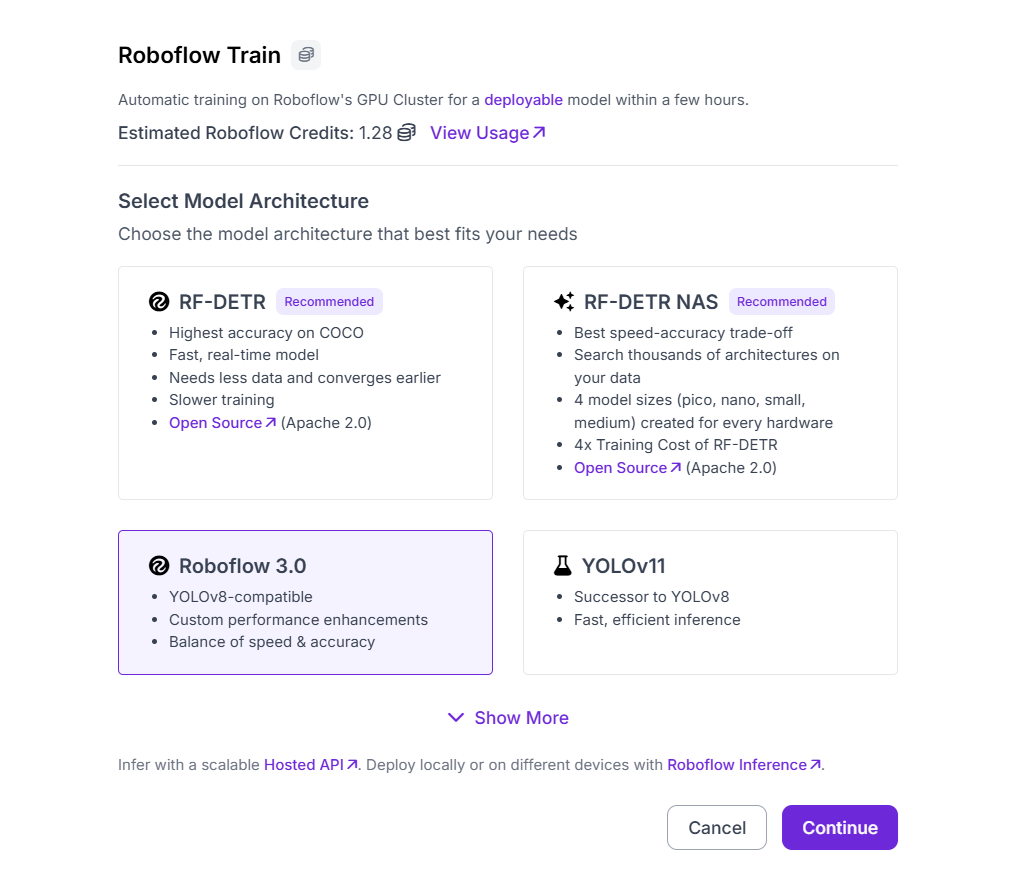
Use the generated dataset to train the model in Roboflow. To train the model click on the "custom train" button, and select Roboflow 3.0 as the model architecture.
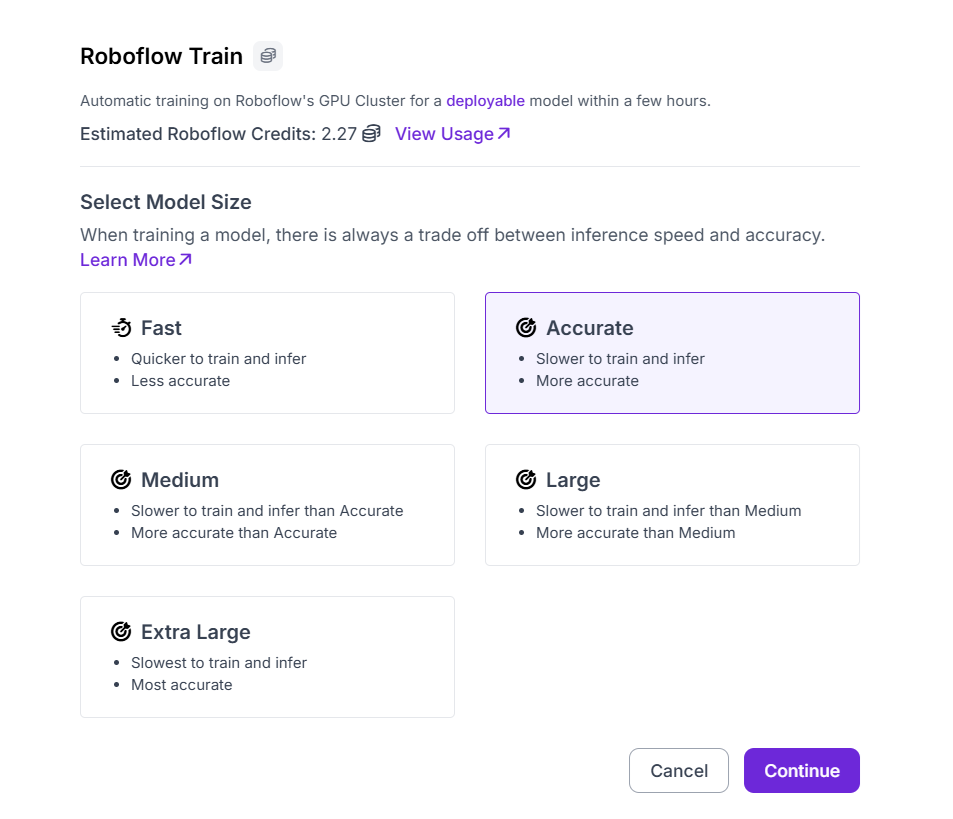
Next, select "Accurate" as the model size.
And finally select your training checkpoint. I selected Train from Public Checkpoint (MS COCO), which uses pre-trained weights from a large COCO benchmark dataset, and adapts them to the welding defect detection task.
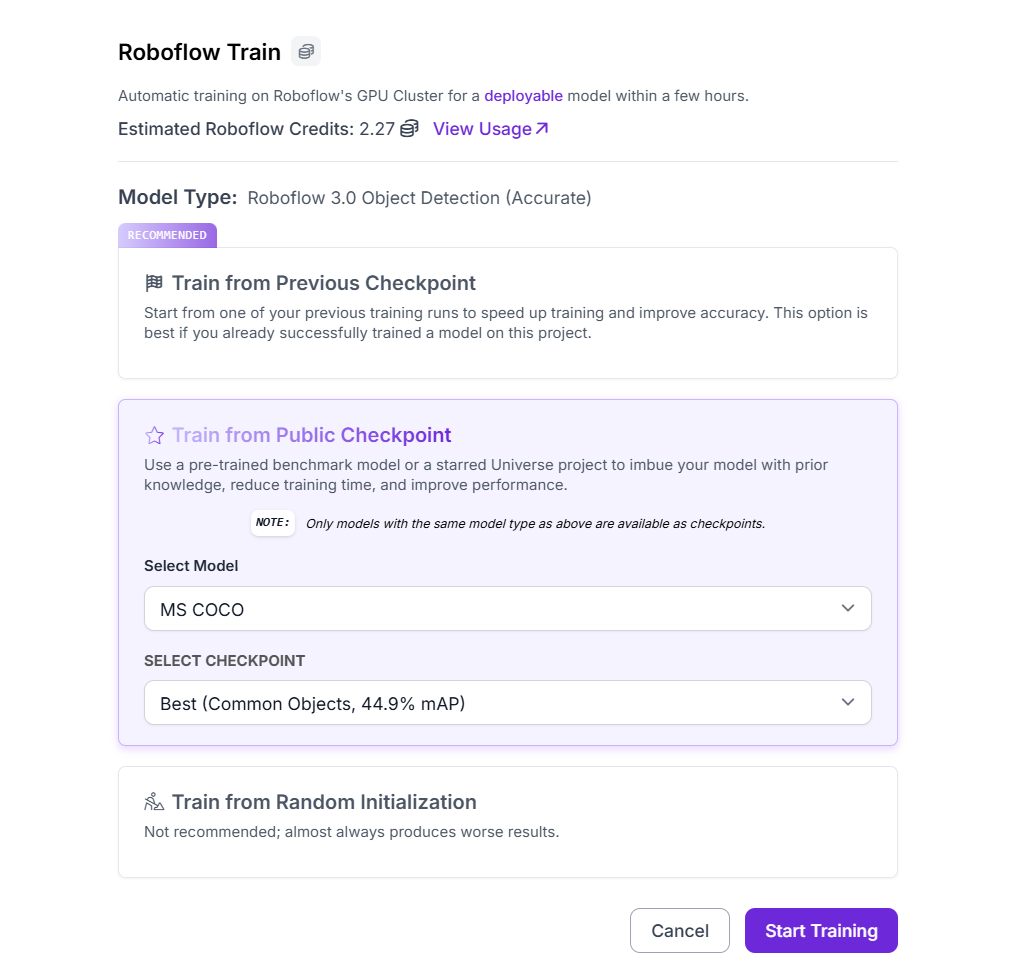
Roboflow provides multiple training options such as:
- Train from Previous Checkpoint: This resumes training from an existing model to further refine its performance.
- Train from Public Checkpoint: It begins with pretrained weights (e.g., MS COCO) and fine-tunes the model for your specific use case, such as PCB defect detection.
- Train from Random Initialization: Use this option to start training entirely from scratch - suitable only when working with a very large, diverse dataset.
After verifying the setup, click Start Training to begin the process. When training finishes, the model is automatically prepared for evaluation and real-time deployment within the welding inspection inspection workflow.
Step #3: Build the Welding Inspection Application
Now using the above trained model, we will build the welding detection application using Roboflow Workflows. Our workflow consists of following blocks:
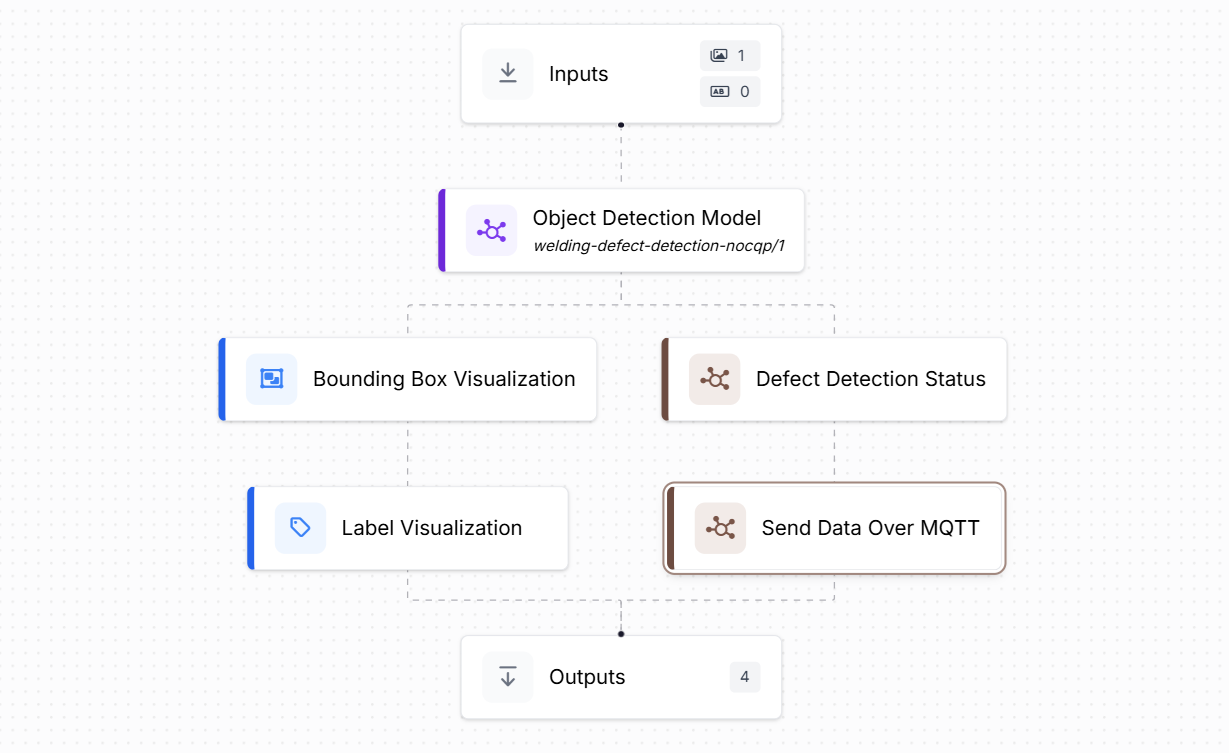
Input Block: The input block receives images, either uploaded manually or captured from a live camera feed. These images show welded joints that need to be inspected for defects.
Object Detection Model Block: This block is configured with welding-defect-detection-nocqp/1 model that we have trained in previous step. The image input is passed to this block. The trained model identifies welding defects returning bounding boxes, class labels, and confidence scores. Essentially, it’s the “AI engine” that powers defect detection in this workflow.
Bounding Box Visualization Block: This block takes the model’s predictions and draws bounding boxes directly on the input image to visually highlight where each defect is located. It provides a clear, real-time visual confirmation of detected issues.
Label Visualization Block: Alongside bounding boxes, this block overlays text labels (e.g., “Defect”, “Welding Line”, “Workpiece”) on the image. Together, the visualization blocks help human operators easily understand the model’s output.
Defect Detection Status (Custom Python Block): This custom Python block analyzes the model’s predictions and summarizes them into a simple status message. It checks whether any defects are detected, counts how many, and returns a message such as:
Defect detected. Count: 3.
If no defects are found, it reports No defect detected.
This step turns raw AI output into a concise inspection result. The following is the code for this block:
import supervision as sv
from typing import Dict

def run(self, predictions: sv.Detections) -> Dict:
    defect_detected = False
    status_message = 'No defect detected.'
    defect_count = 0
    if hasattr(predictions, 'data') and 'class_name' in predictions.data:
        class_names = predictions.data['class_name']
        # Ensure class_names is iterable (it may be np.ndarray)
        defect_indices = [i for i, c in enumerate(class_names) if 'defect' in str(c).lower()]
        defect_count = len(defect_indices)
        if defect_count > 0:
            defect_detected = True
            status_message = f'Defect detected. Count: {defect_count}.'
    return {
        "defect_detected": defect_detected,
        "status_message": status_message,
        "defect_count": defect_count,
    }
Send Data Over MQTT (Custom Python Block): After generating the status message, this block publishes it to an MQTT broker. MQTT is a lightweight IoT messaging protocol widely used in industrial automation. By sending messages (such as defect alerts or inspection summaries) to a topic such as defect_status, other connected systems such as dashboards, robots, or PLCs can act on this data in real time. The following is the code for sending data:
import paho.mqtt.client as mqtt

def run(self, topic: str, payload: str, broker_host: str = "localhost", broker_port: int = 1883, qos: int = 0) -> BlockResult:
    """
    Publishes data to a specified MQTT broker and topic one time and returns delivery status.
    Args:
        topic: The MQTT topic to publish to.
        payload: The string payload to send.
        broker_host: The MQTT broker host IP or DNS name (default 'localhost').
        broker_port: The MQTT broker port (default 1883).
        qos: The MQTT QoS level to use (default 0). 1 = at least once, 2 = exactly once.
    Returns:
        A result dictionary with delivery status message.
    """
    publish_result = {'status': None}

    def on_publish(client, userdata, mid):
        publish_result['status'] = 'published'

    client = mqtt.Client()
    client.on_publish = on_publish
    try:
        client.connect(broker_host, broker_port, 60)
        client.loop_start()
        info = client.publish(topic, payload, qos=qos)
        info.wait_for_publish()
        # For QoS 1/2, wait for on_publish, but never more than ~3 seconds
        if qos > 0:
            for _ in range(30):
                if publish_result['status'] == 'published':
                    break
                import time
                time.sleep(0.1)
        client.loop_stop()
        client.disconnect()
        if info.rc == mqtt.MQTT_ERR_SUCCESS and (qos == 0 or publish_result['status'] == 'published'):
            status = f"Message delivered to topic '{topic}'. The payload is '{payload}'."
        else:
            status = f"Failed to deliver message: {mqtt.error_string(info.rc)}"
    except Exception as e:
        status = f"Exception during publish: {e}"
    return {"result": status}
Outputs Block: The workflow ends with the output block, which collects and displays all results:
- The visualized image with bounding boxes and labels
- The defect detection summary
- Send MQTT messages
These outputs can be viewed in Roboflow or sent downstream for further processing.
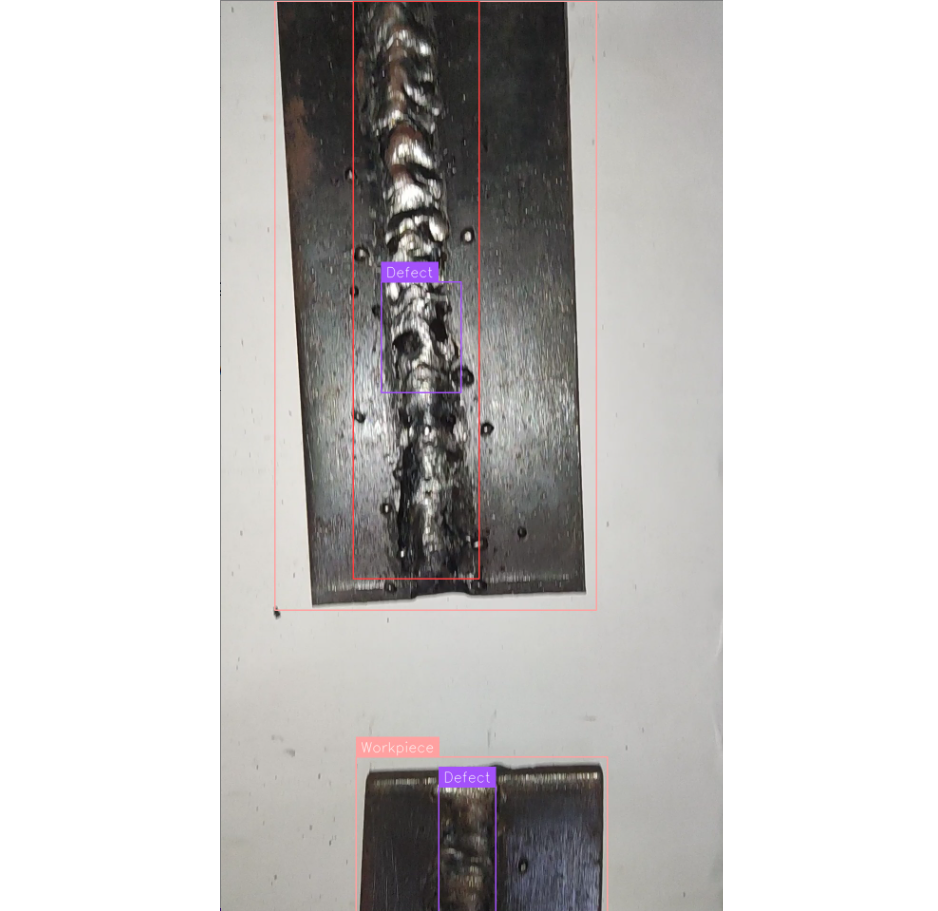
When you run the workflow, you will see a result similar to the following:
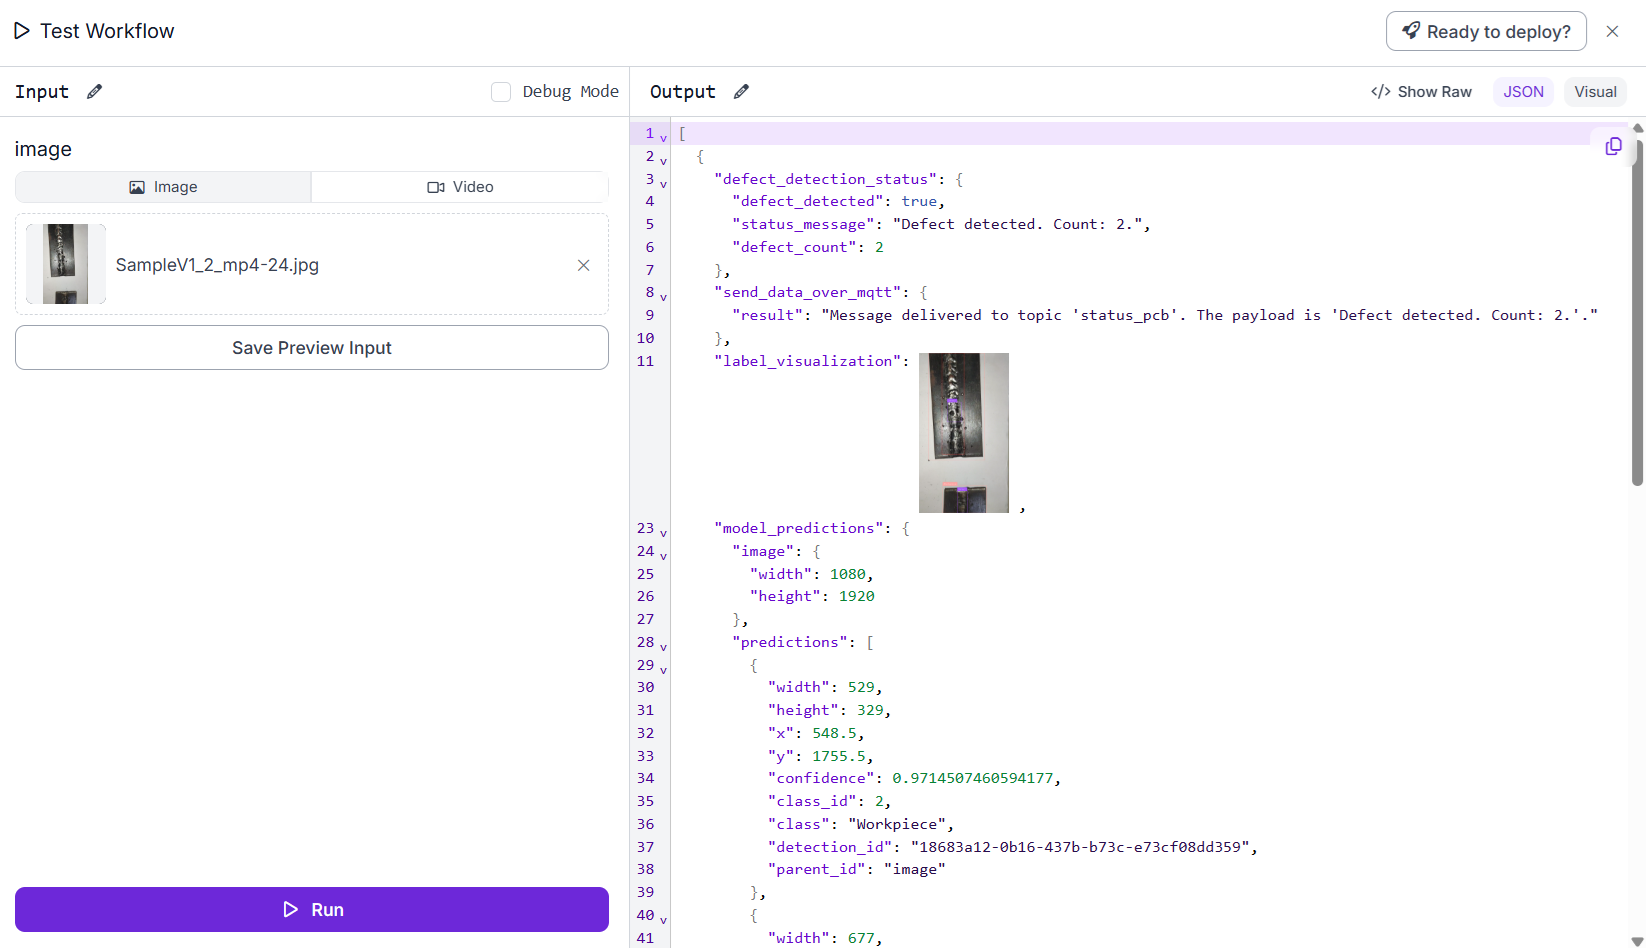
Here is the output image with the bounding box and class label that you see in your workflow.
Additionally, use the following fetch_MQTT_message.py code to verify the MQTT message sent by the above workflow.
import paho.mqtt.client as mqtt

BROKER = "broker.hivemq.com"
PORT = 1883
TOPIC = "defect_status"

# Callback when the client connects to the broker
def on_connect(client, userdata, flags, rc):
    if rc == 0:
        print(f"Connected to {BROKER}")
        client.subscribe(TOPIC)
        print(f"Subscribed to topic: {TOPIC}")
    else:
        print(f"Connection failed with code {rc}")

# Callback when a message is received
def on_message(client, userdata, msg):
    print(f"\nMessage received:")
    print(f"   Topic: {msg.topic}")
    print(f"   Payload: {msg.payload.decode()}")

# Create MQTT client
client = mqtt.Client()

# Assign callback functions
client.on_connect = on_connect
client.on_message = on_message

# Connect to broker
client.connect(BROKER, PORT, keepalive=60)

# Keep listening forever
print("Listening for messages... (Press Ctrl+C to stop)")
client.loop_forever()
The above code subscribes to MQTT topic defect_status and continuously fetches and displays status messages as you run the workflow. You will see output similar to the following when you run the above Python script along with welding defect inspection workflow.

fetch_MQTT_message.pyThis industrial inspection application automates the entire defect detection process from image input to AI analysis, visualization, and real-time IoT communication.
The Best Industrial Inspection Systems
We've explored industrial inspection using computer vision, highlighting how AI-based systems automate visual quality checks across industries. We covered major applications such as defect detection and assembly verification, along with a hands-on example of building a welding defect inspection system using a Roboflow Workflow and MQTT integration. These examples show how computer vision can be easily applied in modern manufacturing to automate process, save time, and yield production. Get started today.
Cite this Post
Use the following entry to cite this post in your research:
Timothy M. (Oct 20, 2025). Industrial Inspection Solutions. Roboflow Blog: https://blog.roboflow.com/industrial-inspection/