
Medical device packaging inspection and UDI label verification can be automated in one Roboflow Workflow that pairs Roboflow's RF-DETR with Gemini 2.5 Pro. This same pipeline can retrain for medical-specific packaging and integrate with industrial cameras and quality systems for production-grade traceability.
Why Medical Device Packaging Verification Matters
Medical device packaging does more than protect products during shipment. It also carries critical information used for identification, traceability, and regulatory compliance. A missing UDI label, misplaced barcode, or packaging mix-up can create downstream challenges for manufacturers, distributors, and healthcare providers.
Barcode quality remains a common issue in healthcare supply chains. According to an AHRMM survey, 48% of healthcare providers reported unreadable or unscannable barcodes as a barrier to successful UDI capture, while 47% experienced problems with stacked or separated barcodes. These issues highlight the importance of validating packaging and labeling before products leave the manufacturing line.
In this tutorial, we will build an automated medical device packaging inspection system using Roboflow. We will train an RF-DETR model to detect medical device packages and visible package damage, deploy the model in Roboflow Workflows, and use Gemini 2.5 Pro to verify the presence of UDI-related markers and generate inspection observations.
Medical Device Packaging Inspection and UDI Label Verification
Here is the workflow we'll create. The system can help identify:
- Damaged packaging
- Visible barcode, QR code, or DataMatrix markers, and if it is readable
- Visible defects that may affect package quality
The final output is an annotated image containing package and damage detections alongside AI-generated inspection observations.
Step 1: Prepare the Dataset
For this tutorial, we use a general package damage dataset rather than a medical-device-specific packaging dataset. The goal is to train RF-DETR to detect visible package damage patterns such as tears, punctures, dents, and crushed regions. Although the training images are not medical device packages, the resulting model can be applied for inspecting medical device packaging when similar visible damage patterns are present.
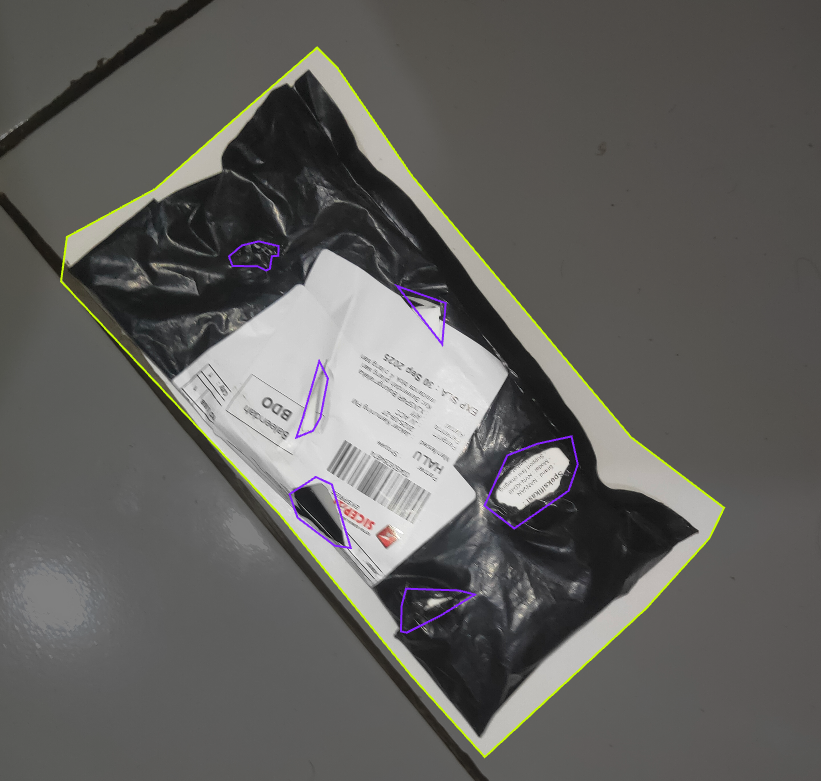
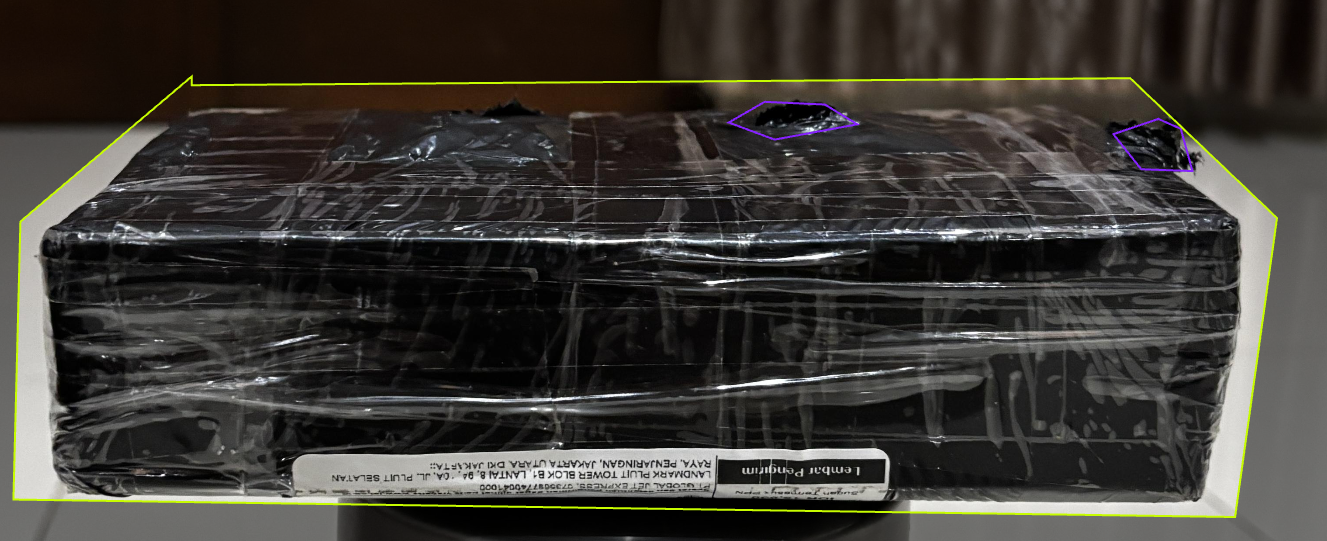
We chose the Package Computer Vision Model dataset from Roboflow Universe. The dataset contains package images annotated for packaging inspection, with two classes:
- package
- Damaged
The package class identifies the full package being inspected, while the Damaged class marks visible defects such as tears, punctures, dents, crushed areas, and other surface damage. This combination allows the model to both locate a package and identify the specific regions that may require further inspection.
The dataset includes packages captured from different viewing angles, orientations, and lighting conditions. Defects also vary in size and severity, helping the model learn to recognize a broad range of packaging damage patterns. Here are examples of the detection targets:
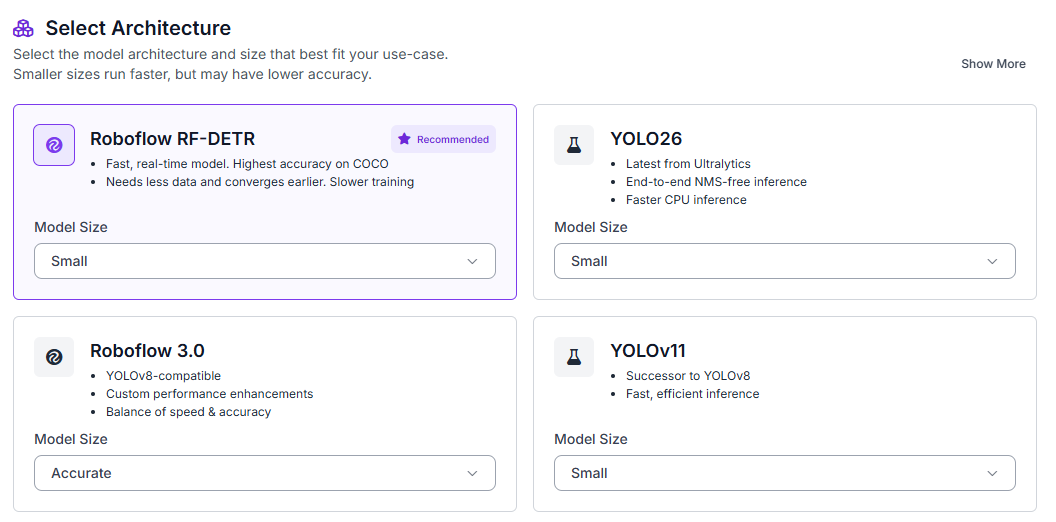
To begin, fork the dataset into your Roboflow workspace. Then navigate to the Train tab and select Custom Training. From the available architectures, choose RF-DETR and set the model size to Small.
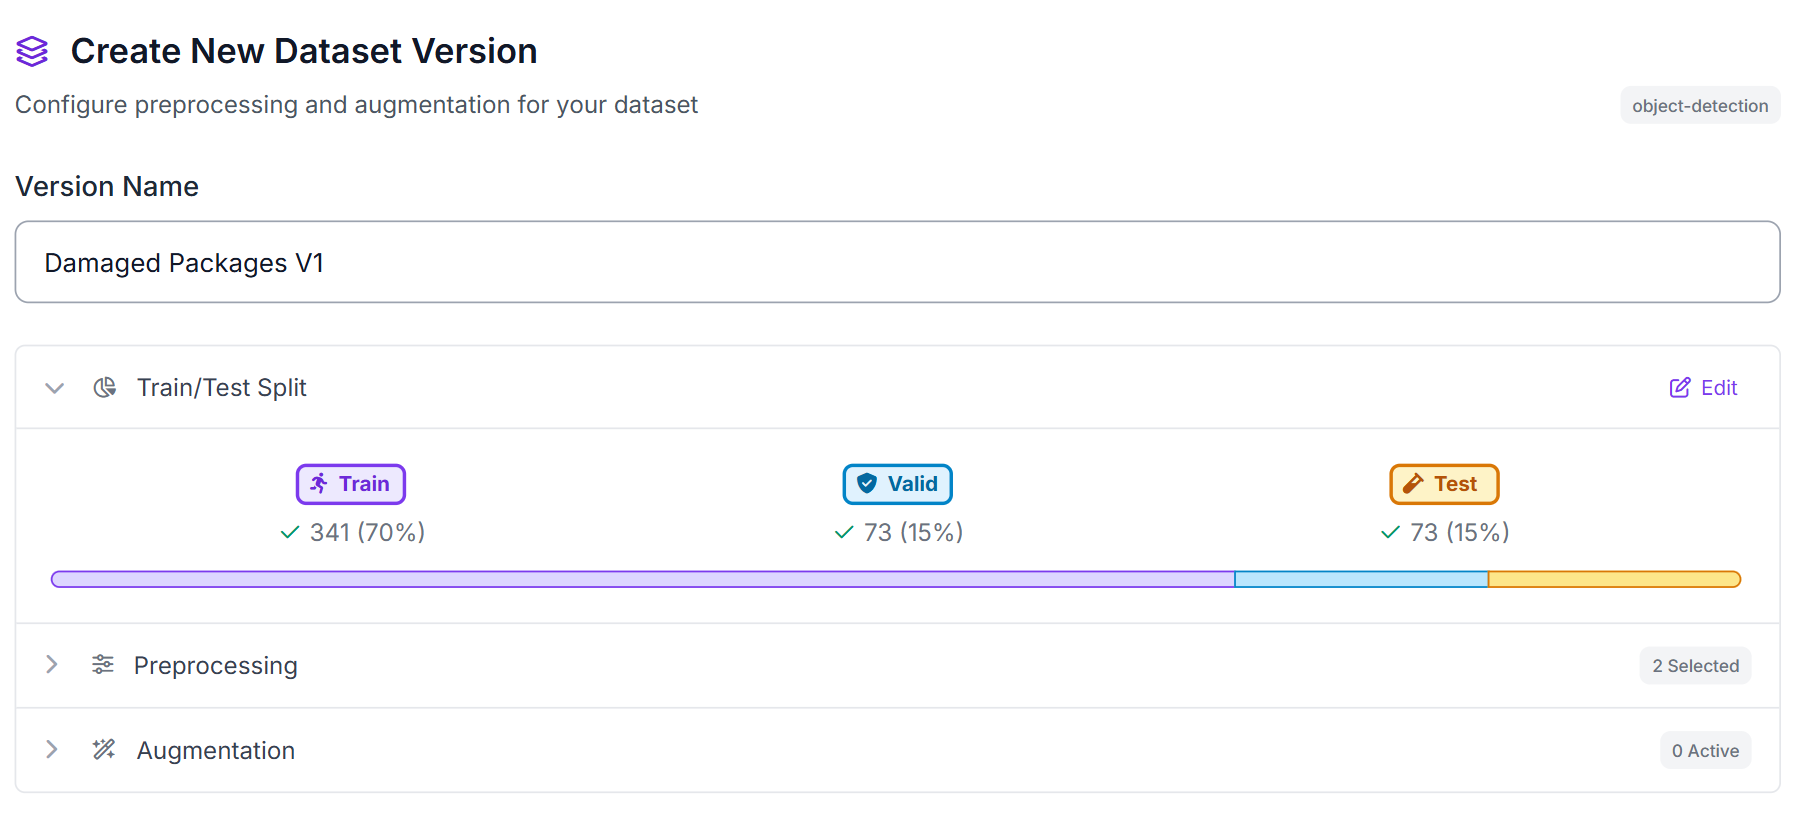
Once the model architecture is selected, generate a new dataset version before starting training. Configure a 70/15/15 split for training, validation, and testing.
Enable the following preprocessing steps:
- Auto-orientation
- Resize (512×512)
These preprocessing steps help normalize images captured under different conditions while providing a consistent input size for RF-DETR training.
Step 2: Train the RF-DETR Model
Once training begins, RF-DETR learns to localize packages and damaged regions directly from the annotated examples in the dataset. Unlike a traditional classification model that only predicts whether an image contains damage, RF-DETR identifies the location of both the package and any detected defects using bounding boxes.
This localization capability is important for the inspection workflow because it provides visual evidence of where damage occurs. Rather than returning a single damaged/not damaged prediction, the model highlights the specific regions that may require review.
After training completes, Roboflow provides evaluation metrics that help measure how accurately the model detects packages and damaged areas. These metrics allow us to determine whether the model is ready to be deployed in a workflow and used for downstream analysis with Gemini 2.5 Pro.
Step 3: Evaluate Metrics
Once training completes, review the model's detection performance on the test set. Our RF-DETR Small model achieved strong results on the packaging inspection task:
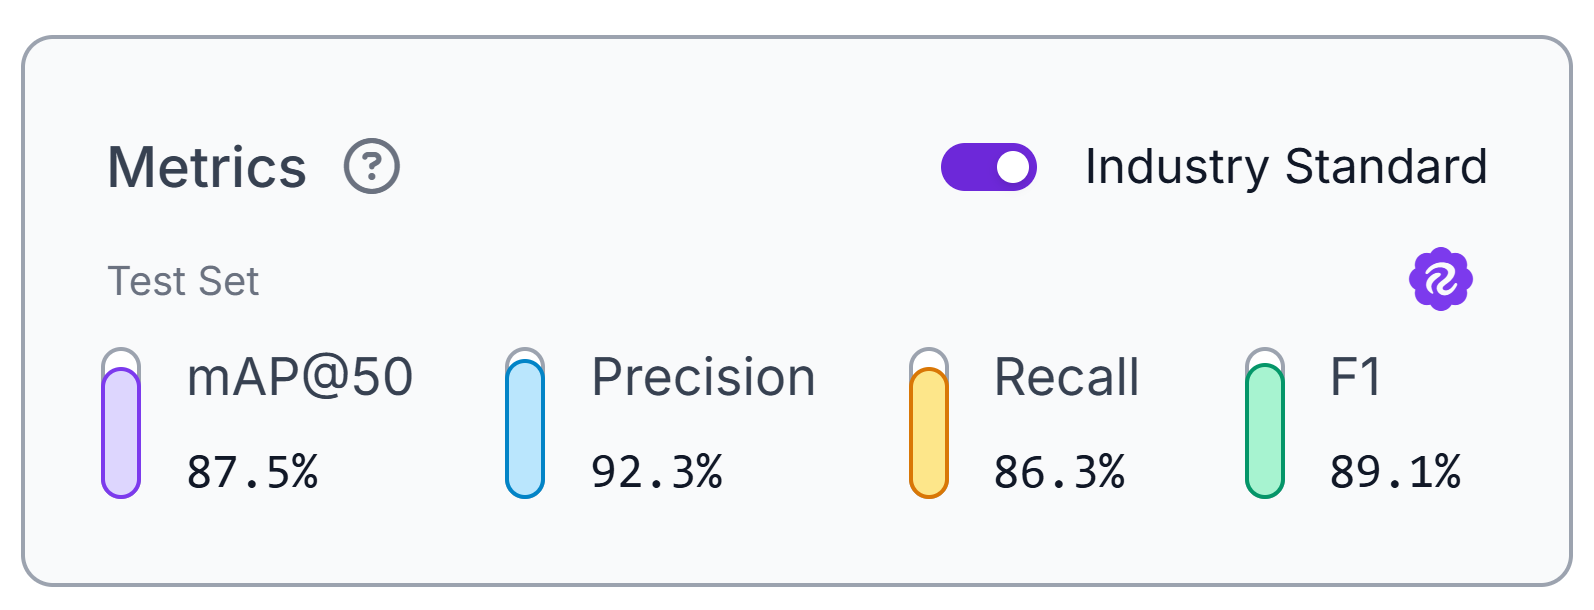
The model achieved 87.5% mAP@50, along with 92.3% precision, 86.3% recall, and an 89.1% F1 score. These metrics indicate that the model can reliably identify both packages and damaged regions across the test dataset.
The high precision score means that most detected damage regions correspond to actual defects, reducing false alarms during inspection. Strong recall helps ensure that damaged areas are not overlooked, which is important when the model is used as the first stage of an automated quality-control workflow.
These metrics evaluate the package and damage detection model only. Verification of UDI information and inspection observations will be handled later in the workflow using Gemini 2.5 Pro.
Step 4: Deploy to Workflows
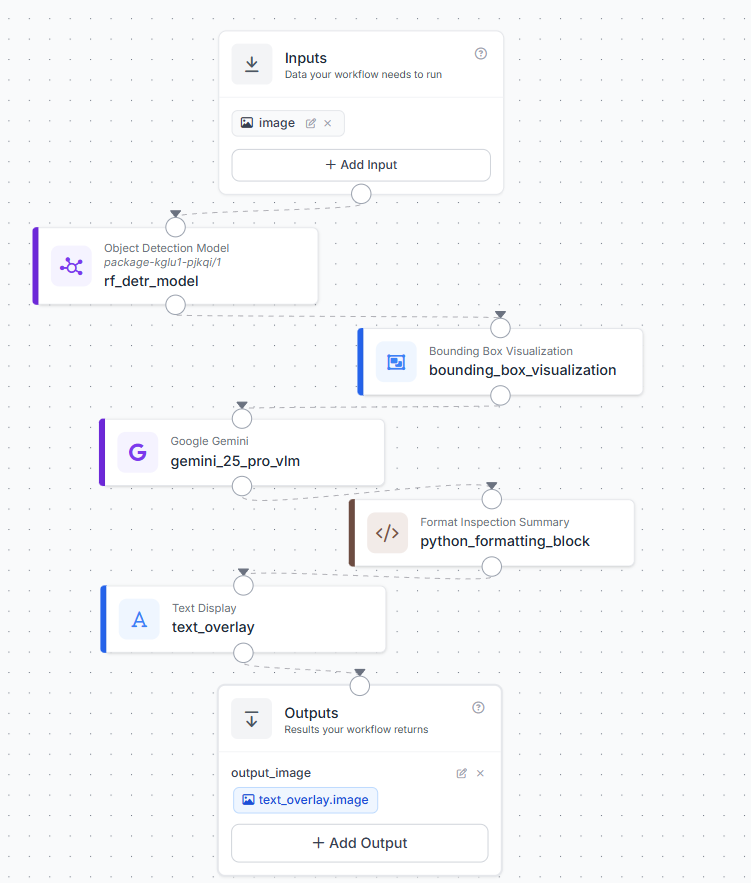
After validating the model’s performance, deploy it as an interactive Roboflow workflow. Workflows provide a visual interface for connecting object detection, visualization, VLM reasoning, text formatting, and final image output in one pipeline.
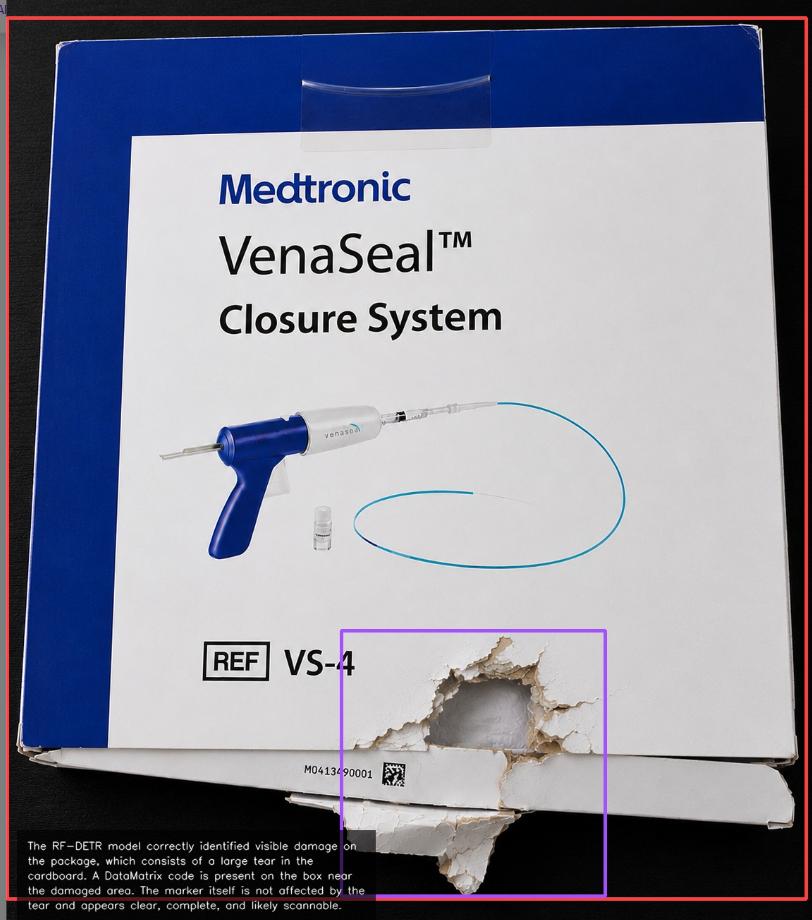
Our workflow starts with an input image of a medical device package. The RF-DETR model detects the overall package and any visible damaged regions. A bounding box visualization block then draws those detections onto the original image so the inspection evidence is visible.
The annotated image is passed to Gemini 2.5 Pro. Gemini reviews the boxed image and generates a short inspection summary. In this workflow, RF-DETR is responsible for detecting package damage, while Gemini is used to interpret the annotated image and check whether UDI-related information is visible, such as a barcode, QR code, or DataMatrix code.
A custom Python block formats Gemini’s response into short, wrapped lines, then a text overlay block renders the inspection summary onto the annotated image. The workflow returns one output: a final image containing RF-DETR detections and Gemini-generated inspection observations.
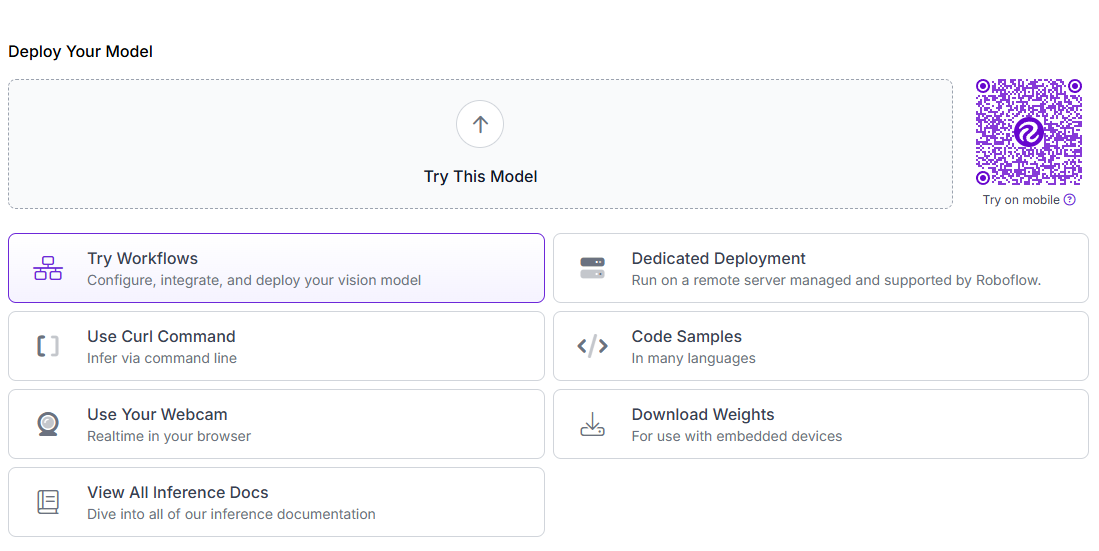
To create the workflow, click Try Workflows when viewing your trained model’s deployment options. From the template gallery, select Detect and Visualize as the starting point.
Step 5: Configure the Gemini 2.5 Pro VLM Block
Add a Google Gemini block after the bounding box visualization block. Configure it to receive the annotated image, not the original image. This gives Gemini the same visual evidence that appears in the final output.
Use these settings:
- Image: $steps.bounding_box_visualization.image
- Model: Gemini 2.5 Pro
- Task Type: Open Prompt
Use this prompt:
Analyze this annotated medical device package image.

The bounding boxes come from an RF-DETR model:
- package boxes identify the package
- Damaged boxes identify visible damage regions

Assess the package using the image and annotations. Determine whether RF-DETR detected visible package damage, whether a barcode, QR code, or DataMatrix code is visible, which UDI marker type is present, and whether the marker appears clearly visible and likely readable.

If a UDI marker is present, evaluate whether any visible conditions could affect scanning, such as damage, blur, glare, low contrast, cropping, folds, or obstruction.

Do not claim that a marker is scannable unless it appears fully visible, unobstructed, and reasonably clear. Do not infer information that cannot be observed in the image. Do not invent defects, labels, or UDI markers that are not visible.

Return only a concise inspection summary in 2–4 sentences. Do not use bullet points, numbering, headings, or structured lists.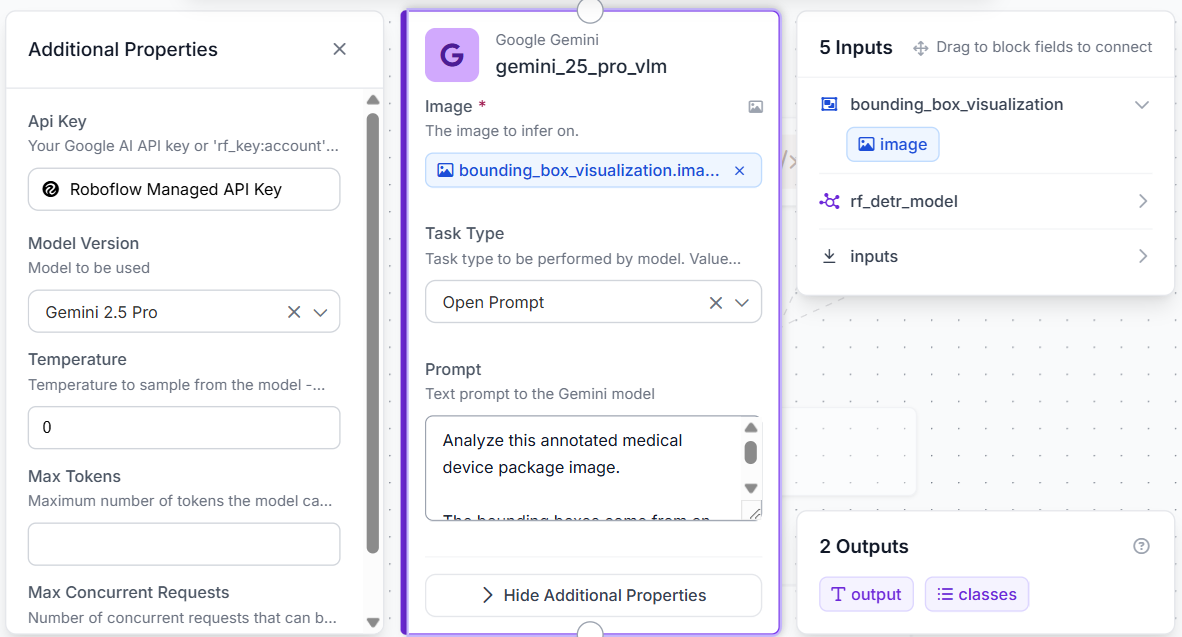
Gemini receives the boxed image produced by the RF-DETR detection and visualization steps. The model does not replace the object detector. Instead, it interprets the annotated image, checks for visible UDI markers, and produces a short inspection summary.
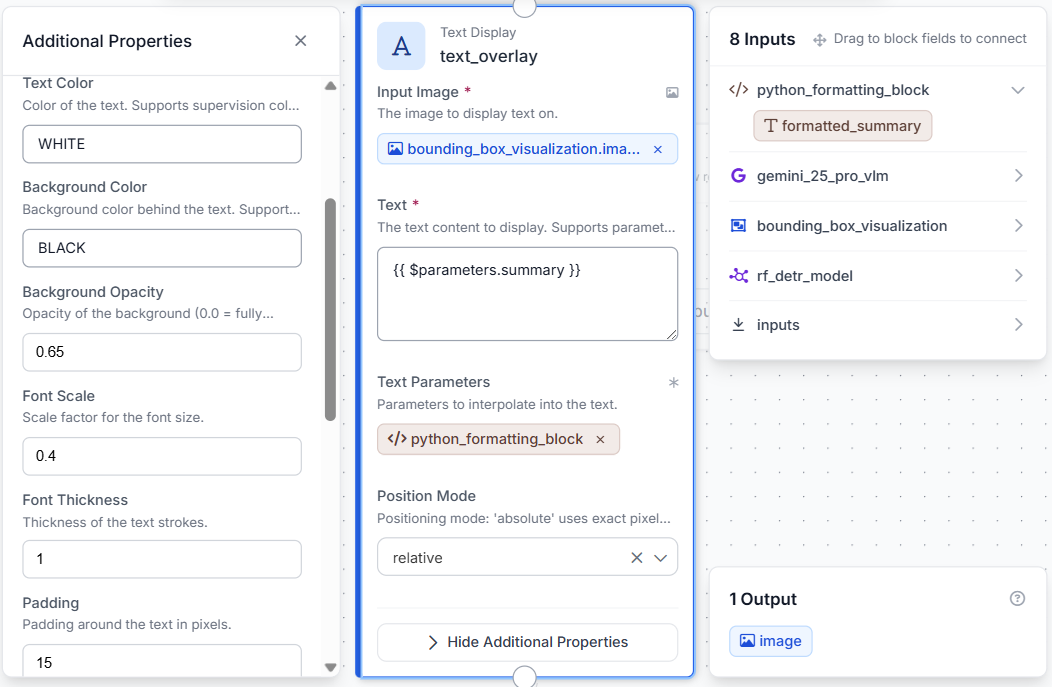
Step 6: Format and Overlay the Inspection Summary
Next, add a custom Python block after the Gemini block. This block formats Gemini’s response so it fits cleanly when displayed on the final image.
Use this code:
def run(self, gemini_response):
    import textwrap

    text = str(gemini_response or '').strip()
    if not text:
        text = 'Inspection summary unavailable.'

    text = ' '.join(text.replace('\n', ' ').split())
    wrapped = textwrap.fill(text, width=58)

    return {'formatted_summary': wrapped}
The block converts the Gemini response into plain text, removes extra whitespace, and wraps the summary into shorter lines for the overlay.
Finally, add a Text Display block. Use the bounding box visualization image as the base image and the formatted Gemini response as the overlay text. Place the text in the bottom-left corner with white text on a semi-transparent black background.
The final output is a single annotated image showing the package, detected damage regions, and Gemini’s inspection summary.
Step 7: Test the Workflow
Click Run in the top-right corner of Workflows to validate the pipeline. Upload a medical device package image containing visible packaging details, such as product labels, barcodes, UDI information, or package damage.
The final output is a single annotated image containing:
- RF-DETR package detections
- RF-DETR damage detections
- Gemini-generated inspection observations
- A formatted inspection summary is displayed in the bottom-left corner
Because the workflow relies on a single image, the results should be treated as visual assessments rather than formal package quality determinations. Clear images with visible labels, UDI markers, and minimal obstruction generally produce the most reliable results.
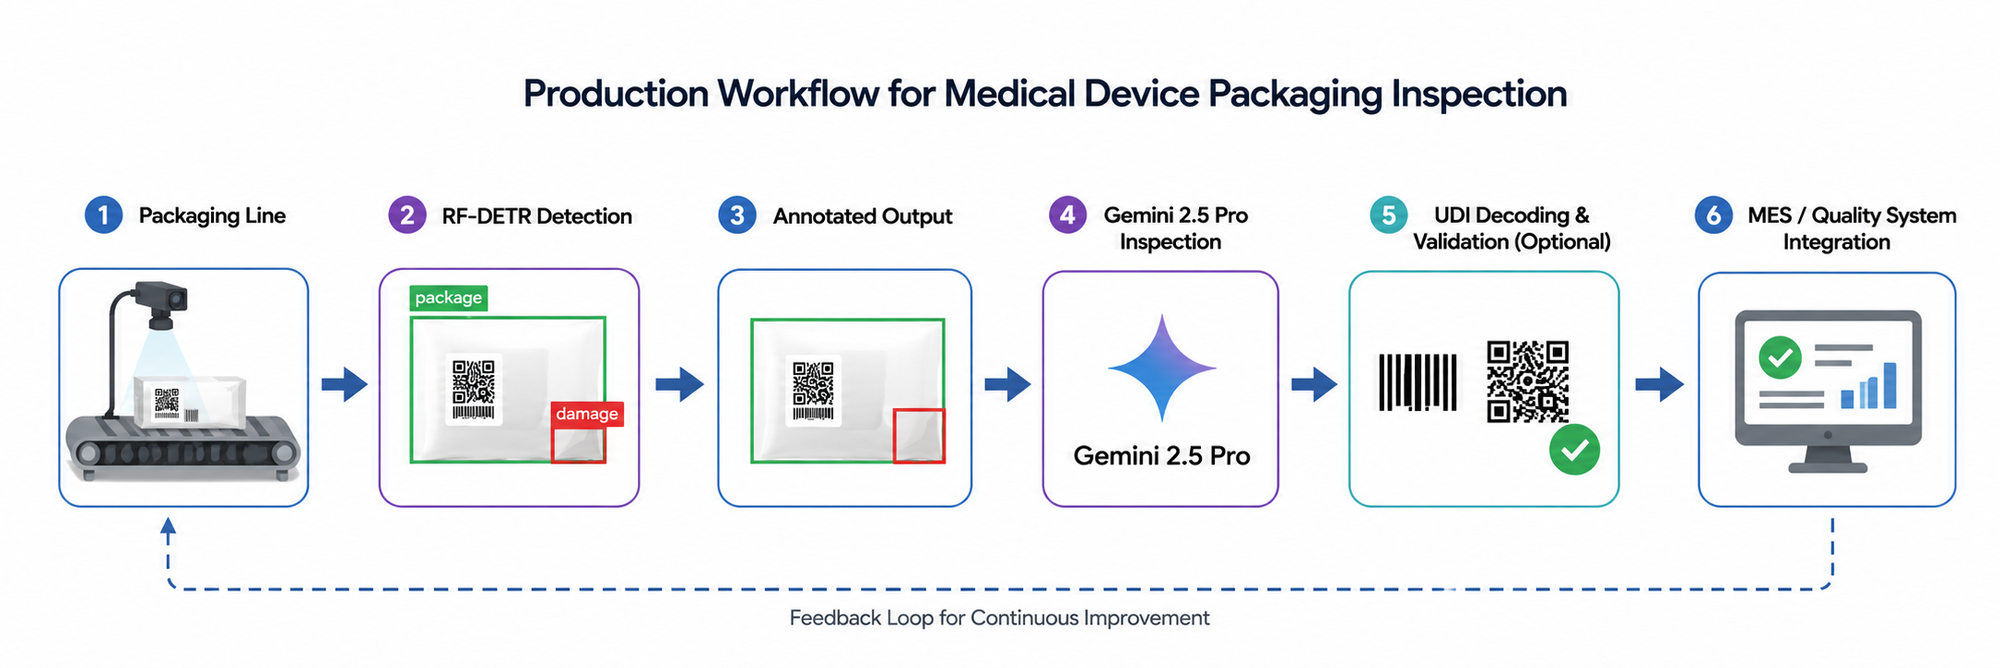
Production Considerations for Medical Device Packaging
While this tutorial uses a general package-damage dataset as a proof of concept, a production medical device packaging inspection system would typically be trained on medical-device-specific packaging images. These datasets may include sterile barrier pouches, cartons, blister packs, and labels.
In a production environment, the workflow could be integrated directly into a packaging line using industrial cameras positioned after labeling and sealing stations. RF-DETR could be retrained to detect packaging defects, damaged labels, missing labels, tamper-evident seal issues, or other packaging abnormalities specific to a manufacturer's products.
The Gemini inspection stage could serve as a secondary verification layer by reviewing the detected package and assessing whether UDI-related markers appear visible, unobstructed, and readable. Additional systems such as barcode decoders, OCR pipelines, or validation software could then be used to verify the actual UDI contents and compare them against manufacturing records.
Inspection results could be stored in manufacturing quality systems, enabling traceability, audit reporting, and automated review of packages flagged for further inspection. This combination of object detection, visual reasoning, and production-system integration can help streamline packaging quality control while reducing the amount of manual inspection required.
Using Roboflow Agent for Medical Device Packaging Inspection
Want help? You could also just describe the problem you want to solve to Roboflow Agent in plain language and it creates the workflow for you. Watch the video below to see the Agent assemble the pipeline from prompts.
Medical Device Packaging Inspection and UDI Label Verification Conclusion
In this tutorial, we built an automated medical device packaging inspection workflow using Roboflow. We trained an RF-DETR model to detect packages and visible damage, then deployed it in Roboflow Workflows and connected it to Gemini 2.5 Pro for package inspection and UDI marker assessment.
By combining object detection with multimodal reasoning, the workflow can identify visible damage, assess the presence and readability of barcode, QR code, or DataMatrix markers, and generate a concise inspection summary directly on the output image.
While intended as a visual inspection aid rather than a regulatory validation system, the workflow demonstrates how AI can help streamline packaging quality control processes.
Further reading:
Cite this Post
Use the following entry to cite this post in your research:
Mostafa Ibrahim. (Jun 11, 2026). Automate Medical Device Packaging Inspection and UDI Label Verification. Roboflow Blog: https://blog.roboflow.com/medical-device-packaging-inspection/