
Improving a computer vision model is an iterative process, and the most common mistakes happen before training: vague problem definitions, too many classes too soon, loose bounding boxes, and skipping baseline runs before adding augmentations. This guide covers a practical sequence drawn from advising hundreds of companies: start with a narrow problem, collect and label relevant data carefully, evaluate using the confusion matrix and vector analysis tools to find class-level failures, test the model by hand, and use active learning to feed the next dataset version with real production images.
Computer vision projects involve iteration. It is rare for a model to perform exactly as you expect after you have labeled your first batch of images. It is much more common for each version of your model to become a foundation on which to build future versions. Then, when you have a model that performs to your expectations, you can deploy it to production.
You may be wondering: How do I improve my computer vision model? That’s a great question.
In this guide, we are going to walk through tips that you can use to improve the performance of your vision models. Our tips are based on the best practices we have seen advising hundreds of companies on developing vision models.
Without further ado, let’s get started!
Know the problem you are solving
The key to building an accurate computer vision model is to start with a clearly defined problem. What problem are you trying to solve? How will a computer vision model help?
For example, consider a scenario where you are working on a system to identify defects on coffee bags. Your problem statement might be “Too many defective coffee bags are sent to our customers. We want to more proactively identify defects.”
Once you have a problem statement in mind, you can start to outline the steps of your project. In the case of identifying product defects, your next steps would be:
- Recording what defects you want to identify.
- Figuring out how to collect images of each defect.
- Coming up with an “ontology” that assigns a clear name to each defect.
Having a clear idea of the problem you want to solve in mind gives you a solid foundation upon which to start collecting and labeling data.
Keep it simple to start
While computer vision models can be trained to identify dozens (even hundreds) of objects, you should aim to identify one or two features in your first model version – whether objects in the case of object detection or segmentation, classes in the case of classification models, etc. Focus on solving a subset of a problem rather than the whole problem all at once.
For instance, there may be eight different defects you want to identify in coffee bags that cross a manufacturing line (i.e. open bag, ripped bag, missing label, torn label). But trying to train a model to identify all eight defects at once will be hard. You will need more data. Any issues with data quality will become more expensive to fix.
You could narrow the problem and instead choose two different defects to identify. Then, as your model improves and you build confidence in your model, you can start expanding the scope of the project.
Collect relevant data
The key to a good computer vision model is good data. There are already many excellent architectures out there you can use for training, but none are of any use if the data you use for training is not well-labeled and representative of the problem you are trying to solve.
There are a few things you should keep in mind when collecting data:
- Data should be representative of the environment in which your model will be deployed. For instance, if you are identifying defects on an assembly line, your input data should be collected from a camera positioned on an assembly line.
- Your data should represent different environments, too, if applicable. For example, if you are building a system to read shipping container IDs, you will need data from cameras that have been taken at all times of day and in all weather conditions. This will ensure your model works in multiple environments that you will use it in, not just one.
- You should collect multiple images that contain objects you want to identify. The more examples you have of something you want to identify – for example, a specific product defect – the better your model will be able to learn.
We recommend starting by collecting 50-100 images for use in training a first model version. When labeled, this is usually enough images to build a model version that can identify a few unique classes.
For a production model version, you may end up collecting hundreds or thousands of images. There is no hard rule for how many images you need to collect.
After training a first model version, consider collecting more data, labeling it, then adding the data to your project. Train a new version and see how the model performs. You can use the performance of your new model to identify potential gaps in your data. Your model doesn’t perform well at identifying one class? Maybe you need more data showing that class.
Tips for labeling data
There are two tenets to creating high quality data:
- Collecting data relevant to your use case, as described above, and;
- Label your data with what you expect your model to output.
Before you start labeling, take a step back to ask what you want your model to be able to identify. Come up with a list of “classes” that describe what you want to identify. Then, write what each class means. Maybe a tear in a coffee bag on an assembly line is classed as “torn-bag” but a bag missing a seal is classed as “missing-seal”.
Clearly defining what each class means ensures that everyone who helps label your data will be on the same page.
When you are labeling data, here are a few things to keep in mind:
- Draw bounding boxes tightly around objects for object detection. The closer the bounding box is to the edge of the object you want to identify, the better. Draw polygons around objects closely for segmentation. The closer the polygon is to the contours of the object, the better.
- Label every object relevant to your project. If you have an image with three objects of interest, label them all.
- Add a few “null images” that don’t contain any objects of interest. These are images that don’t have any annotations and are marked as “null”. These images let a model see examples of when there are no objects of interest in an image. Null images should still be related to the environment in which you plan to deploy your model; random images would be ineffective and may even harm model performance.
- Use SAM-powered labeling to draw complex polygons with one click. This tool lets you calculate complex polygon annotations with ease. This is ideal for segmentation projects. Polygons are automatically converted to bounding boxes in Roboflow too, so you can use the tool to speed up your object detection labeling flow.
Read our full labeling best practices guide for more information and tips.
If you notice your model is performing inconsistently, look back at your data and review your annotations. Common mistakes include:
- Drawing bounding boxes that aren’t closely bound around an object.
- Missing annotations in an image.
- Images that have been marked as null but have an object of interest in them.
- Annotations that use the wrong label.
Review augmentation and preprocessing steps
Before you train a computer vision model, you can apply augmentations and preprocessing steps to your data.
Augmented images are copies of existing images to which changes have been applied. You can use augmentations to increase the number of image examples your model sees during training. Common augmentations include:
- Rotate, to rotate an image by a certain number of degrees.
- Flip, to flip an image in a direction.
- Brightness, to make an image brighter or darker.
- Crop, to crop out a random subset of an image.
For your first model version, we recommend using no augmentations. This is one of the pieces of advice we give out most often at Roboflow. By training a model version with no augmentations, you can develop a baseline understanding of how your raw data impacts the performance of your model.
If your labeled data quality is poor or inconsistent, no amount of augmentations will be helpful.
Once you have trained a first model version with no augmentations, you can then experiment with augmentations.
“But what augmentations should I use?” you may wonder. We recommend looking through those available in Roboflow and asking whether the augmentation is relevant to your project.
For instance, if you are identifying coffee bag defects, a “rotate” augmentation is probably not useful because coffee bags should always be in the same orientation. But if you are counting screws on a tray for use in an inventory management system, a “rotate” augmentation may be ideal since screws could appear at any orientation on the tray.
Whereas augmentations create copies of images with changes, preprocessing steps ensure that all images in your dataset are consistent. For preprocessing steps, we recommend applying the defaults in Roboflow. This includes a resize preprocessing step, which ensures all images are of the same size during model training. This is essential for many models.
Read our full guide to augmentations and preprocessing steps for more information.
Make sure your test and valid sets are well curated
There are three “splits” in a machine learning dataset:
- Train, the images used to train a model.
- Valid, the images used to validate model performance. These are not shown in training, and are used for calculating model metrics.
- Test, the images used to test a model. These are not shown in training, and can be used to evaluate a model on images other than those used to calculate metrics.
It is essential that your train, valid, and test sets all contain examples of classes that you want to identify. For instance, suppose you are building a system to identify coffee bag defects. If all images showing a “torn-label” are in your valid test, your model will never see any examples of the class. This means that your model will not learn to identify the class.
Similarly, suppose there is only one example of a “torn-label” in your valid set. This means that there will only be one example of the class that can be used to identify how well your model performs at identifying the class. This is a case for adding more data to your dataset, and ensuring that your valid and test splits contain several instances of the objects you want to identify.
You can check your data splits from the Dataset tab in your dataset:
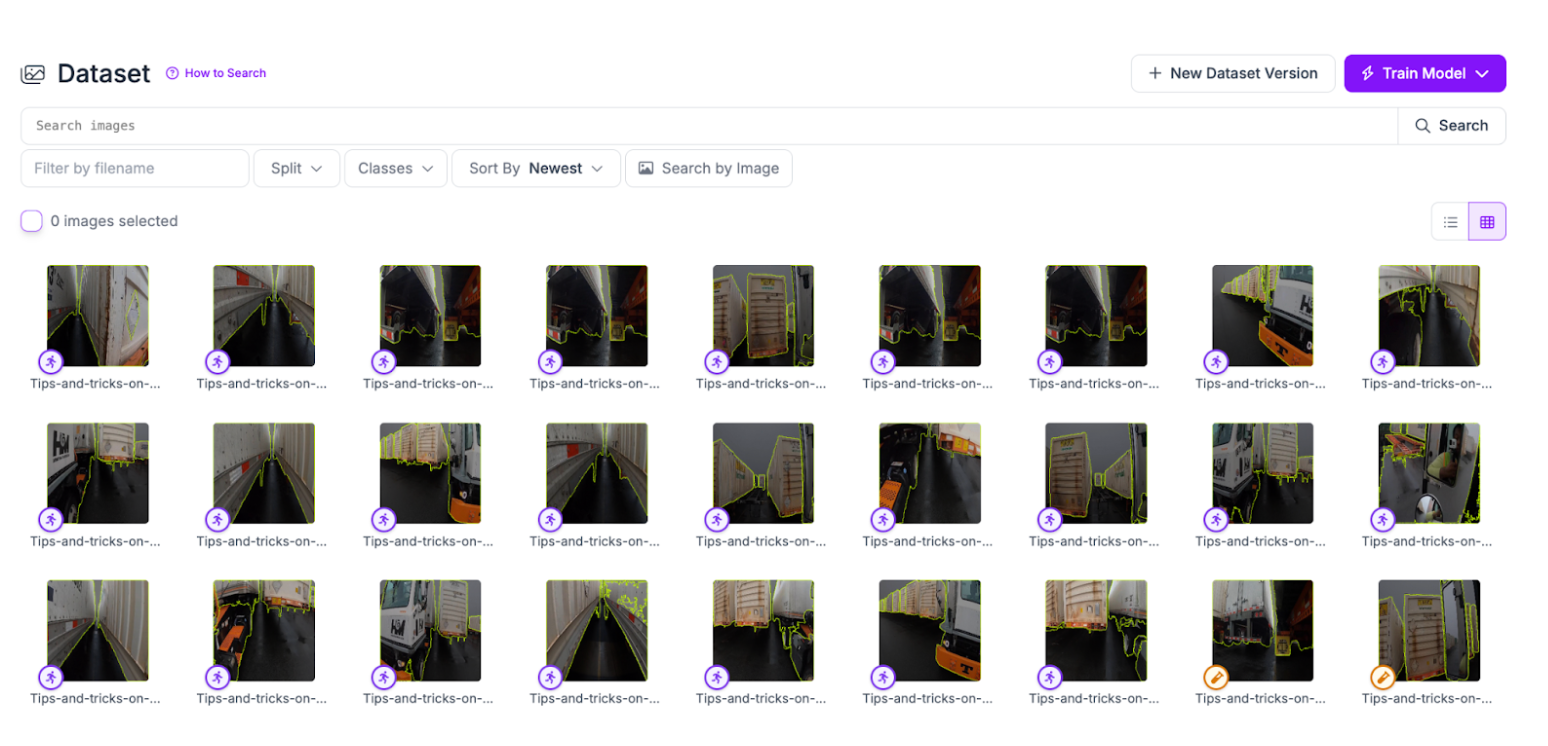
You can use the “Split” feature to narrow your search to only images in your train, test, or valid splits. You can then review images to see if your valid and test sets contain a diverse range of images that you can use to accurately evaluate your dataset.
Review model metrics
Once you have a trained model, you will have access to many metrics on how your model performs. These include:
- Precision;
- Recall, and;
- Mean Average Precision (mAP).
You can use these metrics to understand how your model performs.
Precision is a measure of, "when your model guesses how often does it guess correctly?" Recall is a measure of "has your model guessed every time that it should have guessed?"
mAP is equal to the average of the Average Precision metric across all classes in a model. You can use mAP to compare both different models on the same task and different versions of the same model.
Generally, the closer precision, recall, and mAP are to 100%, the better. But these metrics only give you an aggregate view of how your model performs given your validation data.
If you are going to deploy your model in an environment that looks different to the data you trained your model on – for example, if a model will be run in a darker environment than your input data – the metrics may be good but the production performance may be poor.
This is why it is important to both read and understand the metrics, and test your model with production-like data.
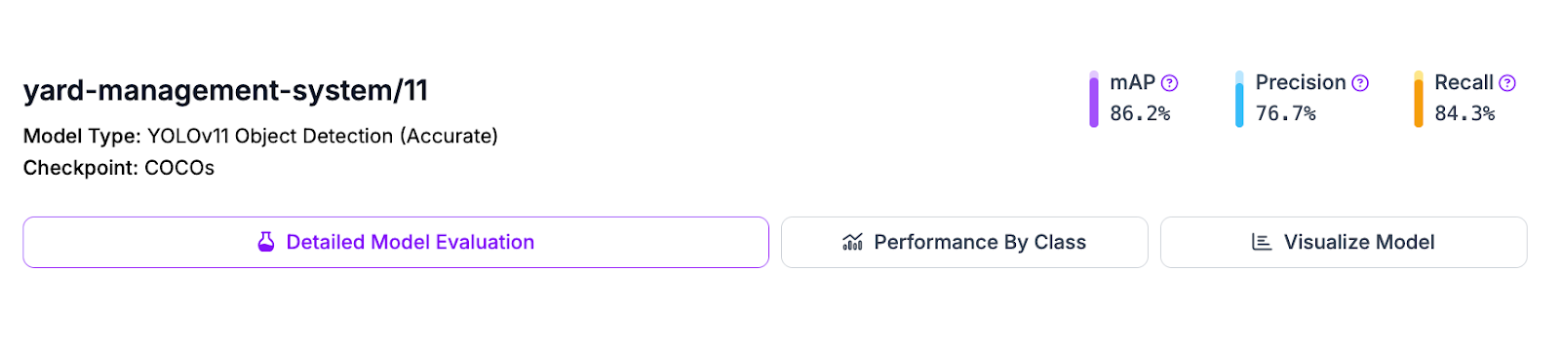
You can interpret your model metrics with Roboflow’s model evaluation feature. This feature, available in your model dashboard through the “Detailed Model Evaluation” button, comes with several tools for diagnosing model performance.
Confusion Matrix
The first tool is a Confusion Matrix, which shows when your model correctly and incorrectly identifies classes on your validation set.
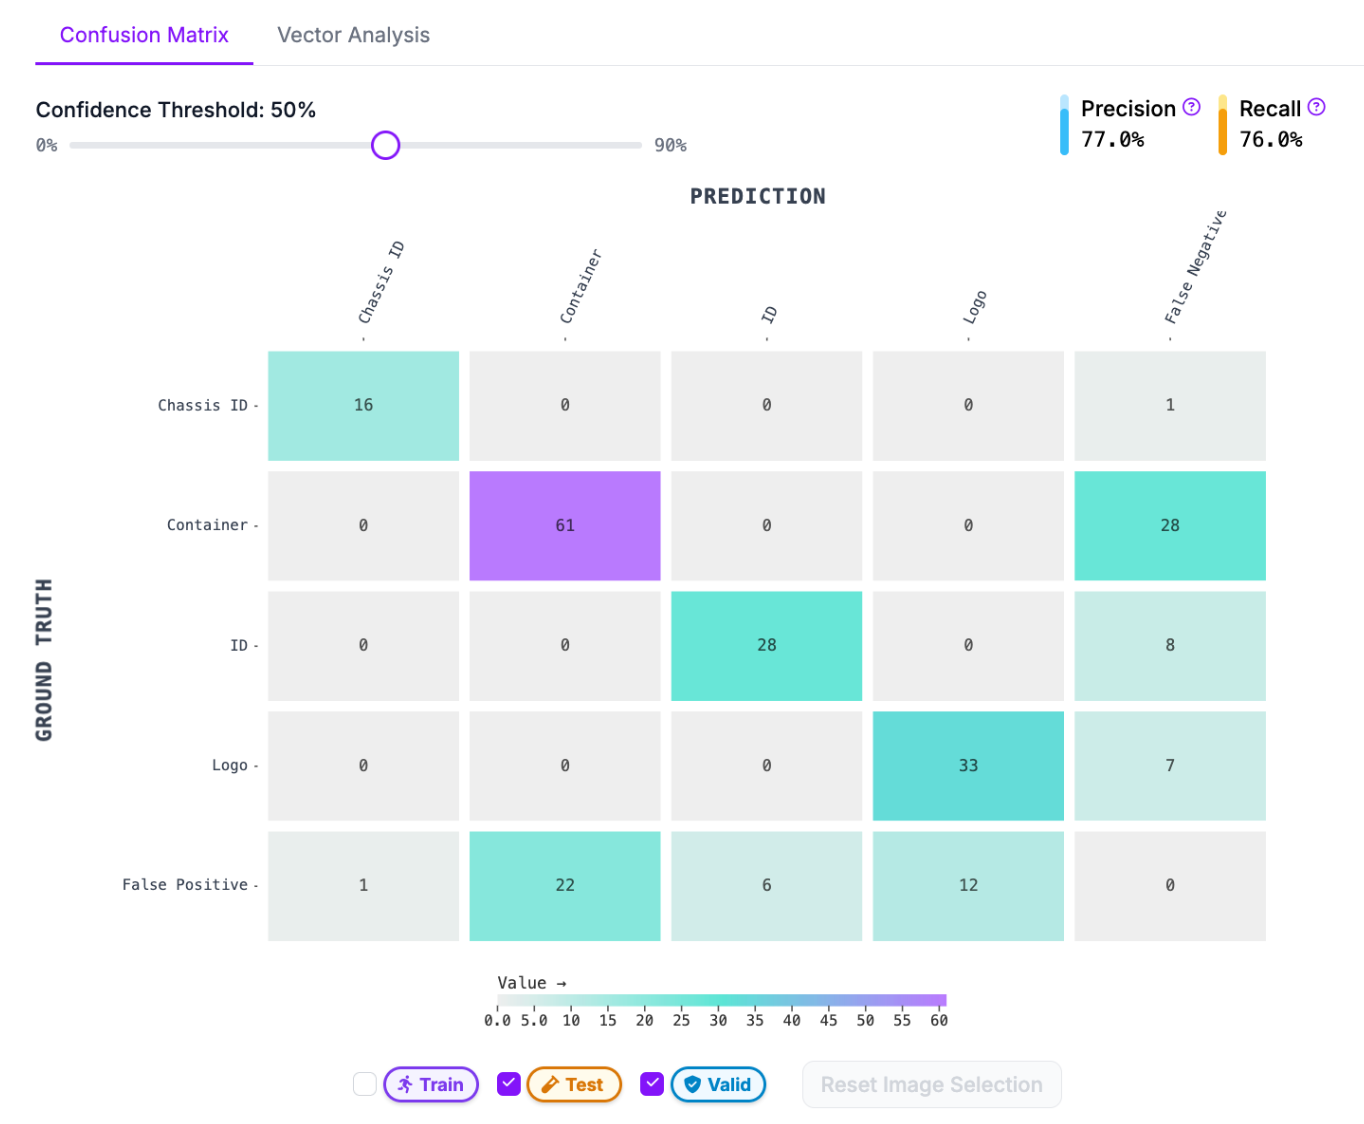
The higher the numbers are on the diagonal line from the top left to the bottom right, the better. If there are numbers outside that line, it means there are either false positives, false negatives, or mis-identifications.
In the example above, 22 instances were marked as “Container” when there was not a container. This tells us that:
- There may be images missing annotations in my dataset.
- There may be data that is incorrectly labelled as a Container in images in my dataset.
You can click into each of the cells in the confusion matrix to diagnose further. In this case, there are six images where a Container was falsely predicted.
When you click into an image, you can compare “ground truth” (your annotations) to the predictions from your model.
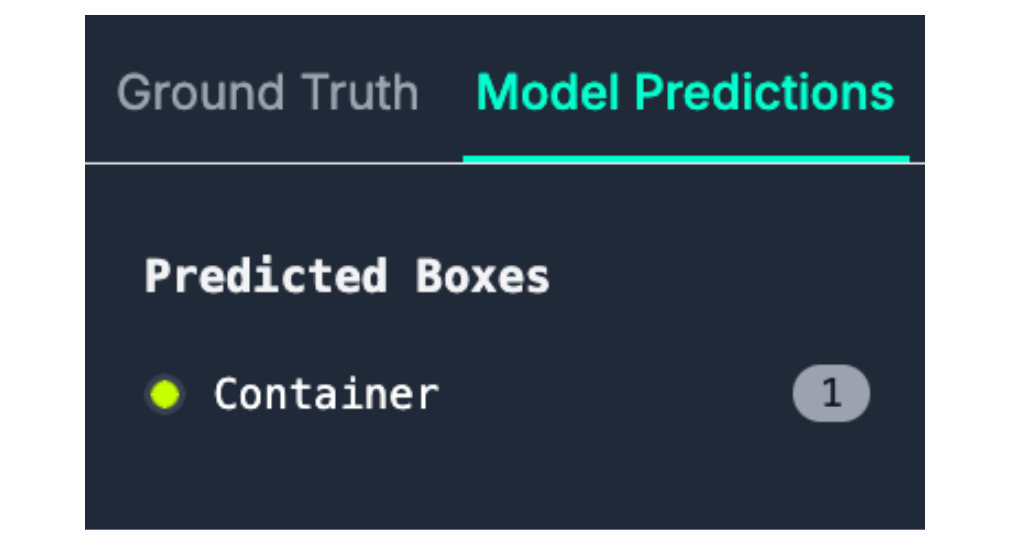
In this example, the model finds a Container where one is not labeled. There is a Container in the image, which tells us that our data has been mis-labeled.
There are also 28 instances of false negatives for the “Container” class, where the model missed a Container that was labeled. This may tell us that:
- We need more data that shows containers in different environments.
- Some annotations of containers are missing.
Like we did above, we can click through the confusion matrix to find examples of images where our model did not perform as expected and diagnose accordingly.
Vector Analysis
The Roboflow model evaluation suite comes with a vector analysis tool that you can also use to identify scenarios where your model does not perform well.
The vector analysis tool clusters all of your images by similarity, using image vectors calculated for each image in your dataset. You can use the tool to find specific clusters of images where your model struggles. You can then click into each image to compare your ground truth annotations with the results from your model.
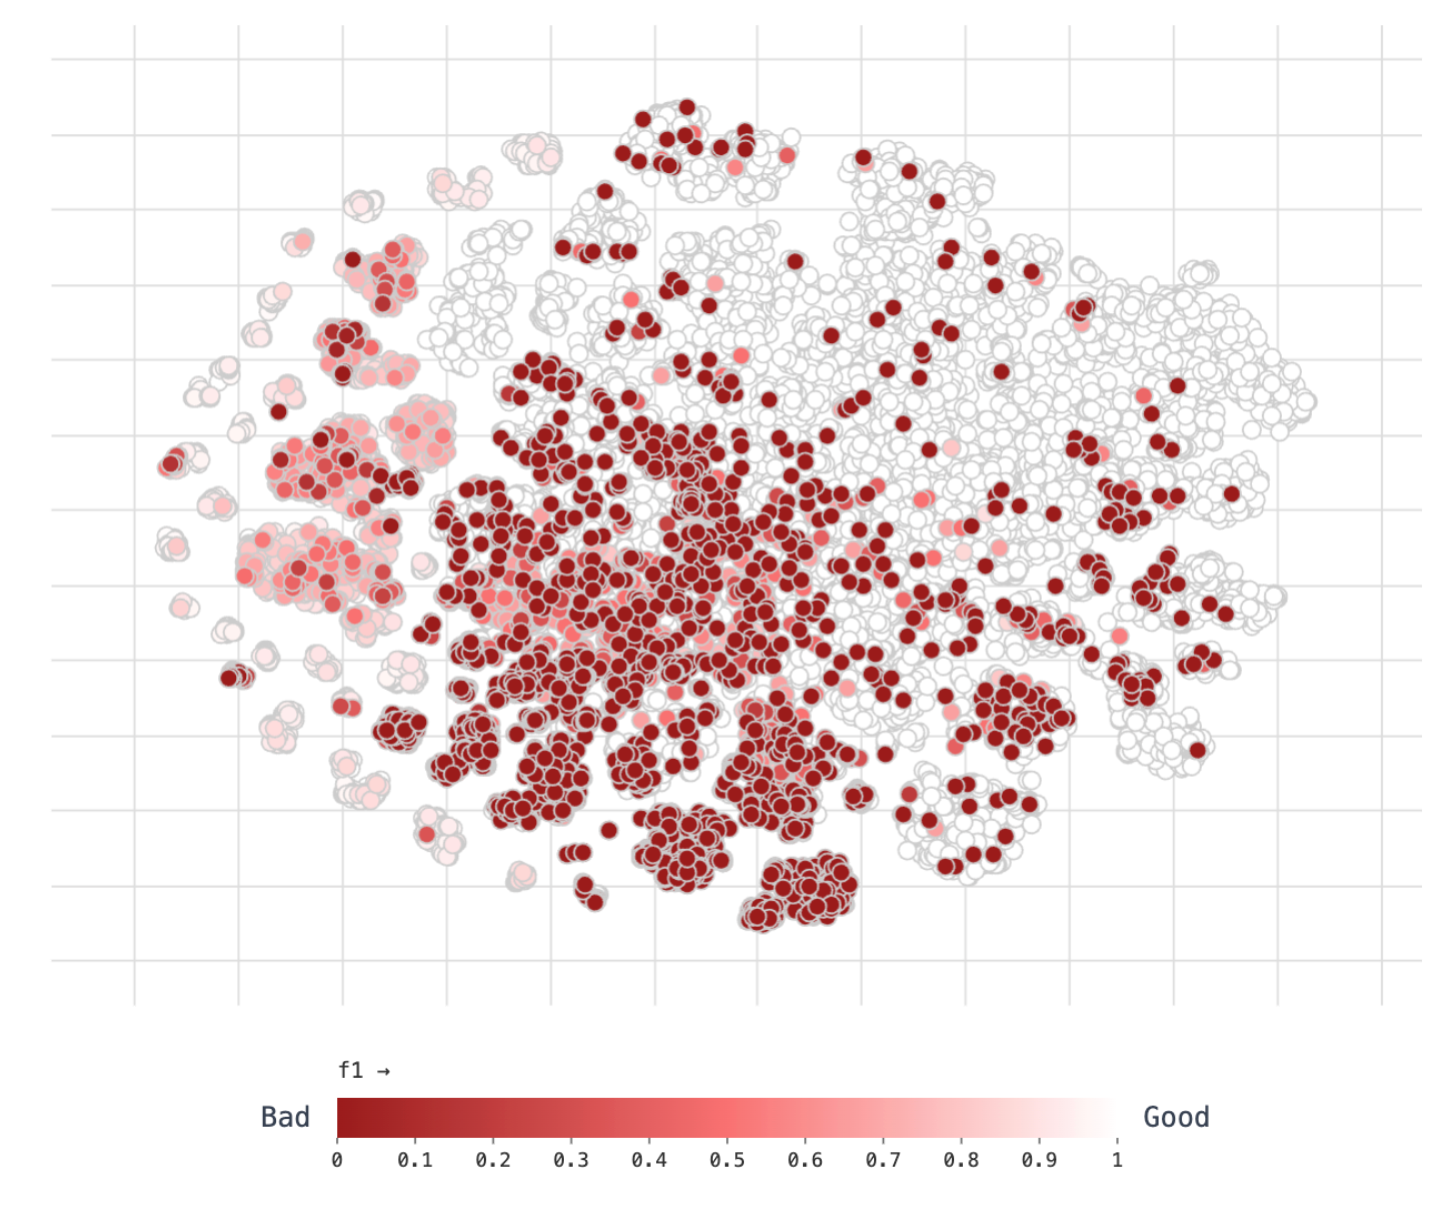
Here is an example of a vector analysis plot:
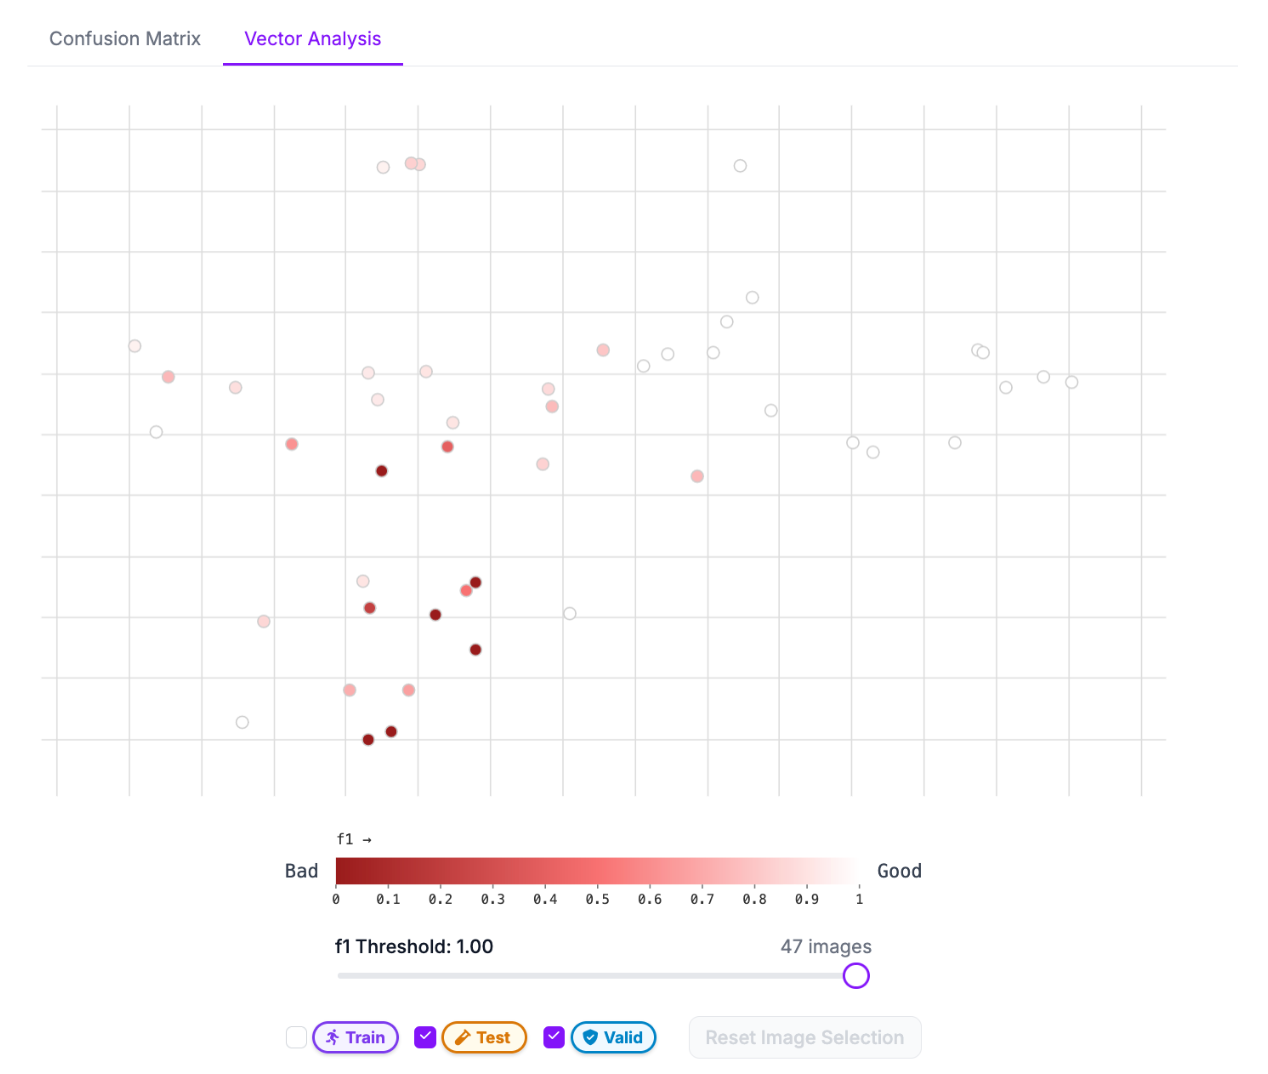
Here, our images are clustered by similarity.
Each image is marked by a dot. The darker the dot, the more mistakes the model made when compared to ground truth.
We can see there is a particular cluster where our model tends to do worse – the part on the graph where there are more red dots. We can click on a few to add them to the sidebar in the vector analysis tool:
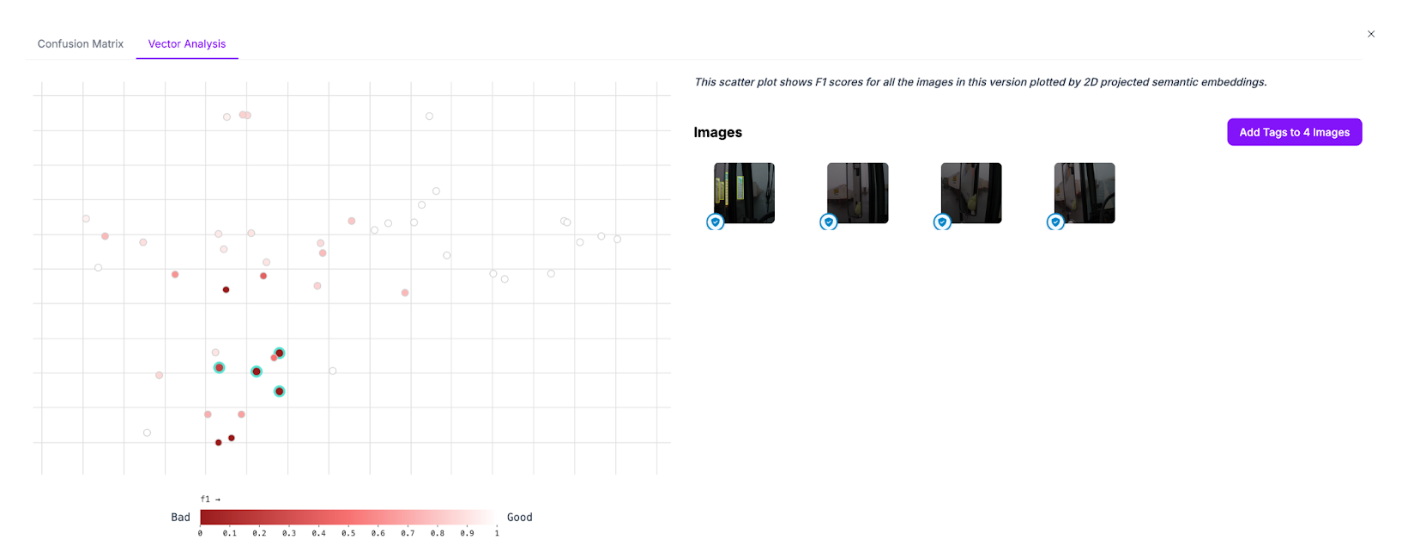
We can then start to evaluate each image to see where the model struggles.
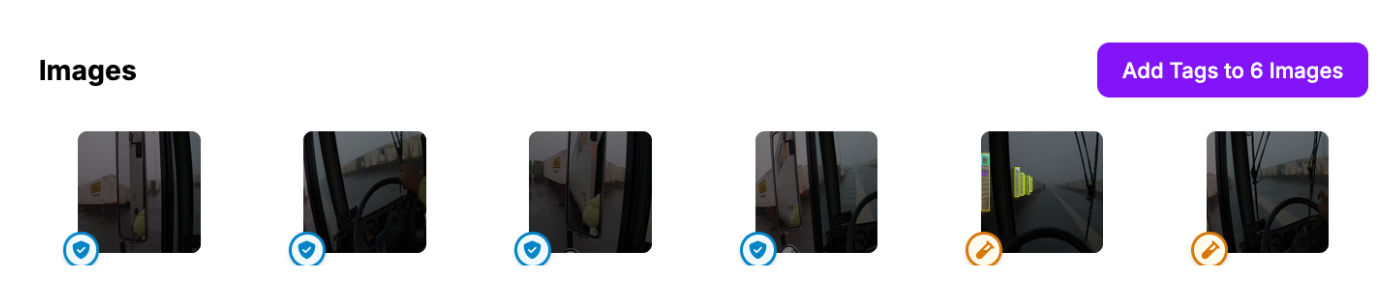
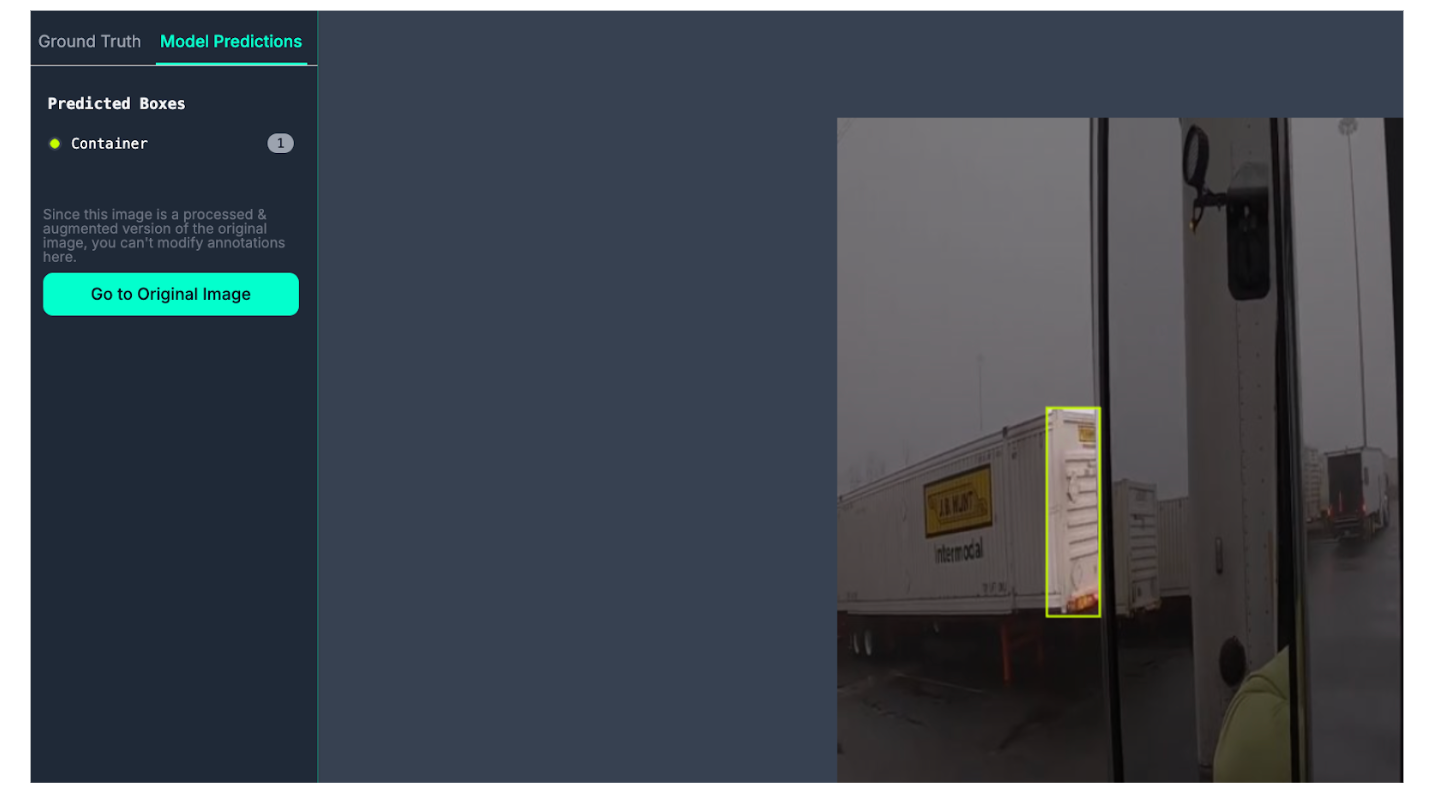
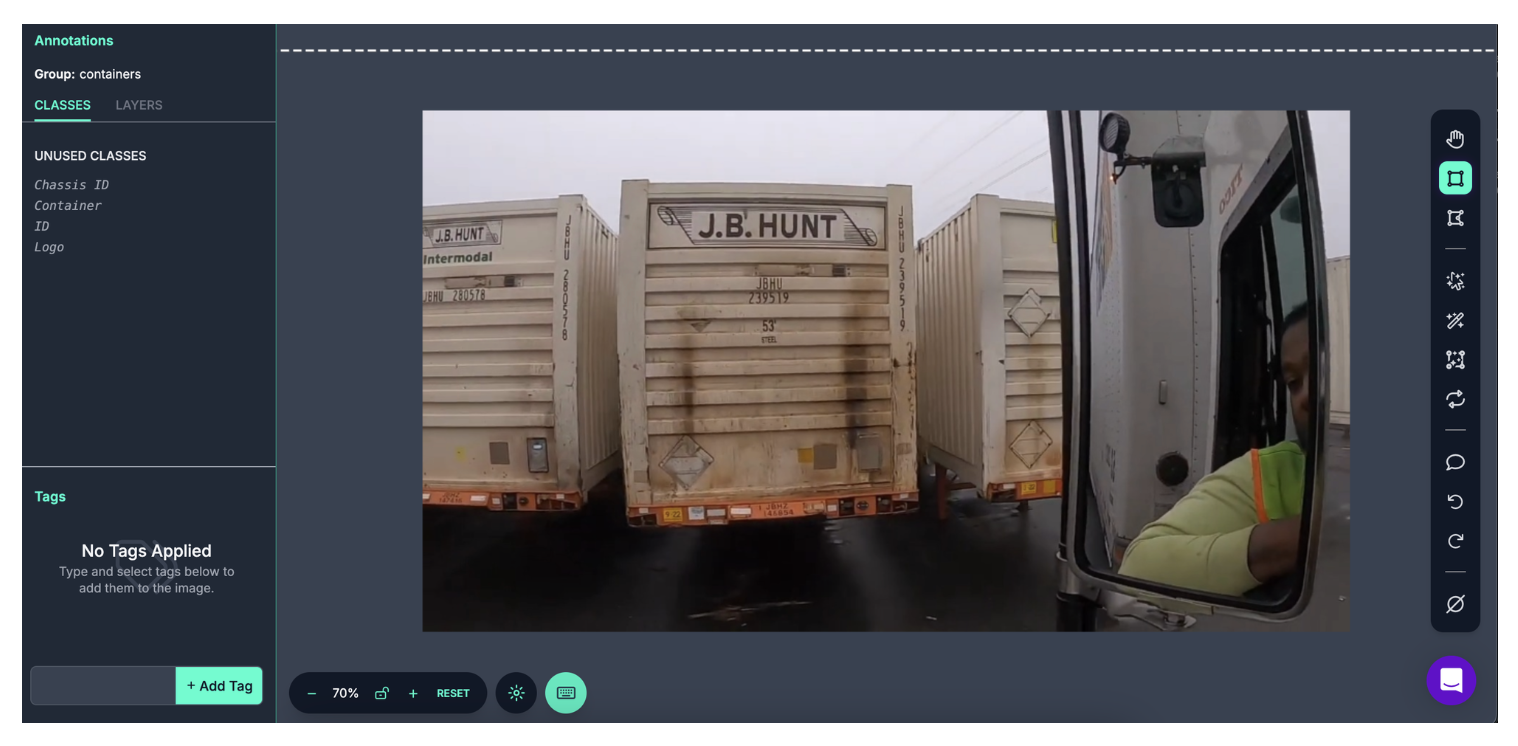
In this case, the cluster where the model tends to make more mistakes is images taken from inside a truck. In one image, the model misses all the containers, only identifying container IDs:
This tells us that we may need more images taken from inside a truck that labels containers.
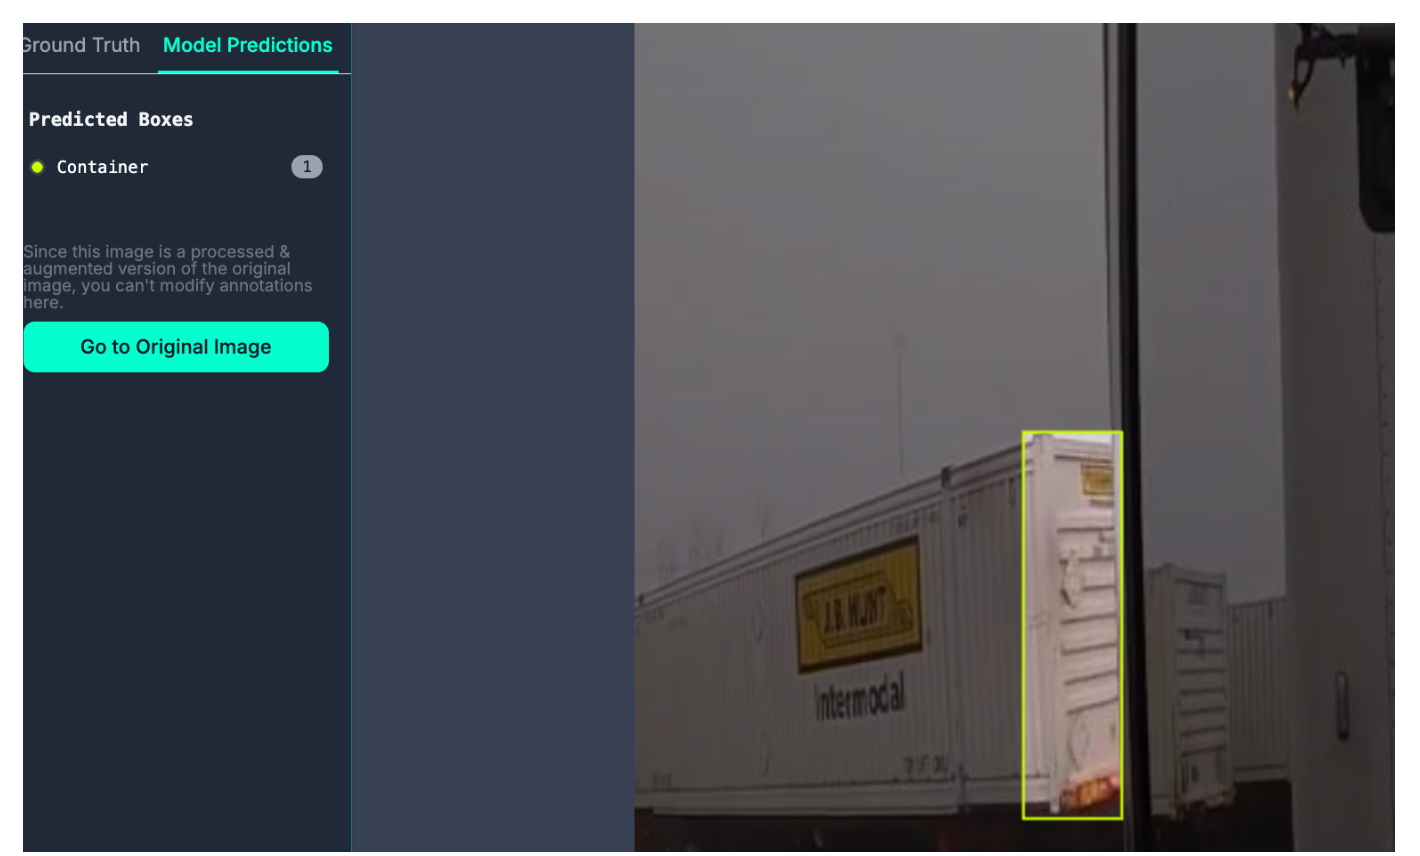
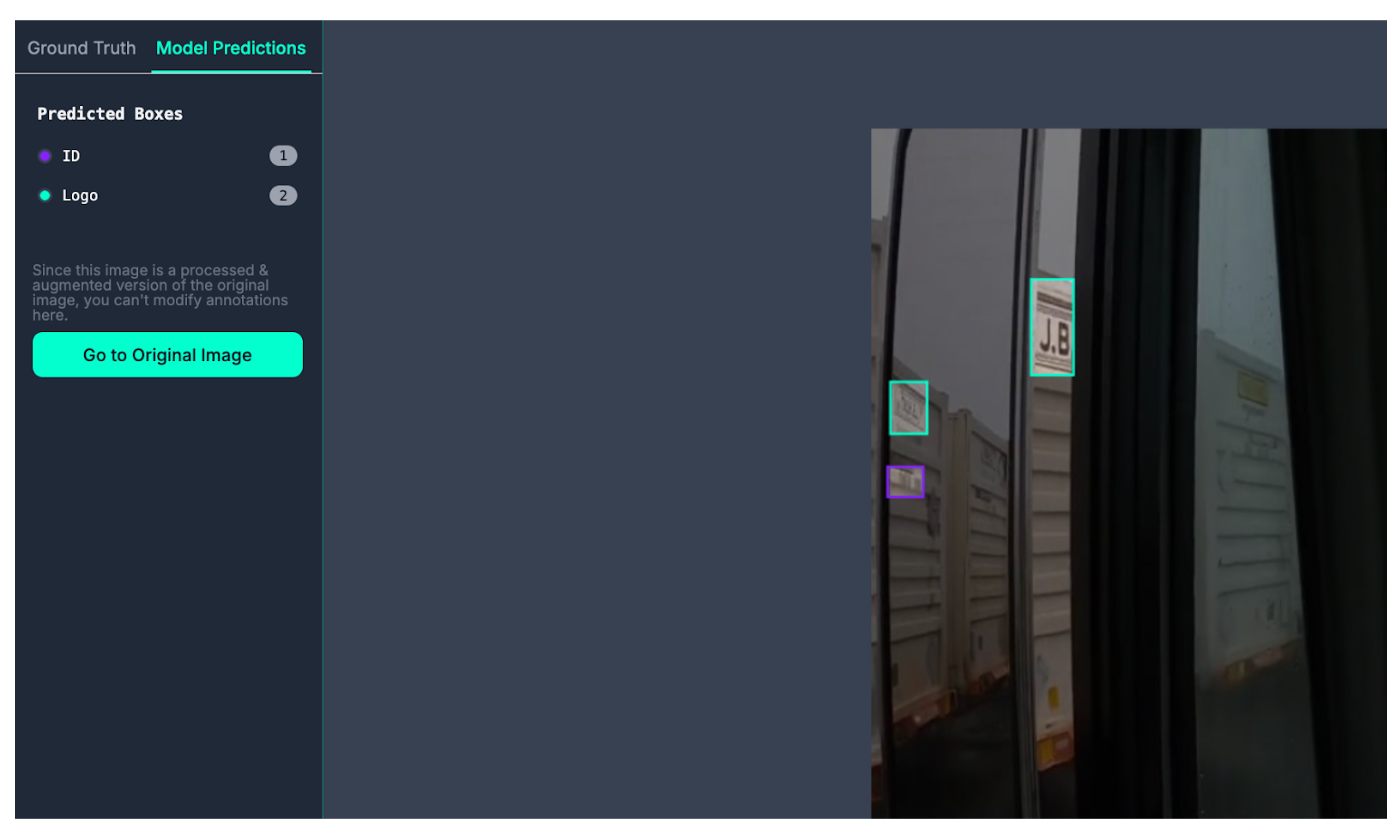
We can build a better hypothesis by evaluating more images. In the next two images that we tagged, containers are often missed, but the ground truth doesn’t contain any annotations. Here is an example where our model found a container but one wasn’t labeled:
The ground truth for this image shows no annotations:
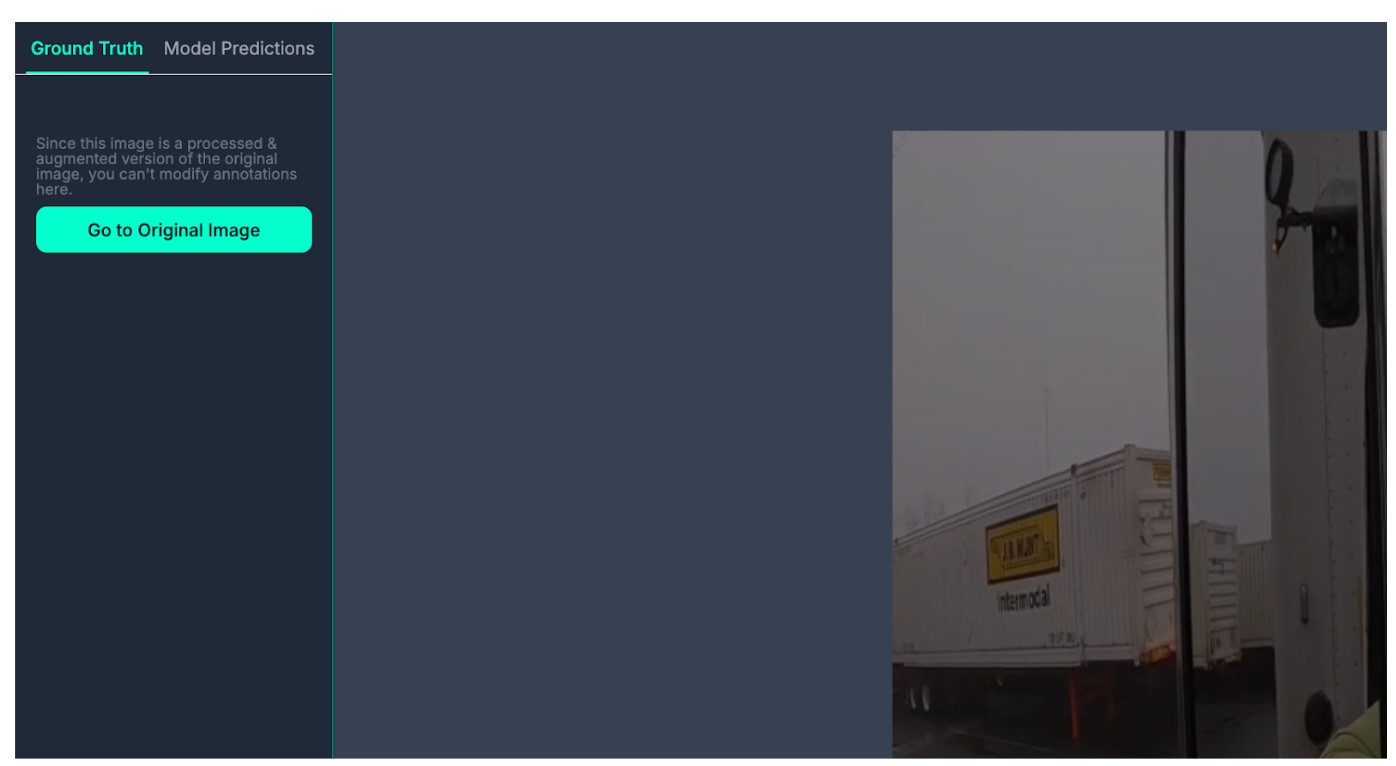
Missing annotations may be the key to why our model struggles more with images taken from inside trucks. Because the dataset is missing annotations in images taken from inside trucks, the model is struggling to accurately identify containers and other objects in those images.
We can make changes based on these analyses then train a new model version. We can then run model evaluation on an updated model version to see how our model performance has changed based on our changes.
For a large dataset – for example, with thousands of images – vector analysis can be especially useful. The visualisation below shows clear clusters of images with red dots on a dataset with thousands of images:
You can access vector analysis from the model evaluation section of your model pages in Roboflow.
Test your model by hand
Metrics give you an aggregate look at how your model performs according to your validation data. With that said, manual testing is helpful, too. This involves running your model on images from your test set, or other images you have collected from your production environment.
The fastest way to test your model is using the Visualize tab in your Roboflow dashboard. You can use drag and drop images or videos into the tab then see how your model performs. This is especially useful for building an intuitive sense for how your model works (and when it doesn’t).
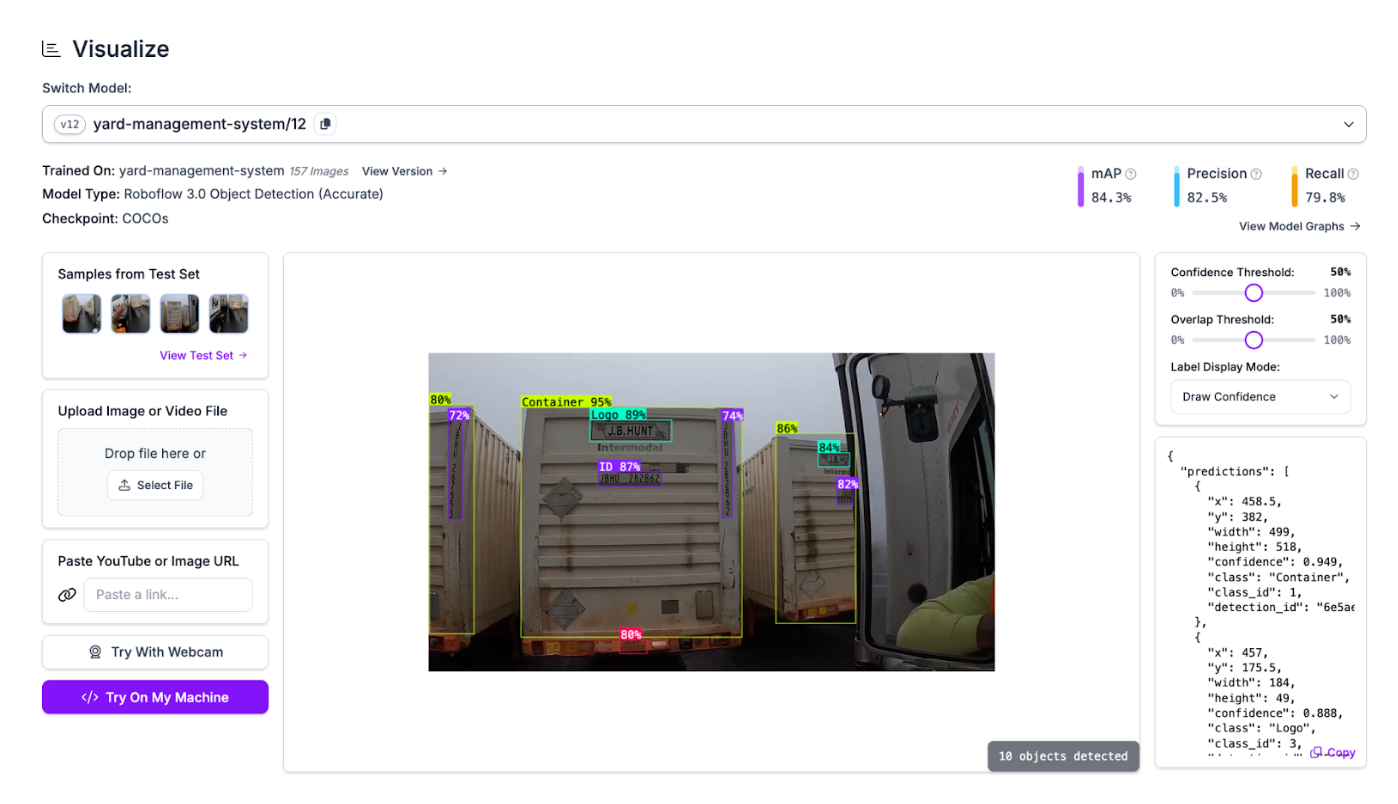
You can adjust the confidence thresholds in this tool to see how your model performs at different levels of confidence. This can help you identify the ideal threshold to set when you deploy your model.
Run your model on production data as soon as you can
One piece of advice we consistently give customers is to build a first version of your model as quickly as you can. You can usually get a first version ready with a couple hundred well-labeled images. You can then use this model as what we call a “shadow deployment”, where you run it on production data to evaluate how the model performs without deploying the model fully (i.e. without integrating it into your alert monitoring systems).
By running model on production data early in your model building process, you can:
- Get a feel for how your model version performs, and identify opportunities for improvement;
- Run your model untethered to business logic, while building confidence that it works over time;
- Gather data that could be used to help improve model performance on edge cases that are hard to catch outside of production;
- Validate that your label names match your business use case.
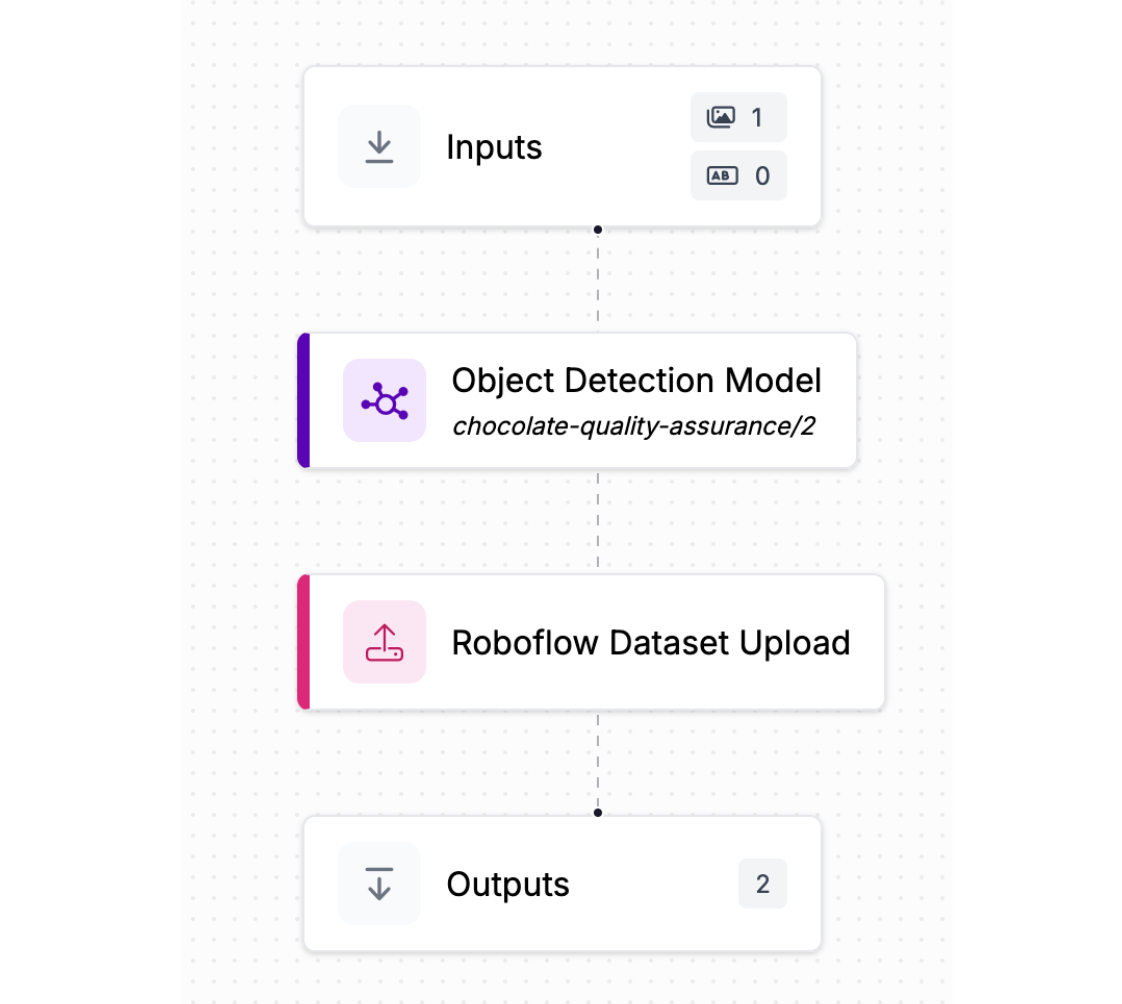
For example, suppose you are building a model to identify defects in chocolates. You could run a shadow deployment of your model on your assembly line to see how your model performs in production before connecting the model to your analytics systems.
You can also use shadow deployments to collect data in real-time and move that data into your Roboflow project. Roboflow makes this easy with the Roboflow Dataset Upload block in Workflows. You can use this block to periodically send back data from a camera to a Roboflow dataset. You can attach predictions from your shadow deployment as annotations that can be reviewed manually then used to train future model versions.
So, don’t spend weeks working on a first model. Get a first model version out as soon as you can, gather more production data, and keep iterating. As you improve your model and build confidence in how it works, you can then start planning how you would deploy your model.
Use active learning
Computer vision models are rarely “done”. While most of the work may be done on a project during the development phase, it is important to keep your model up to date as the environment in which your model runs changes. It’s like writing software. You may do most of the coding at the beginning, but you will still need to maintain the software and may need to add new features over time.
Computer vision models can “drift” over time. This refers to a phenomenon where your model performance decreases as the way you use your model “drifts” further away from the data you used to train the model.
For example, suppose you are building a system to read shipping container IDs. If you use images from one yard to deploy the system, the system may work well in that one yard. But if you use the same model in a different yard that has different weather conditions, you may notice the model doesn’t perform as well.
This makes the case for what we call “active learning”. Active learning involves collecting production data over time as your model is running.
When you have a trained model version, you can use active learning to:
- Collect images to use in training, and;
- Use the predictions from your existing model version as annotations.
You can then review the predictions and add them to your dataset for use in training a future model version.
You can set up active learning in Roboflow Workflows, our web-based vision application builder. The Roboflow Dataset Upload block lets you selectively add images back to your dataset after your model has run on an input image. You can trigger this to happen conditionally (i.e. save every 100th image).
To learn how to add active learning to your project, refer to our active learning with Workflows guide.
Use Label Assist to label more images
After you have trained your first model, we recommend using Label Assist to label future images in your dataset. Label Assist allows you to use a trained version of your model as a label assistant.
When you open an image in Roboflow Annotate, click on the magic wand icon in the right task bar. Then choose the model you want to use as a label assistant.
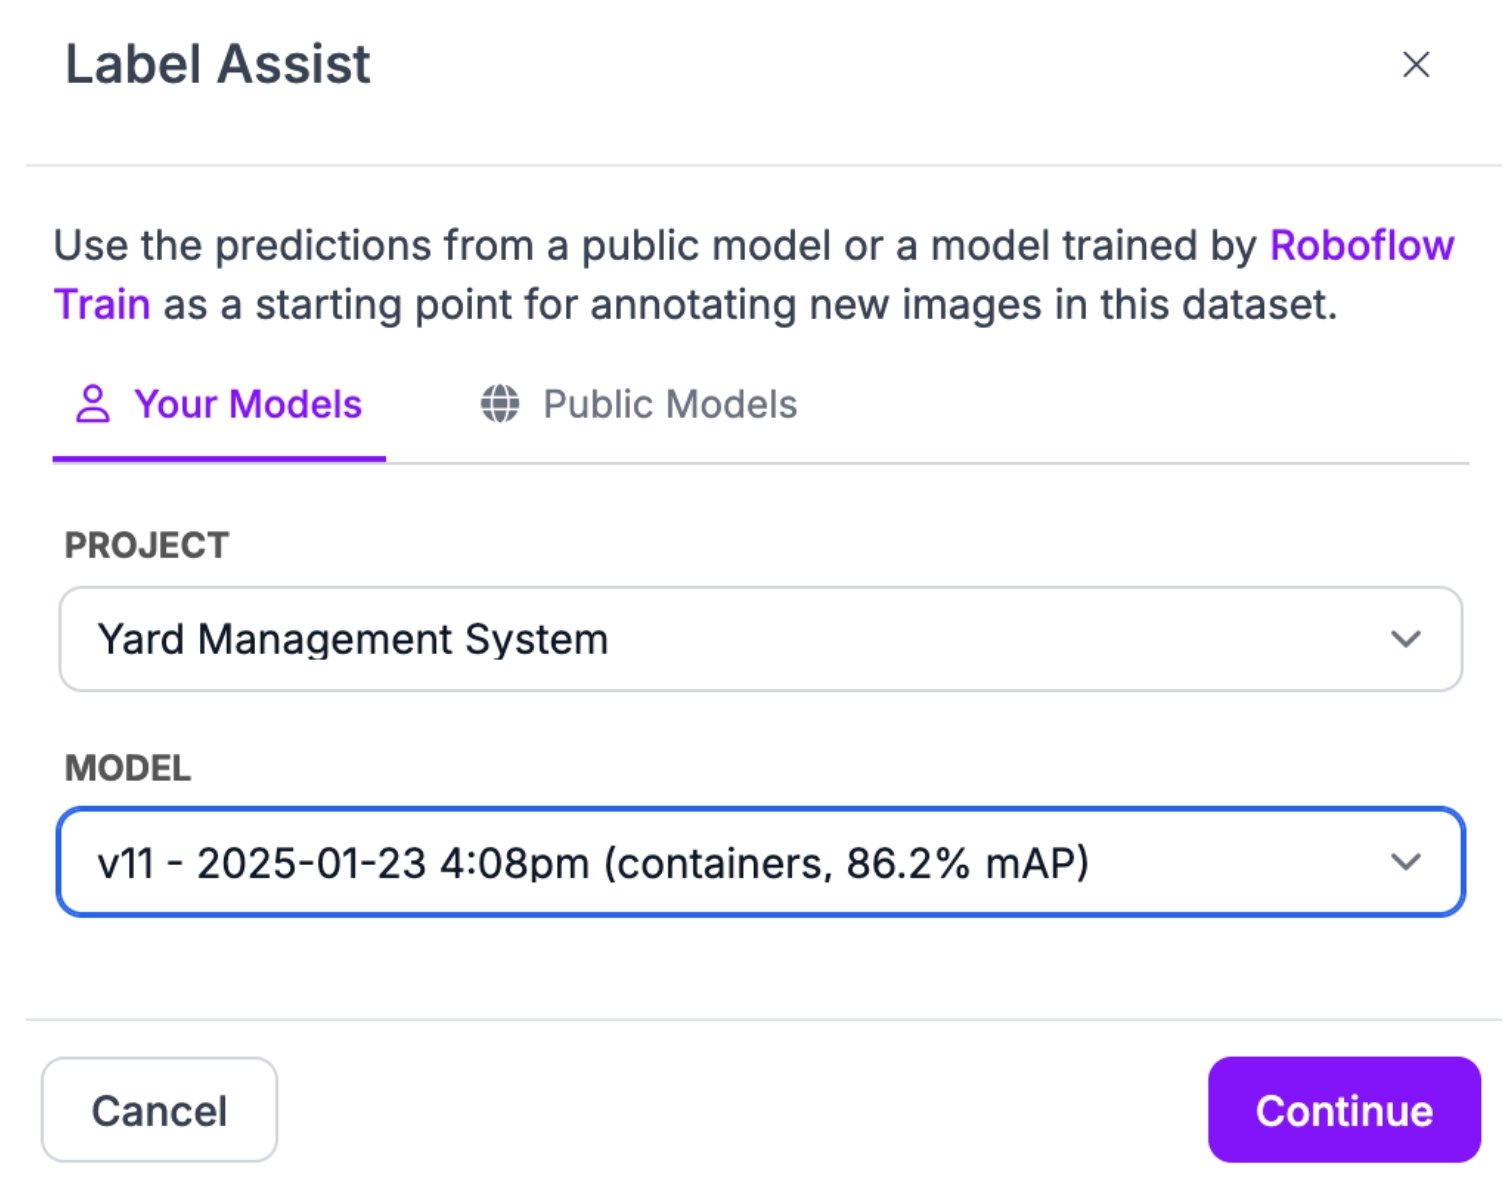
You can choose whether you want to label specific classes or all classes:

Your model will automatically be run every time you start annotating an image in your current annotation session.
Here is an example of Label Assist running on an image:
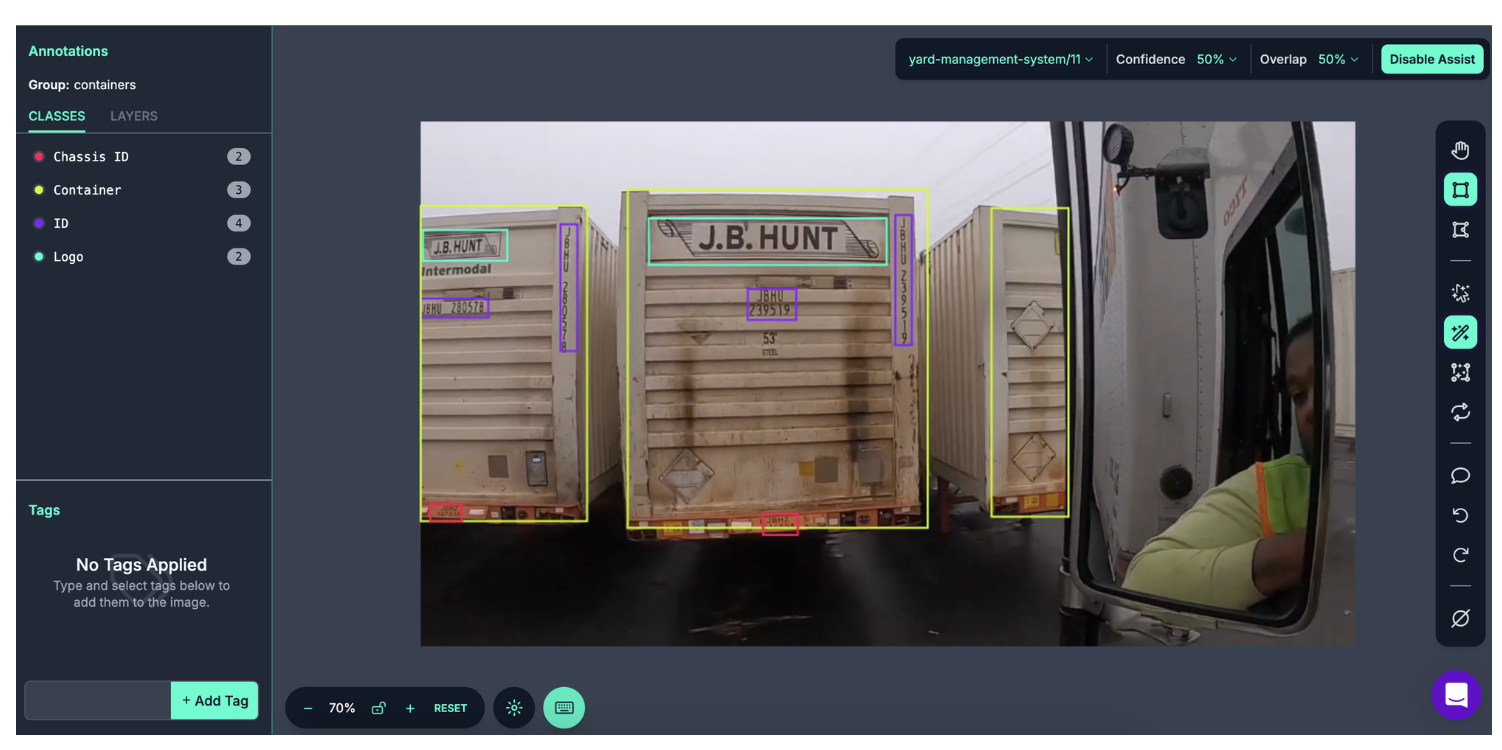
You can adjust the confidence threshold at which your model runs so you can find a value that returns the best results.
Here is what the image looked like before Label Assist:
When you go to the next image in your labeling session, your model will automatically be run, until you disable Label Assist.
Conclusion
Building an accurate computer vision model takes time. But, with proper care, you can train a model that works reliably and in accordance with your project requirements.
In this guide, we walked through several tips on how to improve your vision model. These are tips we commonly share to customers who are building models with Roboflow.
Here is a summary of the advice we have covered in this guide:
- Define a problem statement clearly at the start of a project.
- Start simple, then expand your project when you have a working model.
- Collect relevant data.
- Label data with tight bounding boxes.
- Label every image.
- Use the default, recommended preprocessing steps.
- Don’t add augmentations to your first dataset version. Train a model on your raw data to get a baseline understanding of how your model performs.
- Use our confusion matrix tool to see where your model thrives and where it struggles.
- Test your model by hand to build an intuitive sense of how your model works.
- Use active learning to collect data for use in future model versions.
If you are working on a business-critical project and need assistance getting started, contact the Roboflow sales team. Our sales team are experts in advising on how to improve the performance of vision models.
Cite this Post
Use the following entry to cite this post in your research:
James Gallagher. (Feb 26, 2025). How to Improve the Accuracy of Your Computer Vision Model: A Guide. Roboflow Blog: https://blog.roboflow.com/how-to-improve-your-computer-vision-model/