
The Roboflow License Server is an enterprise feature for Roboflow Inference that acts as a proxy between your on-premise Inference Server and Roboflow's external APIs, routing requests through a DMZ rather than exposing the inference server directly to the internet. This setup lets organizations meet strict data handling and compliance requirements by controlling exactly what traffic crosses the network boundary. The guide covers pulling the Docker container, running the license server, configuring Inference to use it, and a set of curl, ping, and telnet checks for verifying connectivity.
Looking to securely bridge your Roboflow Inference with external services without exposing it to the vulnerabilities of the open Internet? If so, you're in the right place. In the fast-paced world of Machine Learning and Computer Vision, ensuring secure and efficient deployment is crucial.
This article will demystify the role of the Roboflow License Server, explain why network isolation is beneficial, and guide you through setting up your own secure environment.
We will talk about:
- What the Roboflow license server is
- What DMZs and proxies are
- How to set up a Roboflow license server
What is the Roboflow License Server?
A License Server acts as an intermediary between your Inference Server and the external services with which the server needs to interact.
In the context of Roboflow, the License Server plays the role of a proxy that forwards requests and responses between your Inference Server, and Roboflow APIs, and your model weights.
A license server adds an extra layer of security by preventing direct communication between the Inference Server and the external world. For companies that need to adhere to strict data handling and compliance policies, isolating the Inference Server is often a requirement.
Furthermore, a license server allows you to control what data goes in and out, giving you an added measure of control over the data flow.
What is a DMZ (Demilitarized Zone)?
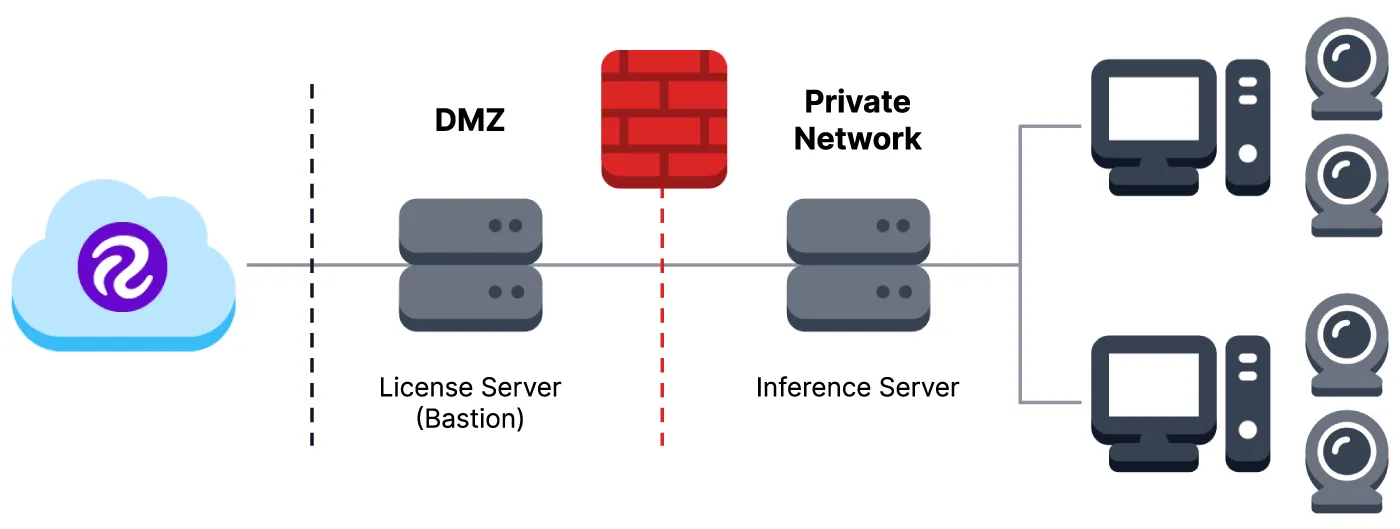
A Demilitarized Zone (DMZ), mentioned in the license server graphic above, serves as a sub-network that exposes an organization's external-facing services to an untrusted network, typically the Internet.
DMZs isolate services that interact with the external world from those that should not, like your Inference Server. A license server is often placed in the DMZ so that it can safely interact with both internal and external services while keeping your sensitive servers secure.
What is a Proxy?
A proxy server is an intermediary that sits between a client (which could be a user's computer, or an Inference server in our case) and a server (like a website or an API service). The primary role of a proxy is to forward requests and responses between the two.
How Does a Proxy Work?
Let's break down the workflow of a proxy, step-by-step:
- Request Forwarding: When a client wants to access a resource (e.g., an API endpoint), it sends the request to the proxy server.
- Processing: The proxy evaluates the request based on pre-defined rules, which could involve filtering content, caching data, or altering the request.
- Forwarding to Server: The proxy then forwards the modified (or unmodified) request to the targeted server.
- Response Handling: After receiving the response from the server, the proxy may again filter, cache, or modify the data.
- Returning to Client: Finally, the proxy sends the response back to the client.
Why Use a Proxy?
There are many reasons why you may want to use a proxy. These include:
- Security: A proxy can filter out malicious traffic and act as a shield for your internal network.
- Anonymity: By routing traffic through a proxy, the external server only sees the proxy's IP address, not the client's.
- Load Balancing: Proxies can distribute incoming requests across multiple servers, ensuring that no single server is overwhelmed.
- Data Caching: Frequently accessed data can be cached by the proxy to speed up future requests, improving performance.
- Access Control: Proxies can block unauthorized access to certain websites or resources based on IP addresses, protocols, or other criteria.
In the context of a license server, it acts as a specialized proxy that forwards requests and responses between your isolated Inference Server and external services like Roboflow's APIs. This setup allows you to keep your Inference Server securely tucked away behind a firewall while still having the ability to interact with necessary external services.
How-To: Setting Up Your License Server
In this section, we'll walk you through how to set up a Roboflow license server.
Before diving into the setup, make sure you have the following:
- A Machine with Internet Access: This machine will host the License Server and must have access to
https://api.roboflow.comandhttps://storage.googleapis.com. - Docker Installed: The License Server will run in a Docker container.
- Network Permissions: Ensure you have the necessary permissions to modify firewall rules and other network settings.
Without further ado, let's get started!
Step #1: Pulling the Docker container
First, open a terminal and run the following command to pull the License Server Docker container:
sudo docker pull roboflow/license-server
This will download the necessary Docker image to your machine.
Step #2: Running the License Server
Once the Docker image is pulled, run the following command to start the License Server:
sudo docker run --net=host roboflow/license-server
The --net=host flag ensures that the Docker container uses the host machine's network, making it easier to route traffic.
Step #3: Configuring the Inference Server
Now, you'll need to configure your Inference Server to use this License Server. To do this, pass the IP address of the License Server as an environment variable when running the Inference Server Docker container:
sudo docker run --net=host --env LICENSE_SERVER=your_license_server_ip roboflow/inference-server:cpu
Replace your_license_server_ip with the actual IP address of your License Server.
Step #4: Network Considerations
Make sure to update your firewall rules to allow outgoing connections to https://api.roboflow.com and https://storage.googleapis.com, and incoming connections on port 80.
In addition, ensure that the DNS settings allow the machine to resolve domain names, specifically for api.roboflow.com and storage.googleapis.com.
How-To: Checking and Debugging Connectivity
Once you've set up your License Server and Inference Server, the next step is to verify that the servers can communicate as intended. This section will guide you through various methods to check and debug your network connectivity.
Ensuring proper connectivity is not just a one-time setup step; it's a continuous requirement for troubleshooting and maintenance. Without verified connections, you risk running into various operational issues, from delayed data processing to complete service outages.
Several tools can help you check different aspects of connectivity. Let's delve into some popular ones.
Using curl for HTTP Checks
The curl command-line tool allows you to check for HTTP/HTTPS connectivity. It can even display the status code for you, indicating whether the request was successful or not.
For example, the following command lets you check you can connect to api.roboflow.com. The command should display a HTTP/2 200 in the first line of the response. If you see a network error, your computer cannot connect to the website you have specified.
curl -I https://api.roboflow.comUsing ping
ping is an excellent tool for basic network diagnostics. It can tell you whether a particular domain or IP address is reachable. The following example lets you check if api.roboflow.com is reachable.
ping -c 1 api.roboflow.com
Using telnet or nc for Port Checks
telnet and nc (netcat) enable you to check if specific ports are accessible. You can use them to test if a specific port on a server is open.
Here is an example using nc:
nc -zv your_server_ip 80
Automating Network Checks
To automate these checks, you can use a Bash script. This allows you to run all the tests with a single command and can be especially useful for routine checks or as part of a debugging workflow. Below is an example bash script that you can use.
Create a new file on your computer and call it check_connectivity.sh. Then, copy the below code into the new file.
#!/bin/bash
# Bash script to check connectivity for Roboflow License Server

# Function to test HTTP/HTTPS connectivity
check_url() {
  url=$1
  status_code=$(curl -o /dev/null -s -w "%{http_code}\\n" -L "$url")

  if [ "$status_code" == "200" ]; then
    echo "----------------------------"
    echo "Success: Able to reach $url"
  elif [ "$status_code" == "400" ]; then
  echo "----------------------------"
    echo "Success: Received 400 - $url likely still be reachable but the server couldn't understand the request."
  else
    echo "----------------------------"
    echo "Failed: Unable to reach $url. HTTP Status Code: $status_code"
    echo "Possible Causes: Firewall rules, Network issues, or the URL might be down."
  fi
}

# Function to test port connectivity
check_port() {
  host=$1
  port=$2
  timeout=1

  # Use different commands for Linux/Unix vs. Windows
  if [ "$(uname)" == "Darwin" ] || [ "$(expr substr $(uname -s) 1 5)" == "Linux" ]; then
    nc -z -G "$timeout" "$host" "$port"
  elif [ "$(expr substr $(uname -s) 1 10)" == "MINGW32_NT" ] || [ "$(expr substr $(uname -s) 1 10)" == "MINGW64_NT" ]; then
    timeout "$timeout" bash -c "echo > /dev/tcp/$host/$port"
  fi

  if [ $? -eq 0 ]; then
    echo "----------------------------"
    echo "Success: Able to connect to $host on port $port"
  else
    echo "----------------------------"
    echo "Failed: Unable to connect to $host on port $port"
    echo "Possible Causes: Firewall rules, Network issues, or the service might not be running."
  fi
}

# Check for command line argument for inference_server_ip
if [ "$#" -ne 1 ]; then
  echo "Usage: ./check_connectivity.sh <inference_server_ip>"
  exit 1
fi

inference_server_ip=$1

# Check HTTP/HTTPS connectivity
check_url "https://api.roboflow.com"
check_url "storage.googleapis.com"

# Check port connectivity
check_port "$inference_server_ip" 80
The above code is a Bash script that checks the required connectivity. It tests access to https://api.roboflow.com and https://storage.googleapis.com as well as port 80 on the Inference server. The script outputs whether each stage is successful or failed, along with possible reasons for failure.
Next, open a terminal and navigate to the location where you saved the script. Then, make the script executable using the following command:
chmod +x check_connectivity.shFinally, you can run the script using the following comamnd:
./check_connectivity.sh <inference_server_ip>Replace <inference_server_ip> with the IP address of your Inference Server.
If everything is setup properly, the output should look something like this:
----------------------------
Success: Able to reach https://api.roboflow.com
----------------------------
Success: Received 400 - storage.googleapis.com likely still be reachable but the server couldn't understand the request.
----------------------------
Success: Able to connect to 10.195.184.123 on port 80
If you do not see a successful response for any of the requests in the script, here are some common issues you may encounter with some context to help you debug the problem:
- Status Code 400: This usually means the server couldn't understand the request. However, it may still indicate that the server is reachable.
- Ping Fails: If
pingfails but other checks pass, ICMP packets might be blocked by your firewall. - Port Inaccessible: If you can't access a port, ensure it's open on the firewall and that the service is running.
Final Thoughts
Setting up a license server correctly is a critical component for the secure and efficient operation of your services. The server acts as the gatekeeper, ensuring that your Inference Server can safely interact with the external world while being shielded from potential threats. Hence, taking the time to set up and verify your license server is a critical requirement.
Cite this Post
Use the following entry to cite this post in your research:
Reed Johnson. (Oct 19, 2023). Using the Roboflow License Server. Roboflow Blog: https://blog.roboflow.com/roboflow-license-server/