
Computer vision is a branch of artificial intelligence that enables computers to interpret and understand visual information from images and videos. Its applications range from face blurring, medical imaging, autonomous vehicles to retail analytics, and more. Yet, developing and sharing these projects often requires complex setups and lengthy deployment pipelines. Streamlit simplifies this process by turning Python code, including computer vision tasks, into interactive web apps with minimal effort.
In this blog, I’ll demonstrate how to build an Object Detection Playground using Streamlit to interact with a Roboflow workflow that handles computer vision tasks, in our case, object detection, with Streamlit providing full control over the task’s parameters and visualizations.
The video below demonstrates the Object Detection Playground we’ll be creating:
As shown in the demo, users can easily tweak different parameters through the interface to dynamically adjust the output of the object detection task.
Building an Object Detection Workflow with Input Parameters
We use Roboflow Workflows to perform object detection and visualization. Roboflow Workflows is a low-code, open-source platform that simplifies the creation and deployment of computer vision pipelines. With Workflow blocks, you can combine object detection with other computer vision tasks, such as visualization, allowing you to visually design pipelines by connecting tasks as modular blocks.
The video below demonstrates the Object Detection Workflow we’ll be creating:
In this demo, the workflow takes various parameters as inputs that can be adjusted to tweak the object detection task. However, it lacks intuitive controls such as dropdowns to select parameter options or sliders to set numeric values, as seen in the Streamlit integrated demo shown earlier, and instead requires all values to be entered manually.
You can try or fork this workflow here.
Setup Your Roboflow Workflow
To get started, create a free Roboflow account and log in. Next, create a workspace, then click on “Workflows” in the left sidebar and click on ”Create Workflow”.
You’ll be taken to a blank workflow editor, ready for you to build your AI-powered workflow. Here, you’ll see two workflow blocks: Inputs and Outputs, as shown below:
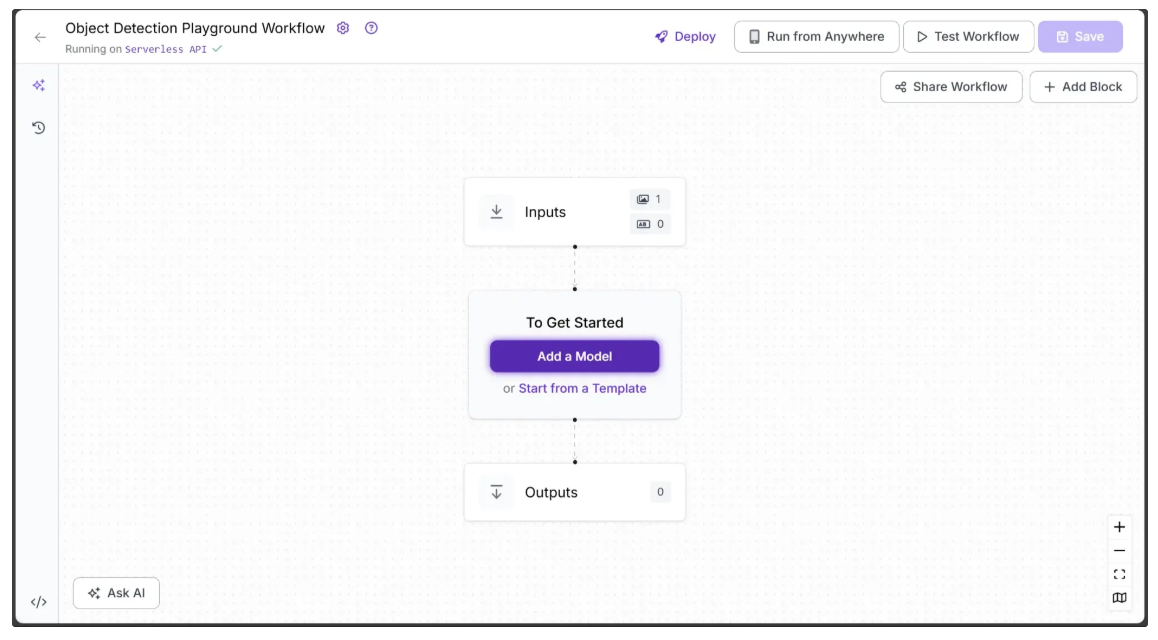
Step 1: Setup Workflow Inputs
We want the object detection performed by the workflow to be fully configurable. To achieve this, we define input parameters that control how the workflow generates its output. The workflow then dynamically adapts based on the values provided for these parameters.
This workflow includes the following parameters:
- image – The input image for object detection. This parameter is included by default in all Roboflow workflows.
- model – Specifies the object detection model ID to use (e.g., rfdetr-base, yolov11n-640).
- class_filter – Determines which objects to detect, ranging from a single class to multiple classes, or all COCO classes.
- confidence – Sets the minimum confidence threshold required for detections.
- text_scale – Adjusts the size of the label text.
- text_color – Sets the color of the label text.
- text_thickness – Controls the boldness of the label text.
- text_position – Specifies the placement of the label relative to the bounding box.
- bounding_box_thickness – Adjusts the thickness of bounding box outlines.
- bounding_box_color_palette – Defines the color scheme for bounding boxes.
- label_color_palette – Defines the color scheme for labels.
To add these parameters, select the Inputs block and click “Add Parameter.” Each parameter requires a type and can have a default value.
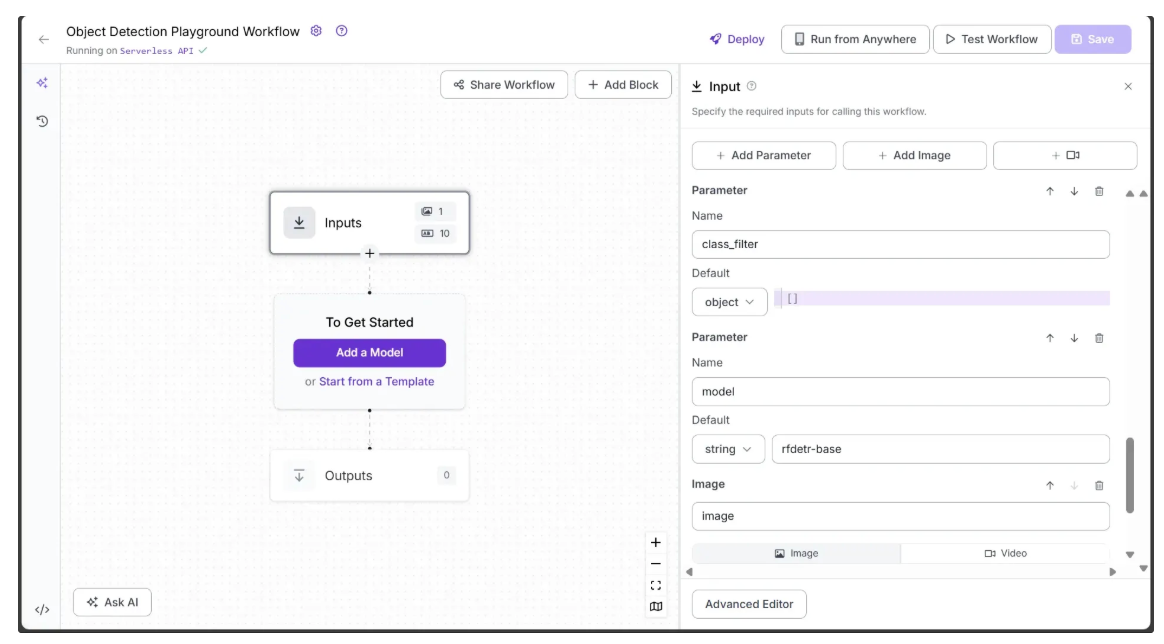
The image below shows the model and class_filter parameters that have been added as inputs to the workflow, while the image parameter is included by default. The model parameter is a string with a default value of ‘rfdetr-base’, and the class_filter parameter is an object that accepts a list of COCO classes to detect. If left empty, it will detect all objects in the image.
The next image shows the confidence, text_scale, and text_color parameters that have been added as inputs. The confidence and text_scale parameters are numeric, with default values of 0.4 and 8, respectively, while text_color is a string with a default value of ‘Black’.

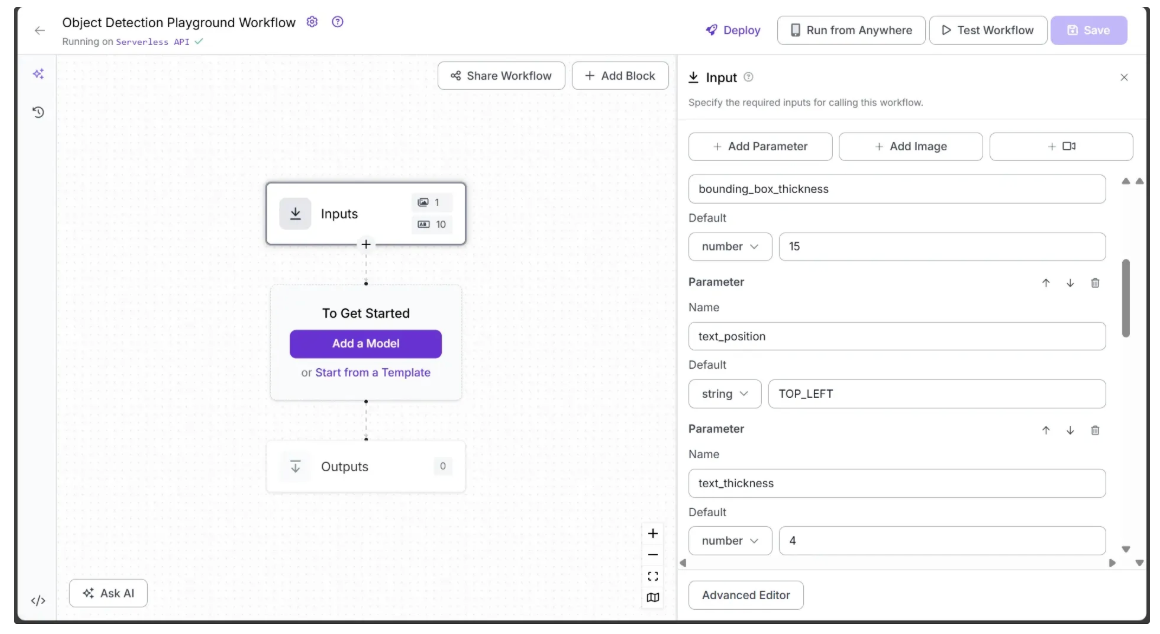
The image below shows the text_thickness, text_position, and bounding_box_thickness parameters that have been added as inputs. The text_thickness and bounding_box_thickness parameters are numeric, with default values of 4 and 15, respectively, while text_position is a string with a default value of ‘TOP_LEFT’.
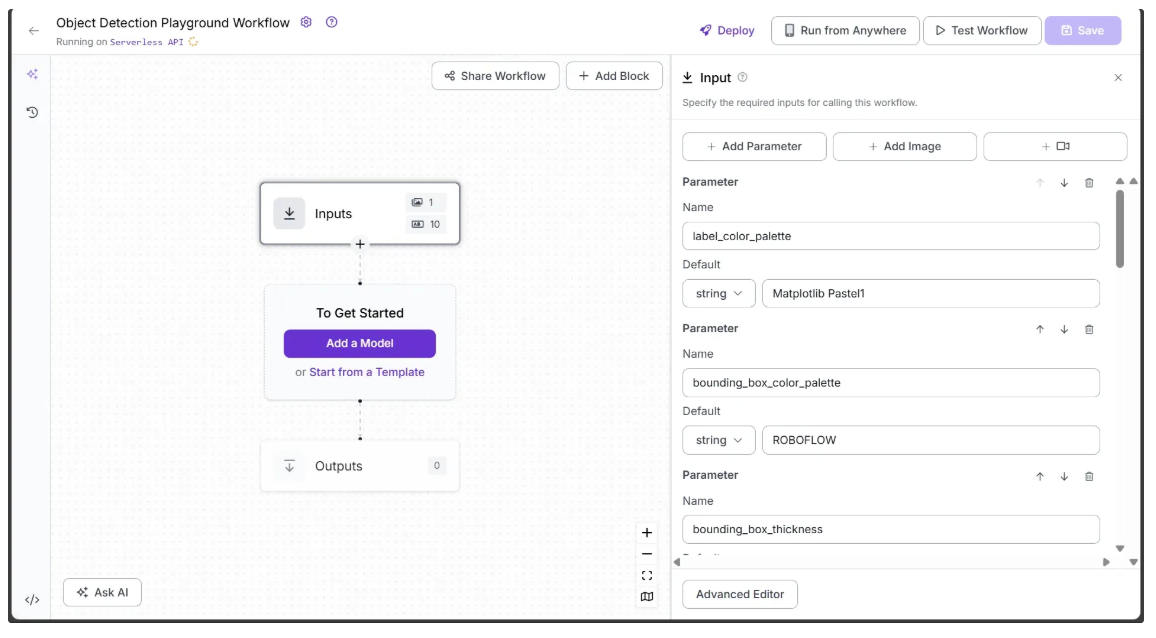
The final image shows bounding_box_color_palette and label_color_palette that have been added as inputs, both of which are strings with default values of ‘ROBOFLOW’ and ‘Matplotlib Pastel1’, respectively.
All the parameters added above serve as inputs for various blocks throughout the workflow, controlling the workflow output.
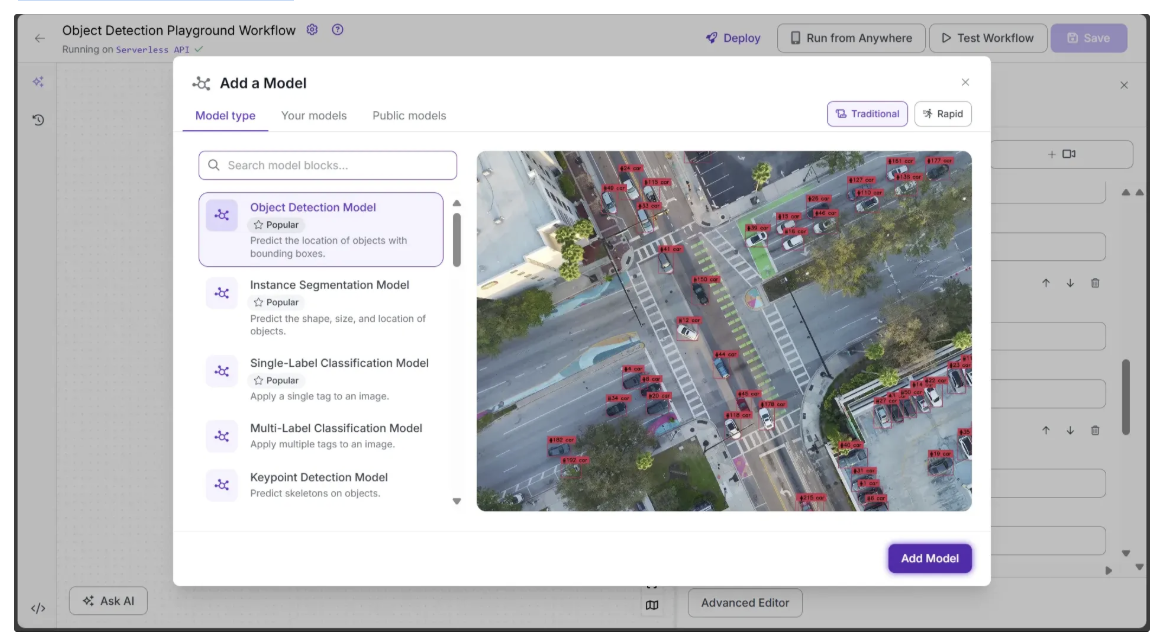
Step 2: Add an Object Detection Model Block
Next, we’ll add object detection capabilities to our workflow using the Object Detection Model block. This Roboflow Workflow block allows us to utilize a variety of object detection models, including YOLOv11, RF-DETR, and more. You can select a model by its ID and configure the detection using various parameters.
To add the block, click “Add a Model”, search for “Object Detection Model”, and then click Add Model, as shown below:
Next, we need to configure certain parameters from the Inputs block, such as image, model, confidence, and class_filter, to be used by the Object Detection Model block.
To do this, open the Configure tab of the Object Detection Model block, click the link 🔗 icon next to each parameter, and select the corresponding input value, as shown below:
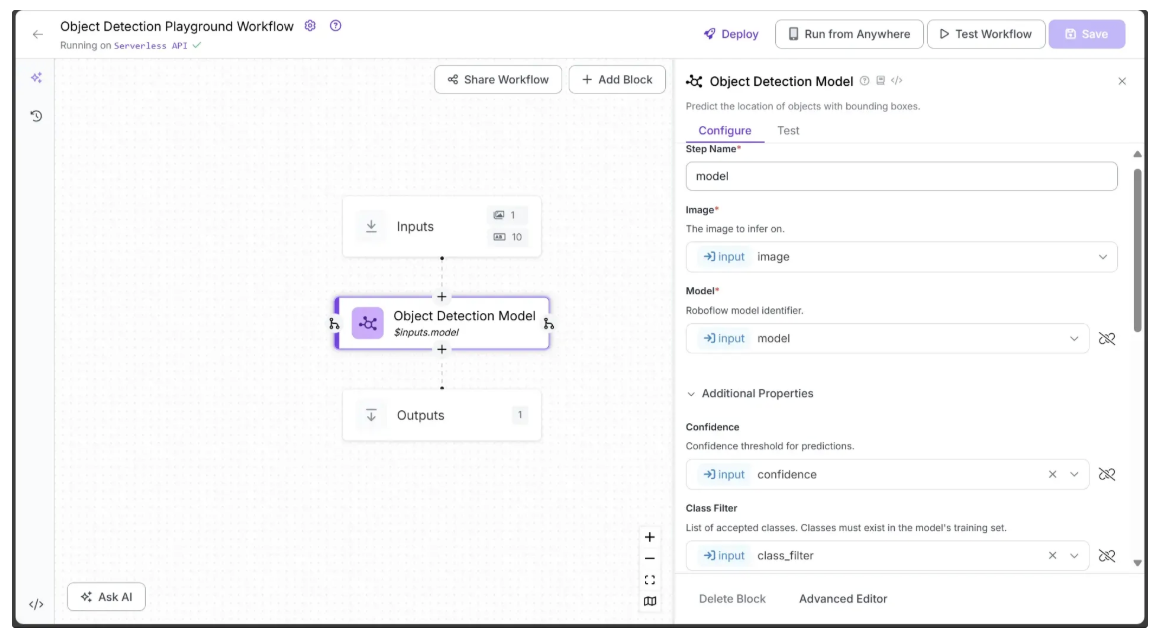
Specifically, in the Configure tab, Image, Model, Confidence, and Class Filter should be linked to the corresponding image, model, confidence, and class_filter parameters from the Inputs block. You can leave all other parameters at their default values.
Step 3: Visualize Predictions with Bounding Boxes
The Object Detection Model block outputs prediction objects, which can be visualized as bounding boxes on the image using the Bounding Box Visualization block.
To add it, hover over the Object Detection Model block, click the + icon, search for “Bounding Box Visualization”, and configure the block as shown below:
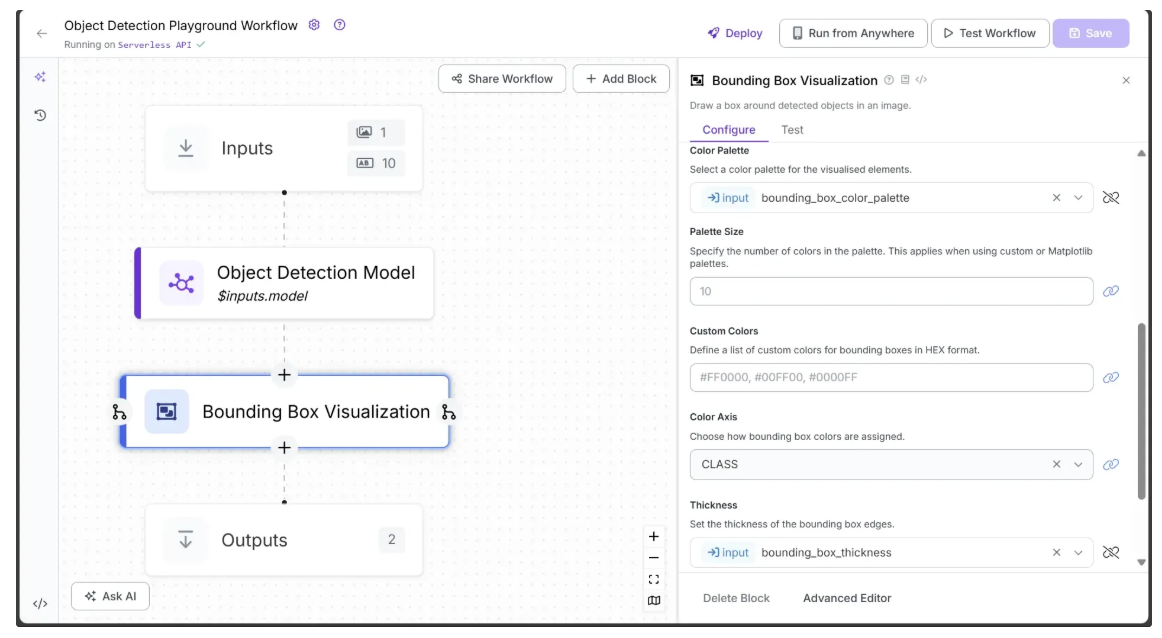
In the Bounding Box Visualization block, link Input Image to the image from the Inputs block (usually set automatically).
Link Color Palette and Thickness to bounding_box_color_palette and bounding_box_thickness from Inputs, allowing these visual settings to be controlled dynamically, and leave the other parameters at their default values.
Step 4: Add Labels to Bounding Boxes
Each bounding box represents an object, so labels are needed to indicate their classes. The Label Visualization block handles this and allows style configuration through its parameters.
To add it, hover over the Bounding Box Visualization block, click the + icon, search for “Label Visualization”, and configure the block as shown below:
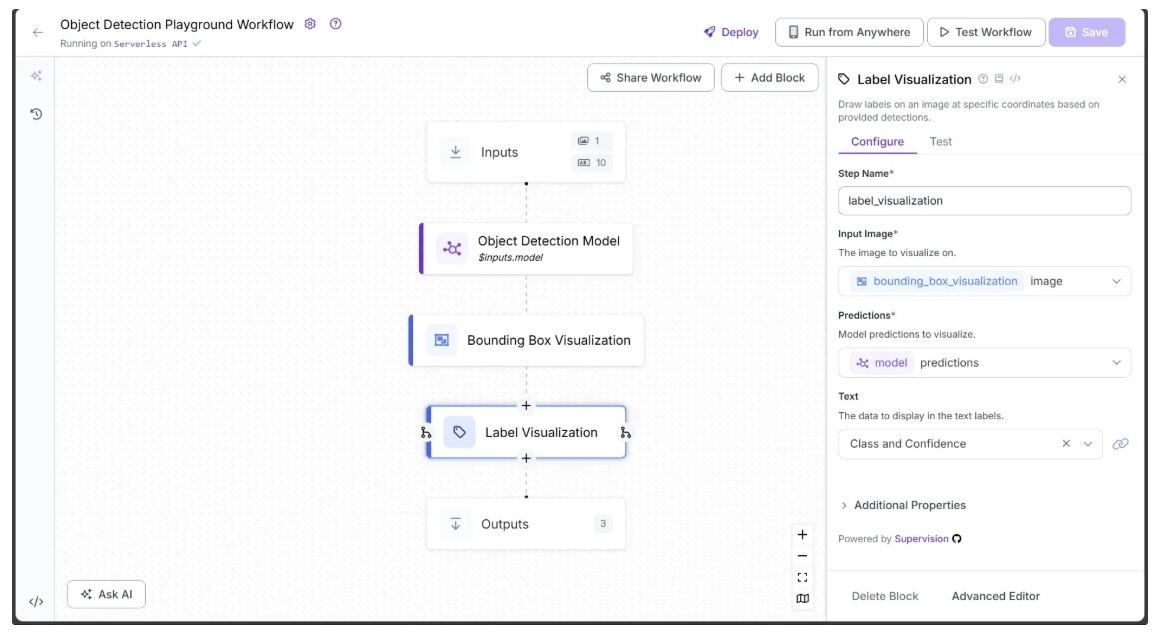
Since we want to display the object class along with the confidence score, set the Text parameter in the Label Visualization block to “Class and Confidence”. Also, link the Input Image parameter to the image from the Bounding Box Visualization block (usually set automatically).
Next, link Color Palette to label_color_palette as shown below:
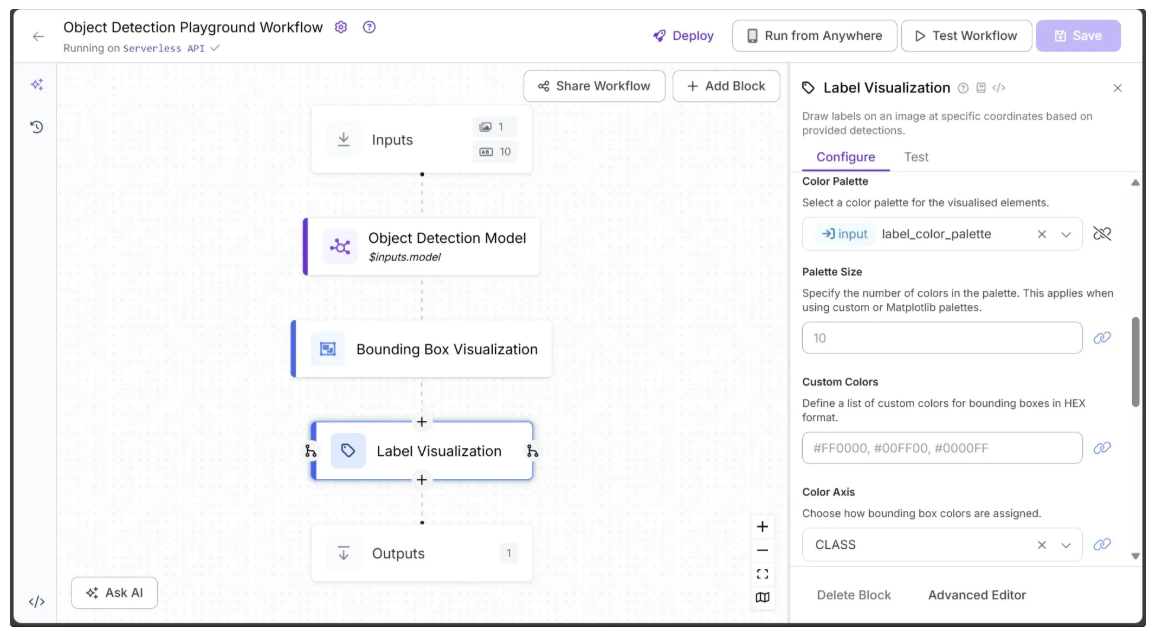
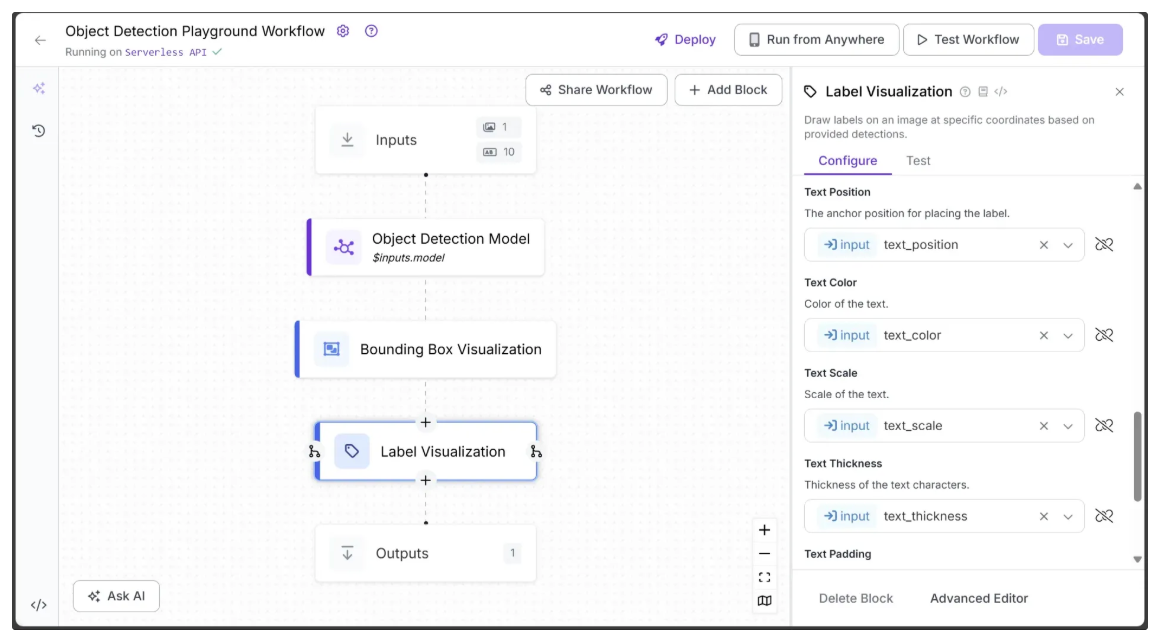
Additionally, link Text Position, Text Color, Text Scale, and Text Thickness to text_position, text_color, text_scale, and text_thickness from Inputs, allowing these visual settings to be configured dynamically, as shown below:
Leave all other parameters at their default values.
Step 5: Setup Workflow Outputs
With all the blocks added, our workflow is now complete, and we can define the desired outputs. To define outputs, select the Outputs block, open the Configure tab, and click + Add Output. Remove unwanted outputs using the 🗑️ icon, as shown below:
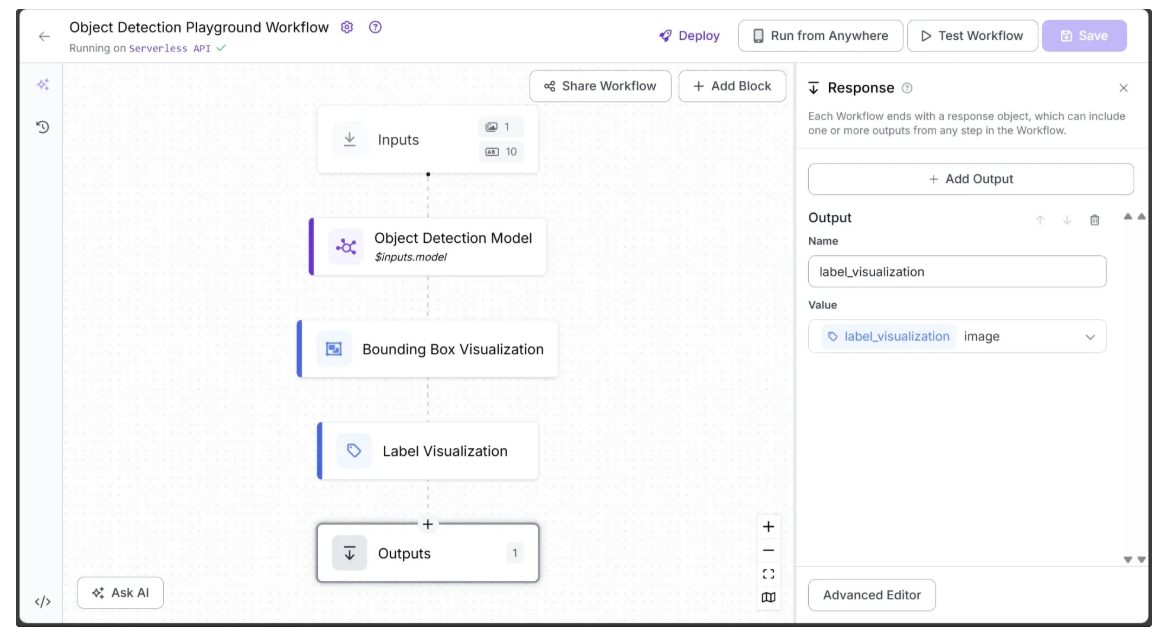
Ensure label_visualization is set as a workflow output and linked to the Label Visualization block’s image, which represents the final object detection result.
Step 6: Running the Workflow
You can run the workflow directly through its user interface, as shown earlier, via the API, command line, or other supported methods. To view the code for these execution options, click the Deploy button in the top-right corner of the workflow.
In this example, we’ll run the workflow using Python. First, install the required package in your Python environment:
pip install inference-sdkSince the inference-sdk is currently compatible with Python versions 3.9 through 3.12, make sure you are using a Python version within this range.
The script below is a modified version of the Python deployment script available after clicking Deploy, with the modification that it also saves the output image locally.
from inference_sdk import InferenceHTTPClient

client = InferenceHTTPClient(
    api_url="https://serverless.roboflow.com",
    api_key="YOUR_ROBOFLOW_KEY"
)

result = client.run_workflow(
    workspace_name="YOUR_ROBOFLOW_WORKSPACE",
    workflow_id="YOUR_ROBOFLOW_OBJECT_DETECTION_WORKFLOW",
    images={
        "image": "YOUR_IMAGE.jpg"
    },
    parameters={
        "label_color_palette": "Matplotlib Pastel1",
        "bounding_box_color_palette": "ROBOFLOW",
        "bounding_box_thickness": 15,
        "text_position": "TOP_LEFT",
        "text_thickness": 4,
        "text_color": "Black",
        "text_scale": 8,
        "confidence": 0.4,
        "class_filter": [],  # List of COCO classes to detect; leave empty to detect all
        "model": "rfdetr-base"
    },
    use_cache=True # cache workflow definition for 15 minutes
)

# Additional Code to save the workflow output image
import base64

base64_data = result[0]['label_visualization']
# Decode and save to file
with open("object_detection.jpg", "wb") as f:
    f.write(base64.b64decode(base64_data))

print("Image saved as object_detection.jpg")
In the script above, replace YOUR_ROBOFLOW_KEY, YOUR_ROBOFLOW_WORKSPACE, and YOUR_ROBOFLOW_OBJECT_DETECTION_WORKFLOW with the values from the Python deployment script. The hidden Roboflow API key in the deployment script becomes visible when you paste the script into a local file.
A similar script is used with Streamlit to run the workflow, where parameter values are provided through the Streamlit user interface.
Integrating Streamlit for Dynamic Workflow Control
With the object detection workflow complete, we now need to create a Streamlit user interface that visualizes the workflow’s input parameters and lets us dynamically control the object detection output using dropdowns, sliders, and other controls.
This eliminates the need to enter inputs manually and makes exploring object detection far more intuitive.
Step 1: Create a Streamlit Script
A Streamlit script is simply a Python file that uses the Streamlit library to build interactive web applications. Unlike traditional web development, Streamlit lets you create frontends without writing any HTML, CSS, or JavaScript.
Before getting started, ensure that the required Streamlit package is installed in your environment. Run:
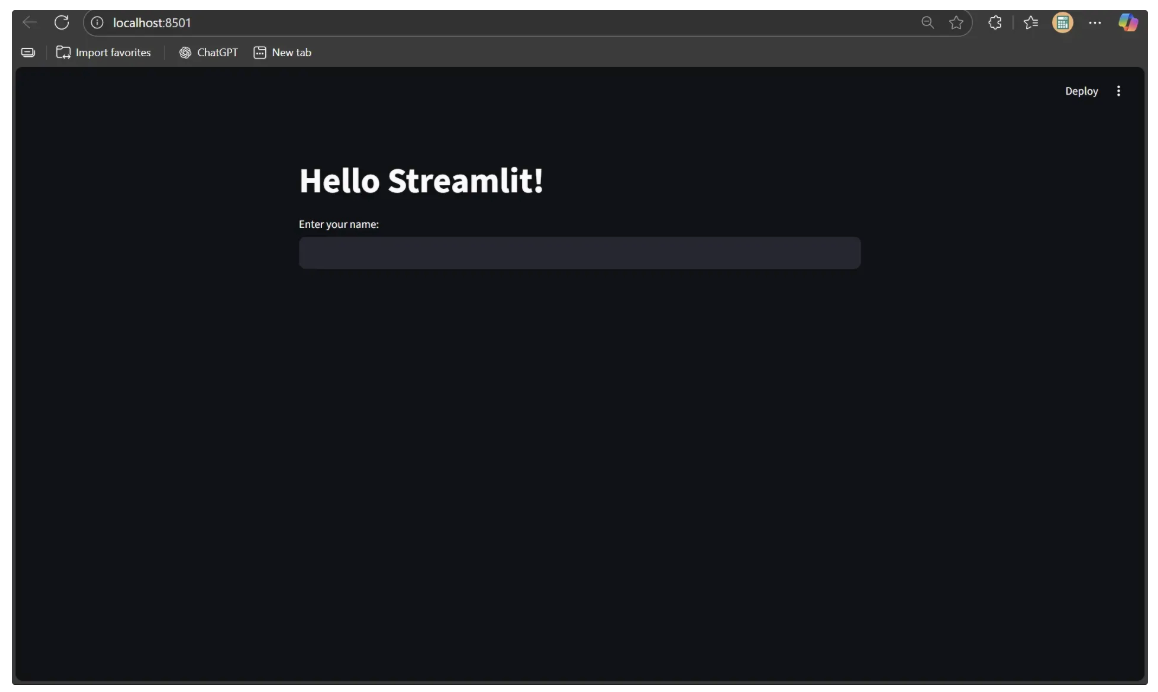
pip install streamlitNext, create a new folder called ‘object_detection_playground’. Inside this folder, create a Python file named object_detection_playground.py and add the following code:
import streamlit as st

st.title("Hello Streamlit!")
name = st.text_input("Enter your name:")
if name:
    st.write(f"Welcome, {name}!")
To run the Streamlit script, navigate to the ‘object_detection_playground’ folder and execute:
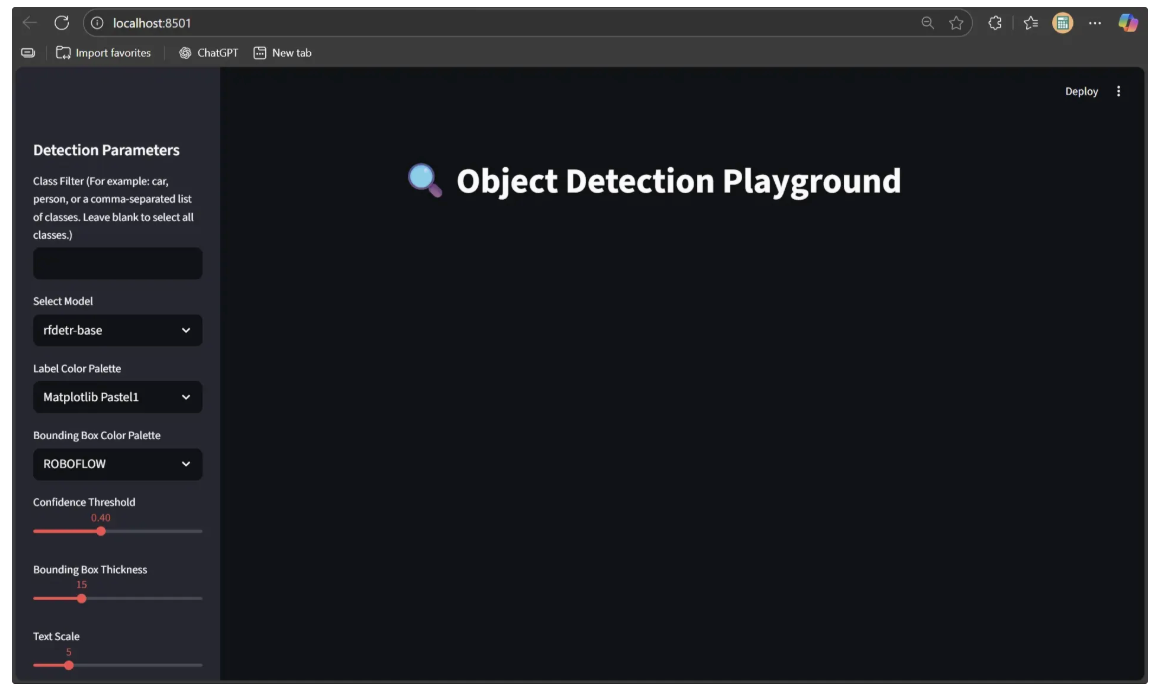
streamlit run object_detection_playground.pyOnce it starts, open your browser and go to http://localhost:8501. You should see the Streamlit interface running:
Step 2: Build an Interactive Control Panel
In the Object Detection Workflow we created earlier, several parameters were exposed as inputs to control the output. We’ll now use Streamlit’s interface to visualize these parameters in a user interface.
To implement this, replace the code in object_detection_playground.py with the following:
import streamlit as st

st.title("🔍 Object Detection Playground")

# SIDEBAR: Always visible detection parameters
st.sidebar.header("Detection Parameters")

# Class filter input
class_filter = st.sidebar.text_input(
    "Class Filter (For example: car, person, or a comma-separated list of classes. Leave blank to select all classes.)"
)

# Model selection dropdown
model_options = ["rfdetr-base", "yolov11n-640"]
selected_model = st.sidebar.selectbox("Select Model", options=model_options, index=0)

# Label and bounding box color palettes
color_palette_options = [
    "ROBOFLOW",
    "Matplotlib Viridis",
    "Matplotlib Plasma",
    "Matplotlib Inferno",
    "Matplotlib Magma",
    "Matplotlib Cividis",
    "Matplotlib Pastel1",
    "Matplotlib Pastel2",
    "Matplotlib Set1",
    "Matplotlib Set2",
    "Matplotlib Set3",
    "Matplotlib Accent",
    "Matplotlib Dark2",
    "Matplotlib Paired",
    "Matplotlib Tab10",
    "Matplotlib Tab20",
    "Matplotlib Tab20b",
    "Matplotlib Tab20c"
]

label_color_palette = st.sidebar.selectbox(
    "Label Color Palette",
    options=color_palette_options,
    index=6  # default to "Matplotlib Pastel1"
)

bounding_box_color_palette = st.sidebar.selectbox(
    "Bounding Box Color Palette",
    options=color_palette_options,
    index=0  # default to "ROBOFLOW"
)

# Numeric parameters
confidence = st.sidebar.slider("Confidence Threshold", 0.0, 1.0, 0.4, 0.05)
bbox_thickness = st.sidebar.slider("Bounding Box Thickness", 1, 50, 15)
text_scale = st.sidebar.slider("Text Scale", 1, 20, 8)
text_thickness = st.sidebar.slider("Text Thickness", 1, 30, 4)

# Text Position Dropdown
text_position_options = [
    "TOP_LEFT",
    "CENTER",
    "CENTER_LEFT",
    "CENTER_RIGHT",
    "TOP_CENTER",
    "TOP_RIGHT",
    "BOTTOM_LEFT",
    "BOTTOM_CENTER",
    "BOTTOM_RIGHT",
]

text_position = st.sidebar.selectbox(
    "Text Position",
    options=text_position_options,
    index=0  # default to "TOP_LEFT"
)

# Text Color Dropdown
text_color_options = [
    "Black",
    "White",
    "Blue",
]

text_color = st.sidebar.selectbox(
    "Text Color",
    options=text_color_options,
    index=0  # default to "Black"
)
Every time you make changes to the script, you need to rerun it to see the updates. You can do this by clicking the Rerun button in the top-right corner, which appears whenever the Streamlit script is modified, or by clicking the Always Rerun button, which automatically reruns the script whenever any change is made.
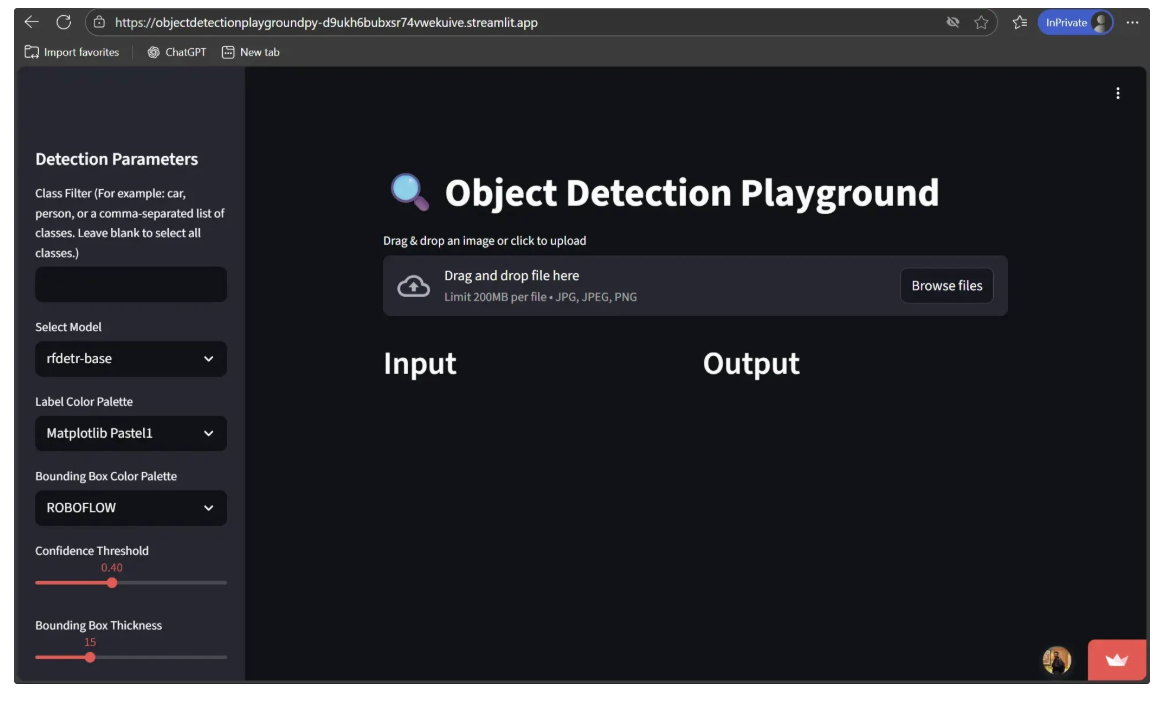
You’ll now see a Streamlit sidebar that lets you select models, apply class filters, choose color palettes, adjust detection parameters, and customize text appearance, making it easy to fine-tune object detection outputs, as shown below:
Step 3: Add File Upload Functionality
Next, add an upload feature that accepts an image and stores it in the session. Storing the image in the session is essential because Streamlit reruns the script from top to bottom on every user interaction, such as moving a slider, uploading a file, or clicking a button, causing variables like uploaded_file to reset unless they are stored persistently.
To implement this, append the following code to the object_detection_playground.py file:
# MAIN CONTENT: File uploader at the top
uploaded_file = st.file_uploader(
"Drag & drop an image or click to upload",
type=["jpg", "jpeg", "png"],
key="file_uploader"
)
# Initialize session state for uploaded image and detected image
if "uploaded_image" not in st.session_state:
st.session_state.uploaded_image = None
if "detected_image" not in st.session_state:
st.session_state.detected_image = None
# Update session state only if a new file is uploaded
if uploaded_file is not None and uploaded_file != st.session_state.uploaded_image:
st.session_state.uploaded_image = uploaded_file
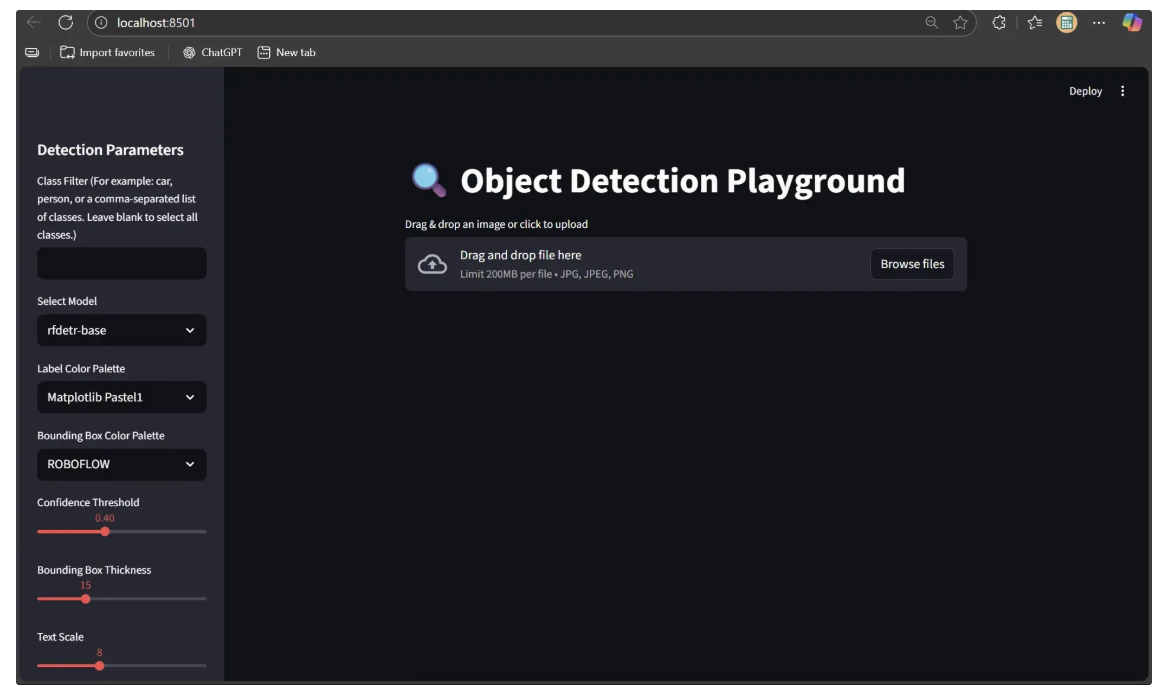
st.session_state.detected_image = NoneThe user interface now includes image upload functionality, as illustrated below:
Step 4: Run Inference with Object Detection Workflow
Now, use the values provided by the user through the sliders, dropdowns, and text boxes to run the object detection workflow. We will also display both the input image and the resulting object-detected image, while giving the user the option to download the output.
To implement this, append the following code to the end of object_detection_playground.py:
from inference_sdk import InferenceHTTPClient
import base64
import tempfile
import os

# Load API key from environment variable
api_key = os.getenv("ROBOFLOW_KEY")

if not api_key:
    raise ValueError("❌ ROBOFLOW_KEY not set in environment variables")

# Initialize Roboflow client
client = InferenceHTTPClient(
    api_url="https://serverless.roboflow.com",
    api_key=api_key
)

# MAIN CONTENT: Input and Output Columns
col_input, col_output = st.columns(2)

# INPUT COLUMN
with col_input:
    st.header("Input")

    if st.session_state.uploaded_image is not None:
        st.image(st.session_state.uploaded_image, caption="Uploaded Image", width='stretch')

        # Initialize running state
        if "is_running" not in st.session_state:
            st.session_state.is_running = False

        # Run Object Detection button
        button_placeholder = st.empty()

        if not st.session_state.is_running:
            if button_placeholder.button("Run Object Detection", key="run_detection_btn"):
                st.session_state.is_running = True
                st.rerun()

        if st.session_state.is_running:
            button_placeholder.text("Running object detection, please wait...")

            # Save uploaded image temporarily
            with tempfile.NamedTemporaryFile(delete=False, suffix=".jpg") as tmp:
                tmp.write(st.session_state.uploaded_image.read())
                tmp_path = tmp.name

            # Run Roboflow workflow
            result = client.run_workflow(
                workspace_name="dikshants-blog-workspace",
                workflow_id="object-detection-playground-workflow",
                images={"image": tmp_path},
                parameters={
                    "model": selected_model,
                    "label_color_palette": label_color_palette,
                    "bounding_box_color_palette": bounding_box_color_palette,
                    "text_thickness": text_thickness,
                    "text_scale": text_scale,
                    "text_color": text_color,
                    "confidence": confidence,
                    "bounding_box_thickness": bbox_thickness,
                    "class_filter": [cls.strip() for cls in class_filter.split(',')] if class_filter else [],
                    "text_position": text_position,
                },
                use_cache=True
            )

            # Decode detected image and store in session state
            base64_data = result[0]['label_visualization']
            st.session_state.detected_image = base64.b64decode(base64_data)

            # Cleanup temp file
            os.remove(tmp_path)

            # Reset running state and show button again
            st.session_state.is_running = False
            st.rerun()

# OUTPUT COLUMN
with col_output:
    st.header("Output")
    if st.session_state.detected_image:
        st.image(st.session_state.detected_image, caption="Detected Objects", width='stretch')

        # Optional download button
        st.download_button(
            label="Download Detected Image",
            data=st.session_state.detected_image,
            file_name="object_detected.jpg",
            mime="image/jpeg"
        )
The script above requires you to set ROBOFLOW_KEY as an environment variable, with the Roboflow API key as its value.
After that you can now rerun the script and upload an image. Once uploaded, the script stores the image in the session, displays it in the input column, and shows a "Run Object Detection" button.
Clicking the button runs the Roboflow workflow using the latest parameters from the user interface and stores the output image in the session, displaying it in the output column and making it available for download.
Since the script uses Roboflow inference, ensure that the inference-sdk package is installed. Run:
pip install inference-sdkThe Object Detection Playground is now fully usable on your local machine.
Step 5: Push it to GitHub Repo
To make the Object Detection Playground accessible to everyone, it needs to be deployed. While there are several deployment options, we’ll use Streamlit’s own service, which is free and easy to set up. Before deploying, the project must be pushed to a GitHub repository.
Start by creating a new repository named ‘object_detection_playground’ at https://github.com/new, as shown below:

Next, navigate to your local ‘object_detection_playground’ directory and run the following commands to initialize the repository and push it to GitHub:
git init
git add .
git commit -m "first commit"
git branch -M main
git remote add origin https://github.com/<YOUR_GITHUB_USERNAME>/object_detection_playground.git
git push -u origin main
These commands initialize a local Git repository, stage all project files, and commit them as the first snapshot. The branch is then renamed to main, and a remote GitHub repository is added as origin. Finally, the local main branch is pushed to GitHub, making your project accessible online and linked for future updates.
If you’re using a virtual environment, make sure it is not pushed to the GitHub repository by using a ‘.gitignore’ file.
Step 6: Deploy it to Streamlit
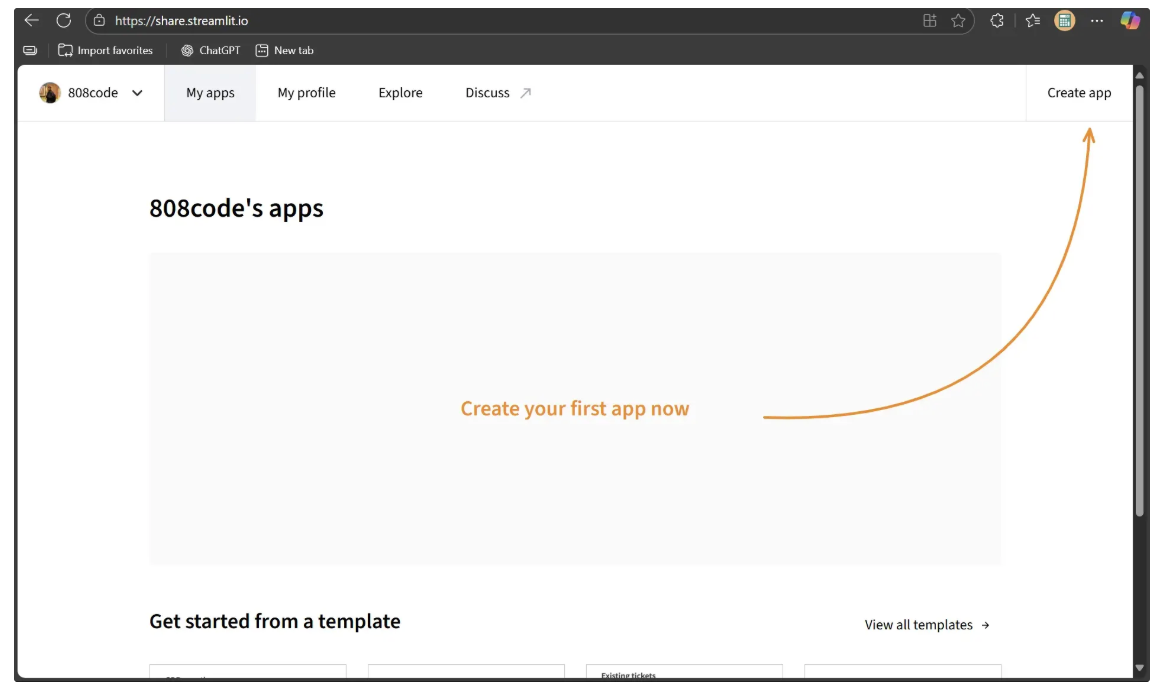
To deploy your local Object Detection Playground app to Streamlit, start by signing in to Streamlit using the same GitHub account you used to create the repository. After signing in, you should see a window like this:
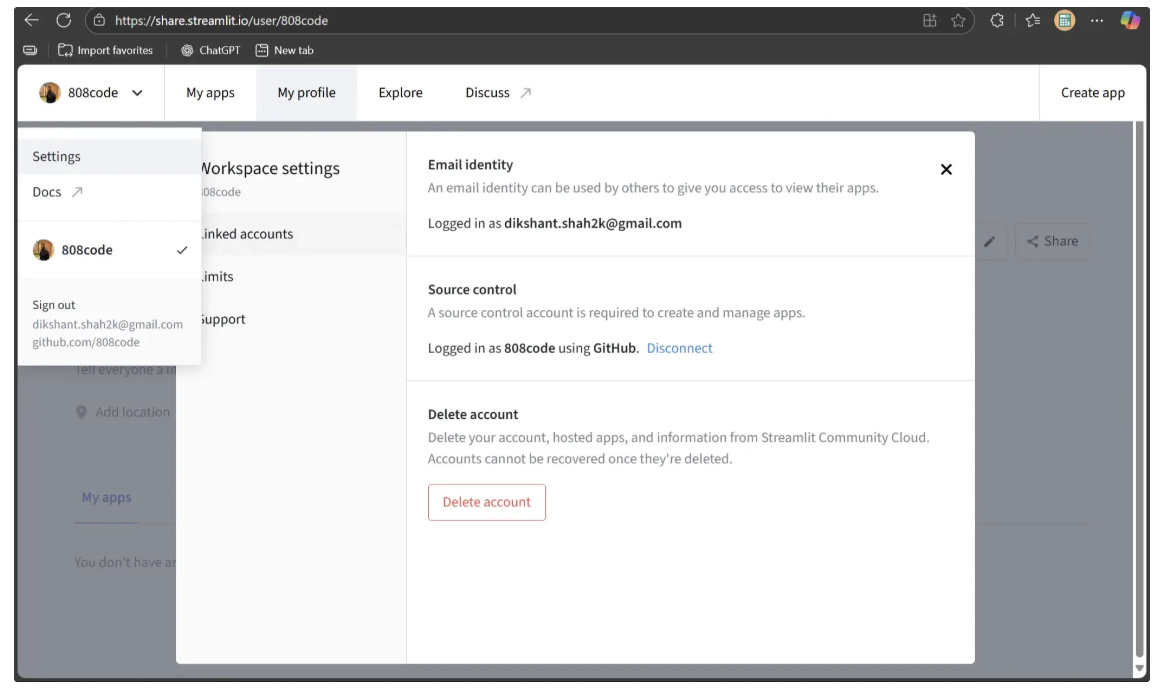
Next, make sure your Source Control account is logged in using the same GitHub account. If it isn’t, go to Settings, then Source Control, and follow the on-screen instructions to log in. Once linked correctly, it should appear like this:
Before deploying, create two files inside your local ‘object_detection_playground’ directory, which contains the Streamlit script: requirements.txt and packages.txt.
The requirements.txt file lists the Python dependencies needed to run the Streamlit script on the deployment machine. Copy and paste the following dependencies into it:
inference-sdk
streamlit
The packages.txt file lists the system-level packages required for the Streamlit script to run correctly. Copy and paste the following packages into it:
libgl1
libglib2.0-0
Once these files are added, commit your changes and push them to GitHub:
git add .
git commit -m "changes"
git push origin main
Once the changes are pushed, your repository is ready to be deployed as a Streamlit app.
On the Streamlit dashboard, click “Create app” and choose “Deploy a public app from GitHub”. Next, click the “Paste GitHub URL” link. You should then see a window like this:
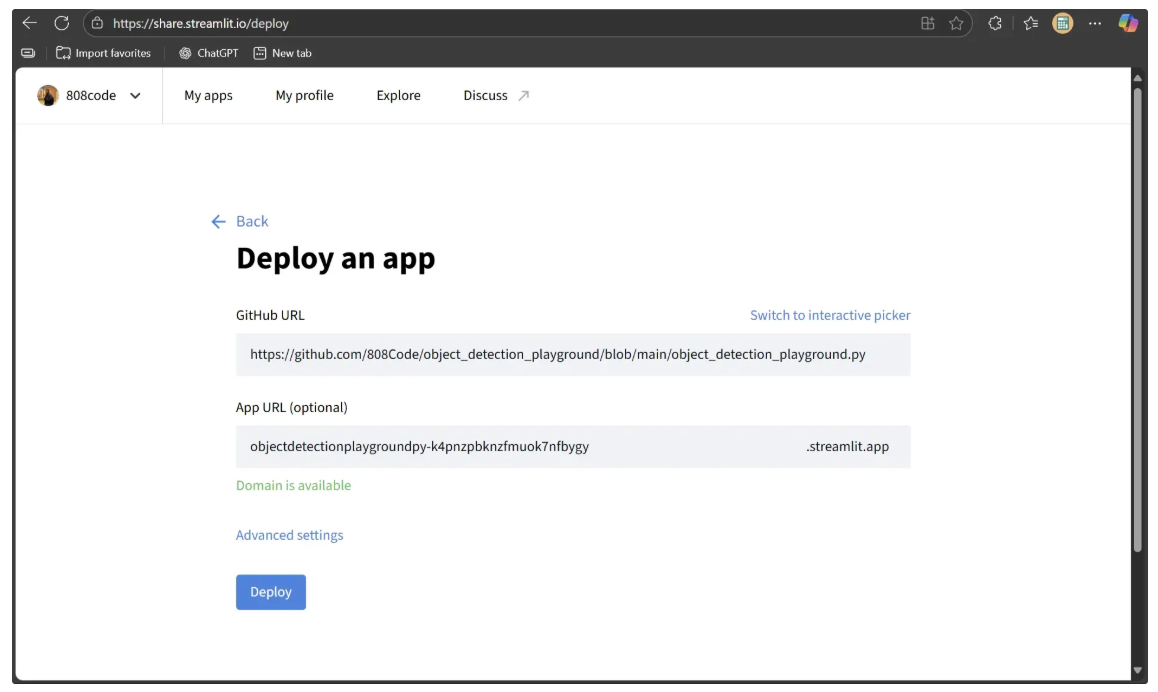
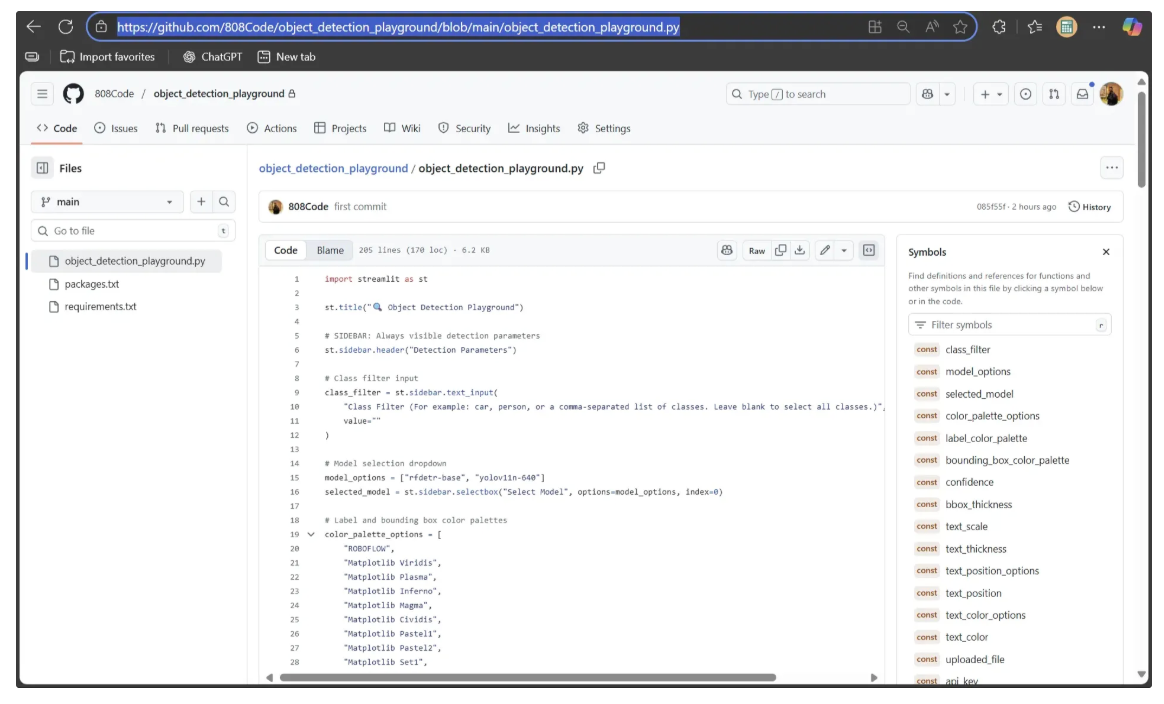
The GitHub URL entered in the form above should point to the object_detection_playground.py (Streamlit script) file in your GitHub repository:
After filling out the form, go to Advanced Settings in the same dashboard to select the Python version for the deployment machine. Since the inference-sdk is currently compatible with Python versions 3.9 through 3.12, select Python 3.12.
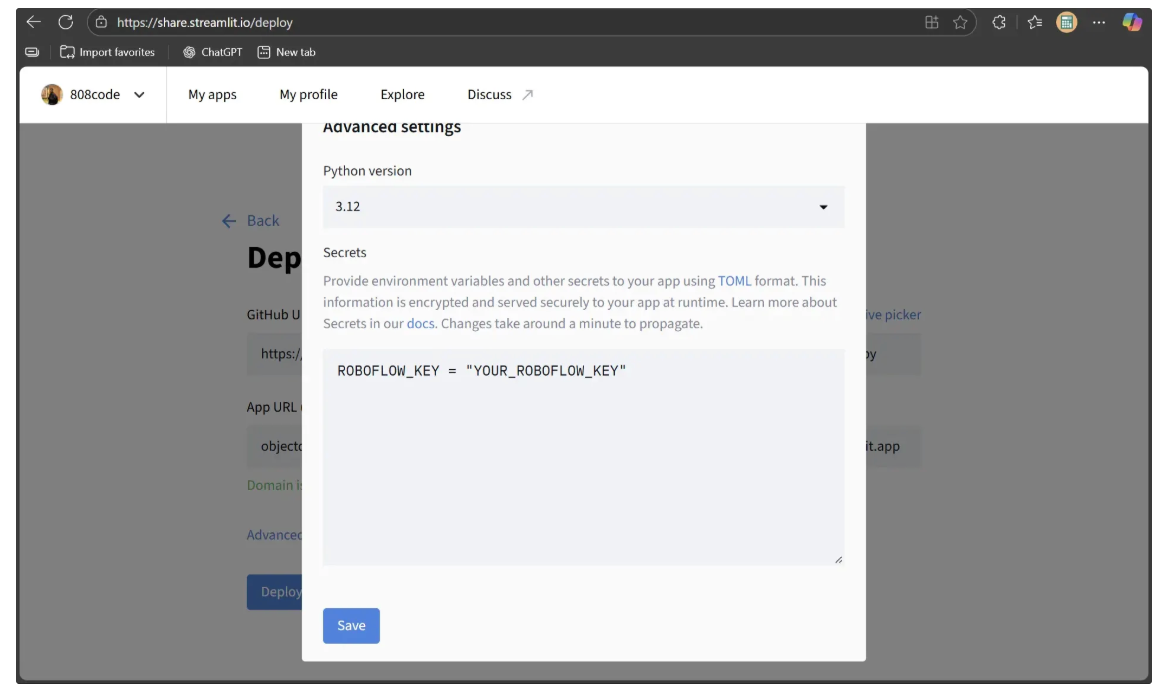
Additionally, because the Streamlit script requires the Roboflow key from the environment, you can add it as a secret in the Secrets section of the remote machine, as shown below:
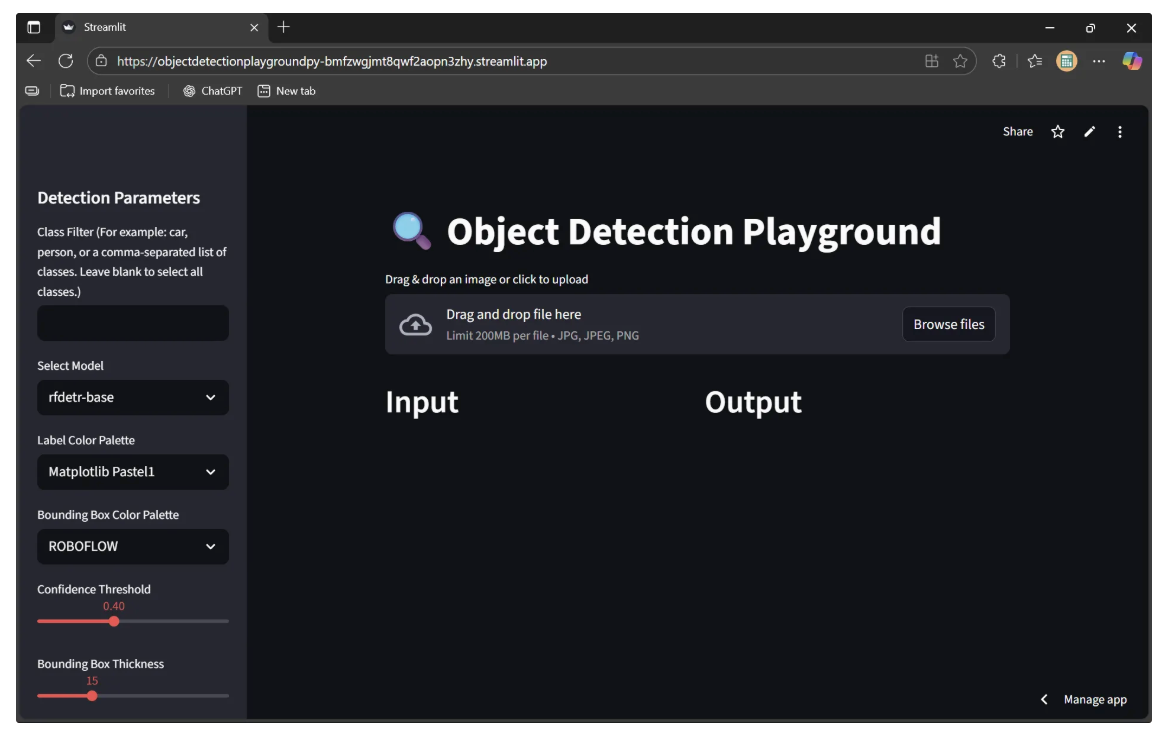
Now, click Save, and then Deploy. After clicking Deploy, a new link will open in the same tab displaying the message “Your app is in the oven.” Once the deployment process is complete, your Streamlit app will be live, as shown below:
By default, the app is only accessible to you. To make it available to everyone, return to the Streamlit dashboard, locate your deployed app, and click the three dots to open the dropdown menu. Then select Settings, as shown below:
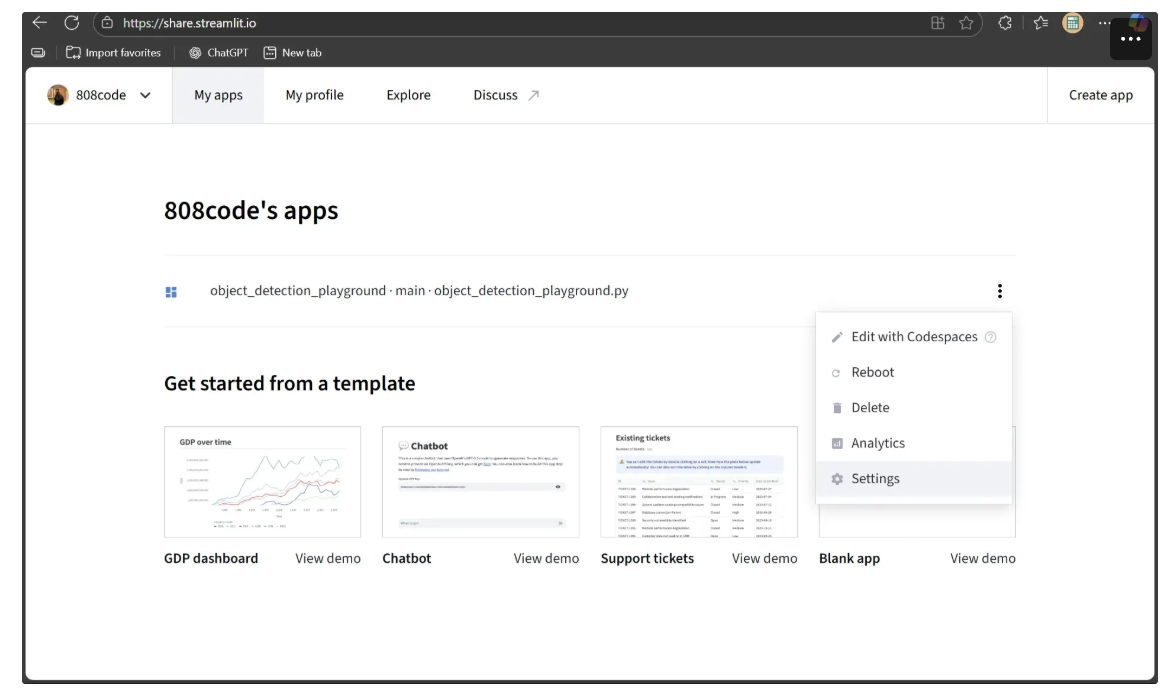
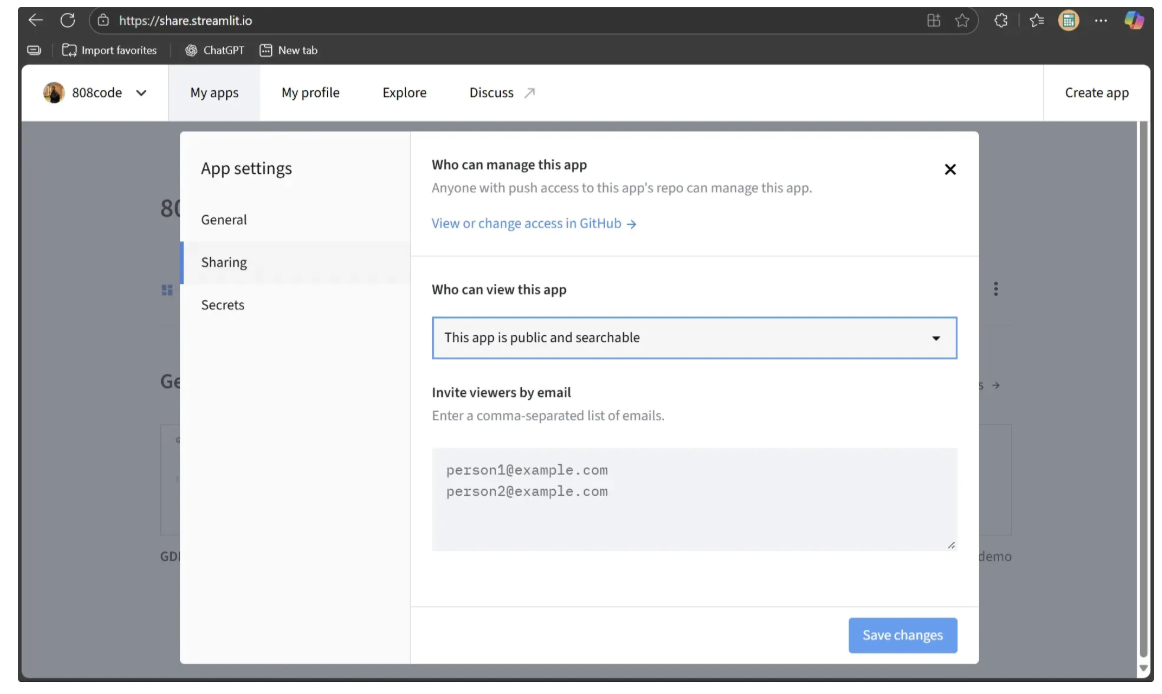
A settings window will appear. In the Sharing tab, change the “Who can view this app” option to “This app is public and searchable”, as shown below:
Finally, open the deployment link in an incognito window. If it loads successfully, your Object Detection Playground is fully deployed and ready to share, as shown below:
Using Streamlit for Computer Vision Conclusion
This blog demonstrated how Streamlit can turn a Roboflow object detection workflow into a dynamic, interactive playground. Although we focused on object detection, the same pattern can be applied to other computer vision tasks such as face blurring, scene segmentation, or document analysis.
With Roboflow’s versatile computer vision blocks and Streamlit’s user-friendly interface, building, experimenting, and sharing AI-powered solutions has never been easier.
To learn more about building with Roboflow Workflows, check out the Workflows launch guide.
Written by Dikshant Shah
Cite this Post
Use the following entry to cite this post in your research:
Contributing Writer. (Oct 3, 2025). How to Use Streamlit for Computer Vision with Roboflow. Roboflow Blog: https://blog.roboflow.com/streamlit-for-computer-vision-with-roboflow/