
On a tablet production line running millions of units per shift, capping, lamination, chipping, and cracking occur regularly as part of day-to-day manufacturing challenges. They are recurring quality issues that can build up unnoticed until a batch is flagged, a shipment is delayed, or a recall is triggered.
The harder problem is detecting defects and understanding exactly what went wrong. A crack and a lamination defect may look similar at first glance, yet they stem from different root causes, carry different levels of risk, and require different corrective actions. An inspection system that only labels a tablet as defective without identifying the defect type leaves quality teams with only part of the information they need.
This tutorial builds a two-stage inspection pipeline: a trained RF-DETR model locates every tablet, and a vision language model classifies the defect type on each crop. A Custom Python Block turns those classifications into a pass or fail verdict with a structured report.
By the end, you will have a working Roboflow Workflow that takes a single image and returns a labeled output showing the defect type and inspection result for every tablet it finds.
Tablet Defect Inspection with Roboflow
Here's the workflow we'll build. Go to Roboflow Universe and search for the pill detection dataset.
This dataset contains 2,103 images annotated with a single class, Pill. Its purpose is not defect detection but tablet localization. The detector finds each tablet in an image so it can be cropped and sent to the VLM for inspection. The dataset includes varied lighting, backgrounds, and tablet sizes, helping the model handle real production-line conditions.
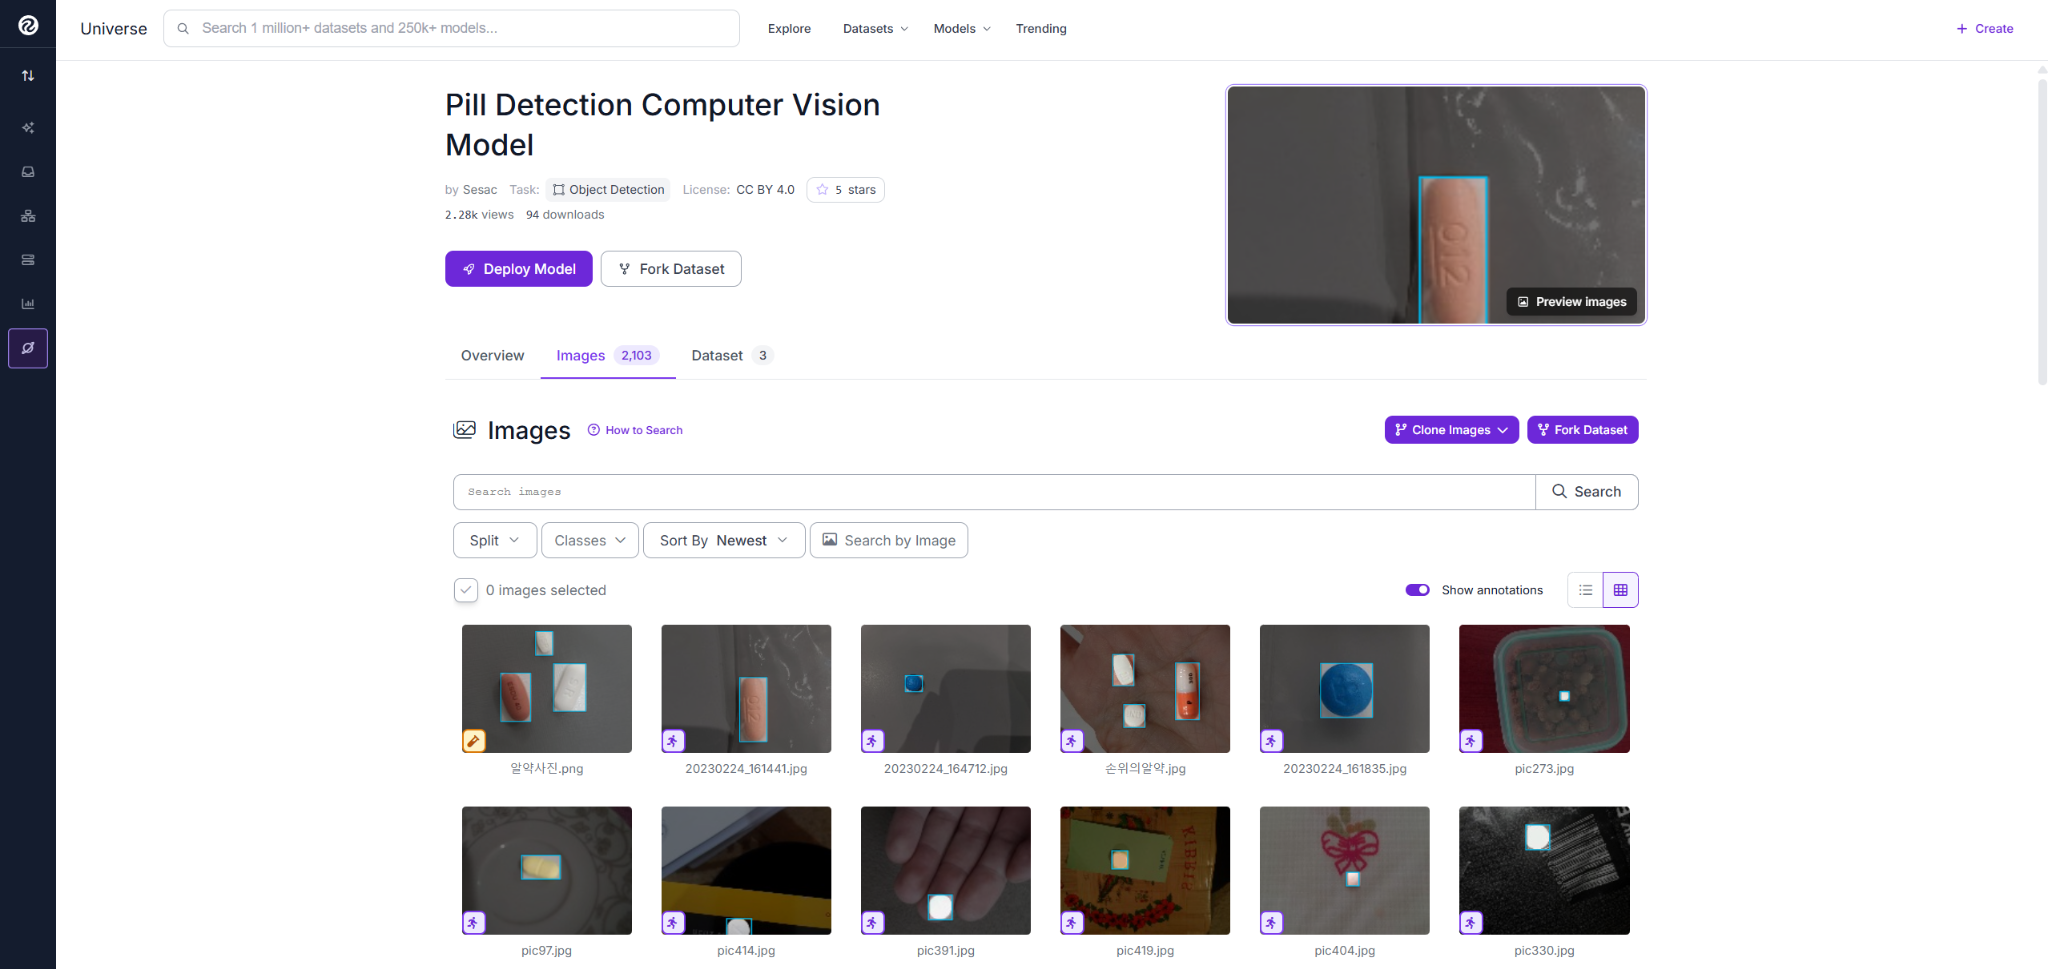
Fork the dataset into your workspace to create your own copy, including all annotations, so you can train and build on it independently.
Train the Detection Model
With the dataset in your workspace, create a new version and train it using RF-DETR (Small) under Custom Train. RF-DETR is Roboflow’s real-time object detection model, designed to deliver fast and accurate inference in production environments.
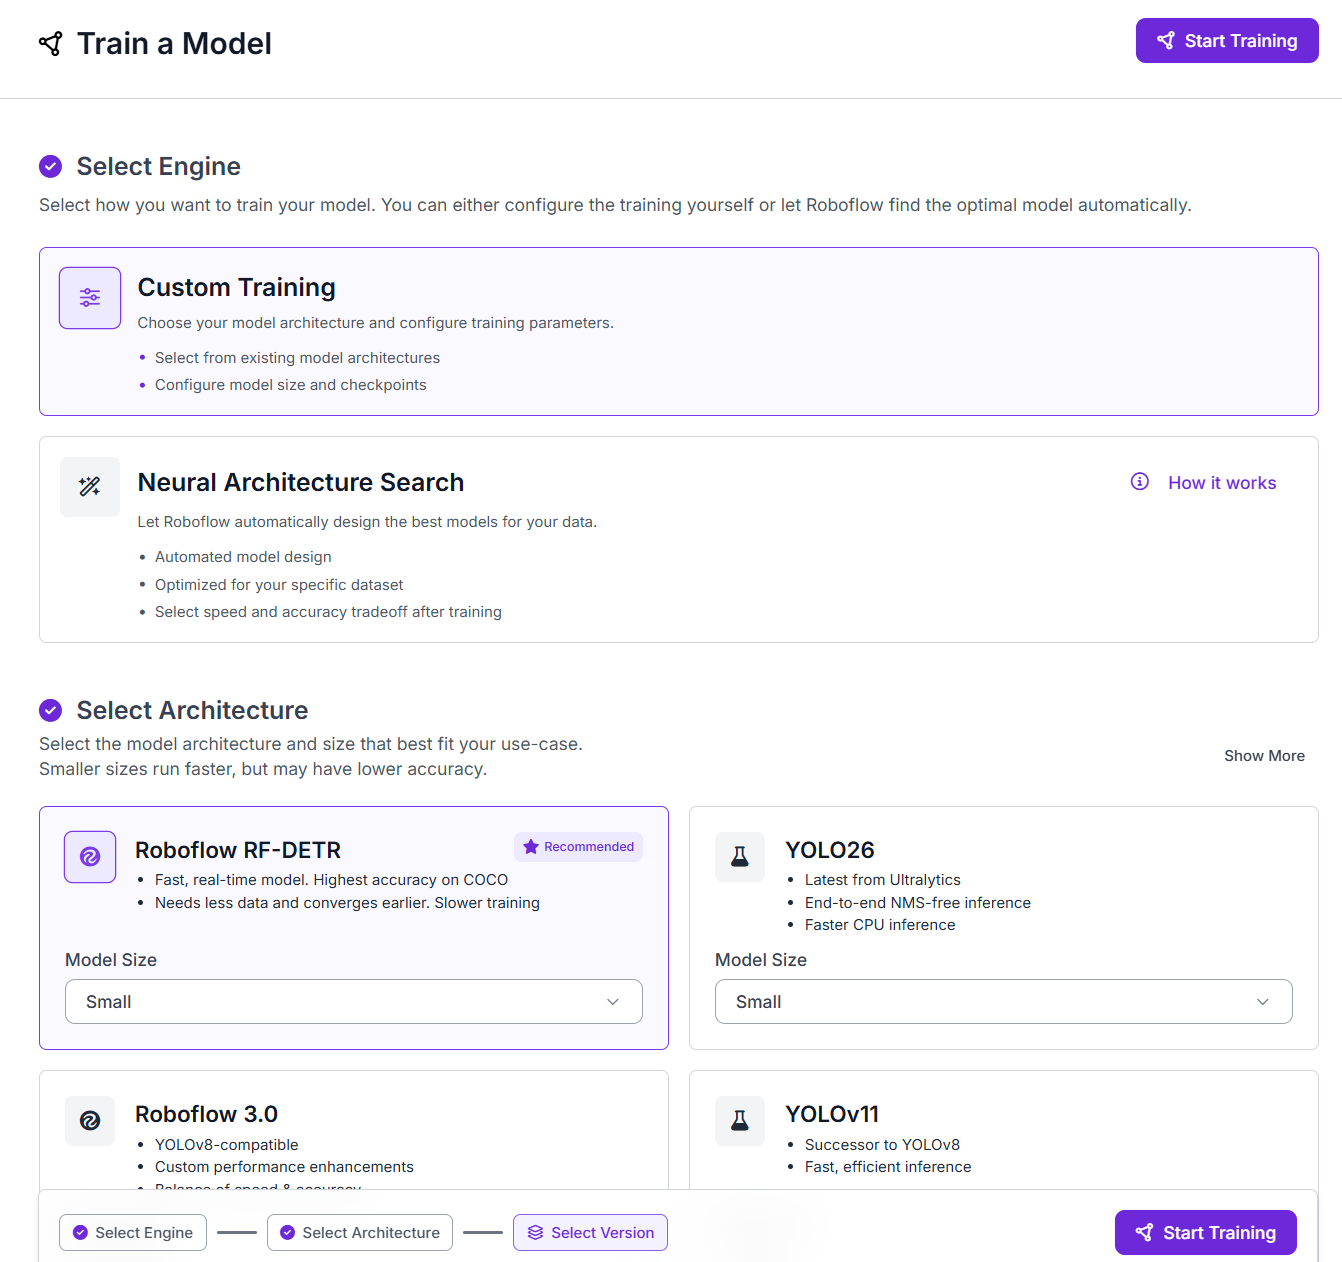
Click Start Training and wait for the run to finish.

Once training finishes, review the test-set metrics: mAP, precision, recall, and F1. This model achieved 99.9% mAP@50, 98.1% precision, and 100% recall, meaning every tablet in the test images was detected. In this workflow, recall is especially important because a missed tablet at Stage 1 can never be classified for defects in Stage 2.

With the model ready, the next step is to build the Workflow that turns those detections into actionable inspection results.
Build the Workflow
The Workflow is made up of the following components, each handling a specific step:
- Object Detection Model: detects every tablet, returns bounding boxes and confidence scores.
- Dynamic Crop: isolates each detected tablet into its own image.
- VLM Classifier: classifies the defect type on each crop.
- Dimension Collapse: merges per-crop VLM outputs into a single result.
- Custom Python Block: converts classifications into a pass or fail verdict.
- Bounding Box Visualization: draws detection boxes on the image.
- Text Display: writes the verdict onto the output image.
- Roboflow Vision Events: logs every inspection run.
- Outputs: returns the annotated image and JSON report.

Step 1: Add the pill detector as an Object Detection block
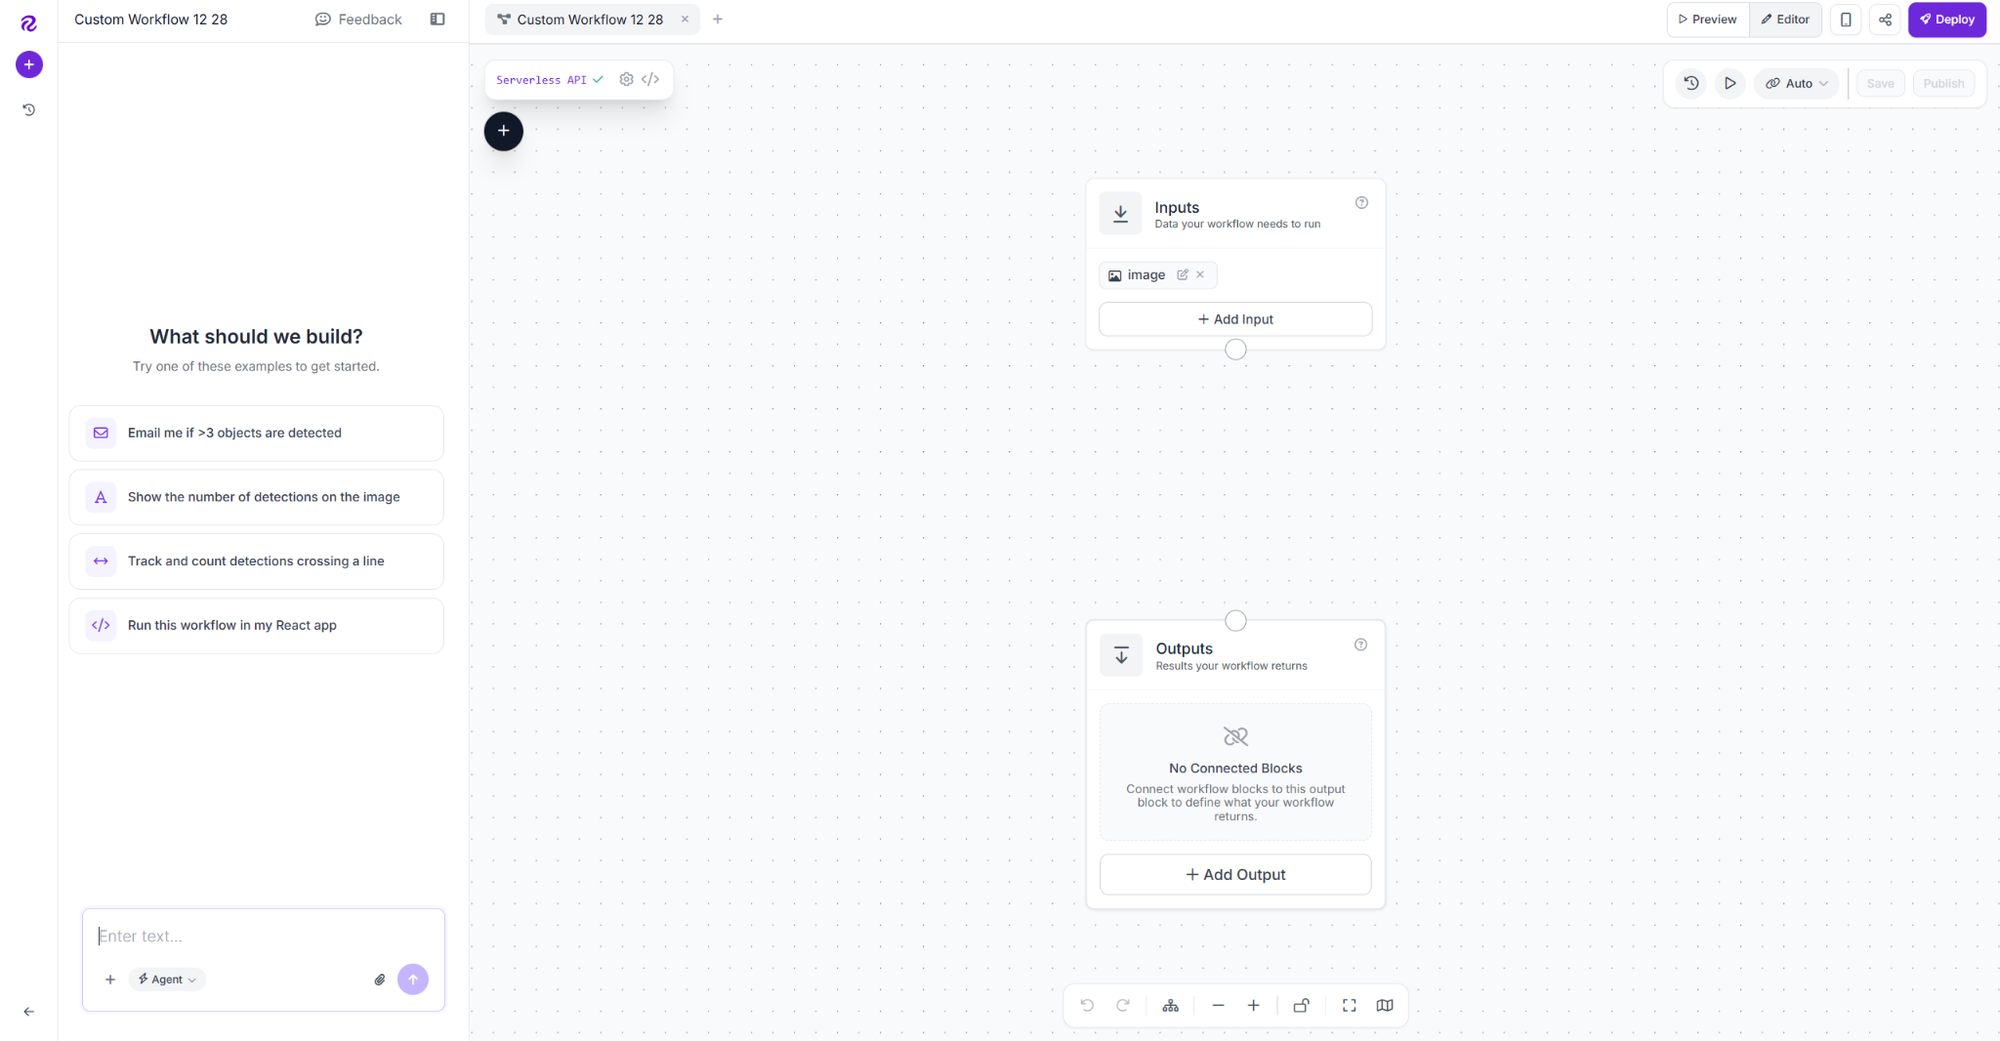
Open the Workflows tab and create a new Workflow. Roboflow adds an Image Input and Outputs block automatically.
Click the plus icon, search for Object Detection Model, and add it as pill_detector. Connect Image to inputs.image, then copy the model URL from your trained model's card and paste it into the Model field.
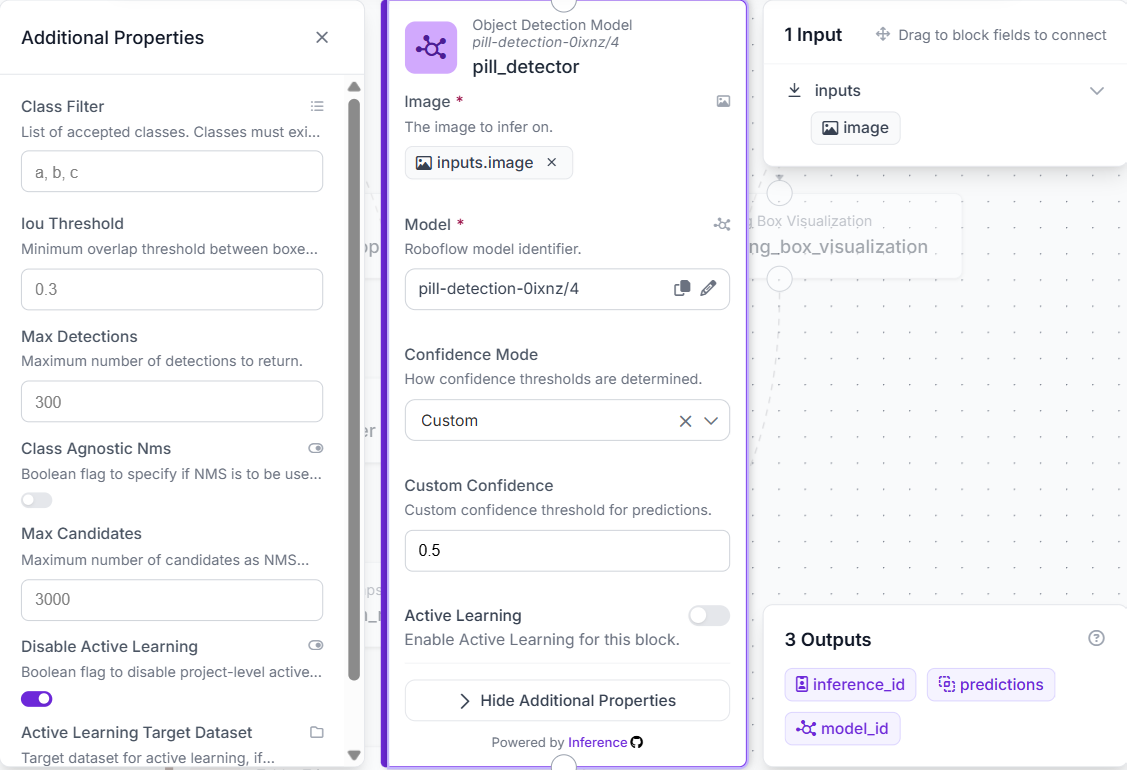
Set the confidence threshold to 0.5. This removes weak detections while keeping real tablets. Each remaining detection is cropped and sent to the VLM.
Step 2: Crop each detected tablet with Dynamic Crop
Add a Dynamic Crop block. Connect Image to inputs.image and Regions of Interest to pill_detector.predictions. The block crops each detected tablet from the image, creating one image per bounding box.
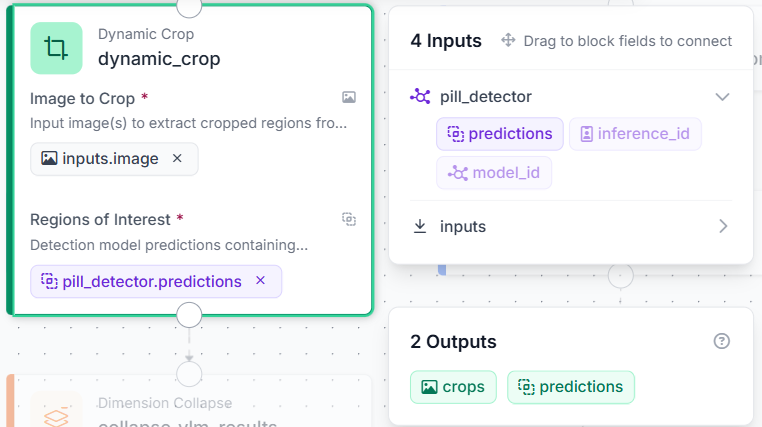
The cropped images are what the VLM receives in the next step. Passing a tight crop instead of the full image gives the VLM a clearer view of the tablet surface, which improves classification accuracy.
Step 3: Classify each crop with a VLM block
Add an OpenAI GPT-4o block named vlm_classifier. Connect Image to dynamic_crop.crops. Set the Task Type to Open Prompt and paste the following into the Prompt field:
Inspect this tablet carefully. Classify it as exactly one of these categories: good, crack, scratch, capping, lamination, chipping, contamination. Return only the category name, nothing else.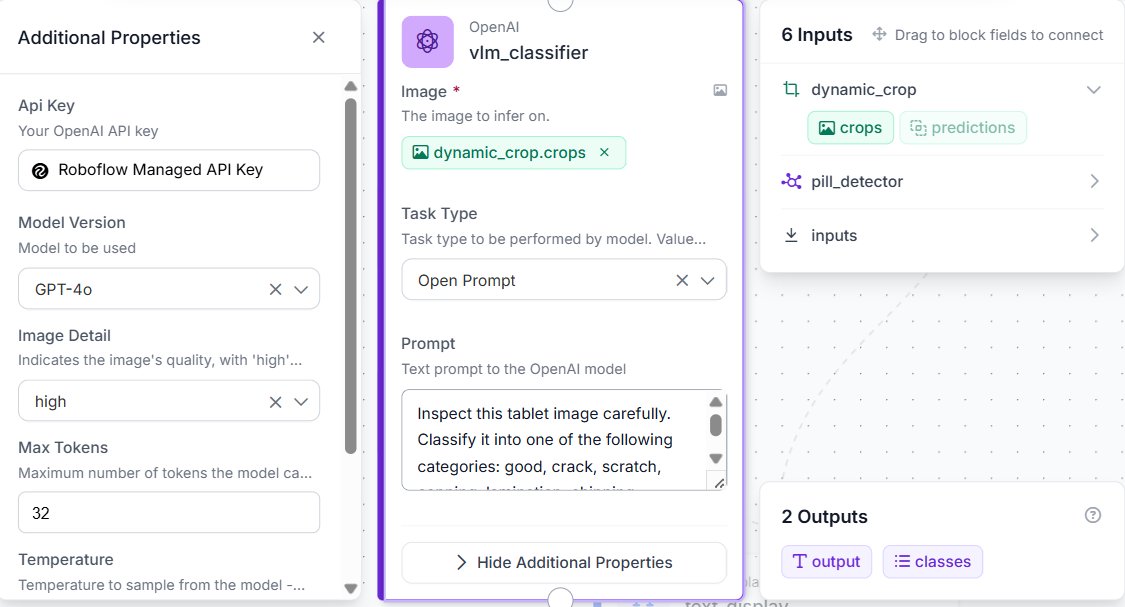
Set Temperature to 0 and Image Detail to High for consistent results and full-resolution analysis. The block runs once per crop, generating a separate classification for each detected tablet.
Step 4: Collapse VLM results with Dimension Collapse
Add a Dimension Collapse block named collapse_vlm_results. Connect Data to vlm_classifier.output.
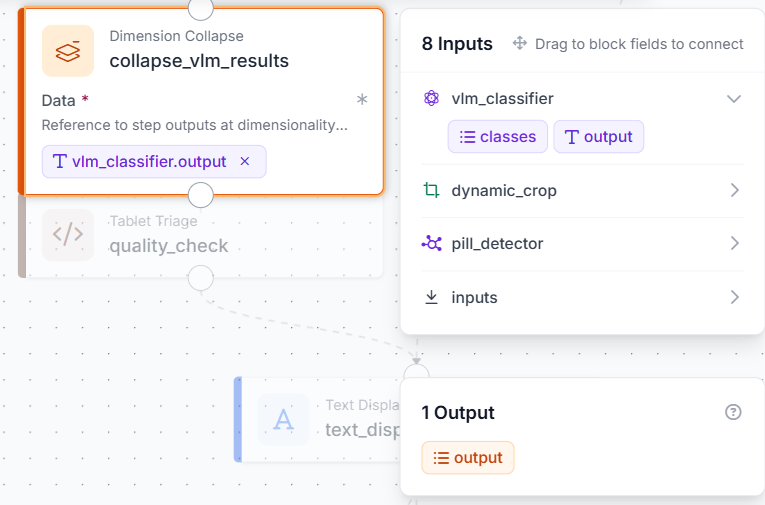
The VLM produces one output for each detected tablet. The Dimension Collapse block combines these outputs into a single result that the Custom Python Block can process. Without it, the Workflow would receive inputs in the wrong format and fail.
Step 5: Add the Custom Python Block (triage logic)
Add a Custom Python Block named quality_check. Connect one input, vlm_output, to collapse_vlm_results.output, kind list_of_values. Add three outputs: report (dictionary), display_text (string), and qc_result (string).

Click Edit Code to open the full editor.
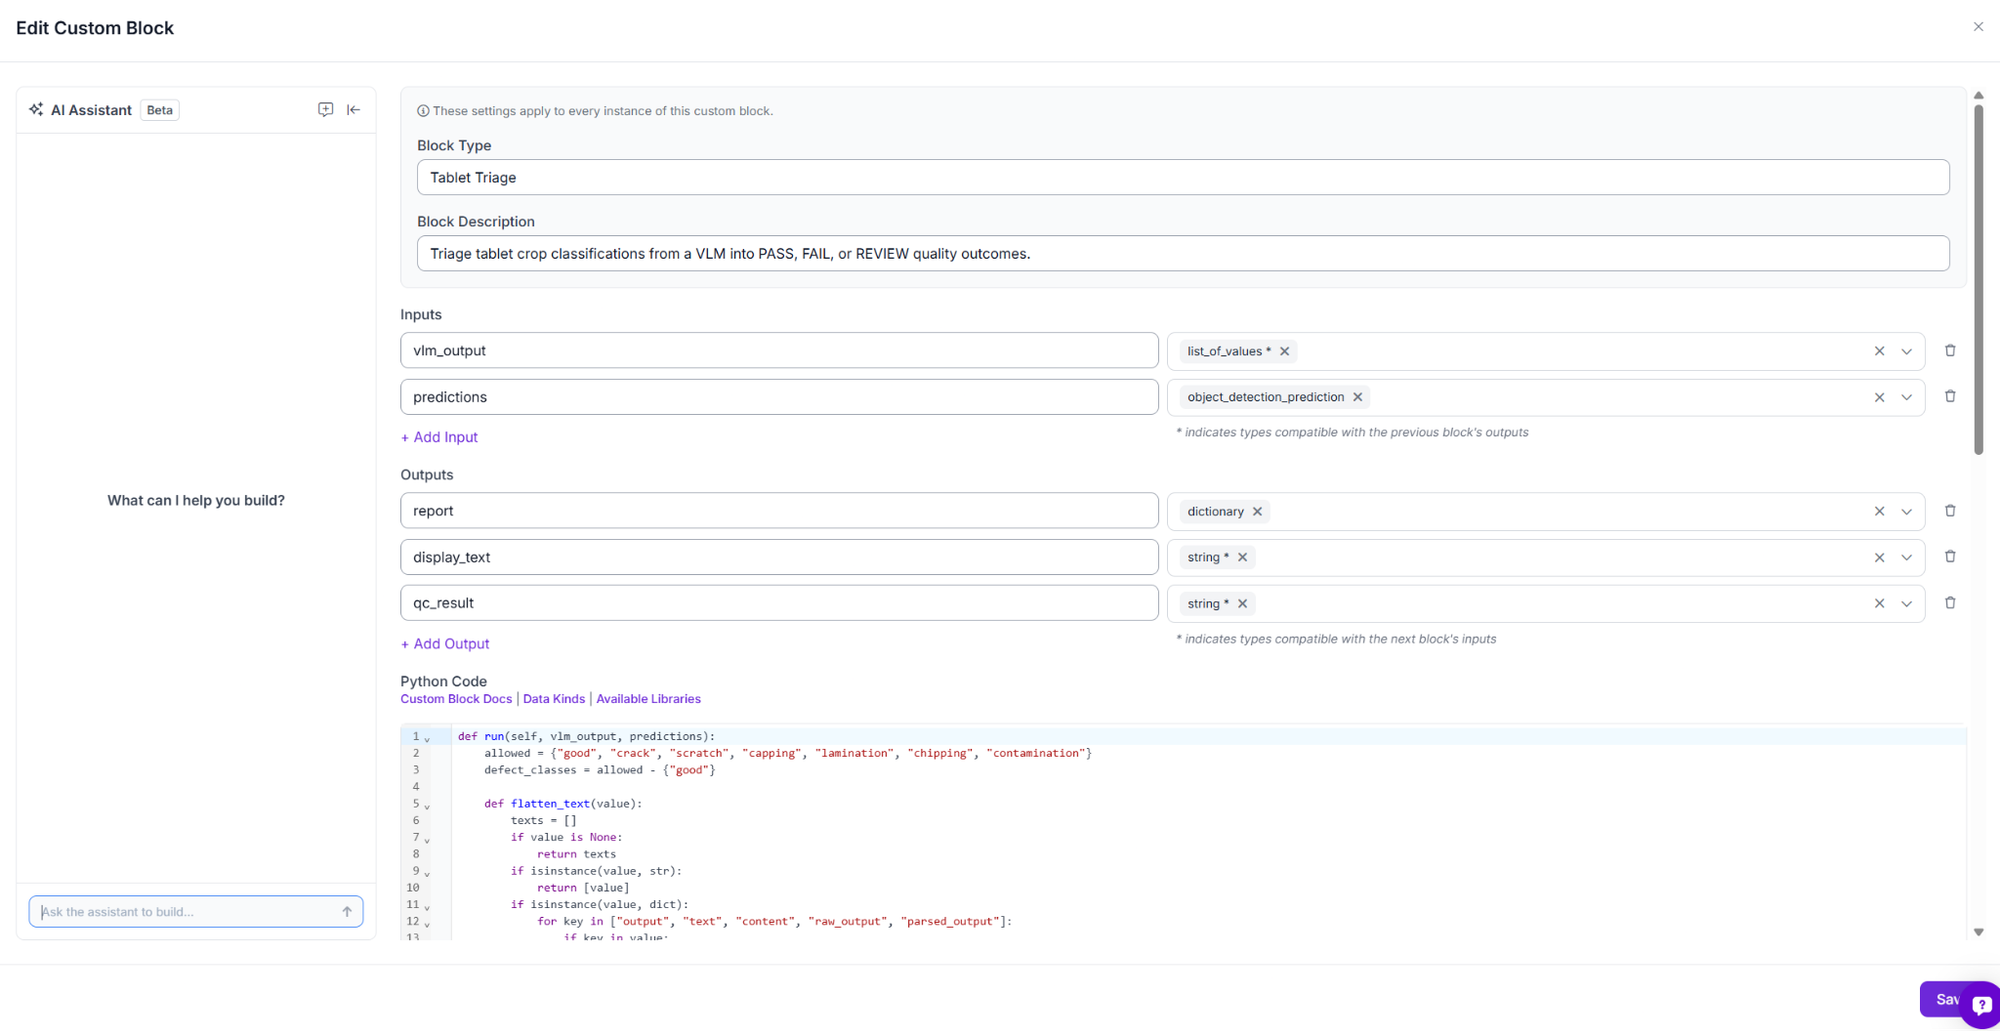
Write the triage logic:
def run(self, vlm_output):
    allowed = {"good", "crack", "scratch", "capping", "lamination", "chipping", "contamination"}
    defect_classes = allowed - {"good"}
    def flatten_text(value):
        texts = []
        if value is None:
            return texts
        if isinstance(value, str):
            return [value]
        if isinstance(value, dict):
            for key in ["output", "text", "content", "raw_output", "parsed_output"]:
                if key in value:
                    texts.extend(flatten_text(value.get(key)))
            if not texts:
                texts.append(str(value))
            return texts
        if isinstance(value, (list, tuple)):
            for item in value:
                texts.extend(flatten_text(item))
            return texts
        if hasattr(value, "output"):
            return flatten_text(getattr(value, "output"))
        if hasattr(value, "raw_output"):
            return flatten_text(getattr(value, "raw_output"))
        return [str(value)]
    raw_items = flatten_text(vlm_output)
    classifications = []
    unexpected = []
    for raw in raw_items:
        cleaned = str(raw).strip().lower()
        cleaned = cleaned.replace("`", "").replace(".", "").replace(":", "")
        cleaned = cleaned.split("\n")[0].strip()
        matched = None
        for category in allowed:
            if cleaned == category or category in cleaned.split():
                matched = category
                break
        if matched is None:
            unexpected.append(str(raw).strip())
            classifications.append("unknown")
        else:
            classifications.append(matched)
    if not classifications:
        classifications = ["unknown"]
        unexpected.append("empty_vlm_output")
    defects = [c for c in classifications if c in defect_classes]
    if defects or unexpected:
        qc_result = "FAIL"
        status_line = "FAIL: " + ", ".join(sorted(set(defects))) if defects else "FAIL: unknown defect"
    else:
        qc_result = "PASS"
        status_line = "PASS: all detected tablets look good"
    report = {
        "qc_result": qc_result,
        "classifications": classifications,
        "defects": defects
    }
    return {
        "report": report,
        "display_text": status_line,
        "qc_result": qc_result
    }
Click Save. If the VLM identifies a defect, the tablet is marked as FAIL and the defect type is included in the result. If all tablets are classified as good, the inspection returns PASS. Any unexpected or unrecognized VLM output is treated as FAIL by default.
Step 6: Add Bounding Box Visualization and Text Display
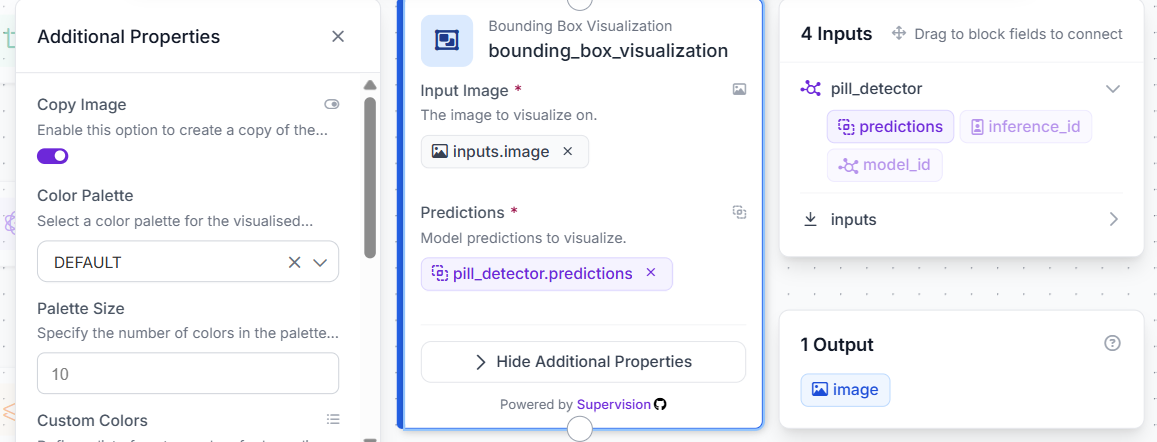
Add a Bounding Box Visualization block. Connect Image to inputs.image and Predictions to pill_detector.predictions. This draws a box around every detected tablet on the original image.
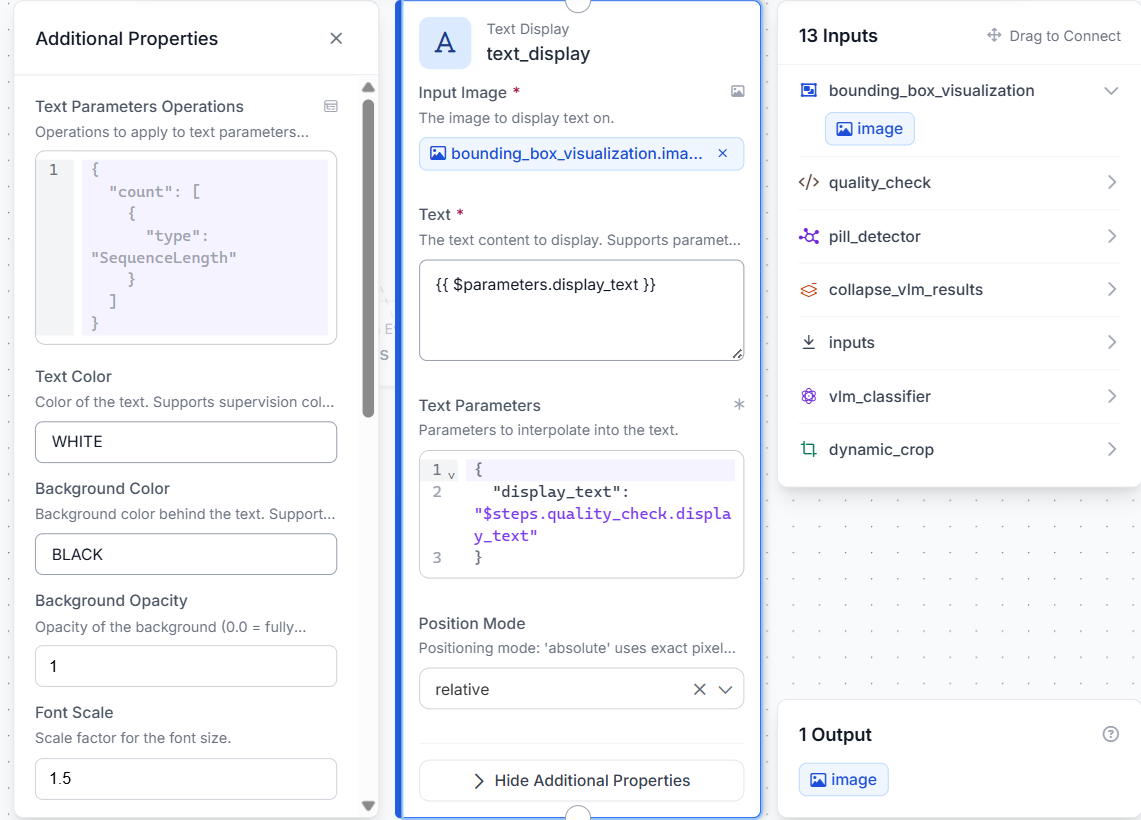
Add a Text Display block. Connect Image to bounding_box_visualization.image and Text to quality_check.display_text. Set the style to white text on a black background, anchored to the bottom-left corner.
The output image displays all detected tablets with bounding boxes, along with the final pass or fail verdict overlaid directly on the image.
Step 7: Add Vision Events
Add a Roboflow Vision Events block. Connect Input Image to inputs.image, Output Image to text_display.image, and Predictions to pill_detector.predictions. Set Event Type to Quality Check and Use Case to Tablet Defect Inspection.
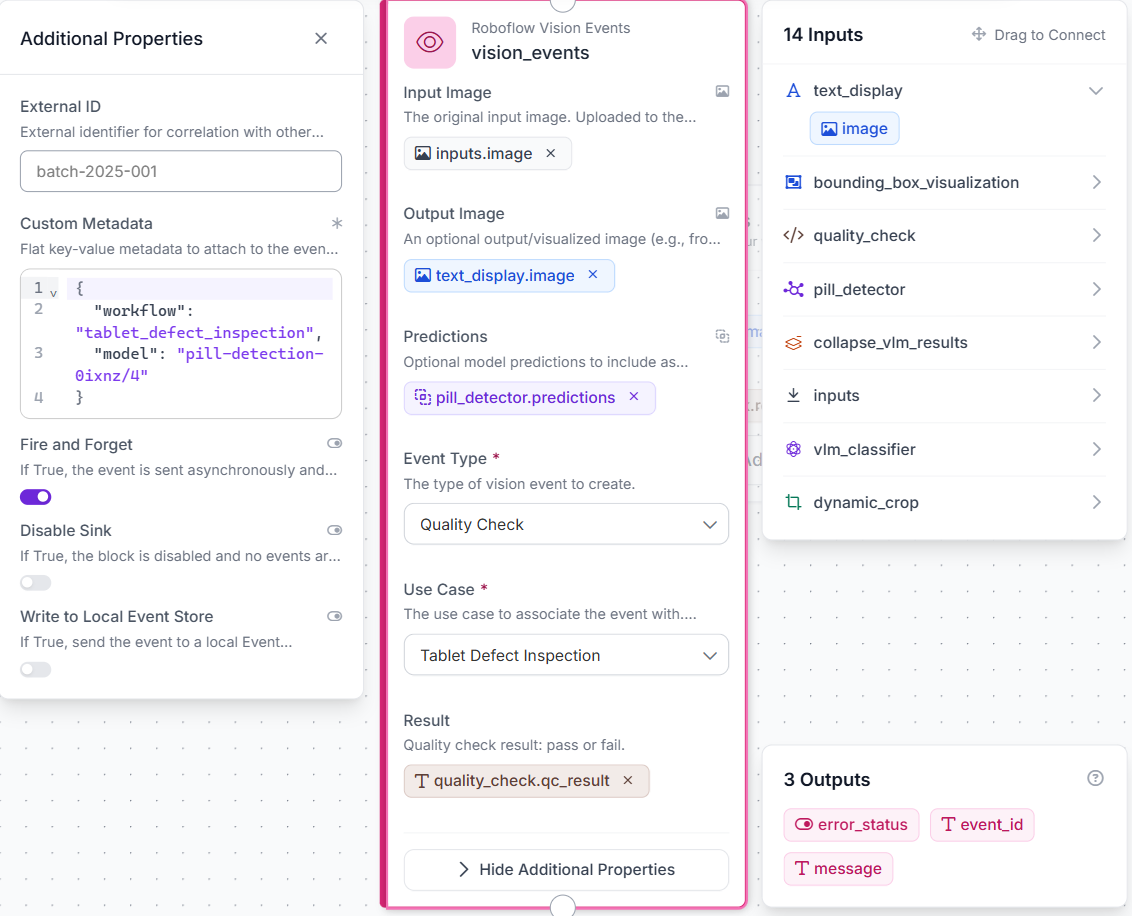
This logs every inspection run: the original image, the labeled result, what was detected, and the final verdict, without changing what the Workflow returns.
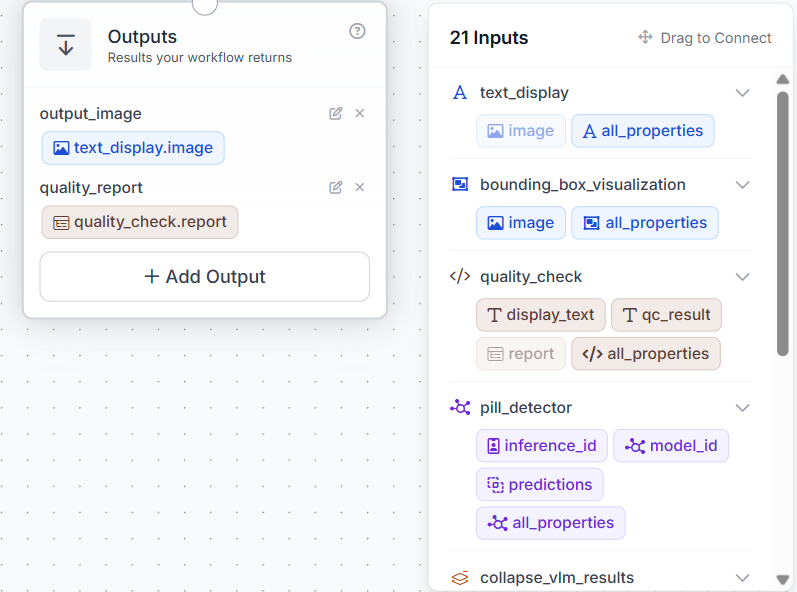
Step 8: Configure Outputs
Set two outputs: output_image from text_display.image and quality_report from quality_check.report.
With all blocks configured and connected, the complete Workflow looks like this:
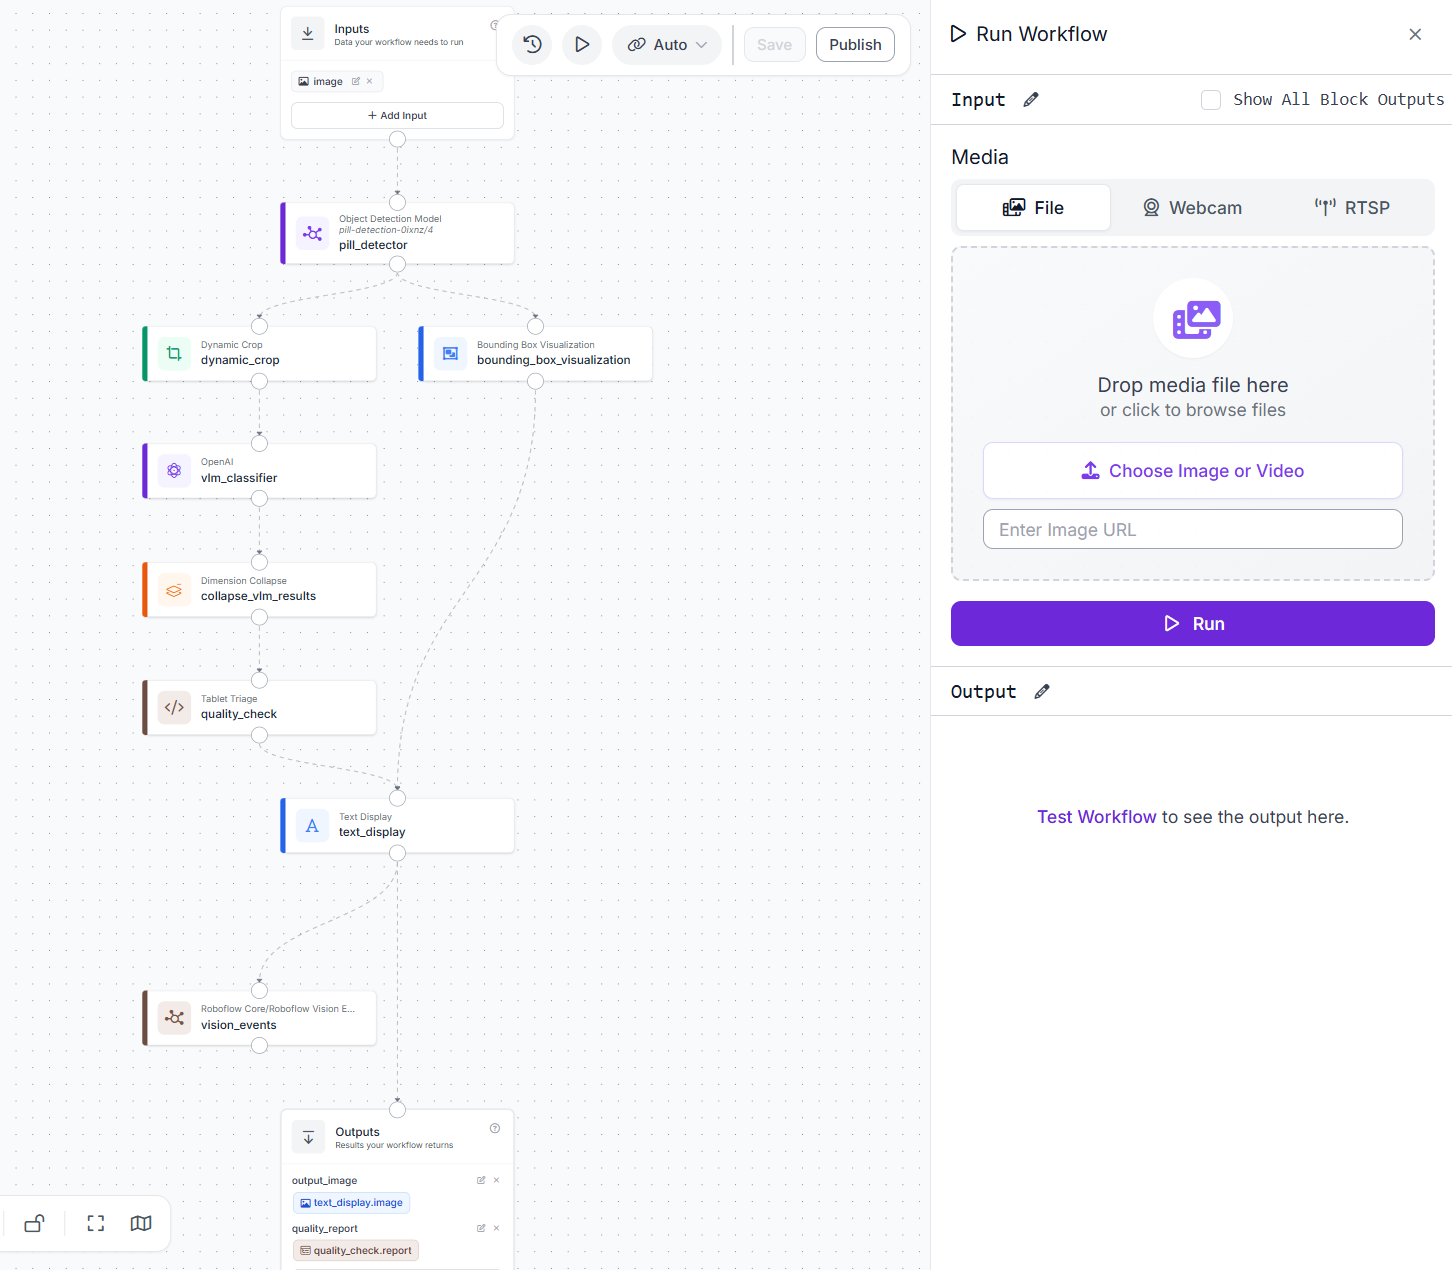
From here, every image that comes in gets a labeled result, a structured report, and a logged record.
Tablet Defect Inspection Results
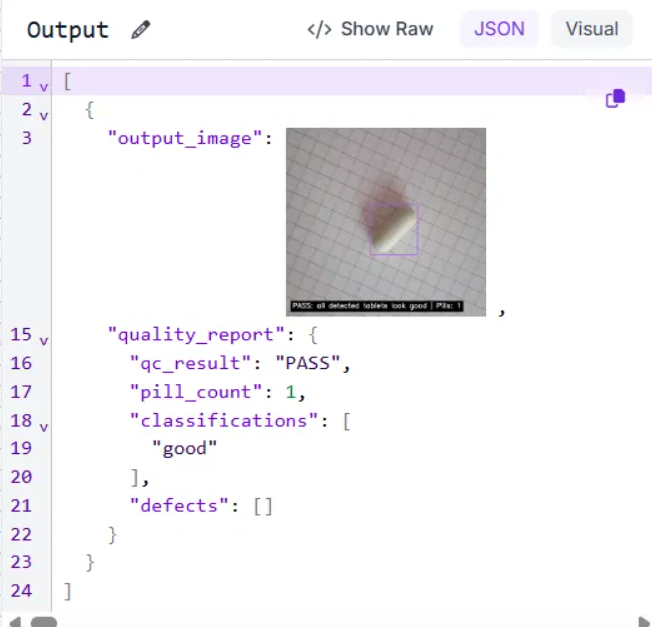
Test case 1: Good tablet, status PASS
A tablet with no visible defects is classified as good by the VLM and returns a PASS status.
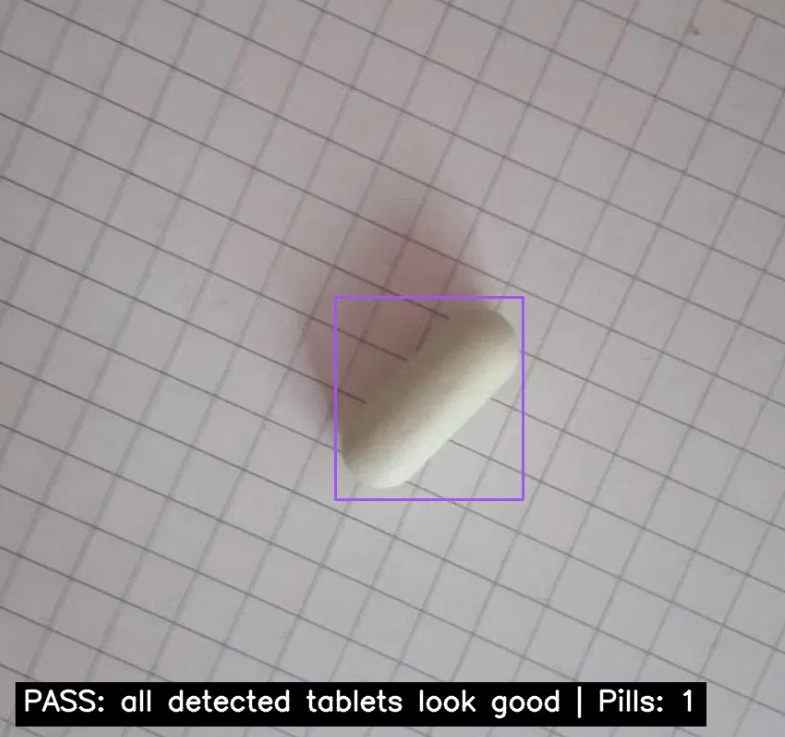
The detector located the tablet and the VLM inspected the crop. No defect was found in the classification.
This is the ideal outcome on a production line: a clean tablet confirmed good and cleared for packaging.
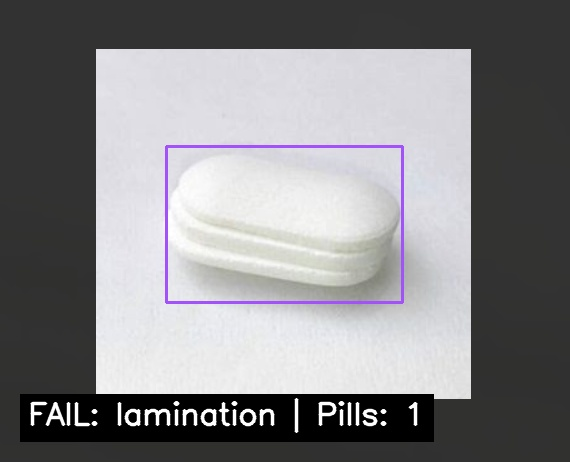
Test case 2: Lamination defect, status FAIL
A tablet with visible lamination is correctly identified. The tablet has separated into horizontal layers, a manufacturing defect that makes it unsuitable for distribution.
The VLM identified the horizontal layer separation as lamination and returned FAIL with the defect type in the report.
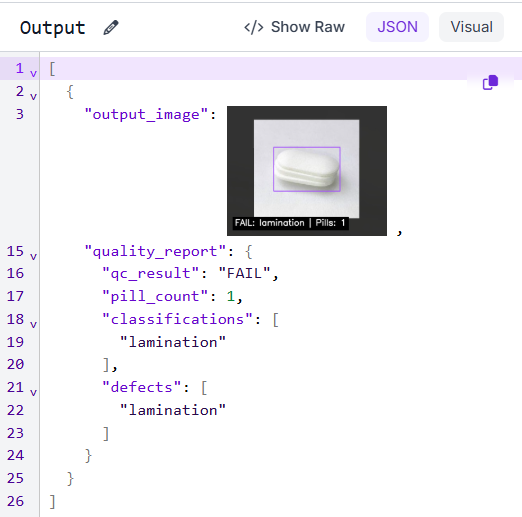
The defect type is named in the report, giving quality teams the information they need to trace the issue back to a specific point in the compression process.
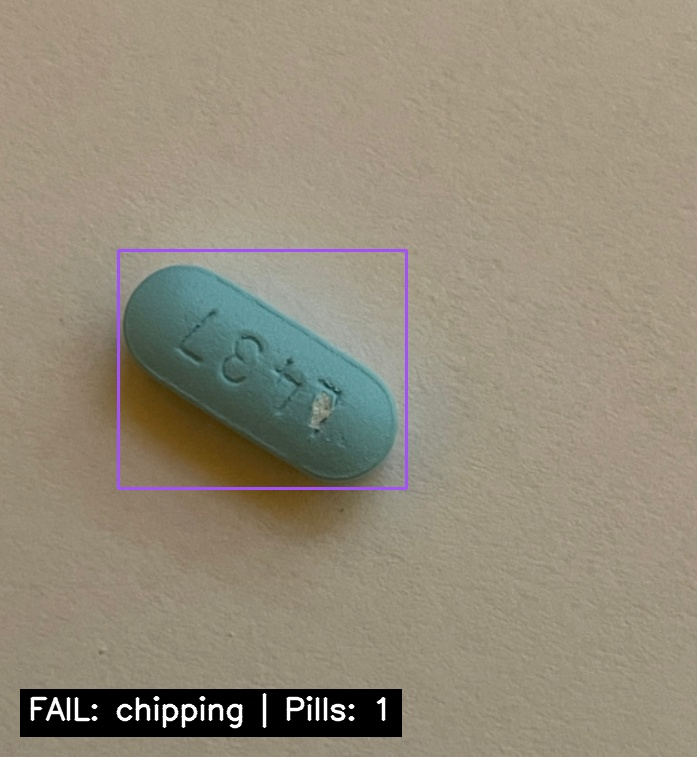
Test case 3: Chipping defect, status FAIL
A tablet with a visible chipping defect is correctly identified. A fragment has broken off from the edge of the tablet, leaving exposed core material and making the unit unfit for release.
The VLM identified the missing fragment as chipping and returned FAIL with the defect type in the report.
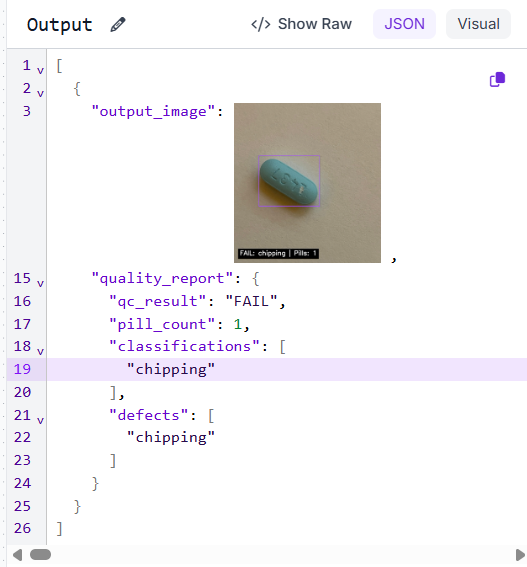
The pipeline handles multiple defect types without any changes to the detection model or Workflow structure. Only the VLM prompt defines what counts as a defect.
Tablet Defect Inspection Production Deployment
Most inspection systems cannot be updated without a full retraining cycle. Adding a new defect type requires collecting labeled data, retraining the model, and redeploying it. In this pipeline, it takes one line in a prompt.
That changes as data accumulates. Every FAIL image generated by the system becomes a labeled example with a verified defect type. Once there is enough coverage across defect categories, a dedicated detection model can be trained on that dataset and swapped in for the VLM. This approach is faster, cheaper per inference, and often more precise on subtle defects that general-purpose models can miss. The Workflow itself stays the same.
Vision Events turns every inspection into a data point: defect type, tablet count, timestamp, image. Over a shift that becomes a pattern. Capping in the first two hours points to punch wear. Lamination after a material change points to a binding issue.
Deployment runs through Roboflow's API or on-device with Roboflow Inference. Scaling from one camera to five is a matter of connecting more inputs, not rewriting the pipeline.
Tablet Defect Inspection with Roboflow Agent
If you'd rather not add each block by hand, use Roboflow Agent. Instead of configuring blocks one at a time, you describe the pipeline you want in plain text and the Agent builds it for you. Here's an example:
Tablet Defect Inspection Conclusion
This Workflow takes a tablet image, locates every pill with a trained RF-DETR model, crops each one, and passes it to a VLM that returns the defect type. A Custom Python Block converts that classification into a pass or fail verdict with a structured report.
The value of separating detection from classification is that each stage can evolve independently. The detector stays fixed while the VLM prompt absorbs new defect categories without retraining. As labeled defect images accumulate, that VLM can be replaced with a trained model and the Workflow does not change.
The same structure applies to any product that needs to be located before it can be inspected. Change the detection dataset, update the prompt, and the pipeline is ready for a new use case.
Further reading:
Cite this Post
Use the following entry to cite this post in your research:
Mostafa Ibrahim. (Jun 29, 2026). Automated Tablet Defect Inspection. Roboflow Blog: https://blog.roboflow.com/tablet-defect-inspection/